Transcripts
1. Class Intro: Graphic art practice is a
relaxing process of drawing free flowing lines onto paper and then intentionally transforming them into artwork. It's a practice with the primary goal of
achieving calmness. I've already published
two classes on the subject neuro
graphic art practices. One into the first-class gives a detailed
explanation of the process. The second-class
builds on that and suggest ways to add
color to your images. Today's class in neural
graphic art practice three additional techniques, offers three additional ways
to use repetitive motions and strokes to further
your meditative habit. This process is non-judgmental
and non-intrusive. Instead, it's
calming and soothing with the byproduct
being unique artwork. You don't need specific
materials to create this art. Just paper and a marker. And in today's demonstrations, I use card stock and
a sharpie markers. While this class is a
natural continuation of minority graphic art series, the techniques shown
are standalone. So gather your materials
and let's get started.
2. Setting the Scene: The first thing I
do when I plan on creating some neuro graphic
art is I set the scene. Now, if this is not your thing, you just like to work in any type of environment
by all means, you can skip this step. But for me it's very
important that I have a calm environment and this
just helps me overall. What I'll do is
I'll either turn on the radio or listen
to some music, maybe even a podcast. You can even have
the TV going in the background if that's
some kind of white noise for you that works to just calm you down and relax things. You can light a candle or
have a cup of tea or coffee. I like to do these
things because it creates some personal
time, some space. And it's a little different than when I'm actually working. When I'm working, I don't
tend to keep my coffee or tea near me mainly because I wind
up dipping the brush in it. But for this purpose, I keep it on the opposite side from the hand that I draw with. So I'm less likely to use
that coffee or even spill it. And it's just a different
environment for me. Once I set up that
enjoyable environment, I can start the NOR
graphic art process. And again, I use this for any medium that
I'm going to use.
3. Class Supplies: These are the class supplies
that we're going to use for neuro graphic
art practice three, I have some 8.5 by 11
card stock and I'll use one card stock for
each demonstration. I also have just a pad here, notepad because I
liked the feel of using a notepad when
I'm doing my drawings. Neither are required. You can use any
size paper, a book. In a previous class. One student even commented
that they use the back of an envelope
because that's what they had with them at the time. Thought that was brilliant. Because the purpose
of this art practice is gained something from it, whether it's peace of
mind or satisfaction. And so you use what
you have on hand. Now to that end, I'm
using sharpie marker. I have lots of art supplies. But for this practice
I find sharpie to be what works
for me the best. If you have other
preferences to use, use whatever materials
that you have. I find the Sharpie to be
very nice because I can get a nice sharp nib if I
start with a new Sharpie. And if I use my sharpie
that I've already used, I get this dough nib
and that's great for filling in color or for
adding circles to my work. I also have a pencil and eraser, and they'll use that for
one of the projects today, but it really isn't necessary. The next chapter, we'll
start our first drawing.
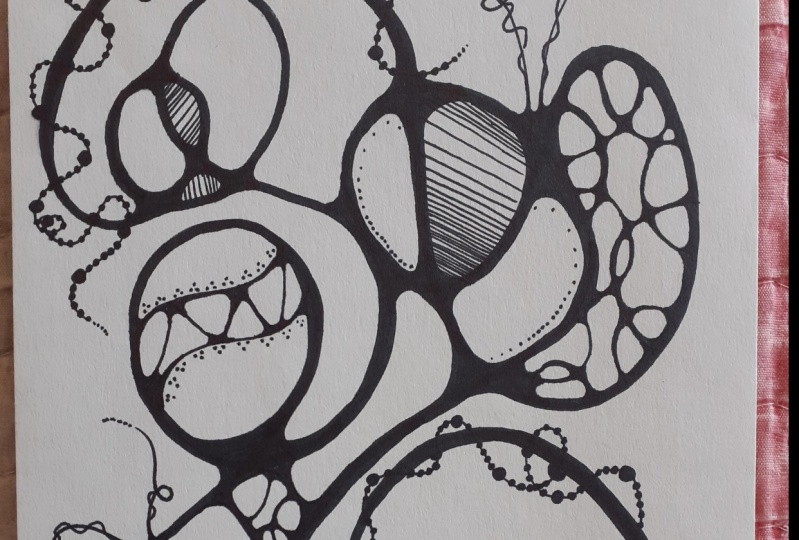
4. Neurographic Art Technique #1: In my previous neuro
graphic art classes, we discussed different ways to achieve different sketches, but the main goal is to use repetitive movements and
be smooth with your work. I encourage large motor
movements and large lines. You can use a pencil
if you'd like. I'm going to jump right
in there with my Sharpie. Now for this project, this is particularly
good when you don't have too many lines and you
have large shapes. And I'll show you what I mean. I mean to start by
making my image, I'm just going to create a line and continue drawing
it into unsatisfied. By satisfied. I mean, I feel like I have covered
enough of the paper. Now. I have my image here. This is a little more
complex than I expected, but it will work just nicely. What I wanna do is
thicken these lines. So I'm gonna take my
sharpie and I'm going to create parallel lines. Just calmly going
all the way around, echoing the lines that I have. I like to go from point-to-point doesn't really matter which one. I just thicken those
lines all the way around. This. I'll speed this
along so you can see my process not really focusing on one side of
the line or the other. It doesn't really matter. I'm just working on
thickening these lines. I'm also not filling
the vignette. If I skip some lines, it's not a problem. If some lines are on one side, then that's not a
problem either. That's the beauty
of this project is there are no problems. Mistakes are just
things that can be worked out and repaired. There for the most part, I have all my lines doubled
up there now a lot thicker. What I want to do
is go to any of the intersections and
create a rounded shape. Now it can be a perfectly
rounded circle, can be an oval, or it can just be around shape by smoothing the edges
that you see here. When I smooth the edges, I'm just going to
gently fill them in. Just the area that
intersects, at least for now. I can bring it as long as large as I want to
continue bringing it up. I like that look better. I just fill in those
little intersections. I'll speed this
along and continue filling in all the
intersections. All I'm doing is smoothing out any areas where the lines meet. That can be whatever you
like for smoothing them out. Can make circles,
ovals, diamond shapes. It's totally up to you. I get to an area like
this where there's a jumble of shapes. I'll just fill in
that entire area, create a smooth edge,
and then fill it in. Turn my paper around so
that I can really work on it to whatever size and shape
and formation works for me. Because these lines intersect. I just want to fill
those in as well. And again, I'm just working
on creating that smooth edge. The same thing over here. Round that out a bit. I'm going to look for
more intersections. Just smooth those out. There's no right or wrong. By watching me do this, you might think of a
different method to use. You might have a
different method. I'm just using
what works for me. I like to play around
with this S-curve. Then I'll fill that in. Now over here I have
a decision to make. I can fill in one line or
I can fill them all in. Today. I'm gonna move where I
want to fill it all in. Continue with all
these intersections. Sometimes I go back and
I fill in the shapes, the little lines between them, just because that's what
I'm feeling at the moment. But if you're somebody
that likes to do all the intersections first,
go ahead and do that. Somebody like me that
likes to dance around for the different objects
do that as well. Once I have my
intersections filled in, now I'll go and fill
in those lines. If I see that some lines are
lopsided and it bothers me, I can go in and elongate or
thicken some of the lines. If not, I'll just stop. If it doesn't bother me,
I'll just fill in the lines. I can further enhance
the rounded edges of these intersections as
I'm filling in the lines. And that's kind
of a metaphor for solving problems as you go. Sometimes I call it
putting out fires. If I see an area that's pointee, I'll play around with it
just to round it out. I'll speed this Alon. They are now I have my
neuro graphic art complete. You can stop there, but there are a couple
of variations you can use that you might
be interested in.
5. Variations on Technique #1: You could stop there or you
can add some variations. First one might be to take a gel pen and just add
some shapes to your work. I'm partial to circles, so I like to add a few
circles here and there. Because we have this
nice thick area, it lends itself very
nicely to doing that. Fill in my little circles. Just play around with that. As you see fit. You can add an odd number
or an even number. Whatever works for you. I like to add circles
of graduated sizes. The largest area I have
my largest circles, and then they get a
little smaller as I go to the smaller
area of these lines, it's just a matter of
playing with the thickness. Another variation is to take
your marker and just to look at the curves and add a
line connecting the curves. Every now and again, I'll just throw in a line. It's a little unexpected. And suddenly we have variation
from those thick lines. I just connect one
side of the shape to another just
following the curve. And again, it's those
curved lines and those circles that really add interest and comfort
to our piece. Another variation you can add, and you don't have to add any of these if you don't want or you can pick and choose
is to add some dots. If I had a line that
was sticking out, say perhaps my shape wasn't enclosed and I
had a line like this. Or I can even add it afterwards. Perhaps I wanted to
add a trail of dots. This is the perfect time
to take my sharpie with my thick nib and
create those dots. Can add a few little
sections to that. And take this as far
as I want to go. I can really play
with this piece. I think I'll go back, add a little more white dots and really play around
with it some more. This is the idea for creating neural graphic art
using thick lines.
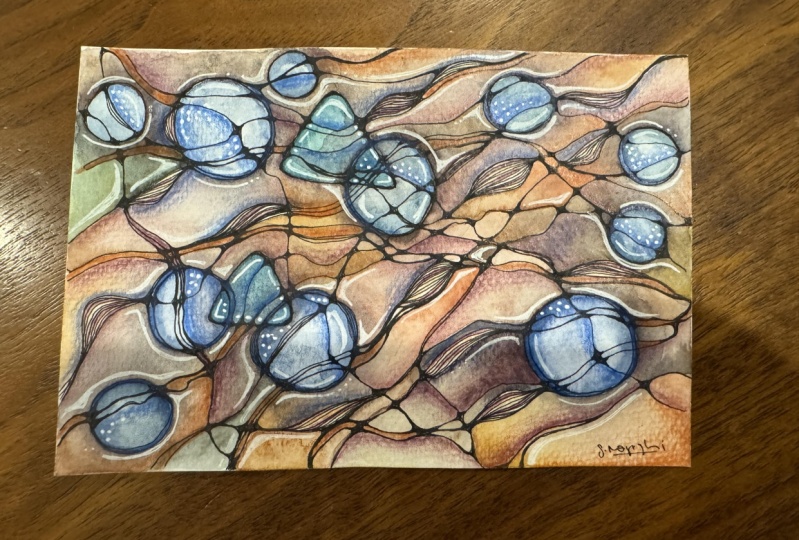
6. Technique #2 "Strand of Pearls": Now for our second neuro
graphic art design, but to take a pencil
and an eraser, I'm going to create my sketch. You can either decide if you
want to make it somewhat hourglass or you want to
have it coming across, I'll start at one corner with the intention of leaving
it to the other corner. But if it moves around,
it moves around. I'm gonna do it just like this. Now to create this, the reason I did it in pencil is because I'm not
going to create lines like I've
done in the past. And I'm gonna take my sharpie, the one with the fine point on any area that has
an intersection, I'm going to create a circle approximately the
size of a dime, maybe a little smaller. Just create a series of
circles on the intersections. If there's multiple
intersections, I can create a larger
circle if I want. If I wanted to just
create a larger circle, I can do that as well. I'm just going to find those intersecting points
and create my circles. Then I'm going to look
for the tail ends here. This one is a nice long
shape in this one is short, so I'll just keep
that in mind for now. What I'm gonna do is go
to the end of the tail. So I'll start with this one and this is kind of a straight line. I want it to be a little curved. In my mind, I'll curve it
for the purposes of class. I'll sketch it out
with my pencil. I'm going to create just
a little dot at the end. I'm going to make three dots, so that's 123
following that tail. And then I just want to create circles fairly close together, fairly small, larger,
going larger. As I get closer to that circle, I'm spaced them out
and then I just like to connect them with
a little dashed line. You could create them so
there's no dashed line, so there's just circles
touching each other. But I liked that little
interest of that little space in-between on some areas and
there's no space in-between. And that's okay. Now I'll speed this along
and I'm gonna connect all my circles with
a smaller circles. Once I have a chain of circles, then I'll just go back in and connect them with
that little dash. So essentially I'm making
strings of pearls. Now if I have an area
that has a long chain, I can really play
around with it. By that, I mean,
I can really vary the shape of the circles
on this long chain. Going to make a
fairly large circle. Gradually reduce
the size as I go down and then connect them. This is just on a whim. I don't want to do
it. I won't do it. Now on areas here where I
have two lines very close together to make one string of pearls that fit
within that line. My pearls will vary in shape
to fit within that line. There I have my
string of pearls. I can elongate the end. And as I said, Here's the
other end that I have. I want to create just a
few strands, few strings. Then some dashes. Just because I like that look. From here, I can erase the
pencil marks and I'll be complete with this portion
of an R graphic art.
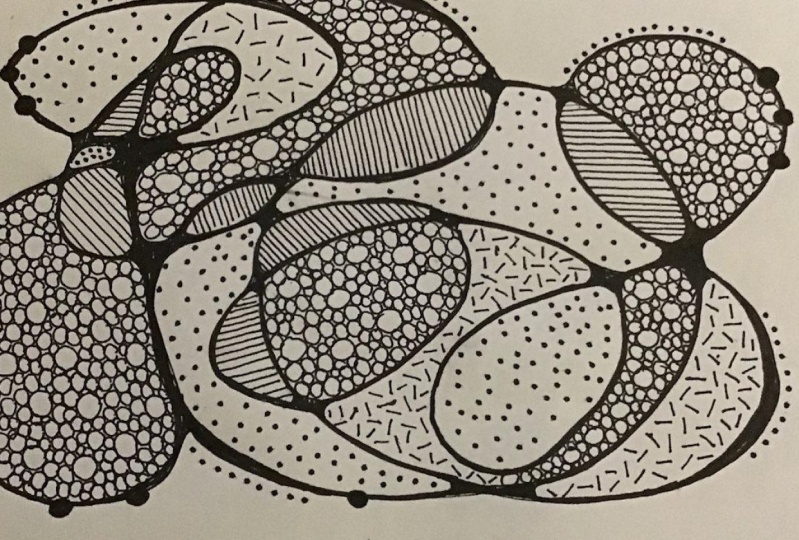
7. Neurographic Art Technique #3: For my third variation on
the neuro graphic art, going to create my first design, again with large motions. I'm going right to
marker on this one. Then from here I'm going to look very carefully at what I have. And I want to create shapes
within these shapes. For example, this intersection, this piece here, I want to create a shape and I
want it to be smooth. It can be a circle,
it can be an oval, or it can be something
kind of organic. So I'm gonna take my marker, sketch this organic shape. I have the entire length of
that shape to fill it in. I can even add a second
shape over here if I want. I can divide it up and have many shapes if
that's what I want. But once I have that, I'll just come over here with my marker and fill
in that black. Just on that one shape. I'm taking an existing
shape and rounding it out, then creating some
negative color. Now this technique
uses a lot of marker. I do find it to be the
most labor-intensive, but also the most rewarding. Then I can come over here, choose another shape.
Take this one. I can even make it as close
to that border as I want. And again, I'll fill that in. Now if there are
any areas that you see that are particularly small, you can just fill those
in or you can make just rounded, somewhat small shapes. And that's where
the choices begin. Once I have two started, it's very easy to get
carried away with this. I'll go to this tick, this box and create an interesting shape
and fill in that space. Now I'm going to jump to here only because that's
what I want to do. And create my shape. I'll continue this all
the way around and it'll speed this along so you
can watch my process. There. I have my interesting
shapes that I created. I can thicken these up if I want the shapes
to be smaller, but I'm really pleased
with the way that looks. One more variation
you can add to this is to just use
your dots again. You can go around the perimeter, you can go around the
interior perimeter. It's up to you. You can even fill in just occasional shapes. So I'll take this and
I'll just make my dots. Filling up those perimeters. I'll continue this
in the next chapter. We'll look at our
finished pieces.
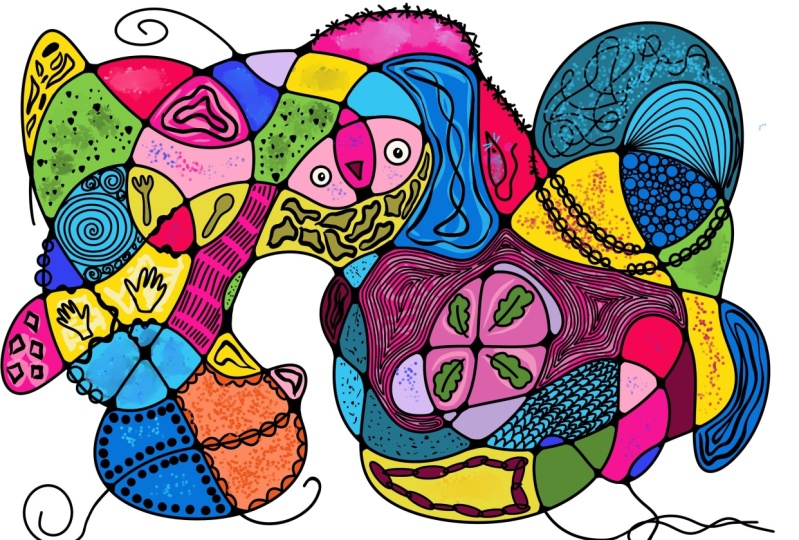
8. Class Wrap Up: I wanted to show you
are finished designs as well as just a
variation or two. So here we have the
finished design on our first piece where we made the thick lines
because there's so much space, you can have the option
of adding circles, dividing up your pieces. We're just adding enhancements. Now here's a variation using that same technique as you can see here at
the intersections, instead of just rounding
them out simply, I created just circles
that were filled in and that just marks
the intersection. I also created that curve that divides up each of the shapes. Then I added a little trail. I felt that was a very
enjoyable process. For our second technique
or strand of pearls, we created those circles on the intersections
of those lines. We had larger pearls. Thought that was a very
interesting look as well. The repetitive motion
of making the circles. Here's another variation. And again, each time you
make your initial sketch, you get a different result. You can really play
around with it, throwing in larger circles, creating that dash
in-between them or not. It's a lovely effect in
very calming to create. For our last design, we took our sketch and Mead shapes within each
of the sketches. You can really have fun
with it making the shapes as interesting and
unusual as you'd like. You can even take one section and divide it into
multiple shapes. And the end result
is you don't really know what it looked
like when it started. Here's a variation as well. I added the dots
around the interior as well as the
exterior of my design. Now on this one, I filled the spaces
in quite a bit. When I made my
circles or my shapes within each of the shapes here, I really made them smaller. So that made a lot of filler, again, a different effect
using the same process. The process is meditative, almost hypnotic at times
in very enjoyable. It's soothing and calming
and it slows you down a bit distracting from all things that happened
during the day. I hope you found these three
new techniques inspiring. They give you a little variation
and gave you something else to consider when doing
your neural graphic art. If you do do one
of these designs, please snap a photo
of it and post it in the project section. Be sure to follow me
here on Skillshare where every Friday
I post a new class. Please consider
leaving a review. Thanks for joining me today.
 Daniela Mellen, Artist & Author