Transcripts
1. Skillshare Black & White Sketchbook Pages Intro: Hello, I'm Daniela Mellen, an author or an artist. In today's class, I'm going
to show you three pages of black and white designs
that you can use to either fill a sketchbook to
make into collage paper, or just to practice
your drawing skills. Now we're just going to use
simple office supplies. I use sharpie markers and black gel pens from the
office supply section, not even the art section. These are made by many
common pen manufacturers. Now there are
multiple reasons why I like using these supplies. The vibrancy is fantastic
on the black and it produces a very sharp
black and white image. The colors last long, I can scan the artwork into
my computer beautifully. It doesn't scratch up the paper and it makes beautiful designs. The writing is
comfortable and smooth. I'll show different
size sharpie markers. Did you know they make
a magnum size marker? And then I'll show you different ways to
use those tips on the markers to make interesting patterns and
shapes in your designs. This class is for beginners, but it's a beautiful way to fill a sketchbook or just create some simple pages when you have some creative energy
on your hands. I hope you enjoy this video. So let's get started.
2. Class Supplies: Now for our black and
white mark-making, what you'll need is
some supplies here. You don't need all
of these supplies. These are gel pens. There's made by
different brands. I like ones that
are long-lasting. Ideally fade proof, fast drying. This is one by uni-ball. You can find this in
almost any office supply. Then there's Pentel and BIC. They're all just black gel pens. They're the same 0.7 millimeter and they all
produce very nice thin lines. Then I like a really
thick line marker. This is the Sharpie magnum. As you can see, it's a
very large wet marker and it gives a
beautiful black line. Very wet and very solid opaque. The Sharpie king size is
considerably smaller, but that's another
option as well. And you can see the chisel tip, just like on the magnum,
just considerably smaller. Standard sharpie
with a fine point. I happen to be
partial to Sharpies, even though they bleed
through the paper, they produce very
vibrant black results. So if you have a
favorite black marker, use that these are
very affordable. They can be found easily
in office supply sections. If you don't want
to use a gel pen, Sharpie also makes a pen, so you can always
stick with that. Now for the paper, I like to
use some good quality paper, this is just card stock, again, because these
tend to bleed through, particularly the Sharpies,
not so much the gel pen. The thicker card stock
is a good option. You can also use a marker
or paint pad here. This is a very inexpensive
one from the kids section, but it will bleed through. So you'll have to buffer it with additional papers
just to prevent that bleed from going
onto the next paper. And that's a fine alternative. I like to use my
little notebook here. The paper is good and I
have a little piece of wax paper that I'll put behind the paper when
I make my marks. Now I like to use
a notebook because then I can refer back to it. I can also scan
these images into my computer to use those
marks that I make, those backgrounds for the pages. By scanning into my computer and making it a digital image, I can fade out parts. I can overlay different colors, just like I would
use for collage, where I could cut it
up and paste it down. I can do that all digitally. I preserve my original piece, and then I can use the
piece over and over again. The next chapter, I just
want to go over the pens very quickly to show
you the differences.
3. About The Pens: Let's start with the biggest
here, the Sharpie magnum. It's a nice thick chiseled tip. I can get a straight
tip or a narrow tip, or even much rounded tip
just by how I hold the pen. Can do the same thing
with the king size. And you'll see the
difference immediately. You can hold it on its side
or get the rounded edge. Then the standard sharpie, which most of us have, just has that one point. Now the Sharpie pen is very intriguing because
it's so narrow, you can get a lot of
control over this. That's what we want is a
variety of shapes and sizes. Now for the gel pens, this is the unit
ball to 207 plus. It's very easy. It comes with this little
plastic coating on top. You just pull that off
before you use it. It just keeps the gel from
drying out before it's being used in a nice, beautiful line. And see how smoothly
that writes. I really like that. So
that's the uni pen. And the uni brand comes
in lots of models. The brand has a very
good reputation for most of their pens. This is the BIC gelato city. Again, you might not have
this particular version. And it's less relevant to the particular version as it is that you try out your pens
to see which one you like. So again, this comes with
that little plastic tip. And I can just play around with this, and this is the Beck. And then lastly, I
have the Pentel here. Open this again, another
little rubber tip. And I can just play around with it to see which one
I liked the best. And that's really just like
the feel of and whatnot. I always like to
after I do my line just to run my finger over
it to see if it's smears. All three of these
worked out very well. The big tended to hesitate, but that could just
be the beginning of using the writing. But these are things I note
when I want to decide, like the pen for
this art activity, because I'm gonna be
doing a lot of writing. I want it to be
enjoyable and smooth. Now on the back of the paper, you can see how it
bled with a Sharpie, but the gel pen was just fine. And this is card stock. Next chapter, we'll start our first black
and white drawing.
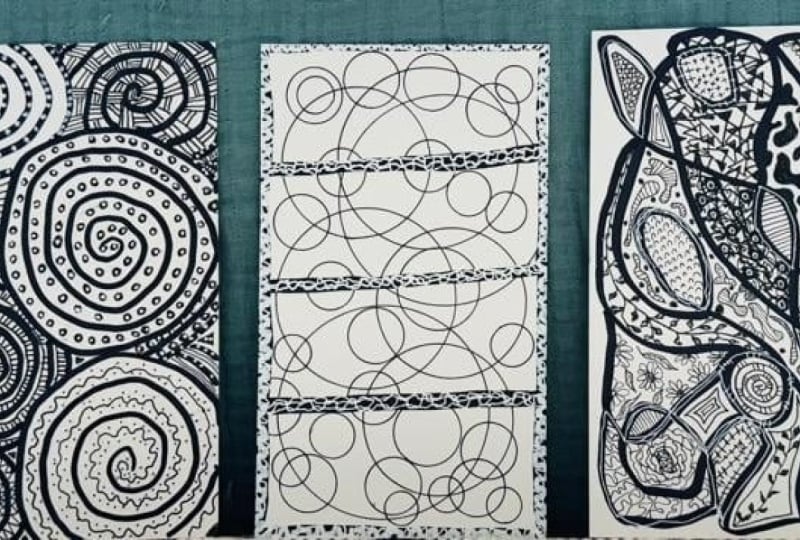
4. Drawing #1: Because I'm using the Sharpie, I have a little piece
of wax paper put underneath my page just so
it doesn't bleed through. For this technique I'm
going to use to size nibs. I have the Sharpie, the
permanent fine point, and then the Sharpie pen. Do the majority of my
work with the Sharpie. I wanna do is create swirls. And I don't want to
create swirls like this. I want to create dotted swirls. So I'll just start
anywhere on the page and just tap the swirls
all the way around. Creating them kind of like the Fibonacci sequence
design or like a seashell. So I like to create one. You can see I'm not being too
particular how I create it. Not worrying about the spacing. And after I create one
that I'm happy with, I'll continue dabbing it
and then I'll just go back. I like them to be spaced fairly close together so that I can really see the swirl
come together. If they're spaced too far apart. It, your eye needs to do
a little bit of work. You will need, your imagination
needs to fill it in. But if you're just spacing it accordingly and then you
go back and fill it in. It's a nicer look. I have my piece here. I'll just add a few more. Now that I have that one swirl, I'll create another one can go in the same direction
or a different one. I'll create an odd
number of these, so three or five. Using this technique,
we're making very large swirls that
fill up the page. I come around again with my carefully spaced dots just enough to connect them. Continue off the page. And then I'll go back in
and fill in the spacing. So now I have three
large swirls. I can even go around
this one here and add another layer just to really
make it a large sorrel. You can make it as
tight as you want. Now I'm going to come in here
and make some tight swirls, again using the dots from this pen because it has
a certain width to it, a certain thickness to the dots. So instead of going
open like this, I'll just go around a few times. Keep it nice and tight together. Now for this time, I wanna do five swirls just because I have this space and I already did three swirls
with a large one. So now that I have my
dots with a Sharpie, I want to take my little pen here and I want to
create just lines, just nice big swirly lines. So I'll start here and I'll
space them out accordingly. And just come around with
some really big lines, not crossing over any
of the lines I already have. I get to a point. I'll just stop and they'll go
back and fill in that line. And I'll continue this
all the way around here. In any open space. I'll create that line. Now again, I'll do three
or five of these lines. So now once you have
your dotted lines, your little trails, and your bigger lines,
now with your pen, you're just going to make
little swirls here and there. You'll want quite
a few of these. Your purpose is to fill in areas where there
aren't any marks. You can continue to go
right off the page. So there you have
the finished page. You have a lot of contrast, a lot of movement, a lot of elements. You can take this
as far as you want, filling in all the areas with different thicknesses and different strengths
of that black.
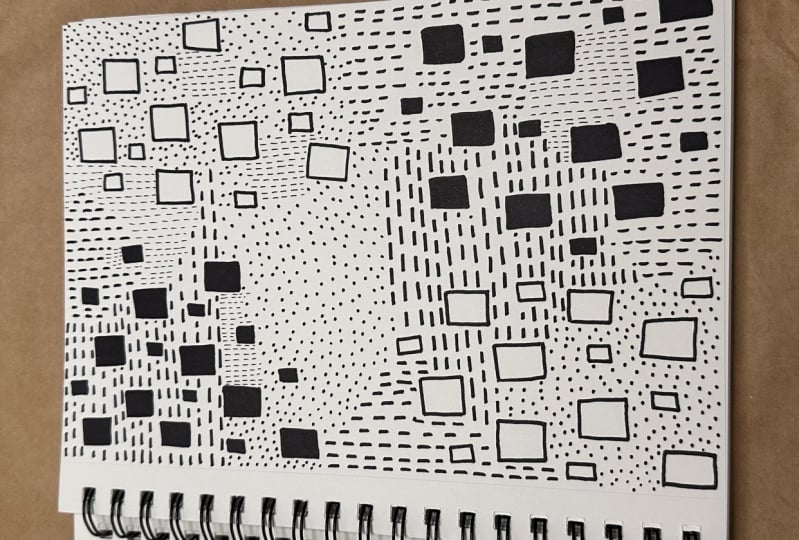
5. Drawing #2: Now for my second page, we're going to add
additional shapes, but we want to use our
thick marker here. I'm going to use that
magnet marker to start with instead of dots. This time we're going to
really work on rectangles. So I'm going to create
some large rectangles by just pulling my
marker across the page. And as you can see, I'm
getting the hang of filling in this area with
these thick shapes. So I'll just add a
few here and there. I have two sections. And because of the
weight of the marker, my eye travels this
way across the page. So once I have my nice
thick markers, my shape, I'm going to go in there with my fine point marker and
really sharpen those shapes. So I'll come around
and sharpen each one, making them into that
beautiful square shape. You can use rectangles. You can use any shape you want. But for this project we're
going to work on rectangles, squares, that type of shape. So for my first
layer of squares, they're approximately
the same size. Then we want to come in here
using my king size marker, which is considerably smaller, and I want to make
smaller squares. I'll do some in-between. The larger ones. Again, I'm working on bringing the eye across the
page diagonally here. So I'll add a few
so that the eye jumps to the next size shape. So now I have two
sides shapes mixed up. It's not symmetrical, but you
can see that line forming. Now I want to start
adding additional shapes, but I want this section
to be the darkest. So now I'm going to
create open squares. And again, I'm going to
use those two sizes. First, I'll start with my larger size and I'm
just going to create a few open squares
on the other side. So opposite them here. Again, I like to
stick to odd numbers. And I'm not trying to
make the squares perfect. I also like how
they look handmade. Like they're sketched. Now once I have the
larger squares, I'm going to fill it in
with some smaller squares. Again, keeping that shape open. And you can see how
much lighter it looks. Just putting a few
in-between areas here. And you decide when you're done. As you can tell,
neither of these areas are perfect squares themselves. There's kind of an odd
edge and I like that. Now I want to come in
and I want to start filling in the area. Again. I want to use
my rectangle shape. So I'm going to start
with a series of dashes. I'll choose one section
and create a series of dashes that fill
in that section. I don't want to make it a
perfect rectangle though. What I'm filling it in, I want it to be a
very unusual shape. So I'm going to start
here and just fill in a series of these dashes,
starting to wide. Go down just a
little bit further. And then we're gonna come up a little bit of the ways here. Again, I have a perfect
rectangle going on. So I'm going to
start to pull it in. And maybe I'll bring it
out a little further here. I'll continue it out.
And this is just how am I feeling that filling it in. I also want to fill it
in, maybe down here. So I'll start across here. And then I'll just continue
it all the way across, filling in this section. And now so it doesn't
look so blocky. I'll fill out a little here
and maybe some up top here. And now I'm ready to
switch my shape again. And instead of being up
and down with my dashes, I'm gonna go side to side. So I'll start here
in this opening. Maybe combine these two. So I'll fill it in this way. So I'll start with
my dashes here. Filling in that area. Because I have this area, I want to add another section. So maybe I'll just
do this top section. I'm starting to like how
that's coming along. Now I want to change
it up completely. I have a lot of this shape
here that's very interesting, but I want to add
some more contrast. So using that same fine point, I'm gonna come in
here and just put in a little section of these dots. And again, I need just
enough to fill it in to give that
element of texture. I'll space it however I like. Do the same thing up here. As you can see, I left
a small area here because I'll add
my pen, that area. But now I want to
add dots up here. Maybe I'll leave a little area here to fill in with
the smaller pen. And I'll continue like this until I'm happy
with the way this looks. So I'll continue adding my dots, leaving little spaces
to fill it in with a smaller pen just for
additional contrast. Now when I'm happy with my dots, I'm going to take my pen here and just make small
dashed lines. It's a nice and thin effect. And in those areas where I left that space, I'll fill it in. I can fill it in
very haphazardly. And so there I have
my completed page. Again. You can spend more time
creating perfect squares, but I like that effect. There's something here
that I might take away and use an additional work.
6. Drawing #3: Now for my last page, I really want to
play with lines. Not worried about
filling the page with lines by just want some
lines and some dots. I'm going to start with my
sharpie magnum large marker. And it's kinda
interesting effect. I'm just going to create a
series of lines, short lines. You can see a little
bit of brush stroke. And I can just play around adding them in all
different directions, keeping them approximately
the same length and all different angles. Try and come back
and fix that line. I like them going off the page. I want to just come back in and take a look at my work
and see where there's space. That looks pretty good to me. Now with my fine point pen, you can use your
gel pen or any pen. Like I want to create
a series of dots. But I'm just going to create
dots and set numbers. And I'm just going
to always go around one edge of these
marks that I made. And I'll continue that all
the way around the marks. I want to make sure every mark has a series of
dots around them. Then just follow
where this takes you. If you left a lot of
space between your marks, go on and add additional
series of dots on every side. And you can always
go in and fill in additional open spaces. Or you can leave
that negative space to add interest to your piece. And there I have an
interesting page made with marks just using the edges of the shape of
the nibs from the markers. Wanted to show you a
bonus page as well.
7. Bonus Drawing & Examples of Uses: I wanted to show you an
interesting bonus page as well. This one is really intended
to use a very thin nib. So either your sharpie
pen or your gel pen. So you just choose the
gel pen that you like. Could you use that uni here? So for this one instead of
a series of short strokes, we're going to make
large strokes. I'm just going to
start with my pen on the paper at any
point on that paper. And I'm just going to create
loops over and over again. I want to just fill up that
page with these loops. Now unlike the other pages, I'm keeping these loops
on the same page. I'm not running off the
page trying to make them all different shapes and I'm just going over
and over them. Now. I just want
to come in and on some areas where they intersect, I'm going to fill them in
with a series of hash marks. So I'll finish this area here, closing that off, and
I'll start with this one. It seems like a good
one to start with. I'll just make a
series of hash marks. I can just jump around. I don't have to
fill in everyone, but I certainly can if I
want to I like to fill in every other one so
that there's no two that are really
touching each other. Come over here. And on some I can combine
very close together. Come over here and make this large one
filled in and so on. And I'll do the same thing
all around the page. There. I have my completed page. Again, it adds
texture and interest and I wanted to show you what
you can do with this page, that you could take this page and scan it into your computer. You have your black
and white image here. Then you want to
find some labels, some blank labels
that you purchase. This happens to
be in every brand and this is what it looks like. It's a template would sticky paper and they're
all cut out for you. You just feed it
through your printer. You can print your images
onto these stickers. You can print the
whole page just as is. And then you can pull
off each sticker individually and use that in an art journal
or in your work. You can do that as many
times as you want. Or you could take
the actual image, shrink it down, and fill the
template with these images. So then you have this
very small version and very intricate. You can cut this up, use this in your work, and it's very valuable. It takes a simple
drawing and turns it into something very useful
for your journaling.
8. Class Wrap Up: Let's take a look at
our finished pages. We have our dots
that we made with two different size pens. Again, swirly lines made out of dots instead of
a straight line. You just dabbed it. Very interesting
looking very textured. The little ones are a little elegant with a little
bit of shadow, and the larger ones
really draw your eye. We have our next
page where we took the same shape, the rectangle, and we made a series of dark squares and open squares
with different sizes. We added dashes for the background to add a
little bit more texture. And then we filled it
in with some dots and some very small areas using
a different pen altogether. This one, we took our page, we made thick rectangles and then just dots
around the rectangles. It's very interesting pattern that's very useful in your work. You can take a
little bit of this, you can tear this sheet
up and use it further. Then the bonus image
which I showed, creating this
intersecting lines, combining curved lines as
well as straight ones. Thank you for joining me
today for your class project. Find the prompt that you felt
intriguing and run with it. You can modify it further. You don't have to stick
to the parameters that I established for any
of these pages, but they are very fun. You can combine images as well. Consider creating your page, taking a snapshot of it, and uploading it to
the project section. I'd love to see your work. Thank you for joining me today. If you found this
class enjoyable, please consider
leaving a review. Be sure to follow me
here on Skillshare.
 Daniela Mellen, Artist & Author