Transcripts
1. Class Intro: Nor graphic art practice is a
relaxing process of drawing freeform lines and shapes onto paper and then intentionally transforming them into artwork. It's an art practice with the primary goal of
achieving communists. Now you may already
engaged in this practice without knowing its
specific intentions. And that was the case with me. Now, I've already published
a class detailing steps to create new
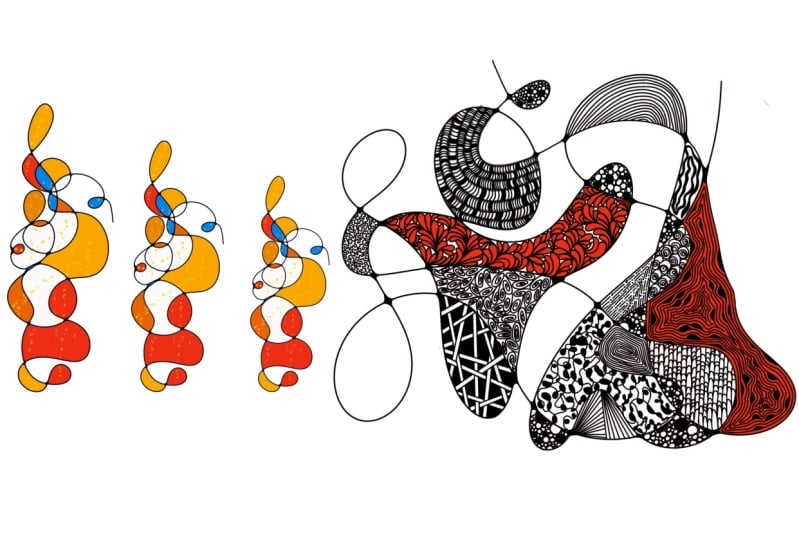
orographic art with markers. And I'll link that below. This class expands
on that process to incorporate simple colors
for an additional art Peel. Nor graphic art is a drawing system that deals
with emotions and thoughts. The process is non-judgmental
and non-intrusive. Instead, it's
calming, meditative, and can be hypnotic. And you can use any supplies
to color your work. Whether it's watercolor,
acrylic paints, colored pencils, or markers. And I'll give tips on using the correct paper for
the medium you choose. Because the goal is to have
this be an easy process where you can clear your mind and focus on what is before you. The paper and art supplies. The results are unique, abstract, and quite relaxing. So gather your materials
and let's get started.
2. Class Supplies: No further nor graphic
art to add color to it. It's not important which
particular medium you use. What's important is
you use a medium that you're comfortable
with, that you enjoy. So if you enjoy craft
acrylic paints, use those. If you enjoy
watercolor, use those. The same thing with
colored pencils or marker. Any medium that you prefer
is the medium to use. Now with that being said, there are a few
things to remember. If you're going to use markers. For example, if I'm
going to just use sharpie markers and I
don't want to add color, but I want to use patterns
as a form of contrasts. And I'll show you that
in a chapter at the end. I just want to make
sure I have the right paper for my Sharpie. So you could obviously use
copy paper if you want. But I find that that
can be very messy. That the copy paper
can bleed if I'm not using a marker specifically
designed not to bleed. So to prevent that and to make my experience
that much more pleasant, I'll just take some card
stock and then I'll just put this with a backing. So I'll put some scrap paper
underneath a pad of paper. And this way if there
is bleed through, it's not a problem. It takes away any of the hassle and just
makes it very easy. I just like a
regular Sharpie with a fine point like this. Or you can use specific Sharpies or specific markers
that you use. But if you're going
to use a sharpie, I'd suggest a heavier card
stock or even a Bristol. If you're going to use
acrylic craft paints or even acrylic paints. I would suggest either watercolor
paper or Bristol board. You can get away with
using copy paper. You just have to treat
the paper very carefully. And if you don't want to have a hassle or if you don't want
to wrestle with the paper, I'd suggest just getting
a heavier weight paper, either card stock, watercolor paper or mixed media
paper, or Bristol board. If I'm going to use watercolors, likewise, definitely use
my watercolor paper. And for that, I'll use
a waterproof marker. And this way when I
use my watercolors, it doesn't cause any bleeding. So those are the only things to think about
when adding color. If I'm using my acrylic paints, even my craft store
acrylic paints. I will use a Sharpie with this, you can also use your
waterproof marker. I like to use the
Sharpie because I feel like it's just fun. And so that's why I used that. It's a thicker marker. I have an abundance
of them and I like the way the black is
a very deep color. The next chapter, we'll
start our process.
3. Setting the Scene: So the first thing
I do when I plan on creating some neuro graphic
art is I set the scene. Now, if this is not your thing, you just like to work in
any type of environment. By all means, you
can skip this step. But for me it's very
important to that I have a calm environment and this
just helps me overall. So what I'll do is
I'll either turn on the radio or listened
to some music, maybe even a podcast. You can even have the TV
going in the background if that's some kind of
white noise for you, that works to just calm
you down and relax things. You can light a candle or
have a cup of tea or coffee. And I, to do these
things because it creates some personal
time, some space. And it's a little different than when I'm actually working. When I'm working, I don't
tend to keep my coffee or tea near me mainly because I wind
up dipping the brush in it. But for this purpose, I keep it on the opposite side from the hand that I draw with. So I'm less likely to use
that coffee or even spill it. And it's just a different
environment for me. So once I set up that
enjoyable environment, I can start the NOR
graphic art process. And again, I use this
for any medium that I'm going to use in
the next chapter, we'll start using a watercolors.
4. Watercolor Demonstration: So to start the NOR graphic
art and the watercolors, I'm going to start with the same process
that I always do. I'm just going to
create some free hand, lots of loose
circles and drawing. And I'm going to use
my waterproof marker because I'm using
the watercolors. Now there are a couple
of things to consider. You can just do a free drawing here and stop when you're ready. You can in your mind, keep a thought that you
want to have it maybe traveled down the length of the page from corner to corner. Want to keep it in the center. Maybe offside. Or you can turn your paper around and maybe
do an hour glass. Or you can just let
it happen naturally. These are just some
very generic things to consider that will make your painting ultimately very
unique and very creative. So I'm going to turn
my paper to the side. And I'm going to just
work on a kind of having a flow from one
corner to the next. And I mean that in
very generic terms, I'm taking my waterproof permanent marker and
this is a number 1, so it's kind of a thicker
nib than I usually use. And I'm just going
to create lots of loops from the top
diagonally across. Now this paper is
very absorbent. And even though this
is a black marker, it really absorbs it
and it becomes gray. I can go over those
lines to dark in them. And I'll do that
in the next step. But it's okay if the medium uses the markers a
little differently. The watercolor paper
uses the markers a little differently
than you plan.
5. Softening the Edges: So now in this stage, I want to start by taking any of these intersections and just really rounding out those edges. I'll jump right in
here in the middle. And I'll just
combine those lines. And I'm getting kinda like
a little rounded square. And I'll just move around doing that on all of the
intersections. And this is a metaphor for smoothing out any
rough edges in life. And then when I have to, I'll just combine
them and I'm getting that nice dark
color that I want. I'll combine this over here, rounding out those edges. And my goal is to do
all of the edges. And if I miss any, I
miss any, It's okay. Continue. Just relaxing and growing
at the pace that I want. Now I'll speed this along for the purposes
of demonstration. But you'll see the process and how it evolves as I continue. So now that I have my edges
softened and I can go back in as I just come across any of that I think
need a little touch up. I can decide if I
want to thicken any lines or add
additional lines. So over here, for
some reason I'm just drawn to this double
intersection here of this, This think I'm just going to create just a line
coming out from it. And again, I'll smooth
that intersection. Now thicken up this
side just a little bit. Maybe curl that
edge a little more. And the same thing over here. Going to turn this around
and do the same thing. Just adding something
else to my piece. No rhyme or reason. Can't even tell you why
I wanted to do that. But I just felt
drawn to doing that. I'll create that edge
a little further. I'll also take a look
at my piece and see if I want to add
additional lines. Think over here, I'm just
going to double up this line. Maybe I'll do one over here. And because that's too,
I'll do one more just to tie it together
on an odd number. You can continue this
process as long as you want. I'm quite happy with
the way this looks. So I'm going to stop right here. In the next chapter, we'll
start adding our colors.
6. Adding Colors: So you have to add
color to my piece. I'm using the watercolors, so I have a nice brush here, and it's just a
large brush number 4 that I'm really
comfortable with, creates little
point if I want it, but mostly I enjoy
using this brush. I'm going to choose colors now you can choose
a single color, you can choose two
to three colors. And then if you want to
choose multiple colors, you can choose colors that are
side-by-side on the cover, we'll say red, orange, yellow. Or you can choose colors
that are opposite, say purple and yellow. Or you can just choose as
many colors as you want, but you want to do
is take the stress out of this project. I like to do is just choose maybe two or three colors
or even the same color. Just different tones are wet my palette by putting
some water on my brush. And then I think I'll just
choose three tones of green. I'll take a little of
this yellow green. Put it down on my palette, start a second puddle. Would this deep green? And then lastly, I'll
make a third puddle. And I'll add just a
little blue to that, so it becomes a little
more turquoise. And that's Prussian blue. So I have my three greens here. I don't need a lot
of color because I'm not going to fill in
every one of these holes, these spaces, if you like that, look and you want to do
that, Go right ahead. But what I like to do is choose an odd number and
I usually start with three and I'll take my colors
and I'll fill them in. So I'll start with this yellow, green here. Rinse my brush. And I'll take three spots, three spaces that
I've created here. I'll fill them in with water, leaving the edges dry. And then I'll just come back
in with some of that paint. And I'll go around the edges. And I'm just trying to
create a smooth blend. When I keep the edges dry. That will just give the edges more color, more absorption. And where it intersects
with the wet paper that I put down with my
brush, it will get lighter. I can dip my brush in water further and just blend it out. I like to come in there with that color and just go over
those edges one more time. After I went around the
entire piece just to wet it. Now if you want white
of the paper showing through, go ahead and do that. I'll rinse my brush. I'll choose a second area. I'll do the same thing. I'm going to stick with
that same yellow, green. And I'll go around the edge again trying to get the deepest
color right at the edge. And then filling it in, dipping my brush in water, filling in the center, picking up some more pigment and going over that
edge one more time. Just to make that more intense. The blending will
be very smooth. And it's a very
interesting effect. Because I like working
with odd numbers. I'll just choose one more. So I'll take this
little shape over here. I'll wet it, coming
around the edge. And then I'll come back in
with some more pigment. Just to intensify it. I'll let this layer dry. And then we'll come back and
add our next two colors.
7. Adding Additional Colors: So now my lightest
shade of green is dry. I don't want to go in there
with that brightest color, which for me would
be that turquoise. I want to add some
turquoise cells here, like I did with
the lighter green. But because they're so dark, I want to choose a
couple of smaller ones. So I'll start with this
little sliver here. And I'll come in, add my
pigment very carefully, going all the way around. And if you're more
comfortable switching to a smaller brush by
all means, do that. You want to make this as
comfortable as you can. Just gonna put some
pigment on the outside. And I'll turn my piece around. I'll rinse my brush. I think I'll do
this segment here. Again. I start with it wet
and I pick up pigment, deposit it in just to
stay in that paper. And then I'll come back in
with a little more intensity just on the edges. And let that run. I could come back over here and do the same thing,
an existing one. And then we wanna do one more. And I think I want
to do a larger one just for some contrast. So I'll take this cell here. And again, it's just because
that cell appealed to me. There's no rhyme or reason. I'm being careful though, to leave a little space of white between my cells that
I've chosen to color. So I have this little
sliver here of white in between this cell
and that light green. Now I'm doing that only
because aesthetically, I like the way that looks. But if you want to fill it
in and you like that look, then by all means do that. That will make your
piece unique and really tailored to your
likes, your style. And that's what we want here. So now I have my three
colors of my turquoise. I want to go in there
and incorporate some of this bright green. Not sure how I'm
going to do that. I think I'll start right
here with this section. I'll go in there and just
deposit a little bit of stain. Take a little more of
my pigment and deposit it right on the perimeter because that marker
is waterproof, it's not bleeding or leaking. And now I think I'll
take this little cell. Do the same thing. I'll add my bright green stain. And before I add
the deeper color, because I added quite
a bit of water, I'll just jump to this cell. Like the way that looks. There's a little bit of
spacing between all my cells. So I'm happy with that. I'll pick up a little more
pigment deposited in. And when I have
that cell complete, I'll take a little more
of that intense pigment and go around the edges
of both of these cells. Now, I'm going to stop there. I like the way that looks. I like the color contrasts. Few want you can add spatter. You can add more colors, but I'm quite happy with
the way that looks. It seems soothing to me
and I appreciate it. In the next chapter, we'll
use our acrylic paints.
8. Acrylic Paint Demo: So now make the
neural graphic art using craft store
acrylic paints. I have a piece of card
stock here. And my sharpie. I'm going to create
my background. And then I'll fill it in with the pigments from
the acrylic paint. Now for this one, I'm going to keep in
mind that I want to do sort of an hourglass shape. And I use that term
very roughly and loosely. So I'll start. I want smallest area in the center and larger
the top and the bottom. So I'm going to
actually start a little differently instead
of just making loops, I'm just going to create a shape that's kind
of an hourglass. And now I'll just start making some loops within that shape, using that shape as my guide. Once I have that done, I can start adding my little rounded edges
all the way around. And I'll speed this along. Experiment. So there I have the
basic starting point for my neuro graphic
art that I'm going to use acrylic paints for. On the back, we see
a little bit of bleed through, but no staining. So the card stock
was a good choice because it was a Sharpie and
the Aeneid was quite thick. I got nice beautiful lines. Now I'm not going to
get rid of the Sharpie. I'm just going to
set it aside so that when I do my
acrylic painting, after that dries, I can sharpen up any of the lines that remain. In the next chapter, we'll
start our acrylic painting.
9. Adding Colors: So I have three colors
of acrylic paint here. Soft purply gray, soft
yellow, and a soft blue. So I'm going to use
the same procedure I did with the watercolors, where I'm going to choose
three cells to color in first, and I'll start with my lightest
color again, the yellow. Now what I like to
do with the acrylic paint is a little different, is I like to blend the
color with a little bit of white so that the center
of my cells are lighter. So to do that, I take my brush. This is a medium brush, a 3 over 8, just going to dab
in some yellow. And we'll start with
one of the cells. Know very carefully get a
paint the edge of the cell, trying not to go over
the black marker. But if I do, that's okay. Just trying to color it in. I have a nice wide border. And I'll turn the
paper around as I create those little curves. Take it nice and slow, deliberate, and just
enjoy the process. So once I have that
nice, thick yellow, in this case, it's going to pull whatever remains on my
brush into the center. It smooths out whenever
paints left on my paper. And it also cleans
the brush somewhat. Get a switch to a
larger brush here, this is a half inch brush, and I'm going to dip
the longer edge in that yellow and the other
edge in that white. And I'm going to load the brush. And then I'm just going
to pull the brush down towards me to create that blend. And one more time
I'll dip in both of those colors and then
move that brush. And then I'm going to take this and starting in the center, I'm just going to pull around creating the shape that
we see of this cell. I have a nice light center. And then I'll just go
back leaning heavily on the yellow area to color in. Just add some paint. And I'll go back in with a
wider area for the center. And I do this for that cell. I'll continue this with my other two cells
that I'm going to choose using the same
technique and the same colors. I'll load my brush, set that down so
that it's ready. And I'll take my smaller brush and I'll go around
the edge here. Now this isn't a
very large cell. So if I color it all the
way in, that's okay. I want to create that shape, that rounded shape of that cell. And I find it very helpful
to move my paper around, turning my brush as well. And while that's drying,
I'll choose a third cell. And I'll just come over here. And I'll do that same procedure where I go around the edge, creating that rounded shape, right with my color. Turn the paper as I go. And then I'll come back with
the brush that I loaded. I'll reload it and just
go over the center, keeping that color,
that yellow to the outer edge so that I have a little
white peeking through. Now for this one, it
would be a little different because it's
such an odd shape. I just wanna make sure
I keep the yellow of my brush to the outside. And I still have a little
white on the inside. I can go over here
and buff that out. Now I'll continue this
with my remaining colors, my blue and my purple. And then we'll come back and
take a look at our work.
10. Refining the Edges: So now we have all
our acrylic paint on our piece of art here. Now, unlike the watercolor, there's no transparency to this. You can see the areas
where I went over the dark lines and that's why I told you not to put
away your sharpie. I'm going to take
it out and just enhance any of the
areas that need it. And I'll just take
this nice and slow. Now the thing to remember
is that when you do this, it will wear down
your sharpie very quickly because it,
where's the felt? The acrylic paint has a
little texture to it. And that kind of takes a little
bite out of the sharpie. But that's one of the reasons
I like using a Sharpie is I can buy them very inexpensive in a pack and just go through
them as I do with my art. It's fairly durable for
markers as markers go. But don't be alarmed if you're using it and you find that it. Where's your point down? Now here's also where I can
round any edges if I missed anything or if I happen to come across something and
discover it on my journey. Just tidy up the edges as I go. And it's very relaxing, very soothing. Come around here. There are any areas where the
paint didn't quite make it. I can fill it in with
Sharpie just as easily. Same thing with any bumpy lines. So it's a very relaxing
and forgiving procedure. Here. It can round
this shape out. Take a look at my work and see if there's anything
else that I want to do that go around this
edge, just a little. Rounded edges are very soothing both to do and
to see on your paper. Come over here, C1 edge of the little point,
round that out. And just thicken this line. So there I have my
hourglass shape. In the next chapter,
we're going to create some more narrow graphic art. But instead of using colors, we're going to use patterns
to fill these cells.
11. Using Patterns to Fill the Cells: So now to make my neuro graphic art and use
patterns to fill the cells. Once again, I'm going back to my sharpie and my card stock. I'm going to create
the basis for my art, but just making a few loops. Again, you can make them in
any pattern you like if you wanted to do the hourglass or the wave or any
combination of them. So when you're happy
with your design, you'll round out the
edges just like we did in all of our
neuro graphic art. So I'll do that and then we'll come back and take a look at it.
12. Drawing the Patterns: So I've rounded
all the edges and thickened up some of
the lines as I went. So now I want to use patterns instead of coloring the cells. I'll probably use
the same technique I tend to stick to where I create a pattern in every other cell or
I always skip cells. But before I do that, I can take a look
here and see if there's anything
I'd like to add. I can add dots or
I can split cells. So to split a cell, what I'd like to do is take one corner and just go across
to a different section. So if I start at this
corner up top here, I'll just split
that cell by going halfway approximately
to one side. And then I'll round
out those edges again. And this just creates a
very interesting piece. I can do this on
the larger cells, or I can just create
additional lines. And it just divides the
cells like we did earlier. Again, I can come in here, round out any edges. Because after all,
that's what we'd like to do with this art. Think I'll divide
this cell like this. And now I just want
to add some dots, just going to go the length
of a few of these lines. And again, I think I'll stick to three cells that I'll
choose to add dots, the length of the lines, or the lengths of the sides. Just as I see fit. And it kind of just
adds some interest. I can continue with this
or it can stop here. Now I want to add patterns
to some of these cells. And the patterns
can be as simple as additional dots
filling up a cell. That could be lines, that can be a trio of dots, anything of that nature. So I think I'll start
with this big cell and I'm just going to add lines. The curved line is
just going to follow the shape of one of these
curves can be this one. But for some reason I
like this rounded edge. So I'll start and just
create a series of lines, kind of evenly spacing
them more or less. And then I can go back in and
fill them in even further. So I know in this one I want
to add at least two lines. This one, I just want one. And the same thing. I'll take that
pattern and try and create it and at
least two more cells. So I'll start here. And I'll just create that
pattern, that rounded shape. And now I'll just add a few touches here and there,
continuing that shape. And the reason I like
to constantly divide up those shapes that I make is because then
it's a little soothing. I could always start
with one side and go the length if you
find that soothing. But I'd like to just constantly
divide things in parts. I'll do one more down here, creating my shape and
then repeating it. And again, I'm just using
this one, the Sharpie. So therefore I have three
patterns of these stripes, three of the dots. Anyway, think I want to
add one more pattern here. I'll add a trio of dots. I'll start maybe
on this cell here. And I'm just going
to add a trio of dots very close together. And I'll continue adding it
until it fills up nicely. And it looks like a
different pattern, even though it's using
the same features of just the dots. But because it's really full
and really close together, it gives a different look. And I can decide when I'm done. I'll choose another one. Do this one right here
with the same technique, my little trio of dots. And you can use any
pattern that you like. And one more thing I'll
jump to this one here. Take your time and really
enjoy the process. And then you can see the result coming across at
develops and emerges. The more time you spend
creating these pieces. I want to continue with
this pattern because I really like these
trio of dots. So I think I'll add it
on this big piece here. Now. It's directly touching
both of these pieces. But because of the way
the dots are far apart, it kind of tricks the
eye into thinking there's more space
than there is. So while I have some
rules that I follow, their kind of flexible, they're more
suggestions than rules. And I'll do one more. And that will give
me an odd five. Think I'll just jump to
this outer one here. Again. Keep my tree
over dots going. It adds interesting, look, it's not a solid color, but it is texture and
it is filling them up. These little cells,
which I like. So now from here I can decide
if I'm done with my work is complete and how I want
to hold it or display it. And we think I'm back to the
original way we started. Now I want to add some
dots on this side because I feel like a
lot of my images here. And this dot will draw the eye, this pattern will
draw the eye to this side and kind
of balance it out. Maybe just add a few dots here. And you can continue
this as far as you like. I am quite happy with
the way this looks. So I'm going to stop here. In the next chapter. We'll review the work we
did today and I'll show you some variations using
those same techniques and the same tools.
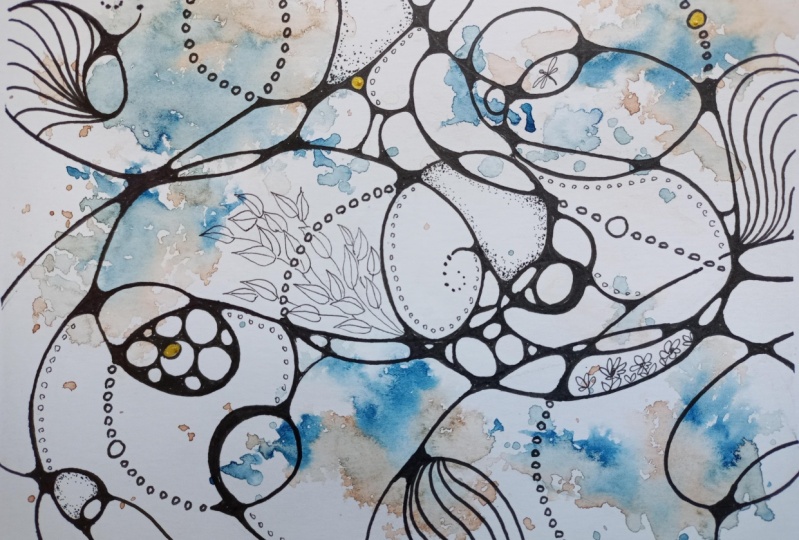
13. Class Wrap Up: So here's the completed
neural graphic art that we did in class
where we added colors. So here's the one I did
with the watercolor where I add a different colors and I skipped cells here just
to give a lot of contrast, you can fill them all in. You could change
it up completely, but this is my version
and I wanted to show you some alternatives using the same techniques
of using watercolor. Now here's a watercolor
that I did where I really filled in
most of the cells. They're still a little
bit of contrast because some of
them are left bear, but it gives a different effect. I also didn't really spend
a lot of time trying to get a lighter center to each of my cells and that created
its own interests. I use multiple shades of colors
to get different results, and I was quite
pleased with that. Another one that I did
using the same process with the lighter centers was just
using three colors here. So I was quite
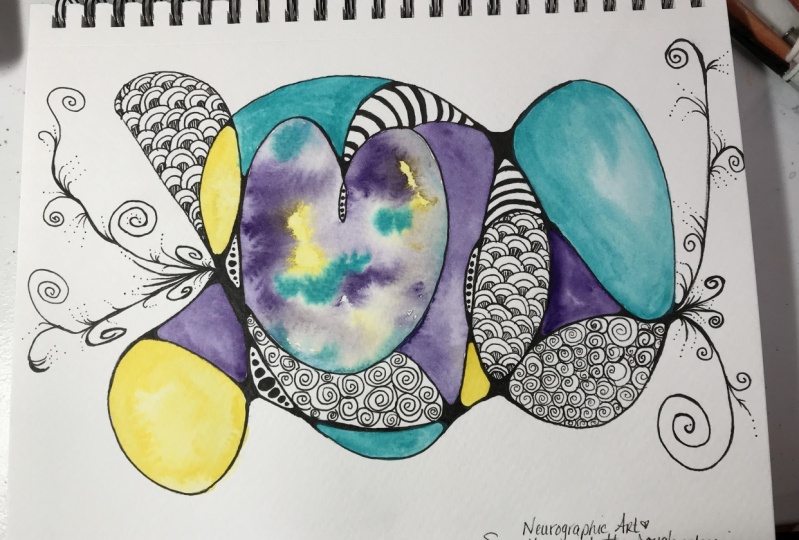
pleased with that. Now in class, we created some new orographic art
with acrylic paint. I use the white paint to create that center just
so I add contrast and carefully spaced out the cells that I
chose to color in. And I wanted to show
you some variations. Just a reminder, this
one was done with a somewhat intention of
creating an hourglass shape, but it could easily be a
butterfly shape just as well. So here's a piece of
neuro graphic art. And it continued
right off the page. It went from corner to corner. I added two shades of green
and then there's gold. So that added some interest. I also decided to put it
in a few dots here and there and split some
of these cells. You can take this
as far as you want. Just follow your intuition. Here's another piece
using the acrylic paints. I hope this was very fun to do. The colors, particularly this turquoise and blue and orange. I changed some of the
lines here into swirls. So I really like the
way that looked and it comes right off the page. Now the last one that I did, I did slightly differently. Instead of using
a sharpie marker, I painted these lines
with black acrylic paint. And I can tell you that
process was very frustrating. What I did was I painted my black lines first
using the acrylic paint. Then I went back
and fill them in the cells with the
colors that I wanted, the yellows and
pinks and greens. And then a sharpened
up the edges with some more acrylic paint. The use of acrylic paint and a brush was a
little frustrating. The Sharpie is just so
smooth and so easy. So my recommendation would
be to use the Sharpie. But if you're drawn to completing
your neural graphic art solely with acrylic
paint, give it a shot. You might have much
better luck than I did. Now for a final variation
that doesn't add color but uses
patterns as the color. I created one using sharpie. I filled each of the cells
in with various patterns. And because there was a
lot of white showing, I didn't stick to my hard and fast rule
of skipping cells. The contrast is quite beautiful. Now here's one that I
did and I just filled in some cells and not others. I also didn't round the
edges because I thought that contrasts might be intriguing
and it was a fun process. I think I'd prefer it better
with the rounded edges. But that's what this
is all about is just the process and then
evaluating it later. So here's another piece of neural graphic art where I used the patterns instead of colors to show
different contrast. I have some solidly filled in, some just dotted, some little clusters
of dots and stripes. And I thought this was
a very effective piece. Now lastly, I wanted to show another piece of neural graphic art with a different medium. And this was just
these brush markers. They're quite beautiful. They're made by many
different brands. I used my watercolor paper,
my waterproof marker, to create that first image, and then I fill them in with
these water brush markers. Again, I just chose colors and then I decided
to incorporate some dots matching those
colors throughout my work. You don't have to be limited
to just a pen and paper. You can expand into any of your media supplies
that you have on hand. Try your hand at creating
some neuro graphic art and adding some color or even
patterns to your work. Now if you do, please
snap a photo of it and post it in
the project section, please be sure to follow me
here on Skillshare to get notified of future classes and please consider
leaving a review. And just to reminder, I post different videos on YouTube on Monday and
Wednesdays on my channel. Thanks for joining me today.
 Daniela Mellen, Artist & Author