Transcripts
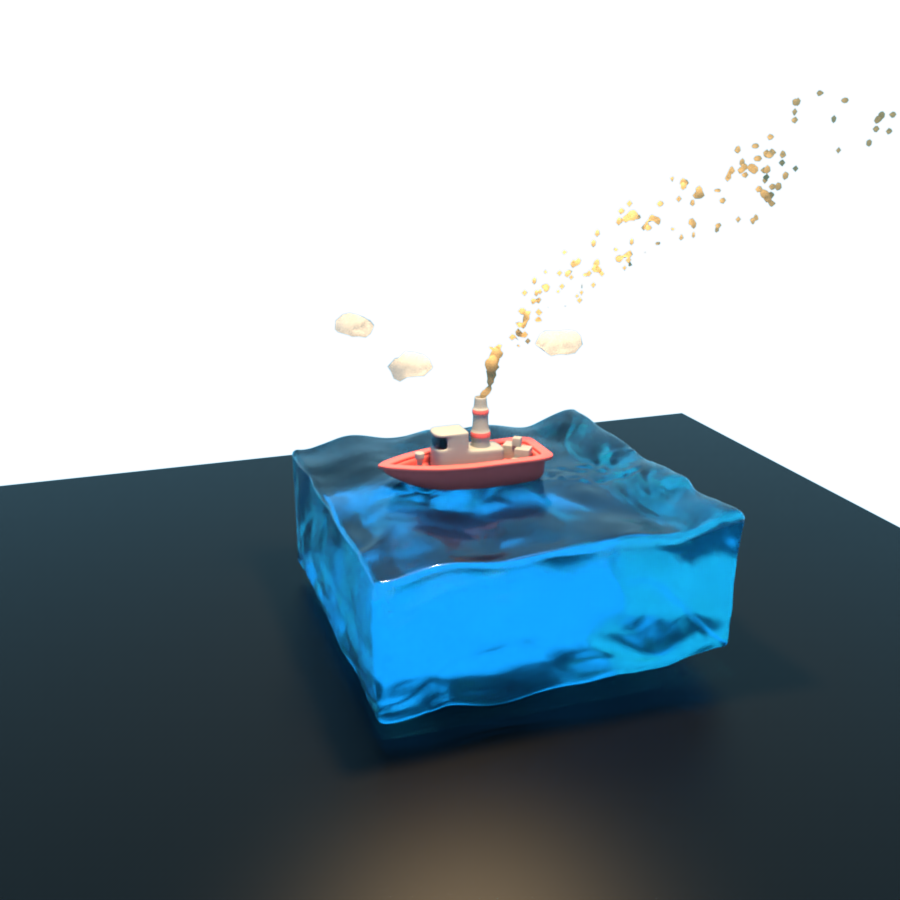
1. Course Introduction: Islam Polycomb everyone. My name is Muhammad Ahmad and value coming to New
Cinema 4D plus. And this class we
are going to create a small board which is
floating on the water surface. Soap, it does't wasting
anytime legs get started.
2. Create Ocean Surface: Welcome to the first lesson. In this lesson, we
are going to create the ocean surface
of our project. So far this cleared out Cu
and change its value to 500 and segment 250 and, and bird and select
a filter to it. And five, perfect. If you want to bring the garage shading
lines here you can see. Now next thing, just
rename it ocean surface. Now we are going to create our vendor default mode and make the bin deformer
digital ocean surface. Here you can see if I
press Play, you can see. Now just select the bin
deformer and change its amplitude to one
and its size to Turkey, self frequency to ten. And just from here, just click the wind
farmer and changes perpendicular to minus
90 and also to 90. Perfect. If I press play, here you can see the floating surface
of our ocean is created. Now. Again, create a new
development Name display. And just make teacher displays, CRT, make teacher display
Sarah, ocean surface. Now select the displacer
and go do shielding. And from here just
select the mice. Just click on nice. And from here, just
look for the baby. Turbulence set its
octave one and it's global scale to 100 percent
and animation speed one. Now if I press play here, you can see the difference and just go back and from here, the object height
to I think it is. You can also increase the heart. Just turn out the garbage here, declines to call her children. Here you can see perfect. Now, again, create a new default will displacer and also make a
gerund of ocean surface, rename it to display circle. And from here go to shading. Just like previously. Nice, and from here, just look for the book so you can also play with
the other effects, nice effects as I already
have implemented these, so I will use this. After completing the tutorial, you can play with
different effects. Just make octave one
certain dog global-scale to 1200 and emissions
period one. And if I press play here, you can see just
hired this sir and select this displacer
and go to fall off. And just from here, create our spherical field. And just here you can see, if I press play. Here you can see. So just select the object
and increase its height. Bot can be 5%. And if I press play here, it can go to for love. And from here, Order remapping. And you can set its inner ear, you can see and just slept
up on CTO or dread pick. And it's gulfs. You can set of
images you can see. And think 45 is burst and just select the spherical
field and just bring it. And from here,
teratoma and just, Just term of this, and just from here, you can decrease the play
with different settings. Just flex the displacer. And our object and
circuits I put 30. Think chronically. 25 is perfect. It's like the
displacer shielding. Select the mines. And I also want to just change a small mantle minus1
and speed one. Perfect. And just turn on this and just select and bring it to and
play with the settings. Perfect. Okay, that's it
for this lecture. In next lecture, we
will proceed from here. See you in next lecture.
3. Create Ocean Surface Continued: Welcome back. In this lecture, we are going to proceed
from where we have left. Now, go to the farmers
and create a new explicit and the name id 3 explicitly and make
digital ocean surface. Now select the displacer
and select the shielding. And from here, just look
for the nice click on lies. And just from here, blister Booleans and
just changes octave 2, 3, and it's global scale to 500. And from here, just
changes animation's P21. Papers play here
you can see and gs minus 1 and movement speed one. And from here you can see just one thing that I want to just let the displacer to and from here and just
go and farm here. Brightness to 50. Perfect. Now select the display surgery. Nice. And from here, just go back and
select the object. Hypo, terribly. Perfect. Now, go to Simulate. And from here glitter a meter. And just sent settings, particular settings, millimeter
150, starting a median. So I want to start it from minus 150 and just drag it here. And also Han Bu 150. Just track a chair. Lifetime is numbered. Circles variation speed to 3030. And a mission from minus 150, select the ammeter
and spring it to how upward and just hide this. Now, rotated. I'm here, you can see this seventies and
also the perfect. Now if I press play here, you can see select the ammeter. And now said it's Science. 220. Drawn dates are
horizontal, 20 and 20. Perfect. Now select the
Display Search Tree, go to fall off and
just drag the ammeter into this and select
that particular object. And here you can
see the difference. If I just turn
this off and this, you can see that the friends
just drag the ammeter. Just here. I want you to see a difference. You can see as soon as
ammeter start omitting the leaves are bubbles of water are immediately,
thus trying. So for this, just like the display search tree and
just clicked and the Bk. Now you can see the difference. Perfect. Now just turn on Terman and
just drag this to this. And from here you can see
just hired the ammeter. Here you can see the difference. I just turned on. You can see the difference. Perfect. Now create a null object
and make the chair. And just three married
ocean surface. Perfect. Okay, There it is
for this lecture. In next lecture, we will start creating
material for our osha. See you in next lecture.
4. Create Ocean Surface Material: Welcome back. In this lecture, we are going to create material for our ocean. So if you are using semaphore diversion are two
and D1 are our two and d are drawn denied him and
before it support the plug-in program that but if you are using
above version, it is discontinue
the pro render. So here I will use programmable
farther rendering. So first of all, just create a new PBL
material and name it. Caution Mac. And just drag it to the motion. Perfect. Now just double-click
and open this. And just like the luminance. And just turn
transparency and this. And just search changes value. I will put the
exact values which I have noted on my paper. You can use these values, select our water, and I'll
select the reflectance and just turn this off
and just delete this. And just like I'm
exploring as to 10. Perfect. Now, you did not
see any difference. Now, click on Render. And just before we
are containing just, you can see from here. Now press Control B. And from here you
can select programs. And just from here, click on effect and
select 39 user. And just close it. Now if I press play
and just press play. Here you can see the
surface of our water. Ocean is created. Here. You can see the if I
just turn on terminal of this, you can see, you do not
see the difference yet. Okay, That's it
for this lecture. In next lecture, we will
start building our board. And then we will
cleared them material for our board and other certain. See you in next lecture.
5. Create Boat Body: Welcome back. In this lecture, we are going to clear
the bar d for overboard. So first of all, DoubleClick and hard
this now create a cylinder and just change
the orientation to Z. And from here, just you can select this and changes segment hurry
to make it editable. And from here, just
select the half of that. So just select the
faces and just hold on shift and just rotate. Just hold Control
to unselect this. Now, hold on shift
and select this. And from here, press
Delete key to delete it. Now, right-click and select
that close polygon hole. You can also use
shortcut key M B. Now, just select to close this. Perfect. Now, you can
press KCI to time, or you can simply right-click select
that line cut tool and just select this and
press space. Perfect. Now, select the live selection
and just select the edges. And right-click. You can use schottky m n. You can simply dissolve
these null plus k2 times. To select a line card tool, just select this and this space. Again, press Q 2 times
amateurs and press space. Perfect. Now again, select this and dissolve these
by pressing shortcut key M N and press K two times. Just make a line, press Space k2 times
and just Press. Perfect. Now, just go to
Filter and from here, just turn off the grid. Are you can simply select the cylinder and
bring it to upward. Perfect. And naming. Bought underscore, embody. Perfect. Now switch to face and just select
these faces and just drag these to the z-axis. And just hold on Control. Enter, make a copy and
gene set to 50 centimeter. Next one is 35 centimeter. Next is 25 centimeter. And last one is 15 centimeter. Perfect. Now switch to
vertices more hand from here, just like the rectangle
selection tool and just select the word is. And from here, just enable, enable x in R, you can use shortcut key press L and a switch to scale more. Just press T and just select the upper vertices and just change its value
to 40 centimeter. As you can see, the vertices are not changing. Sign that easily injured, unable, so does just
press Control Z. And from here just liked about
x is now press ELBO term enough and now drag the
chain the value two. I think 50 is perfect. Now. So each two rectangle
selection tool and just select these vertices. Now press the naval x's. Now again select these
disable by pressing L. And now just again and change
its failure to 70 percent. Make sure your axes
will be disabled. Now again, switch to
live is selection, rectangle selection and
select these vertices. Make sure our vertices
are selected. And again, switch to
scale mode by pressing B, select press L to enable axis
to now select the press T, and now just press P. Now select and now press
L to disable axis. Now, just and change
its value to 980. Perfect. And you can see
our board is getting shape. Now select these vertices
and this by holding Shift to select and just bring it to ten
centimeter forward. Just ten centimeter. Now select the upper vertices and just bring your
25 centimeter. Perfect. Here you can see
our board is getting a ship. Now switch to live selection. And just from here,
select these faces. And from here just select
the inner exclude and just Xcode inside and just
circle the x value. Set the offset value 10
percent, 10 centimeters. Now, you can either
press shortcut be MBR, simply right-click and select, Exclude, and just explore inside and serve
the value minus 10. Perfect. Here you
can see our board. The basic body of
overboard is prepared. Okay, that's it for
this lecture and next lecture we will
continue from here. See you in next lecture.
6. Create Boat Body Continued: Welcome back. In this lecture, we will
continue from where we left off. So switch to our dis-ease. And from here, just select the vertices and just
right-click and select our loop, our podcast tool
and just make a cut here to make perfect. Now next thing,
switch to the edges. And from here, just go to Select or you can
press the shortcut key, you will select a
loop selection tool and just select this. And from here, just right-click
and select tab bilevel, doula and chairs, maker,
but Errol, perfect. On every page under here you
can see a line is created. Perfect. Now we want
to split this one. So for this again, lobe selection tool
and farm here, just go to Swiss cheese and just select hold on
shift and this one. And just select this and just press right-click
and select us split. Or you can use shortcut
key U and then p. And here you can see, if I select this, you can drink it upward
and just rename it. More. Muzzle. Perfect.
Now next thing, just like this, hold on art. And from here, just clear that closed surface and just
increase its thickness. 25. And now I'll select these, just select these control Z. And from here, Just hold on
Shift and select these two. And right-click and delete
contact object plus dilute. Perfect. Now, press C, u, and then L to select
a loop selection. And switch to scale. And just bring it to
outward little bit. And then select and
just put it Control Z, switch to and just
bring it down. Perfect, here you can see the basic shape of
our board is created. Now, just make a
gel of Barbie and just let this hold on Alt key and select
US subdivision surface. Here you can see the difference. Perfect. Just turn this off from here. Closer to the board Bernie. And just right-click and
select OPAT cartoon. And just make a cut hair. Now turn this on. And here you can see the
leaf our bodies created. Okay, There are tools
for this lecture. In the next lecture, we will start creating the
campaign for our kept them. See you in next lecture.
7. Create Boat Cabin: Welcome back. In this lecture, we
are going to create that gap and for our board. And just before we just select AP bought Barbie,
just like this. And just turn off these colored shading lines
just from here to your cube. And change it to 50, 50, and 50. And just bring it upward. And from here, just bring it, make it editable, select faces and just slept
and cold on control. And make a copy. Perfect. Now, select this
and just hold on. Slept this and just write control and right-click
and select x-coordinate. And just in x-coordinate N2 and said that the
offset five centimeter. And just from here, right-click and
select that exclude, pull upward to hire staff
to be 25 centimeter. I think that's okay. You can also say that the
certain value though, its entirety is good. Perfect. Now, next thing, what
we are going to do, just switched to and just
bring it to forward. And just from here. Now, select and press
right-click and select Data. Low particular tool and
just make a cut here. And just 1 is here. One is hears, and
just one is yes. And one is here. And just perfect now select live selection tool and
just switched to see them. Just select these faces. And Control Z and press and slept up, exclude. And just pouring into just like this and
bring it to here. And from here just again, press Control Z space. Now select these
and just bring it to just a little bit forward. And from also select the
bag and just bring it too. Perfect. Now, we are going
to create dark gloss. Far our kept them cabin. So far. This just right-click and select the loop OT code
to learn just from years. Maker. Just make a cut here
and now switch to live selection tool and just select
this one, hold on shift. And from here. And from here, just like that, in that exclude. Just, just like and from here, select the Exclude and
just Xcode inside. Okay, Perfect. Now select the Q, hold on Alt and clear does subdivision surface here you can see the cabin for our
captain is created. Just turn this off and
just like the cube. And from here just right-click
and create a split. Here you can see
I just press and select this to delete this. And just like the
cube one and rest, bring it to here. Perfect. Now, just
like the cube one. And hold on art and just select that glowed surface
leg and just make it 0 and increase its thickness. To think, always perfect. And now select this
one and select, just right-click and select
and delete objects plus. And if I press this
arm here you can see where the glass is not
adopt the shape of this. So far this just make this
cube Ricciardo, this one. Here you can see. You can just select
this and make perfect. Here you can see that
Kanban for our capstone is created and just rename it. Kept going underscore
care event. And just name it
campaigning glass. And just rename it. Perfect. You can just select the whole and just
decrease your size. Just if you want to. Just select and perfect. Okay, there are 64. This lecture. In next lecture, we will create one for our board and also the smoking
Humanae Vitae our board. See you in next lecture.
8. Create Hull and Crate Boxes: Welcome back. In this lecture we are going to create Hall far trouble board. So for this poster, follow cleared our cylinder
and just bring it to upward and just and
just change it. Just select the
slender and Jane your side to 50, right thing, a 100 and changes
segmental one and choose display their garage
building line. Tear. And also again
decrease in height. And just make it editable and select
these faces, sorry. And just right-click and select a loop cut tool
and just make a cut here. And one is here, and one here. And one is here. Now select the live
selection tool and just press U and then L to
select a loop selection tool. And just select the scale and just perfect. Here you can see that
just just a whole. You can also declares it size. If you want to
increase its scale, it just make sure. Perfect. Now you can also
add some fancy atoms in it. Just like i1 Procreate cubes. And I want to sell to
its size, 50, 50, 50. Just bring it here. And just printed here. You can also change
your size to 10. I think Dan is perfect. And from here, just
change its size to 25. 25, and 25. Select Cube. Change size as much per 15. 15, and 15. There it will be. Okay. Just make it hears
selected change here. Just, just, just make it 2400. Going to be perfect. Now just select this
and just rotate. Select and make a doublet
beautiful control, hold on Control and
just bring it here. And just, and you can
just decrease its size. Yes, select these. Remember these are
just fancy atoms. You can just make a copy
and just bring it here. And just increase their size. So it'll fit on that box. And just make a
duplicate and just decrease its size.
Just playing it. Perfect. Okay, that's it for this lecture
here you can see we cleared Hahn for
our board and also some great boxes are
you can say loot boxes. The last thing which is remain is our smoke chimney
fall our board. In next lecture,
we will clear the. So before we are
going to clear this, just rename this name it hun, and just create a null
object and name it. Great. Underscore box. And select all these and
also run into boxes. Perfect. That's it
for this lecture. See you in next lecture.
9. Create Smoke Chimney: Welcome back. In this lecture, we
are going to create the smoke chimney fall our board before
we are proceeding. Just I want to make sure all things are in
place was to fall, just slugged the huddle
and just drag it down, go. And just select and
make it editable. And just make it, take enough soldiers and adjust. I'm going to turn to table. Right click. Make a loop cut tool. And just from here
and here. Perfect. Now here you can see just make it. Now. Select this, select the handle
and hold on Alt and just, I'm doing in surface and just, you can see and
just place it here. Perfect. Now, next thing, what we are
going to do, just rename it. Now, create our tube and
just bring it upward. Select dagger are
churning dynes. And from here just select
values and doing their radius. 1013 is and just segment hertz one. And just bring it here
to Springer down. Make it editable. Select there were the seeds. And just select the
rectangle selection and just select this. Make sure our
articular selected. Switch two, side view. And from here, just
bring it down. Select Scale and just bring
it to inward slug and just now switch to live selection tool and
just bring it here. And just bring it down. Select Scale, and just
switch to perspective view. And here you can
see just perfect. Rosie. Okay, Now select and now just right-click and
make, select a loop. But God, part tool, just make cart here, 11 is here, and just 1 is here. And from above,
just on this here. Choose, okay. Press Control Z. Just select. One is here, and one is here. This one we will bring, and just one is here. Now, plus CU and CO and then hell to Select
Load Selection Tool. Just hold on, shift and just press Control
to unselect this. And just select this. Pursuit and dress.
Looks like this. Now, press right-click and
select Exclude and bring her to check on the
television outward. Perfect. Now, select
that to make it small. And just this, I'm just clear the subdivision
surface here you can see just this. Perfect. Okay, that's it
for this lecture. The marbling of the, there, there will be only one
last part for modelling in which we will create the ammeter, ammeter
forward chimney. See you in next lecture.
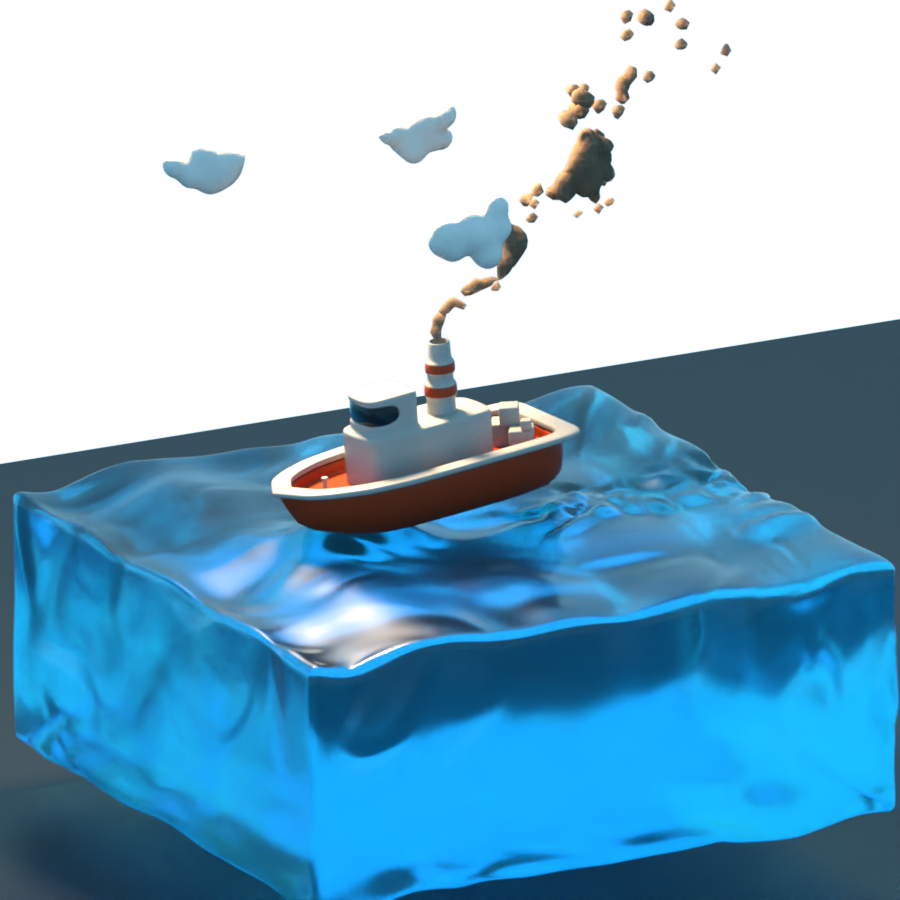
10. Create Smoke Emitter: Welcome back. In this lecture, we are
going to create some MOOC from which will emit from our chimney for this fascia
fall go to Simulate. And from here, just create
our ammeter and just bring it to upward and change
its orientation. Just 0 degree. And also legally and
just hit 90 degree. Perfect. And if I press Play
initially to 0, you can see the
particles are meeting. So if you want to
rotate it to just here. So you can center value
minus 47 too deeply. So here you can see perfect. Now, next thing, what
we are going to do, just cleared our spheres and just decrease
your size to five. And just bring it to upward. And make the child of a meter
and select the ammeter. Go to particularly
just Sure object. If I press play here you can see the spheres
are emitting from. Now, we want to adjust the size so we will
lose some setting. So from here, we
said that will be 20 and render it is
also quarantine. As we have said, the ammeter in ocean surface and we said the star Domitian, their days 150 and
star formation 150. And from here we will serve
their lifetime will be 200. And we want to decrease, as you can see, the speed. So we will set it for B and
variation will be drawn B. And scale. We wanted three and
just took 50 percent. Now if I press play here, you can see the but we want it. So for this goto meter, just circuit 2, 0, 0, 0. Here you can see now the smoke. So for this, spring it downward. And if you want to decrease
the size of a sphere, you can just set the size 3. I think just slept. Plus. Here you can see. But it goes straight upward. We want all distorted. So just certainly it's
angled top ten degree. Now here you can see the, as you can see when our
ball start sailing, thus more with Jane traction. So far this just go to
Simulate, and from here, just the force
that is rainfalls. Now here you can see, just bring it upward. Here you can see, but you can see the particles are flawed. Pin a meeting reading forest. So first of all, just
select them mid slag, include options,
include, and just drag the window into this one. Now select the
window and just go to object and change
its speed to 1. And just turbulence to. I think 15 can
also integrate st. See the turbulence. Perfect. Fourth. Perfect. Here you can see the
modeling section for our board is
almost complete. So before we are
going to have them, just select them in and
bring just Control Z. Just select them,
right-click and select them. And just make smoke. And drag the window. This. And just hired the very end. And so you can see perfect. And just also cleared our null object and
the main board. And just drag that
cleared into board. And also select these
and drag into the board. And just wrap up. Okay, that's it for this
lecture and next lecture. We will clear the
Cologne far our board. Then we will animate
the clouds and also see some settings
for our smoke so that it will be blogging just as the ship is
sailing through water. And then we will set material for our board and
some render settings. See you in next lecture.
11. Setting Smoke Emitter: Welcome back. In this lecture, we are
going to create smoke. Just to make it realistic,
just press play. Here, you can see
there that particles, it is not look like real small. So as we see in project, just go to, just bring it to 0. And just from here, just create are met Baal and make the smoke or monitor
the Journal of MC bottle. Here you can see now
if I press Play, now, just select them at
bol metabolic and just decrease your value. Just entered two. And just one. And certainty value
to 50, I think. Now if I press play here, you can see just turn
off the garage shading. And you can further play with settings as much as you want. Just make sure to. And just, I think. And you can also make
it more realistic. Perfect. Now select meter
and just bring it down. Perfect. Now I'm just like
med bone and you can also play with the settings. Perfect. Now, just bring it to
0 and just rename it, smoke and make it the
general lot Board of your narrative
for this lecture. See you in next lecture.
12. Create Clouds: Welcome back. In this
lecture we are going to create Cloud for our board. So just turn hired board. And from here, just create
a sphere and just size. And from here just turned on their garage shading changes. Standard go. I think our donor drawn. And also OK. Now just make a duplicate
of it or don't control. And just and also from here. And just 1 is just from one is hears. And also make a copy of
here and also on make here. Perfect. Now, this is not just cologne and
select all six spheres. And just from here, hold on Alt key and just select the fracture and the
press control Z. And just for Stovall, hold on. And superior dot selected. And select all of the sphere and make
the geodata lecture. Perfect. Now, select
the fracture. And from here, just
create random. And here you can see it. How adopt a shape of an eye. Now if I press Play, Just, let me see. Just go to and it's
elector turned Booleans. Just select a nice. Now if I press play here, you can see, as you can see, the speed is it is just saw, just select a better
mentor and change its x, y value of 2, 10, 10, 10. Now if I press play here, you can see, you can interplay. Just now. You can see go to
parameter and from here, just as kin uniform, and just set it to
value 0, Brian five. And here you can see, you can also just decrease
it to 0 while to think. Perfect. Now just like the fracture or long Alt key and just cleared our metabolome
and make the tail of vector. Now you again choose
degree their size to five, just two, and its
size to do a d. And if I press play here, you can see some clouds. You can just leave these sort, turn this off and this one and select and make some adjustment. And so it will
behave like a globe. Just play with the settings. And just Ts play
with the settings. And yes, please. Just make this and
just bring it up here and just make a duplicate. And just also changes. Turn this on on. You can just let
them are double. Change its value to
350 degrees or so. Just make it for. Now if I press play chess. So play with the settings. Just select this and
make it a little bit. Also make it smaller. And just adjust. Just heard adjust these. And just perfect. Just turn this off,
turn this off. And if I press play. So here you can see. So I will leave you here and just make two different variants of cloud as body. Your guys. See you in next lecture and in next lecture we will
animate that color. And our board. See you in next lecture.
13. Create Clouds Continued: Welcome back. I hope you have created to Virgin of Cologne
of your own dice. So now select and hold on archi and just
screw you to null object. And here you can see and
just name it can allow. And just drag the
random endo the globe. And just now Just hold on control and make a
copy of glory and just rename it globe
to just select these. And you can just only live it. Some certain D. Just turn this off, just turn this off and
just change its size. And we'll just bring
bring their hair. And just bring it here. Just and this here you can see just select
them are tumble. And just to see. And also select Upload
and slept on October 3rd. Just press play. You can just select
random and see it. Well, you answered
and took relative. Well. And we'll just set
these kids 0.3. And also from here, just like that chain
there early to turn and just drill and
sell the values here. Sorry. Now if I press play here, you can see Perfect. So just before we
wrapping up our lecture, just rearrange all these and just turn on board, select glow one and blow bow
and just bring it upward. Just bring it. And now also turn our D and just select that glow. And if I press play
and just select board and just bring
it the water surface. Perfect. Okay, that's it for this
lecture and next lecture, we will create an animation for our Cloud and also
far our board. See you in next lecture.
14. Create Boat Vibration: Welcome back. In this
lecture we are going to create some vibration
far our board. So for these four strophe, turn off Kurdish girl shielding
and it just from here, select Dashboard and
right-click and select the animation bag and
look for vibrated. And just from here, select the Enable position
and an invalid rotation. And just said it's amplitude
select and lowest value to 10 and just five and
served our frequency one. And I'll select
the amplitude five and select our 15 and slept
up five and frequency one. Now, if I press Play just
before pressing place like the ocean surface and
just turn off all these. If I press play
here you can see, y'know, just turn these on. Here you can see our board is just floating my
birding under water. But here you have noticed
one thing that our smoke. So just go to the board and
select the smoke emitter. And just select
the smoke emitter and just bring it to our
little inward, upward. And if I press play here, you can see just perfect. You can also play with
the settings and just, just see the settings. And you can just to create and play with different starting until
you are satisfied. Rita, if I press play
here, you can see. Perfect. Okay, that's
it for this lecture. And next lecture. We will create the
material far our board. If we just want to look, just select Start bro, grander. And just from here
you can see perfect. See you in next lecture.
15. Create Camera and Cloud Animation: Welcome back. In this lecture, we are
going to create a camera and also some animation
for our glow for Stovall, just bring these
claw cohesion and just hold on Control
and make a copy of clothes and just rename it. Allowed, silly. Perfect. Nowadays, change its position, switch to camera and
select the dark camera. And from here, just bring it
here and just bring it here. And also here. And just like this globe
here and just here. Perfect. Now switch
to perspective view. And from here, create
our camera and just press Control B
and set it to 900. And also it's now
activated that camera. Select the camera and change its projection to
parallel. Perfect. Now just adjust the
camera and just select, and from here just
the absurd and just make a little bird
song and just such value. And just now selected globe, just bring the pole 0 frame. Now select globe 1, 2, and 3 activity. It's just an image. And just bring it to here. And now select that
globe one more. We go here and just guarded. For. Now, select the
globe and move it here. And regarded position. Now select glowed three
and just move it here. And regarded position. Now just press play. Here you can see when our
start moving forward. Perfect. Okay, That's it for this lecture
and next lecture, we will start creating material for our board
and fought our Cloud. See you in next lecture.
16. Create Sky and Ground Material: Welcome back. In this lecture, we are
going to create material for our data more project as we already have created
the ocean material. If we just press
Start broad render, you can see just turn this
off and just two you can, if you start here, you can see just bring it to select a gambler and just Zone. Perfect. Now just bring it to work. Now, create our sky. Here you can see and just
create our default material. And just start render. Here you can see and
just apply this material to sky and double-click to open this and just
select dominance of sky. And from here, just
make it blue to this search 204 be perfect. Here you can see
and just close it. Now next thing what
we are going to do, we are going to create a plane. So just clear it up
lean and just bring it. And just switch to and just switch to scale and just increase
the scale of plane. Just if you can see
increase the size of plane. So you can add to the plane. And just all sorts Qin. Perfect. Now just viewed on new PBL material and name it. Go wrong. Underscore blain, perfect knowledge as
applied to the plane. And just double-click to open it and select the reflectance. And selective fuse. And from here, just click on this color
and just rename it. Just again. Drum. Here you can see. You can also just make it black. Choose the color of your eyes. And here you can
see just from here, you can just bring it. And from here you just can. Perfect. Okay, narratives
for this lecture. I will try that. I will govern the material
in detail as much as I can. So I will split into different parts so you
can easily follow along. See you in next lecture.
17. Create Light and Boat Material: Welcome back. In this lecture, we are going to create material for our board. So first of all, create our new material, PBL material, and just name it. Bought merit. And just select this and select a reflectance and
just change it to 16. Perfect. Now just drag this and applying DEA board. Perfect. Now adjust. Again. We are going to create the
Barbie material for our board. So just hold on Control
and just drag this and just rename it. Bought underscore Barbie. And just select this
and slut and just make it press OK. And now select our board. And from here, you can go to both Bardeen and just apply
this material to board body. Perfect. And here you can see we want to
apply the material, muzzle material for our board. So just drag and apply the
board Muslims material. Here you can see just
burn out the camera. And from here you can see the material for our
board is created. Now, we are going to create just apply the material
to the Gemini. So far this just go to smoke chimney and just
apply the material. Here you can see just slag and the slag,
the smoke chimney. And just turn off this. And here you can see just
apply this material for star, followed by the white
material to smoke chimney. And these, select this tea. Perfect. Here you can see
just to leave this, just delete these, just, and just apply the this
and white just here. Press Control Z, sorry, just supply white area. And now change the order. Here. You can see,
now if I go here, you can see, perfect. Now, next thing which
we are going to create, just go to light and
create a PBR light. And just from here, just create our daughter. And from here create a
null object, name it. Light, underscores center. And now select this
and drag the light. And just bring it up. I select this one. Just bring it. And you can see now increases in density to 300 and just little bit change its colors and play
with the colors. So you can, just from here. So you can play with
different settings. And as you want, as much as you want
to just play with. Here you can see. Perfect. Okay, here I am giving you our task that you should create material
of your own dice. Far the flower, and
also far smoke. And far last run the glass. Here I am giving you a task. Okay, that's it
for this lecture. See you in next lecture.
18. Render Setting and Final Thoughts: Welcome back. I hope you have
created them are DDR for the loss and also far
cloud horrendous, small. If you did not, just
let's get started. First of all, just hold
on control and make a copy of ocean material
and just rename it. Can loss might be ideal. And selective reflectance. Just selectors transparency
and make it go from 25. And just select
the captain Gavin, Gavin and glass and
just give to the glass. Here you can see. Now, next thing which we are
going to create material for our closed just cleared
our new PBL material. And just name it. Color. Double-click and open it. And just from here, just select Luminance, turn
this off, slug the luminance. And from here just go to Effect and look for
subsurface scattering. And just select the subsurface
scattering and just click and in case the
scattering depth to 100. And just applied
to the Cloud 123. Just here you can see. Perfect. Now make a duplicate
of this cloud and just rename it small. And just select the smoke. And just select the goal DOD. Just select the smoke. And from here, just
double-click and select and just little bird change. And just applied or the
just bring it here. Just turn this off
and fly the smoke. You can just play
with the colors. Just to lead this. And just drag and Dodi and just drained or the sphere. And if I press play, here you can see Ts. You can see the different. Okay, Here we will
wrap up our course. I hope you have learn a lot. You can also play further this. So just before
closing the lecture, just press Control B. And from here you can go
to the output setting, and from here you can
see the settings. And just from here,
select the manual. And just like from 0 to 150, you can just minus 150 to 150 and Just let minus
150, 0 to 150. And from here just, you can now select, Save and from here
select PNG, any. Just let the PNG
and just close it. Knowledge. Adjust the camera. Just and just select that camera and
just Dilbert zone. And just select this and and press and just start gendering. Okay? I hope you have learned
a lot from this course. See you in future. Okay, bye.
 Muhammad Umer Najeeb