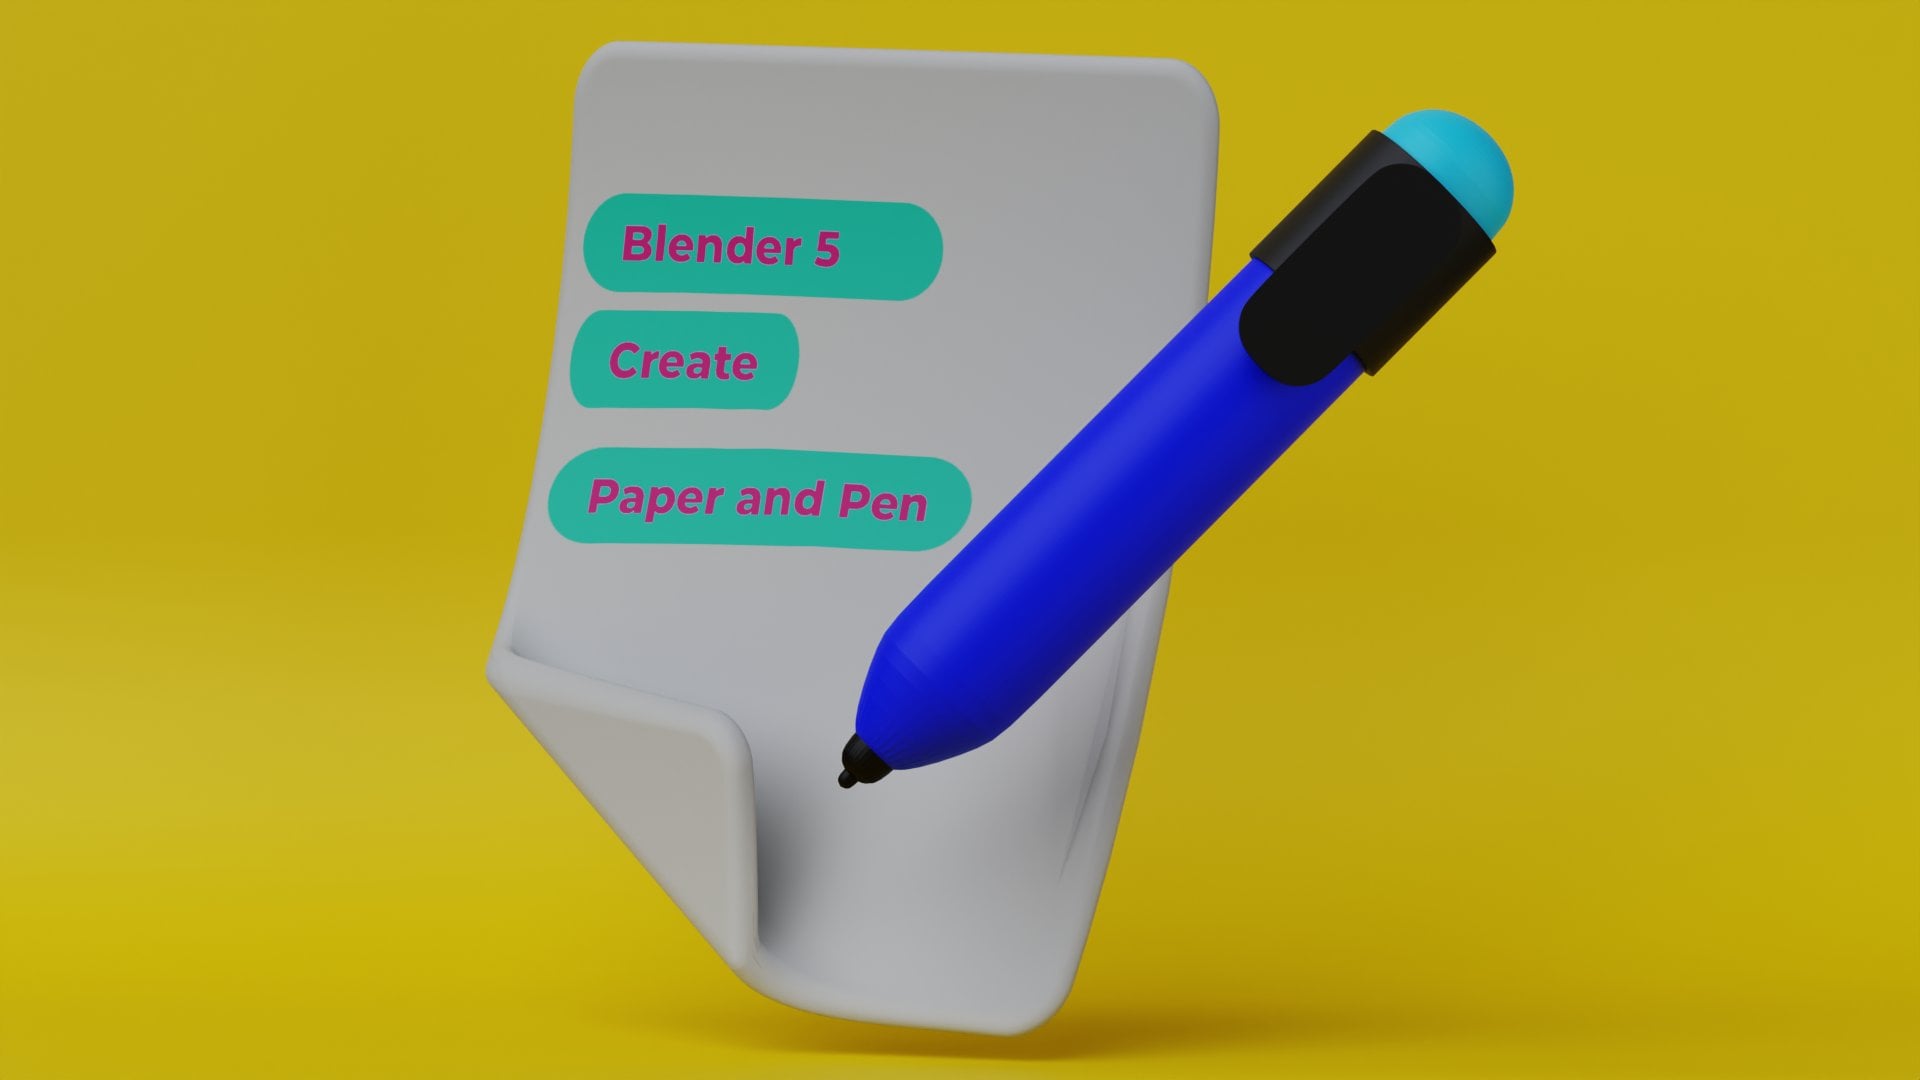
Transcripts
1. Course Introduction: Salam Molcum, everyone. My name is Mohammad Dumer and welcome to the
SEMA 40 workshop. Have you ever wondered how
three D objects are made? Are you ready to unlock
the power of SEMA 40? In this workshop, we will
start at the beginning. We will cover how to
download and install SNMaFty and quickly master navigation
within the software. Then we dive into building
our stunning icon. You will learn expertly create the paper and then how we
can create the pen body. Then also, we create the detailed pen clip
all using simple, powerful cinema fody tools. Once modeled, we will craft beautiful material
for pen claip. Finally, we will master the lighting and
rendering setting to transform your scene into a professional
portfolio ready image. So what are you waiting for? Enroll now and start
creating today. See you in the class.
2. Download And Install Cinema 4D: Welcome to the first lesson. In this lesson, we are going to download the SNMaFdi
and for this, you have to open
the mexondt net, and from here, you can
download the SNmaFty. Or you can simply search for the SNmaFt and just from
here, click on this, you can go to the main
website, and from here, you can just click
on Start free trial, and it will take you
to the same page. And from here, you
can just click on the download Maxon app and just click on this and if you did not have any account
you can create or you can, if you already have, then
you can simply sign. Once you have downloaded the
Sema fody and install it, then you can simply launch the Sema fody from the
Maxion application. As I already have
installed the SNMaFody. So for this, I am going
to launch the SermaFodi and Once you launch the Selma four D as I am
using Selma four D 2026, you can download
any previous virgin and just click on the new. You can also open a project
if you already have created. Let's see just I have created this one for
testing purpose. So from here, I am going
to create a new project, and this is the Selma
40 main interface. Just like blender,
this is the viewport. These are the tool,
and in next lecture, we will start to
navigate in SermaFt and start making some
changes in our viewport. So see you in next lecture.
3. Navigation In Cinema 4D: Welcome back. In this lesson, we are going to navigate how we can
navigate in SermaFty and just in SermaFdy All the three
D software work similarly, just the difference is between the different keys and
some of the functions. As SEMaFdy is popularly
known for motion graphics and how we can navigate in
SirmaFt Just hold down Alt, and if I press left mouse E, I can orbit the SenmaFt. And if I want to pan simply just hold down Alt and press and
hold middle mouse button, you can pan the view port. And if you want to
zoom in zoom out, you can simply hold
down art and press left and right
right mouse button. You can simply zoom in Zoom out. One thing that is the
main difference between, I think Sema four D and Blender three D. In
blender three D, the Z axis is the upper axis, you can also say
perpendicular axis. But in Selma four D, Y is the upward moving
the upward axis. Overall, the workflow is same. First thing, just what
we are going to do, we are going to
make some changes. And for this first thing, just go to the panel,
and from here, you can adjust the panel and select the two
view side by side. As if you ever follow if you
follow my Blender workshop, I have also create the
same project in Blender. Now what we are going to do, we are going to do just go to from here cameras and from here, just select the perspective. And I am switching to perspective mode
and just from here, just go to the camera and
turn off the same frame. Save frame. One thing that I am going to do
just go to the object, and just from here, I am going to place a capsule and just from display
here to the quad shading and make sure the coordinates of
the capsule at zero, you can see these. Now just go to create
and from here, just create a camera
and from here, just switch to the camera
and from this viewport, go to the camera properties
and set the values zero, zero, zero, and
also rotation zero. Now just select the camera
and bring it to the backward. And also, go to the
camera just from here, change the focal length to 135. Perfect. I'm recording
KarnaTPaana Sure, yeah. Sorry, bank. Don't know Karnaugh say. Now, just adjust the camera. And from here, just go to
the render setting and change the setting to
thousand and 2000 pixel. And if you want to
change the resolution, just leave it 72, you can also use high 300. So for this, I'm just going to. Now, what I'm going to do, I am going to adjust
the camera to center. Perfect. And if you
just bring it closer. Perfect. Now next thing, what we are going
to we are going to as our camera is active. And from here I want
to hide the camera. You can just select these dots, visibility, and our
cameras hide now. Now just select the capsule and simply press delete
key to delete this. So as we have just adjust the layout for our
project, in next lecture, we will start creating
the paper and pen for this workshop, see you in next lecture.
4. Create Paper In C4d: Welcome back. In this lesson, we
are going to create paper or this workshop. First thing first, just create a plane and just from
here, go to display. And if we turn on the
garage sheeting line, we can see our paper
is already subdivided. So just go to the
object and from here, just change the value bit segment and height
segment to one. Now just rotate the hour plane to 90 degree and from here, you just can see the
coordinates to 90 degree. And if you want to bring it up, you can bring it up. Otherwise, press Control Z two. Now just switch to the front
camera and just from here, Press, hold down the
scale now press shift, and just scale the lay. Now, make it editable
and just select the vertices and just move them upward and also select these vertices
and break them to. Perfect. Now just switch back
to the perspective. And here you can see, we have just create the
base of plain paper. So right click and
name it the paper. Now what we are going to do
we want to add a loop cut, right click and go
to the loop cut and just add a loop cut
here and just ones. I think just here now switch back to the line cut tool and
just add a line good. It is good to switch to the front camera
and just from here, just select this line and just for this line and press escape
to complete the operation. Now, select this vertice and just move this vertice to the
as we want to make a fold. And if you want to make
a straight line fold, you can hold down the sheat. So I think this is perfect. Now switch back to the perspective mode
and just from here, bring it to the outward. Perfect. Now you can it. Now, switch back to the edges mode and from
here, just the edges, this edge, make
sure your plane is elected and why the model. Just Sorry. Select mode and now. Now just right click and select
the Bavel tool and start babbling and just a little bit and make sure the
subdivier is four. So here you can see
how paper is babble. Now, one thing that I want to
switch to the vertex mode, this vertice don't shift. Slack this vertice, this vertice and make sure this vertice. Now also just right
click and start bevel, these vertices, just like this and change the
subdivision to one. I think three is okay. Perfect. For it now just switch to the object
mode as a whole object, you can see and just from here. Now we want to add
thickness to our paper. And for this, just
select the paper, hold down the old
key and from here, you can see different deformers you can see deformers modifiers, and basically you can also see these from where that we have. From here, you can also
find these volumes. So just simply select
the paper from here, hold on, and just
select the thicker. And you can see how
paper is think. And just from here, you can adjust the
thickness of paper. I think 2 centimeters,
it's okay. You can also adjust
increase the subdivisions. Two subdivisions. Perfect. Now, what I want to do, I want to add a bawl
modifier and just from here, select a bawl and make the bawl child of thickness so you can
see the difference. Select the bevel. You can offset the value. But what I want to
do, press control Z, I want to make the child
paper the child of babel, and just from here, if I just increase the
subdivision and so you can code the idea and make the offset to the three
centimeter and from here, just turn of the
lines so you can see the result by yourself. Perfect. Now, next thing what
we are going to do I want to add
a subden surface, just add and make the thickness the char subduing surface so you can see the I just t of these, you can see the difference. Perfect. So here you can see the base
of our paper is created. And now just select this
hold on on and create a null object and just
make the name this paper. Perfect. So our
paper is created, and we also want to add a band modifier
and you can just add a band modifier and just expand and make the band
modifier the child of our paper, select and fit to the parent. So if you just play
with the band modifier, you can adjust the values. So I just want to can change the angle and just
change the angle to -45. And if I just want to
drag this and just see the values which
is suitable for you, I think, just make it to no plus C that is not working. Let just fit to the parent. Now plus Z and fit to the parent minus angle 45 degree and
from here just to the. Just little bit. Perfect. Now, just turn off the modifier. So our paper is basically
ready and just turn this off. Now you can also
save your project. So that it for this lecture. In next lecture, we
will start creating the pen for this workshop, see you in next lecture.
5. Create Pen In C4d: Welcome back. In this lesson, we are going to create
the pen, and for this, what we are going to
do we just create a cylinder and just bring it
outward and just from here, go to the front camera and just make sure your
garage sating lines are on, and from here, just change the height segment to one and the rotation
segment two, 32. And now switch to scale, and if you hold on shift, you can scale decrease
the scale of the slender. Perfect. Now, just
what we are going to do move this cylinder to here so we can also see
the camera just here. And now just make it
editable and just from here, switch to the vertex
mode and just from here, go to tangle selection
and just bring the here. Now switch to the faces mode, switch to camera top
and just from here, Rush selection and
just from here. Now, right click and select
the pal and pl to the inside. And make sure the subdiviN
of pal is four centimeter. Switch to the perspective mode, you can see the now, again, switch to the front camera
and just from here, switch to the faces
mode and just switch to the bottom
and just make sure you have select the price
selection and select these vertices and just now switch to switch
to the front mode. Make sure our faces
are selected, and now press right
click now extrude and extrude the track. Perfect. Now switch to
the vertex mode and make sure select these vertices,
select these vertices. Now just press PR scale, hold on shift, and
just decrease this. Switch to the bottom. Switch to the bottom
so you can see. Perfect. Now, from here, switch to the ***
mode and from here, switch to the perspective
mode and just from here. Just go to edit from here, just copy and then paste and now just right
click and disconnect. Now, select tool, I select the move tool and just bring to. So you can see the difference. Now just what we
are going to do, just go to the object mode
or model object mode, sorry, and make sure our slender
is selected and from here, add a subdue modifier, and you can see our pen from here is not smooth. So what we are going to do, just make sure
select this lender, go to the model
mode and just here. Just right click
and add a low cut. Just here. Now, just move
our double click just switch to edge mode
and double click Slack and just bring
it to the Okay. Similarly, just if we see our this section, if I just let and switch to
face mode and from here, just like the price
section like this. Now, if I press right click and extrude it to the downward
size, you can see Now again, just right
click and add our loop. Double click. Now, switch to the faces
and select all faces, click select all faces, right click and edit copy and just from here
to here, paste. And just right click
and just disconnect. And now, before we are going to do, just double click like this
and bring them to here. Now also double click to
slack these and just here. And if I just go to the front
camera and to make the tip. Now if I press scale
and now hold on. Bring a little bit. Go to the object mode and
you can see the difference. Now just switch back to
the perspective mode. So here you can see our
pen is basically, yes. Perfect. So that's
it for this lecture. In next lecture, we will try to we will add the up and
close lead for our pen. So see you in next lecture.
6. Create Pen Clip In C4d: Welcome back. In this lecture, we are going to create a close
and open lead for our pen. And if you think that
the pen is not smooth, you can also add a
loop car tool just go to the model and
just select the. And you can also select this double click and
you can just bring it to the down as you like. You can also just double click
and bring it to Perfect. Now just switch back to the object mode and
just from here. What we are going to do just add a cylinder and just bring
this cylinder here. Go to the front camera and now just scale the
scale our cylinder. Hold on shift and
scale our cylinder. Just bring it here. And similarly, as
we done before, just change the
vertices to one and 32. Perfect. So here you
can see just switch to the perspective mode
and just from here, you can just bring it through. Just Perfect. Now, what we are going to do, make it editable and
switch to the faces mode and select brush and
select these faces. Carefully select these faces, hold on shift from here, make sure only the upper
faces are selected, being selected now just delete to delete these
faces now similarly, just select these faces Hold on. Just select these faces. And just hold on shift. Just and press delete too. Now what we are going to do if you want to adjust the size, it's okay otherwise we
just switch back to model, select the slander
and just from here, hold on and add the thicken. And from here, thickness to decrease the thickness
as you want. If you want to increase
the subdivision surface, you can adjust the
slander if you want to and just select and scale and just I
think it's okay. Perfect. And if you just
increase the thickness, you can also now increase the Perfect. Now what we are going
to do we want to if you see the
pen, just clicker. And for this just what
we are going to add up plane and just change the one and just rotate
the plane to 90 degree, I think, 90 degree
and just select the plane and coordinate to
90 degree and just from here, go to the front camera. And just move the
plane to here, here. Now switch to scale, hold on shift, and
scale the plane. Switch to the perspective
mode and just from here, bring the plane to part. And just from here to the you
can also adjust the plane. Just switch back to
the front camera. And if I just I
think it is okay. Now just go to the
perspective mode. Make sure the angle is okay. And if I just bring
this to the upward. Now what we are going to do, we are going to just
make it editable, go to pace, and just from here, select this phase and
make sure right click when we extrude and
when we try to extrude, just create the
cap option is on. Now, just bring it to the here. Perfect. Now, one thing that
we want to now from here, just create an insection that is insect tool and
just into inward. Perfect. Now, from here, just scale to the Y axis and just from here, move the scale to the Y axis. Perfect. Now switch back to
the edges and from here, just like this edge, these edges, hold on, right, shift and shift and shift. Make sure these four edges
are selected and just right click and Bavel
cheers Bavel these. Perfect. And if you want
to increase the segment, I think fives are okay. Now switch back to these
faces and just from here, just right click and
extrude it to the. How. Perfect. Switch back to the model mode
and from here, you can see. If I just bring it here, you can see and just
make sure one thing, just select this one and if we want to
add Bel modify just add Bavel and make this cylinder and make the
child and also make this. So you can see the
difference now from here, just select the pebble. Just. Also just add a
subduing hold on, so we can see the difference. Similarly, just turn
on and from here, just like this plane. And from here, if we want
to add just a babel, just go to the bevel and make
the plain child of babel, and you can adjust
the values from here so you can see the difference. Now just select this, hold down and add a subdivin surface, and you can adjust the Pavel. We just want to increase
I think two is okay. Just make sure somewhere
we have made a mistake. Before here, add thicken and just make this
thickness the child of our and make this
plt child of this. And just from here, go to the thickness and
decrease the thickness to I think two centimeter and
subdi now from here, just go to the bawl, and if I just decrease
the subset to the two and subdivision two. Five. Perfect. So here you can see, just from here, thickness, if you want to decrease
the thickness more, I think two is perfect and just subduing make the
subduing also two. Perfect. Just you can see. Now just bring it to the if you want to increase the extrude, just select the plane,
go to the object, and from here, you
can select the face. You can extrude from here. So just go to the object mode. And I think just Perfect. So if you want to
decrease the size, now just press scale and
now just bring it totally. Perfect. So here you can see
what we are going to do. We are going to make
a single group. So for paper and just
create a null object and select these and make to
th and just name it the pen. So that's for this lecture. In next lecture, we will try to apply material on
our paper and pen. Then we set some lightning
and take or render. Su in next lecture.
7. Create Material Of Pen And Pencil: Come back. In this lecture, we are going to
create material for our pen and our paper. So for this, what
we are going to do, go to here, create
a new material, and just from here, create
a default material, and you can see our
default materials created. Now just the color a double
click, just double click. You can name the color. Now, if I want to add color
to our nib, for this, what we have to do,
first thing first, what we have to do we have
to apply the color on this and also on yes. Perfect. Now we want to add apply color on our
nib, and for this, what we have to do
we have to do select our pencil and just from here, go to the model mode and
from here, go to the. I just go to the cylinder and make sure select this and
just apply the color. Now also double click and select this and apply the color. Now, what we are going to do, we want to apply color on this. And for this, we have to
create a new material, and just from here, I have copied some color, something like this, just go
to the hash and from here, just paste the four. And just select
this so you can see this now pies present apply, so you can see our
color is applied. So just for upper edge, we want to apply
some lower color. Now, create a new
material and just from here past the value and just here, select these Make sure these
faces are selected. Now just apply. Now switch back to
the a object mode. You can see how color is applied this color is
applied on the pencil. You can change the color at upper you can see some of
the faces are missing. Again, go to the
model from here, these faces, you can see just
like this face and apply. Similarly for this. Perfect. Now again, go to the object. Now for pen paper, you can add color just like, create a new color and just
from here, add a value. And just like Perfect. So I think we have applied
the color in next lecture, we will add light, and then we will take a render. And in bonus lecture, I will try to create the
UV map for this page. See you in next lecture.
8. Lightning And Render In Cinema 4D: Welcome back. In this lesson, we are going to add light and also
take the render. But before we are
going to do that, we are making some changes. Just select the paper and
just move a little bit up and also now select the pen and just just from here's the pen, and here you can see the region of the origin of
our pen is not at the center. So what we should do,
just hold on L and just move the anchors to the pen and adjust
them as you want. Now just bring them
to the upward. Just before we are
going to just make some adjustment just like this. Now just turn on the camera. And if you see, we have to move the camera so we can adjust the camera like. If you want to adjust the pen, you can just bring it up. Perfect. You can also
adjust the paper. So we just make some. Perfect. Now just turn off
the camera, hide the camera. Now add a plane,
here, add a plane, and just change the segment
to one and one and now make it editable and go to
the dg mode, select the edge, and from here,
just right, click, right click and
extrude the plane to upward so we can
fill up the area. H. And next, just select
this edge and right click and just make sure right
click and bevel the edges. And you can change the edges of Bel subdivision of
Bowel to as you want. So I think four is okay. Perfect. Now just switch to the object mode and
just from here, we want to add
material, new material, and just double click on this and change the color, I think. We just want to change
color. Control Z. We have to create
a new material. Sorry, create a new material. Now, double click on
this and just here, coloring something from here, just like this light colors. Perfect, and now apply on this. Now if we click on render, you can see this is
the basic render. So what we are going to do, we are going to add light
and make some changes, but the open the render settings and just from here change to physical and just go to physical option and
from here advance, go to the physical and mode is the progressive mode from basic, make the adaptive
and sample quality to the high you can
change the subdivions. Now add the fact and from here, just add ambient occlusion and also add the
global illumination. And from here, yes, it is okay, radicent cache. And if we want to
change, make any change. Color refinement, 80%, I think. And from journal sample
to secondary method, I think light
mapping, it's okay. Now from here. Now, if I click on render,
it will take time. And as we did not
apply any light, so our pen and paper
will not be displayed. What we are going to do, we are going to just create
a light, and from here, we are going to create an
area light and from here, just go to the front camera
and just bring this light to the world and also switch to the top camera
and just from here. Okay. Now again, go to
the front camera and just from here, again, create a light and aiat and just bring this
light to the here, here, and just from here, switch to the top camera and
just bring the light here. Now again, what we
are going to do, we now switch to the right
camera and just from here, again, create a light and aerial it and just bring this light to the back
and just bring it up. Now switch to the top
view and just bring it to the Now, go to the perspective
mode and from here you can see the light. Just select this
light as we did. Now if I click on the render. So you can see that our
image is getting render. You can also play with setting and select the
color as you want. So I hope you have learned
from this workshop, and you can create an project and submit it for the review. And that it for this workshop in C in future workshop
and past of Luck. Just complete fit
for the completed.
 Muhammad Umer Najeeb