Transcripts
1. Introduction: Hey, everyone. I'm Sir Wade. All you'll need for this
study hall session is an animation that you
would like to work on. If you would like
any help as far as how to set up your shot, how to prepare your shot, that
was what my class was for, which is what this animation is from where I have a handout that will allow you to put all the things that you
want to actually block out. As I'm working on it,
that's what I'm looking at. I'm looking at my handout,
and that's all you'll need.
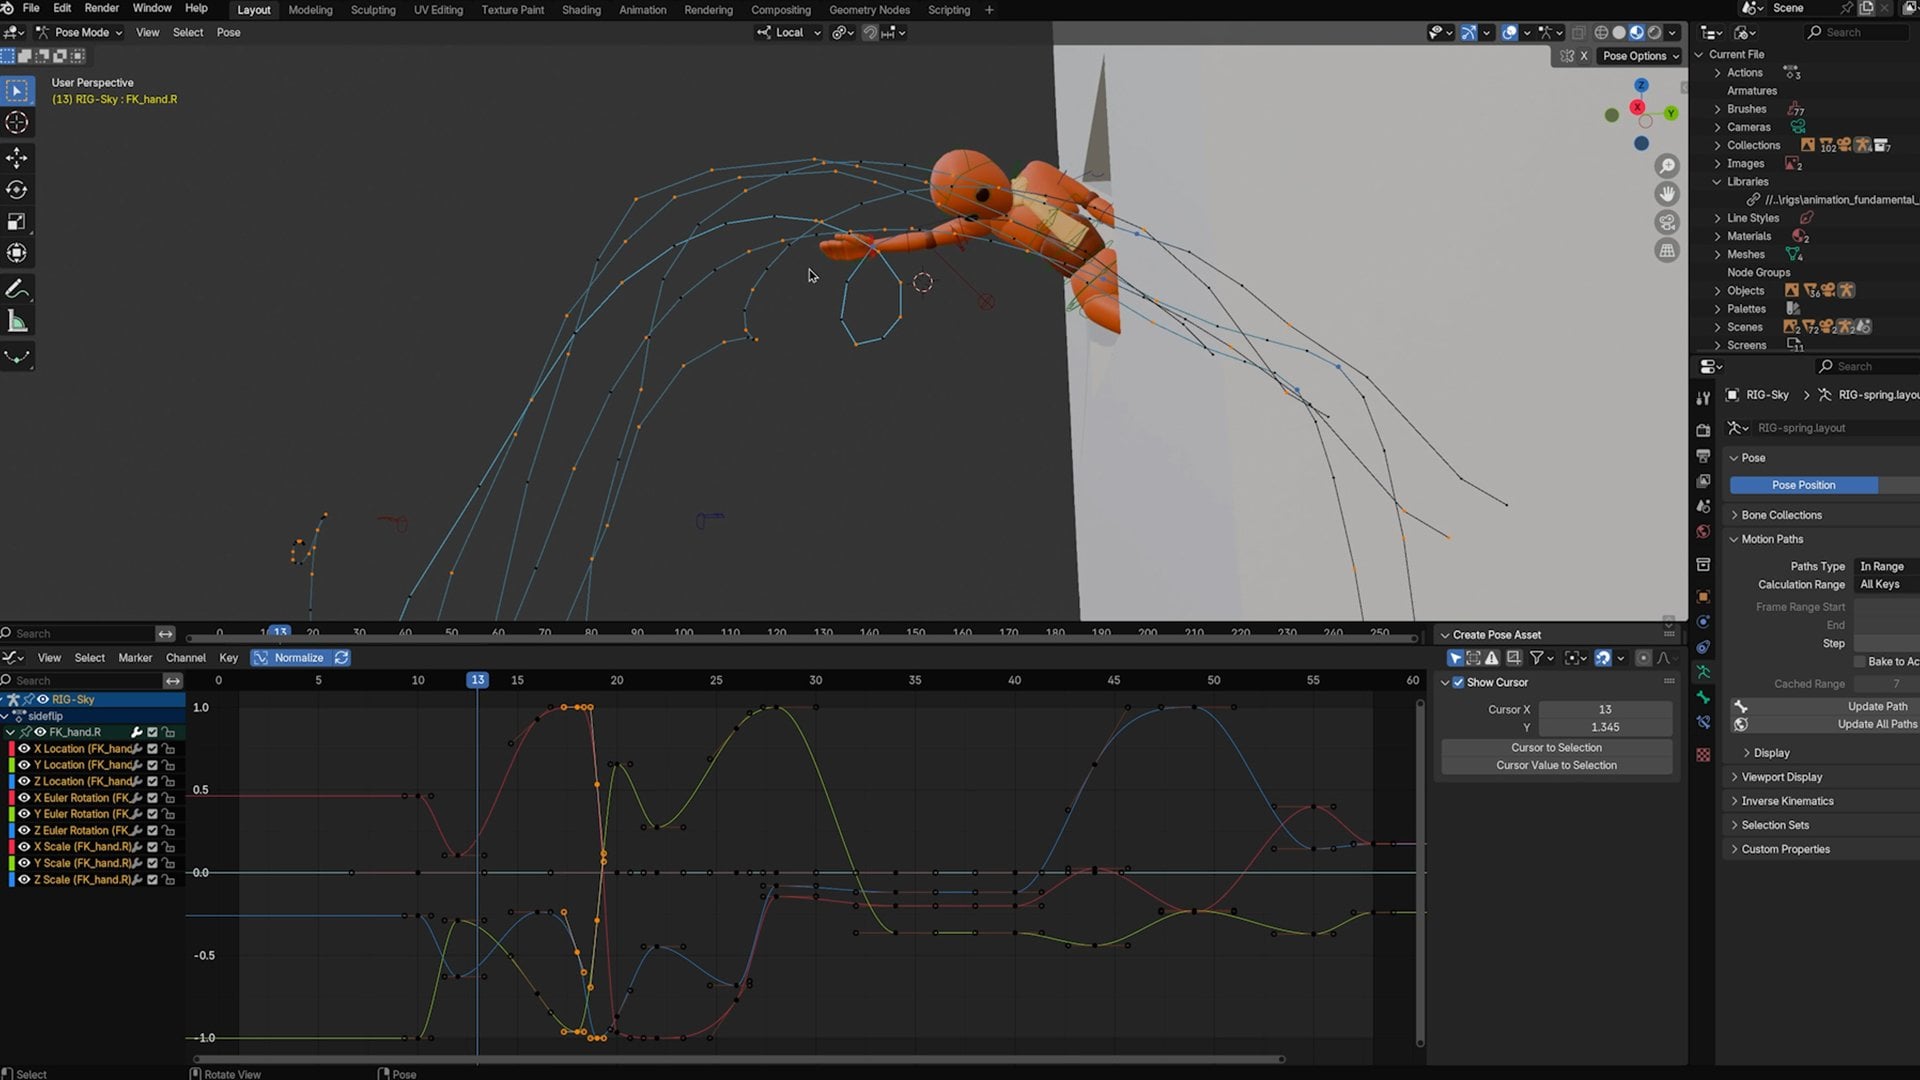
2. Part One: Pose-to-Pose Workflow Recap: Here we are in blender. I've got my perspective
view where I'm going to do all my posing
up in the top left corner. I've got my camera
view just so I can see exactly what the camera sees and on the left, my reference. I also off-screen have my
handout that we mentioned, and that's pretty much
what I'm referring back to make sure I don't
miss any important details. But here I am just making adjustments and
tweaking the pose. I just want to make sure that as I'm posing this character, I'm capturing the essence of
what is in the reference. Now this post in particular, I called out because I
found it really important. I really like the way that the body's really tucked tight. There's not a lot
of negative space, and we have this
very specific shape. I'm going to start off with
the general body shape. I'm going to use the
shoulders as I am here to tuck the arms as well. Don't forget to
use the shoulders. This is one thing that people
always tend to overlook. They jump right to the arms, and then depending on your
settings for your rig, as soon as you mess with the
shoulders, the arms change. But I'm just going to
get the arms tucked and I don't really care
where the hands go. I need them to be
behind the thighs here, but I'm not going to
be really precious about making sure
that they're actually contacting the leg
and holding on to the shin or whatever is
happening in real life, because the camera
can't see the hands. I'm just going to try
some different things, try to figure out what angle
of the arm looks the best and works most
conveniently for me. In this case, I'm not being
very scientific with it. Sometimes I'll just wiggle
the arms in screen space. Sometimes I'll spin
it fully in 3D space. I'm just using that hot-key
where I click a Control, I hit "R", and it'll rotate
in the screen space. That's why I'm rotating
around a lot is I'm just picking an axis based on
the camera's perspective, just to say a little
bit organized. But occasionally I will
just double-tap R, which unlocks all three
axes of rotation. This rig, in particular,
doesn't have that as an option
with the forearm. It's locked to only
the one-axis rotation. That's a little bit
less work I have to do. But I'm pretty much just
going to take my time and just put the character in the closest pose that
I feel is necessary. Not every pose is going to get this much time and attention, especially at this
stage, I can always make these poses a little bit
more attractive later. But because this was something I really liked the shape
of the reference pose, it's one that I wanted to spend a little bit more
time on just to establish a nice overall
flow of the body, especially because this pose is pretty much going to be where the character stays through the entirety of this side flip. Since the character is doing
a flip and he's not going to really move aside
from just rotation, I figured that I should start
us off at a good place, and we can keep this pose
for the majority of the rest of the shot until he opens
up and lands on the floor. The other thing I want
to make sure I do is I want to mess with
the hip control. You can see that I'm
really bending the hips to curve from the legs all the
way up through the head. I'm trying to keep that
line of action unbroken. I don't want it to kink
up and have a hard edge. You can see how it's nice and rounded along the
spine at the back, all the way from his tailbone, through the back of his head. That just keeps it
nice and graphic, keeps it from having
any weird angles, and I'm also going to
just play with the feet to have them follow
that same flow. If I point them too vertically
or too horizontally, they might just feel
disconnected from the body. I want them to feel in line with the overall
shape of that spine. Now, since I'm looking
at a direction, I'm moving my camera around. I'm looking at the
side, the front, I don't have to
make it absolutely perfect because it's really all about what the
camera can see. But it does help if you have the character in all
angles making sense. If it looks good
from the camera, but he looks just
super broken and anatomically messed
up from other angles, it can lead to other
issues down the road. If he's physically broken, it's going to be
hard to move him realistically and get him
in and out of these poses. The other thing I want
to do at this point with this pose is at some point, I need to look at the knees. The knees are one of
the things that I wrote down on my list here
on my worksheet. To actually angle both of the knees in the direction
that he's rotating. I want this, what I'm going
to call the top half of him, which is really his lower body, but what's above his
head at the moment, I want it pointing
to screen left to indicate the directionality
of his rotation. I don't have to do that, but I like that about the reference, and I like that feeling of
momentum through the pose. Even this single pose feels like it has a
directionality to it, feels like it has some velocity, and that's something
that I want to maintain. Because this character
is very spindly, he has very thin arms and
segmented body parts, unlike the person in
the reference who has big shoulders and large
biceps and he has, a thighs and a normal
human just existence. He's not just a character
made of sticks. I can't match the exact
look of the character, but I'm just looking for
the idea of the character. I want the spirit of the pose, the energy of the pose. I want it to feel
right. It doesn't have to look identical. Again, this pose, in particular, I'm just spending this much
time because I like it. I feel like it's
just going to save me some time later to deal
with it now while I'm focused. Here, I'm just going to keep working on
things like this. I'm going to keep
working on this pose, and when I'm happy with it,
I'll move on to the next one. I'll go down my list. I'll go to the next pose that I
have made notes about. I'll copy the gist of
what's in the reference. I'll make sure that
everything on my worksheet is covered in what I
pose and what I key. While I'm doing this process, my other little tidbit is, don't forget that every
time I go to a new pose, I'm going to select every
control that I can see, and I'm going to set a
full key on everything. That way, every single control is keyed on these
different pose frames, and there's no chance
that if I skip messing with the foot for a frame or two on various poses, that it interpolates between if I mess with Frame
10 and Frame 30, and I have keyframes
on the feet. But say I put other
keyframes in between, I don't want it to
be interpolated in the feet just because
I didn't key them, and I forgot to lock them
off and add hold frames. I'm going to make sure that every time I go to a new frame, I key everything, and
then I start my posing. It's also not hard
if you realize, oh, no, I haven't set
a key, set a key. If it seems wrong to you, change it. It's not the
end of the world. This is a very fun, just,
like, loose process. Put on some music, put on an audiobook, and let's just work
together for a while.
3. Part Two: Practice Pose-to-Pose: He as Where is Renel Where is an ladies. Where is To ladies. Where is an ladies. Do He. Nine So So So So Mom Mom Mm. Mm. Mmm. Mm. Well, well, well. Mm.
4. Part Three: Sir's Pose-to-Pose Final Tips: I've got some other tips for you now that we've
been going for a while. I've put in a lot of my poses. I've still got a few
more to go, but this is a really important one
that I wanted to call out. I've completed the
majority of the flip. We now have the character
landing on the ground. And at this point, I just finished kind
of my down position, and I'm going to start putting in when the character leaps
back up into the air. This is really
important. I'm going to grab all my controls. I'm going to do the thing
I told you before where I'm going to set a full
key on everything, and I'm going to jump
over to frame 32 to do this up pose. The most important thing that I want to make sure that
I block in right off the bat is I'm trying not to hyper-extend the legs too much as I move it around, but I can always
adjust the feet. It's more the position
of the hips and of the center of gravity of the
character over the legs. As I've been blocking in this landing and this
kind of downward arc of the character and now this
upward arc as he takes that down position and moves
back up into a little hop, I want to make sure that I'm keeping the
character's weight centered somewhere
between the two feet. When he first
landed, he landed on his screen right leg or
the character's left leg, and his hips were
right over that. Now, as you can see,
I'm posing this to be over his right leg
or the screen left leg because he came down on one ft. His momentum carried
him across to the other leg, and it's that far leg that is really going to be
doing the work here of popping him into the air. So I need to make sure that he doesn't
overshoot that too much. You can go a little bit over, but if he really wildly went sideways, he
would just fall. He would outpace the feet
that support his weight, and he would just
fall on his side. You don't want that.
More often than not, what happens is usually
people don't overshoot. A lot of times
people just forget to shift the weight entirely. They don't use the side to side axis when blocking out
this kind of stuff. They see the character
moving up and down. They focus on that. Then you lack all the
weight shifting mechanics that really make the
shot feel really solid. So I'm going to step
through every so often, and I'm just using the
up and down arrow keys to pop from keyframe
to keyframe. I'm just comparing. I'm looking at the reference. I'm
looking at the feet. I'm looking at the knees.
I'm looking at the hips. I might be looking at the
arms at given moment. I'm really just trying
to compare from pose to pose, what is different? What is changing. It's a big difference
for the foot. It's a small difference
for the hips. Just looking at that
ratio from control to control and from body
part to body part to see the organic breakdown of how these different
actions are working together to make this work. If I moved everything a consistent amount
every single time, the whole body would
feel very stiff. So I'm trying to
add that breakdown of whatever's moving quickly, let it move quickly,
whatever's moving slowly, allow that to happen. I'm trying to pay attention to all these different
body parts at once. That's, again,
where that workflow of analyzing the poses and the reference and
more importantly, noting that kind of stuff
down with our worksheet, and that's going to keep me
really focused on what I do need to move and what I don't need to worry
about at this point. But for this bit, the main thing I'm worried
about is just keeping the weight and the balance
of the character in mind. If I do that, then everything else can be
made to look better. I can fix the heel.
I can fix the knees. I can fix the
shoulders, and so on. But I don't want to have to come back and deal with
the hips and the cog, because it's the first step to being able to pose
everything else. As long as that's
in a good place, then everything else is
going to be a lot easier to continue to adjust and refine as we go
through this process. So hopefully those are
some helpful tips. Hopefully your blocking
is going well. From here, it's just
more of the same, but I hope you've enjoyed
the study all session.
5. Session Completed: Thanks for joining me for
this study hall session. I hope it was helpful. Please drop your favorite pose that you created in the
Project Gallery down below. I'd love to see it. If you struggle
with anything with posing, with anything
in this process, drop it in the discussion
board so that we can all help each other.
See you next time.
 Sir Wade Neistadt, Animator, VFX Artist, Creator