Transcripts
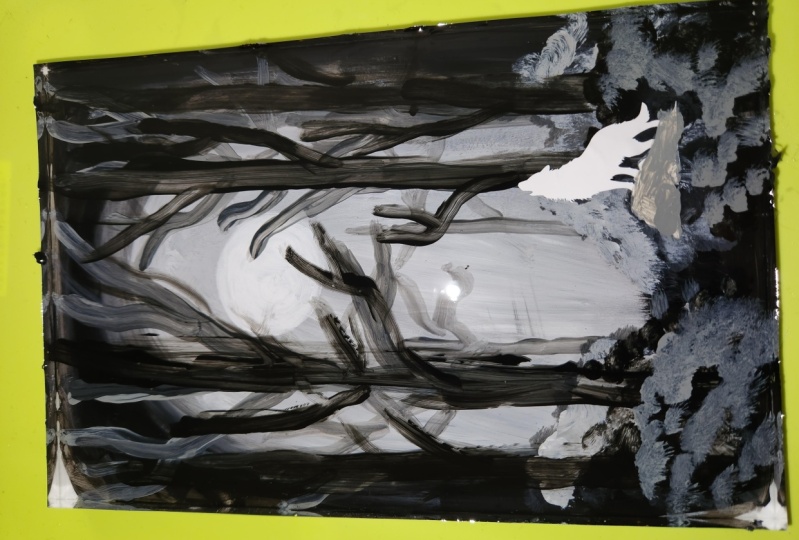
1. Moonlit Forest Acrylic & Resin Class Intro: If you're new to acrylic
painting as well as resin. I'm Cheryl and I've got the
perfect project for you. Come on, let me show you. In this class we're
gonna be creating this moonlit forest scene. We're going to be painting all the images with
acrylic paints. We're only using three colors. We're using a Payne's gray
or white to lighten it up for some of the
layers and add black to darken it up
for other pieces. We are going to do four
different layers of painting, including the base coat and add a thin layer of resin in-between
each one of the coats. This is a very beginner friendly project
that's gonna take the intimidation out of using both acrylic
paints as well as resin. The nice thing about
having a resin layer in-between is it
immediately adds dimension, as well as the
different colors we're choosing four different ways. Class comes with a supply
list that breaks down all the supplies
that you will be needing to complete our project. It's also linked
to where you can find your supplies
that's gonna save you some time sourcing your product so that you have more
time to do your crafting. Come along with me, let's go
start creating this project.
2. Painting the Base Layer: All right, so I've got
my wood panel here. I've already painted
the back and the sides. And we're going to be doing
our image on the inside. And then we're going to
be pouring resin layers in-between each painting layer. I've got three different colors of paint here that
I'm using right now. Zinc white, Carbon
Black, and Payne's gray. I'm going to put a bunch
of the Payne's gray on there because that one is the one that we're gonna be using. Most right now, wet my brush. I'm going to paint basically around the edges as
almost like I'm gonna be making a little
bit of an arch. Right now. I'm concentrating
on the back and then I'll do it up
the sides here. This is the layer that's
gonna be far behind. Well, it's gonna be the
very background layer, so we're not gonna
be seeing a lot of detail from this layer
other than say, the center. So I don't need to
be super precise with my painting there. Now I'm going to
start adding some white as we get to the center. I'm going to mix it in
with the Payne's gray. Mix it into the paint that
we already have there. Right now, I'm
more concentrating on getting the paint down. Will be working quickly because I don't want I
want it to go this way. I don't want the paint to dry completely while I'm doing this. I do want nice transitions
from my dark to my light. Get lighter and lighter
as we go to the center. But not to completely white, just a really light
Payne's gray. You'll see I have
a light side of my brush and a dark
side of my brush. Every once in a
while you'll see me flip it and it's
because I've gotten the brush the wrong way. Little bit more water just to help it flow a
little bit better here. I think I'm gonna be going a
little bit lighter outside. Well, let's get that
centered down first. I'm going to end up having
my moon rate in that area. So I want to have lighter area there. Once again, it doesn't need
to be perfect because this is the back the painting. But I just want to
make sure that I got an area that's highlighted. Gonna be the glow
from the moon or the sun within the fog. Acrylic paint dries
fairly quickly, but you do have some time
to be working with it here. So now I'm going to work on getting the outside
a little bit lighter, closer towards the edge. Because the layers
that are gonna go over top of this are going to be the next layer anyway, is going to be a
little bit lighter. Actually, a little bit
darker, sorry. My background. So I don't want my
background to be too dark. You can see I'm ignoring
the bottom part. And that's because
we're gonna be working in different layers. So this bottom part, he's gonna be covered by the first couple
of layers anyways, I'm more concerned with how
this background is looking. Your paint gets a little
bit hard and a little bit sticky to spread. It just means that
it's starting to dry. A little bit of water will help it move a little bit better. Nearly there. Now I want to paint up the
side with my Payne's gray. If you don't have
enough already, you're going to want to give
yourself a little bit more. Definitely need a
little bit more. You definitely have
to make sure that this is painted
because if it's not, it's gonna be trapped within
the layers are resident in. You're probably going to see
we want to make sure that we're hiding it nicely. It's not really their
weight right word. We want to make sure we're
having a neat side to it so that when we see it in
their resident looks nice. Then this bottom part here, I can just get painted
the Payne's gray ware. I got some of the gray on top of the black
and the front here. That's okay. It's going to get covered. If I get it to the point where there's too many
spots to the front. I'm going to repaint
it at the end. Again just so it has
a nice appearance. Makes sure that we
don't have any of the wood showing on
the inside here. Once you get it trapped in
resin, you can't fix that. If there's one showing
and you can try hide it. Easier to just
cover it right now. Last but certainly not
least, this bottom right, this part
here is going to end up being covered
by a tree anyways, so I'm not too
worried about that. I do want to get a little bit lighter right in
that center section. But I don't want to be using
my huge brush for that. I wanted to using
a smaller brush. For this. You might
even want to wait until your background is
completely dry so that you're not picking
up the Payne's gray. And I'm going to do that. I'm going to wait
for it to completely dry and then I won't
be painting that in, but I'll see you
in the next video. Next video, we're
gonna put a thinly or a resin before we start
working on our forest.
3. First Resin Layer: All right, so I'm ready to
pour my first layer of resin. I'm using moss epoxies
art pro resin and it comes into part
Part a and Part B, and you use equal
amounts of each. If you Google most
epoxies calculator, you can find a
calculator to her, figure out exactly how much you're going to
need for your space. You're just gonna
need to measure it and then say how
thick you want it. I've already done
that and it needed four ounces of resonance or
two inches of each part. I've got it mixed. I've mixed it for
my three minutes. If you're choosing to
use a different resin from what I am using, follow the mixing instructions
for that particular brand, and then follow all the safety protocols
that they require. And I've got that
done right now. So let's pour the first layer. Was got lots of bubbles in it. I've got a heat gun to my side here that I will be using to remove all of the bubbles. And I typically will for the first half an
hour to an hour just depends on the
progress or whatever. I will regularly come back and remove any bubbles that have risen to the surface. We use my mixing spatula here to help move
my resin around. I want to make sure it goes
all the way to the edge. And I'm doing it only doing
an eighth of an inch coat. I don't need a thick coat. You'll also want to make
sure that your pieces level because you want
that resin to dry evenly. And if you've got it slanted
in any way, shape, or form, It's going to flow to the lowest point and
you'll have an uneven coat. I've got up to all the
edges, removed the bubbles. So I'm going to use the
heat gun on a low setting. I don't have any tips on it, so it's got a wide nozzle to it. And just remove any of the ones that have
risen to the surface. Got them all for now, but
there's still going to be bubbles in there that
will continue to rise. Like I said, for about
the first half an hour, I will come back every 510 minutes or so to
remove any of the bubbles. At that point, if I'm still seeing bubbles
will keep coming back. If I don't really have
any bubbles to pop, then I will leave it as is. I also have just an old from a container that I'm
going to put over it to protect it from any dust. Now for this particular project, we're gonna keep
layering residence. So some of them, some of the layers if some
dust happens to fall in there, It's not a big deal
because we're gonna put another layer on, but it's a good
practice to be covering your work to protect
it from dust, especially when we come to the final layer
at this one here. So this needs to sit. I usually let it
sit for a whole day for this particular project, probably about 12 hours. We could do the second the second layer for the
painting and stuff like that. But it all depends on how
warm or how cold it is sometimes as to how
much it has cured. So I'm just going to
wait until tomorrow and do it when it's
completely cured, will see you in the next video.
4. Painting the Second Layer: Alright, so our layer of
resin is completely dry. Now I'm going to mix, create a mixture of the
Payne's gray plus the white. I want it to be just
a little bit darker than the background
rate or boat here. Going to use a palette knife
to mix it simply because otherwise all that
paint is going to be sitting in a brush. I get washed out in
the water so there's no point in wasting it. I've got a small round
brush here a little bit, so the paint flows a
little bit better. Piece of paper towel. The trees that I'm
painting in the distance. So that's why I'm using
my smaller brush here. I'm using a rounded one so that I can also use it for doing branches
and stuff like that. When I do a branch, I want
to start with the trunk and then slowly move it out while lifting my brush so
that it gets thinner there. They don't have to
be too detailed because like I said
there in the distance, so you don't have to get
a lot of detail on them. Just nice to get some branches
on them rather than just having sticks basically sitting in your forest or in your scene. Like I said, with the branches, same goes with the
trunk of the tree. As you go towards the
top of your piece, just lift your brush
up to thin out. Make the trunk a
little bit thinner. Because we're gonna be doing
several different layers. You're not necessarily
going to see all the detail that you're
going to be putting here. Some of it is going to be
covered by future trees, but you don't know exactly what is going to be covered
on what's not. So you definitely still want to have some
detail in there. Let's get another
branch coming up here. The nice thing with having
the resin surfaces, if you do something that
you really don't like, you could take a Q-tip
and lift it off. Just a little bit. Forgiving that way. This one's going to be
a little bit smaller, just you don't want all of your trees to be
exactly the same size. You also don't want all
of your branches to be coming off at the same level on your piece. You want to vary. It. Also makes sure that
each tree looks a little bit different
from the other ones. Have some branches
crossing over others. Do another one and
also don't make, make sure they're not
spaced out exactly the same throughout your
whole canvas because that looks a little
bit wrong as well. You can do some that
are slanted over a few lake that had
been blown by the wind. Alright, I'm gonna do
one more on each side. Like I said, some of these
might actually be covered by layers in front, but that's okay.
You'll still see. Bits of it, you'll see some of the branches coming
out from behind. So you definitely want to make sure that you'd like the look of
it before you start. Because if you stop and there's something
that you don't necessarily like about it. You may be able to
cover it up with a future layer or you may not. The neat thing with their
resin in-between each of the layers is it's going to
add some dimension to it. The lightness of your
paint is also going to add the dimension or the lightness and the darkness
between the layers. But because we have the
resin in-between there, That's also going to add
some dimension to it, which is going to
enhance the look of it. Your trunks don't
necessarily have to be completely straight
like you think can be. A little bit wavy,
little bit wonky. Sometimes as I'm
pulling my brush up, I like to twist it a little bit. Here. They don't all have to be
long branches coming out. Some can be small, short ones, and also
different angles coming out. I think I like the look of that. I have a fan brush here and
I'm going to take that. I'm just going to
add some bushes. Shrubbery. You can do
it with a fan brush. I also have a filbert brush. Oh, here it is. That I also like to use for this one tends to be
a little bit stiffer. You can be a little bit
more aggressive with it. See that little bump
that we had from the first layer is
all gone now because we've covered it up. It doesn't need to go
all the way to the floor because we're gonna be putting
other layers on top of it. But I do want to make sure to get some shrubbery in
the background there. That path there was a
little bit too dark. Just lightened it up. Alright, I'm going to
leave it like that.
5. Adding the Second Resin Layer: I decided to film the
resin part anyways, I've got my resin all mixed. Like I said, same
amount as yesterday. I'm doing same amount. His last layer I'm
doing all my layers, the same thickness. Pour it on, get as much out of that
container is possible. My container looks
fuller because I'm using a different
container than yesterday. This particular one
is also silicone, but it's a little
bit softer than the one that I used yesterday. And I just I find this one a little
bit easier to clean up. When I figured out
my resident mounts, I did it an eighth
of an inch thick. You could do it a 16th and
habit of bitter layer if you find that they're a little bit
too thick for your liking. I did it because I
definitely wanted to be able to see, oops. The dimension. Definitely wanted to be able to see that
there was different layers. The other thing is
make sure all of your acrylic paint is dry before you put the resin on? Not because the resin would affect it too
much because acrylic paint dries fairly
quickly and by the time you've mixture
resonant probably yesterday. But you don't want to
when I'm moving it around with my this is a popsicle
stick that I use to stir it. I don't want to accidentally
affect my acrylic paint. And if I happen to have a thick layer somewhere
and I touch it, I'll move it around and
I don't want to do that. I'm just making sure to make sure that my resin
goes to all of the edges. Once I've got it down or make, once I've made sure that
it reaches every edge, I'm gonna take my
heat gun and I'm gonna remove the bubbles. And like I said last time, I'm going to continue to do that for probably
about a half an hour. I found yesterday after
about a half an hour, there wasn't really any
bubbles coming to the surface, so I do still watch it for
a little while after that. But now you've gotten
on a low setting. One of my favorite parts
I just loved watching. I just copying the bubbles. Almost mesmerizing. Make sure you get those corners because they tend to
have a little bit. They tend to kind of
hide him, of course, of the legs are up the edge
of the screen and the shadow, sometimes they're a little
bit harder to see there, so make sure you
don't miss them. All right, those
bubbles are pot. I'm going to continue to
watch it and once again, I'm going to put something
over top of it to help reduce the dust that might get in
there. We'll see you tomorrow.
6. Painting the Third Layer: All right, we're ready
for our next layer. I'm just going to lighten the Payne's gray out
just a little bit. Not as light as I did
it for the last layer. I want it to be a little
bit darker than that. There we go. Then the trees are going to be just a
little bit bigger as well. I think I'm going to do
I'm going to do some with my smaller round brush
and some with my bigger brush just so that I ensure that I
have different size trees. I think I want my gray
a little bit darker. I want to be able
to see a difference between the first layer, or sorry, the second layer
and the third layer. There's not much difference
quite. There we go. Do one thicker, one. Friend. I'm just going
to twist my brush a little bit to make it smaller. Just want to do right here. You can slightly go in front of one of the ones from the past layer if you want. I went cover them completely. Otherwise, there's no
point in them being there. But you can
absolutely have them. Overlapping. Leaves the words
when I'm concentrating, I'm going to use my
smaller round brush for doing the branches and I twist it while
I'm moving it around. I get different
streaks with my paint. Well, as lifting it up to
make it a little bit smaller. As the branches go. Have some going to the
side off of the frame. I'm gonna do a smaller
tree rate in here. Just like the last layer, makes sure that your
branches are not all coming up at exactly the same
height in the same angle. Make sure to have little
sub branches off of those. Another tree right here. Matter if they're a
little bit crooked. Trees are not all
perfectly straight. You can start seeing how
having the lighter layer below it makes it look like it's a little bit
off in the distance. I'm going to put a little owl sitting on this branch here, but I want to make sure that my brush is a little bit pointed, so I have a bit more control. I might even use a smaller brush than this because I want to make sure that I don't get
them a little bit too big. All right, so I've got to
just a small brush here. I'm first doing
upside down teardrop, but with feathery
edges for his tail. Then I'm going to do It's kind of a combination
between a circle, an oval. I don't necessarily
need it to be a circle, but I want it to be
little bit flattened. I'm going to really
point my brush. Get his little ears in there. And if he's not as
opaque as you'd like, then we'll just wait for
the paint to dry and add another layer to it. I think I'm going to
put one more tree right here and then I'm going to add the greenery
to the bottom. There we go. And I'm gonna get the brush and just add and I'm
doing it a little bit lower than the
brush from yesterday. I want to be able to see
that stuff behind there. I've got something
that's a little bit higher, that's totally fine. And completely on purpose. But I just don't want
to cover up everything from what I did on
yesterday's layer. Make sure to go all
the way to the edge. There we go. Next step, putting the resin on. I will see you in the
next video for that.
7. Adding the Third Resin Layer: Alright, I've got my resin
mixed and I'm ready to pour. My paint is pretty much dry. There's a bit of texture here that from the brush that
isn't completely dry, but I'm just going to pour
anyways and I'm going to avoid that area when I'm
spreading things around just so that I don't move it. Now I'm getting low on
resonant my bottles. So here's a tip. If it's
cold in the area that you are or if you're getting low and it's apart to get the resin from the bottom of
your containers, put it in some warm water for
I don't know, 510 minutes. It's going to make it more
fluid and it's going to make it run quicker. That way you'll be
able to get more out of your containers. It's always a waste to have to leave something
in the container that you can't get out in order to
use resonance expensive enough as it is without
having to do that. So just a quick little tip. It doesn't need to be too long. I had it in for five minutes
while I was painting is when I had it
in the warm water. Doesn't need to be hot, just
needs to be nice and warm. I do find when I
do that as well, I get less bubbles because the bubbles tend to
rise to the surface. While while I'm mixing
because it's more fluid, they just come to
the surface easier. Alright, we've got
everything covered. No, let's get all the excess
bubbles out of there. Now I already have a
little floaty in here. I'm not sure exactly what that is, but the way to get it out, I always have a little
toothpick to the side and I use that to
pick anything out. I just keep using
that wall is curing. You'll notice if you have
to do that, it's curing, it gets thicker and thicker and there is a point
where you're like, I probably shouldn't
do this anymore and then I tend to stop. Sometimes when
it's fairly thick, you can still do it
and it will still have enough fluidity to it
to be able to move out. If it's something like this that you have several layers on top, you don't need to worry
as much about it. But when you're
doing a final layer and it needs to be perfectly, you don't want to
be messing with it. Alright, I've got all
the bubbles out for now. I'm going to continue
to watch it for the next half an hour or so. And if anything rises to the
surface, I will remove them. But for now I'm
going to cover it. And I'll see you
in the next video where we'll paint
the last layer.
8. Painting the Last Layer: Alright, so our resin is cure. We're ready to paint
to the last layer. So I'm going to use
the Payne's gray. And I'm going to darken it this time just a little
bit with some black. Mix it together with
my palette knife. Very first thing I'm
gonna do is I'm going to paint my paint stencil. My dear, you could transfer
an image and paint it, but I have this stencil
here that I quite like. I'm going to use that. I'm going to use a small
stencil brush to start, especially with the antlers. The thing with stencil, with the paint, less is more. If you use too much paint, you'll end up having some
seep underneath your stencil, which is not ideal. So better to do a lighter coat and have
to do it more than one time due to heavier coat. And quite frankly,
I might be doing to heavier coat just because I'm trying to get it done
within one video. So I might get a little
bit of slippage. But what I'll end up doing is just probably cleaning up the outline
if that happens. I'm just going all
the way around the edges and it's just an
up and down pouncing motion. And I have a small stencil
brush here that I'm using. Make sure you lift
it straight up. So oh, actually, no seepage
at all. So that's perfect. You want to lift your
stencil straight up so that you don't have smear when you lift it up. Now I'm going to paint
a couple of more trees. And actually with the last
layer I had intended to add a pine tree and
just kinda got so mesmerized with the other
trees that I didn't do it. So I'm going to do a couple of pine trees
with this layer. I'm trying to make sure that I don't completely cover my owl. I just like the texture
difference of having some pine trees as well as
good a little hair there, as well as some bare trees. This one here I'm gonna do, I'm gonna make this one
a little bit taller or taller than the other one, just like before, you don't want your trees to be
exactly the same. You want them different
heights, different spacing. This one's going
to end up covering a little bit of the deer. I'm using my little filbert
brush here for this. You could also use a
fan brush to do it. I just find I have a
little bit more control with the filbert
and I just kinda like how it ends up
a little bit better. I'm going to do a
smaller one right here. I have three of them.
Differing heights. That's all I'm going
to add for this layer, I'm just going to add
a little bit of brush on the bottom of the
forest floor here. If you prefer not
to do the pines, you could just do the same
trees is that we had before. I just liked the look of the different style of trees and it's more
natural because in a forest you don't have where we live anyways
or where I live. You don't have just one
type of tree if several different types of trees. So I just like the
difference in the texture. Then same as the branches
and stuff like that. Make sure that your branches
are unevenly spaced. If you go look at nature, you're not gonna have
everything evenly spaced or you might have some, some trees that are symmetrical, but in general they're not
really very symmetrical. So there we go. I'm going to let that dry
completely and I'll see you in the next video where
we're going to pour our last Lira residue over top.
9. Adding the Last Resin Layer: Alright, or paint has dried. We've got our resin ready Here. We are ready to pour. This being the last
coat of resin. You definitely need to make
sure to be very vigilant, especially in the first
couple of hours and make sure no dust or hairs or whatever
from the air flow into it. Resident seems to attract little fluids in the air
and it affects the finish. And we would like
to like it to be as smooth and glass-like
as possible. You definitely have to make
sure to cover it for this one and make sure to watch it
for the first little while. I'm just pushing into
all of the corners. Already made sure that its
level because we want to make sure that we get a
nice level finish. Just making sure you want to
make sure it gets pushed to all of the edges
because otherwise, it'll be noticeable if it
doesn't reach the edge. Especially on this last
one, the other ones. Because there was layers going
on top of it afterwards. You had a little bit of
leeway for forgiveness because layers that were on top would fix anything
that might've been missed. But this one being
the last layer. We definitely need to make sure we get it all
the way to the edge. Need to make sure it's
completely level. Need to make sure to watch out for the little
dust particles. So I'm gonna take my heat
gun and coupled the bubbles. Like I said, with this
being the last layer, I'll be making sure to
be very vigilant. Hairs. Bubbles. Be ashamed to put all of this work
into something and then end up meeting to another coat because they've gotten
something about Miss. Alright, I'm gonna let that dry. I'm going to make
sure to cover it. I have a toothpick
toothpick here standing by. I'm going to check it
every day, you know, 51015 minutes to start and then slowly make that
longer and wash it, pick out anything that
happens to float into there because sometimes
even when it's covered, things get in there. I will see you tomorrow
in the next video, I'll show you how to clean
up all the resin cups.
10. How to Clean your Resin Tools: Alright, so we're done
our project and now we've got all of these resin
cups to deal with. I typically I have several cups, so I typically will wait
until I'm done a project and then just clean a
bunch of cups at one time, you'll end up with
this little disk at the bottom of residence, so that is easy
enough to pick out. But what you also get our drips and spots of resin all
along the outside. So I thought I'd tell
you a little cheat a little tip for getting
those out easy enough. What I like to do is
I'll roll the cup in my hand and I find it
easier to do with the ones that are more flexible, the smaller ones
are more flexible. This one here, not quite as
easy, but it still works. And then I take some duct tape, cut to length of it off, put it around my fingers with the sticky side facing out.
This is the one I did. I use it to grab all of those little dots from
the outside of the cup. As I'm twisting it
around my fingers. Sometimes they'll have to
grab a second piece of tape. But it takes a lot of
them out quite easily. That there's one right there, but that is completely
clean now ready to use for my next project. You don't ever want
to be mixing resin in cups that have those
drips and dots and whatever, because that will mix into your resin and
they tend to float to the surface and
affect your finish. Once again, take a little
disco kind of piece of tape. You can also do this
with packing tape. But I find this silver duct tape to be just a little bit sticky, a little bit more durable. And it just it tends to get them out a
little bit quicker. I found when I was
using duct tape, I'd have to use more
tape to get them all out. Just a couple. And then you can
also use that to take them off the outside too, but the outside doesn't
affect your residence. So I took typically don't
worry about those too much. When it comes to
the thicker cups, exactly the same procedure and I always twist on here
because I found it, find it just loosens those pieces on the side
of the cap a little bit. It makes it easier
to take them off. I do find with the thicker cup, I do have to do this a few times because this
particular cup has ridges on the inside and the resident
likes to stick on. This does take the
majority that out and then anything that's left after you use a few
pieces of tape. You can just pick out
with your finger. Now on this nearly done, I'll
keep working on that one. But yeah, that is a nice, quick, easy way to get the
resin off of your tools. If you've used popsicle
sticks disturbed, I tend to put them aside and let them dry
and cure like that. And I'll just keep reusing them until it gets to the
point where I can't actually scrape the
sides and the bottom of my container easily while I'm stirring it and then
it'll just toss it away. But you can also get ones like these that I
use quite regularly, didn't use them for this class. But they've got a
silicone coding, so they're resin just
picks right off of them. I've already cleaned
these ones so that you can use as well if you
want to be able to raise, want to be able to clean
off your mixing tools. You can use this
silicone sticks as well.
11. Moonlit Forest Acrylic & Resin Class Thank You: Here we have our
completed project or resin cured beautifully and we didn't have any dust particles or anything land in it
while it was curing. If by chance when
you're creating this, you happen to have
something that falls into your
last resin layer. You just put another thin
layer resin over top. And to correct that there's not really any other way
that you can do that. I hope you enjoy creating this project with me and had
a chance to follow along and actually create while I was showing you
what to do as well. Once again, thank you
so much for joining me. I hope you enjoyed this class and learned a
lot while you were at it. I hope it took the
intimidation out of creating with both
acrylics and resin. Remember the supply
list is linked with the introduction
video that's going to tell you everything that
you're going to need, as well as linking
it to where you can find your supplies if you left the class with
some questions still, please don't hesitate
to reach out and ask. I'm happy to help. I will
see you in the next class.
 Artsy. Island Girl, Teacher