Transcripts
1. Intro : He is always been thinking of your rotor fantasy game teams and how to use them in surface pattern design. But you just don't know how to start. Then this class is for you. Hi everyone. My name is. I am a watercolor artist and surface designer. In this class, we're going to learn how to pin modern watercolor and motifs to use in surface pattern designer and very simple techniques. I am providing two different sheets of simple sketches. If you want to work along with me without drawing your own sketch. And I'm going to give you some tips and tricks on how to transfer these sketches to the paper. Then you're going to learn how to scan your art. And you will learn digital editing principles on iPad and how to apply them to European team. Finally, we're going to use Procreate and Adobe Capture app to make a professional pattern out of these watercolor motifs. I'm also providing free overlaid textures to use in your own patterns. This class is aimed towards students with no or some prior experience in watercolors or in digital editing. You artists trying to get into the industry and to the artist who wants to know how to edit their paintings distally in order to sell them online. I have prepared easy-to-follow lessons for you. And by the end of the class, you and live with your own amazing watercolor pattern and with some creative tips and tricks, twos in all your next projects, I can't wait to see what you're going to create. So let's get started.
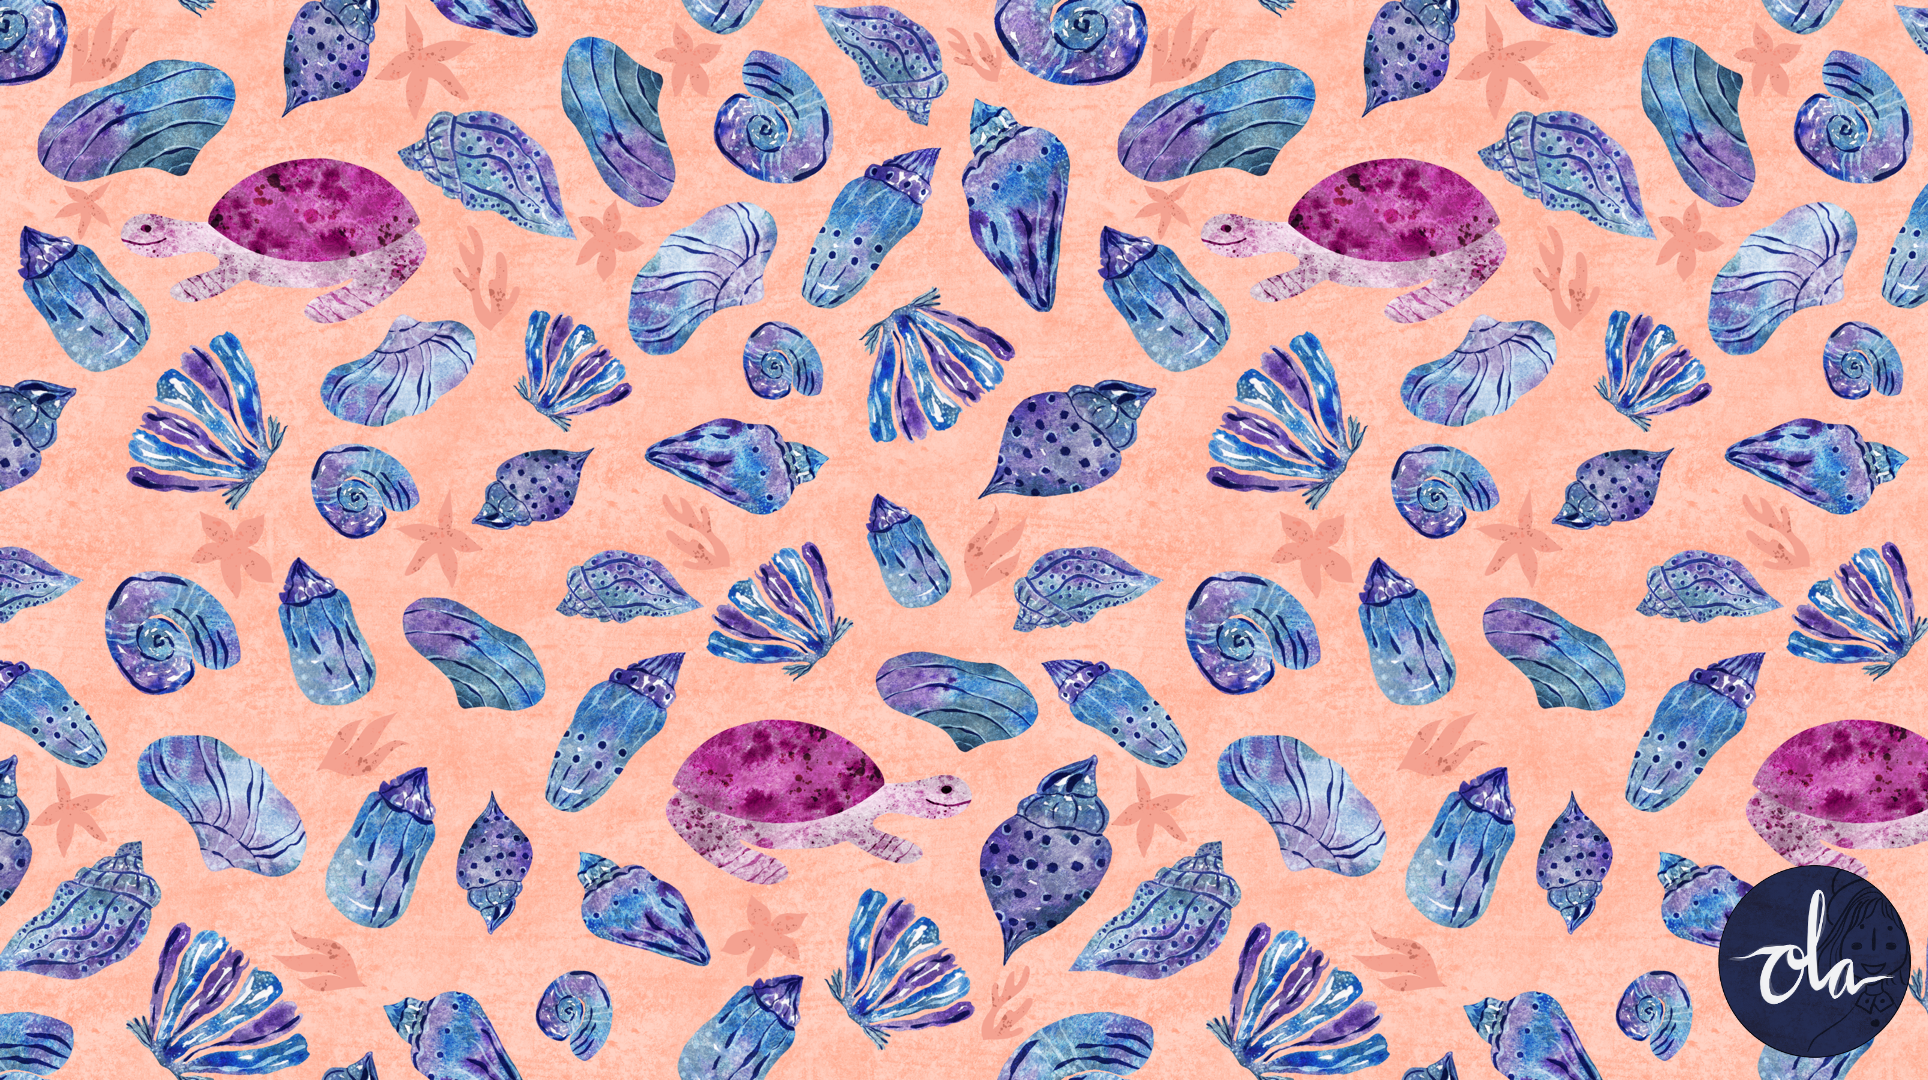
2. Class Project : Thank you so much for joining. In this class. The project will meet to digitize a watercolor painting and use it to design a seamless pattern. This can be any painting you want or you can just follow me and use this kid sheets in the class resources to pinned with me. We will design our pattern with all the seashells and turtles that you are going to create. In this project, you will learn how to create different positions and shapes out of the same painting by using an iPad only. And finally, we'll be learning how to apply seamless overlay texture to use in all your patterns. In the next lesson, I'm going to show you the materials we need in this class, alongside the class resources and the how to download and use them. I can't wait to see all your amazing projects. See you in the next lesson.
3. Materials : Hi.
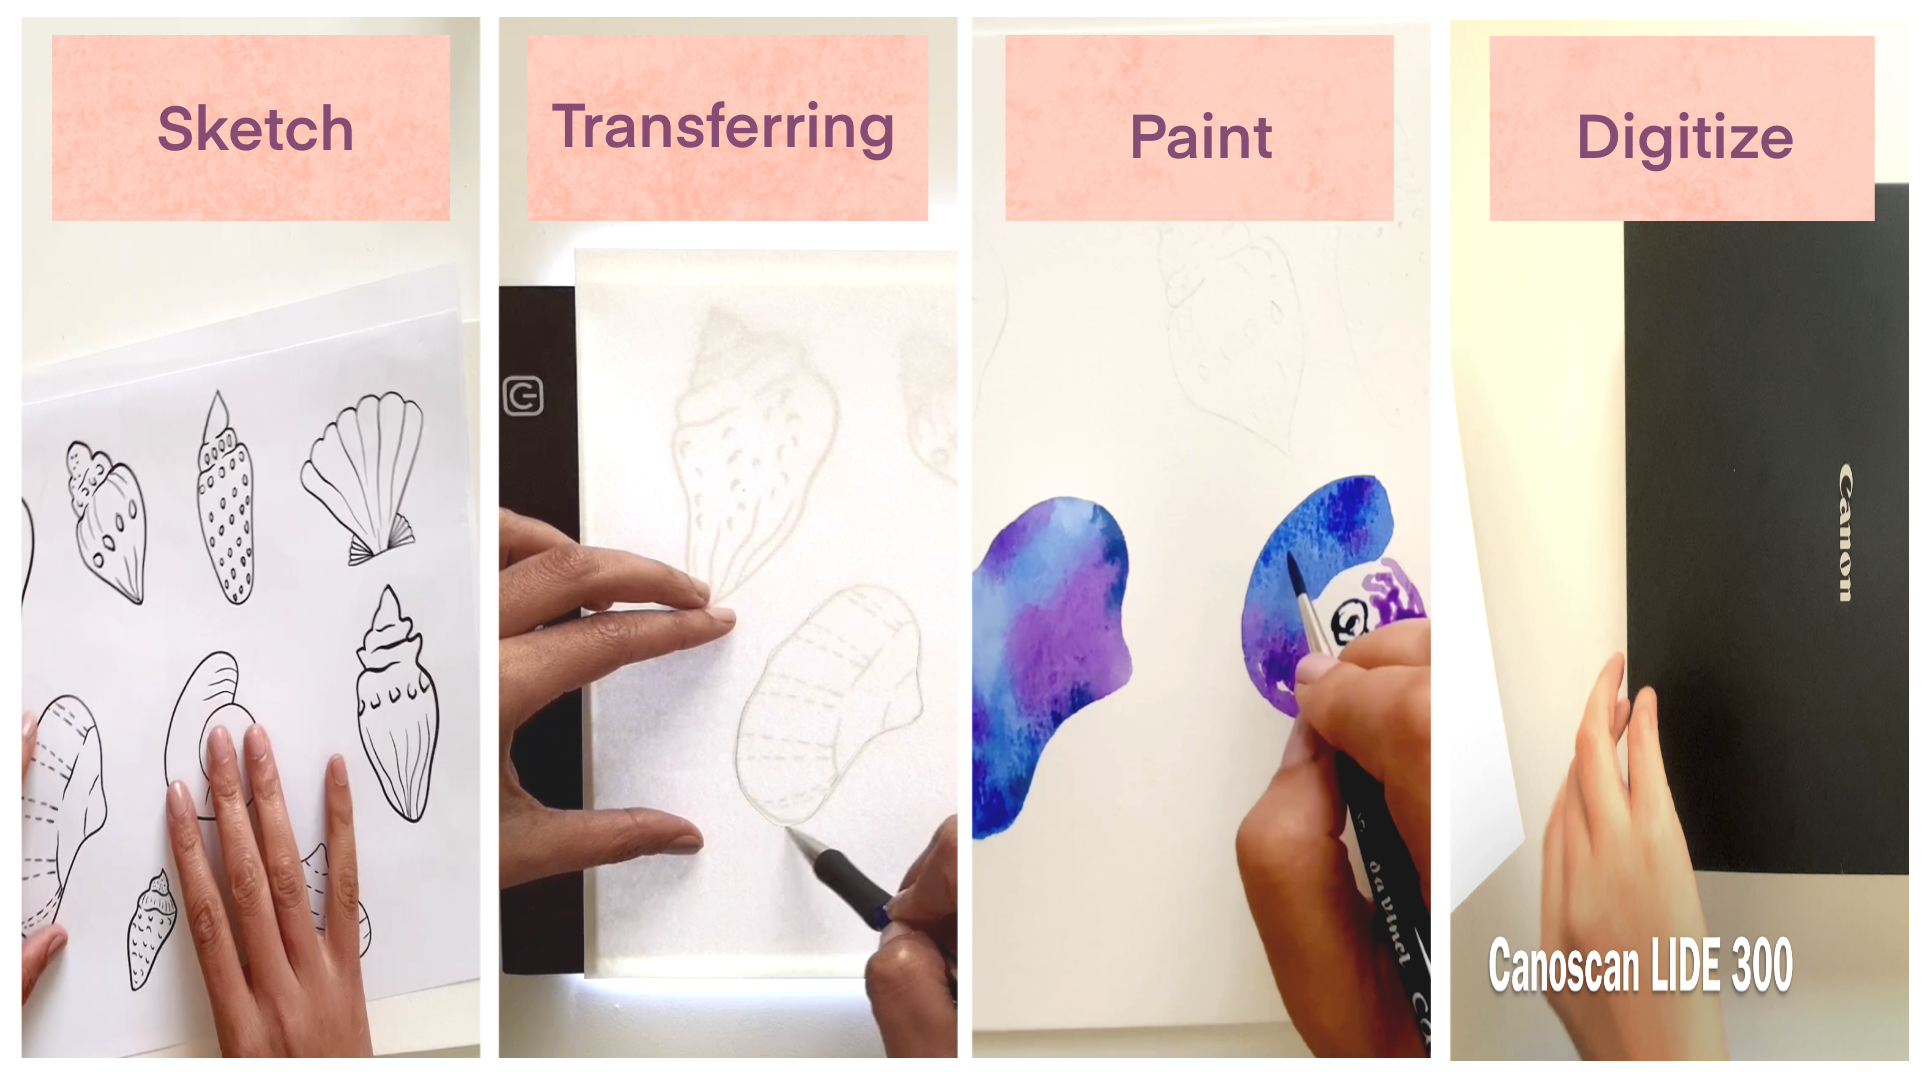
4. Sketching Motifs : In this lesson, we're going to sketch our routine. You need to have a reference photo. In this class. Seasons are my motif. Feel free to follow along with a different motif if you prefer. And of course, you can simply use lies that cheats well in the class resources. And I'm going to show you different ways to transfer this. Get to the watercolor paper. All right, let's get started. I usually choose to draw my sketch on my iPad. Then when I finish, I transfer my final sketch to the watercolor paper. And that's because when I am sketching, I use the eraser a lot. So sometimes I damaged my watercolor paper. First things first, we need a reference photo. I'm using Pinterest. I think I like this one. We're not going to copy a whole photo, but we need a few for sketching and interpretation. I am taking a screenshot, carpet to good size and tap Done and save photo up in Procreate. Tap the plus sign here. I prefer paper for sketching. Now we need to look at our reference photo. So I'm going to tap here and choose reference to be in front of you all the time. You can move it and place it wherever you want. This shows our Canvas tab. To import. Choose our photo. Here you can zoom in and out as you choose any color you want. And from here, I am using inking syrup. I like it very much. Now start drawing. But make sure you're not drawing on the background layer. This is the first sketch tab here. Too low. The layer opacity and plus sign to add a new layer. Change color to black. Now try to refine your sketch. Don't forget in Procreate, tap with two fingers for undo. Three fingers for redo. Again. When you're done with this low layer opacity from here. And we don't need this layer anymore. So swipe left and D. For new layer. Refine your sketch and delete the old one. If you are okay with this one. Tap here to rename. So the first one is done. Tap here to hide this layer. For the next one. You can choose from this image, or you can use different one. If you're done with this photo, tap Clear, then close it. From here. I finished my sketch. You can download it in the project and resources section on the Skillshare website, not on the app. Next class are going to learn how to transfer these sketches to the watercolor paper. See you in the next lesson.
5. Transferring Your Sketch : First option, you can use the line books. Place your watercolor paper on top of your sketch, then turn the light on. Now Yunus kitchens very clear ends. You can easily trace it. Don't forget to use your pencil. Very lengthy. Second option, if you have a light box, use your iPad or laptop as a light box. Set your brightness to the maximum level. Zoom in to the part of the sketch you want to trace plus your watercolor paper and start to trace. Remember, you should use your pencil very, very likely. Now, we don't need our iPad. I'm going to use my kneadable eraser to lift up some of the pencil lines to make it really light. And discourse, any kind of aliases will work. Feel free to use whatever is available for you. Next class we're going to start painting. See you in the next lesson.
6. Let’s Paint : In this lesson we're going to start PMT. These are my art supplies which I have used this time. But feel free to use whatever colors you prefer or available for you. I like to mix my colors on paper and enjoying the unexpected surprises after it, the paint is dry, but of course, feel free to paint in euros type. Next lesson, we're going to scan our paintings. See you in the next lesson. Hi.
7. Scanning Your Art : In this lesson, we're going to scan our painting, asked to do their pain test completely dry. I've been to two external versions to choose between them. I added the ANC for one of them and for the other one, I have added ink. And do I jensen? This is my scanner. I like it because it's very light. So I can take it easily with me when I'm traveling. I normally use 400 DPI to scan, but 300 DPI will work just fine. Remember, the size of the photon will increase as you increase the resolution. I always choose man in the image adjustments section, as I prefer to make the adjustments by myself. If you don't have a scanner, don't worry. You can always take a good picture of your art by phone, but makes sure to use the highest resolution you can find. Next lesson we're going to learn how to adjust our photo to use in Procreate. See you.
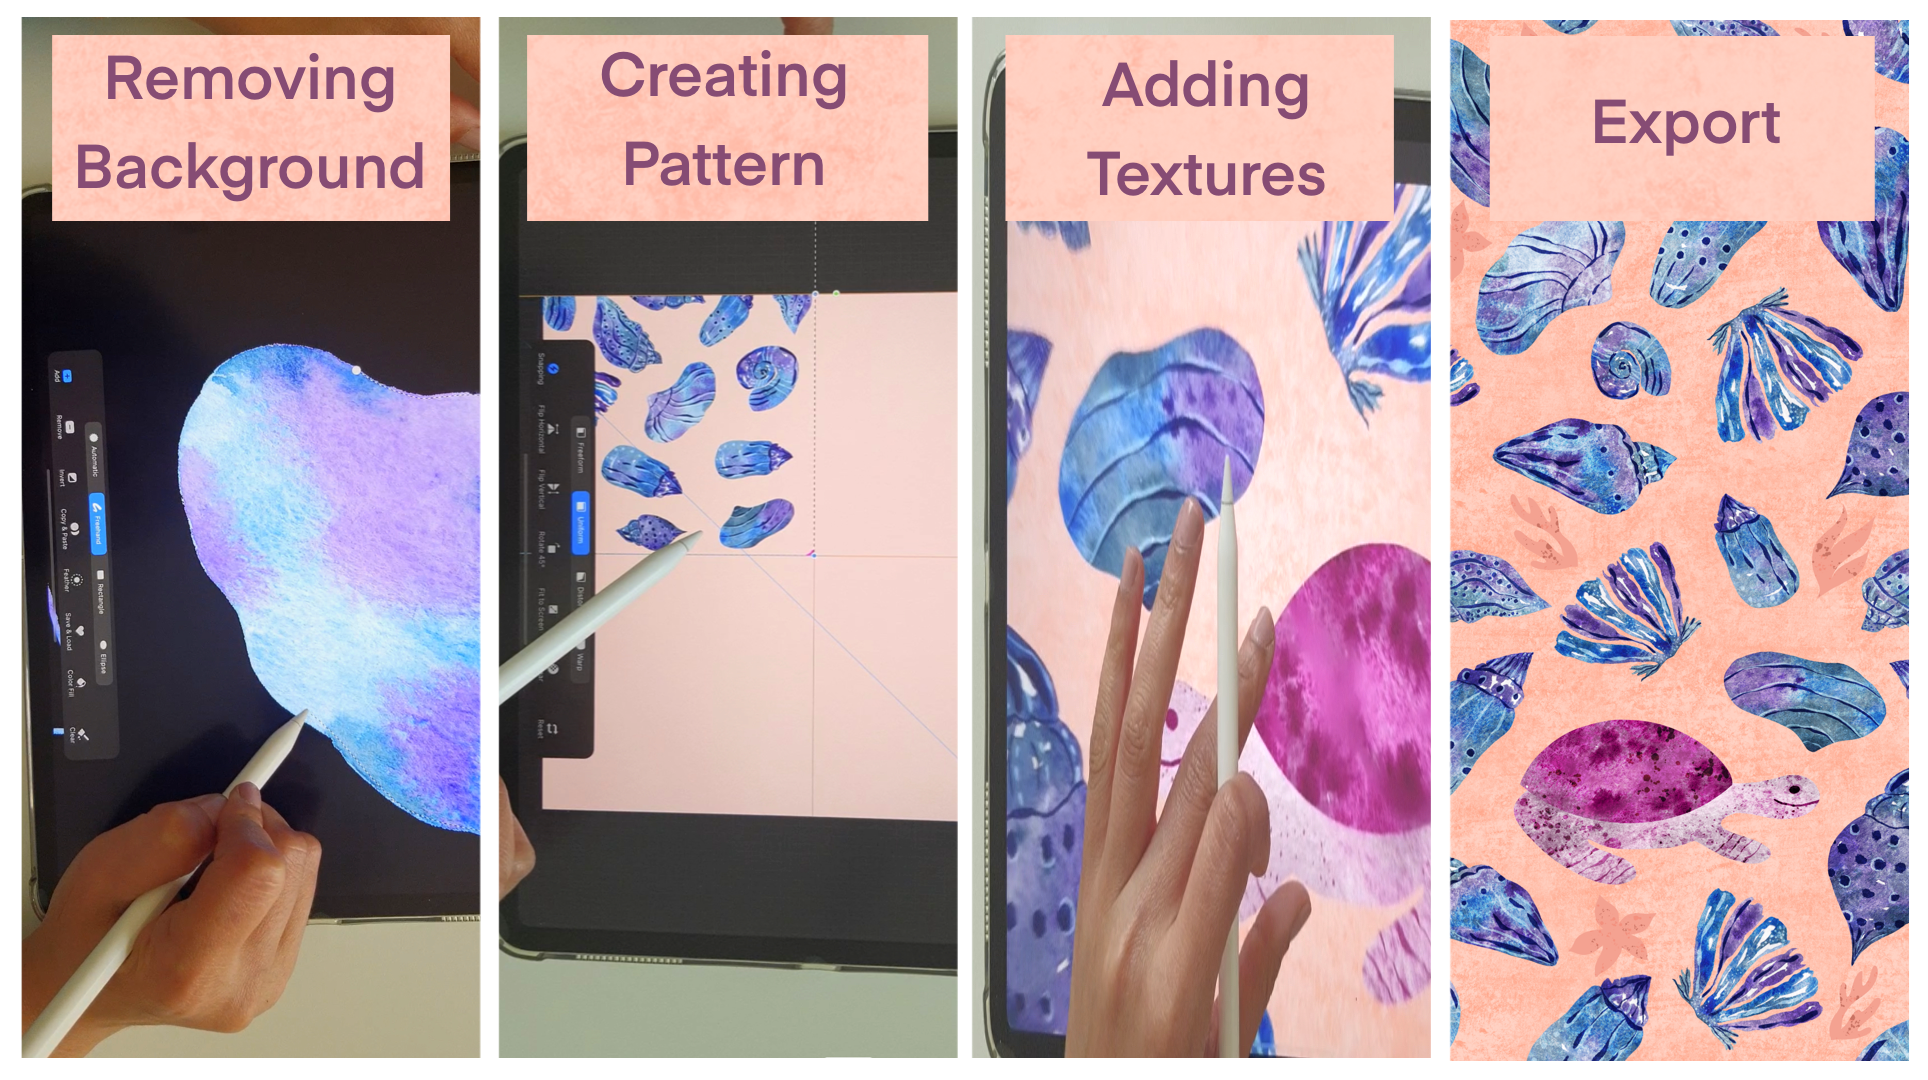
8. Removing Background : In this lesson, we're going to learn how to remove the background. Open, Procreate, tap the plus sign to create a new canvas tab here, we need to choose the size of our canvas tab and choose ten by 10304 DPI. Here it shows the maximum number of layers you can create. And this is the bend them on your iPad. I'm using the iPad Pro, tap Create. And this is our empty canvas. Tab here. Tap, Add, choose Insert Photo, insert file. Depending on where your photo has been saved. Choose your photo. I'll import the other two paintings just in case I want to use them. That paid and swipe right to select your imported photos and to group. Tab here and tab Rename to be organized. Now so I left and tap Duplicate. Take this layer up, hide this group as we don't need it for now. Now we need to adjust the image colors to make removing the background easier. Tab here for the adjustments menu and choose Curves layer. We're trying to add more contrast between the painting and the background. Now, tap Select and choose automatic. Then tap the color. You want to select. Swipe down with three fingers and to sculpt their way. Some other area is not selected with the background and need to select it manually. Now we're going to tap Select, and this time, choose freehand and begin to select the remaining areas like this. Make sure you're on the add mode. And select all of them. Swipe down with three fingers, tap go. And we have our painting separated from the background. Next lesson, we are going to clean and refine our painting. See you in the next lesson.
9. Clean and Smooth : Sometimes using the automatic option in the selection tool is just not enough. So in this lesson, we're going to clean and refine our painting. We need to get rid of these edges. Tab select, choose freehand. Start to select your painting. You can rotate your canvas to make it easier. It takes more time, but gives you perfect results. Close your selection. Swipe down with three fingers, cut and paste, which means that your clean image is now on a new layer. I'm going to repeat this process to all of them and put each seashells on a separate layer. Feel free to repeat until you're happy with the final reason. We need to fix this one here. As some of the colors have been deleted with the background, I'm going to choose a brush. I'll try soft pastel and sketching at a new layer. Then touch the color you want and hold your finger. This will change your brush color to this specific color. Now try to fill in the gaps. Try to mix different shades of color to mimic the watercolor look. Put this layer under your painting, and then penchant the two layers to merge them into one layer. Remember to take care of these small areas. Swipe left and delete this year. Next lesson, we're going to learn how to make different colors and positions out of the same thing. Think, see on the next lesson.
10. Color Exploration and Wrap Tool : All right. We prepared our C-sharp, nice and clean. And each one is on a separate layer. Now, swipe right to select all this seashells layers and tap group to be organized. To save this original group, I'll duplicate it. Hide this one. Now, I'm going to add some decorative lines to make it more interesting. Choose one of our seashells and create a layer on top of its layer. Tab here to a clipping mask. Let me show you the job of the clipping mask. Whatever I draw on the clipping mask layer, it only shows inside the layer under it, like this. Clear this layer, and I'll choose my brush. Let's try inking. Tinderbox. Choose a color. Check your brush size, a new layer, and change your colors. Move it under this layer and start drawing. He used to choose the blending mode. Take your time exploring different modes and choose what you like. It depends on your painting and your colors. And go for a screen. For the other layer I am tools multiply. Let's make another one. Choose your color and start drawing. Don't forget to choose clipping mask. Change the blending mode to color. Blending mode. Let me show you how to create different shapes and positions up to the same painting and duplicate your layer. Depth here. This time, choose Wrap mode. Now you're able to change your shape. As you prefer and make it completely different from the original shape. Okay, heat is another example of wrap tool. I have this little watercolor painting, and I can turn it into a complete pattern by using the wrap tool. As I can create a variation of plants with different shapes and positions out of this painting. I'm going to finish the rest of the sea shots. Now, I'll show you how to change colors to have several versions of the same painting. I make a copy of the seashells. Turn your background off. Then swipe down with three fingers and choose Copy All. And this will take a copy of anything is visible on your Canvas. Then swipe down again and choose based to put them all on a new layer. Turn your background on and tap here to change its color. Try to find a color you like. I'll keep it white for now. To adjust the colors of your painting. Tab adjustments. Hue saturation. That player hearing can adjust saturation, brightness, and also you can choose different hues. Take your time exploring what you like, exit them in you like, so you can turn here and choose the color balance option. Here you can change your color balance for shadows, mid tones, and highlights. You can reset by tabbing one finger. Reset. You can also use Gradient Map. Take your time exploring. You can tab and adjust the gradient. You can tap on the color to choose a different one. Finally, you can try it curves. Enjoy exploring, and I'll see you in the next lesson.
11. Creating More Motifs : All right, This, our sea shells are prepared and ready for the pattern. But first, we need to add some more interesting motifs to that pattern. Starting from now we need a drawing guide tab here. That Canvas drawing guide, edit, drawing guide. Increase the grid size and thickness to the maximum. Then I use my seashell to create a cute to duplicate this layer. New layer. Choose your brush. Start sketching. Okay. Sketches, ready? Open the watercolors layer. Select one of them and duplicate this layer above that clipping mask, which means this layer will show only inside the layer below. Duplicate this layer. It's automatically has been created as a clipping mask leakage. They sell as you like. If you're okay with that result, finish the three layers to merge them. So high in these sharp lines. Choose smudge tool from here. And two is a mesh files. Try tinderbox, reduce the opacity and the size. I'll try sponge in water. Okay. Same process to make the person's body. I want to choose a different color to my tutors to add a new layer. Choose the color you like them here. Texture layer, tap clipping mask, change the blending mode to duplicate this layer and put it on top of the other layer as well. I get to choose clipping less clipping mask. I'm going to add some details. Okay. Name your group and duplicate this one. This one, tab here and tab flatten. This will merge all the layers inside the drop into a one layer. Duplicate this layer. Swipe right, to select both thirteenths and resize them. Next lesson we are going to create our pattern. See you in the next lesson.
12. Let's Create a Pattern Part 1: And now finally to the fun part, to rethink our pattern. I can show you the easiest way to create a pattern, even if you are a complete beginner. For this lesson, we need to download Adobe Capture app. It's such a nice free app. All right, let's begin. Select one of your turtles. Tab flip horizontally. The chickens, this is the right position step here. If you've already downloaded the Adobe Capture app, you should find a teacher. The output, okay. Scroll down and tap pattern. Here are some types of patterns to the regular pattern from here. Tap here. Here it shows you in photo adds a pattern. Check if you like it. I think I need to move my turtle a little bit. Tap Procreate to go back to your pattern. Morefield turtle as you need. It's easier to turn this snapping off for now. That's your pattern and pattern. Regular. Zoom out and zoom in. If you like him, go back. Pinch the two layers to merge. Tap here to reduce the opacity. Select this issue dense layer epsilon. To select them, move as you like. We need to fill in the area on the grid lines completely. Swipe left and duplicate it, reduce the opacity. Move years t-shirts horizontally or vertically through a thief and re-size. Remember, please adjust right to the edge, but you cannot touch the edges of your canvas. Check if the data are overlapping. Seashells. Once you learn, reduce the opacity and duplicate the first layer again, bringing back to maximum opacity, repeat this same process until you fill your Canvas. Now, remember you cannot touch it, the interests. Okay? Once you've done set to the maximum of ST tip here to choose your background color. I like this one. I am moving my third tonnes 11 bit. Let's tear button before moving on. To zoom in and out. I see some gaps here. Go back to your pattern. Swipe right, to select all your pattern layers and merge them on. Here, zoom in here, you'll see that your canvas is not selected completely. And this is very important in making your pattern. To fix this, choose a bright color and draw a line at the corners. Now you can select your canvas completely. Duplicate this layer for science. Hi, The original one. Tap the move tool and tap snapping. Movie. One of the four layers to the corner. Don't leave it until you see these golden lines. If it's not easy, hide everything on your Canvas except this layer. Move it again until you see the golden lines. Repeat for all the four layers, merge them into one layer. We don't need our grid lines anymore. 30s, the coordinate lines. Now fill in any gaps. First to your patterns. We need to fix this empty line here. Merge the layers and the buttons. I think it's okay for now.
13. Let's Create a Pattern Part 2: Alright, this is our pattern, or make it more interesting, I'm going to add some element at a new layer, tap and hold on this small square. This will hide everything on your Canvas except this layer. Tap and hold on your background to choose the same color that bead on the lithium circle. Make your color a bit darker. On a new layer, I'll draw some simple elements. Okay? Okay. Plus to add a new layer, tap clipping mask. Choose a color to 0 brush. I'm using water. In water. Not too much. Change the blending mode. Repeat that again, was different. Once you've learned these layers. Duplicate this layer, hide the original, resize this layer. Open your pattern layer. The vessel elements whenever you like. Okay? You're accused elements in one group. The seashell is bigger than the others, which makes it very much so. Hi In, go back and fix it. Unfortunately, I can't resize it as it's in two pieces. So I'm going to remove it completely. I am fill in this space with new seashells. This is much better. The next lesson we're going to add seamless textures.
14. Adding Texture : We're almost there. We're going to touches to our pattern. Let's add some textures. First, we need to open our texture file. You can download it from the class project and resources section on the Skillshare website. In this file you will find two layers. One of them is for larger scale texture, and the other one is for the smaller scale. It's a free download. You can use it in all your patterns. To x1 type here, to copy. Tap gallery, open your pattern, tap, tap, and drag this layer until your background Lee Chin, the blending mode. I keep it normal for now. Go to Adjustments, Hue Saturation. I'll try to make him great to see the difference of pin layers, change the blending mode to overlay. I make him black. Yes, This is much better. Let's add the other texts. Church. Step copy. This tab here. Clipping mask. Choose a blending mode. Overlay. I try to make him look quite as good at for this layer below the obesity as you prefer. I'm going to make my small elements a little bit darker. Finally, I will add more texture to my turtles. Add a new layer on top of the pattern layer. I'll use water, flex in water. Make sure to choose clipping mask for this layer. Let's test our pattern for the last time. And it's perfect. Swipe down with the fingers, copy. And phase. High-end layers except this one here and rename your layer. Swipe left and duplicate it four more times. Hi of the original swipe right to select them. Appear. Third and snapping on. We're going to resize them. Don't forget you have to see the golden lines. Select two layers and move them. To make sure you see the golden lines. Make sure everything is perfect. This is your pattern in a smaller Skill. Share. Png. Save Image. Repeat for the other layer. And you did it. Congratulations.
15. Final Thoughts : Thank you so much for learning with me. If you enjoyed this class, please leave me a review. It means a lot to me. If you have any questions or comments about the class, feel free to post in the class discussion. Please follow me on Skillshare to be the first to know as soon as I launch my next class. You can also follow me on Instagram at all Alzheimer AD to see my patterns and designs. Don't forget to upload your final pattern to the project gallery. And if you shade it on social media, don't forget to tag me. Thanks again for taking the time to join this class and see you in my next glasses.
 Ola Alhamedy, Landscapes & Nature Paintings Acrylic &