Transcripts
1. Introduction Class: Hi guys Dana, and welcome
to another blended boost. In this course, we
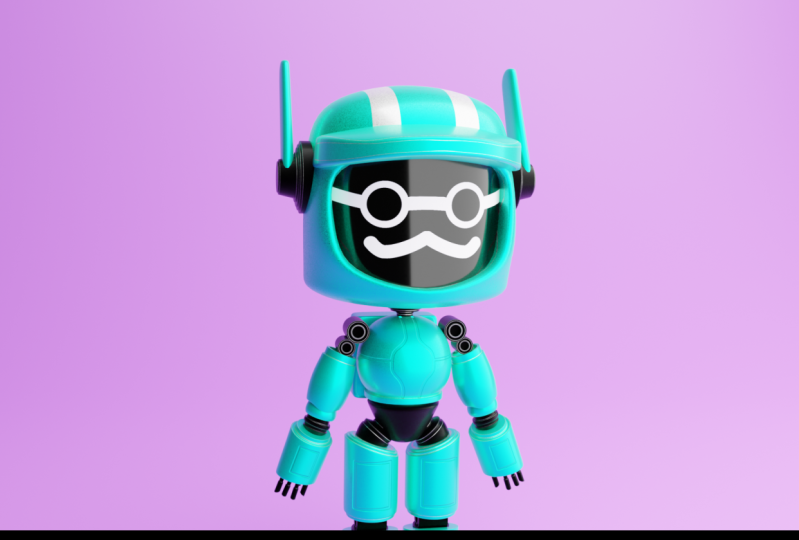
will be creating a famous notebook character from the first episode on Netflix series, loved
that and drop is. First we will start the
course by inputting the reference images that
we provided for you. After that, we will begin
character modeling. We'll start with the head that
using standard techniques like adding subdivision
surface and mirror modifier. Once you finish the head, who will jump on
creating the chest? Then we move on to the
modelling character limbs. If you have similar principles
for the arms and legs and Donald introduce you to
the powerful bevel modifier, which will help us with
creating card edges. Lastly, finished modeling
all the details we will jump on applying
materials for our modem. Then I will show you an
easy way to generate lives for the scene so you can
test your materials. Finally, we'll locate procedural rust
material on the edges. We denote system
which you can apply and change all your
models in the scene. After we apply, you're
asked on the edges, I will show you how to
create bumps, curves, and surfaces per purchase
with texture painting. Finally, we will
finish the course with texture painting for the face
and final render settings, where I will show you
how you can enhance your render quality and create Turnaround Animation to this
way you're finished model. Let us begin.
2. Creating the Helmet and Ears: Hello everybody and welcome
to our first video. So as you can see currently I'm working
with Blender version 3, which is the latest
version so far. Let's go and create a
new file under general. Here we have our default scene and here in this
left corner you will be able to see all the shortlist that I'm going to
use in this course. First I'm going to press
a to select everything. And with x I'm going to delete. So now we have empty scene. So first we can move in
front orthographic view, and here we can go and start importing our reference images, which you will be
able to get as well. So firstly, the shifted a, I'm going to go under image. And here we are going
to select reference. And the reference image
that we are going to impact is going
to be the front one. Now that we have our
front reference image, we can move in right
orthographic view, and here we can import our
side, the reference image. So once again with
the shifting a, we can go under image reference
and cite reference image. Now that we have both images, we can go and change
some settings in the image properties in
this Properties menu here. First let us go and
select the front farm. And here we can go and
lower down opacity to 0.5. And also, I want to turn on this back and let's go entropy
the same for the site. So here once again
turn on the opacity, write down 0.5, and
also turn on back here. Also, I'm going to enable
this filter for selection because I want to disable
those two from being selected. So right now we cannot
select those two anymore and we can started
modelling our character. So the first thing
that we are going to model is going to be
right butt heads. So let's add cube and move it up and place it to about here. Now immediately I
want to go and add subdivision surface
modifier with number of subdivisions to, let's scale it up. And here in the middle I'm going to go and add edge loops. And now we can go and remove all the vertices
on the left side. Let's add mirror modifier and measure that you are having
mirror modifier on top, Lester on the clipping. Now it controlling there, I'm going to go and
that edge loop in the middle and pull it
down to about here. Now it can move those vertices
on the cytopathic G and Z, and it controls on there. I'm going to go and add
one more edge loop. And let's try to match
the reference image here. Also move those top
vertices, it as well. Like so. Because you are
working with the cube, we need to make this
look more rounded. So we're going to select all the vertices on the right
side and we're going to press S and y to make it
more rounded to about here. Now we are going to move those vertices to match
the reference image. Let's pull the whole head back. And here I'll pull this up and also those
backwards as well. Now we can go and add one
more edge loop in the middle. Now I will just move those vertices to match
the reference image. So now we can move in front
and manage the front as well. Now let's pull this
up for the face, this top vertex as well. Here I'm going to go and
apply mirror modifier. Now with face selection, I'm going to select
those two phases in front and with instead
of two phases. So let's kill it on the x-axis. And now I will apply subdivision surface modifier
with number of subdivisions. And now we can remove
all the vertices that we selected and we
have whole for the face. Now, we just need to metric
that reference image. So here I will just select
this down part, move it down. Now let's select all
those front vertices. Now those sides
vertices as well. I'm just moving them
here. Also there. You can see this is
very easy to follow the reference image
once you have it. Now we are going to
remove the left vertices and let's add another mirror
modifier with the clipping. And here I'll pull
those up as well. Let's add another
subdivision surface modifier with number of substitution. Now let's scale it
up a little bit. This top part and
back part as well. Like so. Now let's move in
front of the graphic q. And here I'm going to go
and scale the whole head. Let's now scale the face down. Also move those vertices a
little bit on the side. Here. And now I'm going to
return this slightly down. Select this edge loop. And with E I'm going
to through the inside. Now I will just go and move this front part between front. And also return here in front orthographic view to
adjust the front as well. Now we can go in object mode
and with the right-click, change our shading to smooth. And we are done with creating. Now we are going to
create face inside. So for that part I'm
going to simple cylinder. Let's move it up and
scale it on the x-axis. Like so. Place it in front. And we're going to scale in x-axis to fill all the gaps
and shading to smooth. And we created phase. Next we are going to
add cube to the scene. And here we are going to
create this front part, the hard part, and the GMV. I'm going to pull it in front. Let's add subdivision
surface modifier and scale it up a little bit. Now I'm going to go in edit mode and width
control in there. I'm going to add edge loop in the middle and remote left side. Here I will add mirror
modifier mixture that isn't top with
the clipping gone. And now I will go and scale it down to about here and move
this slightly down as well. And with E, I will go and start extruding on the side, like so. Let's do it one more time. The GSE, I'm going
to pull it down. Now we can move in
top orthographic view and move those vertices back by pressing G and Y
to lock it on the y-axis. Now we can select
this front part and extruded by pressing E. And also with GE can
move slightly inside. You can see that we
are already getting the shape done. Now let's move. Those vertices are
a little bit back. Now we can go and scale down this front part that makes sure that you're
working in the X-ray mode. Let's return to a little bit to match the reference image. Also those vertices
we can move it, move it a little
bit down, like so. You can see that we
are just following the shape and now we can go and add loop in the middle
to tighten up the shape. Now let's add one more
four down part as well. Like so, right-click to
change shading to smooth, and we are done with
creating the head. The last part of the
head will be year. So for that part I will
use simple circle. And here I'm going to
lower down to number of vertices to 16 in the
Default Properties menu. And now we can go and edit mode. I'm going to move in
here on the right side, and let's rotate
it for 90 degrees. Now I'm going to
scale this down by pressing S and let's place
it where it should be. So now I'm going to
measure the first string here to about here. Let's give it a little
bit more, like so. And now we can go and extrude
it inside by pressing E and X2 is rooted
on the x-axis. Now I'm going to
select this edge loop. And here we can go and
press it to extrude. Click to cancel any moment. And now here we can go
and scale this down. E to extrude on the
X to about here. Now E2 throat right-click
to get some extrusion. And here I'm going to scale down U2 through
it one more time. I'm going just to repeat
this the last time. And here I'm going to press
F to fill the gap here. Now here we can go
and immediately add mirror modifier
because we need to also for the left side as well. And also here I'm going
to add Bevel modifier. And also I'm going to change
shading from flat to smoke. So now we have this, this smooth edges for this hard edges for this
connecting parts, we can go and add also subdivision surface
modifier to about here. Now we can go and increase
number of segments. Here, for example, I'm
going to increase to three. Now we can go and continue
with this part here. So here I'm going to duplicate this last edge tube by
pressing shift in the MVP. I'm going to separate it. Now. I'm going to move here to the side and select that circle. And now we can go and
scale this by pressing S and extrude it on the x-axis. Now I'm going to
scale it down and E2 through it one
more time to Kansas. Moment there. And one more time, I'm going to stretch it there. And here we have a
debt part as well. So now we need to
create this year parts. So for that I'm going to simple
syrup cube to the scene. Let's go and add subdivision
surface modifier, lettering, shading to smooth. And also let's go and
immediately add mirror modifier. Now we can go and move
in the edit mode. And here I'm going to scale
this down to about here. Let's place it like so. And here I'm going to
sculpt on the x-axis. Now I will turn on x-ray mode. Here we can go and pull
this all the way up. And now we can go and add edge loop by personal
control in there. I'm going to add one
more inside here. Now here we can
go and move it on the side and you can see that
we can go and scale it up. I'm going to add
outlook in the middle. And here we can go and
move those down by pressing G and C to make
it a little bit rounded. And here I'm going
to select all of these by pressing Z and 0. I'm going to align it. And we can go and increase it a little bit on the y, like so. And to make it more on it, I'm going to move this
slightly down here. I'm going to go and
also add edge loop there and make it a
little bit longer. Now we can select
everything and rotate it. So here I'm going to place
it where it should be. So here I can go and
select all of this and pull it inside, like so. And here we are done
with modelling here. So that's all for this video. We are done with modelling head, and now we can go and focus on the rest of the body.
So see you there.
3. Modeling the Chest: Hello everybody and welcome to our second video
in this course. So as you can see, we are
done with modeling kit and now we should focus
on the rest of the body. First, we are going to
start with the neck. For that part, I'm going to bring another circle
to the scene. And here I'm going to lower down the number of
vertices to 16. Now let us go immediately
in edit mode, and here I'm going to
scale it down by pressing S. And let's go in
x-ray mode as well. Now with Gen Z, I'm going to
pull it up to about here. And now with E and Z, I'm going to extrude it down. Now. I will extrude
it one more time. Right-click to cancel
moment of extrusion. And now I'm going to peel down and let's repeat the
process a few times. So it to extrude S to scale. The last time it's here. Now I'm going to press F to fill the hole here and
also here as well. And now we can go out
of XA mode and here we can go and immediately add
subdivision surface modifier. And now let's go and change
shading from flat to smoke. Also, we will need
to bevel modifier. So here I'm going to bring bevel modifier and
let's pull it up. And also here we can go and
add more segments to it. So tree is going to be
just fine as you can see. And now we can go and continue
with the rest of the body. So next is going to be
this a middle part. And for that part, I'm going to bring another cube to the scene. And let's go and scale down. And also I'm going to add subdivision surface modifier
with number of subdivisions. Now, I'm going to change
shading from flat to smooth and let go in
edit mode immediately. So here I'm going to
turn on x-ray mode. Let's scale it up a little bit. And here let's go into move this part up to about here and two, E and Z, I'm going to
shoot this new part here. I'm going to go and scale
this a little bit done. Entity E and Z. I'm going to extrude
it one more time. Let's do it one more
time last time here. Now we need to add
support loops. So I'm going to add
to support loops. Let's scale it up on the z. And also let's go and
do it the same here. Press SC. Here. We can go and
select this part here, and also this part here. And you can see that he can go and scale it up a little bit. And now we can go and
add edge loop here. In this part we can go
and extrude it down. Now, I'm going to
pull this down here, I'm going to scale it up. And now here I will
just need to move this slightly up and add one more
edge loop in the middle. Now, I will need to scale this down and also scale
this top part as well. So here we can go and move this slightly up to
inflate the ball a little bit to make it
more spherical, like so. And here we can go and
scale it up a little bit. And now I'm going to go and also check if
everything is correct. Here I'm going to add one more subdivision
surface may differ. Now we can go and move in right orthographic
view with x-ray mode, you can see that you need to return this a little
bit on the back. So I'm going to select those
two and more it on the y, this top part as well. Now I'm going to select
all these backwards. This is Andrew gene Y. I'm going to pull
it slightly back. And now we are done with
modelling debt part. So now we can go and focus on this Down button for that
perfect new simple cube, I'm going to add a
subdivision surface modifier, likely to change
shading from smooth. And now I'm going to scale it down and place it
where it should be. Next, we can go in x-ray mode, and here we can go and select those done vertices,
scale it down. Now I'm going to add an edge
loop here and pull it up. Let's move. This part
is slightly down, and now by pressing K, we can select everything. And with ES index, I'm going to scale
it on the x-axis. Also this part here. Let's return it a little
bit and most likely down. Now let us go and also
scale it on the Y. So this part needs to be wider. Like so I'm going
to select this and I'm going just to move it
manually purposing G and Y. And here we are done with
modelling that part as well. So here maybe we can go and
add one more edge loop. Now we can go and focus on
creating this backpack. So for that part,
Let's go and add simple tube subdivision
surface modifier, likely to change
shading from smooth. Now I'm going to steal it
down g and y to pull it back. Now, I'm going to
scale it on the y. Here. We need to turn on x-ray mode. And with Gen Z, I'm
going to pull it up and also down as well. Now I'm going to
add edge loop here. And also now we can go and add edge loops on top
and bottom part. Now we can go in front and
here I'm going to scale up. And let's go and add
one more edge loops. Here you can see
that we are done with modelling the backpack. G and C also here. I'm going to go and move
it to stretch the back here. With the shift in D. I'm going to duplicate this, scale it down and placed
for this part here. Also, you can go and scale
it up a little bit on the x. And here we are done with
creating the backpack. So that's it about the studio. Stay tuned because in
the next video we are going to add legs
and arms as well.
4. Creating Arms and Fingers with Bevel Modifier: Hello everybody and welcome to our third within this course. So as you can see, we
are done with modeling, but the end now we should
focus on arms and heads. First, we are going to create
those connecting parts. And for that I'm going
to simple circle here. I'm going to lower down
number of vertices to 16. Now I'm going to go in edit
mode and move it on the side. Let's rotate for 90
degrees on the x-axis. And I'm going to press S to scale down and place
it where it should be. Now I'm going to press E
and S to scale it down. Now I'm going to extrude
this inside by pressing E. And now we can go and press
E and S one more time. Now we need to pull this out by pressing E and y on the y-axis. Now one more time, E and S to scale it inside. And let's go and
place it inside. And here I'm going to press
F to fill the gap here. Now we can move in right
orthographic view. And here I can go in x-ray mode. And I'm going to select
all these vertices and I will best SY is 0 to
align it on the y-axis. And also I'm going to do the
same with the front part. Now we need to go and
add mirror modifier. But at this time we will go and mirror it also on the y axis because we want
this shape to have on the other side as well. So I'm going to
mirror it on the y. Now we can go and
press G and Y to move it in here I can go and
select this edge loop. And by pesky and y, we can go and book bullet back. And don't forget to
turn on looping. So now I'm going to
connect those two. And here we can go now and apply mirror modifier by
pressing control and day. And now we can go
back in edit mode. And here I'm going
to just go and scale it on the y-axis here. And here we are done with
modelling debt connecting part. Now we can go and add subdivision surface
modifier with number of subdivisions torque. I'm going to change shading
from flat to smooth. And also I'm going to
add Bevel modifier. I'm going to pull it
up to about here. And here we can go and
increase segments three. And here we are done
with the depth, but now I'm going to press a to select it and
it's shifting D. I'm going to duplicate it down, but I'm going to go and
get rid of this half here. Both of these by pressing
X and selecting them. And now we can go and
add mirror modifier, it mirroring only on the x. This time. Here I'm going
to go and press L to select linked objects and
scale it down like so. We are done with
this first part. Next we have this huge arm, but, and for that part
we are going to use one more time circle with the shift in a. I'm going to create simple circle
to the scene. Now we can go in edit mode, and here I'm going to rotate
it and scale it down. First, I'm going to
match this top part. So I will press air to rotate
and scale it down like so, and place it here on top. So now I can go and
start extruding down. So I will press ear to
extrude it to about there. Now that E and S, I'm going
to extrude this part out. And with a, I will extrude
along this huge part solving. I will press U S to scale it. So I'm just following
the reference image. One more time here. Let's scale it
down a little bit. To about here. I'm going to rotate it slightly. Now, I'm going to press
E and F scale inside. Now I will start extruding
for this down part. I'm going to return
a little bit. Now. I will extrude it far more time, scale it down a little bit
more time for this last part. Now I'm going to extrude this, the inset as well to about here and also eat
through that insight, scaled down a little bit
and I'll press F to filter. Hold here. Now, I'm going to do the same here
for this top part. So I'm going to scale
down a little bit, E and S, and extrude it inside. Scale down a little bit and press F to fill the gap there. Now we have this part here so you can see it's
moved slightly down. So I'm going to
go and back here. And here I'm going to select
those three vertices. And also make sure that you
select on the both sides. Also here and here. But you don't need to select
those insights vertices, so you need to do select them. So we need to just
out so you can check it if you go out of x-ray mode. So we need three on the
backend, three on the front. And now I can go and move it
slightly down to about here. And now I can go and select those two and
move them slightly down at substitution
Surface Modifier with number of
subdivisions, tooth. And let's change shading from flat to smooth in object mode. And you can see that
we are almost done, so we need only
supporting groups here. So first I'm going to go and add support loops here on top
by pressing Control and S. And also here as
well as well here. One more, one more here
inside to about there. Now for this bottom part, I'm going to go and
add support work there and also here out
and instead one more time. And also on this
ending part as well. So on here and here, and also on inside as
well to about there. And here you can see
that we are done with modelling this huge part. So now we can go and add mirror modifier to add
on the other side. And also here we can go and add Baltimore support loop
here to make it tightened. And also here, we are done
with those two parts. Now we have this
small joint here. And for that part I'm
going to use circle once again with number of
16 for the vertices. Next week can go and edit mode, and here I'm going
to scale it down. Let's enter in x-ray mode. And here let's place
it inside as well. This circle to about here. So now we can go and
start extruding down. So I'm going to
press E to extrude. Let's kill it up a
little bit so we can go and start follow the reference
image as much as possible. I'm going to rotate
this a little bit and place it here on top. Now I will go and rotate
this second one as well. And also this one here. I'm going to go and align
it a little bit better. Now I'm going to press E
and S For this out part. Let us go and press E and S
for this small part inside. And now I'm going to do
this one more time down. This time I'm going to
scale it down E and S. Now for the last part, needs to go out. And here I'm going to just
go through the inside. And let's go and scale
it down a little bit. So now we can go and add subdivision surface modifier
with number of subdivisions. And also we can go and
add Boolean modifier. Actually NOT Boolean
but beveled. And I'm going to just pull it up and change shading
from flat to smooth. And here you can go and
add more segments to it. And now we can go and add
four arms for the forearm. I'm going to use
circle once again. Let's go and scale it down. Rotate it on the side. First, I'm going to
merge this radius here of the reference
image, like so. Next you can go and move right orthographic fuel and
move index mode as well. And here you can
see that we need to rotate it a little bit. Let's back as well
to about here. I'm going to scale it up
a little bit. Like so. And now we can go and extrude
it down to about here. Now I'm going to press
E and S to extrude it out for this outer part. And let's go and extrude it all the way down to about here. And now I'm going
to press Z and 0 to make it perfectly
state on the z-axis. Now I'm going to
press R to rotate. And now I'm just going to
pull it to about here. Let's move in right,
orthographic q. Here you can see that we need
to rotate it a little bit. Now we need to create
holes for fingers. So I'm going to press E and
S to extrude it inside. And now with E, I'm
going to pull it inside and F to
fill the gap there. Now I'm going to press F
Once again on this top part. Let's go and add sub Digital Surface Modifier with number of subdivision two. Now I'm going to change
shading from flat to smooth. Also, you can see that we
need to add supporting loops. So here I'm going to press Control and air and pull
it all the way down. Now I'm going to go and add second one here
for this top part. Let's go and add one more
here and one outside, one down, and also on, on top to about here. Now we can go and add an
edge loop here as well. And also out. One more insight just
for the fingers. Here you can see
that we are done with this forearm as well. So maybe we can go and just
kill it up a little bit. And maybe a little bit rotation
is going to be just fine. And you can see that on the
writer at orthographic view, everything is just fine. The last part of the arms, arm is going to be fingers. And we can do it by getting one. And later on we are going to duplicate that one and
arrange them around. So first I'm going to add
simple cube to the scene. So now I can go and
edit mode scale down. Let's move it here on the sides. Here I'm going to use
subdivision surface modifier. Now I'm going to change
shading to smooth. And let's enter in x-ray mode. Here I'm going to select this
top part and the G and Z. I'm going to pull it
up to about here. Now I will press E and S
took through that insight. E and Z to extrude it
up to about there. Now I'm going to extrude it
out by pressing E and S. And one more time here
on the z by pressing E, I'm going to suit new face loop. Now we need to go and
add supporting globe, so with control and
there I'm going to pull it up here, down here. Now I will need also for
this inside part as well. Now for this out down part, we will need to do the
same here and also here. And we can go and
add also loop cards here and also one
more insight there. So now I'm going to move in
right orthographic view. And here I'm going
to just move this slightly up, like so. And now I'm going to
extrude new face on the Z, test E and Z to extrude it down. Now I will go and pull this up. So now I can go and
duplicate this one. So first let's place this
one by rotating around here. Let's kill it down a little bit. Now we can go out of x-ray mode. Now we don't need to follow the reference image that March, so we will need just to arrange those fingers as it should
be with the shift in D. I'm going to duplicate
this one here, j and y. I'm going to move it in front. And now I'm going
to go and press L to select this linked object. And with the shift
in D, I'm going to create the third finger. But this time I'm
going to move it slightly back by
pressing G and Y. And also I'm going to look like I'm looking
right now and I will just rotate it slightly
on the side, like so. Now I'm going to duplicate
this one and place it here. And now with G and I'm
going to place it inside. Also, I will, I will look down, so I will be able to
rotate it around. Press just air to
rotate it slightly. Here are considered. We can go and rotate
it a little bit more. I'm going to place it there. Let's move on the side
here, slightly up. Now I'm going to
select this one here. Make it a little bit straighter. Let's go and select this one here and move it here as well. Now the last one is
going to be tamp. So I will duplicate
this one here and place it by
pressing G and back. And with j index, I'm going to move
it slightly there. And now we will need
to rotate this one. I will read more and you can see that we are
done with fingers. Now we can go and only this, we can place it a little bit
more insight than the rest. And here we are done
with creating fingers. So now I'm going to add also
mirror modifier on joint, forearm and fingers because we are missing those
on the left side. First for the Giant, I'm going to add
mirror modifier. Now for the forearm, I will do the same and the last one are
going to be fingers. And here you can see that we
are done with modelling arm. So that's it about the
city-state you on the customer. The next video we are
going to finish our modelling with
creating collects.
5. Finish Character Modeling With Creating the Legs: Hello everybody and welcome to our fourth video in this course. So as you can see, we are almost done with
modelling color, but now we can go and
focus on modelling legs. So for that part, I'm going to use another circle to the scene. And here I will go and lower down number of vertices to 16. Now let us go in edit
mode and scale it down. So first we are going to
create those who joins here. So I will go ahead and rotate this and I'm going to scale it inside and make sure that you're working next famous so
you can see better. Now I can go and start
extruding this down. So I will press E to about here. Let's kill it down. Now I will press E
and S extruded out. Now, eat one more time. And now I will need to
rotate it a little bit. Now let's go and
press E and S scaled out to move it down
one more time. But this time I will need
to rotate it as well. Now let's go and
press E and S. Let's kill it up a little
bit and place it here. Now I'm going to extrude
it one more time here. Let's rotate this one as well. Eat and S to extrude it out. Let's move this one a little
bit here on the side. And now we can go
into extrude it down as you can see here, and rotate it as well
for this bottom part, next weekend go and add
subdivision surface modifier. Also, we can add Bevel modifier. I'm going to pull it up. And here we can add
more segments to it. And as you can see,
we're almost done here. Consider that we are
having COBIT issue here. So I'm just going to go
and scale this down. And everything seems
to be just fine. So everything is correct and we can continue
with this part here. So for that part one more time, I'm going to circle. Let's go and scale it down and place it where it should be. I'm going to rotate
it on the site. Let's scale it up a little bit. And now I will just
press it to extrude. Let's rotate it as well. Now, I will press E and S. Now we can go and extrude
it down one more time. I'm going to select
this edge loop and scale it up as well. Let's go through this part one more time by
pressing E and S. Now, I will press E and Z
to exclude the doubt Z and 0 to make it perfectly
straight onto the z-axis. Move it two down. And now I will press
E and S to extrude inside and E and Z to extrude
it down one more time. And now I will create whole
insights on press E and S and E and Z to
through the inside. And now we can fill
this gap here by pressing F. Now you can see that you can go and add subdivision surface modifier with number of subdivisions to change
shading from flat to smooth. And here we can go and start
adding supporting loops. So I'm going to go and start
with this bottom part. Also here for the
insight control. And there I'm just adding
supporting globes too, but here is going
to be just fine. Now for this part, I'm going to pull it
all the way down, like so, and here as well. Now let's go and
make this top part. Like so. Also here
and down as well. Also on the sides. Here I'm going to press E
and S to suit the insight. And I'm going to press
F to fill the gap here. We are done with
this part as well. Now we have this small
joint here which we can go and duplicate
from this top part. So press L, select this
object shift in D. And with P, I'm
going to separate it as a separate object. Now we can go and grab it here. And with error z and 90, I'm going to rotate it for
90 degrees on the z-axis. So let's scale it
down a little bit. And here we can move it on the side to see if
everything is correct. Now we can go and add this
last part of the legs. So for that part we can
use one more time circle. Let's move it here on the sides. In edit mode, I'm going
to scale it down. Let's place it
where it should be. I'm going to measure this
first radius on top. And now I'm going to
move here on the side. Let's move it there. I'm going to scale it up a bit, E and Z, Z and 0. I'm going to make it
perfectly straight this and align it on the z-axis, E and S to extrude it out. Now I'm going to scroll
all the way down. I will start extruding
kiss Insights. I will press E and S
and S 21 more time. Let's go and create
this small one here. E and Z to pull it inside
and F to fill the gap here. Now we can add subdivision
surface modifier with number of subdivision to change
shading from flat to smooth. And here we can add
support loops as well. So I will go and add
them by pressing control and they're
on each of this. Also we will need here as well. Now we can focus on
this bottom part. Here. Let's move
it down as well. I'm going to add
lung inside as well. Also here. And let's
move now on top. Now I'm going to go and press
F to fill the gap there. And I will press I
for insisting phase. Now I'm going to go and
add support loops here. Now we have this small
insight as well. So I'm going to add simple
cylinder to place it inside. Here. You are going
to be just fine. I will go and add a
subdivision surface modifier. Now I will need to
add supporting loops. Also here and insight. I will select this edge loop
and press I to insert phase their pledge chain shading
from flat to smart. I'm going to move
it slightly down. Let's add one more
support loop on top, like so here we are
done with that part. The last part is
going to be this leg, but I will go and duplicate this joint here
with the shift in D. I'm going to place it down and I'm going to just
scale it on the ZX. Let's move it here in front to see if everything is correct. I'm going to scale it
a little bit on the x. And here we can go and scale
it a little bit on the y. Now the last part is
going to be adding mirror modifier on
those huge part. As you can see,
we're missing those. I will just add them now and we are done with
modelling our robot.
6. Cleaning Up The Scene And Applying the Materials: As you can see, we are done
with modeling car model. And before we
continue on shading, we are going to clean up
our module a little bit. So first we are going to
arrange mirror modifier is always on top on each of
the segments of our model. So here I'm going
just to pull it up. Let's go ECMO On the
next part, like this. So just make sure
that you are having mirror modifier always on top. Now I'm going to move
on arms as well. Also here. Here as well. For the ears and all other
segments should be just fine. We are having this small
back part and here we are going to add also mirror modifier because
we forgot to add. Here, I'm going to pull it
up and weed control and a, I'm going to apply location
and now I'm having mirroring effect also here for this face because it's
just simple cylinder. We are missing a little bit more vertices and information. So here I'm going to go in edit mode and with
control and error, I'm going to create a loop
and pull it to about here. Now, I will add one
more and move it down. And now we are done
with that part. Now if you switch to render it, you cannot see anything because we didn't have
any last of the scene. And also right now, we don't need anymore
reference images, so I'm going to hide
it from the scene and also disabled
from being rendered. Next I'm going to go
under Edit preferences. And here I'm going to search for Node Wrangler add-on and
make sure that you are having this box checked in and this Node Wrangler
add-on is amazing because it allows you to use different shortcuts when
you're using nodes in Blender. For example, let's
go under shading. Here. I'm going to switch render
entering from being able to cycle because we weren't
higher-quality of the Render. And also here I'm
going to turn on transparency under
fill like this. And as you can see,
everything is dark. So here I'm going to
switch from object to world trading with
the shifting a, I'm going to find sky texture. And now if you go and
connect those two together, we will have sky texture
and meeting to our model. And here you have different settings that you can play with. So for example,
with the dust and also Sun's size and
rotation as well. For now I'm going to keep
everything as it is. Let's go back to Object shading. And here, let's go and
create our first material. So first, I'm going to select this part as great new material. And here we are going
just to touch it the same material
to all those parts. So here I'm going to
hold shift and on all orange parts I'm going to
select it by holding Shift, also backpack, helmet as well, and ears and this part as well. The last part that I'm
going to select is going to be this material that I have. And by pressing control and L, I'm going to link those
together as you can see now they're all sharing
the same materials. For example, if you
select this one here, you can see that we are having ten different
elements on our sin, detaching the same material. Now let's go and create another one here for
this black material, I'm going to switch the color
and now I can hold Shift, select all the other
parts like those. And the last one that I'm going to select is going
to be this one here. This is going to be active. We can see this light orange and I will once again press Control
L, link those together. So now they're saying
the same material. And also here I'm going just to go and find
this other material. Now let's go ahead
and work a little bit here on this art materials. So we need to make it metallics. Here. I'm going to
paste metallic to one. And also with the shifting, am going to search for
water on my texture. Right now because we are
having Node Wrangler Adam, we can preview this by
holding Control and Shift and left-click here, we can see our Voronoi
texture and I'm going to increase this
one to 10000 like this. So here you can see
those small dots. And just I'm going to plug
in these two roughness here. And now I'm going to go
and select this principle, BRDF to connect this one
to material outputs. So here you can see
those small reflection which materials should have. And also here we can go and change our color a
little bit like this. And now also I'm going
to do the same here. So once again, Voronoi
texture scale, I'm going to increase
it to 1 thousand. And here I'm going to
plug in this color, roughness like this and also make sure that you
are having this metallic. Don't worry about the phase
we are going to later on, the texture painting
on the face. So here you can
just go and create new material with
black color like this. That's it about the studio. Stay tuned because in the
next video we are going to add some grass on the edges. And also I will show
you how to create bumps and also later on we will
paint on the face as well. So see you there.
7. Applying Procedural Rust Material on the Edges: Hello everybody and
welcome to another video. So here you can see
that we are having this basic metal material
that we created previously. And now you're going to add rust on the edges of this metal. Here. I'm going to go
and move this here. And the basic concept
that we are going to do here is we are going to create two materials
and we are going to combine that material
into one material. And we're going to later on to tell blender that we want to the other material only to be visible on the edges
here with a shift in D. I'm going to duplicate
this first one here, and let's change the
color here to white. If now with the shift and a, I'm going to search
for mixed shader node. So now I can go and join
those two together. And now you can see that we are having these gray material, which is a combination
of this black and white. And here you can see that if you pull this all the way
till one is going to be pure white and
on the other side is going to be black,
as you can see. Now, this is going to be the node that we
will need to import another node which
will tell blender to use only one
material on the edges. And for that we are going
to use some geometry node. So let's bring it here. And now I will go and
bring color ramp as well. Now I'm going to use this point illness and connected here. And this one is going to control which material is going
to be on the edges. So now with control and shift, we can go and preview this year. And now as you go and bring
those two together closer, consider is starting
to detect the edges. Here you can see it. Now we have those edges and now if you go and press Control Shift
and left-click here. Now you will have this material, as you can see, we have this white material
only on the edges. So to add a little bit no
shear because this is pure, we are going to add another texture which is going
to be mass great texture. And we can go and
connect it here. So now we will need to go and pest control and shift
and video this year. And now you can go and
play here with the scale. So for example, you can go
and set it as you like. So also you can go and
increase details as well like this and
knowledge you connect this. You can see that we are having
those white edges here. And also, for example, you can go and also add
this noise texture as well. So with the shift in a, you can search for no
section and also add noise here as well and play also here with the
scale as well. So now let's go and set
other parts as well. So you can see
this. You will need each time to make
changes on each part. So here for example, you cannot, you
cannot see anything. So I'm going to make this one unique by selecting
this number here. And now I'm going to press
Control Shift and left-click. And now I'm going
to play here with this volume here, like this. And now everything
is going to be fine. So we are seeing those lines. And here I'm going to
leave everything as it is now we can go and
plugging this back. So we are having
those edges white. Let's go and focus on this
one here. Make it unique. Precedent that number here, Control Shift and left-click. And here you can go and
play with the scale. So starting, this is
going to be just fine. So we are having those white, white material on the edges. And here everything
should be just fine. And also here, for example, make this one unique. Select the number and play
with the scale here on this mass graves if you want
to see those white edges. And here everything is, should be just fine. Now we can go and apply the same principle on the
orange material as well. So here I'm going to
go and zoom it out. And now we can go and copy this by pressing
Control and C. And now we can go and select this orange material
and hit Control and V, we can paste it here. Now I'm going to use this
orange color here, this dicot. I'm going to copy this
hex code and try it. Now we can go and
remove this one here, connect this mix shader. And instead of having
the black here, I'm going to use this
hex code previously. Did I hit paste it here. And now we will need to set up each of these pieces
individually. So for example, you
can see that we are having issue
and on the Hamlet. And here I'm going to
make this one unique. And let's go and play
with the scale here. Actually, we can go and preview
it here because we want a little bit the edges. So something like this is
going to be just fine. I'm going to plug-in
it back here. Now for this hats front, I'm going to go and make
this one unique as well. So let's go and this time I'm going to use
preview. Once again. Something like this is
going to be just fine. Now, I'm going to plug in back. Also hear everything
should be just fine. Now, for this front part, I'm going to make
this one unique. Let's play with the scale. I'm going to use
this period mode. And this one is going to
be just fine as it is. Here. Everything is okay. Let's see, on the back and back, backpack needs to be
unique here as well. I'm going to go and
play with this volume. Let's go in preview mode. So we can see here we can go and add
just a little bit, something like this is
going to be just fine. Here. We are done with applying
the crust on the edges. So that's it about this video. Stay tuned because the
next video I'm going to show you how you can add bumps. And also later on I will
show you how to create phase for our small
rabbit. So see you there.
8. Bumps,Carves and Surface Imperfections with Texture Painting: Hello everybody and
welcome to another video. So as you can see
in previous video, we create a trust
material on the edges. And now in this video I will show you how to create bumps and also surface imperfections and curves symptoms your module. So first I'm going to select Jess and the, the shift and age. I'm going to hide everything
except stressed ethanol. I will switch in
material preview. So now we can go in and smooth. And here I want to go and
paint this edge here to another material
which is going to be black material that
we had previously. With the Face
Selection, I'm going to select those three
edge loops like so. Let's create a new
material slot. And here I'm going to apply a black material that
I had previously, also here on this top part
and with control and air, I'm going to add one more
edge loop and I will pinch the material
close to the edge. Now we can go and
move in UV Editing. Here we are here
because we will need to unwrap this model first in
order to apply bump texture. So as you can see, this shape
remind us of job which is subdivided and we are going to unwrap it like the simple cube. First I will move in Edge
Selection and it Alt, I will select this edge loop. And basically I will
go and hold Shift and select all those
four sides like so. Now with the shift, I will select also those three top adjust to connect this left
and right side. Now, by pressing right-click, I will mark those as a seems. So right now you can
see those red lines which is telling
wonder that those are the areas where the
cutting is going to happen. So here you can go and burst
a to select everything. By pressing you unwrap, you will be able to
unwrap your model. So here you can see
the production of your 3D model on this left side. Now we can go and move
in textured paintings. So right now we are in
texture painting workspace. And on the left side
we can see our UV map. And on the right side
you can see our model. As you can see, we don't have
any texture yet created. And when there is asking us on which material we want to
create and add texture, I'm going to select
this orange texture and create a new bump texture and increase the resolution
to for k. So we can multiply this
number by four. You can press Okay,
and we have created our first material
zeros 09 bump texture. Let's switch here as well. So you can see that we are
having this white color. For example, if you start
drawing on your model, you can see that this
white line appears and we are creating
bump this way. And if you scroll
down, you can see that currently by default
is set to be white. And if you switch to black now you will be
able to carve into your model and the black line
appears on the texture map. Here. I'm going to undo it. Let's go and switch our brush settings
here for our stroke, we are going to use this table I stroke for creating
smoother lines. And for the follow-up,
I'm going to switch from customer
to constant. And I will scroll
all the way down to turn on the x mirroring. Now we can switch in object
mode and without the date, I'm going to unhide everything. Let's tree height our
reference images. And now we can select
our stress back. And let's return in
texture painting. And now we can start to draw
in our cars into our model. So first we can start from neck and I'm going to
move it slowly down. Now we can move on to
site a little bit. And we can go now
down once again. We can finish it
inside just slowly. Now I'm going to draw a
line on the site as well. Here we can switch in right
orthographic view and finish it all the way back. Like so. And as you can see, we created our carves into our
chest and now we are going to do the same effect also on
the legs and arms as well. So here I'm going to
search in object mode. And let's select this part here. As you know already, we will need to
unwrap this first. So I'm going to use
different methods this time. And this one is going
to be project from you. As you practice, you
will be able to find this option which is
called Project from you. And here you can
see your UV map. Now we can go and switch to texture painting here
instead of edit mode, return it to the
actual painting. And here if you go
in row properties, you can see that we will need
to create another texture, which is going to be
the same bump texture. Right now here we can switch here to
material bump texture. And instead of having
space stroke brush, we are going to
use this timeline. And here I will just
draw simple square. So I'm going to hold
out to be more precise. And also here as well. Last one is going to be here. I'm going to repeat
it one more time. You can see that we
are having several, several issues on our model. And the reason for
that is because they are sharing all
the same material. And also we have squared
on the other side. And that one is because we
are used to protect from you. So I'm going to switch
now to UV Editing. And here I'm going to switch
the material bump texture. Here we can see
our black square. And the easy fix for these
back faces is going to be we can go and
just simply select those back faces by holding
shift and select them. And we can just move this
to the side on our UV map. Now I'm going to unwrap
this one as well. So I will go in edit mode. And once again, I'm going
to use projects from you. Now with g, I'm going
to place this one here. I will scale it up
and place it there. Now let's go and do
the same here for the arms and forearms. I will rotate this time, scale it up and place it
inside as well to about here. And the last part is going
to be this part here. You project from U and V, G and I'm going to
rotate it and grab it. Like so. Let's scale it up. And now we will need to
remove back faces as well. So here we can just simply
select those back faces. And just in UV map
with GMO is to decide, I'm going to do the same
here on this one as well. The last one is going
to be this one. And g to the side. Here we are done with adding
curves into our model. So if you go under shading, you can see the blender
created this bump, bump node. And here you can go and
control the strength of it. So here I'm going to lower
this down to 0.4 and tools. So I'm going to use the
same number for our chest. And as you can see, we created nice curves into our model. There is also one more thing
that you need to know about this technique is
that you need to save all your textures
before you quit blender. Because if you don't save them and once you reopen
your blender, all textures are
going to disappear. You can go under UV Editing here and here we have
this material bump. I'm going to go under Image. I'm going to rename this
one, bump, one texture. We can go and save as the image. And now I'm going to
save the other image, which is going to be just bump. I'm going to go at
once again under Image Save As and
this one is going to be bumped, just texture. And we can save
this as the image. That's it about this video. Stay tuned because in the
next video we are going to do texture painting on the
face. So see you there.
9. Drawing the Face, Creating Turnaround Animation and Final Render Settings: Hello everybody and
welcome to another video. So in this video I will show
you how to create face with texture painting on the
face for our small robots. So first I'm going
to select Trace. And as you already know
for texture painting, we will need to have
UV map created first. But if you select our
face and go to Edit mode, you consider it,
it's already made. And the reason for
that is because we used cylinder as a primitive. And by default, all primitives
comes with the already made you remap so
we can go and jump immediately in texture painting. First, let's go and
create a new texture. And this time it's going
to be a base color. So I will multiply this
number by four to make it for K to add more resolution
to our texture. And if you press Okay, you can see that we created
material base color. And let's switch also
here on this left side. Now we can move in front
orthographic view, and I'm going to
change color to white. And for stroke I
will use line first. And let's call all the way
and turn on X mirroring. So for the eyes, I will
create a simple two dots. So with F, I'm going to increase the brush size to about here. Or you can press right-click
and do the same here. And I will just press once to create two dots for the eyes. And now I will switch my stroke, stroke method from
line to space. And this time I'm going to use stabilized stroke and
let's draw a smiling face. So first I will decrease
the size of my brush. As you can see, I
could smile face and now I can go under shading
and tweak it a little bit. Here. I'm going to decrease roughness
to make it a little bit less and also decrease a little bit specular
to about here. And now we can go and
start getting out Turnaround Animation first
with the shift in a, I'm going to create
simple plane. Let's scale it up.
Now by pressing a, I'm going to select
everything and make sure that your active object is
going to be this empty, which is, which will be
represented as a light orange. And we can press
Control MP and set parent object and
keep this form. So right now we can move
this empty plane and the whole object is
going to move into, Let's place our robot on top
of our grid to about here. And with the shift in a, I'm going to create
simple plane. And let's kill it up. Now we can go and edit mode, and here I want to
create backdrops. So I'm going to extrude this
back edge to about here. And let's bevel this edge here by pressing control and
b and vice calling up, I'm going to add more segments to it by pressing right-click, I'm going to change
shading to smooth. I will create simple,
basic white material. And also for the Hamlet, I'm going to apply
my mirror modifier and I will apply subdivision
surface modifier because I want to
go in edit mode and here on top I want
to add two stripes. So here I will switch
to face selection. And by holding Alt, I'm going to go and select
those two edge loops like so. And here I will create a new material and let's
apply orange material here. Press Assign. Now we can go and make this unique in object
mode by pressing here and here we can go and
change the color of it from being orange
to pure white. So let's change it. So now we have
those two stripes, but we are having all supplied here so we can move
in edit mode here, turn on the extra X
mirroring and to about here, we can just assign the same, the same first material
that we had here. So something like
this is going to be just fine and now
we can continue. So first let's go and create
a Turnaround Animation. So I'm going to move
in layout, workspace. And here I'm going to
decrease number of frames for our mission to 120. And we can move on
our first frame. Here I'm going to
select my empty. And now if you press air and Z, you can see that it's
rotating or out in self. So I'm going to press
N and under item, I'm going to press right-click here and insert first keyframe. Now we can move on
our last keyframe, which is going to be 121st frame because we wanted to
create the loop animation. And here on the z rotation
I'm going to write down 360 and I will press I once again or you can right-click and
insert keyframe there. And if you play this animation, you can see that our
model is rotating, but we want to
create this model to rotate around itself
with concepts bit so we can change
it by pressing a to select both of
our keyframes here. By pressing T, we
are going to change our interpolation keyframe
from being Bezier to linear. Now if you play this animation, you can see that our
model is rotating itself, the constant speed. Now we can go and add
simple camera to the scene. So with the shifting day,
I'm going to create camera. I'm moving the
writer to graph Q. Move on our first
keyframe and the G and I will pull it
back and Lindsey, I will place it on top like so. Now we can press 0 to entering camera view or we
can toggle it here. Let's move our camera
slightly down to about there. And now I will go
under shading and switch my light to the scene. First, I'm going to turn on the sky texture that
we created before. And this time for the lights, I'm going to use simple
plane which will go and pull it up to about here. And now let's add
a mission to it. With the Shift. And I'm going to
search emission. I'm going to remove
my principal BSD F, and now I will plug
in it here, surface. So now if you go and render
it, you, for example, if you increase the scale
of it by pressing S, you will be able to add
more light to the scene. And also here you will be able to control the strength of it. So now I'm going to move my plane to the
site and rotate it, doubled our model to about here. Let's press 0 to
enter in camera view. I'm going to go and
scale it up like so. And let's increase strength
a little bit to about there. Now we can go under
under Settings, make sure that you're entering
our render engine set to cycle and don't forget
to turn on denoising. And also, for example, under column management,
you can play with the look to
add more contrast. I'm going to keep everything
as it is for now. And under output, you can change your resolution of
your final render. Here for frame rates, you can
keep 24 frames per seconds. Here you will be able to
see your frame wrench. And under output here
you will be able to select where your files
are going to be stored. And if you want to
render the animation, you can go and change
from being PNG. Also, you can render
it as a PNG sequence, but you can switch any
of those movie pharmas. So for example, every
JPEG or for example, if we want to render
it as an MP4, you will need to switch
this file format to FM fact video. Here under recoding,
instead of this, you will need to
switch to MPEG-4. And everything here is already
just set to be just fine. Now if you want to
render your animation, you can just go Render, Render Animation
and your animation is going to be
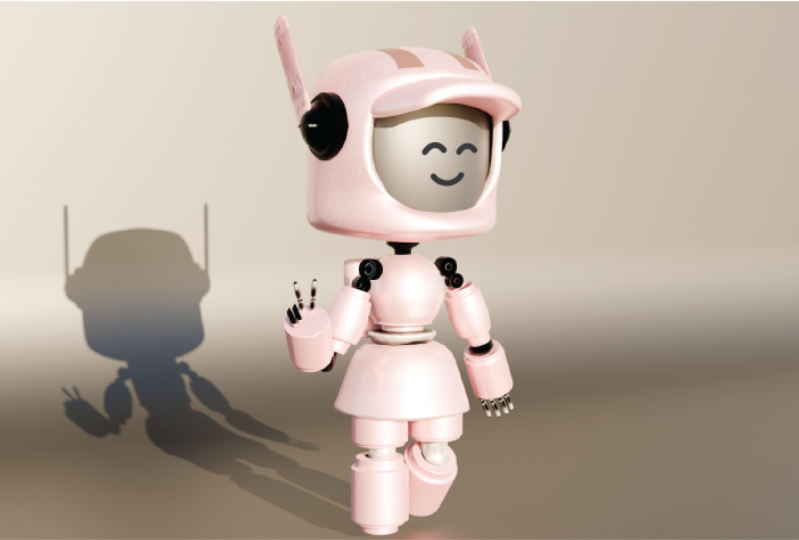
started rendering. So that's it about this course. I hope you had fun creating this small cute orange robots. And if you have any questions, let me know in the
comments below and I will try to answer them
as soon as possible. So I will see you
in the next course. But
 Nodiken 3D, 3D Artist and Animator