Transcripts
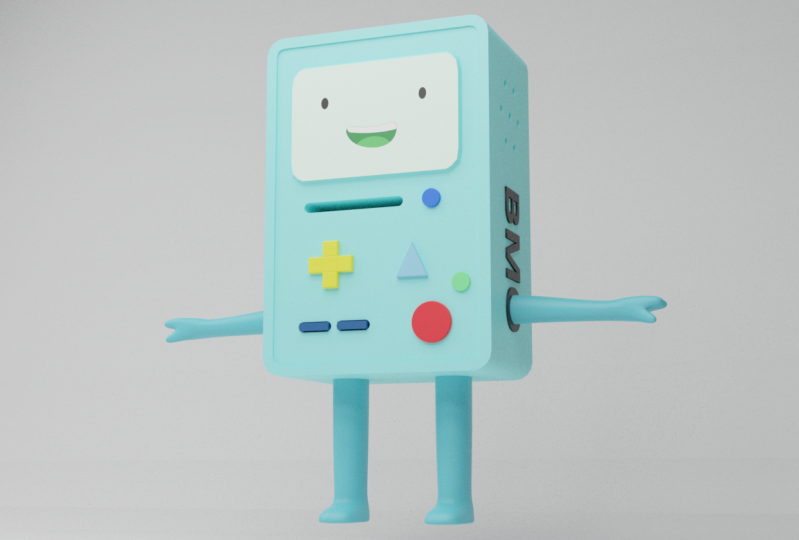
1. Class Introduction: Welcome, friends. I've been expecting you because of my proximity Radar. Come on the side. Hello, everybody. And welcome back to another course of my name is Gena. And in Discourse. I'm going to teach you how you can create. Be more from adventures time in Blender 2.82. So, yeah, Come along with me and see you there.
2. Modeling The Body: so before starting modelling be more from central time. We need to go to our Web browser and search for front face off being so you can find some of these pictures and you can also don't want them for reference. Also, try to find 11 from from from cartoon something like this, because it will need those colors for our Bheema and the last thing that you need. We need to be face so surgical face and you can get, for example, this one with the smile on. So now let's continue in black. So let's open our blender. And as you can see, we are right now in 2.82 I will go here and create a new file under General, Let's delete our difficulty by pressing X on it, and I'm going just with to turn on my screen guest So right here to see what I'm pressing. So now with shifted A, we are going to import our reference images. Some may toe pick reference, and here I got those three references, so first I'm going to put this one, but actually I'm going to leave this one and I go in front or too graphic you by pressing number one. Keep on a keyboard or lump it in with the shift in a now important this be more front reference. So also, I will import the second reference the they want from cartoon. But I will not need this one for now. I'm just going to move to this side by pressing G and extra might on the X. And now I'm going to select this first reference and I will go here under image settings under properties, many. And here I will just use offer and decrease capacity about their brain. Four. And I will disable this image. Tau bay you in protective. So now you can see only cartographic fuel, as you can see. Also, by going here and enabling this option here, you can disable this reference image from being selected. So now we cannot select anymore our reference in your port. So now with shift a being back, my cube and now in edit mode by pressing tab and control there, I'm going to create creator fragile appear in the middle, and I will delete those toe worthless is here in the sight. And now I will select everything with a I will go in modifiers under my differs and I go flying meter on Monday. So now with a I'm going toe, select everything and I'm going to scale this killed up. But here I'm going to enable clipping. So as you can see now, we can move our cube and everything what we do on the right side if it is going to be mirrored on the left side. So let's kill this up. And also, let's turn on X ray right here so we can see it better. So we need everything both sides and a Let's kill everything up to about here and you can see that we need to skilled on the Y axis something like this. But I'm going to scale a little bit more. Also, I outside of this reference because I want to bevel those hedges. So let's see house looking and he's looking fine for now. So let's go back in edit mode. And now with their selection, I'm going to select those two edges and by going in front or to graft, you enabling X ray. I'm going toe press command, be for Bevel and I will just double those address. And if you scroll your most feel up, you will be ableto to select number off faces that is going to be created with public. So unless it is it to about here something like this, this looks good and I'm going to keep it. So now let's go in face election and let's like this front face here and now with the way we're going toe, insert the face inside to about here. But in this dialog box we need toe. They're not offset even And also actually, we are going toe Keep offset even. But we're going to turn off laundry. So now again with I insert one more face inside the cost I want to have some depth here on this small I smoke a small outline around this one here and now One more time e for insisting face just a little bit. Be careful. Don't go too far because you will have problems faces. So just just a little bit about here And now. Let's kill this on the Z axis with Z, N, G and Z to move it up to match this window. Sure, this is scream. Bima. So with Gen X years Morton, the X And also now we need to scale up a little bit and just a little bit on the X. Now, that's perfect. So now I'm going to go in selection and first I will select. Those are just those those were This is here and now with G and back. So I'm going to move it to match our a reference image. So next is this one. And also we need toe scale this on a Z axis to about here. So let's see about this one and this one. So we need skilled just a little bit on the Z axis. Now we need to select the next tool P and extremely Index and SNC tomorrow it both the direction just to match those this line here. So that's almost perfect. Now let's get dinner. So those to be extra militant X SNC s Z This That's fine. So we got a guest left, So this one and this one, I believe so. I was like this one and this one actually lived it manual t like this. This one here on this one there. This one here in the last one both here. So now I will select those two. And with s and X zero, I'm going toe our land, um, together to be in the same position and also here this So let's see if way need to correct something. So maybe this one here used to be able to get this may be just a little bit. Don't And I believe this is fine. So we need just a little bit more to align them to be perfect. So we are done with death part. So now I'm going to slit this face here and let's go in right or too graphic you by pressing Gina Clampett entreaty. Need toe extruded this face a little bit up out of this and let's just kill it a little bit like this and skilled on the X, something like this, we'll be fine and we got our screen create. So next we need to make those those small three holes on the side of the moon has thes 12345677 on this side and seven on the other side. So let's do this by moving our Dickerson right here on the side and with drifting A We are going toe import. Great. A new cylinder. We're going to keep everything here the same. And by pressing and X, we're going to rotate this on the X axis, but scared this a little bit down. Actually, let's move this by pressing and on up it just for better calculation here on the, uh, zero everywhere on those three access. So also with shift and see, we're going to return our de Vieux port. And now, with shifting the was duplicated on the X axis Here we are going to duplicate on 11 meter. Next it. And now we need in the opposite site. So minus one. So we got those street circles. So let's just turn off X ray and its height. This so what we need for more. So this one needs to be a bit up. So here we are, going toe type one on a Z axis, and we need to move it, do about, let's say, 0.5, and also we need one more. So I just duplicated and cancel it by right click. And here we need minus there by five. And now we're going toe duplicate those two with shifting day and moment on the Z axis. And here we are going just just this. And here we are, going toe right down my response. But this one, and also for this one. So now we got those for those seven actually feeling there's that we need to put here on the site of the Bheema and now I'm going to select everybody's cylinders. But the last cylinder that I'm going to start is going to be this one in the middle and with Control and J, we're going to during those together. So now in edit mode, I'll go and rotate those those into sea access for 90 degrees more with of the X like this . And here I'm going just toe apply meter modifier. So we have a boat both on the both sides, those senators. So now I'm going toe on height. This this body off Bheema and more in writer to graph. If you have a scale, everything down to about here and three with GM, see, I'm going to move it up. So left. Let's see if it's good. So it's right here and that's fine. So right now I'm going just to apply this mirror modifier. And here I'm going to select this, uh, this body, and here I will just apply a new bullion door. But before that, let's go on back side off this body. I forgot toe make, uh, slot for, but there is So I select this thesis backside off the body, and I created a new faith here and here. I'm just going to scale this like this on and move it to about here because this is going to be a battery slut. So something like this And here, with the on going just to scare this a little bit like this and that's perfect. You're not going to do anything. They're So now we can easily just apply this mirror much fire our body off Bheema. And now I'm going to select Buddy and I will go and apply bullion, 1,000,000,000 modifier and for difference. I'm just I would just like cylinders Miramar booty in tow bullion, actually, but the fire now I will select those cylinders and two it x. I'm going to delete it. And now you can see we made holes for our being. So that's it about this video in the next video. We're going to create buttons and also these slots for USB, and I believe this is a memory card or some some some kind of slot for this, but so stay tuned.
3. Body Slots: everybody. And welcome back in this video, we're going to make buttons for our Bheema and also the those lots here USB slots and also will need one in the back. So now let's begin by creating those slots here. So first thing that I'm going to do, I go in X ray mode and now we can see reference image and told, but that we need to create. And now it shifted A. I will just create a new circle here. It's right here and there and Ex Im going to rotate for 90 degrees on the X location, and I will just kill this down this energy I'm going to move it to about here. So let's see skill just a little bit tomorrow, So that's fine. And now, with the shift and D, I just moved on the explication until both here. So now I'm going to select those two circles like this. And so Circle one insert does end with command Jr Control jm going to drive those circles together. So now I will go in and it moat and it better to select. Just read half off this cubes off the circles. So this year and also here. So now I will select this those toe worth asses and those stool as well. And now we have this lot here. So now with with a I'm going to select everything at its mode and let's go in the photographic field and here we are going to extraordinary why location, something like this. And also, let's move it in front like this and why? And let's scale it a little bit more by exists with us why? And just extruded out a little bit. So now let's more dough store for sluts. So I actually duplicated this lot here also for the USB slots and this one I'm just going to scale. Don't see if this could work so on when just to go in via remote to see if this actually way are going to do separate separated those floods. So I'm just going to keep this'll this lot here. So now again, I'm going to select the body of a Bheema. So it's also the name this one to be body and here I will again apply bully and gold bullion modifier and on the object, I will select this, uh, this circle, the cylinder that I have here and I would just applied. And now I just easily delete those. And now you see that you have slots here for our But so now let's do the same for our USB slots. So again, with the shift in a family located circle next for 90 days to write it on the night two degrees scared down and move this circle to match this year's be slot. So we need one here, as you can see. And now, with shifting D, let it decide, duplicate. And now we can during those circles together by pressing control and J. And now let's lead health off these circles. I think this and I was like those two worth assists and with F I would join them together, locate edge there and there's eight here and now. Let's like everything and we need to extract this. Why? So now we can select everything and the G and why moved outside off our body so we could just kill this a little bit explication. And now, with shifting, they were going to duplicate for the next slot here. So now we could do bully on this bullion modifier again. So object. Here we are going to select this circle one and we're going toe. Keep operation as a difference now blood. And now it could just delete those two sluts and you can see that we have holes for our user base Lots. Also, we need have some some cube here because we want to help to represent this one to be, you'll be slapped. So I'm just going to scale this like this and let's see, it's good on the front. I'm going to turn off X ray for now. Actually, this one is going to be good. So let's just just insert a little bit more inside of this and with shifting Davey are going toe duplicate the same out of sight. So like this. So now go solid you and you can see that we have those USB slot created and also the back them. SG three Beam has also one slot on the back, and also I guess it's cooling its cooling for being Mama's well. So I'm going to turn off X ray, and now we could just go on the back of Bima and actually, let's work in. We're afraid moat and Now with the shifting eight, we are going to create a new cube, strikes here, scale it down and do it here. So here at the bottom of Bima, we're going to create slot for guards. Actually, this one, I believe it's for it's four games or something like that. So here we have this cube like this one, and now we're going to move it outside of the demon. So let's go again at the back and hear what he could do. We could just go. And actually let's hide body for now. And let's turn our X ray. So here, let's go. In face election, those still faces here like this. And here we are, going toe interfaces like this. And also we could just get it on the explication. So we want to just outline off this one here and now. We could delete those two faces by pressing X and faces. So we have something like this, but we need to connect those faces inside. So this one and this one, Theis f those here as well. We could do this by going here and playing solidified modifier, but this one or the same, so it doesn't matter. And the last thing is this one here. So now we wait just one hide, buddy. See how it looks. So that's perfect. So now let's go in top, Photographic you and move it outside a little bit because we want way. Want just a little bit pulling here for the slot? So something like this then now let's like body again, bullion toe and here as a difference, we're going to select this object cube toe by billions and delete this and now you can see that we have also that slot here. Back in the last thing for the body we need. He's calling for women. So with shifting a, we're going to create a new job to the scene. Let's get it on the y axis like this and also on the X. Unless again go back on behind Bheema. We need to move this outside. So again, on the back that's going where free mode And here we need to fight this. So here we are going right time minus 0.5 and the next one x zero point. Actually, here's one and now we need also one on the excess and with shift. Indeed way. We're going to create one more, and here we are going to write down 0.5. So now we have those five cubes and let's elect everything I'm going to select again this year in the middle with Control and Jay, we are going to bring them together. And now we're going to do a can building William Modifier. So again I'll select body. And here are just do bullying those cubes difference applied. And I'm going to delete this and here concede that we created those holes so to see that we have our body created. And so, yeah, so I'm going to stand off, turn on other lace again and that's it about this video. In the next video, we're going to create bottles for being. So stay tuned
4. Buttons: everybody. And welcome back. Now, in this election, we are going to work with buttons for our bill. So now let's select our body and let's go in our way are going to turn on X ray. So now we can see our reference image so you can see that he has a couple of buttons here and there. So now we're going toe begin with those circles. So first thing that I'm going to do our important new cylinder toe are seen with their necks and writing down 90 we are going to rotate 90 degrees. Now we're going to scale everything down with s. And now we're going to match our reference. So something like this to about here. So now we need toe without a little bit. See how it looks. So that's perfect. And way are going to apply a subdivision surface here. And let's go back in at its moat and with controlled there were going toe this Hold on there. And now we're going to select uh, let me see what I did here. So also, we need another edge loop on the button system a little do it down. And now we need to fix this front side so that just hide body for now. And now we need to select edge selection. And with control, we are going to sleep at slope here. This one here and here. We are going just to scale this a little bit, actually. Let's move it closer to this circle here, the 2nd 1 top part of you and here we are going to interface inside something like this, and now that's perfect. So now with the right click, I'm going to change a shading from shape, but to shade smooth. And now also, I will just increase number off subdivision and, for example, we could just extrude this actually move it in front of a bit on the Y axis. So that's perfect about there. So now with that's return our buddy to the scene, it's right here. And now we are going toe duplicate this one with shift date and scale it for this button here and now we are going to move out a little bit on the Y axis and now again, with shift and D, we're going to duplicate for this one here, and also we need to scale this a little bit more and no, let's moved outside a little bit. So that's perfect for those button there. And now we need this triangle here so that one is going to be easy. So here I'm going to import new cubed are seen. You're going to scale it, move it toe to about here in tough photographic. You were going toe outside and let's just give it a little bit more. And here we are, going to go at it moat and let's select Let's go in selection And here and here we are going toe merge. Those two words desist. So with control and m, you will be able to merge them a center and also for this one here center. And we created that bottom here. But the only thing that I want to have here I was like the strangle here just face just a little bit and I'm going toe, move it in front, this'll and let's inside a little bit and the last describes here. So now, again, with Cube, we're going toe created the same. So let's kill it all the way down to match our reference, and we're going to keep circle way we're going to keep this cube like this one. And here, let's move out on top. Photographic u N G a. Y in front of buddy And now it could go in face selection. Let's elect a lot of these faces around and here we are going to change. Ah, be with point do individual origins like this. And now we are going toe extraordinaire everything out. So we need to sort a little bit more So he just extort something like this. And now let's let everything and move to Metro a reference image like this. And we created our cross here. So, for example, let's try toe our subdivision surface here and with control and error, we are going to create edge loop here. Actual appear also here one here, one for this side just to tighten up those faces here. Also the last one here. And let's see how this one is looking so far. So here we are going to change. Actually, this one is looking, it's not looking good, so let's go back to control Z. So maybe we could just extruded is a little bit out and no, I would just like those faces here and let's kill them like this. And now let's see how this one is looking. So it's looking. It's looking good. And I like this style here because I want to have separate each button up, down left, right. And we are done with modeling our beam. Everybody, we have buttons. Also, we have all slots necessary. And now we could also just create this beam of text from the sites he has on both sides on this side and on the other side. So now I'm going toe go. In Saudi, you turn off X ray. And now with shifted a average escaped a new text under text. It's right here and here. I would just write down with caps lock on the M o. Actually, we need to go at this more to step and now here with caps lock on just right down the mob. But this brought eight on 90 degrees on the X axis and let's move this to the side. And here you can see we need strange fund for this one. So we need some dicker front. So let's go in front in text editor at here in Properties Menu. And here we are going to find front, and I found this. Keep calm. So just search for it to be perfect example off what fund we need to find. So something like this. And now let's go. And we need to extort this bitch down. So here. But that's toe. That's a zero. Actually, we need to appoint one for this one. So this one is perfect one. And now we need to scale this and let's rotate on the Z axis. Actually, what's more, toe side and first Illustrated for 90 degrees on X axis and now one more time on the Y axis for 90 so we can see the irritation of front. So now we need to rotate for 118 degrees on the X axis like this. And now we need also to move it to about here and let's see how this one is looking. So let's set X. Actually, we need to set. Why, Toby? And we need to change your point. So right, click on on text and set Arjun toe be Argenteuil, center of the mass of surface. And here let's set this one to be zero. So now it's in the middle as it should be. So in position off the old is going to be our our. So we need to scale. This will be down and let's move it. But inside So something like this will be a fire. And now we need toe ticketus also on the other side like this. But here we are going to rotate this one for 90 degrees like this. 180 actually. So here is like this and here on this side is like this. So let's see how is going to look like and let's see also on our reference image. So we need to move this a little bit up so less like both our text and let's get up and also scale it. Let's see if we could just increase depth handles offset. Actually, we are going to be because it is so let me see. May be offset a little bit. Actually, 0.2 is going to be fine and also we need to tow more space between those two. So here we are going to increase basing just a little bit. And now let's kill this. But let's get rid of this one because we made change this into stripped in D. We're going to move on the X axis to the other side and they are going to rotate off the Z axis for 9 180 degrees. So now we need toe return our text in the middle. Yes, it should be. So let's tea house looking so far. And actually let's Maltese dissolute bit inside more so something like this and also this one insight and let's rotate this one. So that's fine there. And we're going to give this one like this, actually let rotate for 180. And now we are done with modeling our body. So stay tuned, because in the next video we are going toe Kate arms and legs for our team. So see you there.
5. Arms And Legs: everybody and welcome back now in this video we are going toe, create arms and legs for our be more so with shift and see we are going to return our TV cursor and we're also going to change people. Brains toe, medium point. So now, with shifting a we're going toe add a new joke toe our of your birth and in edit mode we are going to move our site and let's apply Subdivision, surface, toe Disc Cube And also we will apply mirror modifier because we want to have arm some on both sides. So now, as you can see here on this reference, that off, Bima is going to be positioned for our arms. So now let's go in in a writer too graphic you by pressing tree and in X ray, we're going to skill. This can try to match desecrates a little bit number off subdivisions. So how about here? And you can see how arms is looking their very short and they around it. So now we are going to move this closer here and with face election were going toe, just turn off X ray for now. Extrude this one more time here and one more time there. So something like this. And now I'm going to rest. Right? Click here and I will subdivide two times here on this subject. Right? Many here and now I'm going to select this. The square here is going to be my first finger. So I will just extra with death one now, 2nd 1 and now the 3rd 1 So now we have three fingers and I'm going to select all of this tree. And with S X and zero, I'm going toe aligned those feet to get together. So about here and now, for example, we could just let's go back in public mult and change shading from shade threat to shade smooth. And now we could work a little bit more with this hand. So first thing that I want, I want to grab those worth assists and move them down. Actually, let's move them back. And now, in extreme owed, I'm going toe select all these faces. So actually, let it that this one here actually, let's like this face here and just move it down. So something like this. So let's see how it's looking. So as you can see we are almost there. But we need to fix a couple of things. So maybe we could just select those tree and bring them just a little bit up like this. And now we could just extruded one more for our thump. But this one is going to be a little bit shorter than the other one. And we're going to move this and the date. Why access? So as you can see, we are almost there. So what we could do, for example, we could just grab this actual appear with Double Jane. We could just slight and move it on the X and, for example, we could just scare This ought to be down. Actually, let's get back one more time and you're going toe skill this year like this. So young thing way we could just move additional little bit down. And we are also less increased number off subdivision, toe, tree. And the last thing is, we need one agile appear. And what's more, it all do it insight. So here is you can see our arms are done. Maybe just bring them just looked inside and may be scaled them out. So that's fine for now you want to have some changes. We could always go back. And now we need Lex. So same for Allex. You're going to create Cube in edit mode. We're going to move, issue down and here we are also going toe apply mirror modifier and also the same subdivision surface. So no, we can go and see our reference image. So let's are very small and simple. So now, for example, we could just crease number of subdivisions and also in object mode by going death with Deb , we're going to change from flat to shade smote by pressing Catholic. So that's fine for their and now waken. Just try to find position off for our legs and with face election. Now we could just extruded this down a couple of times. Maybe something this will be fine. And now one more time. This Now let's like this. Face the front one. And you were going to throw this out on the Y axis, something this So let's see how it's looking and looking good. So maybe we could just leave as it is, but actually, let's for a little bit more here. So first thing, let's paid extra up there and pull it all the way. And now, for example, we could just create actual appear. So let's keep it for now there and actually actual appear. But we will not go all the way down because I don't want heart edge there. And now, for example, you could just scale this here. Actually, I want this one just will be out on Let's kill this one here, xx this and I like thes Just kill this and bring up now They're perfect legs. Maybe they're they're a little bit shorter, so we could just grab those two faces and pull it back. And also we could destructed this front one and it divides behind. So that's five for now. And as you can see, we are done with modeling Are Bheema. So maybe we could just kill our arms a little bit more down with this and maybe just hold them inside on it. And also here on this special, I need to skill down. So make sure you don't visits like whole edge and scaling down. So now it's perfect more here and here as well. Actually, let's go invite fame alert and but this one and off just hard my body and text here and for example, we could just kill this down. And also there one. Well, so now we could hide it. And as you see our modeling system, maybe you could just fall. So, for example, killed this each of this one a little bit down this and for example, we could just select this those edges here up like this and also those two down on this one just look smaller. And for example, we just like this one and pull it back and both here, So no, it's perfect. So we are done with modeling our be more as agency and it's looking very good. The last thing that I want, I want to change shading for for the body, soil select body. And also don't forget to return text text back. So here you can see that we have these publicans. But I want to remove them by changing shading from Schaff left to shade smooth And also now you will need go here under this triangle and here on the normals you will just turn on out the smoke and secrecy that is looking perfect. So here you can see that we could just create one or one more face here and also for this one. So something like this and also here. So now they're perfect, As you can see, also, we could just select all of these buttons and was pulled them always a bit more out and way are done with modeling power. One more small thing that I want to make these. I want four screws on T back off Bheema because I want to have those screws for for buttery . So I'm going to turn off overlays. But I want working by famous. So this is position for our battery, as you can see. And here we are, going just toe great screws. I'm going to pull this out like this and let's go home back. And now we're going to change origin point off this one toe really circle, which is right here in the middle. And now we could just apply Mira modifier. We chase for it is under fire. It's right here. So now we go And this one surely we need toe put back and no here way are going just to select this face here. Just go back and with it we are going to extruded out, scaled out like this. Now we could go in in a writer the graphic view, and here we are going just to extrude it out like this. And maybe we could just extraordinary one more time. But this time we're going to scale down, and now we could just apply subdivision surface here and here. We could just create edge look. And also you could just select this edge here and maybe you could just insert for more time , face shades, smoke and also need for more. So let's go back in my family and let's go back back of the body. And now it's shift. Indeed, we're going toe Katy's to see location like this, and that's it. So now we have screws here, and also I want to have a lasting to be changed. Let's select these faces here and invite remote and with X ray on wear going toe through this one, this little bit inside like this. So now if you go in front, you can see that we have this hatch here, which is cool detail for being, and also we could do the same for battery slot as well. So again in viral strain with X ray on just he and extruded this little bit insight And now you can see everything is perfect Looks think that I want to change the amount you spring went to select this face here and here. I'm going toe the lead to this face. Actually, I'm going t result this edge here not face edge. And also this one And this one here because I don't need those two so so much. And now it's perfect. So that's it about this reader. So stay tuned. In the next video, we're going toe by material for our so see you there.
6. Materials: everybody and welcome back. Now, in this video, we are going to create material for our gamer. So first thing before doing anything, we're going to go under edit preferences and we're going toe for search for blender kit Adam, which is right here. And we're going Just check this box and let's close this window. So now if your breast and you will have a couple off actually a lot materials that you can use and models as well. So here, underfunded materials were going to change the materials and for our being more way, are going to use this plastic material and you will need a couple of sex to be open it. So here you can scroll and see a couple of Monday off the chicken use for your model. So first think, Let's change our shading que port Look that note and now I'm going to select Bheema body and I'm going toe create a new material for it. But I want this plastic touch, and that's fine for their. So now what we could do. We could just go and like this base color and with eyedropper because our reference image so here we could just let this. And now we have that that material for our Bima. So now we could go for this button here again the same. Just click once here. But here you will need toe make unique. So press there once and again with the I drop it'll just mean And also let's kill this bit up. So also, we're going to move this fun here fuel perspective. So now also lets them on veracity. So here we could see see it better. And now for a base color off this button Here, as you can see stripped now again the same just breast once here make make it unique And now he's But next we have this one again. The same material Make it unique. Change it this Now we need for this button here and also fourth triangle here again like same deal. But here we didn't apply this material here. So let's go back and select this material make it unique and again with the eyedropper tool just so, like the color of it we already have for this one. And let's find there also for sluts was to train them together. And you're going to keep just basic deal for this one for the arms again. The same. But let me see. It's working way. Need to drag it, make it unique. And you can see that times have different Cullerton body. So I'm going just to select it here like this. And also Lex Kate, new material. Same. And as you can see, we made the mistake. We didn't make it unique, so we died drop. It'll just select Lex, and we're almost there. So Lost Inc is Destexhe here, this one. So we controlled Jay. We could train them together, and we could just make a new material and just select any of these make it unique, like this. And again with the I drop, it'll just go and just means so conceived. And there we go. So now you call your part, you can see that our team is looking good, but we need to fix our disclaimer. So first thing, I'm going toe, go and select this face here. And with the selection under select many, we are going to select more like this. And for this one, we're going toe crest. Plus here, create a new material and just beside it, So now for this material we need face Bheema, which is this one here. Lets go trading. And now we go and select our second material, which we have here and here we are going toe search for image structure. What supplied toe base car and also lectures Coordinate. And I'm acting for this pump. Now we're going to select you ve blood here. And this one here. Now we need to import this face here. And as you can see, we need to fix it. So first, think that's cool. Let's like those two. I actually like this one and select more now we could go and press right click And actually , could you just go here and you'll be So now we could go in your editor and here we are going Just scroll this all the way there. And as you can see, we need to rotate this one and to start skilled up like this, make sure that it fits perfectly. So something like this. Let's take one more time Y and 90 now, we could just move it on the X both here and just scale it down so we can see racial off the face and display. And one more thing that I want O ad toe are seen less increase just a little bit your mission because I wanted my screen toe amid some light from it. But here, in a view, will not be able to see it. And there we are. We're almost ready. But here, I want to change my interviewed cycles. And here we need a couple of steps for fixing and prepare this one for to be rendered. So that's it about this video. Stay till the end. Because the next video, we are going to work with the lights and prepare our camera to render are being so. See you there.
7. Render Settings: everybody and welcome back. So now we are going to prepare our demon from Toby renders. But before doing that, we need to change couple of settings. So now if you go under, look, they're not You could see that I forgot toe apply my deal for for these text here. So now I'm going toe also make one more change. So here I'm going to change offsets to four like this and also on the other side as well. So that's perfect. And also, I forgot to apply material for our screws here, some going toe, trying them together by pressing control and J So now they will share the same material. And here I will just supply basement Theo like this. Great. And here I would just make it metallic and we have done with screws. So we are ready to set our female Toby rendered. So now I'm going just a more my reference image. Decide I don't need them anymore. And now I'm going toe entering camera. You by going here or if you press zero, dump it. And now, with shifting gray, we could just fly around with our A s D and D. Andrew consent our camera How we would like to have our final render. So for this gender, I would like to have the mountains in center. And also, I would like toa have it something like this and here in output settings were going to change resolution toe 118. I want to have square and let's zoom in just a little bit. That's fine here. So also, we could just go and here you could just change. I'm going to go at it mode and here you can see that we have. We didn't feel this whole. So I'm going to that thesis actual appear and full inside. And now England just to create one more slope. And here we are going Just scale this. Actually, let's like this back here and here we are going just scale this up. So, like this and square feet here also for this one here, lets try and I had look, let's see if we just make it a little bit better here, and they just killed his down. So now it's looking better. And now we can just continue with our rendering, so make sure that you're working with cycles and here under government management, we're going to change Look from none to medium high contrast. So something like this And here we are going to increase number off samples 1000 because we want type of surrender and everything here is looking good. If you're working on a Mac, you should keep the CDO. And if you're working with other PC that has strong JP or simply doesn't, you can change device to drape you because went toe rather faster and here we are going to keep everything the same. But here, under the layer properties, we're going to turn on the nosing data because I want to have that for composing. And also I will turn on demonising and under feel in, render it settings rather setting. So I'm going to turn it transparent. So I want to have transparent background for this beam because I want to have toe make background opposing, which is going to be next media in this course, and that one is going to be our last video. So everything here looks perfectly perfect. And let's see, So now we could just continue working with our lights so far are lifting. I'm going to separate my view port like this. And here I want you put. I'm going toe have just camera and I will select my camera, which is right here and also under people display. I'm just going to increase capacity. One thing this So now I will not have any destruction here. And I was turned off my overly. So now I could just folks here on lightning. So here I'm just going to change lightning from Parenteau area. And I'm just going to scale it up with this and rotate like this because this one is going to be in my main main source of light. So it's more like this also, and let's just skillet a little bit more. I still have some soft life like this. So now with the shift, indeed, let's move to decide. And this one we're going to decrease father toe 500 and this one is going to be just a little bit smaller like this and absolutely a bit further. So something like this Let's see if it's good enough So I'm going. It's like this what? And rotated And that scaled up a little bit. So something like this and this one needs skilled up. And also just with further like this, I want to avoid this heart light that I'm having here. So that's almost perfect. And I need one that light. So I'm just going toe duplicate this one, and this one is going to be a large one. But this one is going toe be only 300 power. And so yeah, everything looks perfect. I think I want to change is going to be this light here, bring it up and just know it here like this. And also this one is to be a little bit So now everything is good and we could render this so maybe just bring it closer this man light. I like this collection here, as you can see And also let's see about this light here and everything is looking good. So now we are ready to render our Bheema also, that's being this bit closer. Theis and this one just decide it's a bit more. Also, just change shaking these buttons. Actually, let's make dyslexics one and this one just small and everything looks good. Septus, backlight. That's just killed a little bit. I don't and we are ready to render our team. So now we're going to rent our Beamer. And in the next video, we're going to create our background for our Bheema, which is going to be last video in discourse, so state doing.
8. Composing: everybody and welcome back on last video in discourse about creating Bheema from adventure time. And does it can see we are done with surrendering our final render. So as you can see, it's very high quality and now we are going to create a background from composing many in a blender. So let's go under composing and here I'm going to enable use notes. Also, I need your note So it shipped A. I will be able to add this to our scene and I will connect those tools. So now I can see how are you going to look at the end? So for my background, I want just tow cover with blower behind. And now I'm going Toe also includes my denies. Just have more clear render at the end. So I connect. All of these have connect no see image toe image, the nurse normal, normal and also the bicycle. Beta Tau, albeit so Now I input box to our seeing, and here I will increase the number the size of it to 0.4 and also here and now I'll add a blue note. Thanks one and I will connect image and mask and Let's change, uh, let's change, uh, look of blower and use relative. And also, for example, you could just please this one to be, say, about here and now under color, less import, some color for it, and we need mixed note. And now I want my blow to control effect and let's connect this one to you over. So now we could see it. And for example, if you change this way conceit that we have this here so I will just change soft light. Let's see. And as you can see, it's not very strong. So maybe call a bird. Actually, let's keep soft this or call Dutch, actually, So now with the shift D. I want one more time here and I want the same here. But this one I want soft light, so something like this will be fine. And now I want toe import off solar. So now I could just connect those toe together. So one here and I could just go and connect here, this one here and this one here. So let's see how it's looking. But switch those two and now we'll see it. How it's going to look at the end. So as you can see, we don't see any Blore. So we need to increase Buller behind. So I will duplicate this one. And here I will just in case the size of it. And I'll import one more time. Mixed note color. And I will just connect those two together like this. And this one here. So you see, we need to switch those two. But we need that flick toe disconnected one off this and that Want to be dead. And here you can see that we need just to play a little bit. But this one here also it logistically it's a little bit here from the back. So something this will be fine, see if everything is good. So maybe we could just a little bit more disclosure behind here a little bit more. And let's see down this one here. So now you see how it's going to look like at the end. And, for example, just change color here, something like this. But so sorry. Darker one to see how it's going to look like at the end, maybe darker blue, so you can see it. That is very high quality. And let's see more here. So let's try to connect this one here and now. It's looking much better, but I want to have white, white soft light there and here we could just play with the color as you want. But I like this combo here and slipped Good. Also play with it, See if he is size for it Here. Look like make 100. It's looking good. So maybe we should just scare this down. This this one there. I just want to have a bit light behind it. And now our are composing. Compositing is ready to be rendered it. So maybe we could just fix a little bit more cock over here, maybe toe something more blue, but see how it's going to look like and this one is looking good. Maybe you could just try a little bit more. So explain with this. How much like and I want to have this one at the end because it's going toe, it's going toe. Be much goingto be more in focus with this one. With this darker combination, it straight, even darker, more. But because it's adventure time, we're going to keep somewhere in the middle, so something like this. So now we could just go here on the render and rented image, and our rendering is going to begin. So that it about this course. I hope you like it. And I hope you learned something. So for your final basket will need to create something similar like this one. You could pick another character from venture time, and you could just rendered this one by one square. And also make sure that you you'll learn and tried and practised along with me and see you in the next course by
 Nodiken 3D, 3D Artist and Animator