Transcripts
1. Class Introduction: Hello, everybody. And welcome back to another course. My name is Dina, and in discourse, we're going to animate Skate like this blender 2.82 And as you can see here, we have a lot of techniques that we are going to cover. Have particle system animated. And also we have skate animation. And you can see also that we have light animation. And if you go on camera, you can see that we also any meat on camera. So a lot of things that we're going to cover in this course, so stay tuned and let's begin.
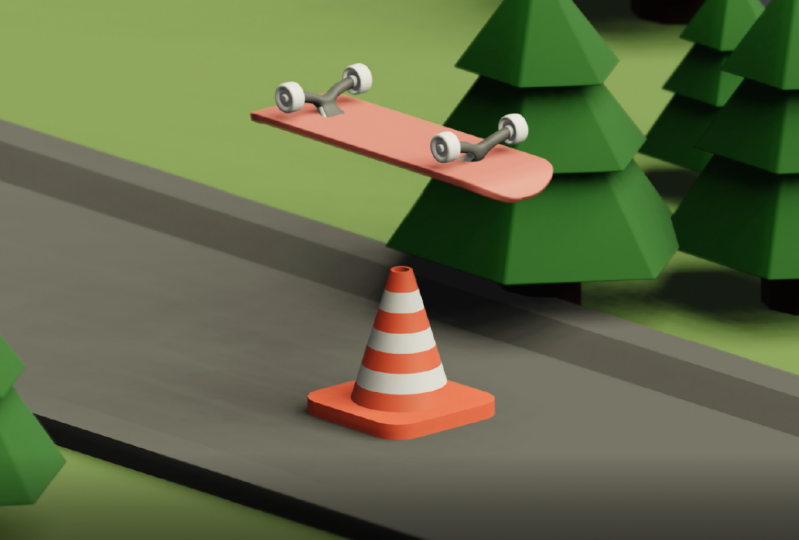
2. Skateboard Modeling: So first thing that we are going to do, we are going to open our blender and here we are going to create a new file underground. So right now we are going to begin with modeling skateboard. And we're going to do that by getting rid off our default Europe. And now with the shifting day I'm going toe add on your plane to our scene. I'm just going to turn on my skin guest Adam. So now you can see what I'm pressing right here. So now I'm going to hide this. And I was like my plane and I will go in that this mode by pressing tab and also it controlling. I hate Look out right here in the middle I lost lead those toe earth assists And now with selecting everything on a I'm going to apply mirror modify toe our plane. So it's right here. So now what? We have everything. What we doing? The right side is goingto be applied on the left side. So now also we need to turn on clipping right here and now I'm going to scale this on why excess and let's go in top, photograph you and scale it on its on X axis like this to about here. So now I'm going to select only those two alerted this and am I will extrude on X axis like this. And with s I will just kill down a little bit and one more time. I will select this look here and skilled up a little bit. And let's extraordinary one more time on the side and get a little bit closer there. And now we could move this air slope little bit inside. So now we have debt that is going to be our end of skate. So also, we need to fix this front here and just bring it closer to the middle and scale it up a little bit off this one. Okay, so now we're going to do both in front of the graphic. You and we're going just to pull off those lopes here and tried to make her and also this one here. So something like this. Maybe this one needs to be with closer here and just kill this up. So we got base for our escaped and now we're going toe apply. Also, subdivision surface here, so under modifier you go here and a people at subdivision surface and lessen cases Toe number two like this. So now they just a little bit with those DeSisto get better occur on ours desk so and the spontaneous just to be a little bit more up. And now we just create the edge. Look here with all the way the boat here and that our desk that created And now what I'm going to do I will go again at this malt with directing everything. I will go in under extra oats And if you hold left mouse here you will be able to open this manual And here is extraordinary long normals. So now I will select that option here. And I will just pull this up like this on this raft circle so you can see how our skateboard is going to look like. And now we need toe agile apps for those here, one here and pull it up. And as you can see, we need to train shading from conflict to smote. And we created our desk as you can see him just looking good. So maybe we could just scare this a little bit on the X axis and now our desk is created. As you can see, way can just start with modeling our wheel. So now for the wheel I will apply cylinder WTO are seen and also will apply mirror modify immediately. So it's right here and now we are going to go in edit mode, small days to the side and here we are going to turn on Toby, mirror it also on the y axis because we want for wheels for our skateboards. And now we can rotate this for 90 degrees and scale also on the why Now let's like skill, everything and let's position our wheels to about here and now, however, go in via faint moat to see if position off our is good. And let's also scale a little bit more on by access. And I believe this is a good one and I will keep their cities. So now I will just go in edit mode and here I will apply mirror model subdivision surface like this and here I'll just great two agile apps. Actually, first I need one on this side here and also on the other side. And now I was like those two. And here I was just go and scale it up. No, it's on divide bit to about here and let's train shading toe smote in object mode. And now we need to work on this front area and also this back area here. So here I will just instead face like this. Be careful. You can always hold shift. So here, don't forget to change to individual origins and so about here. So now we need to extrude our faces inside. So be careful because you need to change here to extraordinary gin. And now with e justice through this bit inside like so and we're almost done, as you can see. So now I will turn on cage for a while because I will be able to see better. So just go back once and here changed too select and with the control and I will just get edge. Look here and also on the other side as well. So something like this. And also we need to select those and skilled done a little bit and bring it here and I will not let this front face and I I will just insert one more face inside and now with E. I will extract for our not and with control. And I would just create. It looks here and here, and we are done with modeling our wheels. The last thing that I want toe turn on for these bills is going to be this out. The small adoption which you will be able to find under data properties here and normals. So here we could just work a little bit more, but those wheels are going to be fine. I just killed this part here and the last thing that we need for our skateboards going to be truck before the trucks were going toe apply and bring on your cubed are seen and immediately I will apply me mirror modifier. And now, in edit mode, I remove my cubes with site also on topside and Lester on the y axis as well, and we need to turn on flipping as well. So now we need to scale this cube and set the location off the trucks. So if I go in my remote, I will be more precise like this. And now we could just kill this a little bit here and let's apply mirror subdivision surface store trucks like this. And now just start extruding did those parts. So something like this here, here's well, Aunt, also, let's drying them together like this. And now I was like those to face here and here also on the up and one of the bottom. And now I will just with s and by skilled on the Y axis. And now with G and X, I will just move this in front to about here and now The last thing I would just like this this face here at the top. And here I've just extruded up like this. And now I will just smoked on the X and that's it about Trucks have changed shading toe from flat small. And here I'll just create a couple of support edges like this one here and also this one here and maybe just killed this up, hold it a little bit and bring it down. Also, this part here, those two I'm just like this absolute here, and let's just pull it down a little bit. Also, this one here and let's go in my family and that's like this the face chief, it's good. Also, this part here and just scaled down a little bit. And I believe that he had done so here. Also, if I turn on outsmarts turned to be fine But you can see that we have problems here. So I just go and lead those vortices and here is well and now I was like this edge loop and now I conjoined those to get there like this and we're done with our stress trucks. As you can see, don't issues that we have is this one here and we're going to keep everything. Is this the last thing that I want to fix is going to be Stop this so I will select my deck and tied this for a while. And you can see that we need to close this And I will just like this face here and press f or creating in your face. And also if you you like, just in case number off subdivision and I was going to be perfect. So now if you press, uh, if you select this face here and with essence Z and zero, you will be able to write it this to be on perfect as zero to deflect and also those two needs to be the same. And he conceded that now we have read geometry for our trucks. So now let's on hide our desk and you can see that we're done with modeling our skate so that it about this video in the next video we are going toe set our camera and work on our our environment, so see you there.
3. Camera And Background: everybody and welcome back to another video in discourse about skate animation. And now we have our we did modeling on our skateboard. So now we could continue working on the elements off our animation. So first thing, I would just like my camera. And if I Brazil after in camera view and now for this animation, I want to change my type off camera from perspective Toe Orta graphic. And here I would just increase a number off What? The F scale. So now I have I have the skateboard inside off my camera in the middle. So now we need to position our camera for our animation. So let's for on this view here and here in camera settings, I would like to change a couple of things. So first I've turned on thirds because now I can see what's right here perfect in the middle and also in base part out. I was just sepak city, so I will not be ableto see anything except camera. So now for our animation, I want to have a new U port a new uh, you'll see what's in a name new workspace, and here I will just change change those actor types. So for this one, I want to have Shader. I just find it really quick. It's Shader editor. Hi, This one here And for this here I will hide here this part and also this part I don't need best right click and I will disable it. I was a stable head. They're here. So now on this, on this report here, Active. Seen my camera here I can apply materials toe toe are seen. And here I could just start modeling and animating so that this is a workspace that I prefer to work when I'm working on some kind of animation. And now, for example, what we could do here we could just go and Kate and you claim you are seeing so But before that, I'm going toe applied those mirror modifier. So this one here, this one here And also the last one is at the bottom here. So now I will select everything for the last selection off my desk and with Control and J. I will join my skate together like this. So now I could just grab this Kate, and it's going to be moved on. So here I would press an and for the location I will select. I will insert zero Toby on the location. And now I could just grab this one here and also brings closer. And I want to scale this on the X axis like this. Plus also scared a little bit on the Y axis and now I will go in at the moat and for this But here I was just best controls and air. And now I would just apply those to edge lips. And I will just scale this on the y axis. Let me just change my be with find. So I want skilled like this and just like those toe edge is here those faces and he just extrude a little bit. And now I would like Toa select this part here and this part here. And I want to scale this a bit on the Via taxes like this. Now I recall in the cartographic view and here I will just create a new plane toe are seen and less skilled up 20 x Texas, and bring it to about here like this. And now we're going to scale a little bit more on why access like this. And here let's move it. And now I will go in edit mode and I will rely. Mira modifiers Toby carpet on, Missy. I will need first to select shift to see to make sure that my tredegar sarees in the middle . I will go back in object mode and set order in tow. Three D cursor. So now I would just like to be righted, Toby A mirrored on the y axis. So that because here I'm going to apply particle system. And with that way, I will be able to create Easy is emotion. Motion off those toe, uh, please. Which is going to be our environment. And now you can see the teeny toe feel those holes on both sides. So I was just scale it on t. Why access like this? And now I would just zoom in so I could see it better. And I wanted those to be close toe displaying here, and you could see that you need toe move this down a little bit. So that's the area that I would like to have on my scene. And now I will just kill this a lot. Like something like this on excesses. So those two planes are going to be animated. And on those two brains, I will apply near. I will play a particle system. And with that way, we are going toe. We will be able easily toe apply small details for our animation. So statement in the next video, we're going toe work with the particle system on those two planes, so see you there.
4. Particle Systems: blow everybody and welcome back to another video in discourse about animating skateboard. And for this video, we are going to work with the particle system on our background. But before that, I want to scale this all the way to match our our background planes and also let training this one to be broad. And also this one. I want to name it background. So here I would just call it back ground like this. And also I want toe parent. Those two cells, like them both entered controlling be I will set Parenteau object and now they will move together with our animation. So now we need to enemy this one here. So I will go on our first give frame and I will grab this and moving with all the way back to about here and with the I I will just insert location. And for this animation, I want to have 150 key frames actually frames and I will change frame rate from 24 toe number 30 because I want to have more friends for my animation. So basically this one is going to be 150 frames, which means five seconds animation. And now I will go back on. I will go on our last key frame and the G and text. I moved all the way to about here through the end and here are pressed I Foreign city give frame and I will insert give friend for location again. So now if you wear this animation, you won't be able to see both of our road and also background morning together. And now we are ready to import and supply particle system you are seeing. But before that I need to select both of these key frames and with the change interpellation from a best year to leaner. So now is going to move linearly on our time light, as you can see. So now I will stop my animation and I will go on our first key frame. And now with background selected, I will just go here and I will apply a particle system. So here we need to change couple of settings. First thing that I like to change is going to be gravity under Bill Field, Bates. And here I would just turn off my gravity to zero. Next, I'm going toe Strange ending, ending off this a particle system. But before that, you could see that we only have particles on our left side, which means we need toe apply mirror modifier. And now you could see that we only have on our planes are our brains particles, but not our road, which is good. So now I will go back again on our background and here under particles settings, I would change velocity to zero and also I will change lifetime off the particles to be 150 . And now, if you play this animation, you can see that our plane is moving. But are particles are staying on their basic position And that's why we need to change physics off this but this political system. So if you go under particle setting, there's a physical options option here and here we are going to change the kid and under relation, we're goingto get to do particle system that are going toe to be together. And if I go on our last different, I could just go here and target object object as a background. So now, if clay animation, you could see that our particle system is also moving with our plane and here you can see them, how you're an emissions going to look like. So it's a bit so fast. So if you want to change the speed off this, you will just need to grab this key frame here the last one and just moved further. And this is still fast. So let's make it 440 and maybe let's make it 400. Actually, I want to be to about here. Have to be small, slower then previously. So that's the way how you can control the speed off your background. And now the next thing that I want to change the on the render we can change rendered s collection. So here, basically I would just change collection and I've caused for background. So everything what we drop in this collection is going to be applied on our part particle system and here can just is to see instance collection and I will just select background and here you could just enable big random for randomness, and I will keep everything the same. So, for example, if I go under background now and, for example, if I moved my treaty cursor Let's see about here and with shift in a I apply R cubed arson . You can see that now we have cube toe are seen as well. And also, if you go on the renders under are under settings in particle system, you can just Greece scale off randomness. And now here you with that where you will be easy, it's going to be easy to add a new stuff for our background. So, for example, let's add some trees, No polity. So first I'm go. I will go in and smote and the Disk cube I'm just going skilled is down and skill skilled up to about here. Let's also skilled this ant something like this. So now I will just go and select everything with shifting d. I'll duplicate this and moved to the top scale down and now I could just kill this up a little, scale it down onto Z axis And now I was like everything, and you concede that we need to fix irritation for this one. So here waken just let air y and rotate for 180 you can see that we created small trees for our scene so now we could just go and skilled this down. It was guilt up if you want, but basically you could see that we created basic basic background. And now, for example, we could go here and at a new cubed or seen and let's add small grass also. So those are just small details that will be that will help us to make are seen looking better. So I'm just killed this stone. Also I looked like a this and this and less like those. And you can see that we need to write. It is for 180 also with GNC. I will be able to move up. So you concede that there are some summer they are ready to big So I will keep thieves here . And for example, I would just create another actual up here and this side also for this part here. This one used to be something like this. Don't. And now you can see that we have small grass here on our seat. So now we could just started applying some basic materials just to see the look off our scene. So here are crazy and I will change to look, that moat and here I would just apply friend of colors. So this so for this one, I will keep this color later on. We're going to change this. But just for the preview, let's change for our three color on the bottom here and also here. We could change something like this also for this part here. Second guess So here you can see that we need to fix those two and, for example, what you could do. We could just apply Amir subdivision surface and those two So for this one here and let's change small and also for the other one as well Cash. So now we could just supply some basic material for our broad and also background. So something like this and also we need to select our road. And for example, let's make gray. Let's change this one. Still another color, maybe something like this. And now if I bet zero here and I go under material, you can see that our animation is starting to get some good look. So that it about this video seen the next one where we are going to start with animating our skateboard so by and see you there
5. Skate animation: Hi everybody and welcome back to another video in discourse about animating skateboard. And as you can see, we created our particle system in previous video and now we are at deforesting and animating our Skype bot. So let's stop dissemination and now let's change our view. Let's exit from camera because we can see camera here. And now, first thing that I'm going to do, I will enable out the king. So now everything we do on our escape bought error it ever change is going to be immediately insert keyframe on that dean debt we select estimates change. So for example, right now I'm on the 20th framed and I want my skates to be right here on this frame, so I'll press a G and with one click, I will be able to insert keyframe on all location, rotation, and scale as well. And I want my escape to jump in on in our scene. So first I will just decrease number of frames for now because I want to preview faster. And on the first keyframe, I will go back on the x axis to about, let's say to about here. And also I will move it up. Maybe something like this. So now if we play an animation, you can see it that are skate is just jam right here in the middle of our camera. And here we need to change a couple of things. So first thing here, I would like my skate old Apollo, ready to be in 0 location. So not if you play this animation, you can see that immediately jumps. And it's a better transition here. So I like the way how this looking and here I want to make a couple of changes. So on the 30th, I will press f z and rotate on z location just a little bit. So now we have two bit better citizens simulation and also on the 60th stream, something like this. And also maybe we could just change here on the tenth frame, just rotation on the z axis. Well, actually this is too much so I will just delete this. I am in the middle. And maybe our keep as it is like this. So also our just spread those key frames just a little bit just to make some good motion here and here, I would just return it to about four. Let's actually delete this one here. So let's play animation. Now is. It's good. And also on the 14th frame, for example, I would like to duplicate my 20th frame. And here in-between I1 to have just a little moment on the z-axis. So something like this. And now we can continue, yes, so on the 60th frame, actually, let's make it now. 158. Here. On the 60th frame, I would like to still have my gate. This. So now if I play animation, you can see what's going on here. And now, I will shift in D and duplicate this keyframe onto 18th frame. And now on this here from 680 Sprint, I want my skate to do a trick. It's going to be good clip. So here on the 17th frame, I will just grab this and pull it up to about here. And here, I will just change rotation on the x axis to 180. And now if you play an animation, you can see that it started, think, but it doesn't end how it should, it should be. So here on the ATF frame, we need to change rotation to 360. And now I will just turn out my out again. And now if you press animation, you can see that we have keep kick lip here. So for example, if you want to rotate on the other side, we could just go here and select minus 180. And also don't forget to change here on the other side as well to be minus 21060. So now if you play this animation, you can see that we have the opposite kick clip. Or he'll flip in this case. So now here in-between those two key frames, let's add a little bit physic here and the two details. So first I will rotate on the y axis and here I will just return my kink. And also, let's move in between those two. So now we have smooth, smooth transition between those those two. And also what we could do on the 75th frame, we could just start date this on the y. And now if you play this animation, we can see that we have a really soft and smooth animation for our, for our skateboard. So now on the 80th faint, we could just duplicate here on the 110. And also because just rotate this a little bit here. And now if you play this animation, we can see that we have give clip here. And I want my kids to live on 100 frame. So here I will just move it and move it onto the x axis. I have my alta King turned, and I will turn it off for now. And now, if we play this animation can see that we have smooth key clip and it immediately just go away. But here, if you want to increase the speed or the test of the skate when it leaves, you just need to move it further. On dx occasion. So here you can see we have good clip and it goes away. So that's it about this video. In the next video, we are going to add more details and we will work with the color and lights in our scene. So see you there.
6. Camera And Light Animation: Everybody and welcome back to another video in this course about animating skateboard in blend of 2.82. And as you can see, we did animation for our escaped. And now we can focus on some small details that is going to make our animation more beautiful and more eye-catching sulfur testing that I would like to animate. And du, is going to be light. So now I will select my light here. That's the light that we have all indeed are seen. And here I will press N and I will arrest location and rotation to be 0, and I will just change location. Let me just go in, render at US. I can see it. And I will bring this up all the way to about 8.6. I have found to be good. And here I will increase the power of the lights to be 303 thousand actually. And I would like to have spot in our scene instead of biocLite. So here the first thing that I want to change is going to be the size of the, of the spotlight. And here I will just change it to something about 53. And here on the 60th frame, you can see that on the 60 a train flip is going to begin and it will end on the 80th frames. So here, under 60 at frame, I'm going to insert keyframe here to be 53. And I will insert the same on the 70. But for the 80, I would like to increase it to about 100. And let's see if it's good enough, maybe just a little bit to 105. And now you can see that when kick flip animation and also we will have more light to RC. Citing this is small but good detail. Also, what we could do, we could just bring this keyframe ultimate closer look. And also we could just press D here and we are going to change into political interpolation mode from vizier to linear. As you can see, we animated our, our light and also for our light, I would like to change the color of it. So maybe I found that the scholars to be good for deceive. So you just need to type F, AB 92. So this is the aim of that I would like to have in my animation. So also, one thing that I would like to change here under Render Settings, we're going to work more with her entered later on. But here I would like to train to look from none to medium high contrast. Or actually, we could just call high contrast. It doesn't matter, but I would like to give mine to medium contrast. And now we are going to animate our camera as well. So first thing that I will do, I will select my camera. And here under camera settings I will have different things that I want to animate. So first thing, I want to animate my autograph scale. So right now is a 50. I said it 215. And here on the 60th on data.frame, when the animation ends, I want to have that that autographed scale with 15 number different here on dated fame ended to keep all the way to the end. But before that, I would like to change or to refuse scale. I want to zoom in just a little bit. Maybe to about here. You'll be fine. And here, let's change it to 11 only. And here on the 60th frame. And we'll just insert keyframe. And now if you play this animation, you can see that we could also just do it like this. With the shift in D. I duplicate it. I believe we set for our light to to change on the 74. So actually it's 75. And now I'll go back on my camera and hold this keyframe. And also I'll press T and change it to linear. So now if you play this animation, you can see that the moment when it flips, it also zoom out as well. So the last thing that I would like to change is going to be depth of field. So first I will turn on depth of field. And here on the 20th on 68 fame io, just key framed here. And also on the 80th famed is same. But here on the 17th frame, I will just want to have all the way to 0.51. And here I will just change my focus on object to be on skate. So let's be sure that we select skate. So under camera, just press let me see the name of it. Name it. Well, so here I will just change to skate and now I will have clear information. But did I select for that fulfilled? So under camera setting, I would like to change F-stop two 0.01. and here I want to frame it on the 70 frame. And now if you play this animation, you can see that we will have depth of field activated here and it immediately will be restored. It's just going to just small details that add to our animation. Some feeling of good motion design. So that's it about this video. Stay tuned. In the next video we are going to make obstacles that jumps, that will go under skate in onto 17th frame where it will jump over that obstacles. And also it will focus focus more on a renter settings. So see you there.
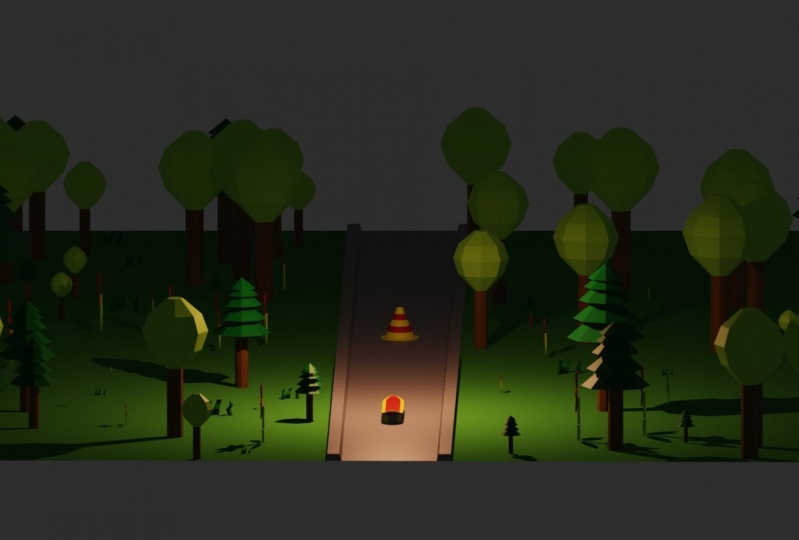
7. Final Render Settings: everybody and welcome back to our last video in discourse about animating skateboard. And as you can see here, we have a couple of issues before continuing. We need to fix our camera because our focus on object in depth of field escaped and in those first give friends, we don't have skate here inside, so we will need to increase number off F stops at the beginning. So here you can see it. That right now is 2.8, and now we could just go and increase it toe safe, for example, to 70 will be fine, and we need just one key frame there. So now if you play this animation, you can see that everything should be as it is. So also on the 70 frame here, we could just go here and with shift indeed, duplicate those two friends because I would like to keep focus just a little bit here and also maybe here a little bit more focus on those toe key frames. So let's see. Actually, we are going toe, make it to 70 beginning, and the end is going to be sent to keep frame. So now we can continue so Now we are ready. Toe model are obstacle for our skate. And now let's go in solid you into the shifting A We're going toe bring a new A new cylinder stores here, which is right here. So I've used G and White Move it here. And also I will movies from this collection because this collection is only for this particle system here and now this cone it's going to be obstacle for our skate. So first, let's go in. Right, Photographic you and they're going toe scale this down to about here and the GNC Bring it up. So something like this And now here at the top we are going to press I for insert, But this And now we're going to go in the photograph fuel And here we are going just extorted this down when this and scale totals. So now we just go here and stable X ray and by frame mode and here with control and they're they're going toe Add a couple off lookups something like this. And also we will just add a new plane tore scene and I think it's here so something like this and also scale it extra de down. And now I was like those for I have just here with the shift and now I will travel those with control and be something like this, and that's perfect. So now we could just go and shake smoke here, out on out the normals. And here we are just going toe. Add a new material Taurasi in. So everything is going to be white except this area here. So the select everything. I'll press l for the bottom here so else to select the bottom part here and now I will hold shift can control to select those those faces around that is going toe being that are also going to be read. So this area will be read here as it is and I'll breast sign. So now if you go under material you you will be able to see colors off you're going which goingto be obstacle for our skate And now concede that we need to fix this but part here. So here I just moved this part. I will de select everything press l and G and X right decks a little bit and this is perfect. So now on the 70 frame you can see that are skate is in the air and I will just use it. Use G and y to move it along the y axis and here I'll breast, I'll press right click on the phone and here I would change order into center of the mess here and also have changed location here to be zero. Now I go here and skill everything down on goingto bring in this one gold and let's see, we need to bring this all the way down. So something like this. Now we need to play animation to see if actually we forgot something. I will sell. I select now my cone and also with the shift I will select road and now press command and beer controlling B and our apparent those toe. So now when a road is moving, also obstacle is going to move. So we need to see if there is any issue in our animation. If our skate is going to hit and you could see it jumps over, go at the perfect position and it will not hit it anyway. So let's see everything. If if everything is correct, make sure before you set to render and that's perfect. So now we could work a little bit more with some details. So here, under every settings, I'm going to turn on my render view now. And here we are going to turn on ambient occlusion. Also, Bloom and I would like to have screens based reflection and let's also turn on motion blur . And maybe we could just change Look from high from medium contrast medium high contrast to high Kontras because it's going to be more effective then medium high contrast so you can see how your and animation is going to look like. We could also keep this one if you like with the high Contra son. Actually, I'm gonna try and keep this high contrast also, if you want, you can use curves. So here you can just turn on this option and you can play with this one here. But I leave my cities so everything here is perfect. I'm not going to turn on. And I think so. Blown. Maybe we could just a little bit intensity to about here and now we could go and select light as well and here consider you can see that we have blending options for this light. So I'm going to turn on my my X ray. And here you can play with the blending off this light here. I'm going toe increase size just a little bit. And now we can see if everything is set correctly. Also, we could just go here and select road and, for example, we could just change the color of fraud as well, or actually make it a little bit darker. And also, we could play with the color off skate as well. So here I'm going toe create a new material for skate. I will go in edit mode by pressing tab and here I will diss left everything with pressing double A. And if I pressed l here I will be able on select desk. I need to create a new material. And here if I, for example, change it, I compress a sign and you can see that I have a new color only for the for deck. So this color is looking good, but I would like to keep until the darker maybe something Lee, some dark green would be nice about here to see if everything is looking good, but actually I will just return and change under color management I would change Look from very high countries Tojust high contrast because our scene is getting a little bit dark and we don't want that. So now also, let's see if we could I'm going to bring back the old color off Rod. So here I would just increase the value of the white here. And also now we could go and select Go in edit mode here, de select everything I will select now both off my trucks by pressing l So l on the drugs and also on the other one as well. So under materials, I will create the new material for this one and I want to have something color on this. I'll press a sign and also I will just increase metallic to be one. So I have now this shiny material here and we need just a color a little bit so you could see what kindof material we will have here at the end. And they could just change it how we like. And now the last thing that we can do, we can go here under material and, for example, we could just increase roughness on the wheels because that's the only material left here all the way to deal one. So now let's go back and review one more time, and here you can decide if you want to change color off your deck. So maybe this is way to dark, and maybe something like this will be more fine. And also, if you go into edit mode, you could also select on this stop part toe have different color than those at the bottom. So you can use C for circle selection and select this stuff faces. But for that you could just go here and apply subdivisions surface, and now you can select all of these faces and change the color of it. So with the circus select, you will be able easy to do that. Let me just go in solid you because it's going to be much faster, and you can just paint over those area that you would like to have different color. Don't for if you make any mistake because with the middle mouse, click your people. Is it de select everything that you don't like? So something this now I will go in right or too graphic You and here with the Middle Creek . I would just select this area here. So let me see. Let's go back to flee on our first pain. And here we will have perfect cartographic you for painting. So let's disliked everything. And now we could just press see and paint over at the top. So something like this and you can see we have issue here. So I will select again my circle selection and I will de select those area the Titan need also on the other side. Actually, this is going to be much faster if I just be careful and paint. Punt this this stop area here like this. So I'm just selecting the stock barrier because I want to have different color here at the top. So now we can just zoom in so we could be more precise with this and you can see that we don't need this one here. And also those decide So everything is perfect here. Now we could focus on other side, so I'm just painting over with my Mose actually into selecting those faces here. I will dislike that at the top. And now I can just de select those tight select by mistake. Let's see if everything is perfect here at on the other side. And here I could go and create new material and here I could just change color to it Breast a sign. So now if you go in, render it you You you render view you will see color off other side. So, for example, here to make it dark decrease roughness It doesn't matter. For example, if you want toe have more this selected and covered with the same color you could just go and without select all off these agile apps So, for example, not this one. But be careful because sometimes you you can make mistake and okay, I reflect on those two area and hear other just press a sign And also we could just now change the color off back and now we can see if everything is good. So here, for example, acquittals, increased roughness, Actually not all the way up, but to about here. And I like the way how my skate is looking. So let's see, one more time or a nation. So it's a perfect jump here over, and we have everything done correctly. Maybe we could just school here and with scarce select we could just go in and remote and we could just go and a flight assigned this material here. And also I think we're done. I will not change anything here. So now we are under. We are ready for under settings. So if you go here under output settings, you can choose a resolution off your file. So if you want to have square for instagram percent Italy that you could just hear changed to 101,000 and 80 like this and you will have perfect swear. But I would like to keep mine Full HD So one the 1000 and 920 by 1000 and 80 and everything here stays the same. I will creates frame rate toe 30. It is all it'd. It iss and here you can choose your output certain things. I will choose my final form to be a BJ pick, and here you can choose destination off your file. So I keep mine here under skate animation. I would call it skate termination and I will accept it also, Let's see if everything else is OK So under render settings, we have Ambito lotions, creams, play reflection, screen space, space reflection on. And also we have motion blur. So everything here stays the same, and I think we are ready to render this out. So let's go back and check if everything is correct. Make sure to check everything before resting gender because later on, you will have problems and you can render the same thing again and you will lose time. So I like the way how I'm how my animation turned on. So let's see it one more time and that's it. So now you can go here and press rendered animation and you're rendering is going to begin . So that's it about the discourse about animating skate. I hope you like it. And I hope you learn something new in Blender and soon in the next course by
 Nodiken 3D, 3D Artist and Animator