Transcripts
1. Introduction : Hey, what's up? Hey. Not much. I'm just working on my
resume applying to jobs. Wait. I thought you wanted to become a proto photographer or content creator or even open up your own brand.
What happened to that? Yeah, and I still want to do it, but I don't have a camera yet. So I decided to work in
an office for a while, save up for it, and then I
will start my creative career. What if I told you
you've got everything you need to create?
What do you mean? You've got an iPhone, right? You can take pictures like
this. Is this a joke? You took this photos
with an iPhone. I don't believe you.
Let me show you. Let me show you how to create amazing product photos for your clients or for
your own brand, with an iPhone only. Watch my skill share
course now and you will learn how to come
up with creative ideas for product photos. Where to find props, how to style products with those props and create
beautiful compositions. How to optimize your smartphone settings for the best results, how to take photos,
how to select photos, and how to edit them
all on your iPhone. Don't need any experience
for this class. It is perfect for beginners. Hello, my fellow creator. My name is Stancy. I'm a product photographer
and a YouTuber. I started working
as a photographer when I was 15-years-old, and pretty quickly,
I realized that a professional camera does not make you a
professional photographer. It's all about your
creativity and your skills, not about the gear. Honestly, it's
usually the people with really expensive
cameras that produce mediocre images because they rely on the camera
equipment too much. Thanks to my skills
and creativity, I live in the Canary
Islands and my days are filled with creative product
photography projects, making youtube
videos and hanging out at the beach. A lot. The thing is, you already
have everything you need to get from point
A to your dream. Don't think like, da. We will become a creatives. Instead, think like today is the day one of me becoming
a creative professional. The first most
simple step you can do is take my skill
share course. Let's dive deep into that.
2. Course Project: Create 3 Product Photos: Thank you very much for
taking this course. I designed the
courses project to help you get started on the
creation of your portfolio. I invite you to choose one product that you
personally like and find beautiful and take three
different photos of the same one product
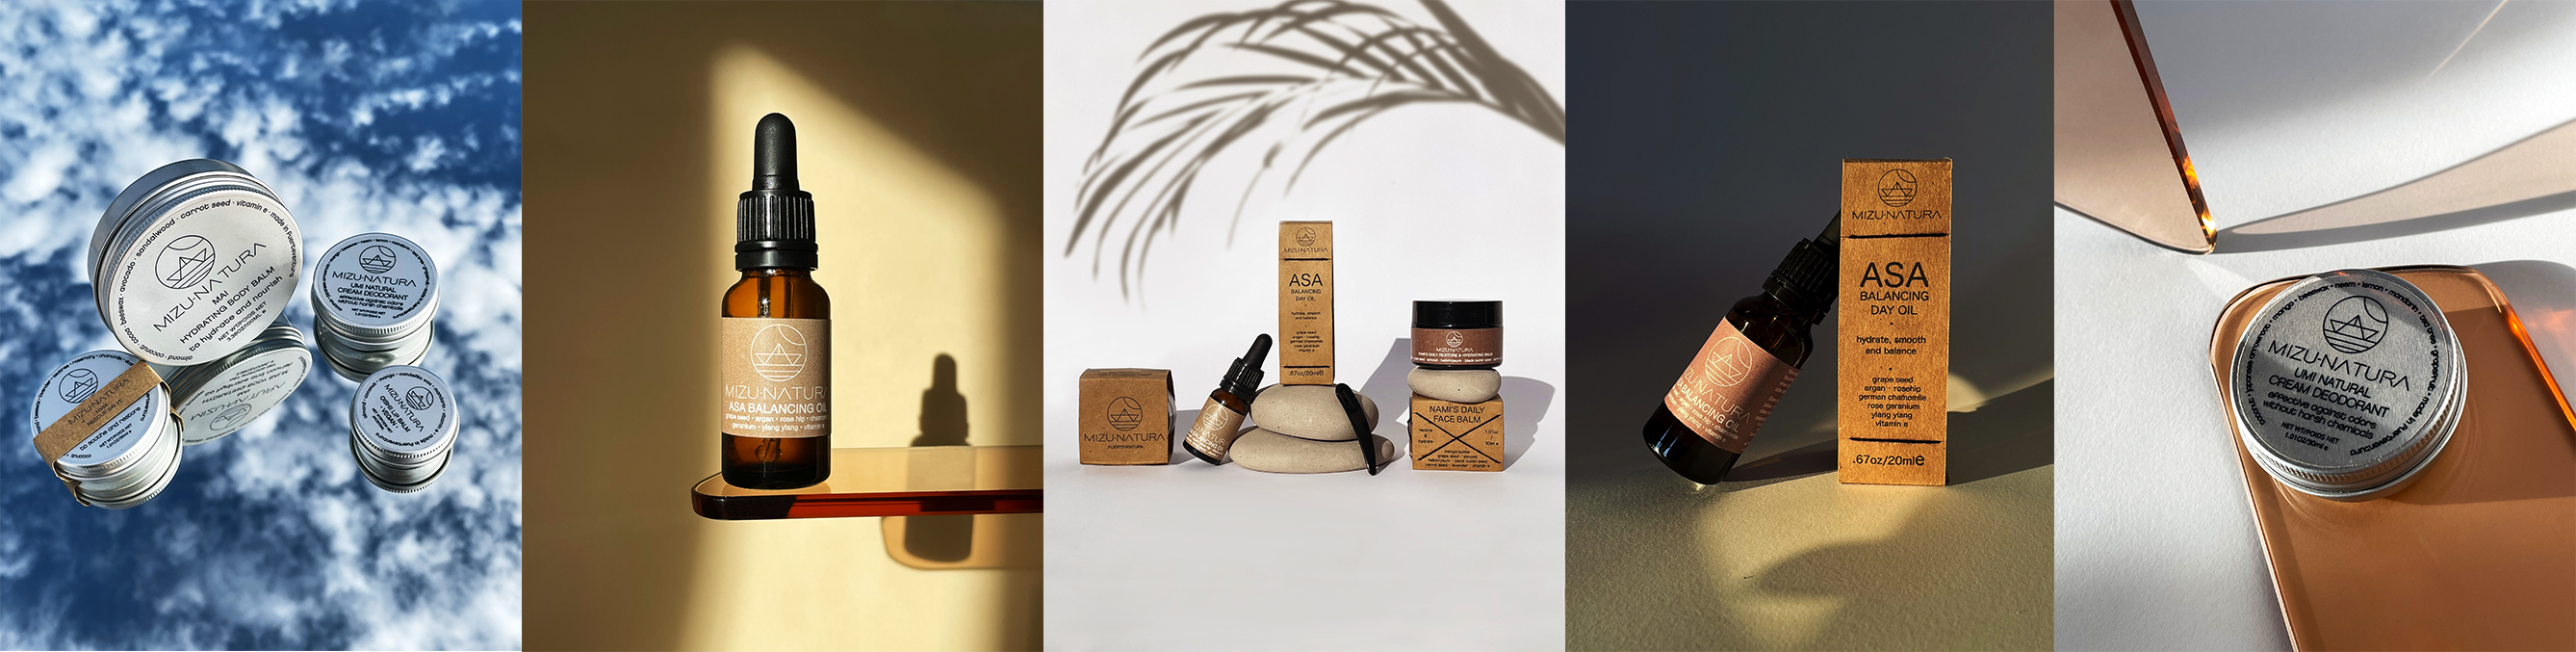
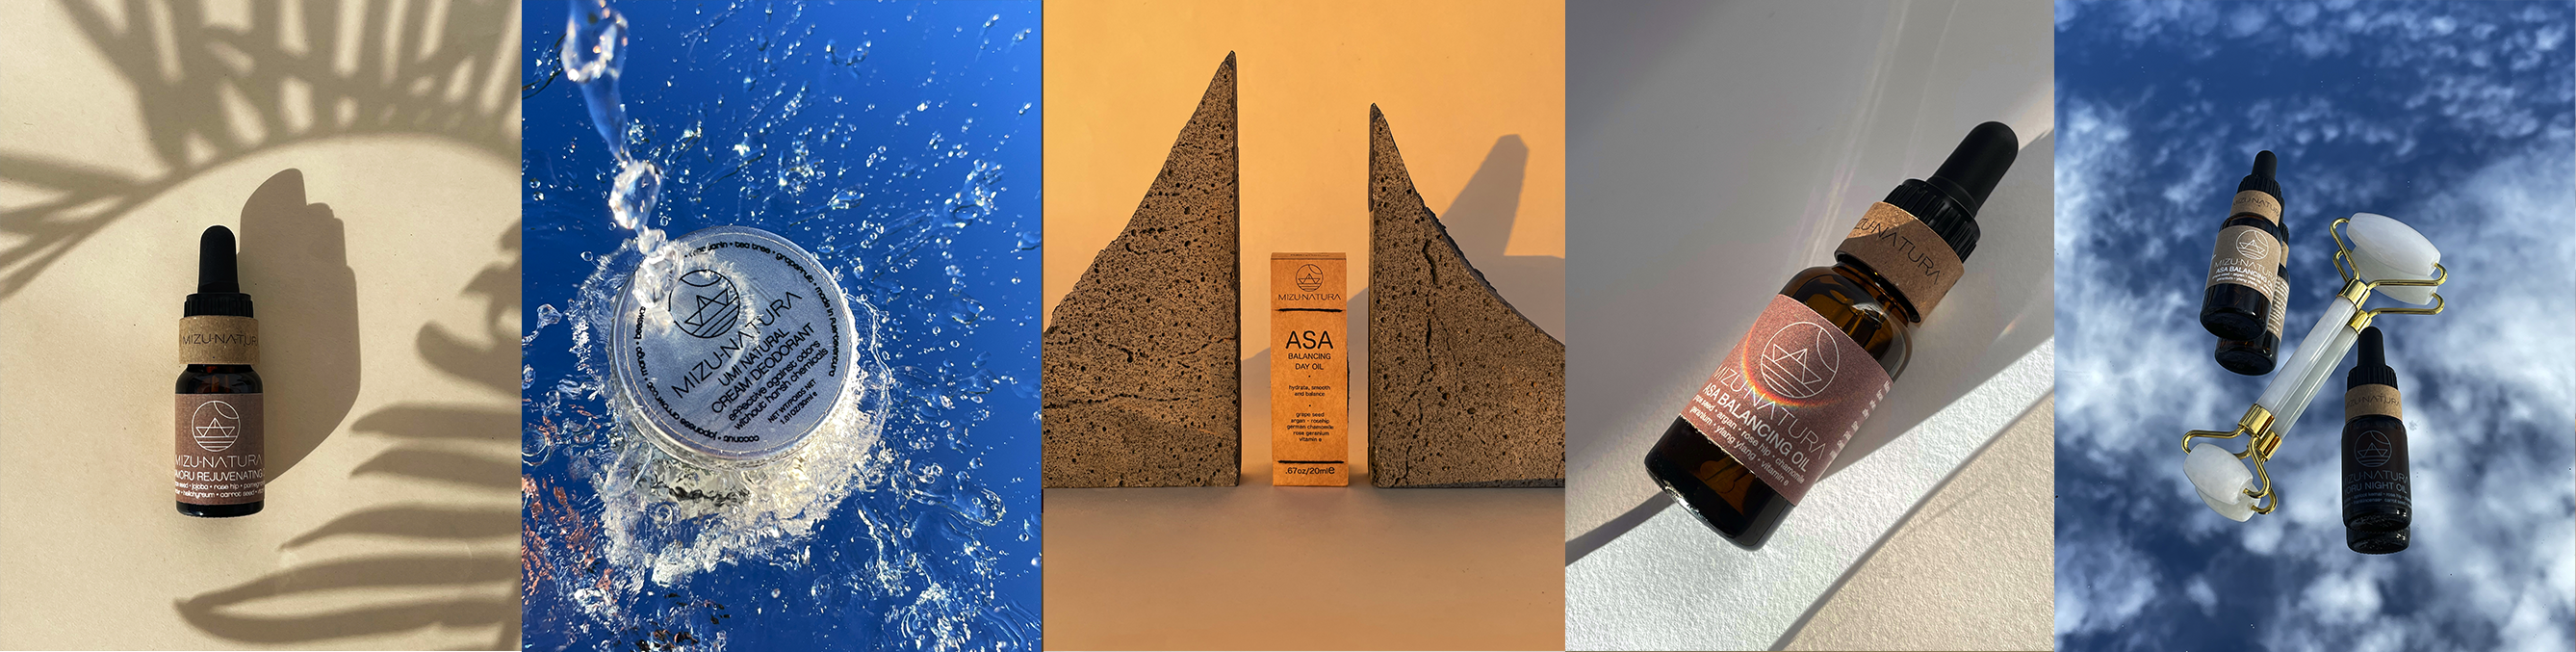
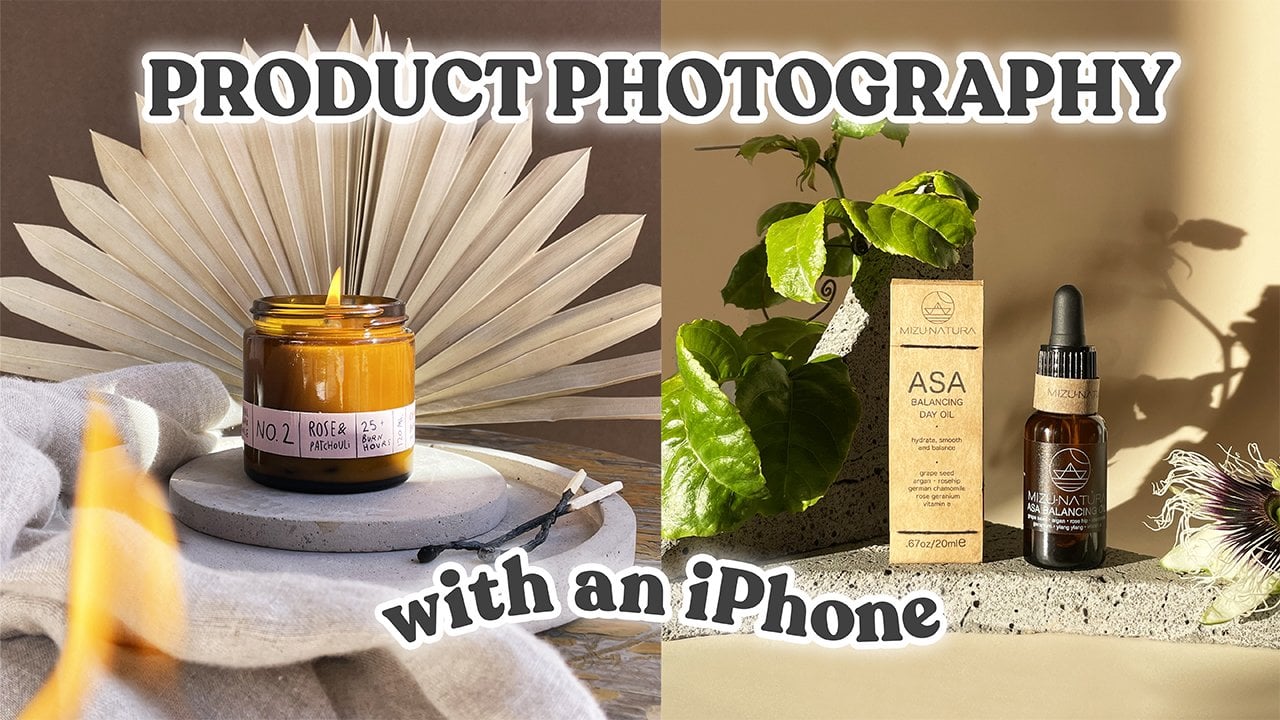
using your Smartphone. To demonstrate to everything, I'm going to use natural
skincare products by a brand Mesnatura, and after each class, I'm going to give you
an actionable step. So by the end of the course, you're going to have
three product photos, ready for submission, ready
to get some feedback. Don't let all of the
valuable knowledge that I'm about to share with you
disappear from your mind. Use it to get the first
feedback on your work and get started with that
creative career already. To complete this project, you will first come up with
three creative ideas for product photos
using three methods that I'll share with
you in the next class. You'll find props and backgrounds
to use for a project, and you won't need any
artificial lighting for it. I'll teach you how to use
the natural sunlight. You will style products
with props and create well balanced compositions using tip see share with you in
one of the future classes. You will also learn how to use your iPhone for product
photography and editing. Don't forget to submit your project to the
project gallery that you can find below and leave a review to my class
when you finish it. I'm specifically
asking you to create three different
photos of the same one product so that
I can give you more useful and
actionable feedback on your work so that you are more equipped to create high quality portfolio projects. If you want to learn more about starting a creative career, check out the resources section under the course
because it created a very useful PDF guide with the six most essential steps that I took to start
my creative career. Also in a resources
section for this course, you will find a super
detailed PDF guide with all the things to do and all the tips that will help you
to complete this project. If you need to stay
more organized, use it and check out
the course details for any additional resources and
links that I left for you. I'm very excited to see what you will create for this course. Let's move on to the next class.
3. How to Come up with Creative Ideas for Photos?: Creativity rules over gear. Having really good
gear is a bonus. Having creative
ideas is essential. How to come up with creative
ideas for product photos. The first method is researching
ideas on Instagram, Pinterest, B hands,
and brands websites. The second one is sketching your own ideas on
a piece of paper. The third one is using
props for inspiration. Researching ideas of
other photographers is absolutely essential because it helps you to develop your own sense of
style, your own taste. It helps you to see what's
currently trending and way your work stands in comparison to the
industry professionals. Recreating someone else's ideas
is the best way to learn. When you find an idea online, and you're trying
to deconstruct it and think, how did they do that? You learn the creative
skills so much faster. I create my best work when I start with researching
ideas of others. I find a few things
that I really like, and then I try to combine them. Because new creative ideas is in fact a few old ideas
combined together. I put my own twist
on these ideas. I created with my own props, with my own products,
with backgrounds, with my own lighting,
with my own style. It becomes something
completely unique. Another thing I recommend
you to do is to research the brand and the product
before taking photos. Go in their Instagram on their tik tok on their
website on their pinterest. Check out what they're
currently creating. What's their aesthetics like? What's their style? Can
you make it better? Can you put your own twist on it without taking a
completely new direction? When you're looking at
the brand's content, think about three words
that will best describe it. For Musa Tura, it is natural, it is elegant, and it is simple. These three words will be a great starting point
for a photoshoot. The second method to come
up with creative ideas of product photos is to sketch
them on a piece of paper. I start by creating
borders on my photo. I just created a rectangle, 8 centimeters by 10
centimeters because usually Instagram posts
have four by five ratio, and I'm just going
to sketch my idea out without thinking
about it too much. I just want to let
the creativity flow, and you don't need
any skills to do it. You're doing it just
for yourself to develop your idea. There it is. Done. Will it look
good? I don't know. I'm going to have to
try it, and I'm going to have to let my
creative process take me places and
maybe improve it and maybe create something
completely different. But now I have a starting point and I don't need to think
about this idea anymore. It's no longer in my head, not occupying the space for
the creative act to happen. Next method to come up
with creative ideas is to use your props and
products for inspiration. I really like just sitting
down and playing with what I have and seeing
what I can create with it. Already, I really like
this composition, but what else is possible? If I just put this round tin on a round tray on
the edge of it, I could create a nice minimalistic composition
obviously with a different background and
some nice harsh shadows to add some interest to it. That will be a
great shot already. Maybe I could put
the circular tray behind the product on a
pedestal to frame it. Could use this prop like this to clean a product on it
and it's on a tray. Why not? Obviously, I can create multitude of compositions
just like this one. In next class, let's
talk about how to find unique and versatile props
for a product photography. It's your turn, research
the brand and the product, define three words
that describe it, find inspiration online, and sketch ideas out or
create a moodboard. When I'm creating a
personal project, I make a moodboard on
Pinterest or Google slides, or sometimes I just screenshot a bunch of ideas on my phone. If I'm working for a
client, I use mill note. This is a professional
tool to make moodboards and collaborate
with other people. Every time I put a
picture on my moodboard, I make a little note
why I did that. Is it because of the background
color of funky texture, some shadow or an angle from
which the photo was taken? Want to be very transparent
when I work with my client. I'm going to leave
a link to Mila note for you in a description
to the scores as well.
4. Where to Find Props for Product Photography? : Beautiful props
can transform and boring and unoriginal
photo into something unique that drives the sales up and gets more
ice on the product. How to find them? The first
way is really simple, just look around your house. You might already have something that will work for your shoot, plants, baskets,
trinkets, bowls, vases. All of that can
work. Second ways to gather some natural
elements like flowers, branches, rocks, and soil. They will work
especially well for natural products
and they are free. The third way is honestly my favorite because
it allows me to have really unique props that
nobody else will ever have. That's finding stuff
on the street. Yeah. Here a couple of
photos that I took with things I found
on the street. I can even tell you
what those are, but they look amazing on photos. So I just found these today
on my daily dog walk. I don't know what this
exactly is So stone cutoffs. I thought they will be
perfect for my shoot. I already can come
up with a lot of different configurations,
how I could use them. For this project
with miss Natura, maybe for some other
shots as well, so I'm going to keep them
with me for a while. I took some beautiful shots
today with a golden hour, and I'm very happy about that. So keep your eyes peeled for
such stuff on the streets. And other ways to shop
for items in stores. I personally real like going to the home decor shops and finding things and coming up with
ideas as I'm in the shop, looking at the things. But make sure you
can return them, ask about the return
policy at the cash desk. Otherwise, you're going to
have to keep everything you got just for that one shoot. That happened before,
and I'm so traumatized. Because I thought the
14 day return policy is commonplace, but no. So brands are like you can have a voucher or exchange
items for something else, but getting your money He. Just saying, be
careful about that. Regarding the
backgrounds, you can use paper from the craft store. That's what I do a lot. I just go and choose
paper in the colors that work best for my ideas
in the brand aesthetic. You can also buy specialized product photography
vinyl backdrops. If you spill something on them, nothing's going to happen. You can use them
over and over again. You can also use some fabrics or some textures
around your house. Maybe you have some
beautiful tiles or maybe a table or maybe a carpet. Carpet? No, I take that back. I can't come up
with an idea where carpet will be a good option. Lastly, you can also
buy props online. I recommend getting
something like these. These are professional,
hand crafted, concrete props from Bitonon. I really like working
with this props because they come in
all these fun shapes. I'm never running out of
creative ideas with this, and I even got a couple
of clients just because I posted about the props on
my Instagram and YouTube. They reached me out,
and we're like, Hey, can you create something
with this for Abra? So some of them come without texture and some of them
come with the texture. So they're really versatile
and they are high quality, which means I don't
need to photoshop them. I can literally take photos with my iPhone and it
will be ready to go. Have you seen those foam props? I'm not a fan of those
because they require a lot of photoshop to remove that
foamy cheap texture. And I reached out to
Don Phone and asked for a little discount for all
of my fellow creators. You'll find it in a
description down below. I hope you'll find some really
cool props for yourself. Now I'm going to share with
you a few tips on how to select props specifically
for your project. First, go and look
at the references on your moodboard on
interest on Instagram and just see what kind of props
you like and what would work best for your style
and this brands aesthetic. When choosing props around your house or online
or in a store, just make sure they
fit your color scheme. For example, for a
natural product, I would choose natural
colored backgrounds and natural colored props. A great thing to do is to look at the brands
color scheme on their website or
Instagram and try to find props in that color scheme. Other thing to keep in mind
is the size of your props. You don't want it to
become too overwhelming. Sometimes it can be
bigger than a product. In the case of this round
cream and the tray, the tray is much bigger, but since it's a neutral
color and I can use just like a little bit of this strain the picture it will work. Just use your sense of style, your taste to determine if this prop is going
to work or not. My last step is to use props that will make
sense for this product. For skin care, I can use a
little basket to store it in, I can use like a makeup bag. I can use gasa or Chade roller. I can use a mirror, like a bathroom shelf, something like that
because it all makes sense with the skin care. I'm not going to use a glass of water with it because
it doesn't make sense. A glass of water would work
with supplements or vitamins. Now it's your turn, gather
the props and backgrounds that you will need for your three photos of
the same product. In the next class,
I'll talk about using the natural light
for product photography.
5. How to Use the Natural Light for Product Photography?: How to use the natural sunlight
for product photography. There are two types of
light, soft and hard. On a cloudy day, you
will get a soft light. The sunlight is
diffused by the clouds. It helps to create soft and
gentle look for the photos, and the shadows will
be soft as well. On a bright and sunny day, you will get hard light. It's strong and it creates harsh shadows with crisp edges. You can create a soft light
out of it by diffusing it. You can put a wide
sheet of paper or some fabric in between the
light source and your sin. There are also specialized photography diffusers
to do that. To what time of the
day to take photos? In the morning, right
after the sunrise, and in the evening,
right before the sunset, you're going to have this
beautiful golden hour that will turn your
products to gold. Photographers love that
time because everything looks more rich and beautiful
and the shadows are long, but be aware that it can change the products
packaging color. In the middle of the
day, when the sun is at its highest
point in the sky, you're going to have
very harsh sunlight. It's going to give you
very short shadows, and you will usually end up with some glare on the
product on the label. It's generally not the
best time to take photos. Somewhere in between
those points of the day, it's pretty good time to shoot. Recommended to just play with your products and props at
different times of the day, see how it looks like and
find the best places in your apartment where it will be convenient for you
to take photos in. How to position the
product to the light? The easiest way to
start is to position your product to a 45 degree
angle to the sunlight. You can also position it to 90 degree angle to create some beautiful
shadows on the side. You can even try to position a product directly
in front of the sun, but make sure to take
pictures from a lower angle, so you don't see the shadow of your smartphone in the shot. And you never really
want your product to be back lit because it will
all be in a shadow, so don't put it in between
your smartphone and the sun. How to manipulate the light? I already mentioned that you
can diffuse the hard light, but what else can you do? You can create some
beautiful light plates and reflections using
everyday objects. Here are a couple of
photos that I took using glasses that I
found at home decor shop. I recommend you
taking a flashlight, going around your house and
pointing it at things and seeing what comes
out of it because that way you can truly
create something unique. Also, I want to recommend you to always be on a lookout
for some light place. This morning, I saw
beautiful shadows from a tree on a table and decided
to use it for a photo. Using no references,
no sketches, just my inspiration in a moment. I put down a piece of paper
to use as a background, a prop from Biton Ton, that, by the way, I
use as my home decor, so it was the easiest
one to reach for. I placed my product in
the paper packaging and just the bottle
together and voila. I also decided to take a photo with multiple
products together. I just placed them so their shadows don't touch each other, and here is the result. The third way to
manipulate the light is to bounce it on a product,
is to reflect it. For example, you have a product, it's positioned to the 45
degree angle to the sunlight. One side of it is very
nicely illuminated, but another one is really in a shadow and you want
that to be brighter. With the artificial
lighting, it's pretty easy. You just put one soft box
here, another one here, and the product is
illuminated from both sides. But when you're using
the natural sunlight, you can just put
a white piece of paper on another
side of the product, which will bounce
the sunlight on another side of this product. The next way to manipulate the light is to actually
make it darker. If you used a black piece of
paper instead of white one, you will make the side of
the product more dark. This is great for moody pictures if you're really
into that aesthetic. The last way to manipulate the light that I'm
going to share with you today is to create some
beautiful sunbeams. Just like this one,
right here on the table. I didn't plan on it,
but it's perfect. You can use two black pieces of cardboard or two boxes
or whatever you have, just place it in
front of the sun, and then separate it a little
bit as much as you want. This kind of sunbeam already works like a prop
for this picture. I can just put my
product in there, position it to how I like it. I really like to eliminate the logo, the name of the brand. Take a photo and it's done. It's beautiful.
It's minimalistic, it's simple, and it's gorgeous. How many adjectives can I
come up with this idea? A lot. But I'm going to stop. Choosing what kind of
light you're going to use for the photo is
very important because it will define the style of the whole project
and never shoot in the poorly lit environment
because it's just going to reduce the quality
of your photos and make them pixelated. Now it's your turn. Look at the moodboard that
you created and see what kind of light is used for each of the
reference pictures. Or look at your
sketches and think what kind of light would
work best for your ideas. Knowing some ways of
light manipulation, maybe you can come up
with some new ideas. In the next class,
you will learn about styling
products with props.
6. How to Style Products with Props?: Styling products with props can be quite overwhelming
and challenging, especially at the beginning, but I promise it gets so much easier and
intuitive with practice. Now I want to share
with you my tips for styling products with props
and show you some examples. A quick disclaimer.
All of the tips that I'm about to share with
you are not rules. I just want to help you
get started with styling. Don't try to implement
all of them at once, and use each tip individually as a starting point
for your photo idea. Do not overcrowd the
photo with props. This can be distracting
from the product. Everything in the
photo should support the product. Second tip. Use props that make
sense for a product. If it's skin care,
you can use a mirror, a jade roller, gaa, baskets, makeup
bags, you get it. Tip number three, if you
want to put all the focus on the product and really
make it the here of the shot, put the product in the middle. Next step is to use
the rule of thirds, which means is to visually
divide the picture in three parts vertically
and horizontally. That will create some
points of intersection, and it's just more
appealing for the human eye to see objects in the
intersection of those parts. Leave some space, but not
too much around the product. If you leave too much, it is
going to look awkward and the products will not be the
main focus of attention. Tip number six is to frame
the product with props. Tip number seven is to
play with props and product until you find
a well balanced look. That's why it's so important to look at the pictures on
Instagram Pinterest and other website to develop your own taste and
sense of style. Tip number eight is to
have odd number of props. Again, this is just more
appealing for the human eye. Don't try to make a
supersymmetrical picture. Tip number nine is to
add an element of chaos. Don't strike to make
it super perfect. Making a beautiful light
beam or reflexion or some light play is one of the great ways to add the
element of chaos to your photo. The last tip number ten, you can style the product
laying flat on the surface, it can stand or it can
lean on something, or it can float. If you want to create ye
catching photos like these, you might want to check out
my other skill share course about floating
product photography. But it is for intermediate
photographers just because it requires the knowledge of
photoshop. Now it's your turn. Style your first product photo, using the tips I
shared in this class, and I will see you
in the next one.
7. How to Optimize iPhone Settings for Product Photography?: Have your first styling
concept ready to shoot, Let's pull out our
iPhone and make sure we've optimized
the settings. I'm going to mention the most
important things only and it's best if you follow along as I mentioned
each setting. Head over to settings,
camera, preserve settings. First, turn on the
exposure adjustment. This is very handy.
This gives you more control over the exposure. Over exposed picture
means that there are no details in a very bright
part of the picture. An Underexposed picture
means there are no details in a very
dark part of the photo. Want to find a happy medium and that's why we need to
have more control. When you turn the setting on, you're going to take a photo
with an adjusted exposure, and when you're going
to take the next one, you'll not need to
adjust it again. If this feature is turned off, IPhone is just going
to automatically reset it every time, and it's not always going to do a great job with exposure. Next, let's go one step back to the camera
settings and make sure we have use volume
up for burst feature on. This is just very
handy when you're shooting something in motion. If there is a water splash, if there is some beautiful
movement in the picture, you want to have
a bunch of shots, so you can just press
the volume out button, and that will take a lot of photos to choose from otherwise, you'll just have to press
your shutter like this. Another thing I recommend
is to turn the grid on. This will allow you to see
those intersection points where it's best to
put your product. You can also make sure it's in the center and you don't
awkwardly position it a little bit to the
left a little bit to the right because that just
doesn't look very good. It whether has to
be in the middle or in one of those
intersections. W Let's go to the
camera app itself. On a left top corner,
we have flashlight. It's best to keep it
off at all times. You don't want to shoot
with a flashlight. Next to the flashlight, we have our exposure adjustment. If you tap on it, it opens up a little scale at the bottom, and you can control the
exposure from there. It's quite trendy to shoot
under exposed pictures, so you can set it to minus one, and your picture is going
to be a bit darker, and the setting is going
to be preserved now. For the next photos you take. In the right hand side in
the corner, we have HDR. I prefer to keep that one off because I don't
like the look of it. I think it makes
photos look cheap. Next is my favorite
live photo feature. I always have that one on. Again, it's very
handy when I want to shoot something with the motion, when I want to capture
a water splash because I'm going to have a
few options to choose from, even though I just
pressed my shutter once. In the top middle, I have
the arrow up button. If I press that, it opens up a few features at the bottom. Go to the format. I'm usually shooting at four by
three because this is the closest one to the Instagram post format
that is four by five. And 16 by nine is
the Instagram story. If I'm shooting something specifically for
Instagram story, I'm going to shoot
it at 16 by nine because I don't want
to cut out anything. It's just looking a little bit weird sometimes when
I took a photo for a post then cut it and the product is just a little
bit squeezed in there. It's just not a great look. The next feature of the
format is exposure, but we have a way to
access that at the top. I just always tells you what kind of exposure
setting you have right now. So keep that in mind if your picture is too
bright or too dark, check if you've adjusted
the exposure before. Another one is timer, 3 seconds, 10 seconds, very handy to use when
you can put your phone on a tripod and then do something with your
hands for the picture. Make that warner
splash, for example. The last thing I'm going
to touch on here is the portrait mode of the iPhone and blurs
out the background, but it doesn't do
a very good job, so I don't recommend using that. If you use it, it's going
to be very apparent that it was blurred
not by the camera, but by the technology, and
it's not the best look.
8. How to Take Photos with an iPhone?: Now what's left to do is to finally take those
product photos. I recommend you to
think before you press the shutter button
because there is nothing more annoying than
choosing one out of 500 very similar photos. They take up a lot of
space and you start procrastinating on
selecting and editing them. And this whole creative
process becomes not so exciting and
quite daunting actually. But even before taking
your first photo, there is something that
you absolutely have to do, and that is to clean
your iphone camera lens. There are always some pieces of dust or fingerprints on it, and if you don't clean it, the picture quality is going
to be really, really low. So I recommend using an alcohol wipe for glasses
or a special fabric piece that comes with every
glasses that you purchase. I recommend taking
just a few picks from different angles
to find the best spot. And when you found
it, take a couple of shots just to make
sure you've got it. First, find the angle
and then take a shot. Changing the angle
can also help you to remove the glare from
the product label. If that happens, glare
typically screams cheap. Finally, you can zoom
in a little bit on your shot to remove
the lens distortion. This is a bit advanced, but it makes the product
look so much better. Just believe me, you
can zoom into 1.5 max, otherwise the quality
will get poor. My last step is to make your composition as perfect
as you possibly can. Don't have the attitude of, I'm going to fix it later
because that's annoying. Things like that just pile up. And then you end up sitting
in front of your computer for 8 hours just fixing minor
details for your project. You don't want to do that
as much as possible. Has to be done in production, not in post production. And now it's your turn. I hope you have been
following along and adjusting the settings
on your iphone. It's time to start
taking those photos. Once you're finished with
the first styling concept, move on to the next two. And when you're done with those, come back for another
class where we will select and edit the
photos on your iphone.
9. How to edit photos on iPhone?: You took some great shots. But most importantly, I hope you had a good
time doing that. Now it's time to select
the three best photos. I recommend you to
do it right away after shooting because your
memory is still fresh. You still remember
which ones were good. Go, like them right now and
delete everything else. To edit the photos, I recommend
using the Snapseed app. It's from Google. It's free. It's really easy to use. It has a lot of tools and
they're very precise. The best way to learn
this app is just to play with each tool
and see what it does. I'm going to show you
just a few of them. Let's go to the
tools tune image. If I scroll the
screen up and down, this menu shows up, and I can
choose what I want to tune. Let's go with brightness. All I need to do is
to move my finger from left to right to
adjust the setting. Adjusting the white balance
can be very handy, too. You can make the picture cooler, or warmer, more green, or purple, depending on the
style you're going for. The last two lell
show you is healing. It can help to remove some
imperfections on the photo. Just tap on it, and it's gone. Now let's edit this
photo Snap side, and I'll show you
a few more tools. Let's go to the looks at
the left bottom corner. It opens up a bunch of different filters
that I can use the most useful of which
is the last edits. It applies every single thing that I've done for
the picture before. It comes very handy
for batch editing. But for this picture, let's
go to the tools and details. There are two
parameters that I can change structure and sharpening. Structure allows me to
drastically increase or decrease the amount
of details in the photo. For this picture, I prefer
to decrease it a little bit just to remove this texture
of the paper background. And to increase the
amount of details, I'm going to use sharpening
and not structure. And I prefer to keep
sharpening to about 20. Otherwise, the picture is
going to look very cheap. If I increase it to 100, it just doesn't look very good. Make sure to keep it
around 20 as well. Next, let's explore
the curves tool. It also has a bunch of
different presets to use like soft contrast and hard contrast and
brighten and darken. Depending on the aesthetics
you're going for, you might want to
use some of these. Adjusting this curve is
just going to give you a little bit more control
over each parameter. Now let's work on this photo, and let me show you
the perspective tool. While I took this photo
intentionally from a lower angle, and I do like how the shampoo bar is a
little bit distorted. You may not want it for every single
picture that you take, and this tool allows you to
straighten everything up. Just play with these points
and use this grid for your reference to make sure
everything is aligned nicely. This is the before,
and this is after. And finally, let's work on
this picture a little bit. I'm going to go to the tools. Crop. I choose five by four, which is four by five. This is the Instaga
format for posts. I'm going to crop
this picture nicely. Then I'm going to go
to the tools healing, and I'm going to firstly remove these corners just by tapping on these
areas of the photo. There is also a little indent
on this metal tin and I can easily remove that by tapping on this
part of the image. Another thing I want to show
you is the selective tool. The three tins that are laying flat on the
mirror are darker, and I do want to
brighten them up to bring more attention them. With this selective tool, I can selectively adjust
different parts of the image. I tap in the middle
of my round ten. Using my two fingers, I can scale the area of impact. Then I'm going to scroll on my screen up and down to open up the menu that has brightness contrast,
saturation and structure. I'm going to go for brightness, and then I'm going to move
my finger from the right to the left and see how much I want to change this
part of the image. As you can see, this
is very precise, and it's doing a great job. I can continue adjusting
my selection Here it is. Look how much better
the photo looks. I still have two
more tins to adjust. So let me quickly do that. There it is, here
is the Before and here is the after,
Much, much better. In the resources
section of the scores, I'm going to leave a
PDF guide for you with more apps that you can use
for editing your images. Now it's your turn.
Start editing your photos and snaps it. Check out every single tool, play with it, and see what
it does for your photo. Have a look at the PDF guide, download some more apps
and test them out. This is time for you to to discover and to
learn on your own.
10. Conclusion: Final step of the project and the final step
of the course is to upload your three
product photos to the project gallery. You've done a great
job. You've made it to the end of the course. I'm proud of you.
You are amazing. Use this course and this project as the beginning of
your creative career. After you receive some
constructive feedback from me, you can start creating
your portfolio project. A portfolio project is typically 7-12 product photos in a
similar style with a concept. You can upload it in the form of the Cars on your Instagram page. You can make a professional one for a photography and
content creation, or you can add it to
your portfolio website if you're aiming to
become a pro supervisor. Check out my website dancing
nova.com for Inspiration, and also check out
my YouTube videos. I have a bunch of videos about product photography where I take you behind the scenes
of my creative project, and also I share my
island lifestyle. Of course, the most
important thing, leave a review for this course. This is going to help me to make better courses in the future, let me know what you
like, let me know what you think I can
improve and let me know. What else would
you like to learn? If you have any
specific questions, you can dam me on Instagram at Stance dot Nova and
check out some of my other skill share courses and follow my page because there
are more courses to come. I'll see my next one. Please.
 Stancy Nova, Product Photographer & YouTuber