Transcripts
1. Introduction: Hi, I'm Elizabeth and welcome to mixed media for beginners
painting and embroidery. I have a background in
high-school art and I've been creating for as
long as I can remember. I love finding new ways
to approach art-making and experimenting with
different VGA combinations. I began sowing into
my artworks during an art class I took
a few years ago for re-explain a wide range of artists inspirations and
art-making approaches. It was amazing to
see the way artists such as debbie smith
through a thread. I had never considered
sowing into my work before, but I really enjoy using art materials and
unexpected ways. I quickly fell in love with
this mixed media approach. You also love to explore new
approaches to art-making. I'm confident you'll
enjoy adding, rather as a new way to add texture and detail
to your paintings. The left gets selling.
2. Class Description: In this class, I'll teach you some basic sewing techniques. Then you'll be creating
a mixed media artwork, whether you use
either sewing thread or embroidery floss to sew into a watercolor art for painting you
previously created. If you don't have a painting, you'd like to send
me to check out the two mini lessons
I have listed below. The first one is a watercolor
mini lessons that cover some basic wet-on-wet
techniques that work really well as a background to
embroidered paintings. The second is an
acrylic mini lesson to help you quickly create an
abstract approach painting, it would also be ideal for the embroidery
mixed media process. For either painting, I recommend that you
work rather smell, I ever say between four by
four inches up to eight by ten inches will be handling our artworks a lot as
we selling to them. So smaller is better
for this project. Also, if you'd like
to learn a couple of more watercolor techniques, you might like to
check out my intuitive art-making simple watercolor
and ink techniques Skillshare class to
learn a couple of other processes that you
can do with watercolor. There were really
well as a foundation for embroidery paintings. Once you have a small painting that you're ready to sew into, you'll begin choosing which sewing techniques you'd like to incorporate into that
painting and begin sewing. There's also a bonus lesson
about how to add beadwork. They are embroidered paintings. In the next video, we'll go over the materials that
we need to have that hand for this project. I can't wait to see
what you create. Let's get started.
3. Materials: For this project,
you're going to need at least one painting that you previously created on watercolor or mixed media paper. This can range anywhere
from a four-by-four picture up to an eight by 105, a painting on thinner paper
that I want us to go into. What I'll often do is
mounted on cardboard and that kind of gives me
a sturdier surface to sew into and makes it
easier for handling. She might also want to
have some cardboard and you can cut down to
the size of your painting. And then just some basic, basic glue stick or
work to attach it. If you're nervous about sowing
into an existing painting, they didn't need
painting supplies with either watercolor or acrylic to quickly create a small painting
for this project, you're going to want
some sewing thread or embroidery floss in
a variety of colors. Think about what color thread would compliment your artwork, what colors will
create contrast, and generally which colors you find appealing when you look at the threat against
the painted surface, the embroidery floss comes with six strands put together and we can divide those up to create
a variety of line weights. As we saw into our projects. You can also double or triple up your sewing thread to create a thicker line
with that as well. Then you're going to
want to have a needle on hand that has a
large enough to fit through whichever width of threat or floss you're
going to be using. But make sure that needle
eye isn't too big. Because the larger than needle, the larger the hole that you're gonna be making
in your painting. They're also going to want
a pair of scissors for cutting your threads
as you work. Then if you decide
to add BDM details, you're going to want to
have some beads on hand. And for this, you
will definitely need the sewing thread to attach those to your painted surface. Once you've gathered
up all your supplies, you are ready to move on to
the demonstration video.
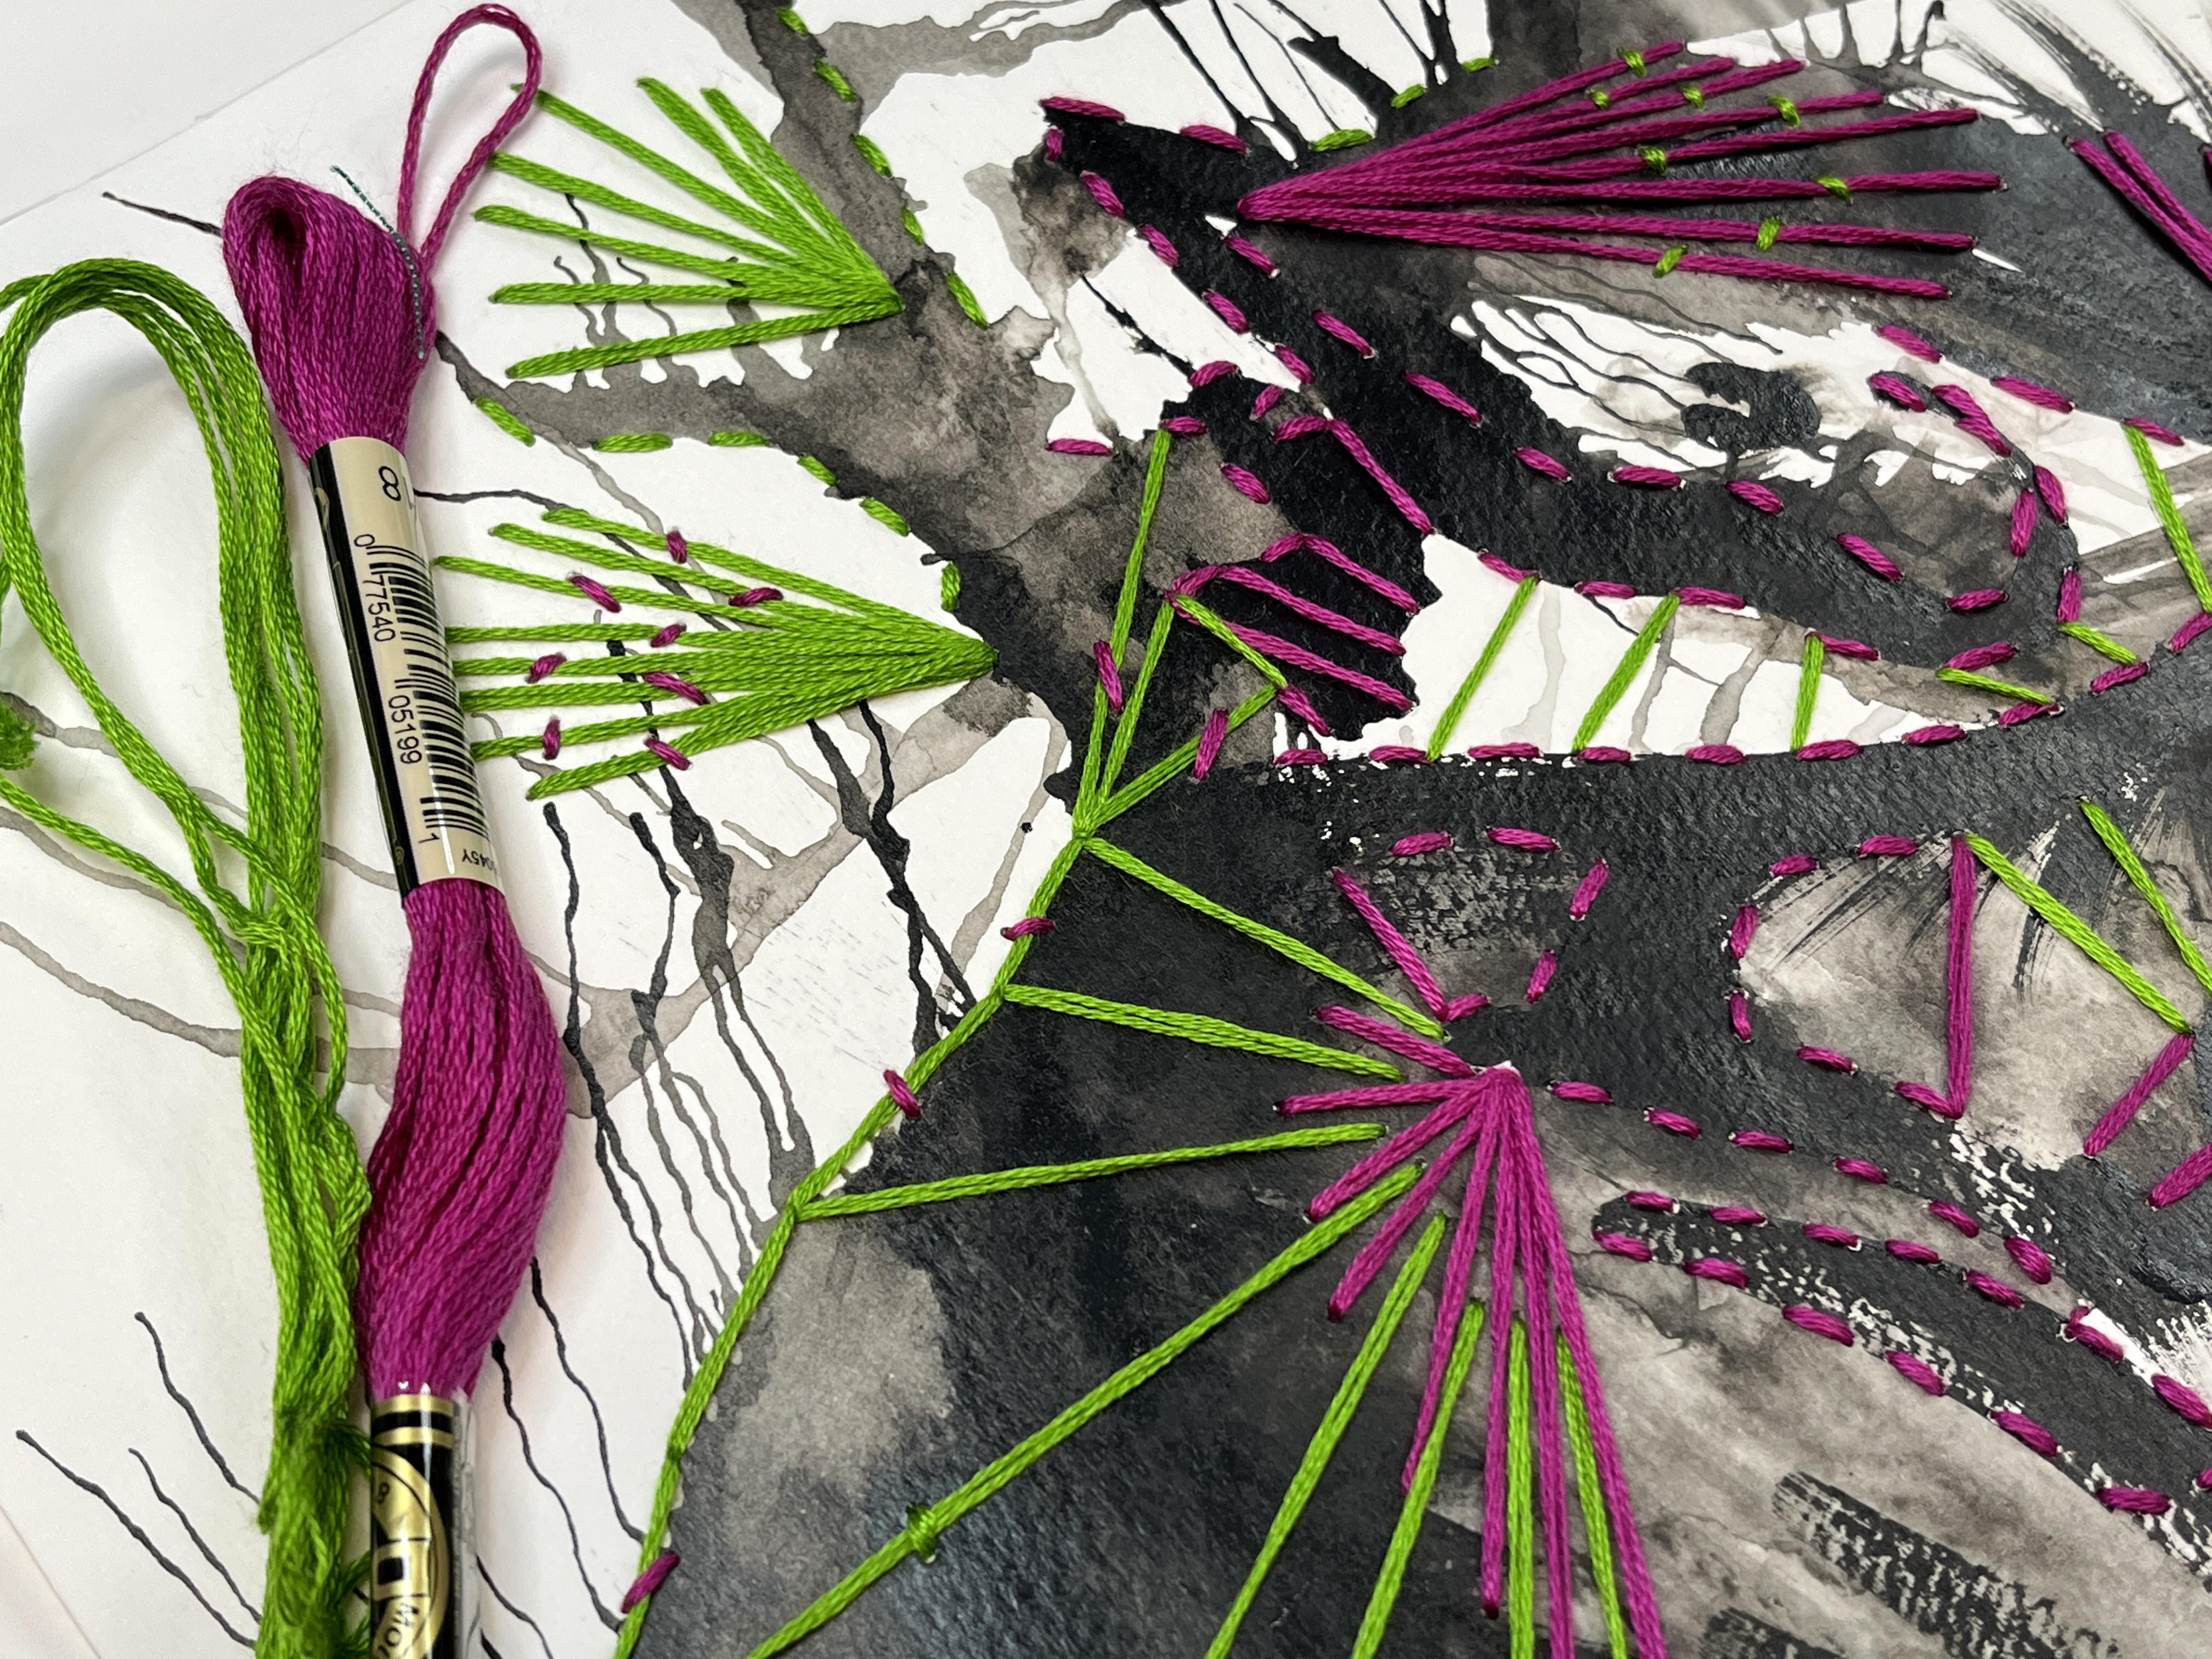
4. Basic Stitch Demonstration: You can use any type of statue like I'm not a great
sort of close but I know the basics
and that has been plenty like any new medium. It's all trial and error as we figure out what
works best for us. And it's allowed me to
create my own way of sewing. A few types of selling
stitches are all you need to begin sewing
into your paintings. Let's walk through a few
of the basic stitches. Some stitches that I
find works best or the running stitch
or basting stitch, which you can see used here. If this one just runs
along, it gets in and out. And I'm going to show
you that 1 first. For this demonstration,
I decided to set up my embroidery hoop because it's a little easier
than tackling, sewing a painting, and
demonstrating basic stitches. So you're gonna go in through the back, get your needle SAT. You're gonna go in
through the back, the front, from the
front to the back. Then you'll flip it over. You'll go in from the
back to the front. The front to the back, making a running stitch along
any india of your artwork. This is the easiest one to do. The other great
thing is you can use this stitch and you can vary
how far apart they are. Because we're not selling
a garment together. We're summing in details. You can also change directions. So I can kind of map out where I want my
design line to go. Say I want to create an angle up here and a map it that way. We'll get back through. Then if you want to,
you can create a little you can go in
through the back and kind of create a security
stitch or kind of go in on the side of my stitch
line like that. Then I jump over to
the other side of my stitch line and I pull it back and that kind of
holds it in place. This is very handy if
you're going to be doing long stretches of thread
on your painted piece. And it adds another element you could keep going with those. Go back through the back. Here we go. Create a crisscross. We're looking at threat as
a way to add line detail, not to show something together. So it's purely there as
decorative elements. And you can do anything
you want to as far as how you approach
those stitches. Another stitch that's
a good one that carries over from
sewing is a backstitch. And that's what I use
to create this peace. Let me demonstrate that for you. So you go in through the back and out through the front
and back down again, just like we did with
the running stitch. Then you're gonna go continue on just like
the running stitch and go back up again. But this time instead of
going forward with a stitch, you're going to go back and
you're going to go back through the hole that you
did in the original one. Now, in sewing, you would
just have to focus on going through the base
of the previous thread. But in embroidered painting, you want to really
make sure you go through the same hole. Because the less holes we
can create, the better. But we want to sew
into our paintings. So you've got to work with it. Then you can do what
is traditionally done with a backstitch and
you can move it forward. Have it go that way. Or because we're not necessarily
playing by sewing rules, you could go back up
through this hole, which is what I tend to do. Then create another
forward stitch like that. Then if you jump ahead
again and you'd go back up, go back down through
the same hole. And it creates a nice
continuous line. Either this way or the traditional backstitch
method is fine. I just find I'm using
the same amount of thread and I like to
see my line grow. So going back through, going back up through this whole feels more
appealing to me. Then during the
traditional method of backstitch for you to go back down and then you
would move forward. Then you go back down again. Then instead of going
up through this stitch, you would go up to here. But in my mind, that's thread that could be
done on the front side. So that's why I instead jump back to here to
continue my line. The same thing we did
here as far as changing directions can apply
to a backstitch, I can jump over here. Starts to June, that way. You don't have to.
There's really no rules. I can then go this way and then backstitch there and
just kind of creep. Creating something
that's showing, again, I don't have to go
through this whole if I wanted them jump my line. I can jump all the way over
there and create that stitch. And then this stitch
could go any which way I want or it could go back to
there to continue the line. We have a running stitch, modified and backstitch
commodified also, cross stitches. Another citric theories
overwhelmed from basics of hand sewing two
and brighter paintings. Just like our running
stitch and our backstitch, you would start going
up from the back. Then instead of
going straight out, whichever way your
stitch line goes, he would go at an angle. You go down through
your sewing surface. Then the backside,
you would try to line it up with
that first stitch. In the traditional
world of cross stitch, you come back up here
and then this sign would crisscross back over that way. You can, you can create the
axis and then you'd go back up through this bottom crossover following
the same angle. They're parallel lines. Let me go back down
through there. And then you'd crisscross
to meet this one. This one also works
well if you want to add some really interesting
axis or cross texture, I did something similar to
that in this piece down here, where I let my lines cross
at different flanks. You can get as creative with this as you want
to say you want to. You can't get too small with it because you want
to keep your holes spaced apart but you could
stitch any which way. Like I could do a
nice long running stitch around here if
I wanted to kind of close in those in
signs or I could do kind of a long stitch and
then crisscross this guy. Some other, other artistic way. It doesn't really matter as
long as you're having fun. So play around with
these basic stitches and see how luck
with your painting. And again, the type
of painting that you have for your starting
surface is going to give you an idea
of what type of stitches going to work
best with your piece. One thing to keep in
mind, like I mentioned, is that the closer
together your holes are, the greater risk you run
up the BIM, your paper. So really be mindful about
how you go about it. If you want to have a
lot of stitch line, the backstitch is
probably your best bet. You can always, you
can jump all over your painting and have some really interesting
stuff happen. I also don't tend
to think in terms of what stitches I'm using. I just go with what type of line or texture I
want to create. This is a great starting point, especially if you
are a beginning so or something you
haven't done it in awhile or transitioning
the idea of sowing into painting is blowing
your mind a little bit. Starting with the basic
stitches is a good way to first approach this style
of mixed media work. I do recommend using a small
scrap painting to experiment on as you become more comfortable
sowing into paintings. This is a great way to try
out different ways to create line dimension and texture with your thread before you get
into the bigger pieces, Let's head to the next
lesson to learn how these stitches will be used
to embroider your painting.
5. Watercolor Mini Lesson: If you don't have a watercolor or acrylic artwork on hand. So into them, this lesson we'll cover a few
basic techniques you could try to quickly create a painting for the next
part of our class. I love working with watercolor
and acrylic paint and experimenting with
different ways to manipulate these mediums. For the first few paintings, I'll be using watercolor. I'll be applying a
wet-on-wet approach to lay down some color. Then I'll develop some details based on how that turns out. I've got my watercolor
paper, It's 140 pounds. It is to pay for that. I really enjoy using that happen to have a lot of on hand. So as long as it's
watercolor or mixed maniac, you should be all set
for this project. I'm going to start with
a very small piece of watercolor paper. Then you can either white
it with a paintbrush or by spraying it with water. I'm going to show
you the effect that both wedding techniques create. First, I'm going
to wet my paints. You can either wet your paints by loading up your
paint brush with water, then dropping it into
your paint palette areas. Recently I learned about the magical wonders of
a water spray bottle, and they are very inexpensive. Every craft supply
store has them. This is my new best
watercolour friend. So now I just kinda spray into the paint
wells where I want, which colors I wanted to use. And it's really easy
to keep my paints wet and have them ready to go. For the first way to do
wet-on-wet technique. I'm going to load my
brush with water. I'm going to wipe the edge a bit off because I don't want
it to be crazy wet. And then you just start painting across your surface
of your paper. You could have the
whole area be wet or you could leave some areas dry. Is up to you. For this piece. I'm just going to get a nice
even amount of moisture. The paper with a
clean brush to wet. One of my other brushes, wipe off the access of that, load it up with the paint. Like really saturated paintings. Water is going to do
the magic for me. Then I'm just going to start. You can do debts. You can do whatever you want. Also, reload your
brush with water and kind of splatter that
down onto the paper as well. We're kind of squish it
out and let it plop down. Doesn't want to do it right now. Okay, there we go. And then let it that has a little bit more
movement to happen. The other thing you can do with your wet-on-wet
is drop one, drop more colors into what
you've already put down. I've got some purple. I'm just going to put
my blue down into that. Or you can just kind
of gently trail along. You didn't spend as much
time on this as you want. But the ultimate goal
is to get yourself a painted surface that
we can then go into. Also drag some water overlying those edges and create a little bit more movement. Encourage the paint. Take a little trip. I want to spend too much time. But I really love watercolor
as hard not to get sucked in C ways, you could push it further. But I loved the fact that
you got when you just let the water and the
paint dance on the page. Now if you are creating
your painting specifically for this project and Skillshare, you have complete control
over your colors versus finding a painting
that you're going to decide is going to become
an embroidered painting. Sometimes the control is nice. Sometimes we get a
little carried away. As you're having fun. Right? Now, even though I
wet the whole paper, I still have a lot
of open spaces. But that's good because
for this project, we want it to be a combination of paint
and embroidery thread. So having those open
areas will give us some space for the thread
to exist in its own right. The other thing you can do, BLAT up some of the
paint if you get areas that are a
little too heavy, it's good to have some
paper towel on hand. If you get some edges, some areas where things
are getting a little more intense than you want and you kind of want
to pull it back. You can just Some paper towel in there
and it'll soak it up, bring back some
of the lightness. And if you've layered colors, it will also reveal some of
the colors that got hidden. That balloon kind of
overpowered the purple. And a lot of ways in some areas, this lets that come back. I don't want to over paint this and I'm risking doing that. I'm going to stop there. Just kinda let that be. I missed that this aside. So there's one way to
do wet-on-wet paint your paper with a nice
even coating of water. Then just start
dropping your paint and playing around with touching the tip
of the paintbrush dry and dragging the line out. Adding more water, however
you want to do it. Set this one aside to dry. Then the next one
we're going to do wet on wet with
our spray bottle. You could do this
with even if you've just had old spray bottles around from cleaning
products or beauty products, you could rinse them out
really, really well, wash them out and then put
some clean water in there. The spray bottle is a different kind of
wet-on-wet approach because of the way
the water goes down in lots in one area, I can have a mist in
another section and it changes how the water
comes out of the page. And because of that, it changes the appearance that
we get on our painting. You can still do the
drop-down thing, but you see what's happening? Because the paper because
they didn't brush it on, I just let the water
droplets exist there. This is really cool areas that are just left
the white of the paper. If I kept dotting and do that, if I could lose that
and that would be fine. See what happens when I
dot with a wetter brush. You can even go in
with a bigger brush. I could still kind
of paint into there, but the edges are different. Bleeds in a different
sort of away because of how the water was put on there. Just really cool. That's why the
spray bottle is my new watercolor best friend. A bit more on this
one will be done. Don't want to lose this effect because that can only be
achieved with a spray bottle. I'm gonna stop right there. There are two
watercolors frame down, so you can see two different
approaches to wet-on-wet. Very different looks. These pieces, but both so fun to create and they only
take a little bit of time. Now because I've created them
with this project in mind, I don't have to worry
about being stressed about sowing into them
because they were created for that purpose. You're gonna do watercolor
and you need to make a new watercolor painting. I hope you'll give us
a very quick process.
6. Acrylic Mini Lesson: For this painting, I'm
working with acrylic paint, so I have my acrylic
paint tray setup. I've got a jar of water, some paper towels to
clean my brushes, and a couple of different
sized brushes on hand. I don't want to spend
a lot of time on this. I just want to lay
down some colors so I have something to work with for my
embroidered painting. With acrylic paint. You don't have to wet your brush before you go into the paint, you can to change the viscosity or
thickness of your paint. But I like to more so just
because it's a habit, It's called If the brush pen, like the water off and
load it up with paint. Again, different
acrylic paint brands have different thicknesses. The water can be great. The water can be disastrous. This is black acrylic. On the thinner side. Just great. For this project. We don't want to be working
on terribly thick paper. I like to do a lot of my
mixing right on the paper. Just let things blend. Because I'm going for
an abstract picture who doesn't really
matter, what happens. It's all just kind of
letting the medium decide how things go and making
decisions in the moment. Like, I don't really
love that pink there. That's not really what I wanted. The great thing about acrylic, just paint over it. It's a great medium to explore
if you're new to painting. It's also great to create
different textures. And the whole goal of
the embroidery is to add another layer of depth through a texture or dimension
to our artworks. You can do that by already
having that in there. With your acrylic paint. You can also change it up. You can wash your brush. I can paint that. Doesn't have every other
color and mixed into it. Stays wet for a
little bit of time. So you can experiment and play with shading
if you want to. You're gonna have less
negative white-space. Probably. If you're going to do an acrylic picture for
your embroidery painting. But that's not a bad thing. And you can always do what I'm doing here
and paint some in. I could also let
this dry and then paint some white in or paint some other lighter values in. But I want to get to the sewing. So I'm going to just keep going and let
it mix a little bit. Because I still get
that value contrast that I was aiming for when
I picked up the white. Just a little different because it's got a little
bit of the purple in there. Because there is no
predetermined image that I'm going for. I can just flip it
around and keep going. Now some of my red dried, so I have a little
bit of an edge there, but that's not a
bad thing at all. It wasn't going
for a smooth blend out was I should've
painted a lot faster. Just want to get
some sort of color down so that I have
a starting point. Keep working there.
So you could go into this and do a bunch more stuff. You could spend as much time on your paintings
as you want to. For this one, I decided to just keep using the
watercolor paper that I used in that mini
watercolor lesson. Because I had it. And I don't want a
very thick paper. I want to be able to
easily sell into. Watercolor paper works
pretty great for that. If you needed it to dry faster, you could get a blow dryer out. And again, we're not
pressed for time. I also just don't want
to stress about it. Let it be a little
rough, little rustic. You can also do kind of a glazed effect
with your acrylic. Watered it down a little bit. Too much. That's too much. That effect, it would be
easier to kind of mix it up on your palette and get yourself kind
of a thin layer. You can kind of lay it down. See what happens. Still, see
some of the orange there. It just play around with it. If this is the way you want
to go for your mini painting, change this color one last time. Call it good. They're going to call that
done that aside to dry. And then now we're ready to
get our sewing supplies.
7. Choosing A Painting: So these are some of the
pieces that I'm considering sowing into for my final
project for this class. We've got a couple of
different options. I've got a couple of
my squares that I'm revisiting to see if there's anything that feels inspiring. I always wanted to make
sure that I turn it, especially if I'm revisiting
old experiments for techniques like this to see
which way feels like up, or at least which way gives me an inspiration for
where to start. So we've got these small
ones that are ready to go. And then I've got a lot
of different experiments with watercolor. This piece was actually one
of the pieces that I made as an example in my intuitive art-making simple watercolor and ink
techniques class, exploring some
wet-on-wet techniques and then inking backed into it similarly to what I share
in watercolor mini lesson. This one was created
using shaving cream and food coloring,
where you take, I take a pan and I
fill the pan on with shaving cream and then
you drop in the color and you can take a stick and swirl it and then
you set the paper down and press it
in a little bit and then flip it off and
scrape off the phone. And you get some
really beautiful color that transfers to your paper. These were a couple
that I discovered in an old mixed media sketchbook. And I'm really excited
by these pieces. I think I might explore both
of these as I approached some different options for my final project for this class, I have this piece that I
started there was just exploring working
with ink using brush, as well as the straw
to kind of blow out the ink blobs that I'm
really excited by. This is an in-progress piece where you can
kind of see I started with the ink and then I just
started playing around with different sewing
techniques that I will show you the
demonstration video.
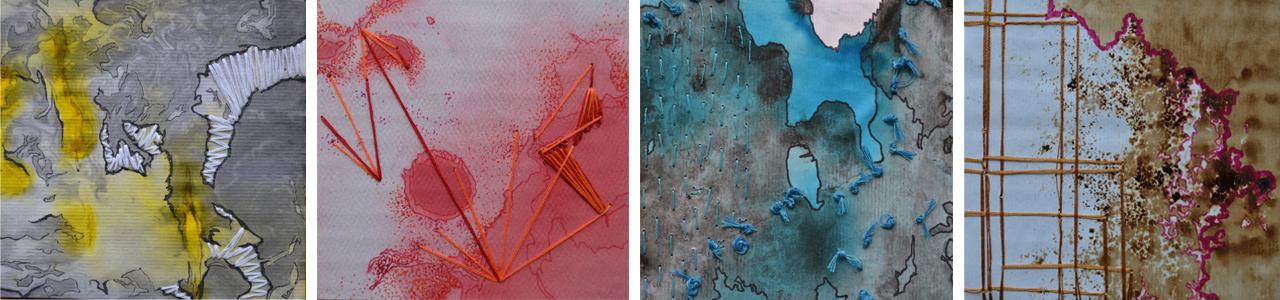
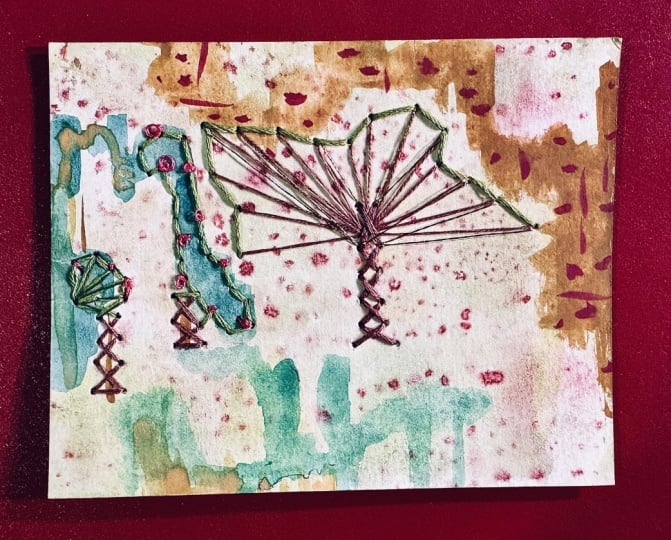
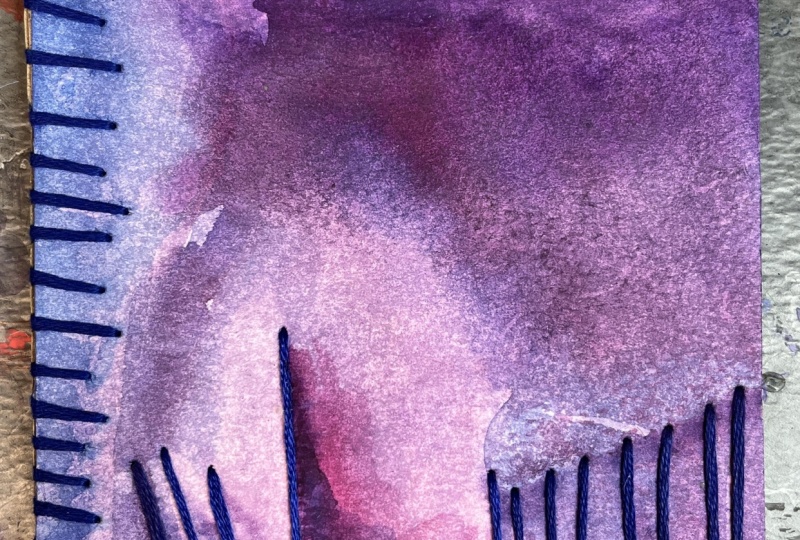
8. Embroidered Painting Examples: These are some of my
embroidered paintings that are, they're part of a bigger
series of 12 pieces, I think in total they show
some might have a range of the different sewing
styles that you can use. And they were made with a
variety of different materials. This one, the painted
part was just done with watercolor and
then I inked in to kind of add the dot
details and create that speckled texture and outline around
some of the areas. This one was done with coffee. I love to play around with
different materials and different ways that I can get color and value on the paper. And I was doing a ton of experimental processes with some of my students in my classroom. And we tried coffee and kind of see how that would,
what happened with that. So some of it's more diluted
depending on how we apply the coffee, this one, ink. So it's a bunch of water was put down on the paper first and then I let the ink bleed around. And then after it was dry, I went back in with some
stencils to create the circles. This one was created with ink as well as some gel food coloring. So the yellow areas are
the gel food coloring. And then because of the different interior
walls that were used to between the ink and the food coloring
and kind of created this oil slick look. And then after that was dry, I went in with the ink
and then I went in with the thread after that
push the contrast, this one, the paper was
submerged and then I went into the water to the
paper and applied soft pastel. And you've already
drawn the paper, the pigment from
the soft pastel, kind of connected and
absorbed this one. All of the outlining
is done with the thread in both the
black and the maroon. And then this last one
was watercolor and ink. This might have been
liquid watercolor versus tube watercolor. It looks really saturated
with that blue. Then after that was dry, I went in and outlined with the ink and then went in
with the sign texture. All of these were done as
bigger sheets of paper. Much more like a
bigger sheet like save this was I treated it and kind of experimented
on the whole thing. And then after it was dry, I cut out the sections I
wanted for this series. I knew I wanted to work small. I knew I wanted this size piece for the entire body of work. I've cut out the
size cardboard I wanted and then use
that as a stencil. Then I had my bigger sheet. I would lay it down, kind of look at it and decide what areas I wanted to save. And then I trace it
and then cut them out and then mount the paper. Can see on this one you mount the watercolor paper to the
cardboard for stability. Then it was much
easier to go in. And so between the two sides. Then, yeah, then
different sewing styles. So this one, if there
are very few holes, but a lot of connecting
radial lines that go around this one
and this one are very similar in that I
wanted to kind of take these lighter spaces and
connect the threat across, kind of create this
stitched enclosure to them. This one I wanted to contrast the very organic nature of
the coffee and the ANC with a much more geometric lines
system in the lighter areas. This one was about
contrast as well. I had created, I did the
inking first for the, the lines for the circles and partial circles that I
wanted to contrast that with some straight geometric lines and kind of play with
variety as far as scale between the
longer lines and the shorter lines
and overlap there. And then this last one, I wanted to do kind of a
loose loose stitching, not worry about getting precise lines and just
let them be a little more relaxed in nature and then also see what
happened with instead of tying off on the back. I wanted to see what happened if I tie it off on the front. Kind of letting,
letting the threads, letting the nature of the
threat be celebrated. Its full glory, messiness, but still kind of having a, having a system and so kind
of playing around with different elements and
principles to create that. Here are some of the
smaller pieces that I've created using the techniques that we'll be learning
in this class.
9. Bonus: Adding Beads: I wanted to show you
how to do the beads for your project if you decide that you want to add
that element in, the first step is to
find a small container to put your beads in so
they don't roll away. I'm just going to use
my dried paint palette, kind of pour out that
I've decided to use. Now not all beads are created
equal in the sense of that. They're all uniform
in color and they all have a hole in them, but not all the holes are. Even. If you're using larger beads,
it won't be a problem. Your needle will go
through just fine. The smaller the beads, the more careful you have
to be a need to check it. You could go through
in advance and kind of put your needle
through each bead and make sure and kind of
create a pile of beads at work and then the other
beads set them aside. These beads are all gonna be fine because these
are pretty big. But I've used the super
tiny beads before. Some fit, some kind of you can kind of work
the needle through. If the needle it doesn't fit, you can force it a little bit, but it can also snap
your beat in half. This size works great. These are just some basic
needs that I found there. E beads, their size, the sex you can see works really well for this
type of project, but you might not
want beads this big. Do I want that large of
a beat on my picture? Or do I want something
more delicate? And if you want
something more delicate, definitely just use
a smaller needle. Or just kind of be prepared to work your way through the
beads to see which ones fit. You can add these
as you go along. You can wait till the
end and then decide. So for the sake
of demonstrating, I'm just going to go ahead
and put some beads in. I've gone back up
through my painting. I'm going to carefully
not stop my finger. String the bead,
can take it down. And then the most secure way to do it is to then go
back through the hole. You came up through dealing with beads that are loose
and then you pull it tight. And then with beads, it's a really good idea
to do a whole lot more of those anchor knots to
secure them in place. You've added your anchor stitch, you've got your bead
in place and you can keep going and add as much
feedback as you want. If you wanted string
a bunch of beads. I have not done this
in a piece before. What I liked the idea of it. So I'm gonna take my needle and you could
create a pattern. You could have as many
colors as you want. It's completely up to
you how you do it. But I'm going to
see what happens. Because I love experimenting
and trying out new ideas, especially as they
pop into my head. I'm gonna keep string of beads like odd numbers, so
I'm gonna stop it. Actually. I want to connect it to
this other line right here. I'm gonna string until
I get enough beads. Go to that line. Work. Then I'm gonna hold
those in place. I'm gonna so back into that
whole gonna pull it tight. Not too tight. I'm going to flip it over. And I'm going to
do another anchor or not to really make sure that my thread is as
tight as it needs to be to hold that line
of beads in place. Now you've got the variation
of the thread thickness. Single traditional
thread, a needle doubled up The embellishment of one beat and even
kind of spin these. Return it a little bit. You can get it so that
it'll either show the circle side or you can
get it to show the side. The full side of the bead. Little maneuvering. Sometimes, sometimes it works. And then this one
we actually thread the needle was seven beats. And then so back down to kind of just keep
going until you're happy with your embellishments in play and experiment
and see what happens. There is how you would add beads to your embroidered painting.
10. Troubleshooting: Knots and Threads: That's your throat gets tangled coming through the
holes just like minded. They're just kinda keep gently tagging and pulling and it'll eventually get itself untangled. Then once you get it untangled, It's a good idea to put in
one of those anchor knots. Just to kinda secure things, can get really frustrated
with it. Just cut the thread. Just cut it off, start over. It'll be fine. But I prefer to fight with it to see if I can get it to
untangle. I like a challenge. Nine times out of ten, you usually get those nuts. Fix themselves. Might be maybe the tenth
time where it doesn't work. Sometimes when
this has happened. And he says, I kinda like
the mask that's created, the jumble aisle, even
work it in institute down. I've done that quite a bit. And some of my abstract
embroidery pieces. You can see a few. Follow me on Instagram.
Elizabeth welfare. You want to follow me
on Instagram to see what other fun art
adventures I'm up to. Quite a not. So what you can do to help get it untangled
is use your needle. Kind of get in there and pull
some of these guys apart. Here we go. Give me very careful
not to pull too hard. If I was working with
my embroidery hoop, I I can yank on it pretty good. It's not going to
rip the fabric. Paper. It could rip it. You
just keep working away. I'm pulling from the front and then I'm also
pulling from the back. We'll try to do Tango. It almost went through the whole. The other thing I can do to save it is to just pull some
of these guys through. Here we go. We did perseverance paid off. I still have kind of a
mess in the backside, but I can I can fix that by just continuing to do tangle and
stretch things out. If you're using metallic
thread like this, really take your time
with the stitching, especially in this case, I've doubled up the thread. I'm actually stitching with
four strands instead of two. Which creates a nice difference in line weight
from this to this. But it means I've got a little bit more of a
mess to work through. I still have a knot in my
thread from the tangle, but I'm just going
to try to keep gently working at through. But I am going to do those
increments are also really important because if you get to a point where your
thread becomes a mass, you just need to cut
it and walk away. You've got an a secure thread. You haven't lost to
what you've sown. That's another great thing
about the anchor nuts. Make sure that you get
it all pulp through before you continue on because there is a
point of no return. If I hadn't noticed that
tangle, almost event, I could have ended up with
a tangle on the front side. Again, nothing we can't nothing we can't correct something. I don't feel like dealing. Want it to work because I
wasn't paying close attention. I have so and I did not
so across this one, before I jump to the next guy, I almost came up
through my threat. Again. Not a problem. Just kind of go backwards. Even if I came up
between my threads. Also not a problem. You can just undo it
a little bit if you just add that design in there. Now, I'm gonna do my ink or not. Because now I've added all
those stitches and I don't want them to become loose on me. Anchor and I am please
see where we're at. I like it.
11. Final Project: For your final projects, you'll be choosing
a watercolor or acrylic kidney to sell into. I recommend working
on a piece that's between four by four inches and no larger than
eight by ten inches will be handling our paintings a lot and large you go the more risk there is and
damaging your artwork. Decided which other threads
you'd like to choose. It's helpful to get out a
bunch of colors and begin putting combinations
together against your patients or test. What is your goal and
adding some details, do you want to add a lot of
texture or create contrast? Will the song parts become a strong focal point
to the work or provide some dimensions that is close to those used
in the painting. Take some time to observe
your painting and pick out areas where additional
details with strengthen it, it might be helpful to
rotate the painting if it is an abstract artwork to help
me see it with fresh eyes, then start poking holes as you map out your first
selling areas. Actually have it. We still
align goals started, began to sell into the artwork. Take pauses between
sections so you can assess how is coming along
and where to sell into knots. So for my final project, I've narrowed down
my painting options to this piece that I found in one of my mixed
media sketchbooks from those kind of digging around,
looking for inspiration. The next thing I
need to do is decide what color thread I want to use. I've been really enjoyed working with embroidery thread lately. So I'm going to use
that for this piece. I'm going to start by kind
of seeing what threads I have a kind of match the colors
that are already in here, as well as what would
add a nice contrast. This piece doesn't really
have any black in it. Many darks at all as separate as accidental blue
that happened. So I'm going to add some black, some pops of colors this pink
and matches pretty well. I really liked the
pops of yellow. So I'm gonna pull up
my lightest yellow and then it just feel like I want
to give it a little shine. And I happen to pick up some of this silver embroidery floss. This is going to be
my color scheme as I go into this piece and turn
it into a mixed media piece. This piece is definitely
bigger than I want my painting and
embroidery piece to be. What I'm gonna do is
I cut some cardboard down to the size that I
tend to like it to be. And then I'm just
going to start playing around with how I
want to practice. I don't want to lose
some of these yellows and kind of like to
get rid of that blue. I'm not really loving it. Since we'll make an art for fun. Not going to stress about it. Just going to lay down my cardboard template,
start cutting. The worst thing that
could happen would be I didn't like what
I cut out on the end. That happened. Just
the different piece. The process again. Love happy accidents. So we're gonna see
what happens here. Now if you wanted to
have a cleaner cut, you could definitely
use an exact name. I'm really excited
to get to showing. So I'm just going to
go for a scissors. Now. I love that, that's great. I still have some of the
yellows that I really enjoy about the big piece, have lots of great and
negative space in there. It's super great job getting MakerBot history,
but that's okay. Always clean the whole
thing up with Dr. knife. When I'm all done, I'm
going to grab my glue, glue down to my
cardboard backing. And then you're gonna go for it. This is where it
might be helpful to kind of rotate the painting if it's an abstract piece to see which side seems
to be the top of the painting to help you kind
of see it with fresh eyes. Then once you've got
your painting chosen, you've picked out your threads. It is time to start somewhere. You're gonna begin by
poking some polls to map out the areas that you're
going to go into first. And then after you
have at least a couple of holes started, then It's going
into the artwork. You're going to want
to be very careful not to pull the thread too tightly that could cause
your paper to rip. And you're going to
want to also add little anchor knots along the way just to
secure the thread so it doesn't slide
back through the hole and become too
loose on this site. It's a fine line
between two tight on the thread and to loose
those increments, I'll give you a lot of
control along the way. Then also be sure to take pauses as you're working on
different sections. You can assess how it's coming along and where you
want to go into next. If you have any
questions along the way or health every the posted
the discussion fraction. Once you're satisfied
that you've added your started to photograph
of a finished project. Actually never loved last year.
12. Final Thoughts: I hope you enjoyed
exploring sewing is a new mixed media approach. The techniques we learned
in class can be applied to artworks beyond watercolor
and acrylic paintings. Have fun and see where your needle and
thread can take you. If you enjoyed this class
and want to hear about future Skillshare classes,
I'll be teaching. Be sure to click the
follow button above. I can't wait to
check out we create. So be sure to click on the
great Patrick button and share your final project to
the project section of our class until next time.
 Elisabeth Wellfare, Artist, Art Educator