Transcripts
1. Introduction: Hi. I'm Elizabeth and
welcome to my class. Bite Size art techniques, repurpose paint to
create collage paper. I am a professionally trained
artist and art educator, as well as a published
author Illustrator. In 2020, I began
teaching for Skillshare, developing classes that explore a wide range of
materials, techniques, and art making
approaches as I share my creative journey and artistic practices
with my students. I love exploring mixed media
techniques and finding new ways to work those materials and techniques into my artwork. In this Bite Size class, we're going to be using our saved paint to create decorative collage papers
for future artworks.
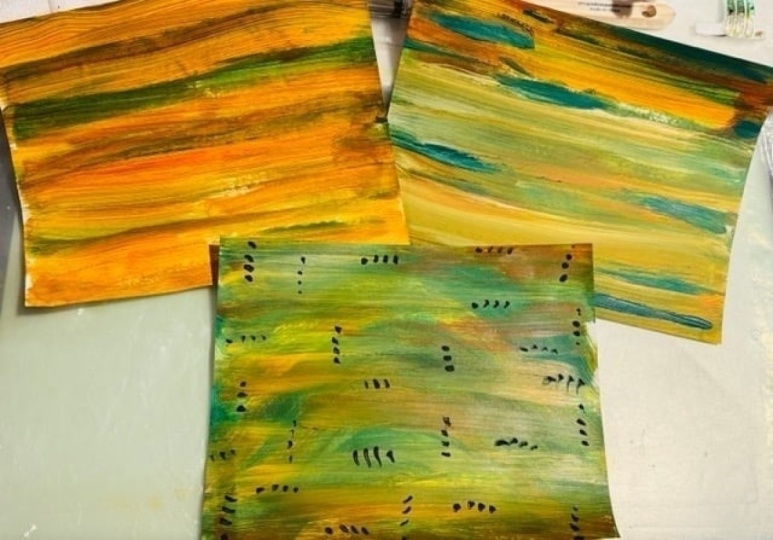
2. Let's Use Leftover Paint To Create Collage Paper: Hi. I'm Elizabeth Welfare and welcome to my bite
sized technique class, Repurposing Paint to
make decorative paper. Something I like
to do when I have leftover paint is
use that paint to make decorative paper that I can then use later
on for collage. And it might be these pieces
got stuck to something, but it's okay because this was just me
mopping up a lot of extra watercolor in a
different project I was doing. So that's going to get torn
up for collage anyway. So it doesn't matter
if these papers get a little messed up
in the process. But for this one, I have
leftover acrylic paint, and I have the guts of
an old baseball book. I had, Gutted the book to use the cover to
create a new sketchbook. What I do is instead of throwing out the pages
from the inside, I save them because
they make for really fantastic
collage materials, both on their own, but also
in situations like this. Let's rip up a sheet, and I just have some
crazy leftover colors from a couple of
different projects because I was reusing
a paint palette, and then we're just going
to dry brush it on. It's okay, it doesn't go
all the way to the edge. It's totally okay if it does. It's okay if the colors bleed together and blend
and make something new and if they stay
chunky and just whatever. Because this is really
thin book paper, it's going to curl
up a little bit, so I'm just going to be very
careful when I set it down. I'm going to set this down
to dry and get a new sheet. This gets a little messy, so you're probably
going to want to have a wet cloth on hand. All right. You can also clean
up your area as you go to. I'm not worried
about it too much, but I might clean this
up just a little bit to minimize how much paint gets on the back side of my papers. I'm going to scoh this off
to the side a little bit. Let's get another one.
Actually, I'm going to leave it attached to these in the pack so that it doesn't curl up on me as much
until I tear it off. I just going to scoop
up some more paint. You can do a dabbing technique and let some of the
white show through, which can be extra
fun if you've got some pictures or words
underneath there. Or I just gives you some
really nice contrast. But the important thing is, don't just let
your palettes dry, don't just wash them off
if you're using acrylic or tempra even guash
and water color. It's really important to
get the most mileage out of our supplies because
they're not cheap. I love creating decorative
papers like this, and then I'm just
going to peel it off the stack and set it
to the side to dry. That works a lot better
keeping it attached to this. You can do the same thing with sketchbook paper or whatever. I'm just going to keep going
until my paint is gone. It's okay, it starts
getting a little dry brushy because that gives us a whole
new texture to play with. That one is done. My fingerprints are getting
smudged on the papers, but that's okay
because that adds a whole other element to
this. Let's do another one. We have some good
that's a paint left. I'm going to keep going with whatever else I can get off
my brush and off my palette. And really go for the texture. Now I can take this even
farther and I can sc back into this and really reinforce
those scratch lines. You can even go
different directions. This one's filled up
with dry brush texture, so it's not going
to show up as much, but it is going to add
a nice subtlety to it. I'm going to tear
it off. I'm not sure if I can get any
pain off of this. Oh, yeah, I can. I'm going to scoop from there and I'm
going to scoop from there. I just go across my page. This is great because we really don't want
to waste materials. If you have a lot of
scrap paper lying around, this is a great
use for that too. We can do some more mark making with our
handy dandy fork. This is a great way
to use forks that you've used for picnics
or company or whatever, a big parties just wash them, and then you can keep using them in the kitchen for
other times that you entertain or maybe one or two of them make it down to
the art studio or to your art table so that you can create with them because
they make fantastic texture. Er. Set that one aside. This one's running low. I
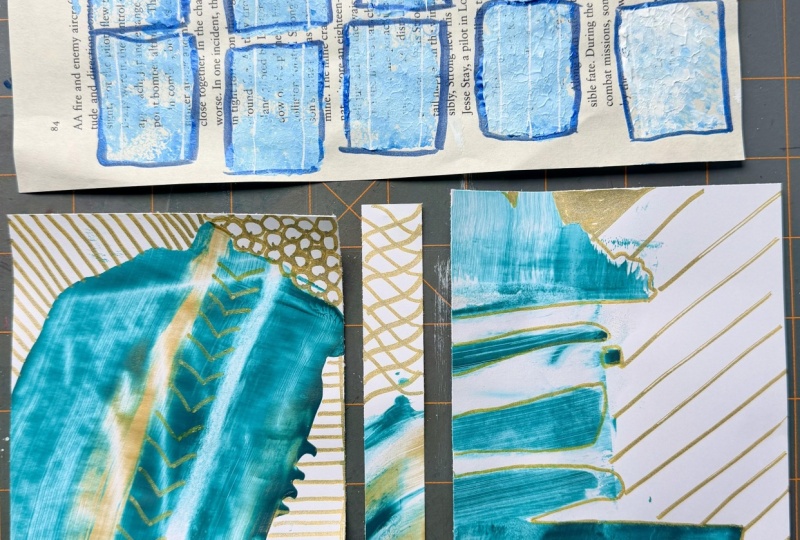
have one more palette though. These palettes are from a furniture painting
commission that I did. I painted some bar
stools for a friend, and I love saving my paint
with ser plastic wrap because just in case
I need it to touch up anything for those
commissioned paint jobs. But then when it's all done, that extra paint can get repurposed for my own
creative practice. Now we have some new
colors in the mix. We're going to try
some new techniques, see what else we can
get this paint to do. So play around with
wiggling your brush. It's okay if it goes
on pretty thick. It's if it doesn't
go on pretty thick. L peel this one off. I think I can get a
little bit more out of this last palette before I'm
out of pain. Let's see here. A b from there, I've got some of the teal. Oh, that's really pretty. I would not have thought to
put these colors together. That's the other fun
thing is you end up with color combinations
that you might not have otherwise come across because you're just picking up your
paint and stamping it down. That's gorgeous. This is my favorite one
yet. I love this. Now I know I'm going
to intentionally use this color scheme in a different piece because
what a fun discovery. Now, as those curls
up pages dry, they're going to
flatten back out again. If they don't, I can just
stack them up underneath a heavy book for a little while and they'll flatten
back out that way. Let's see can get a bit
more out of this palette. Can you a combination of things? Let's see. There any more paint anywhere that I can't
get off of there. I more fs purple hiding up there
by the bristles. There. A great reuse for old paint that you have
saved lying around, or if you don't have
old paint lying around, just throw some
gloves of paint on a paint tray and go to town. You don't have to do this with just or using up extra paint. You can do this with fresh
paint if you want to. Then that gives you
a whole selection of new collage papers that you can into your practice
down the road. Thank you so much
for checking out my bite sized art
technique class. Be sure to connect
on the discussions. Don't forget to share
a class project, and I'd love to hear
how this went for you, so be sure to share it
with myself and others by leaving your review. And
I'll see you next time.
3. Bonus Part 1: Leftover Paint Backgrounds: So I have some more palettes of leftover paint from a class that I taught with some kiddos, and I have a home made the sketchbook using
cardboard for the cover, and then sewn in signatures
of different types of paper. And then I have some
color swatches inside here that were for a
class that I took, but I don't need them anymore. So I'm going to go ahead
and use this spread with this leftover paint to create some really interesting
backgrounds that then after it dries, I can work back into. So let me get something to
put down this paint with. I think for this
one, I just want to do something really
fast and quick, so I'm going to go
ahead and use my brayer and just kind of get some
color down on the page. And some of these palettes were sitting a little longer
than I intended them to. So, unfortunately, paint is
not in a super great state. But it hasn't dried yet. I want to make sure
that I use it up before it dries up
because there's there's no sense in not using leftover paint to create
interesting papers. Normally, I would do
this on separate sheets and I have a lot of paint
here, so I might do that too. But this is a sketch book I haven't worked
into into a while, and I'd like to have some
new pages started that have some interesting things
happening on them as a jumping off point
for other stuff. Because a lot of times when I
do my leftover paint stuff, I do it in a way
where I'm kind of using it to create
collage papers. It gives me stuff I
can tear up and cut up and then create
something new out of that. This is a different
way to go about it. This is using the
leftover paint to create some
interesting marks and textures on a sketchbook page, a spread, and then
I'm going to go ahead and when that dries, work back into that page. I'll share with you how I do that when I circle
back around to this. So most of these colors
are kind of the same. It just kind of happens to be what paint palettes
were still able to be used because I saved everything
from this class that I taught with kiddos as part of
my summer camps that I ran, and I had every
intention of doing a ton of this work with
all the leftover paint. And unfortunately, I
got caught up with other projects and
just summer schedule. It was just a little
busier than I planned on. And I wasn't able to get
back to the studio and kind of open up the leftover
palettes that I had saved. So Some of the paint dried and was lost in the
process, but that's okay. I still at least had some
where the students had used too much paint on their palettes and then didn't end up needing
it for their projects. I was still able to work with
that today in the studio. I'm going to use all of it, whatever is here, I'm
going to work with. Play around with
different ways that I can roll it onto the page. And create something
interesting. If I overroll it, it'll just become a
giant muddy mess. I definitely don't
want to do that. I want the paint to maintain its integrity as far
as the colors go. It's fine that it's mixing Sem, but if you just
really go for it, you're going to lose
the whole feel. Right now, this reminds me of action painting and those
vibrant actually more so. It reminds me of
abstract expressionism, which is an art media
or an art style that I really love from the
1950s and 60s, I think. Bright is tired. My art is true dates might
be a little off. But I love abstract expressionism
and just the bold play of color and mark and the way that they
approached expression. In those ways on the canvases. You think about some of the different abstract
expressionists out there and that
existed at the time. Actually, if I keep going into this, it's going to get muddled. We're going to set
this one aside. I still have a little
bit of paint leftover, so I'm going to see if I
have another sketchbook that I can open up and work on. I'm going to let this dry. This is going to
take a while to dry. It might be dry by tomorrow, but the paint is pretty
thick in some areas, and it was gummy, like I
said, because it was old. So it might take
a couple days to really let it get fully dry. Let's see. I have a couple
other homemade sketchbooks. These ones. I used an old book and I gutted it, and then I, you know, inserted
the signatures to the sections of
pages that way. Most of this is already
filled up for these. But let's see if I
have any pages that I that I could or want
to work back into. This one hardly has
anything on it. So let's work into this one. I'm going to keep going
with some greater clips. Because I'm really
loving that fact. See what happens here. I like this page, so
I want to be a little careful because I don't really want to add anything
more to that page. If something accidentally gets over there, not a big deal. It's just a sketch book. But my sketch books
are important to me. They're more than just practice. They're a where I do I practice
and I explore and I play. They really kind of
become an important piece of where I make my arts. So I don't want to I'm not saying I'm not afraid to go into it freely
and openly and, you know, have something get, you know, not be successful. But when I have a
piece I really like. I kind of want to let
it exist like that. All right. This is pretty cool. I'm going to let
this dry as it is. This one feels like, you know, when you've got in the cities, when you have those boards
where people can, like, paste posters and posters
and posters over, but then, like the weather and time
kind of pulls you know, wears away the papers. That's what this
feels like to me. Just kind of a lot of worn
away magazine or poster images rather from those
different bulletin boards. So pretty cool. Alright,
set this one aside. And then I have
another smaller one. Let's see if this
guy lots of here. This is a page that where I just sopped up some ink,
have some other ones. Cause that already has something
I could work back into. And actually, that was
over an abandoned. Sketchbook spread to
begin with. Here we go. Here's one that's just
completely Oh, you know what? And this one, I can take
these segments come out. I didn't attach them.
Instead of sewing them in, I did these kind of funge things so that the pages
can just slide in. So I could actually do a
couple of these. Let's see. I like to work back into, like, my old sketches and turn
them into something awesome when they didn't get a chance to kind of become
something awesome initially. So let's see if I have
any that could use a little that could
use a little help. I don't have a ton of
paint left on my palettes, but I do have a bunch of old
paint that my mom gave me. She was trying to kind
of clear out some stuff. So this is just
different craft paint that had gotten left at her house from my niece
as she, you know, grew up and kind of was growing up and spent
a lot of time there and wanted to kind
of do different projects at my mom's house. So it's kind of it's
an abandoned paint. But these are really
old and kind of gummy. So that'll be kind of fun. To use it up this way.
I have a lot of that. I have accumulated a
lot of different, like, little bottles of craft paint
like this over the years, and I was doing
different projects. And as a typical artist
and art teacher, that also means that
I'm a little bit of a hoarder when it comes to
potential art supplies. So I end up I ended up with a
lot of that, it's so gross. This is not supposed to come
out of the bottle like that. We're going to throw this guy away when
we're done with this. But I ended I had a ton of craft paint that
was in really great shape, but then I didn't use
it for a lot of years. And unfortunately, whoops, when you don't
use it, it goes bad. So that's kind of what's
happened to my niece's paints, which is why it's a
good thing my mom was getting rid of them
on her behalf. But, um, You know, they just if you still
have some lying around, you could absolutely do something like this with them
and then get rid of them. You know, just kind of give
yourself your space back. So these are in very strange. Much different consistencies
than the ones that were left over in the students
pallets. That's okay. All right. This is
kind of a mess. But it's at least adding some interest
to a sketchbook that needs a little interest. And then here's a page
that has nothing going on. So let's see if there's any of this teal left in here that
wants to come out and play. O. I could have shaken that
up longer. That's okay. So what am I going to do when I come back into these pages? I'm going to I could you
could come in with Sharpie, if you hide some
lighter color areas. You could come in with
paint pens, acrylic pens. I love coming in with white. If there's a lot of
dark color happening, that's a really great idea. You could go back into
it with colored pencil, you could collage back into it. You know, in the end, all of
these are in a sketchbook. I could still tear
them out and turn them into collage papers
if I wanted to. I feel like I have a
lot of collage paper. So I'm kind of looking for
some new ways to approach techniques that I love that aren't going to just kind
of add more to mytash. Night. Love you.
Alright. That's good. I'm gonna avoid that green. That green is past
its prime, for sure. I can get some more. The white's been absorbed by
everything else. That's okay. Alright. A little red? Nah.
It's gone. Okay, cool. So now I have a bunch of textured papers in sketchbooks
that I can now draw back into paint back
into collage into and approach using up
leftover paint in a new way. So I'm going to
let these all dry, and then I'll circle
back and show you how I work back into these
pages in my sketchbooks. You could also do
this on Canvas, you could do this on
a sheet of paper. As long as it's
thick enough media like thick enough
material to withstand, throwing some paint on it,
should work out great.
4. Bonus Part 2: Working Back Into Backgrounds: So now that my leftover
paint backgrounds have dried in this sketchbook, I'm going to go ahead and
work back into those. This time I'm going to be using some paint markers that I have. They are really
similar to Pascas, but they are a different
brand that I got on Amazon, and they
work really great. They've got really
nice bold colors, a lot of variation of colors. So what I did was I
pulled paint pens, paint markers that
had colors that were in the leftover
paint backgrounds. So I'm kind of working within a color scheme. You
wouldn't have to do this. You could work with any
wild colors you want to, but I love having that
color relationship and commonality across
the different media that I work with when possible. So that's always a
great starting point. So I was starting by creative filling in
the white spaces where the brayer didn't go all the way over and then
kind of using those like messy script like jagged in lines and kind of
emphasizing that to further break up the background
space in this. And I treated each of the
sketchbook pages and the spread separately when I did the background leftover
paint application. So I'm doing the same
thing in my sketchbook. They're related because the
paint had similar colors, but design wise, now that
I'm working back into them, I'm treating them
independent of each other, but they'll be unified by
the fact that I'm using paint pen and similar colors and just by the fact that they were done by the same artist. So I love merging
rounded shapes with line and kind of playing on that the balance and
contrast between those. And I also love that
pup of metallic. And this particular
brand of paint fence has a really nice metallic for
silver and gold in there. So I'm playing along
with that and kind of doing that and then roughing
in kind of a border. I've been very into
borders lately. So working back into your
sketchbook in this way is really really freeing,
really relaxing. It's really low stakes, just kind of having
a good time and intuitively diving in with
whatever makes sense. So that's kind of where
this is coming about. So it's a p to play. It's a place to just have fun, and it's a great way to
get a jumping off point on the page from all
that leftover paint from previous painting projects. And truly one mark just
leads to the next. And that is very
much how I work on a pretty consistent basis across all projects regardless
of the artistic goal, but especially when
I'm working into my sketch books and working back into leftover paint backgrounds. Now I'm going to start
working into my second page. I'm going to approach
this one a little bit differently, but similar ish. So one thing I like to do when I'm inking back
into watercolor and even acrylic paintings
is to kind of go along the lines that have
been created by the paint. I have used that as a starting point for where the ink goes. Similarly, I'm doing
that with this one. I've found some of the jagged edges where
the different colors and brayer marks created lines or breaks between
the different stuff. And then I've inked along
those with my paint markers, and then I'm going
to start filling those in solid in some spots. But then I'm also
using that to define sections to then go over
with some line work. So this is a great way to start playing with
the illusion of depth. The the technique on the
other page works similarly, they're also going to be I created illusion
of depth there, too, but it's also still very graphic and bold and
still very flat. This one's going to have a
little bit more depth to it, just by the nature of the
closer together lines and the more defined edges. But then I also
love incorporating circles into stuff too. So one side is filled
with horizontal lines. This other side I'm
filling with kind of these blobby oval circle shapes. There's really no
rhyme or reason to it, other than I am
following my intuition. I'm doing the marks that I love and trusting that no
matter what happens, I'm going to have a great time working in my sketchbook today, and that somehow magically,
by the end of it, it's going to end up
looking pretty cool, at least in my opinion. That's my sketchbook, so that's
really all that matters. That I'm having a
good time and I'm happy with what I create. I also love these really
kind of rough roughed in, like repetitive
rectangle shapes. So I've started incorporating
those into my pieces a lot. I love circles within circles. So that's kind of become a common imagery that I
like to do and metallic. Like I said, I'm
really into metallic. So this time I'm using
my metallic pen and of playing with that and really loosening up on
the second spread. D of felt like the first one was kind of a warm up for me. And now that I'm going
into the second one, I'm playing with more
variation of mark making and different ways to
approach it and just really loosening
up and having fun. The purple here was
very intentionally chosen because there is
purple in my sketchbook, my like leftover
paint background. But the great thing
about this paint pen purple is that it's so bright that when I layer it on top of those
darker sections, it creates a nice value. So I've got that value pop. I've got the metallic value pop, I've got the white value pop, and all of that against kind of the dark semi muddled
leftover paint background, I creates some really
interesting stuff. So there's my two
sketchbook spreads. I am super happy with
how they turned out. I'm going to add a
little bit more to this, but I have a couple
more spreads from bonus work from this class
that I'm going to work into, and I will add those as future bonus videos as I
get those done. So please don't forget to share your sketchbook spreads,
leftover paint spreads. And however, you're working
them to them and using them in your art in
the class projects, and I will see you soon.
5. Bonus Part 3: Handmade Tools and Leftover Paint: Recently, I took a
class with Jen Dixon, who also teaches Skill Share. And it was part of Peggy Dean's
Summer creative retreat. And in that workshop, Jen shared different inspiration and ideas for creating your
own tools for painting for mark making
to really get you kind of getting creative
with what you create with. And so I decided to do it. I have had this kind
of funky bubble. It's it's not bubble wrap. It's like, bubbly like
material, though. But it come in some packaging, and it hasn't worked so great for watercolor techniques yet. But I kind of thought
like, hot gluing it to a popsicle stick
and kind of using it like that would
be pretty cool. And kind of seeing what kind of textures I can make with it. So a lot of what Jen shares is kind of the trial and
error and really kind of pushing yourself to really manipulate the materials and to make some cool stuff. So here is where I
mistake. I cut it. And when I cut it this way, it actually deflated
all the bubbles. But I decided to just embrace it because it could still make a cool mark and be a neat
way to apply paint to paper. So I'm just using my
at cogen to kind of seal up the last bits of it. And now it's kind of more like a bunch of seran
wrap plastic wrap, but I decided to
run with it anyway. And then I had a bunch
of kind of bits of cardboard that I had ripped up for a different
class I was teaching. And I love when you peel
the paper off of cardboard, you get that corrugated side to it, the corrugated interior. So I wanted to start folding those and
gluing those to kind of build up kind of
a top to my handle, the pop supposed to candle. So I'm just layering up
more and more and more of the corrugated cardboard side and building up
the tool that way. Jen did a really
cool thing where she did something similar, but then she used another
tool that she had made with toothpicks to kind of
create the edges of this. I'm definitely excited to explore more of
that down the road. But for a first start in creating my own tools,
this was really fun. So this one was
just kind of like a wispy sort of
corrugated stiff thing. And then I had some
paper leftover that I had torn off
from the cardboard. So I decided to roll that up
to kind of create, you know, sort of kind of a
toothbrush style thing and then glue apopsicle
stick into there. And then, be careful,
you're doing this. Hot glue is very hot, and you do want to make sure you're not injuring
your fingers. So I had 43 tools so far, and I want to make another one that was
kind of brush like. So I decided to kind of cut some fringe into some
pieces of cardboard paper. So again, the paper
that I peeled off of the cardboard or
the outer layer of it, and I'm cutting it into a couple different pieces
of fringe with my scissors. So I can kind of layer it up and create sort of like a brush. So I just did about
four of these, I think, in creating it
and layering those up. And then I had to
kind of run out of popsicle sticks that I had pulled out and I wanted to
just kind of keep going. So I decided to kind of seal it up and kind of
create the top part, burning myself a couple of
times with the hot glue. But I created this nice
opening in the bottom, and I have this old toothbrush. I use the bristle end to do kind of splattering and
texturing in my paints, but I thought the other end
would make a nice handle. So now it's kind of a dual
tool, which is pretty cool. So I hot glued my bristles
to the end of that. These are the four
tools that I've created that I'm
going to work with. So in a class that I have on Sculpture and
some YouTube videos, I've shared how
I've been reusing my leftover paint to create
backgrounds and stuff. So this is actually a
sketchbook page where I had created the background
texture with leftover paint. So the background was
created with leftover paint, and now I'm using another
palette of leftover paint and a squashed toilet
paper tube to create some interesting kind of ovalis rock sort of shapes on there in
high contrast black. So that's adding a
layer of value to it. It also breaks up the sketchbook spread a bit, which
I really like. This is definitely
something that I'm going to return to a bunch and
some future work. It just makes for some really interesting marks
on the page, too. Then I wanted to
start playing with some of the tools
that I had created. I grab that brush
one that I made last and I'm dipping it into the yellows and the oranges and doing a stamping technique, and letting it wherever
it touches the page, it's going to leave a mark as the paint comes off the brush, it's going to become
more ghost like. So just kind of really playing with adding this brightness to the sketchbook spread by using this really funky tool that
I made with cardboard paper, glue to a toothbrush. And I really like
how it's going. I think I washed this tool
after this creative session, so we'll see how it is
after it dries if I can actually reuse it or if I just need to remake the
end of it each time. So then I kind of decided
to set that one aside, and I wanted to move on to
another tool that I had made. So I'm searching for kind of a blank page in one of
my handmade sketchbooks, and I wanted to keep
using this tool again. So I wanted to use it more like a paint brush and kind
of see if I could use it to start texturing and building up some color sections on a blank sketchbook page. And then I'll circle back to this one and kind of go back into it. But
then as it was going. I was inspired by the piece
that was still on the table. So I decided to return back to the squash car
ber tube and kind of add some of those oval
shapes to this spread also. This is definitely
far from done, although it could be done in
its like simplistic sense, but I think I'll probably end up working back into this
page with some markers. But I really enjoyed
the bright color that my toothbrush brush
tool was able to add to it, and then the high contrast of the stamped squash
paper towel shapes. And then I went to look
for another page in my handmade sketchbook
that I could work into with some
of my other tools. That I had created
in this session. And these sketchbooks
are really fun to make. This one is one where I
didn't put the pages in. I can actually take
the signatures of pages out so that I can keep filling the bound
sketchbook cover at the sketch book
cover with more pages. So for this one, I'm using my deflated bubble sheet and then just
scraping it through the leftover greens
and kind of getting it kind of it's doing
a dry brush effect, which is really cool. I really liked that
because of the way the plastic was because it wasn't absorbing
the paint at all, that anything I put down, anything that I swiped it
through was going to end up on the page when I moved it over and kind of brushed
it along the page. So a tool that I was super excited about making and
ended up coming out. I felt like it was going
to be a failure because it didn't turn out in
the construction of the tool the way
I thought it was. Actually ended up being
one of my favorites. I really liked how the way the plastic got the
paint on the page. And then I had my other
tool that I had made, I just kind of rolled
up the cardboard paper. So I went ahead and used that to do kind of some
circular stamping. So going back in with the
black and just creating some more contrast and some
shape and line variation by kind of going into the open spaces and
kind of creating these large dotted
lines and curved bits. And then I wanted to kind of add some more value contrast. So after doing this with
just the black for a while, I decided to also then
go in with some white. So I had some white
lift over on my page. I'm just kind of
scraping that up onto the tool and
then going in to add some bright pops of
big bold white dots too. So that's kind of, like, helping expand the value
range of this piece, so it gets a bit more dramatic, a little bit more
exciting and kind of adds some bright interest because when you get into these
unconventional marks, it can get a little muddled. So I hope you enjoyed
checking out some of the tools that I made
inspired by Jen Dixon's class and working back into backgrounds that I created
using leftover paint. Check out my other
videos for more. And I'll see you next time.
 Elisabeth Wellfare, Artist, Art Educator