Transcripts
1. Introduction: Do you love creating
textures in your paintings? Are you curious about
how to incorporate watercolor and acrylic paint
into a single artwork? Hi, I'm Elizabeth and welcome to my class Watercolor and
acrylic birch tree painting. I'm a professionally trained
artist and art educator, as well as a published
author, Illustrator. In 2020, I began developing
classes on skillshare sharing my creative and
explorative approach to art materials, art techniques, and artistic
processes with my students. This is intended
for creatives of all skill levels
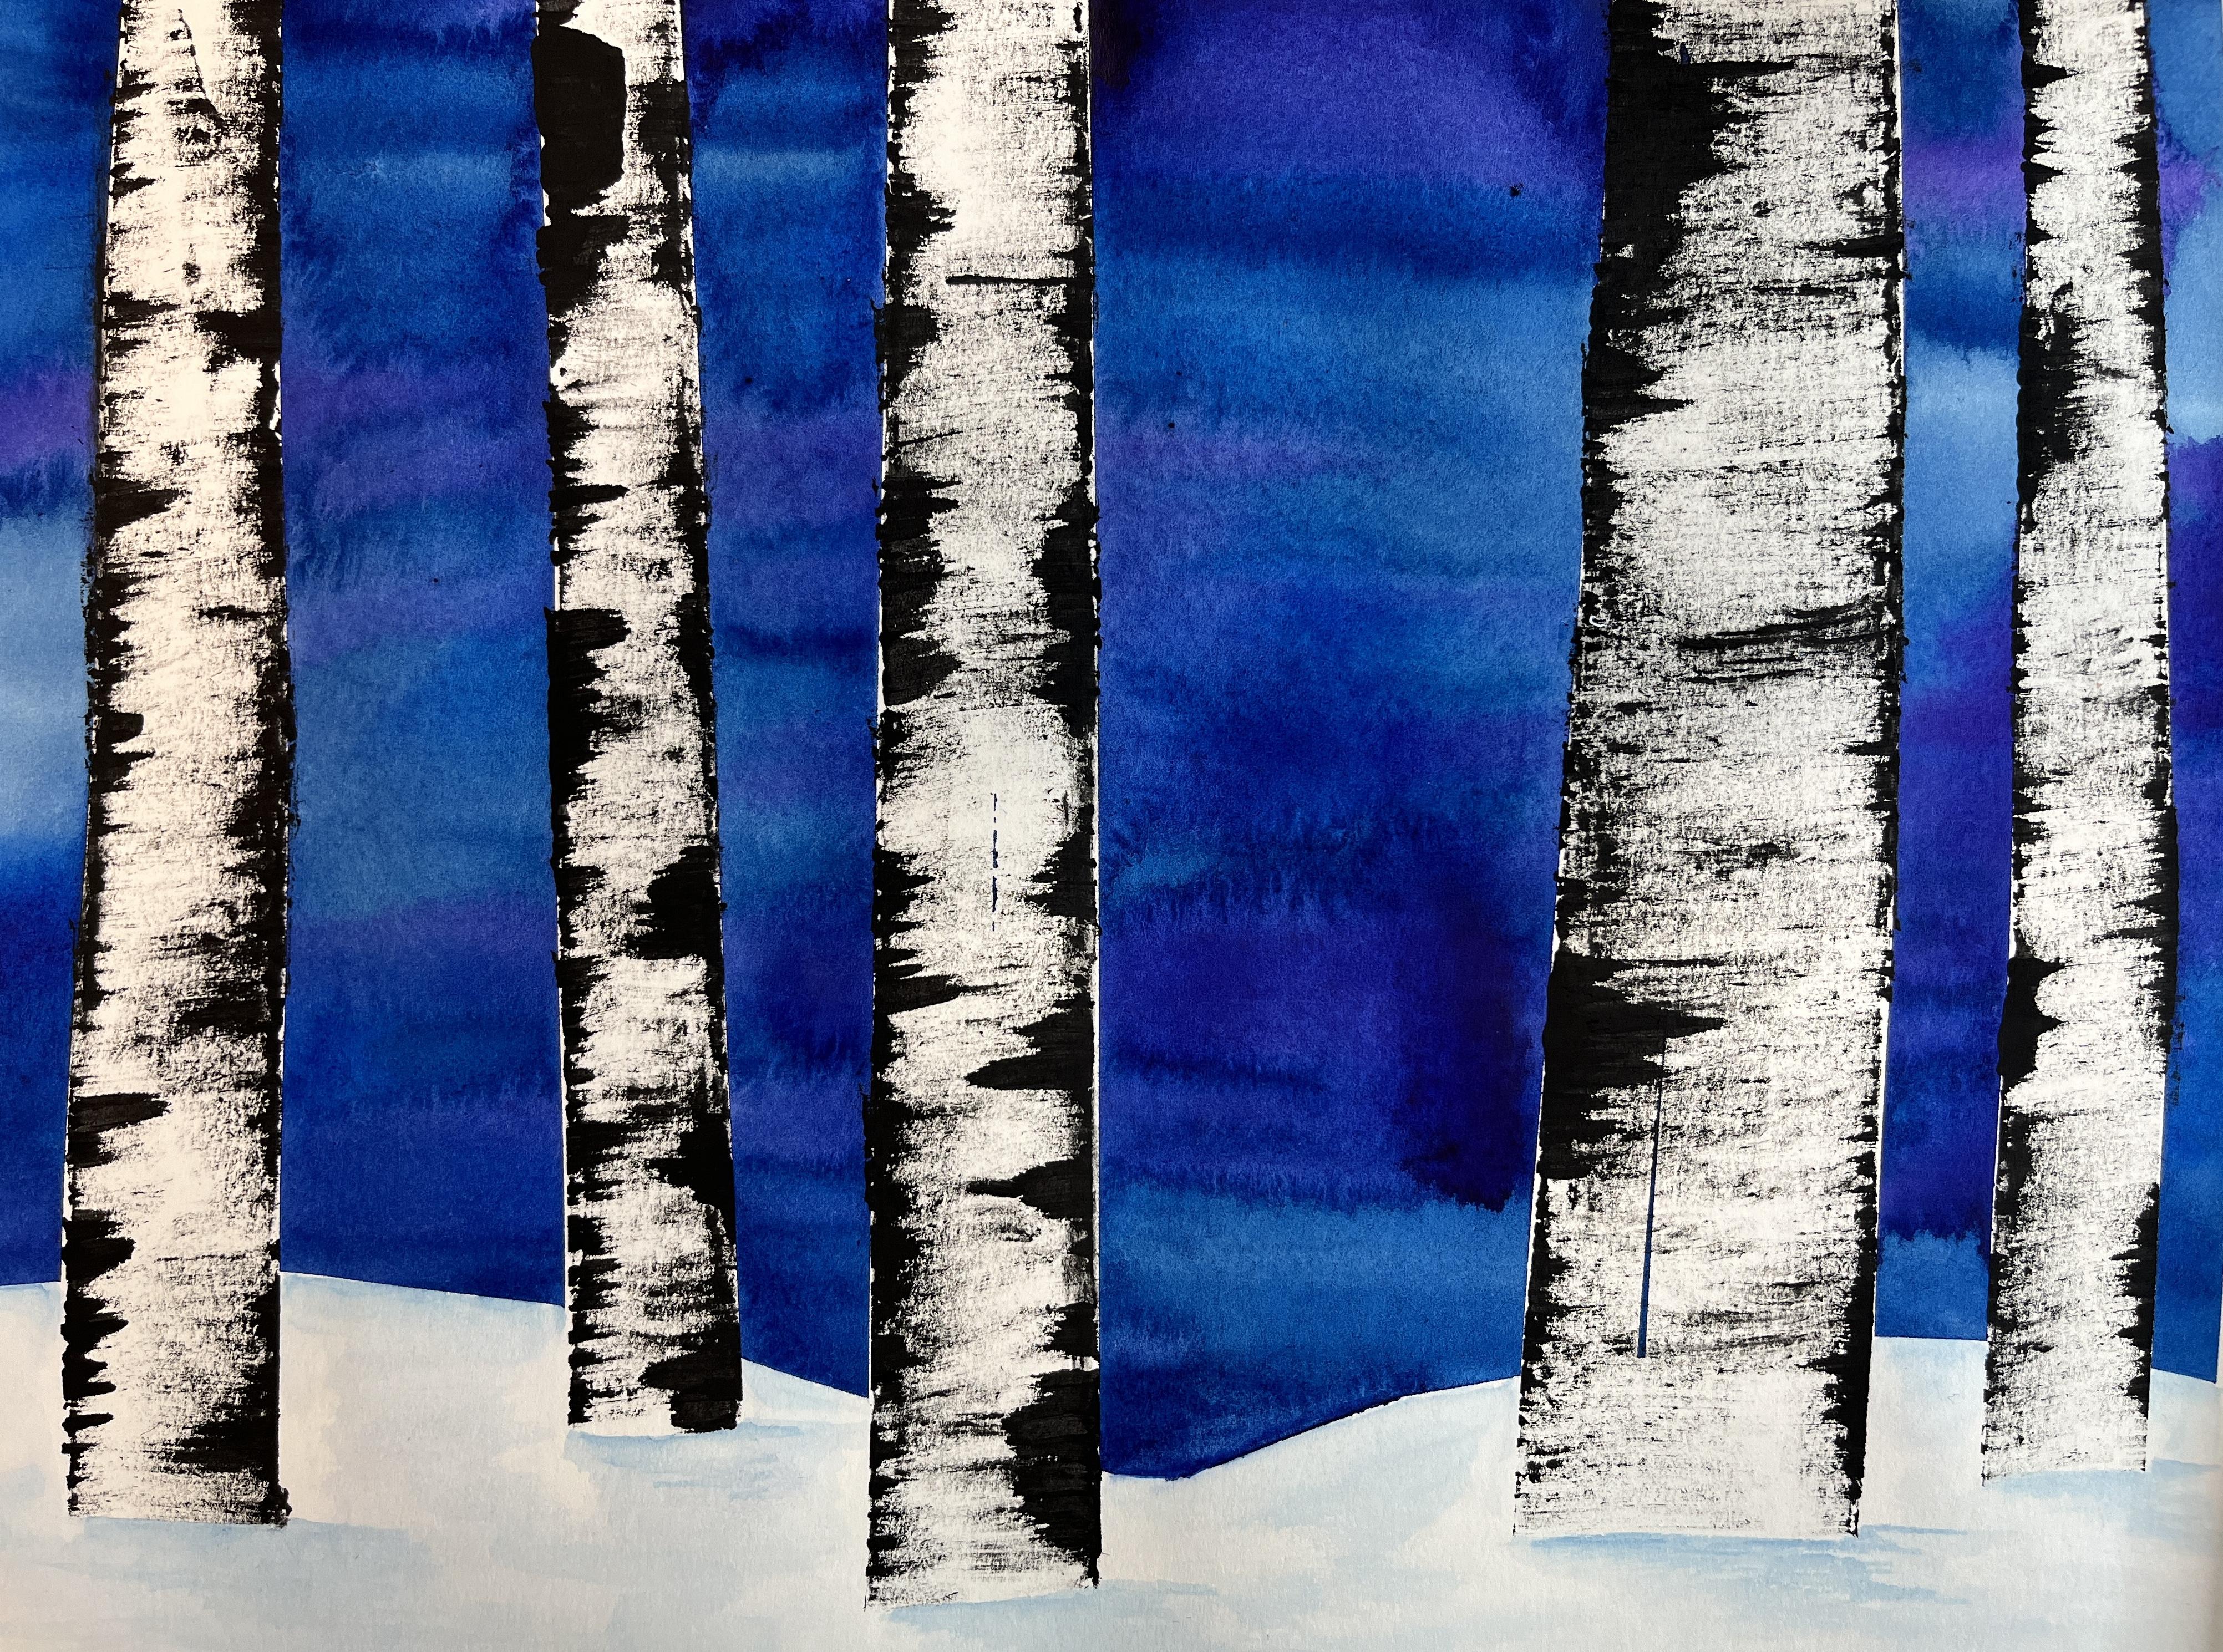
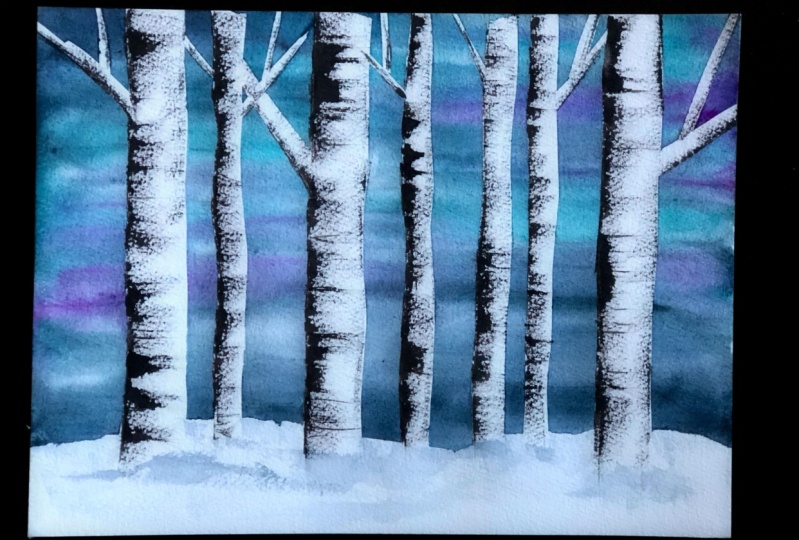
as a way to create a beautiful winter tree scene using some basic paint
and texture technique. By the end of this class,
you'll have created a colorful winter
scene featuring some lovely textured
birch trees using techniques you'll be able
to apply in other artworks. I hope to see you in class.
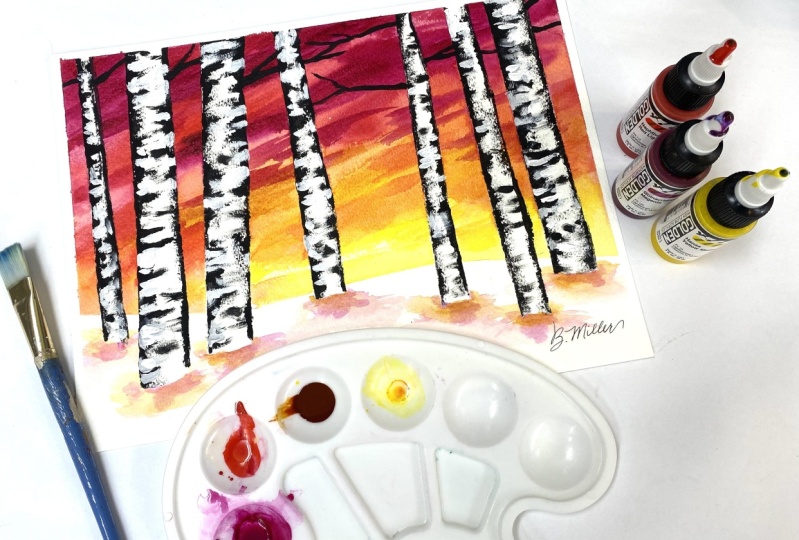
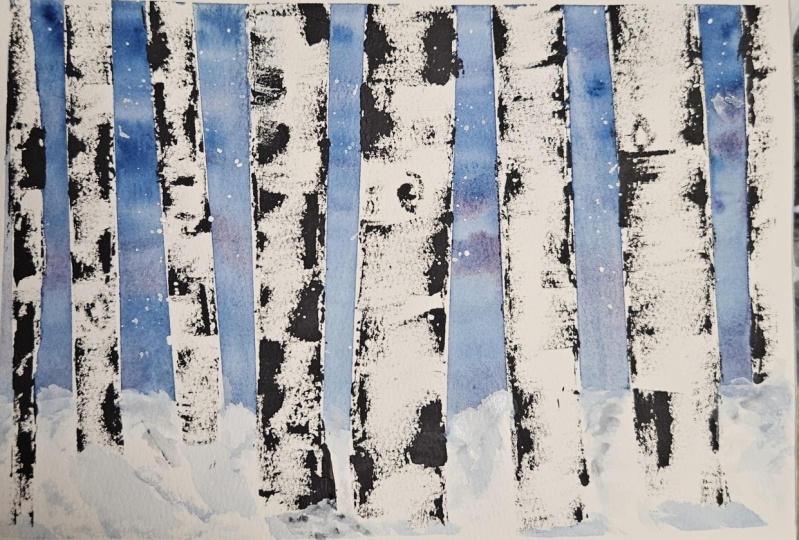
2. Class Project: Thanks for joining me
for our class project. We will learn how to use tape to define our tree trunks
and our snowy ground, as well as how to build up a bold sky using a wet and
wet watercolor application. Then we'll work with
black acrylic ink to build up and define
our bark texture and then some soft
watercolor application to finish off our
birch tree landscapes. The first step is to gather
up our art supplies. Let's head over to the
next lesson to see what materials we'll be working with in class. See you there.
3. Materials: Welcome back. Now
let's talk about what materials we're
going to want to have on hand for
this class project. All right. Our
materials for class include watercolor or
mixed media paper. I'm going to be going 912
for my class project, but you could work any
size that you liked. For that, we're going to need water color in
blues and purples. So any kinds of blues and purple water color
that you have, whether that be two
water colors that you squeeze out and
use pan water colors. Any brand, any work, I'm going to need a cup of water to activate my water colors
and to wash my brush. I've also got a microfiber
cloth that I love to have in the art
studio because I can wash it and use it again. But any kind of kitchen
cowl paper towel will totally work great for
painting our watercolor part. I'm going to be using a 1 "
flat brush to do my sky and then I'm also going to
be using this size six. Anything smaller like this, I wouldn't, you don't really
need smaller than this. And you don't want too much
larger than say, a ten or 12. But this is going to be for
the detailing of our snow. And adding a little to that
section of the painting, we're going to be using tape to mask out our trees
in our snowy ground. I like to work with washi tape. It's pretty inexpensive. It goes down really easily and
it peels up really easily. But you can also use painter
tape if you prefer it. And then we're going
to be working to do the bark texture
with black acrylic. I'm just using Craft smart. Any brand of acrylic
paint will work great. I have a reusable palette that I like to use when
I'm doing acrylic. This one is a
disposable palette. But any type of palette that works for acrylic
paint will be fine. We're only going to be
working with black. For that, you may to
modify your birch. If you need to bring
some lights back in, you may want to have white
acrylic on hand also, but black is ultimately
all that you need. We also are going
to want to have some scrap paper so
that we can practice our birch texture prior to going into our trees
on our final artwork. So this is one I've
already used to practice some birch texture
which is why it has the practice there. This is just copy paper. I love it, it's inexpensive. I use it in all sorts
of ways in the studio. A couple sheets of this
might not be a bad idea to have on hand for
ensuring that you have the right amount of black
paint on your cardboard. We're going to have a
small piece of cardboard, but we're going to be dipping in the paint to create the texture. Anything that's
roughly an inch and a half to 2 " wide will be great. We're just going to be using
the shorter end of it. I just cut this off
of the end of one of my boxes that I'd
gotten in the mail. Small piece of
cardboard scrap paper, palette black acrylic paint. A large and a small
watercolor brush, mixed media or watercolor paper. Blues and purples in your
water colors for your sky. A cloth to wipe off your paint, brushes a water container, some tape to tape it down. And that is all that you
need for our class project. Take some time to gather up your materials and then head
on over to your next lesson, where we will start taping off our trees in our snowy
ground. See as soon.
4. Taping Trees & Snow: Welcome back. Now we'll
preserve our whites by taping off our tree
trunks and snowy ground. The first step, after
we've taped down the edges of our watercolor
or mixed media paper, is we're going to
use our Washi tape, or painter's tape, to create the trunks
of our birch trees. I like to start with
one strip going at an angle and then I add a second or third overlapping at the top and then widening
toward the bottom so that we get that narrowing as it goes up towards the
top of the birch tree. You can put as many
birch trees down. As you want to
think about though, what's going to look
good as a composition. If you want to sketch and plan these out in advance, you can. I like to just go with the flow and see what happens and build up the
composition as I work. You could also cut your washi
tape or painter's tape into thinner strips if
you like to create even more variation in the
size of your birch trees. But if you overlap
them and you go ahead and aim for an odd number, you'll have a really good composition going
on in your page. Just make sure you don't
evenly space them out. Then for the ground, you could cut your tape to do this or you could just kind
of pinch it down. As I go like I'm doing, I started on the edge
and I go across and to create the rounding
of the snowy ground, I hold my finger down
and move the tape, and then just keep pushing
it down and up so that I get the rolling hills in a
pretty easy sort of way. And then I add more
layers of tape to help secure any folded
areas as I'm going, because I'm going to be doing
a light wash of paint over the whole upper sky
and I don't want that to bleed through onto
my snowy ground. So make sure all of your tape is secured down very tightly by rubbing it and just ensuring that everything is
sticking as well as you can. In our next lesson, we will add our watercolor sky.
See you there.
5. Painting Sky: Welcome back. In this lesson, we'll be using a wet on wet watercolor application to create the sky of our landscape
with a large flat brush. I'm doing a wash of
water across the sky, going right over the
washi tape because I'm fairly confident that it's
secured nice to my paper. A nice even wash water
is what you need. You don't want it
bleeding under. Just get it wet but
still stay in control. And then I'm dropping
in my darkest blue so that I really get some
pops of boldness in the sky. And playing around with letting
it fade out as it goes. And I have less pigment on the brush and going back
and forth with that color. And then I'm going for a bolder, more ultramarine blue to pop some brighter
variation on top of that. Just have fun with, just
lay down your color. Be super loose and relaxed. Just make sure you
don't over paint it. Otherwise you'll
lose the variation of colors that you have and it'll all become one single color wash, which that's fine. But having a
multicolored valued sky is much more exciting
for this project. Then I'm going to pop
in stem purple as well. The what I love about
my flat brushes, I can do bold washes of color, but I can also turn it sideways
and get more line detail. Because of the wet
on wet application. All of this is going to soften
as the pigment moves out, but it's going to be really
beautiful in the end. Now we need to let our sky dry before we move on
to our next lesson. See you soon.
6. Adding Bark Texture: Now we need to carefully remove
our tape from our paper. Once all of your
tape is removed, we're going to be
adding a little bit more paper to extend our tree trunks down onto
our snowy landscape. Then we'll be using our black acrylic paint to begin adding our tree bark texture,
so now it's dried. I'm going to carefully
remove my washi tape. I am peeling the tape back
on itself very slowly. This is sped up,
so that's why it looks like I'm pulling
it off kind of fast. Take your time with this step. You really don't want to
rip your paper because that will ruin the quality of
your painting In the end. Get all your birch trees
and then my washi tape is coming up on my borders and I don't need it taped
down any longer. I'm removing that as well. The last step is removing
my ground very carefully. Making sure that I pull the rest of the birch
strips as I go. And then the final border
off at the bottom, and then you can
discard your tape. But then I want to extend my birch trees down
onto my snowy ground so that it looks more realistic using small sections
of Washi tape. I am continuing to do the truncated
widening at the bottom, making sure that I'm not overlapping any of the
birch area because the next thing we're
going to paint with acrylic paint is going to be the texture of our birch trees. This step is all about mapping. How far down do you
roughly want to go for the bottom of your tree, where it comes out of the snow? Now I've gotten out my
black acrylic paint. I'm just using regular craft
paint that I picked up at our art supply store and a
small piece of cut cardboard. You can practice this
on a separate sheet of paper to build a little
confidence and to kind of help determine how much
dabbing you're going to have to do to get the excess
paint off your cardboard. So you're going to
dip it in the paint, dab it onto your palette, or an extra sheet of paper. Press it down to the edge of your tree and then quickly drag it across
while lifting up. If you have too much paint, you're going to get really
large swatches of color. So that's why the dabbing
off on the side is very important because you can
always add more paint. But once it's down,
it's a little tricky to get it off again. You can't get it off again. But there is a trick that I
can show you for fixing that, should you have too much
black paint that goes down. But this step is really fun
because you touch it to the edge and then wish and
then whisk it off to the side. Pushing over and lifting up. At the same time, the
cardboard is going to give you a really beautiful variation to how it goes down,
which I really love. I like doing all of the
left sides of my trees at one time so that I'm not trying to manage
going back and forth. You can do the right
and the left to the left side and then do
the right of the same tree. But this is a nice, easy way to keep yourself
in the flow of movement. And then you always go
to the same direction. If you're left handed, you
may want to do this reversed. Then I flip my paper
over and now I'm doing the opposite
sides of my trunks. So same concept.
Dabbing the paint. Dabbing off on the side. My cardboards absorbed a
little bit of the paint. So it gives me more ghosting
lines, which I really love. And you can do a little
bit of a wiggle when you first touch it down
and then lift it off. Then if you want
to put even more, some horizontal bark texture, you can use the corner edge of your cardboard and then drag the paint across
a little bit to give it some more line details that are a little
bit more controlled and a little bit
more pronounced. You just keep going
until you've finished up betting bark texture
to all of your chunks. If you do end up
with areas where you have more black
than you want to, you can do a reverse of this. So you can do a secondary piece of cardboard and you can use some white acrylic paint and just do the same thing
we did with the black. But now you're
going to do it with white and go over the top, it adds even more grays. Well, it adds more grays to it because you've
got the white and the black mixing a little bit
on the trunks themselves, which can be really nice. I like to use this just as a
corrective measure so that I don't go overboard
because it is very easy to overdo this
step of our project. But that is a way to fix it. If you need to tone down
some black patches on your bark and just add as much texture as you want to make sure you
don't go overboard. We don't we want to have
a nice randomness to it. Make sure that you're not doing an evening out of those lines. Because that's our tendency
is to even them out. Our brain wants to even things, but we want it random because
we're mimicking nature. Now I'm defining that
edge a little bit. I have a couple of spots
where my paint didn't quite push down,
ready on the edge. I tweak that a
little bit by going along the edge, but
for the most part, I'm letting that happen and
exist because I like it now. You could wait for your
black acrylic paint to try either do this
step carefully. If you're doing it like
I am, well it's wet. Or wait for your black to dry. And then come in and
take the washing tape carefully up from the
bottoms of your trunks. Now that we've added
our bar texture and carefully removed the
remaining pieces of tape, it's time to paint in
some very subtle details with watercolor on
our snowy ground. See you in the next lesson.
7. Painting Snow: Welcome back. Using
minimal water color. We're going to add some
cast shadows to our trees, as well as add some depth and dimension to our snowy ground. Now that I've removed
all the washi tape, I've gotten out a
small watercolor brush and a clean cloth, and I am using a fair bit of water to a very small
amount of pigment just to kind of indicate some cast
shadows below the trunks. Just kind of going right along the edge of the trunk
and then feeding it out, letting some of the
line texture exist there you can decide
how soft you want to make this and how minimal or how bold you
want to go with your color. I really wanted this to be a very soft part of the
piece so that it didn't compete with the
boldness of the sky or of the darker parts
of the trunks. I'm being very minimal
with my color. Dabbing it off on my rag and going back and forth
with water back into that even further soften the marks of water color I'm
putting down in my snow, I did have a little areas where the pavement was a little stronger
than I wanted to. I tried to scumble
it out of there in the second tree from the left.
It didn't work that well. It was already set in the paper. Go fast but slow with this step or you can
always go darker, but sometimes it's
hard to back it off. Then to add more
realism to this and to help map out the
depth of the forest, I'm doing a little bit of the same technique
along the top, the backmost edge of the snow where the snow
meets the sky here. You do need to be
careful because it is possible to reactivate your watercolor sky and have that bleed down
into your snow. So just be careful. The watercolor is dry,
but it can reactivate. So I'm just very
subtly going in with a little bit of blue on the
edge of my snowy landscape. And then fading that out so that I still have the
brightness of snow below and it doesn't
become something that looks more like water
and less like snow. I'm realizing that I had done
very flat bottom trunks. And in reality,
trees are rounded, so instead of going
flat on the bottom, I could round that
instead and let the tree trunk have just a slight indication of
the roundness of it. But I'm happy with the
flatness and I kind of like, that's a little bit
of a funkiness to it. It's been so fun to
create a watercolor and acrylic birch tree
painting with you. Let's send it over
to our final lesson to wrap up the class.
See you there.
8. Final Thoughts: Thank you so much for taking
this class and creating a watercolor and acrylic
birch tree painting with me. I hope you had a lot of fun incorporating watercolor
and acrylic techniques into your paintings and
are feeling inspired for ways that you can use
this in future artworks. I'd love to see your
birch tree paintings. So please head over to the Projects and
Resources section and click on that Create
Project button to upload a photo of your painting. And feel free to add some texts sharing how the process went, how you felt about it, and maybe even some ideas
you could share for future application of any or all of our
painting techniques. It's also really
fun to check out the projects of your classmates. So after you post your project, be sure to take some time
checking out the other work in the student gallery
and leaving likes and feedback on
classmates paintings. As we build a community of supporting each other on
our creative journeys. I'd greatly appreciate
it if you left a review. Student feedback is
the best way for me to continue growing
as an online teacher, as well as finding
ways to improve past, future, and current classes. I know that as a student, I really appreciate the
option to leave a review. It gives me a chance to
share what I've learned and to provide some thoughts
about how things went. And it's a great
opportunity to connect with other learners on
the skillshare platform. I greatly appreciate it
if you took the time to leave a review and let me know what you thought
about the class. I love sharing my
art adventures and sharing my student's
work on my Instagram. If you are also online
sharing your work, please tag me so that
I can celebrate it, see what you're working
on and continue to connect on social media
as fellow creatives. You can also follow
my art journey and get additional
demonstrations by following me over on my Youtube channel under
the name Elizabeth Welfare. If you check it out, be sure to click the subscribe button so we can stay connected
beyond Skillshare classes. If you want to
stay up to date on my newest Skillshare classes, be sure to click
the Follow button, and I'll see you next time.
 Elisabeth Wellfare, Artist, Art Educator