Transcripts
1. Introduction: Hi, I'm Elizabeth, and welcome to another artist
inspired series. In this class series, we
look at different artists. We learn a little bit
about their life, we dive into their art and the different processes and ways that they approach
creative art making. And then we get inspired
by that and we put that into our own artistic practice and give it our own unique twist and layer on our aesthetic and really kind
of come away with a really fantastic
new way to create art and weave in some new ideas and
new approaches to our art making process. I've been teaching here
on Skillshare since 2021. I'm also a professional
artist and art educator. I love sharing my passion for art making and art history
with my students and taking you along on the journey as I explore new artists
started getting me excited and inspired in
different art processes that I'm exploring in my art studio as we
all continue to grow and learn together in this
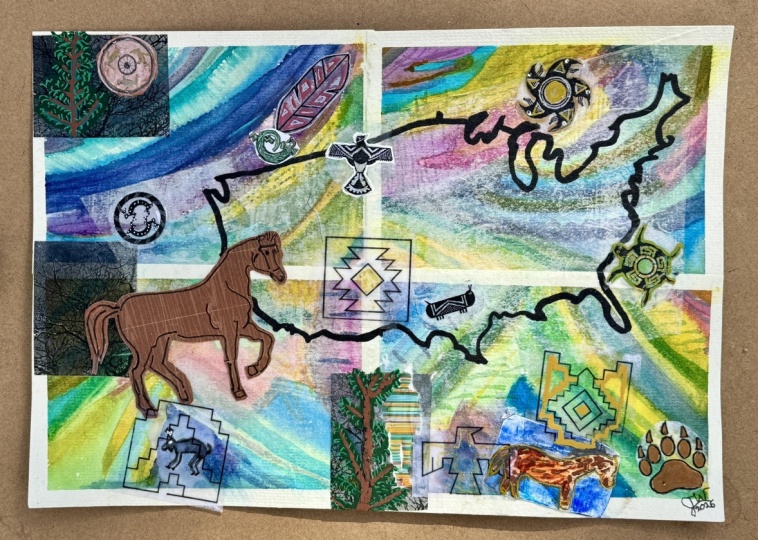
amazing creative world. In this class, we look at the amazing work of Native
American artist Zhan QuickTC she is a Native American
artist exploring her Native American heritage and life and traditions
in her art making. She's also a really amazing mix of different art approaches. Not only was she tapping into different imagery that was very significant and important
to her own background, her own cultural background, and and beliefs and cultural practices that were
a key part of her life. But she was also
exploring all of these unique art approaches that were very
important at the time. In the 90s, she began exploring
layering up on canvases. Really collaging in
different newspapers and magazine clippings and
then painting over that. There's this wonderful mix of traditional Native
American imagery. And abstract expressionist
art making approaches. She was directly influenced by Robert Rosenberg, Jasper Johns, all of these different artists
that were really key and important during the same time that she was living and
creating and working, but she was putting
her own spin on it. The work that she was making was very important because
it raises awareness about different mistreatment
of Native Americans both historically and in modern times the
continuation of that. It's raising
environmental awareness, it's raising social awareness. It's all of this amazing
messages that go into the work that Smith
created throughout her life. Got so many different
ways that she has explored imagery
and art making and art techniques that
you can choose all of these different
ways that you can get inspired by her work and put your own spin on it
for our class project. I'm going to share a bunch
about her life and her arts. You're going to have a
Google Slides presentation that you can check
out that takes you on an even deeper dive and shares her history as an artist
take you from the beginning, all the way up to her
passing in early 2025, just give you all of these
different ways that you can get inspired by her work
and put your own spin. So I really hope that you'll
join me in class as we dive into this amazing
artists life and work and really get inspired by
what Smith was doing in her work and ways that we that into our own
art making practice. Let's over to our next
lesson to talk a bit more about our class
project. I'll see you there.
2. Class Project: Name. For our class projects, we have a couple of
different routes we can go. I really love mixed
media art and I really love layering collage elements
and painting over them. I forgotten that I really enjoyed doing this
when I was in my 20s. I'm really excited to revisit that when I get into
my class project. But there's a lot of
different avenues we can go down for our Smith
Inspired project. Can lean into the collage
abstract expressionist approach that she did from the 1990s on through the rest
of her career. You can also lean into the mark making approaches that
she did earlier on and then also woven in with those mixed media collage pieces and you can also lean
into printmaking too. If you're someone who does
jelly plate printing, you could incorporate that too because Smith was also a
printmaker and she did this whole long residency
exploring and learning the printmaking process
when she was in her master's program
and she went on to work and study under many
different amazing printmakers and really grow in her skills and her ability as a printmaker. There's a lot of different
routes you can go. I'm going to share with you
the mixed media collage painted canvas approach
that I'm going to do. But I think I also want to play with the mark making
elements too. I'm going to try to
weave both of those into my class project and maybe even do a couple
mini studies along often when I get really
excited about an artist in different avenues that they've gone down
in their journey, I tend to do multiple
projects and that could easily be something that you
to also get excited about. In the next lesson when we
talk about class materials, I'm going to share a couple of different ways
you can approach your class project and
the different materials you might want to have on hand. You could absolutely also do your class project
digitally too. This does not have to be a traditional hands on analog
art making experience. This could very much be a really amazing
digital experience because it's also very fun to play with collage and
digital painting. Or just digital painting
or even drawing. There's really so many avenues you can go down for
your class project. We're going to look at
a couple key moments in Smith's life and how those different windows into her art journey can be tapped into for our
own creative practice. Let's turn over to the
next lesson and talk about your material options for
class. I'll see you there.
3. Materials: The materials for our project are leaning into
the mixed media. So for this one, I'm going to do my student project on
a stretched canvas. You could do this
on Canvas board. You could do this on
mixed media paper. I'm going to do a bunch of them. So I'm probably
going to eventually play with mixed
media paper, too. We're going to build up some imagery using
collage materials. So I've just torn some
images and some phrases out of magazines that are
interesting to me and funny. I'm going to use water
down liquid glue to do it, you could also do Mj
page if you wanted to. I don't necessarily want
a super sheen to it, which is why I'm going
to lean into liquid, white glue instead of Mj Poch. But if you have Mj page
instead, that would work great. I've got my container to
mix up my water down glue, and then I've got a nice craft brush that has taken a beating that's going to
be for my glue application. Then I want to play with
different mixed media. I'm going to do acrylic because that emulates what Smith
was doing in her work. I'm probably going to play around with watering
this down too. So probably have a couple
extra water containers to water down my acrylic. I've got some big acrylic
brushes on hand for that. I've got a cloth, because chances are it's
going to get messy. I'm also going to
protect my work surface. I'm going to put
down either some newspaper or some scrap paper or something to kind of keep my art table a little bit
cleaner so that I can easily move from
the messy collage abstract expressionistic
esque painting to some more detailed work. After my glue dries
from my collaging, and then after my paint dries from adding in some
painting details, I think I want to work back
into my piece further. I've got some paint pens, I've got a sharpie,
I might get out some pastel, some charcoal. I'm not quite sure at that
point where I want to go, but I'll be sure to list all of the materials that I do
end up using and that I recommend are the must haves and then some optional
ones too for you to check out on the projects and resources section of our class. Definitely check out
the materials list there as you're getting ready
to dive into your project. But this is ultimately, I think everything I'm
going to essentially need to create my
Smith inspired piece. Let's hand it over
to the next lesson, so I'll see you there.
4. About Jaune Quick-to-See Smith: I was first introduced
to the work of Zhan Fichts Smith through
teaching AP art history. It's one of the
classes that I teach virtually to high
school students and Smith's Piece trade is one of the pieces that we
study in that class, and it's really important piece because it bridges
the imagery of traditional Native American art with more modern art making approaches and leans into what we consider to be
abstract expressionism. The expressive qualities of abstract art and
whatifferent ways we can play with paint and
paint properties to be expressive in our art. Smith was doing both
of those things, but that wasn't all
Smith was doing. Zan fits Smith spent most of
her life on reservations. That's where she grew up. She traveled a lot
with her father who was a horse trader and she got to see a lot of
the West Coast that way, the Northwest region, especially around the state of
Washington in the US. She knew from an early age that she wanted to be an artist, but she encountered a lot
of obstacles in that route. She was told that as a woman that she could not be
a professional artist, that women did not
become artists. Then she was also told
as she wanted to pursue higher education
by an advisor in high school that Native
Americans didn't go to college. That may have been what had
been the case for many folks. There was not a lot of
support there to get continued education if you were Native American
at that time. But Smith is not
someone who ever let anything stop her from
what she set out to do. Not only did she go on to take two years of college to
initially get started, she then earned her BA, as well as her MA
and has gone on to teach multitudes
of people by doing different art series and workshops and lectures
around the country. Of helping raise up and
inspire many others. She also early on became
very involved as a curator. She would put together
different artists, especially Native American
female artists and really create these amazing shows
that not only helped those women see that they were professional artists
and they had something amazing that was important
that needed to be put out there and seen by
others and celebrated, but that others could also then see these
amazing shows and see these amazing artists
and all that they had to offer at a time
when that wasn't the norm. That was not what was
typically happening. She did a tremendous
amount of work advocating for Native
American artists and women artists during
her lifetime and really encouraging anyone that
she came across to do it, to pursue art, to pursue
the creative path. And really make that an important aspect of
the work that she did. The other side of Smith is that her artwork became a way to raise awareness of
the mistreatment of Native Americans
historically, as well as now. She never stopped using art as a way to express the
different arties of equality, the different issues that
Native Americans have faced, and the different ways that the traditions are important and the culture is important and
the people are important. She's created many pieces that have become very important. Raising an awareness about that aspect of American history. She has some beautiful
pieces and she's explored a lot of different
artmking practices. Drawing was a
beginning stage for her when she was in art school
in the beginning stages. She's explored a lot of
different mixed media work, especially from the
1990s onward with her more collaged abstract expressionist symbolic
mixed media pieces. She's done a lot of amazing
work with printmaking, which is a medium that she
began exploring during her master's program
where she really dove in to become as amazing as possible at it while
she was still pushing her own imagery and
her own purpose and creative passions
in her work. We can see a lot of
different ways that Smith was exploring different
art making approaches. But through a very
focused driven goal in the imagery that she
was putting out there. She's got some amazing
sculptures that also explore this and
she's got a lot of repetitive motifs that
she comes back to that have different
meanings depending on what the piece
is focused about. The more you dig into the pieces and the more you
read about them, the more amazing
they all become. Like anything, if we
don't have the context, we can't really get
into what the artists intent was and why they
were making what they were making and the
importance of it all. Smith's work is such
an amazing body of work to do that with because that information
is out there. She shared it, so
we can look back at her amazing history
and really find some great information
about why she was making what she was making and
the meaning behind it all. I love that she is an artist that is so incredibly true to herself and to her goal
as an artist and what her purpose in being an artist was. She really was very intentional in not only
the image that she made, but the exhibits
that were curated and how that information was then translated
in the art community. On the projects and
resources section of class, you will find a Google
slides presentation that takes you from her very
beginning of her life all the way up to her passing
in early 2025 and takes you through a multitude
of her pieces and her journey as an artist. There's so much so many
more pieces out there, but I really tried to give you a nice range to show you
her different trajectory and the growth and
different ways that she evolved and the messages that she was working
with in her images. I think taking some
time to look at that before you dive into
your project is really key to helping to
further inspire you about this amazing
artist that we're looking at before we begin
creating our own pieces. After you've taken
some time to explore the Google slides presentation and get even more inspired, then we can over to
the next lesson to start diving into some
different ways that we can we've missed different
artistic practices and processes and approaches to
art making into our own work. I will see you soon
in the next lesson.
5. Collage: So the first step in preparing our artwork or starting to
work on our class project is to use the different
magazine pieces that we've collected and
to collage those down. You can go for something
more abstract. In this one, I'm working on
just using bits of newspaper. Newspaper is definitely
something that Zon Quick Doc Smith used in
her own mixed media collages. So this is what I'm doing for the version of this
class that I'm creating for my in
person students. I also wanted to play with color in the magazine
images, too. I've just got some
random images from my collage dash that
I've collected, and I'm going to start
cutting some of these out. I'm not leaning into any specific message or
symbolism for what I'm using. I'm just going for
interesting shapes and colors and textures, and I'm just creating an interesting surface to paint on and add
mark making too. A message may evolve as I go, but that's not my
initial starting point. If you have a message
that you want to explore, I think that's fantastic. Lean into that, go for
it. That's amazing. I just want to play with
her art techniques and her art process and see
what comes out of that, and then I might lean into something more particular
down the road. Now, because I'm going to
be painting over these and layering up my
collage pieces, I'm not going to worry about
making super perfect cuts. I'm going to get
some of the black background off of these peppers. But ultimately, I'm going to just relax about
the cutting process. You could absolutely
do very neat cuts. But really, the
collage for me in this process is just to create an interesting
surface, like I said. So I want to lean into that. I'm also working pretty small. She was working very, very
large for most of her pieces. You can lean into some
text if you want to, you don't have to
again another option. A lot of these
magazines are ones that I've gotten for free
at our library. We have a table out in the
lobby where people can just donate their magazines that they're dine with, which
is really amazing. I get a lot of great
resources there. That might be something
that you also have in your community is an
area where you can find really interesting
collage materials that you can then
incorporate into your work. I might not end up
using all of these, or they might become a series. I'm not sure. I'm just kind of getting a starting point and then I'm going
to go from there. This one I really liked
the bubbles for this. Clinique ad. I'm just going
to cut off that texture. So what I've done is I've
gotten some white liquid glue. I've added a little
bit of water. I'm going to mix my
water and my glue together to create a
water down glue mixture. I want to make sure
that I'm not breaking down the adhesion of
the glue too much, but I do want it to be
thinner because I'm going to be painting it on the collage
pieces and on the canvas. So there is going to be a
little bit of dry time. If you're not working on Canvas, for this one with the paper, I use water down glue
for this one as well. You wouldn't have to do that,
especially if you wanted to do all of this in one
session when making time. You could absolutely
just use glue sticks and glue
them down that way. I did the watered down
glue because I wanted to have a little bit of
protection on the newspaper. I wanted it to have a little
bit of the glue surface just so it takes the
paint a little bit better and isn't as absorbent. Because the paper
will absolutely suck up the paint,
which is fine. That's not a problem. I just wanted to have that little
bit of extrans there. It also thickened
up my paper too. This is Canson
mixed media paper, which works great
for painting on, collaging on, drawing on. But I'm probably
going to you know, do a lot to it, and it's going to get very wet. So I wanted to have just a little bit of protection there. And then this one I'm doing it on canvas just because I have a bunch of canvases
that I was given, and I want to use them. I don't do a lot of
canvas painting, especially in
square format, too. So that was kind of
another fun thing was to work in a format that
I don't tend to lean into. So I'm just going to
paint the glue down, and then I'm just going to
start putting down my papers. I'm going to paint on top of it. I'm going to do the same thing. This is just going
to help seal it. This is an important
step to do the under and the over if you're going to
be painting on a canvas. I think, in my
experience of doing mixed media collages and
painting on collage surfaces, I like to have that
extra bit of adhesion. I'm just filling in my
canvas with collage pieces. This is basically doing an underpainting, which
you could do that too. You could paint
everything one color or a variety of colors. That would be another great
way to start this project. But I'm just treating the canvas so that there's
some interesting stuff there. Turning the images upside down is another
really good idea. So having them not face
the direction that they're intended to some random this guy's upside down
head is really great. I don't want the words to be something like stick out a ton. I'm also going to have those
go in kind of a funny angle. I actually have more
collage pieces than I need. So I might rip some of these up. And then if I go off the edge, that's not a big deal either, so I can just trim them off. You can also use your
glue to get it to go over the edge sometimes. This magazine paper
is pretty thick, so I'm going to let
it hang off the edge, and then when it's dry,
I'm going to trim it off. That's fun too, because it
goes over and it goes under, and because everything is wet, you can easily slide
things in and out. Things might slip a little
bit during this phase. And you can do a couple
of coats if you need to. The magazine paper doesn't necessarily always want
to stick down depending on the quality of the paper
and your glue to water ratio. So you can always do a couple
of coats if you need to. Step one, done. Then I'm
going to let this dry. You could let it dry or
you could make it dry. But I do want to let the
glue sit a little bit on its own before I
start applying heat. I do find that when I put
heat on a collaged surface, sometimes the glue doesn't
react the way you want it to. So it's nice to let it
just dry on its own. I'm go to go ahead
and wash my brush, I'm going to let this sit
until it's fully dry, and then I'm going to come
back and will join us. Then you can join me
in the next lesson where we start painting over our collaged
artworks. See you soon.
6. Painting On Collage: For this one, I need to trim off my excess collage pieces. What I want to do is I
want to paint over this. I'm going to do that in a
couple of different ways. I'm going to do a
glazing effect. I've just randomly
chosen colors. Kind of play plate a bit
with some color mixing. Glazing is where you thin down your paint so that something that
is normally opaque, like acrylic becomes
transparent. You can do a glazing effect
with watercolor too. Watercolors already transparent. Watercolor glazing
would be when you've painted a transparent layer and then you paint another
color transparent layer, and then the two together
have this optical effect. For that one, you let
it dry between the two. But for acrylic, we can thin our acrylic paint. You
can see through it. Now I can also
play with areas of opacity where I don't
see through it. I can have areas where the paint is built up and it is behaving like we normally
expect acrylic too. You also might find
that depending on the brand of
acrylic you're using, it's going to have a
different level of viscosity. Viscosity is its thickness, and if it's on the thick side, it's more inclined to go
opaque right off the bat, or if it's more like a student grade or
something like that, you're going to find that it might be harder
to get the opacity, depending on what's
underneath it. If it's just on white,
it's designed for, then you usually don't have
much trouble covering. When we start to go
over other things, that's when we start to have some opacity issues with
some brands of acrylic. Now, I don't want to
lose all of this. I want to really lean into
the transparency aspect. I've got a couple
of different ideas for how I can pull back. In the other one, I pulled
back by taking paper towel and wiping off that because I got a little heavy handed right
off the bat with this one. But this one I want to play
with some other ideas. I had the idea that
I could do some scraping with cardboard
and that's working great. That'll also give
me some texture too, which is really fun. So you can scrape all
of it off and you can then use that to apply it
back on. That's really fun. You could also use an old credit card or an old gift card. I don't have any
around the studio, but I do have these scrapers. They're designed for
leaving a texture, that's a whole other thing
is actually using a scraper. But this I was
thinking I could use the edge of it and that's going to give me a different scrape. Then something else would. I really want to keep
that face there. That face is important to what
I like about this collage. The other thing I
can do is I can grab another acrylic brush and
I can just go in with water and almost wash off the acrylic because
it's still wet. As long as it's still wet, then we can keep going back
and forth and we can pull our paint back and
bring some areas out. And that becomes more soupy. But that can be great. At this stage, we're just
playing around with color, we're playing around with
what do we leave in? What do we cover up? What textures do we want to add? Then where do you want
to go from there? White is a very opaque
paint with acrylic, usually, regardless
of what brand you're using. That's
something to think about. Now, the beautiful thing about Smith's work is that she
was playing with paint. The paint was part of
the subject matter. The paint was visible, just like abstract
expressionists were doing. Letting your paint be part of the imagery is an important part of this. We don't want
to smooth it out. We want to let the brushstrokes
speak loudly and boldly. But that's not to say that
you couldn't do something that was more smoothed out. And play with that too. But I like the play of
the magazine images and the transparent paint
application and then building up some more
graphic nature too. Now, we can let this
dry and then we can go back into it with
some more mark making. I think that's where I
want to go next with this before I get
too carried away. Adding in paint.
I really want to lose the weirdness
of those peppers. I'm going to wash off this brush and I'm going to try
it off a little bit, and I'm going to lift
up the paint a bit. What's going to happen
as your acrylic dries, it's going to get tacky. Sometimes that can pull
up the magazine images. There is a time limit
that we have to do this. This is a pretty fast process. I'm lifting the paint out, bringing back some details. I can only do this as long as my paint is wet. I love that. I think I just want to do
a teeny bit paint there. Awesome. I love it. Okay,
I'm going to let this try, and then I will be back to do
some mark making into that. So now, for this one that's
on the mixed media paper, I didn't do a ton of
collaging beforehand, and I want to play with the transparency
of acrylic paint, and you can thin it and
you can thicken it. So I'm going to do a
little bit of pattern or just mark making
underneath the paint. So I'm kind of just using my sharpie and adding
just some random lines. I'm basically just breaking up the white space in a
very haphazard way. But this is going to
be great. This is going to be something
interesting to paint with. I'm going to now use
my acrylic paint. I love using leftover paint. So that's what I'm going
to lean into for this. I also love the fact that this paint was probably a
completely different project. It's a limitation. It's a constraint that
I'm working with. Could I absolutely get more
paint colors? Yes, of course. But I'm going to start
with these colors as my base point because
those are the ones I have on a palette and
I want to use them up. For this stage of the project, I want to keep it really loose. I just want to start getting down some color and some value. Now this paint is pretty thick
because it's been sitting, but I'm hoping that I can put some water in there and then also play with
scratching back into it too. I don't want to totally
obscure what I've done. I actually wish I
had thinned it. That's what I'm going for.
See where it goes through. I'm actually going to
an into the dry brush, but I'm also going to try to lift up some of
that acrylic that I put down. Well, that's grab
some scrap paper, and I'm going to drag it across the surface and I'm
going to bring the image back. Now, I've lost most
of my newspaper, but that's okay because I can always collage
more into this. I can keep going back and forth between the collage step and the painting step and
the mark making step and all of that and keep
building that up. I can also add more water. This is what I was
hoping I had and I can pull up even more of it. Yes, that's what I
wanted. I wanted that. I'm going to wash
off my brush and I'm going to play with
some other colors. But first, I would normally not put my paint in the
water before picking up. My color, but I want to do
more of a glazing effect. I want to have more of a really thin juicy
water color like this. Then I can always absolutely
grab more and I can go in thicker as much as I want to. But for right now, I
want that thinness. Let's see, what else
do I want to do? I'm going to grab some blue.
This is going to be thicker. I didn't add more water. Then you can do a lot of mixing on the paper, which
is really great. Then anytime it gets to be
more than you want it to, you can take your paper towel or kitchen towel and
you can keep lifting. This is my method for doing something similar to what
Smith was doing in her work. This isn't necessarily
how she approached it. No, she was doing lots of
collaging and painting and drawing different
applications into it. You could also play
with your collage step. You could add tissue paper. That's a really lovely
way to collage. It is going to get messy,
lean into it. It's worth it. I am going to let this dry. Then I'm going to meet you in the next lesson where
we're going to start working back into this with
maybe some additional paint, but also mark making with
colored pencils, paint pens, sharpies, fine liners, whatever drawing supplies you have on hand that you
want to play with. See you soon.
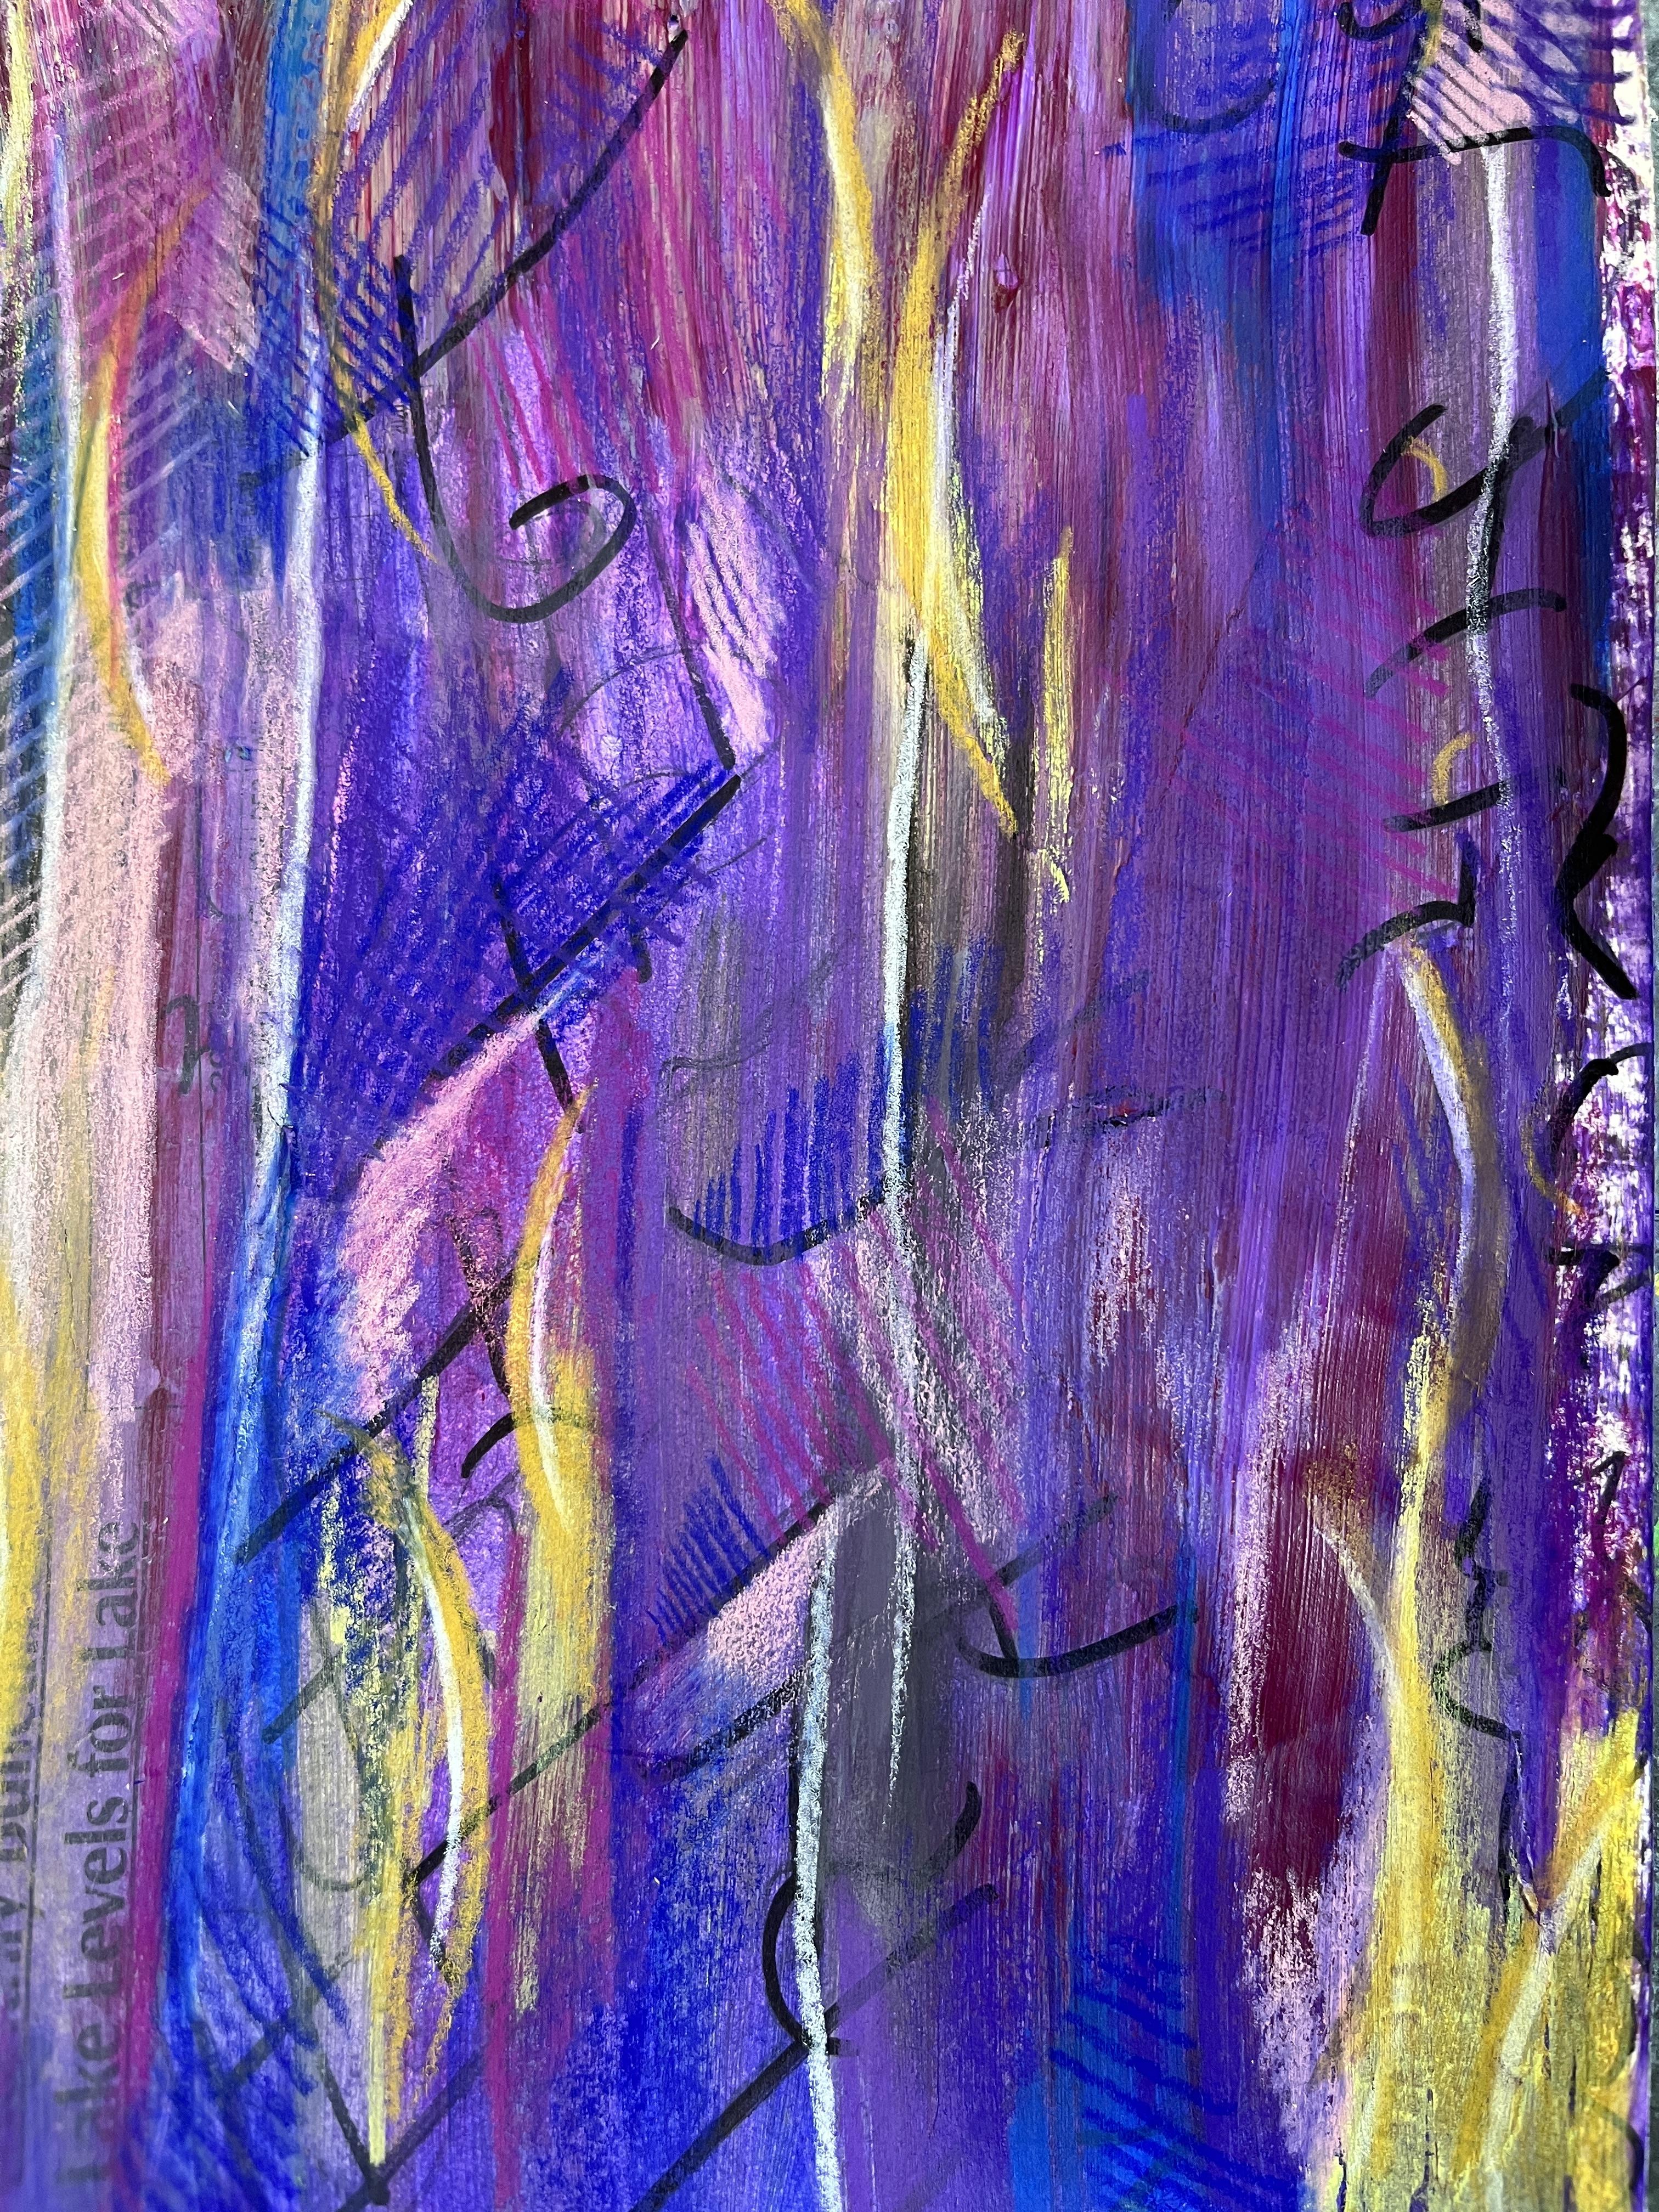
7. Mixed Media: Alright. Now I'm going to
work back into this one. So it's a little bit warped. I'm going to put it
under heavy couple of books to flatten it back out. So I have a sharpie, a fine liner, some paint
pens, some colored pencils. This stage, you could use any art material
that you want to. You could keep painting
into it if you wanted to. So we're just going to
kind of have some fun and pull out some
interesting details. I'm leaning into
abstract, absolutely. I love the play of some of the newspaper
that came through. I've got some marks that
I did that I painted over and I'm going to start
to pull those back up. I'll do Sharpie first. And I'm just going to pull up some lines that were
a little more muted. Bring those back up
to the foreground. They've gone to the back
because I painted over them. Now I'm bringing them forward. I'm also going to
do a little bit of extra work with that kind of inspired by some of
the lines that I see. I don't want to do all of it. I just want to have
a little bit of something more to build off of. Then with the paint pens, I'm going to lean into the
colors that are already there and kind of
build those up a bit. Yoking I can do as well. While the paint pens are wet, I can smudge them intentionally and give it more of
a painterly look. This is fantastic.
You wouldn't have to smear it with your
finger like I'm doing. I'm just an idea that
came out of nowhere. What I love is that it
gives it a less takes away the crispness that we often associate with paint pen work and then it just becomes
about the color. You get that really
great boldness. I think I'm going to
rain it back in a bit and I'm going to go in
with my colored pencils. To start building up
some richer color. Now, it's better to do
this when your piece is dry the paint pens don't
take too long to dry. I could give it some more time. I think I'm just going to
lead into the areas that don't currently have wet
paint on them that way, I can keep going
with this stage of the piece without having
to wait for it to dry. If you find that your
colored pencils or other dry media are not going on the way
you expect them to, it's probably because
the paint is still wet. So just give it a few
minutes to dry and then you can come back
in with this step. Colored pencil on
the paint pen and any painted surface is just such a fantastic way to add some really nice bold color. Just keep playing, just keep
going back and forth between different colors and
values of color. Then you can see if you
play with color value, this is a brighter
lighter red violet. It's mulberry. So it's going to be different
than the color that I created with the
paint underneath. In different areas, it's
going to show up different. Over the gray, it shows up different than
it does over here. Pretty fun. This is also a great
way to get your color to be a little bit more unified
to the play around that. I'm actually going to lean
into the lightness some more. I'm going to grab an even
lighter pink and I'll add just a little bit of
brightness and contrast. It's those aspects that really
make a piece start to pop. Then it just becomes
so much more dynamic. Pam going to lean into
the yellow a little bit, but I'm going to
see if I can warm up what I did with
the paint pen. Just give it a
different yellow vibe. At this stage, I'm very much leaning into
my own aesthetic. I'm definitely still inspired Zon Quick to See Smith and everything that she
was doing in her work. As far as the pantrl quality and the mark making and all
of that beautiful fact. But this is becoming
more my style. But I really love her prints
and her drawing pieces. I want to play into that and see if I can push this
piece a little farther. Still staying on the abstract. I don't necessarily want
to go outside that, but I think we can play with mark making in some
interesting ways. That's great. I think that's all I
want to do to this one. I love this so much. I
had my collage element. I painted over it,
making sure that I still was able to see elements
of the collage through, and they're pretty
covered at this point, but they add a textural
element up here, and then I can see the
text through here, even though it doesn't have
any meaning in the piece. Then I added some marks
with Sharpie just to break up because there wasn't a ton of collage on
the original piece, glazed application of paint, making sure I didn't
cover up everything, but really leaning into
the pastry quality of the paint and then pulling
back anytime I needed to. Then I went back in and brought some of the Sharpe
elements that had gotten push to the background
up more to the foreground. Then I went in with
paint pen to add even more intentional
strategic page the effects and I
smudged it to lean into a different quality that we can get out of paint pens. Then on top of that, I started doing the colored pencil
to really make some of the colors pop and crispen up and define what
areas were going to be, which color and how were those areas of color going
to relate to each other. Then I went in with
some texture with my colored pencils and then some additional mark making
with the colored pencils and really leaning into some of the lighter values so that I was having more of
a contrast range. I think this is fantastic.
I love this so much. I am excited to
continue working on my other painted collage
when that one is dry. So have fun layering up whatever kind of
mixed media you want to. You could lean into
charcoal, colored pencil, water soluble crayons when you feel like you've hit a
point of completion. It might be just you are satisfied with the art
experiment that you've had, or you have a piece that
you are happy with, then you can head on over to the final lesson to wrap up the class, and I
will see you there.
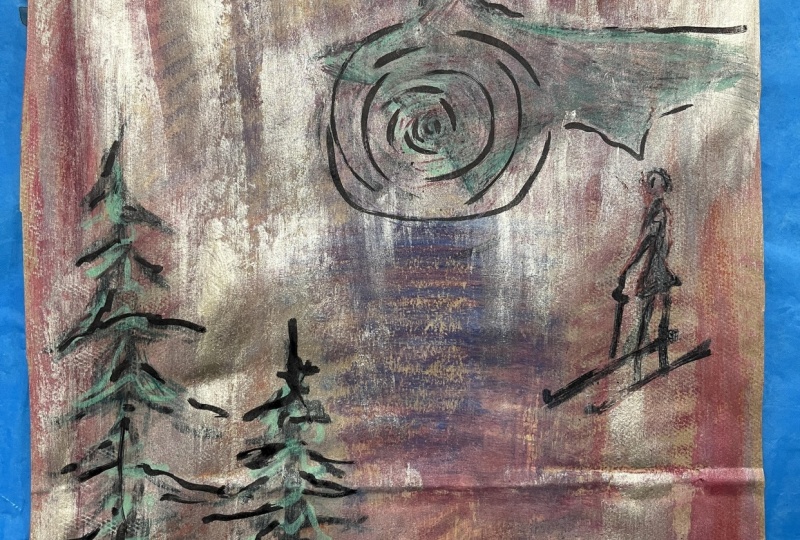
8. More Mixed Media: Now I'm going to work back into my painted collage for the second piece that I
created for this class. This one I really wanted to lean into colored pencil
and paint pens, and I wanted to do similar to what I had done
in my first piece, but I wanted to keep
it more subtle. I decided to do very
minimal mark making. I didn't really
want to go in with any strong marks at all. So I stayed away
from the Sharpie, and I just kind of popped in some lights and some
darks a little bit, leaning into colors that were already part of the
painted surface. I did find some
really fun things happening when I had the
edges of my collage paper. So I was when I went to do
some colored pencil there, the line became even more defined by the pencil,
so I leaned into that. I did do a little bit of
confetti dashes here and there. But because I kept layering more paint over the painted collage and
the colored pencil, all of that became much
more subtle again. So you kind of see as
I work through this, I'm trying to create a
nice sense of balance, but I'm also trying to let it evolve intuitively
and organically, and I want to lean
into each step impacting what happens next
and try not to overwork it. Because I really liked
this one as it was. It didn't necessarily need more. It could have stayed. It's just a painted
collage, I think. But the more I did to
it, the more fun I had. So for me, this one
was very much about the process and trying to be very intentional in what I added and not letting myself
get too carried away. I did have some crazy
moments with the paint pens. I did have some leaking
with my pastas, but you can always pull
that back with cloth. You can even wash it off with a damp cloth if you needed to. And you'll find that if
you're working on canvas, so this one was on Canvas, anywhere where the canvas was painted but not collaged on where it was just
a painted canvas, I have the canvas
texture that pops up even more when you're working
with the colored pencil. So that would be
something to think about for your own piece if you decide to do your
painted collage on canvas is if you don't cover every part of it with
paper in the collage step, you're going to end
up with some textures that are great and can add more variety,
but might bug you. I really enjoy smooth
colored pencil, so I had to kind of
embrace it and kind of ended up using some of the colored pencil values to
downplay that a little bit. So you can see how
I've got some of the edges of the
collage pieces that are now popping out
because I went in with kind of a red brown color. Now I'm laying in some
acrylic paint pen. I'm using a mixture of my
betam pens and my posca pens, kind of, depending on
what colors I want. I had kind of remembered
belatedly into this step that I really enjoyed smudging it
in the other piece. So from here on out, I kind of smudge it all and kind of let it take on more of its
painterly qualities and less of its
marker qualities. But I find this is a
really great way to have a more controlled
application of acrylic paint than I achieved when
I was painting over the collage surface with a paint brush and with acrylic
paint out of the tube. So this has for me is very much about trying to balance out my color without making
it too balanced. Like, I do kind of want
to have the play of the randomness of the collage
textures underneath and, you know, let it be kind of
funky and a little bizarre. Sort of kind of in
the abstract realm. But I did really love the
effect of that bright yellow, so that was something
I wanted to lean into. And then it's always good
to pop in your lights. We talked about this last time, so just adding in
some extra brightness just helps create some
more depth and dimension. So I'm using that to kind
of define certain aspects and edges of the
collage pieces and then kind of playing
with the idea of further masking
through transparency, but, like, more intentionally obscuring a little bit the text that I had
incorporated into the piece. Because you'll find
that as you continue to work back into
pieces like this, things that you originally put into the collage
stage that really feel important and
significant become less so. I mean, some become more so. Like, that face really takes on even more importance when
I'm working into this step. But the words that I added
to my collage become less. So this is something
else you can do. Here I'm using colored pencil to kind of bring that
image back up to the surface because
he was getting a bit muddled in the painted
collage stage. So I'm kind of using the
darks to pop the shading of that collage drawing from
a magazine in there, and then I'm going to lean
into the whites, too, and I'm going to bring out his highlights and
really kind of let him be very
present in the piece. And then something you can do, I had these eggs that I really, really love and were kind of a very important part
of the collage stage, but I didn't use any of those colors when I
painted over my collage. So what you can
do is you can use your other mixed media
elements to really kind of intensify some of the colors that are not
addressed in the painted stage, and then you can use either
paint pens or oil pastels, colored pencils, whatever
additional media you're working back into
your painted collage. You can use that to add more elements of colors
that aren't there. So the great thing
is the popping of the turquoise and kind of that bluish color really
kind of helps add some more depth to the painted over collage piece because when I painted over it, I took out it just lost some of its value range because
of adding the thin, transparent layer of the peach. But by going in with a
turquoise colored pencil and working that color
around the page, like, around the
canvas, I can kind of help unify that collage piece. So letting it really
have a moment, both as its piece of collage, but also as a color
and just to kind of help it make more sense
in the grand scheme of it. So you'll see me kind
of going back and forth between different colors and then kind of circling back to
that turquoise and kind of helping it find its way and kind of unify with
the rest of the piece. You can also add in
the white again. So the white was a way for me to add a little bit
more creaminess to the colored pencil
application by layering up even more without going
any darker with my blue. But it was also a way to
kind of tone down that blue, so it really became more part of what was already
happening on the canvas. And then here's where I said,
like before about adding in highlights to really bring out certain aspects
of my collage. So I'm just kind of
following the picture and adding some
additional highlights to kind of make that face pop, which I really This is one of my favorite parts of
this entire piece. It's just that
little face peeking through amidst the
chaos of all of it. So adding in the paint pen as a paint element
and kind of just really letting it be a very loose thing can
definitely get carried away. I had a couple moments where
either the paint pen was leaking or I just
put down too much. And then I found
myself kind of trying to rein it back
in by layering in other colors and just kind
of that pull back and forth, how much do I want to add of
a different color or value? And then I even, like,
wiping it off at some point. But that was kind of
great because then you get a little bit
of staining that happens from the
paint that you put down when you pull
it back a bit. I did also find that the paint started chipping
off from the collage. That was something that
I kind of leaned into. Some of the chips,
I let it stay. Some of them I went back in and added some more paint over the top of them and just kind of played with
the back and forth. But I will say that when
you get to the point of doing your mixed media stage, if you work back into
your painted collages, just be mindful that
because we're drawing, which is kind of a harsh thing to do on top of the
painted surface, I might cause it to
chip a little bit. It just might break down some of the plasticity of
your acrylic paint. You could also find
that you're going to need to maybe wait
for some things to dry. The more paint pen I layer down, the more I had to wait to go
back in with colored pencil. And I'm not terribly
patient about that. But it's always fun to see. Can I get the media to
play nicely together, or are they going to
resist each other? But that's a great opportunity
to either take a break or jump around to a different part of your picture
and work on that. So there's a little bit of tension that can happen when you're working with mixed media. But that's the fun of it, right? To see how do they
react to each other. What does each element add? What do I want more of and just kind of having fun with it? It is very easy to
overwork these. If you're just going
for the experience, then don't worry about that. But if you are starting to
create a piece that you really like and you're
getting attached to it, then just take some pauses, take some steps back to kind of decide when is
a good stopping point because you can
really kind of get carried away and add a
little bit too much in. But that's the fun of it.
I trying a new technique, trying some new approaches, getting inspired by Jean, and really having some fun
putting your own spin on a process of art making that she did a lot of in her career. I had so much fun creating this. Thanks for checking out
the second mixed media painted collage that I created. And let's head it over
to the last lesson, and we will wrap up the
class. I'll see you there.
9. Final Thoughts: The Thank you so much for joining me in this class as we
look to the work of Zhan Picts Smith
and got inspired by her amazing journey as both an artist and
an art advocate and a curator and an explorer of imagery and tradition
and heritage and symbolism and all of these amazing things
that Smith brought to the art world through
her pieces and the ways that we can then get inspired
to make our own work. Just more anything,
more expressive, more personal,
more experimental, all of the great things that we can pull from Smith's work. I hope that you'll take
some time to pop on over to the Projects and
resources section and share your class project
to the student gallery. I am so inspired by Smith's work that I have
a feeling I'm going to be sharing several pieces
as I continue to explore how I can
layer what Smith was doing with her art into
my own practice and my own aesthetic and what I am
exploring in my art practice. I also hope you'll take some
time to leave a review. It means so much to
me as a teacher to hear your feedback
about what you enjoyed, what really worked well, how it impacted you as an artist. I also love it as a student because it
gives the students who are considering taking the class a window into the class from
the student perspective. Sharing how the class went for you and what
you got out of it, your experience from
the student side is really meaningful to help get more students excited
about joining us on this awesome artist
inspired series journey. I also love to stay connected. If we aren't already
connected here on Skillshare, be sure to click the Follow
button so that we can stay in touch and you'll
get notified about future classes that I create. Discussions that I share about exciting upcoming
art opportunities. I'd also to connect off
the platform as well. If you want to, if
you're on Instagram, pop on over there and follow me at Elizabeth under
Square Welfare. I share all things art, whether that's the
pieces I'm making, exciting updates
about new classes, art adventures I'm going on, classes I'm teaching in person. I really use Instagram as a
way to document my life as an artist in all of
the different ways that art touches
different elements. Also have a YouTube
channel where I share different art techniques
and art approaches and art adventures that I go on. There's some really
fun inspiring and neat things to
check out over there. Thanks again for
taking this class. I loved having you on the Artistsp Journey series
with me and I hope to see you in another class real
soon till next time. T
 Elisabeth Wellfare, Artist, Art Educator