Transcripts
1. Setting the Stage: Class Breakdown & Project: Year of the snake in the
Chinese zodiac is coming up, and I thought it could be fun to celebrate the
occasion by drawing a minimalist snake illustration together. Now, I'm just kidding. It's the year of
the horse snakes, but I just love any
excuse to draw a snake. So if you're looking for a quick and fun class where you'll draw a beautiful
minimalist illustration together, then this is the one. Hello, and welcome back. It's time again for
Minimal in Minutes, the snack sized class where we create minimalist illustrations
in less than 30 minutes. As I mentioned, I love an
excuse to draw a snake, and I thought it could
be fun for you to gain insights into my workflow
when drawing snakes. I've drawn quite a few of them over the last
couple of years, and I figured out
some cool tricks that will make
them look awesome. This class is all about
the joy of creating, so I made sure you'll get
to celebrate quick wins. After the first part,
you'll already have a beautiful snake sketch that might look
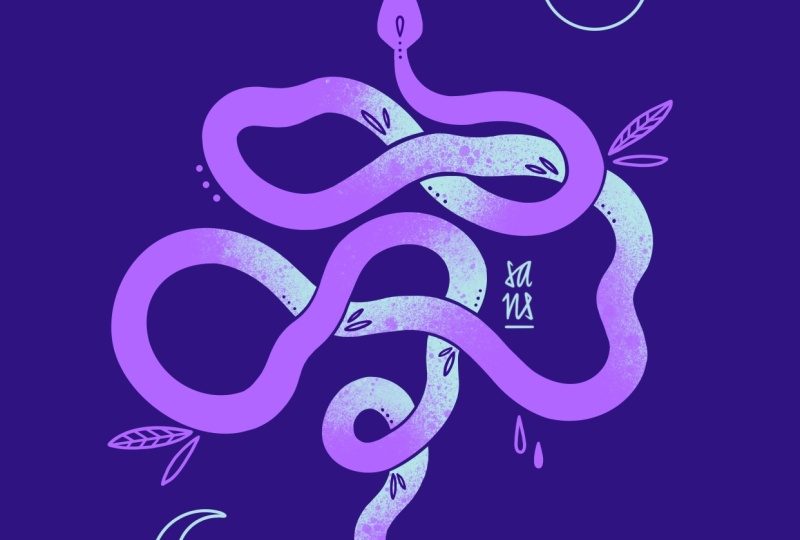
something like this. Doing the second part, we'll add color and finalize
our illustration. And you'll end up with your own snake illustration
like this one. I personally always
work in Procreate, but you can work with your
preferred medium or app, whatever you feel most
comfortable with. Now, let me say a few
things about myself. My name is Sandra Staub
and for over ten years, I've worked as an illustrator, graphic designer, and muralist. Work with all kinds
of clients from small local businesses to
multinational companies. A couple of years
back, I also became a teacher right
here on Skillshare, and I love sharing my
passion with the world. My Chinese zodiac is
actually the snake, so maybe that's where my obsession with drawing
snakes comes from. What Chinese zodiac
sign are you? Maybe we'll draw that next time. You have suggestions, what to create in the next
minimal in minutes, please write them
in the comments. Now, without further
ado, let's get to the good part and
start with our sketch. I'll see you in the next lesson.
2. From Idea to Sketch: Create Your Minimalist Design — Fast & Easy: Alright. As usual, I get started with a four by five format. For me, personally, I prefer the 440 millimeters
by 550 millimeters, which is a custom size that I prepared for
myself and Procreate. The reason behind
that is, as usual, it's really easy to
fit on Instagram, but it's also quite close
to the normal din format. So I can reproduce art prints of this illustration
if I would want to do. However, if you have a
personal preference, definitely go with that format. You might even prefer to
use the iPad horizontally. So definitely go for
that if that's your jam. I don't really want to
complicate my sketching process, so I usually just
pick my two got colors and then later decide if I want to
change them or not. I do all my sketching using the six B pencil from the preset sketching
set by Procreate. And then I just get started. I start by sketching roughly the head and
place it in the center, and then I just try to draw the shape of the
snake that I'm imagining. Well, that's always
a bit of a process. So you might see me
struggling quite a bit. But B B If you like parts
of your sketch, but you want to change them, but don't want to
lose any progress, what I do is I create
a duplicate of that layer and then toggle off the visibility
of the one below. Now I have two identical layers, but I can work on
one, modify it, but I will not lose the
progress of the original one. So the tricky thing
for me when drawing snakes is always to
get the shape right. I want them to be intrinsicate
and also interesting. But B maybe a last little loop here. I think over here might
be the best location, but maybe it needs a
little bit more space. Now, as soon as I
like the shape, I simply just redraw the
curves of the snake, making them obviously wider like they have the
body of a snake. Feel free to create another
duplicate of your layer. I try to keep the width of the
snake as even as possible, except for close to the
head and close to the tail. But that's actually
easier said than done. Now it's starting to
get a little bit messy. So I really need to clean up my canvas a little bit
in order to understand which lines are actually the snake and which
are just guidelines. Okay, we're definitely
getting somewhere. All there is left to do now
is to decide which parts go over and which parts
go under the snake. I already defined it here, so I think it would
be more fun if this part went under the snake. So let's go over here. That way, I have a nice mix. Don't forget that in
Milm'sillustration, it's always important to
keep the attention of the observer because we're
working with very few objects, and due to that limitation, the attention span
might be limited, as well, which is what we
obviously want to avoid. Now, here I'm not quite
happy with thickness, so I'm adjusting
that a little bit, and I want to lift this
part just ever so slightly. So it gets a bit more dynamic. Now what there is left to do is fixing the head because so far, it doesn't really look
like a snake's head, maybe add a little tong, and then we can already think of moving on to the final artwork. A little protob I have for
you is that you could add some little wiggles in some of the curves to make it a
bit more interesting even. But but Maybe something like this. However, keep in
mind that adding these extra little wiggly curves will take a lot of
work and extra effort. I'd say we are ready
for the final artwork, and we will add some details
and decorations later on. Usually, when I draw a snake, the shape is just everything. So that's why I wait a little bit longer than usual
with adding the details. If you're ready
with your sketch, share it in the class project
so we can all see it. And then join me in
the next session for the coloring part
and the final artwork.
3. From Sketch to Artwork: Polishing Your Minimalist Design: Welcome back to the second
part of Minimal in Minutes. Today we are creating
a snake drawing, and we basically
jumped right after the sketch onto
the final artwork. The reason for that is
that for minimal artwork, the shape is just everything. So I want to first see
how it behaves before I add my final details
and decorations. I put my sketching layer into a slight transparency
so I can draw over it. For my final artwork, I
pick the studio pen Brush. It's located in the
inking category of the presets of Procreate. For now, I just pick any color that contrasts with
the background. We can worry about
coloring later, but for now, I just want
to redraw the snake. For the head, I like to use the drawing assistant because this can definitely
be symmetrical. Okay, now my outline is ready, so I can drag and
drop the color. And now I can make some
final adjustments. For example, here, where the
lines aren't quite nice. I like to keep all my
shapes very, very clean. So I usually take a little bit of time to adjust
these minor details. Now, let's add a tongue
on a separate layer. I'm just picking
any color for that. I'm dragging it
underneath the layer of the snake. Okay, perfect. Now, last but not least, what I'm going to do is
distinguish a little bit between the upper parts and
the lower parts of the snake. I like to do that by adding
a little bit of texture. I add a new layer and I
set it as a clipping mask. Let's also quickly erase some
parts of the snake shape, so it will be a bit
more clear which part goes above and which
part goes below. Okay, now on the texture layer, you can just add some textures to certain parts of the snake. That makes the
composition a little bit more interesting and intriguing. The way I do it is usually
by using a texture brush. My favorite is the fat nozzle from the spray paint
set by Procreate. But you can pick
another texture brush, whatever floats you boat. Let's pick a different color. And what I also like to do is since everything
is on one layer, maybe it's a good idea
to separate some parts of it that you want to
have the texture on. So I'll put the free hand
selection tool and just start selecting a part of the snake that I want
to apply texture too. And then with the
brush, you just apply a couple of splatters, I guess. A little tip for me is also pick the same brush for your eraser. And that way you can create a bit more interesting textures. Now, let's keep doing this
to a couple of other parts. But, Alright, I have my snake and my texture and the tongue
separated in different layers. So now we can play around with colors a little
bit if we want to. I've been thinking of mixing it up a little bit this time by contrasting a turquoise
and a purple color. I move around the
sliders until I find a color that I like,
maybe something like this. Now let's see what happens if we work with a turquoise color. I've been thinking of something vibrant but maybe
not too intense. Let's see what it looks like. I really like this contrast, but I think what
I'm going to do is I'm going to swap
around the colors. So the snake is going to be
in this turquoise color, and the texture is going
to be in the darker color. I will use a darker
version of the color of the background for the
texture of the snake. By doing so, I actually ensure that all the colors
are going to match together. And actually, I think
this is kind of too much. So I think I'm going
to change it back, so the snake is going
to be the dark element, and the texture is going
to be a lighter element. Or I could see what happens if I change the
background color. But I decided to go with a lighter
purple for the snake, with a turquoise mint
color for the texture, and with a darker
version of this purple. As you might be able to
deduct from this already, my go to method to create a minimalist color
palette is to pick two contrasting
colors and then add one accent color that will
be used a bit more sparsely. In order to pick the
two contrasting colors, I usually go with a theme or something that I'm
interested in right now. Today, I felt like creating something a little bit electric, a little bit neon vibish
but also a bit spooky. That's why I picked these
rather vibrant colors. I'm just adding
some last details. For these little
decorative details, I use the color of
the background, just so I can keep
the color palette as minimalist as possible. Now let's add a
few more details. I think I'm going to add
a sun and a moon here. And for that, I use the
rotational symmetry. Here in the drawing
guide options, I picked the guide
option vertical, but then I also toggled
on rotational symmetry. And of course, you can add some further detail if you want. I usually use,
like, a handful of the same symbols as decorations
in my illustrations. That way, I can keep my message and my illustrations consistent. Now, last but not least, I want to add my signature, and then let's call it a day. By the way, I'm using the
same three colors that I've already used before
for my signature and for my copyright
information. Now, when you finish artwork, make sure you join me
for the next lesson for a very quick wrap
up. I'll see you there.
4. Course Recap: Wrapping Up Your Minimal in Minutes Experience: Alright. It's a wrap. You finished your cool
mystical snake illustration. Congrats, and thank you so much for watching until the end. I hope you had a
little t of fun, learn some new tricks, and feel inspired for the
rest of your day. Please share your sketch
and final artwork with me and your fellow classmates by uploading it to
the class project. As always, make sure that
you add your signature. If you like these minimal
in minute sessions, I create one every month, and you can get early
access on my patron. There you will also find a new wallpaper pack every month, as well as other goodies
and exclusive content. Of course, you can also watch all previous Minimal in Minutes sessions
here on Skillshare. Follow me if you don't want
to miss out on new classes. If you're intrigued
with minimalist illustration and
want to learn more, check out my other classes
right here on Skillshare. Thanks so much again for joining me today and creating with me. Feel free to pop your ideas
of what to draw next in the comments until
next month. Bye.
 Sandra Staub, illustration & design