Transcripts
1. Introduction: Are you struggling to
add realistic fuzz and fur to your
models and blender? Well, have I got
a class for you? Hello, and welcome to
the fourth installment of my Blender Mini class series. I'm Harry, a season three ty
artist with over a decade of professional experience
and the privilege of being recognized as a top
teacher on Skillshare, specializing in
Blender tutorials. In this class, we'll
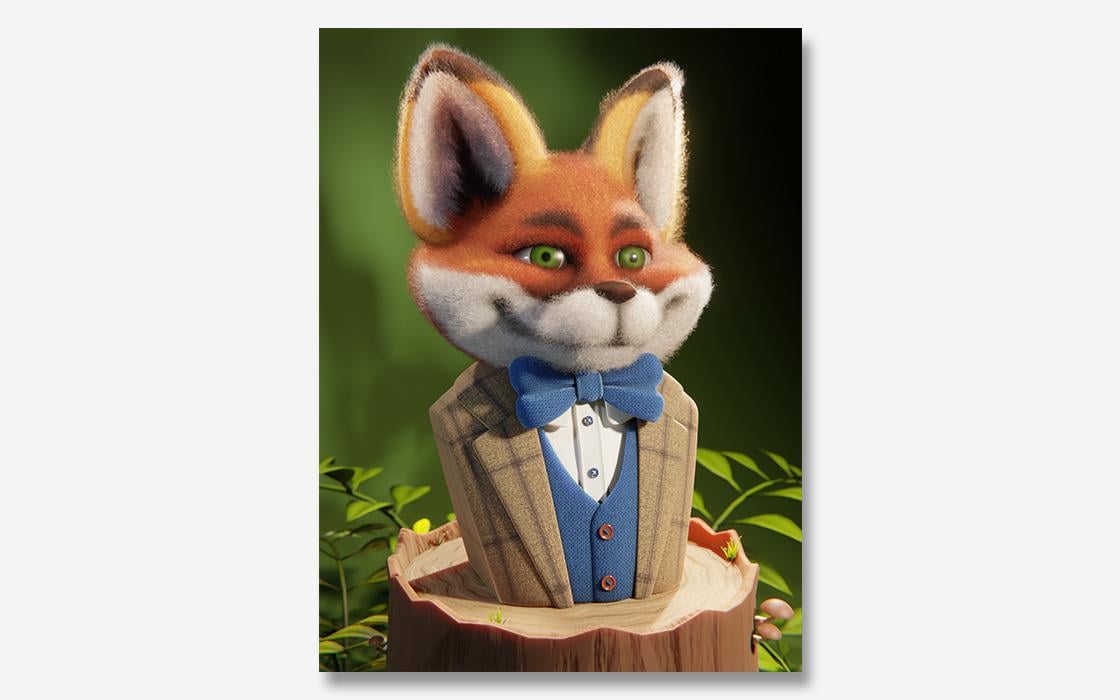
learn how to add realistic fuzz to this
adorable Fox model. So it looks like it's a
needle filtered character. The file we'll use in class comes fully modeled,
textured, and lit. This means we can
jump right into the process of adding fuzz to this charming little fox without needing to
do a bunch of setup. Just download the files
and we're ready to start. If you've never heard of the
term needle felting before, it's a real world crafting
technique where you use a specialized
needle covered in barbs to weave together the
coarse fibers of wool into a solid shape rather
than a sheet of fabric. It's often used by
artists to create adorable characters with soft fuzzy appearances
on their surface. This is the technique that we're going to replicate and blender. While this is the fourth class
in my mini class series, it's actually a
great supplement to two of my previous
full length classes. In my nome class, we learned how to
create realistic hair using the particle
system and blender. In my portrait
lighting master class, we learned all
about illuminating our characters with
artistic lighting schemes. This class will touch on both of these topics as we learn a
completely new way to add realistic hair to our models and how lighting can
accentuate subtle details. If this is your first
time learning with me, it's important to note
that my blender classes are well regarded for
their clarity and ease. Thanks to my step
by step approach that's perfect for beginners. While this class is a
shorter mini class, you can still expect
thorough explanations that anyone can follow
regardless of experience. By the end of this class, you'll be amazed at how easy it is to replicate this charming
felting technique and blender. So, if you're ready, I invite
you to join me in class. Let's jump into our
first lesson together.
2. Setting Up the File: This lesson we'll
begin the class by getting our file set up. If this is your first time
taking a blender class, I'd highly recommend
you start with my complete beginners
guide to blender first. This class was designed
for the absolute beginner to blender and three
D art in general. We cover every single
necessary topic in order to get you up to
speed and running and blender. We'll accomplish this with
short and focused lessons that cover each topic from
a beginner's perspective, utilizing a well
organized starter file. We end the class with an
easy project where you set up and customize your
very own cozy cam site. With that out of the way, let's
continue with the lesson. While our working file
is 90% ready to go, we do have some easy setup
to handle before we start. First, you'll need
to make sure that you have all the
files downloaded. You can find them in the project resources for this class. After you have all
the files downloaded, don't forget to unzip
all four folders, including the folder with
the blender files in it. Blender won't be able to
see the texture images if you don't unzip
everything first. After everything is unzipped, I'd highly recommend
that you create a new folder called textures, then transfer the contents of all three texture zip folders
into this single folder. This will make our
next step much easier and it'll help
keep the files tidy. You can easily do this by making a new empty folder
called textures, then going into each
of the three folders and highlighting all
the files inside of it. Now hit Control X to cut the files or Control
C to copy the files. Go back to the empty
Textures folder and hit Control V to
paste those images. Do this process with all
three textures folder until they're all in one
singular folder called textures. Let's go back to
the Blender folder, adhere to Blender
Files and Cheat Sheet, and then we're going to
open Start underscore felted Fox bust underscore 01. As a quick reminder,
this file was created in Blender version 4.5 0.3 LTS. I highly recommend that you
use this version or newer when following along in class to make sure everything
works as intended. Now that we have our
start file open, we'll want to switch this left view port to the rendered view. We can do that by
going up here to this button at the top right
of the left view port. We're going to click
the far right button so that we can see the textures and the
lighting in the scene. After swapping to
this rendered view, you might notice that a lot
of the textures are missing, and they might even be
showing as a bright pink. This is because Blender
doesn't know where to look for the correct
images to display. Because I created this
file on this computer, Blender knows where to
look for these images, but your computer
might not know that. Luckily for us, this
is a really easy fix. First, we'll go
over here to file, and then we'll go down
here to external data. And then, lastly, we'll
go to find missing files. Now navigate to wherever you
saved this Textures folder that we transferred
all the texture images into into one place. Once you find this
new Textures folder, simply select it here from the list and then choose
find missing files. This will tell Blender
where to look for all these texture images and automatically
relink them for us. Now your rendered
preview here on the left side should
look just like mine, displaying all of the
correct textures. The last thing we
need to do is save our file so that it's
ready for the next lesson. We can do that up
here by going to File then choosing Save. This will make sure that
all the textures remain connected when we reopen
the file, and that's it. We're ready to move
on with the class. In the next lesson, we'll
add the first layer of short fuzz to our Fox
model. I'll see you there.
3. Adding the Short Fuzz: In this lesson, we'll add the first layer of short
fuzz to our fox model. Let's begin. It's time to add some fuzz to
this little guy. We'll have some
nice looking fuzz by the end of this lesson. However, it won't be
the correct color. We'll be handling the
material in the next lesson, but I wanted to warn
you before we start that the fuzz is going
to be pure white for the rest of this
lesson and not match the orange material
applied to the fox model. With that out of the way,
let's jump right in. First, make sure that you
have the left viewport set to the rendered view by
clicking this button here found on the far right
at the top of this viewport. For some reason you don't see these buttons here
on the far right, you might need to hover
over this toolbar here and then click in your middle mouse button
to pan it back and forth so that you can see these buttons here on
the far right side. Now in the right
view port over here, make sure that you have
this fox's head selected. You'll see it here
highlighted in orange. And now with the head selected, hit Shift and A
on your keyboard, and this will bring
up the ad menu. We'll be using a
relatively new way to add hair to our model that was
introduced a few versions ago. Method will use curves and geometry nodes to create
hair on our model. Luckily, for us, you
don't really need to know how either of those things work in order to
use this method, as it's simplified down into
just a few easy modifiers. So let's add our hair now
by going down here to curve and then choosing fur. Right away, we can see
that our model has become a lot fuzzier in
both of the viewports. The left viewport
shows that white fuzz that I mentioned earlier in
the beginning of this lesson. Our next steps will be
adjusting the look of this fur to better resemble
curly wool fibers. We'll be making these changes
in the modifiers panel for this new curves object that was just parented to the
fox head object. Can find the modifiers
down here at the bottom right by clicking on this
little blue wrench icon. Before we get too
far, let's rename this curve object
so that's something a bit more accurate to
what it actually is. So over here in our list, we can find the word
curves here just underneath the fox head object
in which it's parented to. And then we can just double
click on this word curves, and we'll type in short
fuzz and then had enter. I mentioned a few times
now that this fur has been parented to this
fox head object. We can tell easily that it's
been parented to it because this short fuzz object lives
inside this fox head object. So if I twirl this closed, you'll see the fuzz disappears, and that's because
it's actually located with inside this object. This means that
anytime we adjust the position, the rotation, or the scale of the head, the parented fuzz
object will follow. This just makes sure that
the fuzz stays attached to the head regardless of
what you do with the head. Alright, let's begin making
adjustments to the fuzz. Our first step is going to be cleaning up the modifiers
a little bit by simply collapsing them to make adding and
moving them easier. To do this, we're
just going to go down to this list down here
at the bottom and then click on these tiny arrows at the left of each
of these modifiers. You'll see here that
it just collapsed them and makes it
easier to view them. Now let's add two new modifiers that will help us control
the look of the hair. To do this, we'll
go over here to the Add modifier
button, click here, and then we're going
to choose search and then we'll type in Trim TRI, and then we'll see
here trim hair curves, we can select this
from the list. Reposition this modifier in
the list in just a moment. Let's add one more modifier. We'll go over here to
the odd modifier button, click Search again and
this time we'll type in curl CURL and then
choose curl hair curves. All right. Now it's time to
reposition these modifiers. Each modifier adds to the
effects of those beneath them. So adjusting the order
of the modifiers can make a big difference in the way that the hair is rendered. You can adjust the placement of the modifiers in the list
by clicking and dragging the small dots on the right side and then moving them
around within the row. First, let's go
down here and twirl these closed so it's a
little bit easier to see let's rearrange
some of these modifiers into a better order based on the effects that they
have on the hair. I'll explain what each
of these modifiers do as we go through
them one by one later. So our first step is to
grab this trim hair curves, just grabbing these dots
here on the right side, and we're going to move
it to the second position here from the top and then
we'll go down here to the curl hair curves
and drag this to the fourth position just below this interpolate
hair curves. Then lastly, we're going to move friz hair curves up one level, so it's just below curl. So now just take a moment, look at my list
and make sure that your list is in this
exact same order. Okay, so the fox is looking
pretty wild at this point. But it's just a few
adjusted sliders from having a durable fuzz. Before we make any
adjustments to the fuzz, one important thing
I did want to point out is the
difference in the way that the hair appears in the left
versus the right viewport. We'll notice over here in the
left viewport that we have nice smooth curves in
each of these spirals. Whereas on the right side, we're seeing really jagged lines, and everything just
looks a little bit more crunchy and hard and less soft. This difference is only
visible in the viewport and the true appearance of
the hair is actually a lot more similar to
this left viewport. If it ever seems like
the hair is jagged in the right viewport or
it seems a bit sparse, please know that it will render much smoother and
more dense than that. Now let's go through
each of these modifiers from top to bottom and get a brief
understanding of what they do while we
adjust the settings. We'll start over here at
the very top by twirling open set hair curve profile by clicking on this little
arrow here to the left. Our first change is going to be adjusting the radius found here. So let's click on
this value here, and then we're going
to type in 0.0, zero, zero, so three
zeros and then six, five, and then hit Enter. The purpose of this modifier, the set hair curves profile, simply changes the thickness and the overall
shape of the hair. The main thing that
we adjusted here was the radius of each
individual hair, changing how thick a
single strand of hair is. So in our case, we made
this hair a good bit thinner than it was before
by lowering this value. Factor min and the
factor max adjust the thickness of the tip of the hair and the root of
the hair respectively. So this min changes how thin
the tip of the hair is, and the max changes how thick the base of the
hair is or the root. In our case, having
it set to Mn zero means that the hair will come to a very tiny point at the tip, and then the factor
set to max one means that it'll be wider at the
base or the root of the hair, which is exactly what
we're looking for. This is how most hair
would be shaped. Now that we're done
with this modifier, we can simply til it closed
to clean up the view, and then we're going
to go to the next one, which is the trim hair curves. So we can twirl
this one open now. Again, we have just one
value to change here, and that's going
to be the length. So we can click on length here, and then we'll type in 0.02, two, five, and then hit Enter. This trim modifier allows us to easily control how long
the individual hairs are. We want relatively short fuzz, so we used a much smaller number than what was there by default. Well, we won't be using
these other parameters here within this modifier. Some of the other useful sliders here are the length factor. This allows you to multiply
the length of the hair by a new value to make slight adjustments to the hair length. Example, higher values
mean longer hair, and shorter values
mean shorter hair. In our case, we want it to be exactly what
we typed in here, so we're just going to
leave this set to one. Another interesting slider
here is the random offset. This allows you to have
the hair trimmed at random lengths to give it a
slightly more natural look. We'll be handling this
randomness in a different way, but you might find this useful in your own personal projects. You can add a little
randomness to the length of your hairs by simply
adjusting this value. Increasing the number will make the hair a bit more random
in terms of its length. For our case, we're going to
set this back down to zero. As I said before, we'll be handiling this randomness
in a different way. Now let's move on to
our next modifier, so we can twirl
this one closed and then move to interpolate
hair curves, and we'll twirl this one open. We have a few different
things to adjust here, and the order we change
them in matters. So we need to make sure that we do them in the correct order. First, let's change this
view port amount down here to 0.05 and then hit Enter. Will make the hair look significantly less
dense than it was. But this is only true in
the viewport display. What I mean by this
is that the hair is technically just as dense as it was before we
made this change. But we force blender to restrict
how much it shows us in the viewport to
prevent the program from becoming too
laggy or crashing. We'll still see the full density of the hair in the final render. This is incredibly important when using higher
hair density values, which we'll be doing
in just a moment, especially on lower powered
computers like laptops. If at any point in this class, you notice that
blender is becoming too slow to effectively
work in it, adjust this viewport value
to something smaller. In your case, maybe
0.025 might be better, which is half of the value
that we currently have now. Purposes of this lesson, I'm going to leave mine at 0.05, but know that you can always
make this view lower, and it won't change the way that the actual final image renders. This is especially important if you have a weaker computer. Now we can increase
the density value to a significantly higher value thanks to us lowering the
viewport amount first. We can do that over here
where it says density. We're going to click on
this number and then type in 20 and then zero, zero, zero, three more zeros
after this. So 20,000. Hair in the viewport
might look pretty much identical to how
it looked before, but it's actually about 20
times more dense than it was. It just looks the
same because of the lower viewport
density that we set. This higher density
value will allow us to have a lot more
hair and have it fully cover the surface of the fox's head to make a
more believable woolly fuzz. Next, we're going to be
limiting where the fuzz is allowed to be
using a density mask. I've already created this
mask for us by using the weight paint tools
within the fox head model. Won't be explaining
this masking process in depth for this lesson, as I've already
handled it for us. For this part in the
lesson, you can just watch. Please don't follow along, as this mask is
already finished, but it should help to
see what this mask looks like and how it will
affect the fuzz placement. So first, I need to
select the fox head, and then I'm going
to go up here. I'll switch it to white paint. And now, if I zoom in
here on the fox's head, you'll see generally
this whole head is red, except for a few areas such as the nose and around
the eyes here. These areas are
instead shown in blue with a little bit of green
and yellow around them. This bloom means
that the density is set to 0% in these areas, meaning that we're
telling Blender to not place any fuzz in these areas as they
will look a lot better without any hair growing
from the eyes or the nose. The areas in red have
the density set to 100%, so Blender knows to put as much hair as it
wants in those areas. Now that you see what
this mask looks like, let's go back to the modifiers
and actually apply it so Blender knows not to put
any hair in these areas. So first I need to jump
back to object mode, and then I'm going to select
the short fuzz again, and then we can go
back down here. Also adjust this view just so it looks a bit more similar
to the left side. So to attach this mask that I just showed you
to the density, we can go here where
it says density mask. We're going to click on
this little icon here on the right side with the
plus sign in the middle of it. After clicking this icon, now you can click on this
dark field here to the left, and we're going to
choose remove fur, which is what I named that
mask that I just showed you. This has now applied this mask
to the density of our fur. We won't really notice a huge difference to the
hair at the moment, but it will become more
obvious as we continue. The last adjustment
for this modifier is down here and
it's called seed. We're going to set our seed
to four instead of zero. So we'll just type in
four and then hit Enter. The seed value is simply a slider that randomizes
the position of the hair. It doesn't change the
overall quality of the hair or its density
or anything like that. It simply tells blender
to redo the hair with a slightly different
placement to provide a similar
but different look. Change doesn't make a whole
lot of sense at the moment. But I found in my
experimenting that the seed value in particular created a better look
for the short fuzz, especially in the final render. So we're going to
use it for now. Now we're ready for
our next modifier, so we can twirl this one closed, and then we're going to
twirl open curl hair curves. Let's go through the
changes one by one, and then we'll
explain what we did. So first, we're going to
change the factor down to 0.2 and then hit enter. We'll change the
curl start to one, the radius to 0.25. And then finally, the
frequency to five. We've made quite a
few changes here. So let's go through what
this modifier does and what each of these sliders
we change do for the fuzz. In basic terms, this modifier adds a curl effect to
each of the hairs. This will allow us to achieve a similar look to the
curls of a woolly fiber. So the factor slider
that we changed here, you can think of this as an overall strength of
the curling effect. Lower numbers make the
hair overall less curly. By lowering this value, we've allowed the hair to
spread out more across the head and be less clumped
up into large curls. The curl start value
found down here, this determines how much of each hair received
the curling effect. Higher numbers cause more of the overall hair strand to
receive the curling effect. So if you lower this value, that means that less and less of the hair actually
receives the curl. So it might start out straight and then curl only at the tip. If you have a higher
value like we have here, the hair starts curling
immediately from where it grows. The radius value just below it controls how large the
individual curls are. If you want really tight, springy curls, smaller
values work better here. If you want big,
more flowing curls, then you would want a
larger radius value. Then lastly, the frequency
found down here at the bottom. This slider determines
how many curls are present on each
strand of hair. Higher values will create the springier curls
that we're after. If you wanted less curls
overall across the entire hair, you would want a lower value, or if you wanted them even springier and even
tighter curls, you would want a higher value. Now we can move on to
the frizz hair curves. So we're going to turn
this down and then twirl this open here so
we can see these values. Let's start by
adjusting the values, and then I'll
explain what we did. So first, for the distance, we're going to set this
to 0.25, the shape, we're going to set 2.05
and then down here, we're going to check on this
preserve length button. This frizz modifier adds a zig zag noise to
each strand of hair, causing the fuzz to be
a lot more chaotic. This help replicates the way
that the barbed needle of actual needle felting weaves together the shapes
of the fibers. The sliders for this
modifier aren't quite as straightforward and
obvious, unfortunately. So for the distance value
that we changed here, in basic terms, this slider adjusts the amount of
friz present in the hair. In general, larger numbers
make the hair more frizzy. And then the shape value
that we changed here, this slider controls how strong the frize pattern is on
each strand of hair. The lower numbers will cause a sharper, more
chaotic frizziness. Lastly, probably the most
important setting on the frizz hair curves is
this preserved length. So if we don't turn this on, we'll notice the hair
gets really, really long, and that's because
these effects here are being applied
on top of all of these other
adjustments and making the hair significantly
longer than we want it. If we turn on preserved length, that'll make sure
that this modifier doesn't affect the
length of the hair, only the friz within the hair. So it tells Blender
to look at the length of the hair that it
was before we started applying these effects and
then make sure that it doesn't make it any longer after
adjusting these things. Tells Blender to look
at the length of the hair before we started
making any changes here and then make sure
that the hair ends up basically the same
length as it was before and not this
really long fuzz ball that it turns into without this. So make sure you have
preserved length turned on. Now let's move on to the final adjustment that
we're going to make, and that's to the
hair curves noise. So we can twirl this closed and then twirl open this
last modifier here. And we're not really going to be changing a whole lot here. We're just going to be
checking on a few boxes. So first, we're going to
uncheck cumulative effect, and then we're going to
check on preserve length. This hair curves noise
modifier is responsible for adding a bit of randomization
to the hair overall, making it feel less computer generated and a
bit more natural. By unchecking cumulative
offset here at the top, we ensure that the randomization of this modifier doesn't go too wild by multiplying with the previous changes
on top of themselves. And just like with the
frizz hair curves, this preserve length
button here at the bottom just tells
blender to look at how long the hair was before this modifier and then ensure
that after all the changes, it remains roughly
that same length. That's it for the changes. So we can go over here until
all this closed, and we won't be adjusting
this surface to form as this really doesn't
have any changes for us. It's just a necessary modifier
for this effect to work. So we can leave
this one collapsed. Now that we've adjusted
all these modifiers, let's just zoom in here, and I'll give you a
really quick rundown. Again, just a basic terms of what each of these
modifiers are doing for. To begin with, the set
hair curves profile is changing how
thick the hair is. Next up, we have the
trim hair curves. This changes how
long the hair is. Then we have the
interpolate hair curves. This is primarily
adjusting how dense the hair is and also where
the hair is allowed to grow. In our case, we told it
not to grow in the nose, and we told it to not
grow behind the eyes. After that, we adjusted
the curl hair curves, which adds a little bit of a corkscrew curl to
each of these hairs. We can see that
here if we zoom in. A lot of these
hairs have kind of a circular curl on them. Then we started adjusting
the friz hair curve. Where we're getting
a lot of this kind of zig zag pattern. We can see that sort
of squiggly pattern here on each of these hairs. And then, lastly, the
hair curves noise, adds a little bit of randomness and chaos to the hair to make it feel a bit more natural and less generally
computer generated. Okay. So before we
end the lesson, let's head over to the
rendering workspace and see what this fuzz
actually looks like. So I'm going to zoom
out here quick, and then we can go over here to the rendering workspace
found here at the top. Now we can render our image by going over here and choosing render render image or
just by hitting F 12. I'll see you in just a moment when my image
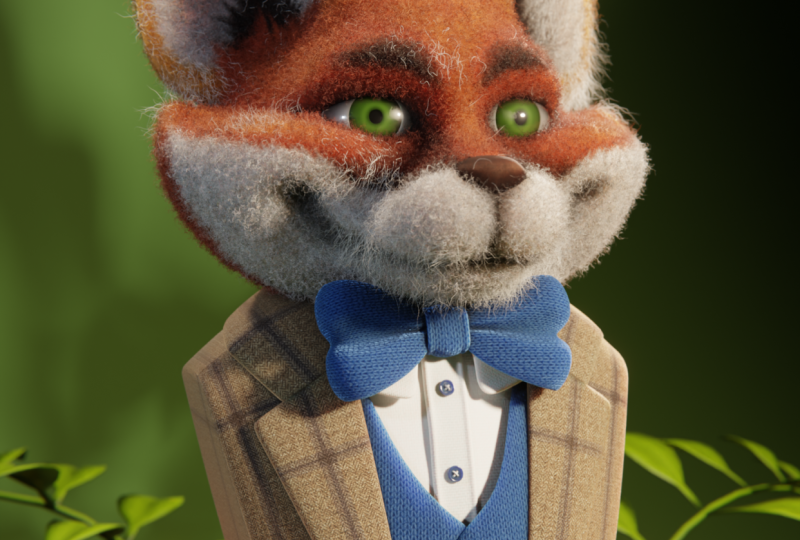
finishes rendering. Okay, so the render is done, and it looks interesting. We knew already that the fuzz wouldn't be the correct color, but it does feel a bit
different when you see the full effect of all
the fuzz on the surface. So we can zoom in
here now and see how much more dense
this fuzz is. And we can see all these little curly hairs here and how it's frizzy and just all of the different effects
kind of coming together to make
this overall effect. Even though the fuzz
isn't the correct color, it's still really
cool to look at the edges of the model
and see the curly, fuzzy strands, making
the fox's head look almost like woolly felt. We can see an example of that here and just around the faces, especially around the edges where it's the most noticeable. Just imagine how
much better this is going to look when it's
all the correct color. In the next lesson, we'll
create the material for the fuzz that we just
added. I'll see you there.
4. Creating the Fuzz Material: In this lesson, we'll
create the material for the fuzz that we just
added. Let's begin. Now that we have some
fuzz added to the fox, it's time to make
sure that the colors match the texture underneath. This will not only
make the fuzz make a lot more sense for the
model it's attached to, but it will also make
it appear more dense due to the gaps between each
hair being less obvious. So first, let's switch
to the shading workspace so that we can begin
creating the material. We can find the
shading workspace found here at the
very top center. We'll also want to switch
this top view port to the rendered mode by clicking this button here found
on the far right. You can use your
mouse wheel here at the top to zoom into the
head to get a better look. Okay, so now we're ready to
begin creating this material. One thing to note is,
I won't be covering every single aspect of creating
materials in this lesson. However, you should
be able to follow along just fine if
you're unfamiliar. I won't be skipping any
steps during my explanation. I just won't be going over
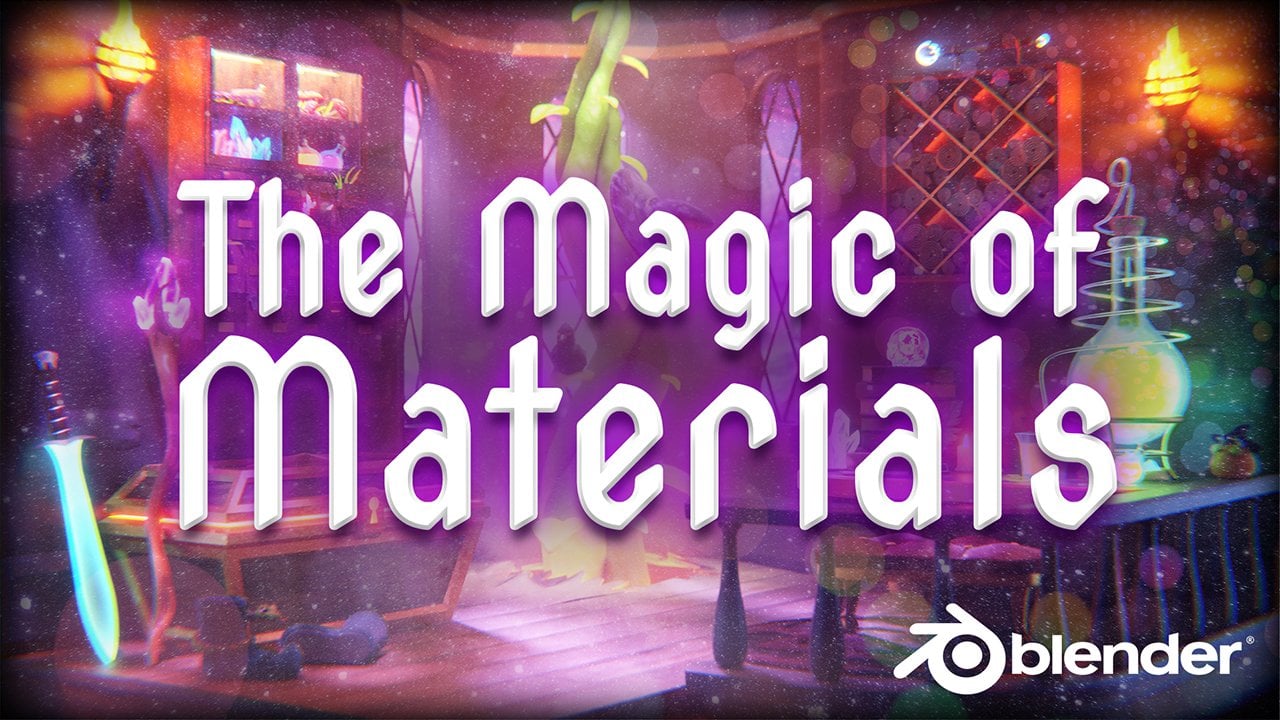
every single detail as we go. If you'd like to learn
more about the ins and outs of material
creation and blender, I'd highly recommend my magic of materials class
found on Skillshare. We go over all the basics of material creation
and blender from a complete beginner's
perspective while texturing a premade
wizard study file. With that out of the
way, let's begin. First, you need
to make sure that you have this short fuzz object selected from this list here on the top right.
So we'll go over here. We can scroll up
in this list until we find the fox head object, twirl open this
arrow next to it, and then make sure you
have short fuzz selected. Now, down here in
this bottom viewport, we're going to check
on this button here that says use nodes. This will add two
placeholder nodes for us to begin
editing if we want to. Those unfamiliar with this
node editor at the bottom, we can zoom in and out
using our mouse wheel. You can also click
in the mouse wheel to pan it left and right, just to slide the
view back and forth. Typically, after adding
these placeholder nodes, you'd either edit
this principled BSDF node found here to make the hair a specific
color or you'd add new nodes to adjust
the missing properties. In our case, we're
actually going to be copying the vast majority of the nodes from a
different material and simply reusing them
for the fuzz material. Specifically, we'll be copying the notes from the material currently applied to
the fox's head object to save ourselves a lot of work. Let's start by selecting the fox's head over
here on the right side. We can just select
it here in the list. And now down here in the bottom viewport, we can zoom out. Using our mouse wheel and then
we're going to drag select over all of these nodes here to the left
of this green one. We want all of these nodes
selected right here. We won't actually be
using all of these nodes, but it'll be easy for us to just delete the unwanted nodes later. Now with these nodes selected, we can hit Control and C to make sure that we copy
them and then we'll go over here and select the short fuzz object from the list so we can switch
back to this object instead. We're going to hover our mouse over this bottom
viewport and hit Control and V to paste those
nodes that we just copied. After you paste them, select any one of these nodes
here at the top. So if you select on the top color bar of any
one of these nodes, you can just click and drag it and then move it over
here to the left. We want it left of
this green node. Before we hook up
these new nodes, let's remove the ones
that we don't need first. So we're just going to
go through each one of these and delete any
node that we don't need. So first, I deselected by just clicking off into
this gray area first. Make sure I don't want
anything selected. Now we can select this node and hit Delete on our keyboard. We can select this
node, hit Delete. We can select this node here
on the far left. Delete it. Then lastly, we're
going to click and drag over this little
tiny dot here. So at the bottom of
this purple line, we want to select
just this dot here, and then we'll hit Delete
again to remove that. So now let's reconnect
these nodes. I'm going to zoom in over
here on the left side. We can click from this
little purple dot on the side of this node and
drag it to this purple dot. And then lastly, we'll
go over here and drag from this yellow dot
to this yellow dot. Now that we have
everything connected, let's also take a moment to get everything
compact a bit more. Right now, it's all
kind of spread out. And again, we can just drag
select over things and then click at the top of any one of these and just move them around, get everything a little bit
more tidy, less spread out. And just make it easier
to work on this material. Okay? So now with all this
setup out of the way, we have one new node dad. So hovering over this
bottom viewport, we're going to hit Shift and
A to bring up our ad menu. Go to search, and then we're
going to type in attribute. So A, should be enough
to bring it up. We're going to choose attribute from the top of the list and then place it here to the left of this purple node
here on the bottom. Now we can zoom in where we
just place this new node, and we're going to click
from this purple dot on vector and drag it over here to this purple dot next to vector on this node. Reason we added this node is to make sure that
each hair pulls the correct color from
the surface that's attached to below
on the fox's head. You'll notice right
now that the fuzz is primarily orange regardless
of where it's attached. If we zoom in here, we'll see that even in
this white area, this fuzz is still orange, and that's because it
doesn't know which color to pull from and it's pulling
from the wrong area. This attribute node
that we just added will force blender to use
the correct color for each hair by telling it to use the same UV unwrapped
for the fur as the head. In basic terms, the
UV for an object just determines how a texture
is displayed on the object. Tells us exactly where to place each pixel of the texture. We want to pull from
this information to tell the fur
which color to be. So to do this, we're going to go over here to this
attribute node, and then down here
where it says name, we're going to click
on this name box. And now we need to type in
some very specific text. So you'll have to
follow along here, and I will put it up on screen so you can see exactly
what I'm typing. So we're going to type
surface, all lowercase, underscore UV underscore
coordinate. And then hit Enter. By typing in this text
down here in the name box, we've told Blender to
specifically look at the UV coordinates for the
surface that it's attached to, and you will have to make
sure that you have it typed in exactly
as I have it here. After typing this text in, you'll immediately
notice that the hair now matches the color of the
surface that it's attached to. So anything here in
white shows white hair, and then over here where
it's orange or darker brown, you can see that the hair
now matches this color. We're nearly done with
this material already, but just for the sake
of understanding, let's discuss the most important
nodes in this material, just so you have a better understanding
of what's happening. If we zoom out here so we
can see the whole material, this orange node
found here named Fox head base color oh one is the hand painted texture that
I made for the fox's head. This is where all the colors you see on the head
are coming from. I painted this texture
directly inside blender using the
texture paint workspace. Now if we zoom out, all of these notes here on the
top are devoted to adding a felt texture on top of this hand painted
texture that we just discussed down
here on the bottom. This helps vary the
colors a bit more on this hand painted
texture and ensures that if we ever see between
the gaps and the fuzz, it still looks like there are small fibers below the surface. If you zoom in here
on the fox's head, we can see an example
of that here. So you can see all these criss crossing lines and
dark patterns. This is that fuzz
pattern that I've placed on top of the
hand painted texture. Okay, so we have a few more
changes, and then we're done. So I'm going to zoom out here so we can see a bit
more of the head. And then down here in
this bottom viewport, we're going to zoom in here on this green node called
principled BSDF. This large green node
here is generally responsible for the surface
properties of this material. So think of things like how see through it is or how
reflective it is, that kind of thing is
what we control here. We're going to change this IOR value found here near the top. So we'll click on this
and we'll set it to 1.3 and then hit enter. Value controls how
reflective the material is. In our case, we don't
want these hairs to be too shiny and reflective, so we're going to lower
this value slightly. Now we're going to move
down this list until we see this section here
called transmission. So we'll twirl this open, and we have one slider in here. We're going to set
this weight slider to 0.5 and then hit enter. This setting controls how see
through your material is. It's typically used to
make things like glass. We're using this setting to make our hair a little
bit see through, so it catches the light
in a more realistic way. We did limit this effect to 50%, though, as we don't let
the hair too transparent. We can see an example of
this here if we zoom in, we'll notice that these
hairs in the back here are catching
light and allowing the light to shine through them because they are
partially see through. And now before we call
this material done, we do have one more
setting to change regarding the way that
the fur receives light. And this actually
won't be changed inside the material itself. So we're done in this
workspace for now. To get a good idea of why this change is going
to be important, first, let's head over to
the rendering workspace. We can find that
here at the top. So before we do any
rendering here, first make sure
that you're set to slot one found here
at the top right. See all these
different slots here. You want to be set
to slot one for now. Now we're just going to
render our image by going to render render image or by
hitting F 12 on your keyboard. Okay, so my render is done, and we can notice already that all of the colors and
everything look great. But we'll also notice
that the fur looks pretty dark and almost like it
would be rough to the touch. It doesn't look
particularly soft. This is due to each
hair casting shadows on the surfaces beyond them
and the hair next to them. All of these shadows
add up and make for a much darker appearance that gives a lot more contrast
around each hair. This is why we're getting areas
like here around the eyes and on the side of the face
that are just really dark. We're going to use
a setting that allows us to remove
the shadows from the fur to help
get rid of some of this excess darkness
and the rough look. So first, we'll go over here
to the layout workspace. And then over here,
we're going to go to the object properties
tab found on the right. It's this orange square icon. Now we'll scroll down this list until we find the section
called visibility, and then we'll go
further down the list until we see ray visibility. We'll notice this checkbox
here called shadow. We're going to uncheck
this shadow box, making sure that you have
the short fuzz selected. So make sure that
you have this object selected before you uncheck this box so that we're not unchecking the shadows
for another object. This will tell blender to not allow the fuzz to
cast any shadows. Now that we've made this change, let's go back to our
rendering workspace, and then we're going
to switch it to slot two up here at the top, just so we can render
a different image without overwriting
the first one, and now we can go to
render render Image. With that simple change,
we can now see that we've removed all of
that excess shadowing and roughness that we
saw earlier while still retaining a soft and
fuzzy look for the fox. That's overall just a lot
brighter and more cheerful. You can see a difference
between these by just switching the slot
back to slot one, and we can see how much
of a difference it made in the overall
look of the render. Now we can also take a moment to appreciate the fact
that all of these hairs are also colored the right color based on the surface that
they're attached to. So we have white
fuzz where we expect it and orange fuzz
where we expect it. All of this short fuzz is
looking great at this point, but we're not quite done yet. In the next lesson, we'll
add an additional layer of longer fuzz to our
fox model. I'll see you.
5. Adding the Long Fuzz: In this lesson, we'll add
an additional layer of longer fuzz to our fox
model. Let's begin. While the short fuzz
that we added to our fox's head
looks great so far, we can improve the
look by adding a thin layer of longer fuzz
on top of the short fuzz. This longer fuzz will add small wispy hairs that extend
past the edge of the model, giving the head an overall
softer appearance. We'll also be using a new tool
to comb these longer hairs so that they follow
the curves of the head and add
even more detail. The process for adding
this longer fuzz will be largely identical
to the short fuzz. So we're going to be going
through this process a lot quicker than the short
fuzz that we added first. Won't be stopping to explain each parameter as we've already done that in
the previous lesson. After the long fuzz
is added, though, we will slow down again and learn how to comb and style it. Okay, let's get everything set up and ready
to add the fuzz. First, make sure
that you're set to the layout workspace
found up here at the top left if you're
not there already. Next, we're going to switch
this left viewport to the rendered mode by clicking this button here
on the far right. Now we're going to go over here to this list on the right side. We're going to scroll down
this list until you see Fox head inside the
Fox collection, and we're going to
twirl this open so we can see the
short fuzz object. To hide this for now just by clicking this little
eyeball icon here. This will hide it
in the viewport, but it won't hide
it in the render. We'll turn the short
fuzz back on later. But for now, while we're
working on the longer fuzz, it's going to be easier if we
have the short fuzz hidden. Next, we're going to
select the fox head from the list here or just inside the viewport,
whichever you prefer. And then while
hovering our mouse over here in the right viewport, we'll hit Shift and A, go to curve and then choose fur from the
bottom of this list. Before we make any changes,
we will rename this. So we're going to
double click on this word curves and we'll call this long fuzz and
then head Enter. Won't be adjusting
the material for this long fuzz until
we're done combing it, as the white material
actually makes it a lot easier to see in
the viewport for now. Now that we have this
long fuzz added, let's go through some
of the modifiers. So now we can go down
here and switch to the modifiers tab so we can
see the modifiers applied. Just like last time, we're going to start by collapsing all of these modifiers by clicking these tiny arrows to
the left of them, and then we'll be adding
one more modifier by going to add Modifier. Choosing search and
then typing in trim, TRIM and choosing
trim hair curves. Again, we'll collapse this
so it's easier to see, and we're going to drag on
these little dots here and move it to the third spot
in the list from the top. So just below Interpol
and above hair curves. Okay, so let's quickly
go through each of these modifiers and make any
adjustments that we need to. Again, I won't be explaining
each of these settings as we've already discussed
them in the short fuzz lesson. Feel free to reference
that lesson again if you're confused about what
any of these settings do. We'll start from the top of the list and then
work our way down. So at the very top
here, we're going to go to set hair curves profile, and we're going to change
the radius to 0.0 005. So three zeros after the decimal point
and then hit Enter. Now we can move to
our next modifier, so the second in the list. Scroll down a bit
so we can see it. And again, we do need
to change these in a specific order,
just like last time. That way we don't overload blender with too many
hairs all at one time. So we're going to
start by changing this view port amount first. So we'll set this to
0.1 and then hit Enter. Now we can go to our density, and we'll change
that to 60060, zero, zero, and then last, we're going to add the density
mask that we had before to prevent it from attaching
to the nose or the eyes. So we'll click this
symbol here on the right, then click the dark
gray box to the left. Choose remove fur. Now we can collapse
this and move on to the trim hair
curves modifier. And we're going to
change the length to 0.165, and then had enter. Okay, so we have two more
modifiers to adjust. We'll go down here to
hair curves noise. And the only thing we'll
adjust here is just the scale. We're going to set this to
0.5 and then had enter. And then one last modifier,
we'll collapse this, twirl open friz and then we can uncheck cumulative offset. We're going to switch
the distance to 0.03, and then we can check
on preserve length. And that's it for our
modifier adjustments. So you can either twirl all these open if you'd
like, or in my case, I'm just going to leave
them all twirled closed, and then I can open them
up later if I needed. We've got all the settings
for the fur dialed in. So now we're ready to begin
combing the hair into place. The point of combing the hair is to make it follow
the curves of the head and not just stick straight out of the
surface as it is now. This will be a bit
of a manual process, and everyone's hair will
look a little bit different, which I think is pretty cool. I'll show you how
to use the comb and the basic method
for combing the hair, but this will be a lot more of a free form process than
adding the hair to the head. More or less just be providing you guidance on how to do this, but it's ultimately up to you to comb the hair into place. So our first step is going to be switching into the sculpt mode, which you can find over
here in the right viewport. You want to make sure
that you can see this drop down list
here on the left side. If you can't see
this drop down list here where it says
Object mode currently, you need to click in your middle mouse button and pan this to the side so you can see all the way over
here on the far left, and then we're going to
switch to sculpt mode. Sculpt mode will give
us access to a bunch of different tools that affect
the hair in different ways. Quite a bit of tools, so we won't be going
through all of them. But we will be using
the comb tool. This comb tool does exactly
what it sounds like. It allows us to comb the
direction of the hair. We can find the comb
tool down here, and it's a symbol here
where it has the hair growing up and then being
pulled to the right. Your file likely already has this tool selected by default, but if not, and just simply
select it here from the list. All of these tools, including
the comb tool that we just switched to affect the little white guides on
the surface of the head. They're a little bit
difficult to see, but if you spin your view
to the side and then zoom see here that we have
these gray hairs that have that frizzy effect, but then there's these
straight white thin lines that poke out of
the head as well. These are called
guides. When using these tools such
as the comb tool, you're not technically
moving the hairs. You're instead moving these little white guides
that we see here, and then the guides tell the
hairs nearby how to react. If you notice when you're
using your comb tool, that the hair sometimes
doesn't react, it's likely because you've missed one of these
guides when combing. So if you comb between
these white guides, you might notice that the hair really
doesn't do anything, and that's because
you're not hitting one of these with the tool. With that brief explanation
out of the way, let's start adjusting the hair. Our first step is adjusting
the size of the brush. We can do that up here
where it says radius. We're going to type
in 40 for the radius. So it makes the brush
a little bit smaller. This brush size should allow us to be
pretty detailed with our combing without
needing to be really specific about
where the guides. Also notice that as you zoom in and out on this
viewport here, that the size of the
brush remains consistent. If you're zoomed out further, the brush is going to be
functionally larger on this, so it's going to cover more of the model and the
more you zoom in, the less of the model it covers. That's important to take
into account as well. If you'd like to work on your model a bit closer like this, you might want to
set your brush to a larger size such as 80 maybe, and that will allow you
to cover a similar amount of area even though
you're zoomed in further. As an additional tip, if you'd like to
change your brush a little bit more on the fly, you can use the bracket keys on your keyboard on the far right side near
roughly where the enter key the left bracket will make it smaller and the right bracket will
make it larger. So if you'd like to move around your model and zoom
in and out and then just adjust your brush sise on the fly, you can
do that as well. I'm going to set
mine back down to roughly 40, and I
might change it later. Now, all we need to
do to begin combing this hair is to simply click
and drag on the model. So I'm going to start by
zooming out a little bit, rotating my my
first goal here is to comb these hairs in
the middle up and back, and then the hairs here on
either side of the eyebrow to the left or to the right so that they follow
the shape of the head. So I'm going to start by just clicking and dragging
right here in the center of the eyes and just start pulling
this hair back. And we can see as I'm clicking
and dragging the hair is moving along with the
direction of the brush. Once I have the hair in
the middle going back, then I can start combing it off to the side around the eyes. So maybe I'll comb these to the left and then start
combing these to the right. And our goal here is to just recognize the flow of the model underneath and to
make these hairs here follow a somewhat
similar direction. So in real life, this is likely
how this hair would flow, so we want the hair on
our model to do the same. You can also see
how every one of these clicks isn't really
moving the hair a whole lot. So sometimes you need to
go over an area multiple times and to make
sure that you're actually hitting
the guides nearby. Unfortunately, due
to these hairs being controlled by
these white guides, you might find it difficult to comb some of these
hairs into place. If this happens, I recommend you just take a moment to look around the area that
you want to comb and try to find
the closest guide. In this case, if I wanted to
comb this area specifically, I can see here that
there's a guide there. So I want to click
on this guide to have the best effect
on the hair nearby. Click somewhere where there
isn't a guide at all, it's unlikely that it'll
make much change at all. You can see here I'm
clicking and dragging. It's not really doing anything. So I recommend when possible,
if you're having an issue, try finding the guide near where you want to adjust
the hair and then click directly on top of that guide and see what it
does to the hair nearby. Also, as a general rule, these guides are a lot easier to effect if you look at them
from the side like this. So rather than looking on
them straight on like this, you might have better
success rotating your view so you're
seeing a profile view of these and then
just combing along the surface here and seeing
how it affects the hair. Also gives you a better
idea of how much this hair is actually puffing
out from the surface. You don't want your hair going
into the model too much. So as an example,
if I was combing this hair and I noticed that I moved it too far into the model, you might start
noticing that there's kind of a bald spot here. That's something we want to avoid because that's
saying that all of these hairs aren't actually poking out
from the surface. They're actually
growing into the model, which means we won't
really see them at all. Areas won't technically be bald because there is going to be
a layer of short fuzz here, but we are losing the effect of this longer fuzz
that we just added. So we want to avoid
areas like this. If this happens, try to find the bald spot on
the model and then rotate your view to an angle that's kind of like
a profile view here. So I know that this guide
is somewhere around here. I'm just going to
click on this area and start dragging across
it and pulling on it. You might be hard to find it sometimes because the
guide is also hidden. That's why this area is bad. Having trouble
seeing this guide, you can Alt and Z when you're keyboard to put your
model into X ray mode. Now this is allowing me to see through this model slightly, and I can see here this is
the guide that I need to effect because it's right in the middle of this bald spot. Now I can rotate my view to
a spot where I can actually see the guide pretty well and then start clicking
and dragging on it. If you're having difficulty
moving this guide too much, you might need to
have a bigger brush, so we can make our brush a bit bigger here and maybe
adjust your angle. Eventually, you're
going to find an angle here that actually
affects this hair. You have a particularly stubborn guide like
this one seems to be, you might need to
actually rotate your view slightly inside the model so that you're on this side of the model before
you start adjusting it. So now we're actually
inside this head, and it should allow
us, we can see here to push this
guide outside of it. Don't really worry about what it looks like when you're
pushing it out. You just need to get
it outside the head. And then once you have it
outside the head again, we can rotate around and
then fix this problem area. At this point, you might want
to turn off the Xray mode, so hit Alt and Z again
at the same time. And now we can fix this
area here and just be careful not to push it
back inside the head again. That I've given you some tips on how to effect these hairs, let's quickly go through some of these areas at a
slightly slower pace. Then I'll finish combing the entire head during a time lapse. I won't be talking
during this portion, but you will get to
watch what I'm doing in a slightly sped up
version of the video. During this time lapse, however, I will include a graphic
along the side of the screen showing arrows
drawn on the head, which give you the
direction that all these hairs should
ideally be combed. You can use this as
a guide of your own or you can follow your own
styling if you'd like. As I mentioned earlier, this is a free form process and everybody's head is going to
look a little bit different. Don't stress out too
much about the details, but if you'd like a little
bit more of a guiding hand, you can use my images with the arrows drawn on
them as a guide. Once you're happy here with the forehead and you
have everything combed upward in the middle and then to the sides above each
of the eyebrows, we can then move over
here to the ears instead. The ears can be somewhat
difficult due to their shape. The goal with the ears
is to comb the hair upward toward the tip
of the ear at the top. The hairs around the
tip of the ear are going to be acting
a little bit odd, though, due to the shape of the point that
they're attached to. So we'll need to take some
special care up there. But for now, I'm just going to focus here on this left ear, and we're going to start
combing all the hair on this ear upward
towards this point. So you'll find, again,
it's a little bit easier to move these hairs when you're looking down the side of them, so I'm just going to start by
pulling these hairs upward. And again, just rotate
around this view. You'll get a better
comb if you can look around the entire ear
while you're doing it, not just focusing on one
specific spot the entire time. So just kind of move
around and move hairs little by little
towards the tip of the ear. And all these hairs along the backside should
also be moving up. And then don't forget the
center of the ear here. We're also going to
pull these upward. And do be careful of those bald spots here in the
middle of the ear. The center of the
ear in the back of the ear here tend to get
bald spots pretty easily. So just move the hair
little by little, and not moving it too fast
will help you avoid that. And then once you're happy with the hair all pointing
upward on the ear, we can move on to the tip. I think this is pretty good
for this demonstration. So now we can move up here
to the tip of the year. So when we reach the
tip of this year, we'll notice the hairs
kind of go a little wild. They all kind of just go
different directions. That's because of this surface. The surface points many
different directions, so the hair is going
to reflect that. There's going to
be a bit of trial and error here as
we comb the tips. So we just move slow as
you move through this and not move anything too
much in one direction. But my advice here for the
tips of the ears is to avoid having the hair stick
too far out past the tip. In general, we're going
to have this hair kind of wrap around this direction from the
front and then have the hair on the back side wrap
around to the front side, so we're kind of curling
it around the tip. Rather than having it just
poke straight out into the air because then you
get a lot of these really wispy little hairs here, which depending on the animal
might be more accurate if you're maybe turning this into a lynx or
something like that. It might look
pretty good to have a couple wispy hairs
poking out here. But for our fox and the
look that we're after here, we don't want to
have too many tufts of little hair
pointing out here, so we're going to kind of
wrap these around the tip. And to do this, again, you're just going to have
to go kind of slow, and you can see as you move
just this one guide here, all these hairs around the tip all start curling
around the back. That's kind of what we
want, but you can see it moves it really
quickly as you're going. Be careful here. Then again,
the same thing in the back. We want to move this up and have them curl around the
tip of the ear here. Then just keep
pushing them around. You don't want the hair to
disappear entirely on the tip. You don't want to have
a bald spot there, but you don't want
it sticking out too far or else it looks
a little wild there. This is a good time to just move around the ear and just make sure all these hairs that you're combing are all moving
in the same direction. So I think for now, that looks
pretty good for this ear. And then the process for this other ear
would be identical. I won't be going
through that now as it's basically
just the same thing. Comb all this stuff upward
along the front and the back, and then at the tip, again, we'll just have to move it
so that they kind of curl around the tip of the ear to
avoid it poking out too far. Okay? With the ear done, let's cover one
last tricky area, and that's here right along
the front of the face, around the nose and the mouth. The tip of the nose
and the front of the mouth have limited
guides in this area. So we don't have a whole lot of control over this
area, unfortunately. This doesn't mean that we
can't comb this hair, though. The goal with all this
hair around the nose is to comb it all in a
direction away from it. So we want all the
hairs above it to move away from it and up,
the hairs below it, to move down, and then the
hairs along the side to go along the side of the face
going back this direction. I mentioned before, the
lack of guides in some of these areas will make this a
little bit more challenging, but we can still
comb it pretty well. So let's start here
in the middle, and we're going to
comb this guide here right below the
nose straight down. So we're just going to grab this and then move it downward. Now above the nose, we can start combing these
guides upward. In this case, this guide here is all the way up here
between the eyes. That's generally what controls
these hairs this far down. So we can start
moving that. And then along the side here, we're going to have
to find the guide. In this case, it's
right here to the left. Start coming these back
in space to the left. And this area here is going
to be relatively difficult to avoid some bald spots here,
especially around the nose. Luckily, that kind of works to our favor here because
on a real animal, the hair around the
nose and the face and the mouth would be shorter than the hair around the
rest of the head. So I wouldn't worry
too much if you can't get rid of some of these
bald spots that uppear. Try to avoid them if you can, but don't agonize over getting
rid of them because you do have somewhat limited control in this
area to begin with. Now we can just rotate
around to this side. And again, just keep
pulling these to the side, pulling them away from the nose, but still making sure that they follow this curvature
of the face. So this face here should
be moving this way. We can also start
pulling some of these guides here below the eye. And our goal here is to just
pull all these hairs rather, along the face away
from the nose. Everything is moving
backwards in space. Once you have a lot of
the side stuff done, you can spin around
to the bottom and start moving
these guides down. Start pulling these
back towards the chin. All these guides here
can start flowing back basically directly
towards the bowtie. And we can see here now,
all these hairs are starting to flow away from
the nose and the center. If you can find the guides
here along the side, you might be able to
start splitting them so that they follow left
and right underneath. But if you can't find
the guide for that or if the one just
doesn't exist, I would recommend just
combing them down and back. So basically down and
underneath the chin like this. And then along the sides
here is where you can actually make it follow the left or the right
side of the face. So at this point, you
should have all your hairs now kind of pointing away from the nose and then following basically the shape
of this smile. And as I mentioned before,
don't worry too much about these bald spots you're seeing here along the
sides of the nose, as these are really difficult
to avoid, and ultimately, they do kind of work with the overall fur of
this creature anyway. So I really wouldn't worry
too much about these. It's important to remember that these longer hairs that
we're adding are only there to add further detail to an already dense
layer of fuzz below. If there are a few
hairs out of place, it really only adds to the cozy handmade
feeling of this fox. Okay, so the time
has come to speed up a bit and finish combing
the rest of the hair. I won't be talking
during this part, so feel free to pause the video and catch up whenever
you need to. I'll also place some
visual guides on the screen to show the direction that I'm combing these hairs. That way, you can use those as a guide for your own combing. Simply follow the direction
that the arrows are moving on the face and comb your hair
in that same direction. One last word of advice. I'd avoid combing the hairs
too close to the surface, as you want to make
sure that they sit on top of the short fuzz. When in doubt, let the fuzz be a little bit puffier and longer than you think
it needs to be. And you can always go
back afterwards and comb the hair down if it's too
far out from the model. If you start combing
this hair and it's really tight
along the surface, you might want to pull the guide out a
little bit so that it puffs off the surface a bit more than you
think it needs to. As I mentioned,
you can always go back afterwards when you turn the short fuzz back
on and then start combing this longer
fuzz down a little bit, so it's just above the short
fuzz length if you want. If you'd really like to,
you could also just turn on the short fuzz visibility so you can see how long
this hair is roughly. An exact guide of how long
it is, but it does help. It will, however,
make this view a lot more cluttered
and harder to read. So in my case, I'm going to
be leaving this off and then just adjusting it afterwards
if I need to. All right. I'll see you in a little bit
when my fox is fully combed. Don't forget to use
the guides along the side of the screen
for your own fox. Okay, I have my
fox fully combed, and I think he's
looking pretty great. We can see here
as I spin around, but I mostly just
combed everything upward towards the points, especially along the
sides of the face. So the face here was combed
to these points on the cheek, back to the left, and
then back to the right. Anything underneath
was combed downward. The back of the head
here gets a little bit tricky because generally you
want these hairs between the ears to flow
up over the top of the head and then backwards this direction through the ears. But then the hair
at the bottom here, you want to be combed down
and up at the same time. Luckily, it's the
back of the head. We're not really going to see
this here on this render. I wouldn't worry too
much about this area, but it can be a little
bit chaotic in this area as you want to start combing
it downward this direction, upward this direction, and
then backwards this direction. See here, all the hair
on the back of my head kind of goes in a little bit
of a different direction, but that's kind of a
natural sort of chaotic, fuzzy fiber look
back there anyway. So I'm not too worried about it. And then, again, the back here, these ears just kind of go
upwards towards the tip. And then paying
special attention to make sure that the tip of the ears don't go too far out from the tips
of the ears here. The fuzz stays pretty
close to the edges. You're satisfied with the
combing of your hair, you can go up here
towards sculpt mode and then switch it back
to object mode instead. And we have two last changes to make before we're
done with this lesson. Before we make any
adjustments, though, let's render the image
with just the long fuzz applied so we can see what
it looks like overall. So I'm going to go over
here and make sure the short fuzz is turned
off with both the eyeball, and I'm going to click on this
little rendered icon here, so the little camera so make sure it's idden in both views. And now I can go to rendering. And then it doesn't really
matter which slot you're on, but I'll switch it back to slot. I'll go to render render Image. Okay, so with our render done, we can now see how much realism this longer fuzz
adds to the fox. By combing this fuzz to match
the curvature of the head, we've accentuated the
underlying model while also giving the overall look of the fuzz some directionality. So it's not just random curls. We can see that especially
here in areas like the ears, where this hair clearly
follows the shape of the ear, and it's not just random
curls everywhere, also along the sides of the
face and on the forehead. We can also see here
this bald spot that I mentioned that is somewhat
difficult to avoid. That really won't
matter once we see the short fuzz in
this area as well. Really great wispy hairs and
kind of a general softer, woolier look along the edges of the model that we
didn't have before. All right, so let's make a few final changes before
we end the lesson. First up, we're going to apply the correct material
to the fuzz, so it matches the
underlying colors of the head just like
the short fuzz did. We're going to do that by
going over here to shading. Then we'll switch
this top view port to the rendered mode using
this far right button. We can also zoom in on this head so we can
get a better look. Next, make sure that
you have the long fuzz still selected in this list. And over here, we're
going to choose this drop down one that has a little circle with a checker box on it. Click this drop down here, and then we'll
choose fur material, the one without the 001 at the end of it, so
the one just above it. And then what happened
to our fox's head? I'll be completely honest. I haven't quite figured
out why this happens, but it obviously has
something to do with swapping the default
material on this fuzz. Lucky, this is
pretty easy to fix. So to fix this quite
unsettling looking issue, we're going to go over here to the right side to
the modifiers tab. We're going to twirl open
the second modifier here, the interpolate hair curves. We're going to go down
here where it says UV map. We'll click on this name here, and then we're
going to switch it to surface UV coordinate, and then we're
going to go back to the top of this list again, click on where it says
surface UV coordinate now, and we're going to switch
it back to UV map. We'll now see that the fox's
head looks correct again, and the fuzz is properly colored based on the
underlying texture. So the fuzz is orange
where it should be, and it's white
where it should be. I'm not 100% certain why
this fixes this issue. I suspect it's just telling
Blender to reload this map, and that somehow fixes whatever happened
while we switched it. But luckily, it's
relatively easy to fix, so I won't complain too much. Okay, so we have just a
few things left to change. To make this last change,
we're going to go over here to the layout
workspace found here at the now we want to
disable the shadows on the long fuzz just like
we did for the short fuzz, because it's going to have
the exact same issue. This long fuzz
will start casting shadows across the
entire head and make the thing overall
a little bit too dark and kind of
crunchy looking. So we're just going to turn
the shadows off entirely. So again, make sure you have the long fuzz still selected. Go down here to the
object properties, scroll down this list until
you start seeing visibility, and then underneath
ray visibility, we're going to uncheck shadow. Then lastly, we're going
to go over here to the short fuzz and then turn on both of these
check boxes here, so we'll highlight the eyeball and the little camera
icon next to it. That's it for this
lesson. We'll save the final render of the
fox for the next lesson as it'll give me a chance
to explain some of the compositing effects
currently applied to the render, as well as one additional optional one you can
use if you'd like. In the next lesson, we'll
render the final image of our fox and discuss some compositing effects.
I'll see you there.
6. Rendering the Final Image (and Compositing): In this lesson, we'll
render the final image of our fox and discuss some compositing
effects. Let's begin. The time has come to
render the final image of our little fox to share with
our friends and family. We've done all the hard work, so all that's left to do
is render the image. Let's start by heading to
the rendering workspace found up here at the top center. Now we can render our image
by going over here to render, render image or just
by hitting F 12. The render is done,
and our fox is looking fantastically fuzzy
and downright dapper in their little suit. I'm a little bit biased as I designed both the
model and the class, but I think they look super
cute, and I hope you do too. Before we call it
quits on this lesson, let's discuss some of
the compositing effects that are happening
behind the scenes. This will help you
better understand how I achieve the look of the final image and
we'll even discuss an optional effect that you
can turn on if you'd like. Let's head over to the
compositing workspace now found directly to the right of the
rendering workspace. Customize this view slightly to make it a bit more
useful for our purposes. On the left side, you'll see
a bunch of nodes that are responsible for the effects
that I added to the image. I've labeled each one
of these nodes that their effect on the
image is more obvious. We'll discuss each
of these nodes in a bit more detail
in just a moment. Then over here on
the right side, you'll likely see either
an empty gray box or an image of the fox
that we just rendered. If you don't see the fox render over here in
this right view port, go up to the left here
where it says backdrop, click this button to turn it on and then click it
again to turn it off. That should reload the image so that it pops up over
here on the right side. Okay. So what do all these nodes here on the left actually do? First, let's see
what the image looks like without any of
the effects applied. We can do this by clicking on this little yellow dot here
on this far left node. We're going to click
here at the top, and we're just going to move
it and place it here on this small dot here before
the last two nodes. So we're bypassing
all of these nodes. Will show us what the
actual raw render looks like over here
on the right side. Well, notice that the image
hasn't changed drastically, but there are some
notable differences. Overall, the image
is a bit darker. The subtle glow is missing
from the highlights and the minimal rainbow blur along the edges of the
image is also gone. Let's go through each of
these nodes quickly and hook them up so that we can get an idea of what
they actually do. First up is this
node over here that I have labeled Brighton Image. To connect this
back to the image, we're just going to click
from this little yellow dot here on the right
side of this node. And then drag it over
here to this dot here. Now we're only using just
this node in the image. Now if we zoom in on this node, we can see here that this is
actually called exposure. This exposure node is simply responsible for controlling
the exposure of the image. I've increased the
exposure down here slightly just to brighten
up the image overall. Values higher than zero
will make the image brighter and values lower than zero will make
the image darker. Next node in the system is here and I've labeled
this one glow. Let's connect that
to the system. We'll drag from image here at the top over here again
to the small dot, and the name of this
node is actually glare. So that's what you
would search to find it in the list
if you needed to. This glare node has a few
different modes that add lens flares or subtle glows to the highlights of your image. For this image, I have it
set to the fog glow mode. But you can see here there
are a few different options. Fall glow mode is one of the more simple
options that just adds a soft blurry glow around the brightest
areas of the image, such as the tips of the ears or the highlights of the eyes. So if we zoom in over here on
the right side of this ear, you can see that
there's this kind of soft yellowy glow that extends past the
edge of the model, and that's because
of this glare node. You might also see
it around here, around the edges
highlight on the eye, there's just a
kind of brightness that sort of emits
from these highlights. As a quick example,
if I zoom out here, I can bypass this instead to show you what it
looks like without it, you can see here all that glow that we see on the
eye is now gone. You also saw it lose
a little bit of glow down here on the
white part of the fur. So if I re enable it, we can see here this glow is now
added back to the image. Just helps the bright parts of our image seem even brighter
than they were before. Now the last effect that we
have applied to the image before was this rainbow blur one that I have labeled here. So before we reenbd this, let's zoom out a little bit. We're going to go down
here to the bottom right so we can see
these mushrooms, as this is a really obvious
place to see this effect. Now let's re enable
this effect by dragging from this yellow dot and
then dragging it over here. This rainbow blur node is actually called lens distortion. This node does a few
different things, but we're using it to add a subtle rainbow blur effect
to the edges of the image. The slider responsible for
this rainbow effect is the dispersion value found
down here on the bottom. See, I have a relatively
low value set. If I set this to zero, we can see what it looks
like before I added it. So we can see that we have nice sharp edges
here, obviously. And then if I set
it back to 0.01, we can see the subtle
rainbowy blur. It's pretty obvious here
on these mushrooms as we're seeing a red and
yellow fringe on the top, and then we're seeing
kind of a bluish green fringe on the bottom. That's because this
effect here is mimicking a real world effect called
chromatic aberration in which the glass of the
camera lens acts as a prism and splits the white
light into separate colors. So that's what it's
mimicking this effect here. So we're seeing this white light being split into its
different channels. Is also somewhat of
an optional effect, but I do think it enhances the overall look of the image and gives it a little
bit of realism, as this is an effect that you do see with real world cameras. Even though it's
technically a defect, it does add to the realism. We can also see it here
on the edges over here. So each of these hairs
is just a little bit blurry and the colors are a little bit shifted
off of each other. This lens distortion effect only happens along the edges
of the image, though. To the very center
of this image, you're not really going to
see any of this effect, especially at such a low value. At really, really high values, you might start noticing
it, but really, you're only seeing
this subtle effect here along the very
edges of the frame. Okay, so now that we
know a little bit about the effects that we already
had applied to the render, let's discuss that one
last optional effect that adds a fun
twist on the image. And that last node is over
here to the right side, and I have it labeled
painterly effect optional. This node isn't currently
connected to the system. You can tell that
because there's nothing being output here
on the right side. The actual node associated with this effect is called
the uahara node. And what this does is it
filters your image in a way that makes it resemble somewhat like an oil painting. So let's zoom it here on
the right side of our fox. You can see an area
that has a lot of different versions
of the hair. So some in the
back here that are long and some that are short. Now if we drag from
the right side of this node up to this dot here to connect
it to the system, we'll see the actual
effect of this node. So now that we have this Kuahara effect added to the image, we can see that all
those fine strands of hair have been much more simplified down into what resembles
basically brushstrokes. The whole image has this kind of oil paint filter
applied on top of it. It still looks obviously like this has some fuzz
and hair to it, but it's a lot less detailed
and a bit more stylized, which might be effect
that you like. You also have some effect over
what this painterly effect looks like on the image by changing these parameters
here on the left. So if you adjust this size
value to a larger number, you'll notice that
this painterly effect becomes a little
bit less detailed. Overall, it's a bit more smooth and it's a bit more
brush stroke looking. So let's set this back to eight. And if we make the size smaller, it'll make the brush
stroke smaller and the image overall will
be a bit more detailed. The uniformity value below that changes how rough and granular
the brushstroke effect is. If you use a lower value
here, such as five, it'll make these brush strokes a bit more rough and
a bit more noisy. Overall, this effect
is pretty subtle. I'm going to set
this back to ten. The sharpness value
here controls how sharp the borders between each of these colors and the
brush strokes are. If you use a much lower value, such as 0.25, we'll make for a significantly
blurrier image. So you can see now
that this image has a lot more blur to it, and it looks like the
whole image is just kind of being smoothed over
with some sort of effect. Leave this set to
one. Then lastly, we have somewhat of a
complicated effect. The eccentricity
controls whether the brush strokes will follow the high contrast edges
of the image or whether the brush strokes will just be randomized regardless
of the image. If you have a lower value set, you'll tell the brush strokes to just randomly be painted across the image and not
really care too much about which direction
this edge is flowing. We can see here
that the image has almost like a honeycomb
pattern across it. However, higher values
will tell blender and this effect to follow the edges of the image
the best that it can. You'll start seeing more
directional brush strokes, ones that actually look like
they've been painted upward or downward to match
the In general, this effect usually looks better when you have a higher
eccentricity value. As I mentioned before, this
effect is entirely optional. I can understand why you might
not want to use it as it does somewhat minimize the look of the fuzz that we just added. But if you like it, feel
free to leave it on. Now I'm going to turn mine
off just by bypassing this node and running this last node here
to the dot instead. Once you've decided
which version of the image that
you like the most, or if you'd like to save both of them, you can also do that. We can now save our image. To save the image, all we
need to do is go up here to where it says image
and then choose Save as. Now navigate to wherever you'd like to save this image
on your computer, and then we can change
the name down here. So I'll just call
this Fox render, underscore final underscore 01, to give it a version number. For the file format, PNG works perfectly fine
if you'd like that. Or if you want, you could
also switch it to a JPEG, and then I would
recommend just turning this quality up to 100%. Either one of these
options work. So either JPEG set to 100%
or just using the default, PNG works fine, as well. Once you've picked your
file format and your name, you can hit Save As Image. You'd also like to
save a version of it with this painterly
effect applied, you can just reattach this painterly
effect and then go over here to Image, Save As. And then, again, we can just
click on this to make sure it's using the same name,
and down down here, we can add another
underscore and then type in painterly, if we'd like, and then hit Save As Image down here to save a second
version of the same image, one with the painter effect,
and then one without. And now at this point, we're just about
done with the class. However, we still have one more topic to cover before we end. In the next lesson, we'll discuss the ways that
you can customize this fox render to make it unique to you. I'll
see you there.
7. Class Project Ideas: In this lesson, we'll
discuss ways that you can customize your Fox render
to make it unique to you. Let's begin. We've completed
the example for this class, but that doesn't mean
that we're done learning. I'd like to give you a few tips and tricks for
customizing your render, so you can add a bit
of your own style to the image and
make it your own. It's important to note
that this lesson is just to give you ideas
for your own project, so feel free to deviate from
what I'm showing you here. You don't need to follow along exactly with
what I'm doing. I'm just giving you
a few more tools to make your render unique. Before we begin, let's save
our file as it exists now. So we have a point to come
back to if we want later. To do this, just go over
here and choose File. And then save. Now that we've saved the
completed class example, we can save a unique
class project version of this file so we don't
mess up the original. This will give us the freedom
to play around without worrying about
being able to undo the changes if we
don't like them. So to save this new version, we're going to go back to file, and then we'll choose
Save As instead. Now, down here at the bottom, we can click on this
name to change it. I'd recommend that
you just add at the beginning of this
file name Class Project. Then put an underscore
to separate it. This will just make it obvious what this file is meant for. Once you've changed the name, go over here and just
choose Save As. Now we have a fresh file to
continue the lesson with. You don't need to open this new class project
version of the file. Blender already did that for us when we use the Save As command. Now let's start with a
pretty simple change that has a big
impact on the image. Color. We'll begin
by heading over to the shading workspace found
here at the top center. Now in this top view port, make sure it's set
to the rendered mode so we can see all the
colors in our image. All right, now let's
start adjusting the color of the
fox and their fur. We'll be doing this
with one simple node. However, we will need
to copy this node to two different locations so
everything works properly. We'll start by adjusting
the fox's head material first as that informs
the color of the fur, and it's the easiest to see. Start with, we can go over
here to the right side. We can twirl open this just
so we have it open for later. And we want to select
the fox had object. Now down here in this
bottom view port, we're going to zoom out a bit. Then we're going to drag select over these two far right nodes, and we're going to move
them even further to the right as we want to make
some room here between them. Now we can hit Shift and A to bring up the Ad
Mnu, go to search, and then we'll type in Hue HUE and choose Hue saturation value. We're going to move this
node over here and place it directly on top of
this top yellow line. So we'll just click
to place it and Blender will automatically
connect it for us. Now let's zoom into this node so we can see it a
little bit better. This hue saturation value node does exactly what
it sounds like. It allows you to adjust these parameters with simple sliders. The most useful slider here
will be the hue slider, as it's responsible for
controlling what you would consider to be the
color of the texture. So if we slide this hue
slider back and forth, we'll notice that the color
of the material changes. If it's moving a little too fast as you move
it back and forth, you can also hold Shift while you click and
drag on the slider, and it'll move a lot slower
so you have more control. One important caveat
of this hue slider is it's really only going to change the orange on this texture. It will pretty much leave
the white and any of the really dark black areas
relatively unchanged. So you'll notice as you slide it back and forth that there's pretty much always a white part on the bottom of the face. There isn't really any
hue here to effect, so this slider doesn't
have any effect on it. For this example, I'm going
to set my hue to 0.1, and then I'll make a
bluish purple fox. Again, feel free to make your
color whatever you'd like. I'm just going to use this color here for the purposes
of this example. You also have the
ability to adjust how saturated these colors are
using this next slider. Higher numbers will make
the colors more vibrant and lower numbers will
make the colors less vibrant and closer to gray. If you wanted to make a
white fox for your example, you could just set this saturation all
the way down to zero, and that will make it
almost entirely white fox, except for some of
the darker areas where it means a bit gray. For my example, I'll make the
blue a bit more saturated, so I'll set it to 1.25. Lastly, we have the value
slider here at the bottom. This slider will
control the darkness or the lightness of the color. It's important to note
that with this slider, it does actually affect the
black and the white areas, as those do have a
value to adjust. So if you make it really dark, you'll start getting pretty dark gray here instead of white. Alternatively, you can
make it really bright as well to make the white
areas even brighter. By default, this
slider is going to stop at two if you just
slide it to the right. However, you are able to type
in values higher than two. So if you type in five, it'll
let you go even brighter. For my example, I'm going
to set mine to 1.5. So it's just a little bit
brighter than it was before. So now that we understand the basic concepts of how to easily change colors
on a material, let's apply the same node to the fur material so that it matches the
underlying texture. Please make sure that
you're happy with the color of your
fox's head first, though, as you want
these nodes to be identical for both
the head and the fur. So our first step is to select this hue saturation
value node and then hit Control and C to copy it. Now over here in our list, you're going to select either
one of these fuzz objects. It doesn't matter as they
both have the same material. So I'll just choose
the long fuzz for now. Again, you might need to twirl
this open in order to see the long fuzz and the short fuzz underneath the head object. So if you don't see
them, it's probably because you need to
twirl open this arrow. Now that I have one of these
fuzz objects selected, I can zoom out here
on the bottom. And then again, I'll be drag selecting over these
far to right nodes and then move them over a
bit further to the right so I have room for the
hue saturation and value. Now I can hit Control
and V to paste the hue saturation value that we just adjusted into
this material. We can also click and
drag this node on top of this yellow line
to automatically connect it, and that's it. All the changes that we
made to the fox's head have now been applied to
the fur attached to it. Due to the fur using the exact
same images to color it, the hue saturation and value node has the exact
same effect on the fur, making it match the
head identically. This point, feel
free to head over to the rendering tab and
give your image a render. That's where you can
really appreciate the new color in all
of its fuzzy glory. For now, though, we'll keep
going with the lesson. Now that you have
a new fuzz color, you might also want to
change the eyes, as well. So let's head over here
to the Fox collection, and we're going to select
the Is from the list. Down here in the
bottom viewport, make sure you're set to
slot two, which is Iris. If for some reason
you're selected on either of these
other materials, make sure you select
this material, I Iris from the list. Is the material that
controls the eye color, which is currently set to green. If we zoom into this material, you notice that we already have a hue saturation value node set here to the left of
this green node. So we won't need
to add a new one. We can just adjust this one. Simply adjust these
three sliders to find a color that you like. For my example, I'll set my values to create
a bright pink color. So I'll set my hue all
the way up to one, lower my saturation down to 0.8, and then set my value to 1.5. Background color can also be easily changed to a
better matching color. Over here in the outliner list, let's roll to the very bottom, and then we're looking
for background plane inside the background
elements collection. Now we can select it
here from the list. For this particular object,
the background plane, you will have to select it from the list rather
than the viewport, as I currently have
the selection locked to prevent accidental
selection during the lesson. So the only way to
select this right now is to select it
here from the list. Now if we go down
to the material, can see that this material is much more simple than
the previous ones. It simply uses this base color here to change the color
of the background. So to change this
background color, all you need to do is
click on this green box and then use this color
picker to choose a new color. You can easily
adjust these colors by clicking anywhere on this circle here to move the dot around to
the color you like. And then you can also
adjust the brightness using this slider here on the right to adjust how bright
or dark it is. Render, I'll make mine
kind of a dark purple. Alright, let's do one
last color change before we move on to a new tip. For this change,
we can zoom out a little bit so we can
see more of the fox. And then we're going
to select either the vest or the bow tie. It doesn't matter they both use the same material right now. So I'll just select
the bow tie for now. Now, let's zoom out down
here on the bottom. And again, we'll drag select over these two far right nodes, drag them to the right
to make some more. We're going to hit Shift and A to bring up the ad
menu, go to search, and then you can
either choose it right from this list or
if you need to, you can type it in again, H, UE and choose Hue
saturation value. Then again, we'll
place it here at the very top on top
of this yellow line. Now, let's zoom in so we
can see the node better. And then just like for
the other materials, go ahead and adjust
these values to find a color that you
like for this bow tie. I'll make mine a light
pink to match the eyes. So I'll set my hue
to 0.8 to five, my saturation to 0.9, and then my value to 1.9 to
make it a good bit brighter. Once you've found a
color that you like, we do actually have one
more change to make. So we're going to zoom out
and then go down here to where it says sheen at the bottom of this
large green note. You'll find out at
the very bottom down here and you should
see a blue box. The sheen setting
here is used to make the fabric look a bit
more like fabric. The setting will also appear on the coat and the shirt fabric. If you decide to
change them too, be on the lookout there as well. As a quick explainer of
what the sheen does, we zoom in now to the bow tie, we can see that these
extreme angles here, where the fabric moves
backwards in space, we have a whitish blue color, and we can see it
around the edges here. That's controlled by the sheen. The color that you place down here in this tint box will have a subtle effect on the material when viewed at these
extreme angles. Is an important facet of what makes fabric look like fabric. It's helping to mimic microfibers
that catch the light. We want this color to be similar to the overall color
of the fabric. However, it's typically a bit brighter than
the base fabric. So for this pink bow
tie that I made, I would want to change mine
to kind of a bright pink. So maybe I'll find a pink color down here and then
also brighten it up and maybe make
it a little less saturated by moving it
towards the center. So, for example,
if you use green, you might want to make it
more of this color instead. However, for mine, I'll set
it back to this light pink. Okay, so now we've changed both the bow tie as well as the vest. But what if you
wanted them to be different colors
from each other? In that case, we would need to separate the material and make a duplicate of it so that we can adjust them independent
of each other. So first, I'm going to
select the bow tie again, and it doesn't matter which
part of the bow tie I select. There's the knot in the middle, and then there's the
bow on the outside. They're technically
two different objects, so select either one. Now down here, you'll see
next to the word vest, there's a little number four, showing you that this
material is currently applied identically to
four different objects, the bow on the outside,
the knot in the middle, and then both sides of the vest. Make a new duplicate
of this material, all we need to do is click
on this number four, to tell Blender to
make this version of the selected object have a unique version
of this texture. So we can see now
that it's changed it from vest to vest 0.001, meaning it's a new material. Now let's rename this new
material to Bow Tie instead. That way we know what this
is actually applied to. Now we can zoom out
on the material. Back up to this hue slider and then adjust this to
make it a new color. I'm going to make mine
more of a yellow color. So I'll set it to 0.95, 1.5, and then two for the value. After you change the color, don't forget to go back down to the sheen and change this
tint color to match, as well. So I'll need to make mine
more of a warm yellow color. Whichever part of the
bow tie that you didn't select still has the old
vest material applied to it. So all you'll need to do is select this part in the middle if that's
the part that you didn't select and
then go down here to the drop down and then choose
the new Bowtie material. If you want, you
can just type in BOW to filter the list
and choose bowtie. And now these both have
the same material applied. The two methods that I just showed you for
changing the color of the materials can be applied to nearly every
object in this scene. So feel free to explore
these objects on your own and see what you can
customize to your liking. That includes everything
from the color of the jacket to the color of
the plants or even the stump. Now let's move on to the last
tip that I have for you. Another major aspect of this render is the bright
and cheerful lighting. The lighting of a render
plays a large role in the way that you perceive it and the mood that it conveys. Changing the lighting can have a subtle effect on the render, like just highlighting a
different part of the model, or it can completely transform the mood of the render
if you go more drastic. Let's cover both of
these changes quickly so you know how you can implement
them in your own image. We'll start with
the simpler option, changing the focus of the
render to a new part. This can be achieved by changing the position of the lights
that are already there or by eliminating some of the light sources so that the
light is more directional. Head back to the
layout workspace for these changes found up
here at the top left. Next, make sure you have
the left viewport set to the rendered mode using
this far right button. Now in the outliner
list on the far right, we're going to scroll
all the way up to the very top and then make sure you have this camera and lights
collection twirled open. This is where you'll find,
obviously, the camera, as well as all of the lights that are
currently in the scene. Before we make any changes, we do need to re enable
a few things that I had turned off for us while we
worked on the class example. First, let's unlock the
selection of all of these lights so that
we can actually move them around
in the viewport. To do this, we'll go over
here and just click on these small arrow icons
until they turn white. We'll do that for each
of these lights to allow us to actually select
them within the viewport. If for some reason you can't see these arrows
that I just clicked, go over here to the
top right and click on this filter icon
and then make sure that this button here
is highlighted in blue. Okay? We have one
last change now. So over here in the
right viewport, if we zoom out and
rotate around, notice that you don't really see any lights within this scene. It seems like it's empty.
This is because I had them hidden from view so that they didn't clutter our
view as we worked. We'll need to re enable them
now so that we can see them. To do this, we're going to go up here to this top option bar, click in our middle mouse button and move it
all the way over here to the left so that we
can see this button here, the view port overlays button. Now we're going to
click on this dropdown, go down this list. Going to turn on extras. Once you turn this
on, you should now see all the lights
show up in your scene. If for some reason you
don't see these lights, it's probably because this
button here is not turned on. So if it looks like this still, you'll need to click
this button and highlight it in blue so that
you see all these lights. Alright, so with all
of our setup done, let's actually change
some lighting. The most simple change that we can make is just to turn off a few of these lights and make the scene a little
bit less bright. So as an example, we could go over here to this
list and we could hide this light fill by clicking both of
these buttons here, so the eyeball, as
well as the camera, and then we could also
hide this light rim left by clicking the
eyeball and the camera. Turning these lights off has had the effect of
showing off more of the face's curvature and volume without really
changing much at all. This left side now is receiving a lot more shadows from the
protrusions on the face. So this nose here appears to stick out further
than it used to, as well as the ears looking a lot more deep than
they were before. And that's simply just because this area isn't receiving as much also have the option to move around lights
in the scene as well. So for this example,
I'm going to select this light undersquare main from the list on the right side, and then over here
in the Viewport, we can just move this light
around using the move tool. You can see as you
move this around, the shadows on this image here are changing
pretty drastically. So for my example, I'll
move it a bit higher, and then I can also
change the rotation of this light relatively easily by hovering my mouse over
the small yellow dot here at the very
end of the light. So you'll see any
light that you select here, we have this small dot. If you grab that yellow dot and you position
it on something, so just dragging
it onto something, it will angle the light
towards that object. So if I drag it down
here to the head, we'll notice that it now angles directly towards
the head instead. We can now see how eliminating
a couple lights and moving some others around can change the
look of the image. But what if we wanted
something a bit more drastic? These changes will help
us reshape the mood of the image and give it
a completely new feeling. Let's start by hiding all of the lights in the scene
by going over here and clicking the eyeball
and the camera next to each object here listed
with the word light. So we're just going to make
the scene entirely dark. Next, we're going to click on this small white folder icon next to camera and lights to make this the
default collection. This will ensure that
any new light that we add pops into this
collection automatically, so we don't have to find
it and move it here. Now over here in
the right viewport, we can hit Shift and A
to bring up our ad menu, go down to light, and
then choose point. Now let's use the move
tool to move this light up and then just position it
off to the side of the face. Somewhere around here is fine. We can see a little bit of the fox illuminated
at this point, but it's pretty dim,
so let's change that. So over here on the right side, we're going to click on this
little green light bulb icon to change the object
data properties. This is where we'll change the brightness and the
color of the light. Let's start by making the light significantly brighter
than it is now. To do this, we're
going to change the power value found here. So I'm going to change the
power from ten all the way up to 500, so
significantly brighter. Can also adjust the color using this color bar
found here at the top. In the interest of
making my render feel pretty different
from the original, I'm going to choose a
pretty vibrant color. But as always, feel free
to pick whatever color you think looks best for the image
that you want to create. In my case, I'll make this
kind of a neon blue color. But if you wanted something
a bit more natural, sort of like the original, you could pick something
down here maybe closer to the orange
or the red side. This blue light is certainly different from what
we had before, so it works perfectly for
changing the mood of the image. Now let's add a second light of a different color somewhere
else in the scene. So if my lights still selected over here in the right viewport, you can hit Shift and D
to duplicate this light, and then just move it over
here to the left side. I'm going to make
this light a bit lower and then also
move it behind the fox. Somewhere around here is fine. If I wanted more
of this left side of the face illuminated still, I could move it
further away from the fox so that it
catches more lighting. Maybe somewhere around here
would work fine, as well. Now that I have a
new light over here, I can change the color and the brightness of this one as well. So let's lower the
brightness of this one down to half of
the other. So 250. And then I'll make
this color maybe a bright pink just to offset it. After you have the basic scheme
for your lighting setup, feel free to select some
of these lights and move them around to better fit the image that you
want to create. Maybe I'll move this a bit to the front so I can see more
of the face illuminated. I can also move it to
the left a bit more. And then don't be
afraid to turn on some of these other
lights that I had before. Right now, my background
is pretty dark, so maybe I'll turn on
this light background. So I'll turn on both the eyeball as well as the render icon. I think that's done
a pretty good job of completing the
lighting for this image. With just these three lights, I've completely
transformed the mood and the look of the fox render
into something brand new. Obviously, this might not be the vibe that you're going
for with your image, but hopefully it gives
you some ideas of how you can change your lighting to meet the look that you're after. And now, finally, I'll leave you with the
most fulfilling, but also the least
guided tip that I have. Create your own character and
add some wool fuzz to them. It's really fun seeing
your own creations come to life with this fuzzy wooly
look that we just explored. Class should have given
you enough tools to practice these techniques
on your own creations. Even if you're not
confident with every aspect of this process, there are a few
things more valuable and fulfilling as an
artist than to see your skills improve
with practice and to see your
creations come to life. I can't wait to see
what you all create. Congratulations on reaching
the end of this mini class. I wanted to take
a moment to thank each and every one of
you for taking my class. Your participation
and excitement for learning is incredibly
rewarding for me as a teacher, and I can't thank you enough. Now that you've got all these
new skills under your belt, I can't wait to see where
your creativity takes you. I wish you the best
of luck in creating your fuzzy little
creations and blender. As I mentioned at the
beginning of this class, this class was heavily tied
into my previous gnome class, where we used an entirely different method of
adding hair using particles to a cute little gnome that we modeled from scratch. If you like this class, you might also enjoy
that nome class. Also briefly touch on
lighting in this class, which focuses specifically
on portrait lighting. If this topic interests you, I highly recommend my portrait
lighting master class, where we learn the ins
and outs of analyzing references and replicating complex portrait
lighting and blender. You can find either of these two relevant classes on
my teacher profile. If you enjoyed this mini class, let other students know
by leaving a review. Your feedback really helps me understand what you found
most valuable in the class. You can leave a review
easily by going to the Reviews tab just
below this video. Clicking the leave
a Review button. I appreciate the support. After leaving a
review, you might want to follow me here
on Skillshare, as well. You can follow me at any time by clicking the Follow button below this video or by going to my teacher profile and clicking
the follow button there. Following me is the best
way to get notified when I release a new class or make
important announcements. Don't forget to check
out my teacher profile for more classes just like this. You might find something
else that interests you. Lastly, I want to thank you
all again so much for taking my class and supporting me by participating in
the class project. I can't wait to see what
you all come up with. Farewell, and I hope to see
you in another class soon.
 Harry Helps, Professional 3d Artist