Transcripts
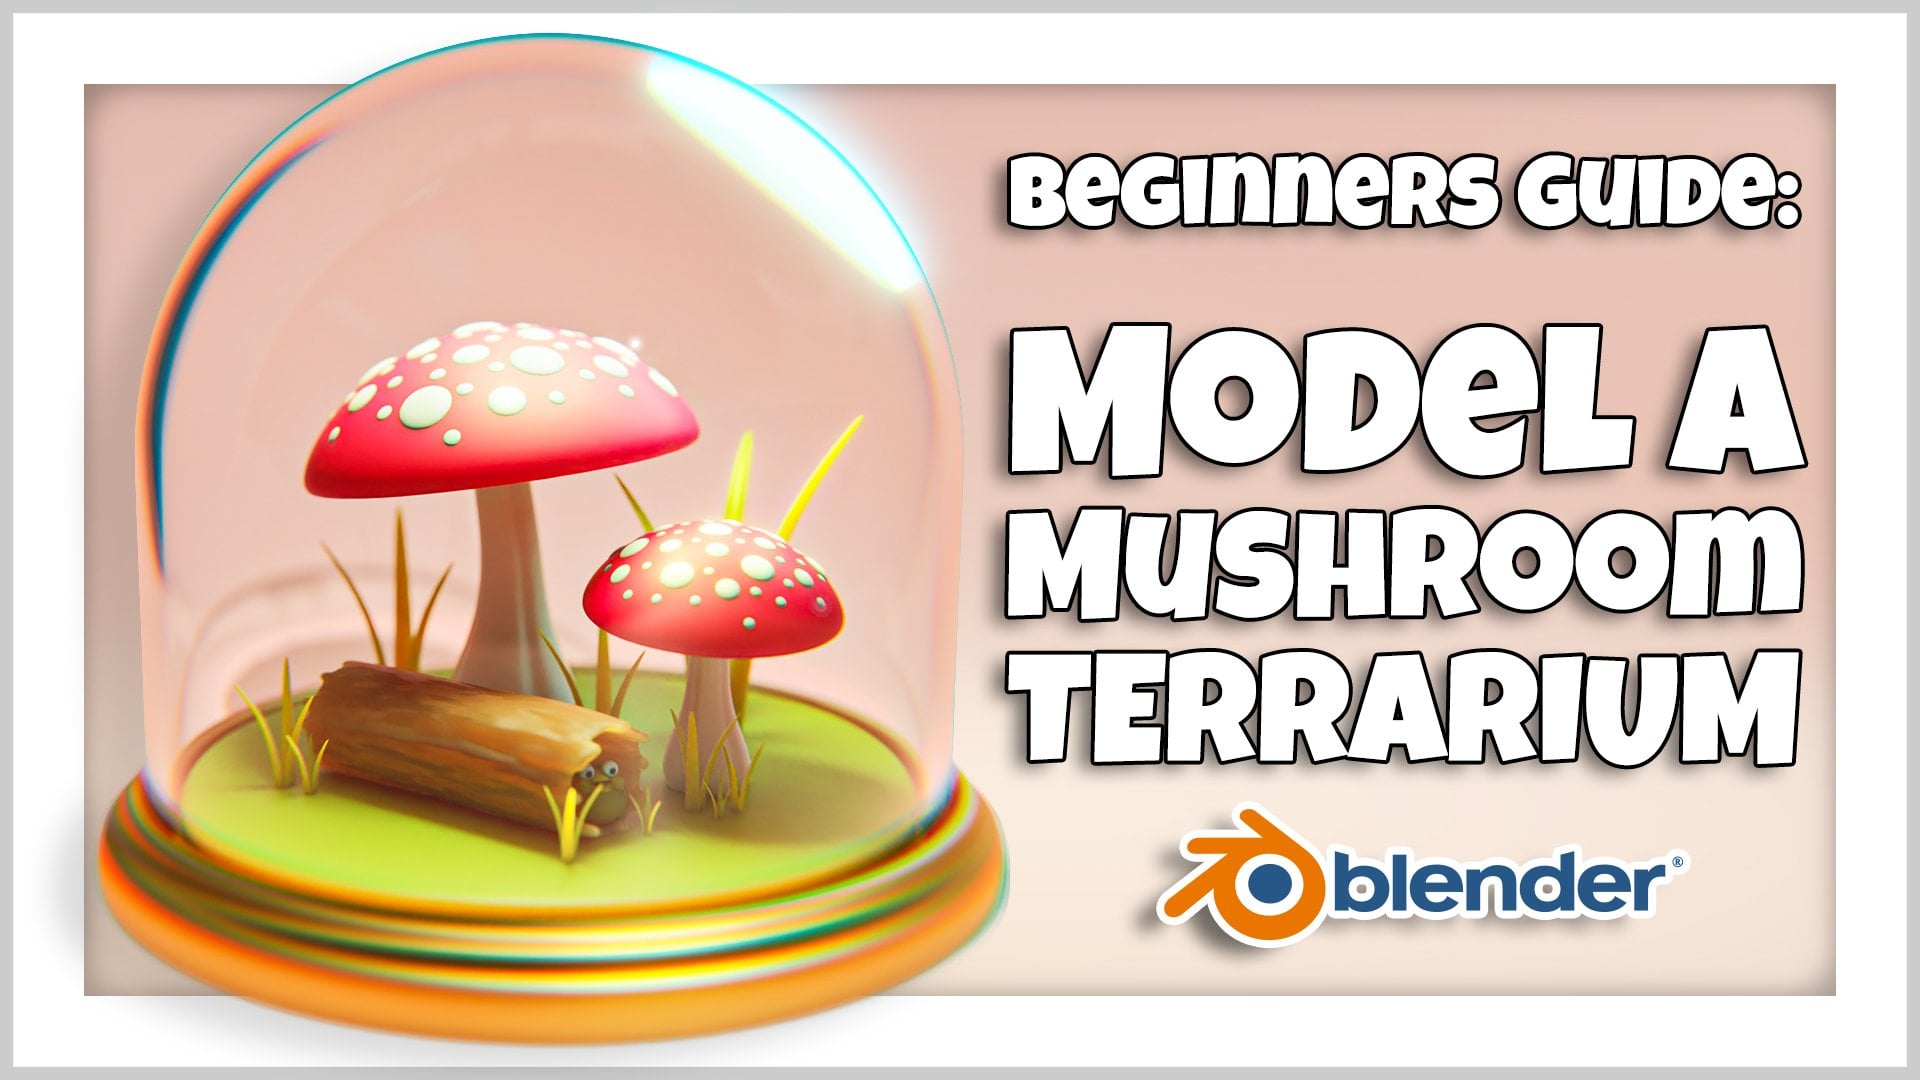
1. Introduction: Hi, my name is Harry and I'm
a professional 3d Artist. I've worked for over a decade as a professional artist in
multiple different industries. My jobs have included
creating user interface Art for a major video game
development company and working as the lead 3d
Artist and later Studio Director for an award winning Architectural
Visualization studio. In this class, I'll guide you through a fund
beginner exercise, where we'll model texture and render a cute gnome
with a real hair beard. We'll go through each part
of the process step-by-step. So you should find it funny and easy to follow along with me. We're using Blender
for this tutorial, which is an amazing and
totally free 3d software, the only barrier to entry is having a computer to
run the software on. A fuzzy little gnome
might seem like an odd choice for a
beginner project, but it really is a
perfect place to start. While creating your gnome,
you'll learn Modeling, which is how we'll
create the body of our little gnome Modifiers that add additional
modeling effects such as smoothing, Texturing. This will add color and
detail to the clothing of our gnome and their
beard. Lighting. We'll add lights to illuminate
our scene Rendering, which involves
positioning a 3d camera and generating a
picture of our gnome. And lastly, Compositing
that will add a background and a FUN pattern
behind our gnome render. At the end, we'll
have a cute gnome to render to our
heart's content. It's also a character
that can be easily altered to give them a different look without too much effort. Our class project will
have you take all of the techniques you've learned
while making the gnome, and then apply them to make a unique gnome of your own design. This would include
making adjustments like changing their hat
shape and style, clothing colors and fabric, or their beard style and color. I hope you'll join me on this fund little
beginner's journey through Blender by making your
very own bearded gnome. I'll see you in
the first lesson.
2. Setting Up Our File: This is your first time
taking a Blender class, I'd highly recommend
you start with my complete beginner's
guide to Blender first, this class was designed for the absolute beginner to
Blender and 3d Art in general, we cover every single necessary
topic in order to get you up to speed and running and Blender will accomplish this, but short and focus
lessons that cover each topic from it
beginner's perspective, utilizing a well-organized
starter file, we end the class within
easy projects where you set up and customize your
very own cozy camp site. With that out of the way, let's continue with the lesson. This lesson, we'll be getting some initial settings out of the way before we
begin our project. Let's begin. The first setting
we're going to change is our display units. We can do that by going
over here, this setup tab. This will change
our scene settings. Then we can go down two
units and twirl this down. We're going to change this
from metric to imperial. I'm more familiar working in imperial units such
as inches and feet. For the purposes of this lesson, I'll be teaching it
in imperial units. However, this is optional if you'd rather use
metric, that's fine. However, I'll be changing
mine to Imperial. So if you'd like
to follow along, you can switch that. Now. We're going to switch this
from metric to imperial. Then we're going to
change our default length from feet to inches. We're now going to
enable our graphics card within our Blender settings. So to do this, go up
to Edit Preferences. Then we're going to go down to the system window
here on the left. Then you want to
switch it to optics. If you have the option to. If you can't use optics, then you'll have to use cuda. However, optics is
the preferred method if you have access to it. And then you want to
make sure you have both of these boxes checked. Now you might see different
names here for each of these because this will show your
actual computers components. In my case, I have
an AMD processor and an NVIDIA graphics card, but we want to have
both of these checked. And that will allow
Blender to use both of these hardware pieces in
order to render our image, which will make it faster. We can now close this window. Then we're gonna go back
over here on the right side. We're going to choose
our render properties. Here's where we're going
to set our render engine. For our purposes. We need to use cycles
for this lesson. We're going to change
it from EV to cycles, and then we're going to
change the device from CPU to GPU compute. Now we're going to scroll
down here to viewport. And we're going to change
our max samples from 1024 down to 500. We won't need a
full 1024 samples. We can also scroll down here and twirl down the de-noise option. And we can check this box. We want to change this from
automatic to optics instead. Because we want to
force it to use optics and this situation. Now we can continue
to scroll down. Then in our render settings, we're going to change
our noise threshold to 0.07. Then hit Enter. Then our max samples, we're going to
change this to 2000. And then hit Enter. Then we're going to twirl
down this de-noise menu, just like we did before. We just wanted to
double-check that it's set to open image denoising. For this case, we do not want
to actually use the optics. The OpEx is good for the viewport render
because it's fast. However, the open image
denoising or is a lot more accurate even if
it is a bit slower. So these settings that
we just adjusted here in this render column will only
apply to the final render, whereas the viewport settings will only apply to
the viewport render. And then the last setting
we need to adjust is by going to our
output properties. This little symbol
here that the left. Then we're going to
change our resolution from 1920 by ten at instead a square resolution
of 2000 by 2000. And then hit Enter. Now when we make
our final render, It'll be a nice square image. Now that we have all of
our settings changed, we need to actually
save this file. That way when we start modeling, the file will have all these
settings changed for it. We won't have to do these again. We're gonna go up to File. Then we can do Save. And then we're just
going to choose where we'd like to save our file. In your case, I would suggest
saving this file somewhere like your desktop or
your documents folder or on a separate drive that way you know exactly
where it is and you can come back to a time after
time that we each lesson, you can be building
upon the same file. You don't want to lose
the file between lessons. Down here we can change
the name to something simple like gnome class. Then once we're
satisfied with the name, we can just hit
Save Blender file. In the next lesson, we'll start modeling the Body of our gnome. I'll see you there.
3. Modeling the Body: In this lesson, we'll begin
the modeling of our gnome, starting with its
body. Let's begin. Make sure you have the saved
and setup file from the last lesson open before
you start modeling. The first thing we're going
to do is unable to free and built-in add-ons within blender
to make our lives easier. So first we're gonna go up to Edit and then down
to Preferences. Then you go over to Add-ons. And at the top here, and you can search the name of an add-on. So the first one when
you want to search is extra objects. You type in extra objects and then you should
see this here. So you'll want to have the add mesh extra
objects checked. So that will enable
it and that'll add new objects for us to
use these primitives. The next one you want to enable
is called modifier tools. So you just type
in modifier tools. So you want to check
the box next to this interface modifier tools. With those two add-ons enabled, we can now close this window. Let's start by selecting
our Cuban, the center. And then we're going
to delete this using the X or the delete key. And then we're
going to go over to this list at the top right. We're going to click the little eyeball
next to the camera, and that's just going
to hide it within the viewport. It's still there. We haven't gotten rid of it, but we just don't have to see it in the viewport now because it's large and it's
sometimes in our way. Well now hit Shift a
to add a new object. And then your list here, you should see more objects
now than you had before. The one we want to
add is round cube. We can click on Round Cube. Then that's going to
add this cube here that has these rounded edges. Now we're not actually going
to be using this as a cube. Instead, we're going to convert
this cube into a sphere, but at the sphere will be
made up entirely of quads. So four-sided polygons. We're going to open up
this drop-down over here because we want
to make sure we don't click off of this or else
we'll lose the options here. So if you've done
that, just delete the cube and then re-add it, and then open up this menu. By default, this opened up
with a two size free EBX, the Y and Z direction. However, if yours didn't open it to make sure you type
into for each of these, you can either just type
into and hit Enter for each, or you can click
on the top one and drag down to highlight
all of them. Now, just type
into and hit Enter and it will change it for
all three of the fields. The next thing we'll do is
change the radius at the top. And that's actually what's
controlling this rounding. So if we zoom in here, we can see that the rounding
is occurring on the edges. As we turn this value up, the rounding actually
gets more pronounced. So we actually want to
set our rounding to one. So what that'll do
is essentially make this entire thing into a sphere. It's rounded it off so much that it's turned
it into a circle. And then lastly, we want to
change these divisions here. So by default it
starts with four. However, we want to
bump hours up to ten. And you can see when
we type in ten. Now our circle is
a lot more smooth now and you can still see
each individual face. However, it's a lot more round on the edges and
it's not quite as jagged as it was before. Now that we have
our sphere created, notice that it's
sort of looks like a golf ball and that's because it's not set to shade smooth. So right now it's shading each individual polygon by itself. So with your sphere selected, just right-click on it
and choose Shade Smooth. Now it's a nice smooth sphere, except we're also seeing
this X pattern on it. So it's mostly smooth except
it has these lines down it. And that's a symptom
of the edges in the middle overlapping. So it's relatively easy to fix. You're going to hit tab
with this sphere selected. And that'll bring
you into edit mode. Now we're going to go into
our edge mode by hitting to. And that'll switch this to edge. Now what you wanna do is
find the central line here. So you're gonna have to,
central lines will have a horizontal one and you'll
have a vertical one. So to start with, hold down your Alt key and then click
on this central line. That's going to select a
line all the way around, contiguous, around this object. However, you'll
notice it looks kind of dotted and dashed. And that's because
there's actually two lines sitting on top of each other which is causing that weird seem that we're seeing. Now that we have
just one of them selected by holding Alt and clicking on
this central line, we can hit X on our keyboard. Then we're going to
choose dissolve edges. So we don't want
to actually delete the edges because that'll delete the face is associated
with the edges as well. We wanna, we wanna
do is just remove the edge itself but
leave the faces behind. So we're going to
choose dissolve edges. Now that's cleaned up
that central point. Now we're going to
do the same thing for this horizontal line. By holding Alt and
selecting the central line. With this horizontal
line selected, we can hit X on our keyboard and then choose
dissolve edges again Not to remove that line. Now we have just
one more to remove. And it's this line here. So it's the one that's
lined up with this y-axis, the green line on your grid. We're going to again hold
down Alt, select this line. Now we can hit X on our keyboard and then
choose dissolve edges. Now that we've removed
all of those edges, we can hit tab on our keyboard to go back
to the object mode. And we can see that it's
nice and smooth ball. Now. Now we're going to start
shaping the body of the gnome. We'll be doing that by
sort of squashing and stretching this sphere into
the shape that we want. So to start with, let's hit Tab on our keyboard to
go back into edit mode. Then we're going to choose
our Vertex mode at the top, which is one on your keyboard. Then we're going to use
something called proportional editing to turn that on the top here there's this
sort of bulls-eye shape. It's next to the one that
looks like a magnet. So we're going to
click on this bullseye and then I'll turn blue. So that means we have
proportional editing on. Now, what proportional
editing editing does means that instead of just moving a single
vertex like we were before in the video where I showed you
the different tools. This is going to move the
Vertex we have selected, and then we'll also remove
every other vertex around it a varying degree until
it eventually falls off to a point where it's
no longer moving these. So just make sure movements
a lot more gradual. And it allows you to work
with this as if it's a ball of clay or
something like that. Before we started editing
this model, however, we need to discuss something
called X-Ray mode. So to enter X-Ray mode, you're going to hit Alt and Z at the same time
when your keyboard, and that'll make your ball
and every mesh within this scene look as
if it's see-through. You can see a little bit of the stuff from the front as well as this stuff
from the back. Now initially this is a
rather confusing view because everything
overlays on top of it. However, X-Ray mode has
one specific advantage. So by default, if I
switch back out of x-ray mode by hitting Alt
and Z, the same time. When I drag select over
these Vertex in the middle, I drag select and I can select everything
here on the front. However, if I spin
around to the back, I haven't selected anything
through the model. So it will only select the
Vertex that are visible. Now a lot of times that's not how you actually
want to work. You wanna be able to
select like this and you want it to select the
entire top half of the models. So when you start moving it, you're not just moving the front half of the model
that you could see. You want to actually move
everything behind it. And that's where X-Ray
mode comes in handy. If I switch back to x-ray With Holt and Z at the same time. Now if I drag select
through the model, you'll notice that
it actually selects everything throughout the model. So it selects directly
through it and it'll select things on
the backside as well. And that's a very important
when you're modeling. It's something that's
pretty easy to forget. So have you ever
find out that you've started moving something and you forgot to use the X-Ray mode, you'll have to control Z back a few steps before you
started moving it. Go into your x-ray mode and then remake your selection
and start moving it. To make sure we're working
in a nice flat view. As we edit this,
we're going to use this little toggle up here where we can click on
one of these letters. It will make our view nice
and flat against this view. We can see here I'm looking
straight down the model, but soon as I rotate, it'll snap back to what's
called the perspective view. So these views Up here are
your orthographic views, which are very technical
and very flat and 2D views. And then if I rotate
my camera at all, it'll pop me back into
this perspective view, which is more of a
three-dimensional view. But for working on
something really precise, using these orthographic
views can help. If you mouse over one of these controllers here it will also show you the shortcut, in this case to jump
into the X view, which is the view
we'll be using. You can use NUM pad three. Why is controlled numpad one? Then the shortcut for
the Z is numpad seven. I find it a little bit easier
just to click on these. So I'm just going to click
on the X nominee X view. Now I'm just going to select
these top two vertices here. So I'm just going to drag
select over top of these. So now I have them selected. And since I'm in X-Ray mode, it's going to select through
the entire mesh and it will select the Vertex
on the back as well. And that's very important. So make sure you're an
X-ray before you do this. Now, we have these top
center Vertex selected. We can switch to our move tool I clicking this symbol here. Then we're gonna get our gizmo. It's now we can start
moving this blue handle up to start shaping this sphere. And you can see what this
proportional editing is doing. It's moving the ones
that we had selected, as well as everything
else around it almost as if it's made of elastic or clay. Now if when you move this, you notice that you
don't see this circle. So you can see I here I
have a circle on my screen. This is just showing
the falloff. So this is the influence
of this movement, the proportional
editing movement. If you don't see that circle, that's probably
because it's way too big or it's way too small. And the way you can
adjust that as while you're moving these Vertex. So just keep clicking down
while you're moving it. And then you can use
your mouse wheel Scroll it in or out to make this circle either
larger or smaller. You can see the size of the
circle up at the top-left. And my screen here at
the very top left, up here, you can
see it says at 69, " right now, I'm going to
make mine a bit smaller. In our case, I think something more in the 40 range might work. So our goal here is to make this shape into a
teardrop shape. Maybe like a melted cone could
be a way to describe that. We're going to
pull this up here. We can continue to edit this. You don't have
to get it perfect. And the first try, it's we're
going to move it up here. Maybe I'll make
this a bit smaller. So something like that. So it's a bit of
a teardrop shape. Now, I want to flatten this bottom
out because I don't want it to be entirely
round on the bottom. This is going to be
the butt of the gnome. And we're going to have
this sit on the grounds. So we want to be a little
bit flatter on the bottom. So we can zoom in here, select just these
bottom ones here. We can pull these up. And
now I might want to make this influence a little
bit larger for this time. I'm gonna scroll it
up a little bit. I'm just going to flatten
it out a little bit. In this case here,
I might want to select all of these Vertex
here in the middle. So I can hold Alt, the
Vertex here in the center, and it will select this
horizontal line across. Now, maybe i'll, I'll scale
this in a little bit. So I can hit S on my keyboard to quickly
start scaling it. I don't want to narrow
this out a little bit. Somewhere about there. And it's still using the
proportional editing for this. You can see it's moving
everything around it. If I didn't have
proportional editing on, I'll just show you quick. You don't have to
do this yourself. If I turn this off by
clicking this button here, and I do scale again, you
can see the difference. It's only moving what
I have selected. So it's making this
really jagged line. Now in our case, we
definitely don't want that. We're going to leave
proportional editing for one, for the time being. It can, I can go back
to scale and I can adjust the size of this
with my scroll wheel. The proportional editing fall off to make sure it's
moving things as I want. Maybe I'll scale it
in a little bit. I can try again at the bottom, maybe I want to round out the
bottom a little bit more. I can hold Alt and
click on one of these Vertex down here to
select this loop around it. Hit S again, maybe all
fatness up a little bit. I want them a little bit pudgy on the bottom and
then the top here, this is the top of his head. Now, most of this is going to be covered by the hat so you don't have to get too
specific with the top here. But it just helps knowing the general shape
of the entire body, even if we're going
to cover it up with some clothing that way we know what it should look like
underneath the clothing. Again, I'm going
to hold the Alt, I'm going to select. So you can see here it's trying to select the verticals here. Just click around until you find where you
want it to select. We're going to select
maybe this one here. We'll just scale it
in a little bit. It's just kind of sort of massaging the shape into
what you want it to be. It's very now we have
this melted cone shape. It's also maybe I've
flattened teardrop. So if I rotate my camera around, you can see what we have here. If I hit Alt and Z, I can hop out of the X-ray mode to make it a little bit
easier on the eyes. That's what we have right now. We also don't always
have to work by selecting an entire loop
or an entire piece. We can also just select a single vertex and
move that as well. So maybe we just kind
of flatten it out here. If we consider this x-direction here on our little
compas up here, if we consider this to
be the front of it, maybe we'll make
it a little bit, little bit wider in the front. So we're going to select
the central one here. This is gonna be
sort of his belly and where does beard sets? And then we can pull in the
area here where his nose will be less back a little bit. We're just trying
to think of what the end product will be, maybe the back-end, we can
leave a little bit more round. And then the front end, we'll have a little
bit flatter because a lot of this is
going to be covered up with his beard as well. Once you get your gnomes body to a shape that
you're happy with. Again, this is about what it should look like
for this tutorial. Sort of a flattened teardrop
or a melty cone shape. We can hop out of our
edit mode by hitting tab. You can exit your x-ray mode
by hitting Alt and Z again, just a little bit easier to see. The last thing we're
gonna do is add a modifier to help smooth
this out a little bit. You can see up at the
top here where we've pulled these, these Vertex, it's gotten a little
jagged again, the areas where we didn't
move at a whole lot, it stayed nice and smooth,
such as the bottom. But up here we can see since
we stretch this out and we didn't add any more
Vertex or faces up here. I've got a little jagged. So we're gonna go over here. So this little blue wrench icon, this is your modifier panel. We can click Add Modifier. We want to add the
subdivision surface modifier. Once we add this, you can notice right away it started
smoothing it out. However, we can exactly
see what it's doing. In a way to, to fix
that is to go up to this menu here with these
overlapping circles. We can click this drop-down. Then down here we can
check on Wireframe. When we check this
on, it allows us to see the wireframe of the object. Now we don't always want
it at 100% opacity. We can set this down to 0.25, so it's only 25% opaque. Now when we click off of it, we just see a light indication of what the wireframe
looks like. Over on the modify panel, we can see this
little monitor icon here as well,
little camera icon. So when we click this
blue monitor icon, that means it's disabling
it in the viewport, but it won't disable
it in the render. If we have this blue
camera icon on, this is the symbol for render. That means that this change, the smoothing still exist once
we make our final render. However, it won't exist
within the viewport. If we zoom in here and we
turn it off in the viewport, we can see the amount
of difference that it's making in terms of the
smoothing of this, these numbers down here, or what is actually
causing the smoothing. So if we turn this
up another level, we can see it gets a
little bit smoother and you might have to
zoom in to see this. So we turn it back down to one. We can see the sort of jagged
edges we're getting here. And then we turn it up to two. You can see it's
gotten just that bit, a little bit more
smooth on the edges. This is the viewport display. So this is only showing us what is going to do
in the viewport. However, at the render time, this is the setting
that will change that. So if we turn this
up to say four, that means when it comes
to the render time, it will be twice as smooth as what it would be
in the viewport. So we can work with it a
little bit less smooth to save ourselves some
processing from our computer, because the smooth
ER we make it here, the more heavy this
scene will be a little bit more difficult
for your computer to use it. So you either want to
have these numbers either identical in
both set to two. If you're smoothing
is relatively realistic and not super high, or if you need it to be
much higher for the render, make sure you're only using the, the render toggle here to make
it higher for the render. For our case, we're
actually going to just leave both of these at two. So that'll be plenty
of smoothing for this. A lot of this is
going to be covered up by hair and a hat. So we don't have
to make this body, body really, really smooth. Now you might also notice
that we haven't actually added any visible faces to this. So when we turn off
this viewport toggle, it starts looking more jagged, but we don't see any
more cuts on this. And that's because this
modifier is actually hiding those cuts with this
optimal display. So when we turn this off, we can see how many more
cuts it's actually adding. If we change these numbers here, every time we
changed the number, we can see that it's
cutting the model up more and more each time. So here it's so small you can almost can't see it
unless you zoom in. So that in our case is
this is much too high. So we're going to turn
this back down to two. And I would suggest
you leave off optimal display in
this case because that will be important later on in knowing the resolution
this model, resolution meaning
how many faces, how many polygons
this model has. That'll be important
once we get to a step for adding the beard. For now, just have it set to two for both of these settings. Make sure you have all of
these little buttons up here, turn blue. So these three here. And then just uncheck
optimal display. Now that we're done
with the body, make sure you save
your file by going up to File and Save. Or you can do Save
As if you'd like to branch the file
for any reason. But I would recommend
just doing Save. We can see here it's
saved the file now. Then you'll be ready
for the next lesson. In the next lesson, we'll be modeling The Feet of our gnome. I'll see you there.
4. Modeling the Feet: In this lesson, we'll be
modeling The Feet of our gnome. Let's begin. To begin this lesson. We're going to enable
another add-on. So we can go up to
Edit Preferences, go down to Add-ons. And in the search
bar at the top here, you went to type in loop
tools, and that's one word. You can usually just see
if you type in loop, you want to enable
mesh loop tools and just click this little
checkbox next to it. Once you're done with that,
you can close this window. Now, let's select the body of our gnome and then
go into the X view. So by clicking on this
little X symbol up here, it goes into that nice
flat orthographic view. And then we're going to move
it up so that the bottom of our gnomes body is lined up
with this green line here. That way when we make
our next object, which is going be the Feet. The Feet are already lined up wherever they
should be anyway. So we can go back into our
move tool or you can just hit G and then Z and then move it up and just
get it as close as you can see the bottom of
the green line here. It doesn't need to be perfect. We just wanted to pretty close. So if I zoom in here,
that's about how close minus it doesn't need
to be better than that. We can rotate around to
get out of that view. Then the next thing
we're going to do is hit Shift and a to add a new mesh, I'm going to add a cube. The cube is just going to
pop up here in the center. That's fine. We don't have to move
it the 3D cursor off the origin here
because we're just going to quickly move
this foot off anyway. We went the size of this
cube to be about 24 " in relation to the spotty, that should give us a
nice size for the foot. Once you have a
24-inch cube made, you can just click off
it and now it's created. Now let's select our foot, this cube that we've just made. We're gonna go back into one of these orthographic views so you can use either the X or Y. It doesn't really
matter in this case. Then we're just going
to move this foot up so that it's lined up
with this line again, because we want the
this is the bottom of the foot essentially
that we're lining up. And that should meet
up with roughly where the bottom of the
gnome body as well. We're going to align that up. Now we can rotate around. Then let's just move it towards
the front of the gnome. That way it's not
inside the body. So this should be a good
place to work on it. You can move it off
a little bit to the side here if
you don't want it overlapping with the
body as you work on it. Before we go too much further, let's start naming these objects that we're creating
in our scene. That way we don't
have just a bunch of cube and round cube and sphere and everything listed in this scene collection over here. We want it to be pretty obvious what we have in our scene. Right now we have the cube selected and which will
eventually be a foot. So let's just double-click
on the name up here in this list where it says cube.
We're going to type foot. Then we can do dash left, just so we know that eventually this is going to
be the left foot. And then when we duplicate
this foot after creating it, we can do foot dash right away. It's obvious which is which. Now we can select
this round cube, which is actually our body. Just double-click on the name Round Cube and we can type in body and then hit Enter the
collections within this list. Here are essentially
folders that contain certain items or lights
or cameras or meshes. So let's make a new one and
then we'll call that gnome. So first we're going to
click on this little box, this little folder box here
next to scene collection. Now we can right-click and
then make a new collection. Now we have collection
to down here. Let's double-click on the
word collection to and just call this gnome. Hit Enter. Now we can select the
items from the list here, so we can click the
body and drag it in. There, we can click foot
left and drag that in. Now we have these items
nicely categorized here. Eventually we can rename this. So we can name this
now collection. Instead of that, will
name it render studio. We won't be doing anything
with this collection yet. But in the future, this is where we'll build our render studio. Now that we have
everything named, select this little box next
to the gnome collection here. That way anything we
create will automatically go into the gnome
collection to begin with, rather than going into the, either the scene collection or the render studio collection. Now that we have the
organization done, Let's go back to the foot
by selecting it here. Then we can hit Tab to
go into our edit mode. Then we're gonna go right
into the X-ray mode as well. So we can hit Alt and Z at the same time
to go into X-ray. Now we want to start
shaping this into them. More foot shaped object
instead of this big cube, this wouldn't look
very good As that foot So the first thing
we're gonna do is drag select over the
top for Vertex here, so that we have the entire
top of the box selected. Then we also need to
make sure that we turn off proportional editing. We won't need that right now. We can just click this
little blue bulls-eye. Now it's off. Then we're going
to hit S to scale. And then why? To make sure that it's bound to just the y-direction we will wanna do here is to scale
this inward a little bit. So that's more of
like a wedge shape. The top of this
right now is going to be the toe of the foot, and then the bottom
will be the heel. So we're going to start now by just shaping it
out a little bit. So we've pinched
it a little bit. Let's pull in this side as well. So we're just going
to drag select over all the backside
of the foot. So this will be the
top of the foot as well as where the
leg will come out. We're going to just
move this inward a little bit too
thin the foot out. Think about there. Then we're going to grab just
these top ones here. Then we're going to
pull those down towards the sole of the shoe that
we're going to give him. If it seems like it's
still a little too thick. Also, just grab
these bottom ones here and pull them in
a little bit as well. So nothing we do
here is permanent. We're just moving around points if anything seems a little off on yours or you
want to deviate a little bit from
what I'm doing. Feel free. Now that we have that setup and we have this roughly wedge
shaped object, we're going to hit Control and our spring Akbar Quick cut menu. Now you can see as we
mouse over the model, it's popping up this
little yellow line. And wherever that yellow
line is, when we click, it's going to leave
a cut behind that will add more vertices
for us to work with. So first we're
going to click with this horizontal line
selected like this. Now when we click,
now it's allowing us to slide this
around a little bit. We're going to start
by sliding it down to about maybe the
one-third point, maybe the 25% point of
the bottom of this foot. About here is fine. And again, we can
always move that. Now what we're going
to do is select the bottom four vertices
at the bottom here, IT S and then Y. Then we're going to scale
those in a little bit as well. Again, if it seems like your
scale is moving a little bit too fast or it's a
little too sensitive, just hold shift down as you move it and it'll slow it
down a lot for you. We're gonna do
something like that. So you can see now that we're
starting to shape this foot out Up at the top
here is the toe, and then the bottom is the heel. This is the bottom of the foot. So this is where the sole
of his shoe would be. Up here is where the
top of the shoe is and then roughly where the leg
will come out eventually. Now let's add another cut here. So we're gonna do
Control R again. This time we're going
to cut vertically. So we want the yellow line
to be going up and down. We're going to click. And we can just click
again to set it. So we don't want
to move it at all. We wanted to write
in the center, so we don't need to
slide it back and forth. Now with this,
we're going to grab these top two vertices up here. And then we're going
to just pull these up to round out the
top of the foot. So make the top of this the shoe that the foot or
whatever you want to call it, a little bit more round. Then we're gonna do a
similar thing at the bottom. We're going to grab
these down here, some holding shift now to drag select over
the other side. That way I'm selecting
both of them. We can just move those up a little bit too, round that out. And maybe now I'm seeing this. I might want to move
this middle lineup. So I'm just going
to drag select over this and pull this middle
line up a little bit to make the shoe a little
bit more of a almost like a teardrop shape similar
to how the body is shaped. We don't need to cinch it in, in the middle like we
did with the Body. But it's roughly the same shape. We might have narrowed the toes out a little bit too much too. So we're just going to hit
S and Y with the selected. Just scale them up a little bit. Now, again, this is only
scaling it in the y-direction. So it's just making
the foot wider. It's not also making
it larger overall. Then the last thing
we're going to do with these cuts is to control our we're going
to add one more cut. We're going to add it here
on the top half of the foot. Then we can slide it down. So this is giving us the
bounds of where sort of where the shoe stops and then the
ankle and then into the leg. We'll start. We're going to
pull it down to about here. It's a little bit above this, not quite as same
distance as the bottom. It's a little closer
to this midline. So essentially we
need to define where this leg is going to pop
out of the top of the foot. Now with that cuts selected
and placed in the model We can now go into our face mode with
three on our keyboard. Now that we had three,
we're in face moon. We're going to hold shift. And we're going to
select the four faces on the back here. So we're going to select the
area where the leg is going to pop out of the
top of the foot. You want to select roughly
where this black dot is. So if you select
too far past that, you might select through the
model to the other side. But if you select
close to roughly where this little black dot is showing you the
center of the face. You should be able to select the actual facie
one. I held shift. Select it all for these faces. Now I'm going to hit
I on my keyboard. I'm going to scale this in. I'm going to scale
it into about here. I don't want to scale
it in so far that the lines start crossing over. I'm gonna scale right before
that starts to happen. So by inserting these faces, we've created an area
that's thinner than the top so that when
we extrude this out, there'll be a little bit of
an edge here to show where the top of the foot
goes around the leg. It's the backside of the shoe. And then the leg will be
extruded out of this backwards. But before we do that, we need to now use
the add-on that we installed at the beginning
of this loop tools. So first we're going to
hit N on our keyboard, 3d at the end key. Now we can go down
to Edit tab here. We can twirl open loop tools. Then we're going
to also twirl open the circle option here. So this will give
us the options for the circle Loop tool. Now that we have the
circle tool open, because a few different
things we can do. First we can just click
on this circle button. And what that'll do
is I'll take all of these faces we currently
have selected, will form them into a
vaguely circle shape. Now it's obviously
bound to what it has access to in
terms of Vertex. So it's more of a, an angular circle here, but it's doing its best job
to make this into a circle. The reason we want this to be a circle is because
we want the leg that we extrude out of this
TB more circular. Rather than if I hit Control Z. This sort of flat, kind of almost trapezoidal
shape that we have. Now, that's the first option. We can just click circle
and it'll just try to average it all out and
make the circle as it is. Alternatively, you
can hit Control Z. To undo that, we can instead define a
radius that we want. Now, if we hit circle, it's going to use this radius
value to make a circle. So by default, one
is much too large. But we can make
this a little bit smaller down here at the left. Make it roughly the
size that we want. In my experience, I think about one point or 0.12 is okay. You can maybe go up a little bit higher if you want it to
be a little bit bigger. But I would say 0.13,
maybe it's the largest. You can make it not. Let me have that set. I can rotate around, make sure nothing
is intersecting. And I think that
looks pretty good. Now hit N on our keyboard to hide this menu since
we didn't using it. Then we're going to
hit E on our keyboard. And that will start
the extrude process. We can extrude this
back and you can see now it's starting to make
the leg of the gnome. This leg will eventually just
intersect into the body. Back here of the gnome, it'll just kinda
run into the body and hide itself
behind the beard. So I don't really have to
worry too much about the leg. I would just make sure
it's long enough that it has enough room to intersect. You don't want to
make it really short. Because then you might see
the top of the leg here. Then we're going
to actually delete the faces here at the top. So with these faces
still selected, just hit Delete or
X on your keyboard. Then we went to delete faces. This will be important
later on when we apply smoothing to this. If we left those faces
at the top here, the smoothing we get kind of
crazy Up at the top and I would start pulling this
into a point at the top, rather than leaving it
nice and round as we have. The last thing we
wanna do here for this ankle one leg intersection, as we want to make it a little
bit less abrupt right now it's very, very square here. So we're gonna go
into our edge mode, which is two on the keyboard. We can hold Alt. And then we're going
to click on this edge loop here that goes around the base of the ankle.
We're going to select that. Then we can either
drag it back using these controls here on
the gizmo, like this. And we can just kind
of I it up and make sure it goes back
relatively straight. Or alternatively, we can
be a little bit more precise with this
movement rather than having to guess
what straight. Because we can see
here if we just moved it along this axis, it's moving at horizontal
along the world axis, but it's not taking
into account that the slag is actually
going back in space, a little bit angled. So to fix that, we can go up
here where it says global We can switch it from
global to normal. Now you can see here that it's actually rotated this gizmo. Now it's rotated it a
little bit off-center here. The Z now is going towards the back of the
leg rather than going up. However, that means that
we can now just grab the Z handle and move it and it moves it
exactly along the leg. That's because it's following
the normal the leg. So it's a lot closer to the
actual rotation of this leg. We're going to move
it to about here. Maybe we switch back
to our Vertex mode. We can select this.
We pull this up. So we just want to
round this out, make sure it's not
quite so stark. The difference between where the ankle and foot
run into each other. Movie, pull this
up to about here. We just want to soften this out. If at any point it seems like your leg maybe it's too thin. We can just drag
select over the leg. I'm going to select
the ankle first. Then I can hold Shift and
select the top of the leg. Now I can just hit
S on my keyboard. And then scale this up
a little bit subtle, make the leg a little bit wider. And then I can go back
to my edge mode here. Select this edge
around the ankle, make sure I'm in normal mode, and then just slide
it back a little bit. Now it's a lot more gradual here. Nothing that looks better. Let's go back up to the
top here and switch back from normal to get global. Now we're going to
add smoothing to this foot because
Our next few steps, we need to know roughly how
smooth the foot is going to be before we start extruding out for things
for like the soul. And then the rim around
the base of the shoe. With this object selected. It doesn't matter
if you're still in edit mode, that's fine. We can go to our modifier panel, which is the little blue
wrench here on the right. We're going to add modifier
subdivision surface again, just like we did for the body. And this time we're going to
set our smoothing to 3.3, 3.3 for both of these values and we can
leave optimal display on. We can see here now that our
foot is much more round. So if we hit Alt and Z, we can leave our x-ray mode. We'll notice here that it's that golf ball look that we
had before on the body. That's something we can
fix now if you'd like, you just hit tab to
exit your edit mode. And then with your foot
selected, right-click. Shade Smooth. Now it's nice and smooth. Again. Now we can go back into
edit mode with tab. The first thing we're
gonna do is make a border around this foot, the edge of this foot here
right now it kinda looks like a sock or just like a sort
of a cloth closed foot. We want to make it look at
least more like a shoe, because we're going
to add a little leather sole at the
bottom of this. Once we get to the
Texturing step, the first thing we need to do is hit Control and
our, on our keyboard. Then we're going to be
placing a line that goes around the foot. Then once we place the line, we can slide it
down to the bottom. You'll notice it starts
making the bottom of this foot a lot more flat. Right now, this subdivision
surface modifier is averaging all these points out and it's smoothing
between each one of them. But the more edges you have, the less smoothing you'll get
between them because it's averaging less distance
between each one. As we add more
edges to this foot, the foot is going to
start taking more of a hard shape wherever
those edges are. First we can click on this. So we want this horizontal line, I guess it's vertical,
in this case, vertical going around the foot. We can click and you
can see right away the flight already gets a
little bit more square. If we start sliding it down more towards the bottom, well, notice that the foot
starts taking more of a shoe like shape at the
bottom rather than a sock. So we're gonna put it right
about, right about here. We went a little bit of a
border here at the bottom. We're actually going to be
extruding this board or outward to make a rim around
the bottom of the shoe. Now let's switch
to our face mode using three on the keyboard. We're going to
select this new ring of polygons that we just
created with that cut. We hold Alt and then click
on this ring of polygons. You can see here it's selected all the way
around the foot. Now we're going to hit Alt
and E at the same time. So that's going to
give us more options for the extrude
them we had before. We had Alton E, we'll get
this little box popped up. And before what we did
was just extrude faces. This time we went
to extrude faces along normals because we want the faces to extrude
outward from the foot rather than
all in one direction. We're going to choose
extrude faces along normals Now as we slide our mouse, you can see it start extruding all the way out around the foot. We don't want to
extrude this out too far because we don't want a really pronounced rim around
the bottom of the shoe, but just a little bit as fine. Remember you can hold Shift to move it a little bit slower
so you have more control. So we're going to extrude
it about that much. Show you mine so you can see it substituted about,
about that distance. The actual distance is not
particularly important, but just visually
about similar to mine. Again, we can see
here that this is a very smooth transition. If we wanted to make this a lot harder here to make it look more like a son seem that
goes around the shoe. We can hit control. And are we want to place a cut on the inside
here of the shoe? The shoe seem that we just extruded out in the
top side of it. Since we click as
we move it closer to the base of this actual shoe, we can see that it's
making that seem harder. It's more of an
actual sewn seam. We're going to move
it about here. I'll show you a quick on mine. It's right about here. I've
moved it closer to the toe of the foot and it made that seem a lot tighter on
the inside of the foot. That's what mine
looks like as I spin around just for reference. You'll notice here, I
don't know that we've actually gone over this
before because it was so, so similar on the body when
we added the smoothing. But this cage that
you're seeing, this sort of transparent cage, that's the actual model. The sort of smoothed out
version of it is actually what the results of the
smoothing is from the subdivision
surface modifier. If we just turn this off
in the Viewport here. So we click this
little monitor icon. This is what the foot
actually looks like. This is what we just did. And that's what that
cage looks like. But when we turn our
smoothing back on by clicking little
monitor back on again, this is what it
will look like once becomes comes to render time. So this is the result we want to actually pay attention to, even though the actual foot itself is very low poly
and sort of jagged, the end result is nice
and smooth like this. Now let's create
the little leather sole at the bottom of our shoe. Let's switch into our face mode by hitting three
on the keyboard. Then we're going
to hold Shift and select each of the faces
on the bottom of the shoe. It's now I haven't
them all selected. Then we're just going to
hit E to extrude this out. You don't really want to
extrude these out very far. So just a little bit, just about that much. You can see here
roughly the distance. Then we're going to scale
these in a little bit by hitting S and then just
moving them inward. About that much. Now we're going to
hit Control and our, we're going to place
an edge right in this, this distance of the new
extruded soul that we did. Right-click here. And then we can pull this
back to about about here, similar to what we did for the rim of the shoe
that we extruded. We're going to place that
they're now you can see here that we have just a nice
little soft soul on. Someone hit tab to
exit this edit mode. So it's a little bit
easier for you to see. That's roughly
what the bottom of your shoe should look like now. Just gives the indication that something is different here, the bottom material of the shoe, this is the transition
point between them. We can see at the top here a nice crisp edge when this little rim that
we put on the top of the, or the bottom of the shoe here. Then it transitions
backwards into the leg. And we don't have to
worry about making the top of the shoe here. We're just going to
assume that this foot, he's wearing maybe high
boots or something. And most of this
pretty much everything beyond about this
point here back. So most of this leg is just going to be
covered up by the Beard. We really don't need to waste
their time putting too much effort ends at the
top of the shoe when it's just going to be
covered up anyway. Now that we're done
with the sole, make sure you're out
of your edit modes. So make sure you're in
object mode like this. You can use tab to
enter, enter and exit. So once you're in object
mode, select your foot. Now we're going to
start placing it. We can just slide it over. We want to have it pretty
tight against the body, almost the top of the foot, touching the belly
of the gnome here. We can slide it
back a little bit. We also probably don't want
the Feet poking directly out at a 90 degree angle
from the body of the gnome. We want to have them sort
of tilted outward a little bit and maybe rotate the toes outward a
little bit as well. It'll look a little
bit more natural given the gnome a
little bit more of a Cute sort of
pudgy look to them. So we're going to place the
foot roughly about there Now we can hit R and then Z on our keyboard to rotate the
foot outward a little bit. And also while
you're doing this, have you hold Control
while using rotate. It'll snap it in five
degree increments. So maybe we want to rotate
it out about ten degrees. So in this case it's
actually negative ten. And you can see that at the
top left of my viewport here as I move it and you
can see the number change. I'll do about negative
ten for this one. Now to rotate the toes outward. So rather than just
the entire leg, the right now the foot is
still perfectly up and down. We're gonna go up to
the top and switch it from global, local instead. So normal is going to
look at the faces and the orientation of the
edges of the model. Whereas local is
going to look at the orientation of the
entire object as a whole. So now you can see
when I switch it, I'll do it again here. Quick. Global, you can see this red line is
sort of off kilter. So if I tried to rotate this, it's going to rotate
it all over the place. Now if I switch it to local, it outlines it up with
the rotation that we just did that negative ten
rotation on the foot. Now we can go back here. We can go into our rotation
tool here if we want to. So we wanted to
use that instead. Now we can just rotate
it here on the x-axis. Again, you can hold Control
to make sure you're rotating it by certain
amount of degrees. Maybe another ten
this time as well. Ten and the Z up and down,
and then ten and the X. Now that we have
our foot rotated a little bit and looking a
little bit more natural, we can switch back from
local to global instead. Because then our
next operation here, we want to make sure we're
moving along the grid. Instead. We're going to select
this foot here. And now we're going to
make the second foot here, which is just gonna be a
duplicate of the left foot. We can hit shift in
D for duplicate. Then we can see here
as we start moving it, now we have a second copy of it. However, we want to
make sure that we're copying it along this grid line. So along the y-axis so
that it stays horizontal. It doesn't look like he has
one shorter or longer leg. We're just gonna hit Y to make sure that we're doing that. And that's why we
switched it off of local back to global. Because we did local first, it would move it
along the local axis, which in this case is
no longer lined up. So we're gonna move it roughly
to about the right spot. So about there is correct. But now his feet are both
rotated the same way. What we're gonna
do is mirror it. So we're gonna go up to
object at the top with this new right foot
selected object. Then go to mirror. Then we have options
about how to mirror it. So in our case, we want
to mirror it along the Y global axis. If we did, why local? Again, that's going to look at the orientation of
the foot itself, not where it is
within the world. So we'll do why global? You can see it pops it over. Now it's the correct rotation. And we can go back here and
just make sure that it's be placed it roughly
about the right spot. These don't need to be exact. You might have his
legs a little bit rotated more one way or a little bit further
apart one way. And this will all be hidden once we have the beard anyway. Now with that done, we have both the little feet and
we have the Body created. In the next lesson,
we'll be modeling The Hat of our gnome and giving them a Nose. I'll see you there.
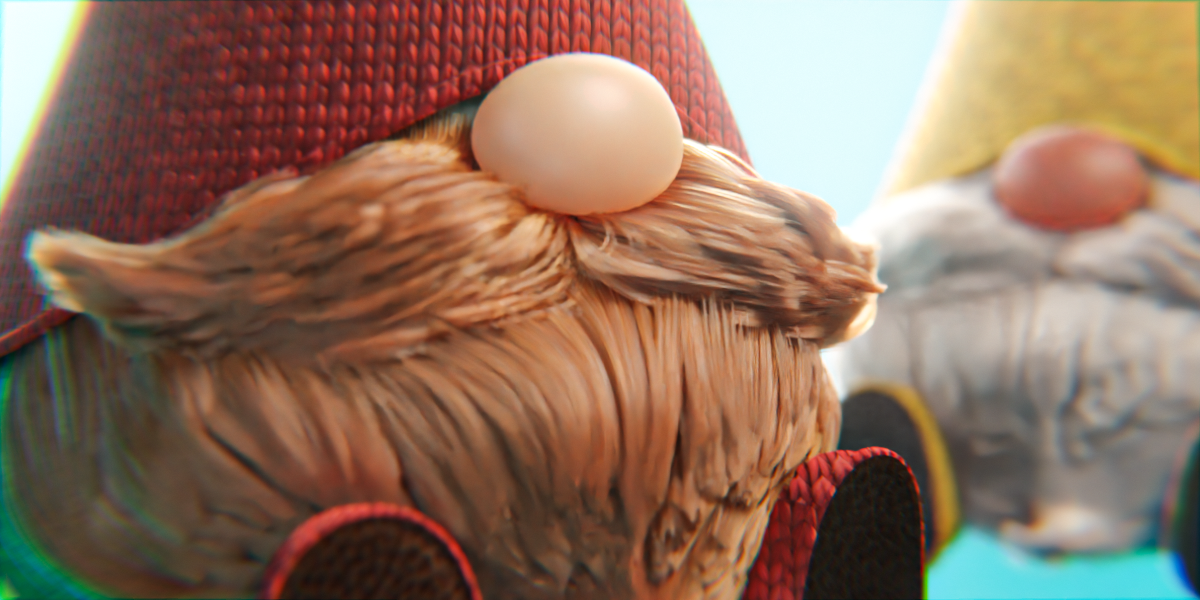
5. Modeling the Hat and Nose: In this lesson, we'll
be modeling The gnomes Hat and giving him a
Nose. Let's begin. Let's start by
creating the base mesh for the Hat, which
will be a cone. We're going to hit Shift a and pick up the add menu
that we can go to Mesh. I'm going to go up here to cone. So you can click that. Now it's going to
generate the cone here underneath the gnomes
body. That's okay. We'll be moving in
here in a second. Let's start with, let's
change our vertices to 20. We don't need 32 cuts
for the Hat because eventually we're going
to be smoothing the hat. So we don't need
to start out with so many vertices to begin with. So 20 will be plenty. And that'll make it a little
bit easier to shape it when it's in the low polygon format. Before we apply the
smoothing for our radius, we're going to type in 24 ". That way it's a
little bit wider. Then the radius for
the number two, which is actually
the top of the cone. We're going to
leave that at zero. That way it comes to a point. Then for our depth, we're going to type in 60 ". That'll just make it
a little bit taller, a little bit more head shaped. But again, we're gonna
be shaping this hat. So don't worry too much
about how this looks now will be making adjustments. Once you have that all set, we can just grab this Z handle
here with our Move tool. And we're just
going to move it up roughly to where we want. Our goal here with this hat. So we can see here the orange outline that
we have around it. We want this to be about
the midpoint of the Body. Sort of rate, rate right here
where this body tapers in. That's where I'm considering
the top of the head start. I want it a little
bit below that. I'm going to put mine
right about here. And this is purely up to
you wherever you put it. I would suggest that it's roughly about that
mid point though, because we want to have
enough room for a nose. And then eventually
a big Mustache, and then the beard that will
come down from that as well. I think they're
looks okay for now. We can now switch
to our scale tool, which is over here on the left. It's this sort of
growing box icon. We're going to scale
this up just in the X and the wide direction. That way we can widen
the bottom of the Hat. We're going to scale it up
just until it starts peeking through the body here. So we can see it's
intersecting here, but we'll be dealing
with that in a minute. But we want to
scale it up so it's about the same size
as the bottom, the bottom of the Hat rather. It's about the same size
as the width of the body. I think that looks good. Now we can scale it up
a little bit as well. We have two different
ways we can do this. Here. We can just scale it like
this and make it taller. And then we'll have
to move the hat. Or we can control Z that we can instead go into
our edit mode by hitting tab. Make sure we're
in Vertices Mode, which is one on your keyboard. And then we can just
grab this top vertices and move it upward. I would suggest
probably doing it this method because
then it doesn't, you don't have to move the
bottom of the hat again. We're just going to move
it up until it's about, about here so we can
see that it's not, it's not intersecting
with the body anymore. I'm gonna hit Tab to go back to our move into our
object mode rather. We're going to slide
this hat back a little bit because as we
shape the body, at least in my case, he the body wasn't perfectly
symmetrical front and back. So I need to make sure that
the Hat accommodates them. About here's good.
Again, don't worry about this stuff where it's just clipping through a little bit. We can always fix that. While we're still
in the object mode. Now's a good time
to right-click on the model and then
do Shade Smooth. Make sure you have the model
selected when you do that. Now it's sort of smooth, but we can see we're
having some issues here and we'll be fixing
those here in a minute. It's got a bit of a shadow at the bottom and a shadow at the top. The shadow at the top. We'll fix a little bit later, but the shadow at the bottom
we can fix pretty easily. Now let's go back into
edit mode with tab. We're going to switch
to our face mode, which is three.
When the keyboard. We're gonna go into our x-ray
mode by hitting Holton Z. Then we can click just this
bottom face here on the hat, the bottom of the cone,
then we're just going to delete that delete faces. Now if I hop out of
x-ray mode With Alton Z, I can see that the shading is
much better at the bottom. It's still a little
weird at the top, but again, we'll be
fixing that student. Let's go back into our
x-ray mode With Alton Z. Now we're going to
switch to our Edge mode, which is two on the keyboard. Then we're going to
drag select across all of these edges
here in the middle. So we're just going
to drag a box and select all these
edges here in the middle. Now right-click. Then we're going to
choose subdivide. Subdivide will add cuts across the edges that
we had selected. And it's a little bit
different than the control R. And then the little yellow
line that we were dropping. Because this is going to
add them in uniformly and we can tell it
exactly how many cuts to add all at once. So right now it's set to one. If I click this up Can see there's two
or two cuts here. We can add as many
as we want here. So to start with Berlin
going to add two because we want to work as
low poly as we can. Because we know that will be
smoothing this afterwards. And the more cuts we have, that's more polygons and more vertices that we have to deal with prior to smoothing. And it might cause some
smoothing issues later on. So the less we have to
work with, the better. In our case two is plenty. Once we have that,
we can click off. Now we have two cuts across
the center of the hat. Let's switch back
to our Vertex mode with one on the keyboard. Now our job here
is to go into be, to start making a
really rough curve, curl in the hat. It's right now, it's
just going straight up. However, in the example that
you saw in the thumbnail, and probably what
drew you in was this sort of curly
hat that we had. It makes it a little
kit, a little bit, a little bit more cute,
little less rigid. So let's start doing that now. So to start with, make
sure you're an x-ray mode, that's very important here. We're going to just drag across these and then we can
start rotating these. So I'm going to switch into my Rotate tool here because they find it a little
bit easier to have the gizmo to work with. And most of these cases, I'm just going to start rotating this and I can use
the white handle because it really
doesn't matter that I'm rotating it specifically
on an axis. I just want to rotate
my camera around. Rotated here. And then I can just
hit G on my keyboard quickly to move it back. Again. It doesn't matter
that I'm moving in a specific axis
right now because I'm doing something
pretty organic. In this case, I'm
not trying to be super precise and mathematical. I just want to give it a
nice little curl to that. So maybe that's enough
for the bottom one. So we'll just drag,
select the top. Rotate this a bit more, hit G to move it back. Now maybe I want to rotate
it around this way. It curves a little
bit to the left. Again, just hit G. Move the hat that you want to get a little
bit clearer, look at it. You can hit Alt, see periodically just a hop
out of the X-ray mode. See if it's a little
bit easier to see. What we have so far, don't
worry about it popping through here will be
fixing that later. So you might notice
here that it's actually kind of twisting itself. These edges here seem to be
like a cork screwing and going around this way because of the way
we've been moving it. So there's a few different
ways we can fix it and we can just line it up
a little bit here. So we're looking straight
down this point. Then grab this white handle
and then just rotate it. So that's a quick way to do
it, to straighten these out. We can also switch to normal
mood like we were before. And that will realign this. In this case, it's a complex like twists
that it has here. But it's doing a better
job than it was before. So we could just grab
this blue handle here and rotate that as well. To help twist this back to the, a little bit more of
a straight flow here, rather than having a
corkscrews, it goes back. So that's our curl so far. Maybe I want to make
it a little bit more severe so I can just hit G. Pull this down a little
bit. Let's not to Ben. I had to go back
into my x-ray mode here to select a cross these. You'll notice here that when I tried to select that there, I had to stop a little
short because I couldn't quite get my selection
without hitting the top here. There are different
selection modes we can use. However, at the top
here at the left, there's a little square icon. If we click and hold on that, we can change that
to select the Lasso. If you choose select lasso. Now when you click and drag
it doesn't make a box. It makes us free drawn
circle that you can make. That way you can
very specifically choose which vertices
you're selecting. So there specifically chose
just the top and the bottom. If I wanted to do that,
I avoided the middle. When you're working on
stuff that's a little bit more twisted and rotated. Sometimes this select lasso is a little bit easier to get the exact selection that you want. I'm just going to move
this up a little bit. I'll hop out of my x-ray
mood with Altman Z. Just look at it. I think that's
pretty good so far. I'm happy with that. Given the amount of Vertex
we have here to work with, we can really make it a
nice smooth curve yet. Now that we have the general
shape of our Hat created, we can go to our Modify panel, the Modifiers panel over here on the right with the
blue wrench icon. We're going to add modifier. And we're going to again add a subdivision surface modifier. We can see here that it
starts smoothing the Hat out. Except we want it to be a
bit more smooth than that. It's, we're actually going
to turn this up to 3.3. I believe that's what
we actually used within the feed as well. That'll make the Hat
and nice and smooth. Except you can see
up here it's got this weird jagged point that
it's coming to at the top. That's what we're
going to fix next. Once you have your Modifier applied the subdivision
surface at the 3.3, select this vertex
here at the very top. I'm going to select this. I'm actually going
to switch back to my square Selection tool now
that I'm done shaping it. So select box. Again, I'm just
bringing this up by clicking and holding
on this button. So anytime you see a little, little triangle at
the bottom right of one of these tools, that means that there's more options hidden
underneath it. So if you click and hold it
will reveal those options. Select box. Make sure I have the
tip selected here. I'm going to right-click. And I'm going to
choose Bevel vertices. So you could also do Shift
Control B if you're, if you prefer using
the keyboard shortcut. So bevel vertices. Now as I move my mouse, it starts flattening
out that tip. We're going to flatten
it out a little bit and you can see it makes it a look a little bit better
actually as we flatten it out, you wouldn't think it would. But having it flat
at the end allows the smoothing to do a
little bit better job. We're going to bevel
it out to about here. We're going to almost
have the length of it. We can always adjust this later if it seems like
it's getting to shorten, we're going to bevel
it to about there. So about half, maybe a
third shorter than it was. Now we'll switch
to our Edge mode with two on the keyboard and it might already have them selected
like it did for mine. It doesn't already have
this edge selected. You can just Alt click
on the edge of I, just Alt click here. It'll select the
whole ring around it. Now with that selected, again, can right-click and we're
going to choose bevel edges. Or you could just
do Control B if you prefer that bevel edges. And again, we can
start beveling this, but instead of beveling
the Vertex now it's beveling the edges
that we just selected. So as we slide this back, we can see we start sort of
cutting that edge and half, so we're getting rid
of that hard corner, sort of rounding it out. However, if we scroll
up on our mouse wheel, we can add some in-between cuts there to make it even smoother. So we're going to add
a fair bit of them. I don't think it
actually tells you exactly how many you are adding. Actually at the bottom here. A little hard to see, but right
now I currently have six. The bottom there I see it says segments and then
parentheses six. I think that's enough. I'm going to bevel it here
and I don't want a bevel. It's so much that it collapses in the center here
because we're actually going to try to fix
this weird circle that we have in the center. I'm going to bevel
it until about here, right before it starts
collapsing in on itself. And I can see that
after I clicked actually does tell me
here on this option box. So it's exactly six segments which the amount of cuts that had added there to round it out. Now we're going to zoom
in here on this kind of crushed circle that
we've made at the end, we're going to hold the Alt. And we're going to click one
of these edges here that comprise this circle here. With that selected, we can
hit one on our keyboard. It should have these
Vertex automatically selected because we had them
selected as edges first. Now we're going to hit M on our keyboard to bring
up the merge menu. We're going to choose
Merge at center. So when we do that,
it's taking all of those vertices that we had selected and it's
merging them down. It's sort of welding
them together into a single point
at the center, the center of the
center of gravity. You can think of it that way
of those Vertex that we had. Now it's centered that out and smashed them all down
into just a single point, which you can see it looks a lot cleaner here, not the end. Now there is a little bit of a weird smoothing that
we're getting here. And we can still fix that. With the center vertices
still selected. We can go up to
Select at the top. And then we're going to go to
select more, slashed less. And then we're gonna
do select more. Or you could just
do Control numpad plus if you have the
numpad on your keyboard. Now we have all of
these selected here. Then we're gonna go
to the circle tool that we used before. So we're going to hit N and
then go to your edit tab. Make sure you twirl
down loop tools and then twirl down circle. We can hit circle,
the button here, we have radius checks. Now by default, 0.13 is
gonna be way too big, but we can always
change that in the bottom-left after we hit circle. Circle here, I can see
again it's too large. I think 0.03 is actually
the right size for this. So I type that in down the
bottom left hit Enter. We can see it's a
lot closer and it's made it more of an
actual circle here. So that should help with some of that weird smoothing we
got at the end of the Hat. It's also a little bit twisted, but we can fix that
with the rotation tool. So we can go back to
our Rotate tool now. And I'm currently
still own normal. So let's see. It looks like normal
still lined up. We can just grab this blue handle and rotate it so that's
a little bit straighter. Now if we click off of this, That can actually jump out of my edit mode by hitting tab. I can get a look at
the end of the hat. The end of the Hat is
a lot smoother now. It doesn't have that weird jagged point that it had before. We can zoom out here. We want, might want to make
this a little bit softer. At the end. We can hit tab and go
back into edit mode. I'm gonna go into my x-ray
mode by hitting Alt and Z can also hit N to hide your side menu here if you don't
want to have that up. We can drag select over all these vertices that
we just made at the end. Then we can right-click and
then choose smooth vertices. So smooth vertices
is going to try to average everything out and
make sure nothing is too, none of the vertices
are too tight together. So it's doing something
similar to what this subdivision surface
Modifiers doing, except that's not
adding any geometry, It's just taking
everything that's currently there and trying to put them into a little bit more of a smooth configuration. And we can adjust that by adjusting the
smoothing value here. So if we turn that up, it'll
try to smooth it out more. And then we can
tell it to repeat this level of smoothing a certain number
of times as well. So this one gets
really sensitive here. The more you turn this
up it's repeating this. And the higher this value is, the more of those repeats
actually make a difference. So if we turn this down, we can see the repeats make up a little bit less of a difference. I usually just turn
this up to one. Then typically I'll whoops, I hope to Control Z that. So right-click. That happened because
I clicked off of it. So I'll right-click again,
choose smooth vertices. And again, I usually keep
this usually at one end and hopefully just setting the smoothing to one is enough. If not, you can try to and then maybe Adjusting the
smoothing down a little bit. We're going to smooth
at about here. So this is more of a
personal preference here. I have mine at 0.8
and then repeat to. It's now when I click off of it, I can leave my edit
mode by hitting Tab. And I can hit Alt Z
to jump out of this. Now I can see the end is
a little bit more smooth, except it's got this kind
of corner at the top. We can just grab
these with Alt Z. So that's x-ray. Grab this. I'm going to switch into my
proportional editing tool. Then I can just stretch this out a little bit
to get rid of that corner. That corner is
happening because we have some, some edges here. There are a little
close to each other. The more I pull this out, one the longer the hat gets. So if you wanted to
add more length, this is how I would do it. The tip of your hat. We
can also rotate this down. Just kinda play with
the shape of the Hat. This is really a personal
preference thing. Here is a very organic
shape that we're making. And you don't have to match the exact curvature of my hat. That's not going to
make your gnome wrong or right and whether or not you're hat matches mine exactly. So I would just play with it here or using your
proportional editing, again, using your mouse wheel to make it larger or
smaller the influence, just try to shape that the
tip of the hat a little bit. Once you get it to something
you pretty happy with. We can turn off our
proportional editing, can have tab and then
hit Alt Z to jump back. Now I have a hat here
that kind of curves up and has a bit
of a curl to it. It's got a little
bit more life than the hat that just went
straight up into the air. So our next step is
actually going to be to add the news prior to
finishing the Hat out, because the hat
is actually going to drape around the nose. And if we don't have
the Nose in place, it's going to make
it more difficult to know exactly where we should stop the hat in the
front of the face. So let's start creating our
Nose by hitting Shift and a. To create a new mesh. We're going to
create a round cube like we did for the Body. For the round cube here, you want to set your
radius to 0.25. Then your size 2.5 for
all the X, Y, and Z. And if you want to change
all these at the same time, just click and drag on
the X and drag down. It's actually have to
do a little bit faster. I think you have to
click and drag down when the X down to the Z and then
point 0.5 and hit Enter. And that'll change all three
of them for you rather than having to do them
each individually. Now that we have
these parameters set, we can grab our nose and move it up towards
the front of the face. We want to line it up
sort of where the Hat meets the body here. So in this little
intersection here, we can right-click on this
to shade smooth away. It doesn't look
like a golf ball. Now we're going to
start squishing this into more of an oblong, sort of wide No shape. So we can just switch
to our scale tool here. And then we can just grab
these little controllers here. Just start squashing it down. We want it to be
sort of still round, but maybe a little bit flatter Something more in that range. So an egg shape almost. So we can slide it back and then make sure
it intersects with his body a little bit
because we want to make sure the nose looks like it's
actually attached to them. Positioning right about here. So it's just touching
the top of the hat here and it's still
intersecting with his body. Now let's, before we
move into the rotation, we're going to first
switch back to global. Now we need to rotate the nose so that it matches
the slant of its body. And before we do that, we
need to switch from normal. If you're still in that
for messing with the Hat, switch it to local instead. Let's now run local. Then we can switch back to our
rotation tool. Now, on the left side, we can grab this
green handle here. We're just going to rotate
it so that it's roughly the same rotation as this length of the Hat and
the slant of its body. That's a little bit
too much there. It doesn't have to be precise. Just try to approximate it because we're
going to be bending this Nose backwards
so it doesn't stick so far out on the sides. And it'll help if
it's matched to the same rotation as his body. About there's good, I think. Before we get too far
into editing this Nose, let's make sure we rename this. So we're just going to go to
the list on the top right. Just double-click it and rename Nose and make sure you're both of your feet are
renamed as well. From the last lesson. You can also rename its head
from cone to hat instead. Let's go back to the nose. We're gonna hit Tab to
go into our edit mode. Now we want to be
in our Vertex mode here and go into our
x-ray mode as well. By hitting Alton, see, we're going to try to select
just the edges of his nose. So the furthest
most vertices here. We want to select
these on each side. Now let me just a little bit, just these first three here. I actually selected one, one-to-many on this side. I can just hit Control and then drag select around
the ones that I don't want. I have about three
selected on either side. Now I'll turn off my
x-ray mode again. So that's a little
bit easier to see. I'm going to select my
move tool and then make sure I have proportional
editing still turned on because I want to gradually bend the edges of this Nose
backwards towards its body. As I move this back, I'm going to need to make this
a little bit smaller here so that it's not
moving quite so much. I'm just going to pull
this back to about here. I want to basically
pull it back until the selected Vertex are
almost touching the face. Depends on which
ones you selected, but near where you selected. And I'll be touching the face. We can see here from the top, it's sort of bent
this Nose backwards. Now it looks like it's
connecting all the way around and it's not
floating on the edges. Now if the Nose is
a little bit too pointed for your tastes, again, this is just purely
personal preference. We can hit a on our keyboard to select all of these vertices. Can right-click. Then we could do
smooth vertices. We can just smooth these out
and it's going to average all of these things out and
make them a little bit, a little bit smoother, a
little bit softer of a curve. Now it is making the
nose a bit smaller, but we can always scale that up. As we see marooned. We can just start
have smooth that out to the roundness that
we're looking for. I'd say about there for
my tastes pretty good. If you wanted to copy
exactly what I did here, I have one smoothing and 24 repeats to really
heavily smooth this out. Now I can hit S on my
keyboard to scale these up. Back to roughly about the
size that it was before. And then maybe I'll go
back to my scale tool here and just squish
it a little bit more. It's a little bit flatter. Slide this up to the Hat. I think the Nose is good now. Now that are Nose is complete, we can go back to editing hat. I'm going to hit tab to exit
the edit mode for the Nose. Select the hat now, and then hit tab to enter the edit mode for
the hat instead. The next thing we want to do
is start pulling down these, these kind of ear flaps that
the side of this hat gives. So one, it makes it one
at hides the years, so we don't have to worry
about modeling them. And it just gives the hat
a little bit more life. It looks like it's more of a slouches sort of
loose fitting hat that drapes down over his nose, kind of covers where
his eyes are and then drapes down along
the sides of his body. So to do that, we're gonna
go into our Y view here. I'm gonna just click this little green thing at the top right. We want to select an even amount of vertices on this side. First, I need to be
in my x-ray mode so I can select through it
by hitting Alt and Z Now this here is
my sensory point. So I'm going to select
out a certain number of points here to make sure
that I'm selecting enough. So let's start with selecting
five total vertices. So the center one and then
to further out on each side. Now have both of those selected. Both sides because I
was in X-Ray mode here. Now we can just
start pulling those down and you can turn off your, your proportional editing
and you can go back to moving in global axis
rather than local. I'm moving these down now. We're going to move them
down to about here. This is another thing that's
just kinda preference. I'm going to remind
down to about here. I'm going to exit my x-ray mode. So I can see a little
bit better here. We can see as we pull these down and actually
started pushing them back into the
head because we only move them straight down. Effects that we can just hit
S and Y on our keyboard. We can scale them out
just in the directions. So the left and the
right direction to move them back towards the
sides of the head. We're going to want to move
it out to about the middle, or the middle is now poking out and then we can fix
the other sides. So about there. So just the middle stuff
now is poking out. Then when you have these areas here that are still
inside the head. So I'm gonna go back and X-ray. We can just start selecting each of these and
pulling them forward. So it'll help if you do
this sort of uniformly. So right here I can
see that this is the matching vertices
on this side. I'm just going to hold Shift
and select that one as well. So now I have both
of them selected. Again, you're going to just
have to keep popping in and out of your x-ray mode here to make sure that you're actually intersect
or not intersecting them. It's a lot easier
to tell if they're intersecting when
you're not in X-ray. It's a little bit annoying
having to hop back and forth. But I mean, you can technically see here
that it's intersecting, but I find it a lot easier to
see it when it's not X-ray. Police forward. They're not intersecting and we can
deal with this here later. Then I'm going to
select this vertex and the back and just
do something similar hold Shift to select this
one. Pull this back. So this one is actually doing
a little bit better job of non-intersecting. Then we also have these
Vertex in the back here. We can move those down as well. I'm going to drag
select over these. I'm going to pull the
back of this Hat down. I want it to pull up
a little bit here, so it still looks like there's
ear flaps on the side, but it can be a lot lower
than the front of the Hat is somewhere in that range. And then maybe I want to
round this out a little bit more by selecting just
these two edge ones. Holding Shift to make sure
I'm adding to my selection. Just pulling those down and then pulling them out to make sure
that it doesn't intersect. Then I can pull that
up. Then I just have a nice rounded back on
the back of the hat. Then it really drops
off in the front. So let's round off
this front edge here. So our goal with this, the front of this hat is what you
actually want it to make it look like it's
hanging across the nose. So we're really going to hug it up against the nose
here and then have it slopes down towards the
front ear flaps of the Hat. So let's start by
grabbing these two. I have two vertices
selected here. I'm going to pull those down. Now I can click this
one, hold Shift, grab this edge, pull these down, and then pull them
towards the front. We can see here
now we're getting that sort of draping look where it looks like it's kinda
hanging off of his nose. That's what we're going for. Just continue to shape
this hat a little bit. If there's any curves that
seem like they're either too curved or not curved enough, just grab these vertices
and start pulling them. We have these spots
here that are still intersecting on the
side of his head. We can just grab these points here by holding shift
to grab both of them. Let's see what
happens if we just scale these outward
a little bit. Sometimes it only takes
just a little bit of a scale outward to
fix those issues. So that's usually the
easiest way to fix them. So my case, I'm just scaling
in just the y-direction. So I hit S and then Y. Then I'm scaling them out. And I was holding shift there to make sure it's
scales a little bit slower because my body
isn't entirely symmetrical. It's a little bit
lumpy or on this side it seems I can just grab only the side vertices and just pull them out
just a little bit. We only need it to non-intersecting
just by a little bit. It doesn't need to be way Separated from the head. Because if you have a too
far separated from the head, then it looks like
it's kinda floating. We want this to look
like it's at least attached to his head, still. Might need to pull some
of these vertices here. I'm gonna go into
my x-ray mode for this switch back
to my Lasso tool. So select lasso. Select all of these. Leave my x-ray mode. Then I'm going to move
this in the x-direction, so I'm going to G and then X. To just slide this forward
just a little bit here, because I had a little bit
of an intersection there. Now if I spin around,
it looks like it's all it's all handled. Now that are hat is
shaped correctly. We can go through here and add a rim on the edge of the Hat, sort of like what we
did when the shoes. So we're kinda, kinda carry that design detail
now into the hat. So we're going to hit Control
and R to bring up this cut. And we want the cut
to go horizontal. So it's gonna look like
it's way too high. Eventually we're going to
just slide it down here. But you want this
horizontal cut like this. Just once I click. Now I can slide it down. And I'm gonna make
this brim just a little bit larger than I did on the shoes because that's
just bigger than the shoe. So the brim would also
probably be bigger. I'm gonna do it about that far. Now I can go into my
face mode with three. I'm going to hold
Alt and click on these faces so that it
selects this entire ring. Now we want to extrude this, but remember we need to
do Alt and E rather than just E because we need to choose extrude faces
along normals. That's important pretty much
anytime you're extruding edges or faces off of
something that is round. So we'll choose this, extrude faces along normals and just extrude this
out just a little bit. To about here. We
can see here it's adding this sort of roundedness
to the edge of the hat. Now this is a choice of yours. So you can choose to do
this next step or not. If you liked this more gradual, sort of softer look to that, you can leave it as is, or you can do what we did for
the shoes and hit Control R again and then add a cut going around with this
newly extruded brim that we added to that. Click that, and then
you can move it. If you'd like the more soft, sort of Fabrycky look, you can do that or you can
do this and give it a little bit harder of a son rim
around the edge of the hat. There. Now we have a nice little detail going
around the edge of our hat. With the rim on that done, we can hit tab to
exit or edit mode. We can click off and we can
see what we have now created. If there's anything
you notice on your hat as you spin around, like in this case, I'm
actually noticing that my hat gets a little
flat on the edges. It's pretty easy to
just go back and adjust that. So we'll hit tab. Go into my Vertex mode with one. I'm going to go into my
x-ray mode With Alton Z. Then I can just select maybe
just the center ones here. I can move those down with them. Move down just to round out the bottom of
this hat a little bit. To now get out of
that by just painting my camera around and rotating it rather than it'll pop me
back into this 3D view. Alt and Z, then S and Y. To just quickly scale these, Howard a little bit. I might need to pull. We need to pull just
these here as well. I can see it fix that. Then. I think this side yeah. In this case, the sign
wasn't wasn't an issue, but I'll probably just pull it out for the sake of symmetry. There we go. Now the sides of my hat or a little
bit more rounded. You'll notice sometimes you
might be seeing it on mine. I'm not sure if the
compression is eating it up, but it looks like it's
intersecting here. But as I zoom in, it's actually not intersecting. And that's just a problem
with the view port basically not being
exactly sure how far, too far apart these
are when you zoom out. So it's sort of just allowing things to show through
that aren't there. If you're noticing
that on yours, but when you zoom in, it seems like it goes away. You don't have to
worry about it. If it if you don't see it
when you're close to it, then don't worry about
it when you're far away. It won't actually show
up in the render. Now in my head is
fixed and it's shape, it's a little bit more
round on the edges. I think we're done.
The next lesson, we'll be setting up
the Vertex Groups that will tell our
beard where to grow. I'll see you there.
6. Painting the Vertex Groups: In this lesson,
we'll be painting the Vertex Groups for our gnome. The Beard knows where to grow. Let's begin. The first thing we need to do is select
the body of our gnome. And then go down to our modifier
panel here on the right, the blue wrench icon. Then we need to look at our
subdivision surface modifier. Makes sure that yours is set
to 2.2 for both of these. And then we're going
to be applying this subdivision
surface modifier, which means we will be baking in this smoothing
into the model. So it will no longer be something we can
toggle on and off. It will just be
part of the model. It'll be permanently
higher resolution. And the reason this is important
is because when we go to paint in the areas
using the Vertex paint, we need to have a lot
of different Vertex in order to paint
nice smooth lines. If we had less amount
of Vertex like this. I'm not sure if you can see
that I might be better. The less Vertex we have, the more blocky the
painting is going to be. So we need to make sure
that we have a lot of Vertex that we can paint
relatively smooth lines. So we can make
nice rounded areas for the Beard and the Mustache. So just make sure that you have the Modifiers still toggled on with the little
monitor icon here. It's set to 2.2 for the levels in the
viewport and render. And then just make
sure you also have the model actually selected. Now we can hit the apply all button and we can see
the Modifiers disappeared. But the model is still
nice and high resolution, which means we've actually baked that modifier directly
into the model. Now with your model selected
up at the top-left, we can see us as objects mode. We're going to click on
this drop-down here, and we're going to
switch it to wait paint. Since we click this, the
model is going to turn blue. And also our mouse
is now turning into a brush. At the top here. This is the controls for the brush in which
we're going to be painting the weights on with
the weight of the brush, the size of the brush, and then the general
strength of it. For our brush, we're
just going to leave it at a one wait, for our radius, we're probably going to want to have this. I can just click on this
up here and type in 25, someone, my brush to be
a little bit smaller. Now I'm going to go into my X view up here
at the top-right. I'm just going to click on the little red X bubble that we, I'm a nice straight view. The first thing I'm gonna
be doing is painting in the area where the
Mustache is going to go. So simply just click
on your model. You can see here as you click
and drag on your model, you're actually painting in areas that eventually will
be telling hair to grow in. So we're gonna be painting in currently we're painting in
the area for the Mustache. So we want to paint it out. And this is gonna be a
relatively large Mustache for this gnome because we want
it to be sort of comical. We want it to be a
little oversized. So I'm going to paint in
sort of like this kind of rounded must been shaped
thing for his Mustache here. In the red areas here are full influence and then the
yellow or less influence. So it's going to
grow a little less hair on the yellow areas. Then as it starts
fading out to blue, blue means that there
will be no hair on it. So what we're doing is just
painting in this area here, saying that all this red stuff should have a bunch
of hair in it. And then as it fades off into
closer and closer to blue, the hair will eventually
stop growing. And try to make your Mustache
relatively symmetrical, but you don't need
to worry about it being absolutely perfect. Even for people in real life, there are Mustache
might not be exactly perfect on either side, so we don't need to
worry about the gnome having perfect
Mustache symmetry. Now one thing you do
want to make sure you're doing is don't paint underneath the nose and don't
paint underneath the Hat. Because anywhere
we paint there's gonna be hair growing out of it. So if we paint up
underneath the nose, then there's going
to be hair growing underneath the nose
and then poking out. We want to prevent that by just not painting under
it to begin with. Just continue shaping
your Mustache, getting it to something
about similar to mine. Again, it doesn't
have to be perfect, either left or right or
matching identically. But just make sure it's something
similar to what I have. And don't worry about
this jagged area that we're seeing here on
the right side of mine, that's not going to be
noticeable once the hair grows in because it's gonna
get all filled in here, you won't notice this little
sort of stair-step area. I think that's about
good for my Mustache. Again, just take some time
to make sure yours is roughly similar in
shape and size to mine. If you want to thicken it
up a little bit, Go ahead. Okay. So I'm happy with this. Now that I have my
mustache painted I'm gonna go down here
to the bottom right. It's this sort of triangle icon here with the forward or
three squares on each corner. And click that, that's your
object data properties tab. Then we can see here
are Vertex Groups. So currently we have
one vertex group and it's just called group. So instead of that,
we're just going to double-click the word group. We're going to call it Mustache. And then hit Enter. That way we know what exactly
this group actually is. Now that we have our
Mustache group named, we can hit this little plus icon here to make another
Vertex Groups. Then this one here
is called group, but we're going to
double-click on it and call this Beard. Now we can start
painting our beard. However, you can see that we can actually see where the Mustache was and we don't want the
Beard to overlap the Mustache, were intentionally
drawing these as two different areas
because we want to give them different properties
and we want to style them differently and we're
going to curl the Mustache. Whereas the beard
we're going to combed down into a point. When we're painting this,
we're going to need to go back and
forth between these and just click back-and-forth
between them as we paint to make sure we're not painting on top of each other. A little bit of overlap is
not the end of the world, but you don't really
want to paint way up into your Mustache when
you're making your beard. So we're just going to try to
remember what we see here, this curve here, I
find it's easier to kind of look at this quickly. Switch back to your
beard and then just try to mimic what
you remember seeing. I'm just going to do
something like this. Really quick outline
and now switch back to my Mustache and make sure that I haven't overlapped anywhere. I'm just going to quickly
fill in this area here below. Now let's say as
you're drawing this, you accidentally draw
up into it by accident. Way you can fix that is to go up here to where
it says draw. We're going to click on
the icon next to draw. And instead of draw, we're
going to choose Subtract. Once I click Subtract. Now when I paint, It's actually erasing what I've just painted. So it's sort of your eraser so you can paint over a little bit and then go back and clean it up with the Subtract brush. And I can just switch back
and forth between these. Make sure I'm not
overlapping anywhere. And you also want to
make sure that you don't leaving big gaps here. So I think there's actually
a gap between these, or I should actually
paint this in. I'm gonna switch back
to my drawing brush, which is the one
that adds the color. I'm just going to fill
this in a little bit more. And it helps getting this, this transition between
the Mustache and the, the Beard done first that way, then you can just focus on doing the other
stuffed afterwards. Okay, one more, Chuck. I think that's pretty good. Now, I can actually make
the radius of my brush a little bit bigger here just
to speed this process up. So maybe I'll go back to 50. So I'm just going
to double it here. Now that I'm happy
with the transition between the Mustache
and the Beard. And I'm just going to
start painting this in. So you want to
paint it into about the halfway point of the Feet. We're going to paint it
down to about there. Just kinda drawn like
little circles here to make sure not
leaving little gaps. If I did that and
left it like this, I'd have this patch
right in the middle of my beard where the hair
doesn't grow and it's thick. Want to make sure that
this stuff stays all read anywhere that I
want a lot of hair. I want that to stay red. We're going to paint
this out to about here. Don't worry about
drawing on top of the Feet because you're
actually painting through them. You don't have to stop. When you paint over
top of the Feet. It's just painting
right through them. And it's painting one
to the body behind. Just like the
Mustache don't paint up underneath the, the hat. You think you might've painted
up underneath the Hat. And you can hit Alt and Z
to see through the model. So you're switching into
your x-ray mode and it lets you see how much you've
painted underneath it. This little bit of blue and
green here is not an issue. You just don't want
to paint a bunch of red up underneath it
because then you'll have Hat growing out
through your hair, growing out through your hat, which is going to
look pretty odd. We want to round this off here. Anymore. This is red. That's where
the hair is going to grow. We're giving it a
nice rounded beard. The Beard is going to
be much longer than this because the hair is going
to grow outward from it. We're just telling
the hair like where the roots of the
hair going to start. And we can style it from here. Now we might want
to rotate around and try not to paint too
much into your legs. It's not too bad to
have it painted, like right behind
the foot but don't paint it down into
your leg area. Try to leave it from doing that. I think that looks pretty good. Maybe just round some of
these corners off here. Oops, Control Z that, so that was actually me holding Alt and doing that by accident. So I can just Control
Z that change. That by default is actually, I'll do it again
just to show you. I hold Alt and drag, it's making a gradient. But in our case, that's not
really helping for this. So if that happens to you
can just Control Z it, but the way it happened is
by holding Alt and dragging. I'm pretty happy with this. If for some reason,
once we get into the actual creation of the hair, if we want to add some, some extra width
here to the edge, all we have to do is go back to these Vertex paint things
and paint in more, more area and the
hair will update. So none of this is permanent. We don't have to get
it absolutely perfect. If we find some
overlap here between our Mustache and our beard, It's not the end of the world. We just come back
to our Vertex paint and just adjust some
of the positions here and the hair
will update after we actually have Hair
attached to the model. Now that we're happy
with our Vertex paint, you can hit Alt Z to get
out of our x-ray mode. Now we can go up to weight paint and just switch
it back to object mode. And we have all of
our Vertex Groups here saved already in
the Vertex Groups, even though we can't see
them, they're still there. In the next lesson,
we'll be using these Vertex Groups to
create the Mustache. I'll see you there.
7. Creating the Mustache: In this lesson, we'll
be adding the Mustache to our gnome and then
combing it into shape. Let's begin. The first thing
you'll need to do is make sure you have
the body selected. Then we're gonna go down to
our particle properties tab, which is these four blue dots here with lines connecting them. We're going to select that. We can see here it's
empty right now. We'll just hit this little
plus icon here on the right. Now it's created a
particle system. Let's start by renaming this so that we know it's the Mustache. Can just double-click on
particle system here at the top. Just type in Mustache. Then we're going to switch
it from emitter to Hair. Emitter would be
something that you would use for particle effects like sand falling or water
droplets, things like that. However, this same system
can accomplish hair as well just by switching it to the hair function instead. So when we switch it to hair, now we can see we have a
whole bunch of hairs that are just exploding out of
this body right now. And we'll be fixing
that here soon. Now let's scroll down on this list until we
find Vertex Groups. So that's down here
at the bottom. And then under density, we can just click on
this field for density. And now we see those two
Vertex Groups that we created. So we're right now we're
making the Mustache. So let's choose the
Mustache Vertex Groups. We can see here now
that it's limited the hairs to only pop out
of the Mustache area, which is why we painted
these areas to begin with. Now, currently it's
incredibly long. So let's fix that. We're going to scroll
back up to the top. And under hair length
here at the top, we're going to
switch it from 157, which for some reason is
the default to instead 10 " 10 ", then hit Enter. Now we can see the Mustache
is much more short. It's still poking
straight out of the face but will be combing, get into shape here soon. And then the last
thing we want to change as the segments. So right now it's set to five, which is how many segments, essentially how many Vertex
each one of these hairs have. Right now it has five Vertex, which means it can be
relatively smooth. But the higher we
make this number, the more smooth the bend
on the hair can be. Let's turn this up to eight instead of the phi that
default because we're gonna be doing a sweeping sort of curly looking Mustache and we want it to be
nice and smooth. So having a higher
value here will help. Next, we're going to twirl down the render drop-down area here. Then we're gonna
go down to path, which should be
already dropped down. But if not, just
open up path and then check the B-spline
checkbox next to that. And that's just another
thing that will help give us a little bit more smooth
curves when our hair is just in case they
look a little jagged. This B-spline
things should help. Now that we have those
initial settings done, I can zoom out here
and re-center. And we're gonna go
up to object mode. At the top-left. We're going to instead
switch it to particle edit, which you can see kinda
looks like a cone. Since we switch to that, it will by default
switch to the cone tool, which is what we're
going to use first. However, we're going to
want to adjust some of these values up here. So for the radius,
Let's set this to 75. We want a larger cone, so it's not take quite as
long to combed the Mustache. We can leave the strength at 0.5 and we can leave
deflect a meter set. Right now this is set to 9.84. I'm just going to set
mine to a nice even ten. This is just make sure
that the hairs don't lay exactly flat against
the surface here. It just gives it a
little bit of a buffer. Now with those settings set, we can actually start
combing the Mustache. I suggest you at least
in beginning here, follow along with my steps because it'll make sure that you don't get too many overlaps
here in the middle. We're going to start
out by just Coming these edges outward and don't worry about
the shape right now, we just want to get everything going to the left or the right. So just come this
stuff straight out. Combed this stuff over here. Now the tricky part here, and this might take a little bit of finesse here in the middle, because we want to try to split these hairs in the middle. We have found the best
way to do that is to split the Mustache
and half here, is to just find the midpoint here or is close
to it as possible. I mean, again, it is a
naturally growing things, so it doesn't need to be
perfectly symmetrical. And we just want to start
combing these here to the left. And we can see we're
starting to slowly nudge the hairs in the
middle here to the left. And we want to make a left side of the Mustache
and a right-side. The closer you are to the
middle of this brush, it'll influence it
a little bit more. You'll notice that
they move a little bit slower when they're on
the edge of your brush. Again, don't worry about the
shape of our Mustache yet, we're just trying to part it. Maybe a little bit more, maybe one more row
of hairs here. Almost have it. Okay? I think that's about middle
or pretty close to it. Now that we have
the one side off, it's pretty easy to
just move this one over now because we can be a little bit more direct
with her movement of it. Let me have a Mustache pretty separated now, pretty
well separated. And you can see here I have
this grid and my screen. And that's actually relatively easy to turn off
because we're gonna be doing a lot of combing from
below and above on this. So to turn off your grid, go up to the area here
where we added the, the wireframe to it. We can twirl this down. And then we can
just uncheck floor. And that will still
leave our axes here. So we can still see
the X and the y-axis. But it gets rid of that kind of annoying floor that we were
looking through there. And again, that's just in
the same drop-down here, the overlapping circles. This is your view port
overlays panel here. And then you just uncheck floor. Okay. Now we have our
Mustache pretty well separated and left and right. Now we can begin the process
of combing it into shape. So I'm going to start just
by combing it down at the same angle as the hat because we're going
to want to make sure that we don't have it coming
through the hat at all. We're just going to keep
clicking here and just, we were just combing the hair. Essentially, we're just
combing with almost seems like stiff wet hair. That's why it's
acting a little bit, a little bit odd here. We want to try to flatten
this stuff out in the middle. Then once we have a
sort of combed down, we can do this
side-by-side here. I'm going to come this
straight out again. Now I'm going to start
curling the bottom up. So we're trying to give
it a little bit of a, sort of a twist at the end,
a little bit of a point. So it looks like, kind
of like that sort of stereotypical cartoony
Mustache on the edges. Now that the left side
is mostly to shape. And we can see here that
it's actually really flat. And we'll be fixing
that in the next step. But for now we just wanted
to get the rough shape down. And that way we know
we have enough Hair sort of separated to
the left and the right. This also gives us an
idea of whether or not we need to adjust our
Vertex Groups at all. I think in our case here it
looks pretty, pretty good. We're going to just try to
make it somewhat symmetrical. You don't want it
to be perfectly symmetrical what the other side, because then it'll look a
little bit too artificial. But make sure your hair isn't poking through your
head, it off the top. Just kinda drag over the hat so that it cones
that stuff down. If there is anything there. I think that looks pretty
good for right now. Now let's go back up to the top here where it says
particle edit. We're going to switch
back to object mode. Now when we do that, and
you can see our hair now is no longer those
thin black lines. Instead it's showing the
actual hair that we have here. Except you'll notice
right away that one it's very flat, which
will be fixing. And two, it's very sparse. So you can see almost
directly through it. It's very thin Mustache. And then we were going
to fix that is by adding children to each
one of these hairs. Currently, every one of these hairs is just
a single hair. However, if we go down to the children drop-down
on the right side, we can toggle this down. Now it's set to
none, which means there are no children hairs. It's just the thousand
hairs we started out with, which is how we
define it up here. Now, since we've
started combing this, these parameters
here are locked out. So you had to have changed the hair length and the
segments prior to coming. So as long as you're
following along that you should have. But right now we only
have 1,000 hairs. We're going to scroll down to children and then we're going to switch it
to interpolating. You can see soon as we switch
it to interpellate it here, the Mustache thickens
up in the amounts here. So this is the display amount, which is going to
be the viewport. And then you're render amount, which is how much it'll make when it's actually
at render time, which is similar to how the subdivision surface
modifier works. You have two independent
values that you can type in. Now just like the subdivision surface modifier that
we've been doing, we're going to make these
both the same number. And we're going
to change this to 35 for both of these because we want to see exactly what it's
going to render. So we're just going to have
the same number for both. Now we haven't set
the 35. Each one of these hairs now is
actually 35 hairs. So it's made children around each one of those 1,000 hairs. So we can see our
Mustache as much thicker and it looks a
little thin right now, but that's mostly
because it's flat. So once we puff
this up and give it a little bit more volume so
it looks more realistic. This hair will look a lot
more realistic as well. We can see here in the
middle, then you might, this is entirely basically how you combed it and how the
children are laying out, but actually have a little bit of overlap here in the middle. I don't think that looks bad. I don't I don't think
this looks unrealistic. But if you have something
worse than what I have here, we'll see how I have a few
hairs here that are just kind of almost poking
out straight down. You're going to have
to go back into your, your edit mode here. So go up to the top-left Article edit. You can see here that you can't exactly tell
which one's doing it because there's
children are being generated off of much less hair. So it's hard to tell
exactly which one is. It's actually causing
the issue here. But we can go up to
the top-left here, next to particle at it. We're going to choose
the far right one, which has the, the lines with
little squares at the top. And then we can choose
just a single hair here. So we're gonna go
into our selection mode up here at the top-left. So the little selection box. We can just drag
select over one hair. So maybe it's this one here. Now we can go back
to our combing. So switch my to my cone tool and we
can start pulling this one outward a little bit
to help separate it. Now I'm going to go back to the selection mode up
here at the top-left. Couldn't remember
what it was called. Now let's just try
to peel this one backwards and see if maybe that's the one that
was causing the issue. Now it's possible that I
might have made it worse, but we'll see, again, I'm going have to sort of reshape this kind
of fix it again. Go back to my selection, switch, to my selection tool again, and see if there's any
other ones here that maybe would be
causing the issue. I can see there's some here that are kind of poking outward. Going to try to
flatten these out. Just going to go back
to my selection tool, switch to my selection mode rather than go back to
the selection tool, just drag to deselect them. I'm gonna go back to
the first mode here. Okay? So hopefully that,
that fixed whatever I had going on in the middle or at least didn't make it worse. This part here is
pretty finicky in the middle when you're trying to part this stuff in the middle, It's not really
an exact science. You just have to keep tweaking
it until it looks correct. So I'm gonna switch
back to object mode. And it might've
helped a little bit. I think I see a little
less hairs here. So I think for my purposes I'm just going to
leave it as is. But if it's something that
bothers you when yours, you're going to have
to try to figure out which of those hairs is causing that roughed
up middle area. You can do it with the method
that I just showed you. So let's go back to our particle Edit menu here at the top-left. Then once we're in here, now
we're going to switch from the cone tool instead
to the puff tool, which is the third
from the bottom. I have my puff
tool selected now. My radius is set to 50 and your strength
should be set to 0.5. It should be set to add. What the puff tool does
is it's going to try to leave these hairs
where they're at in terms of how they've
been combed and curled, except it's going to try
to puff them outward. So it's going to
add volume to this, so it's not quite so flat. Now it is going to
mess up some of your your combing and we'll
have to fix that later on. But it should hopefully leave a general sense of the
shape that you had before. The areas we really
need to puff up are these big flat areas here in the middle as well as on
either side of the part. So when we click on it, you can see you don't want
to click a very long. The longer you hold it down, the more it's going to puff it. But we're going to just
click on this either side, just really short
bursts of clicking. And as we click it,
it's pulling it away from the surface here. We can see here it's really kinda puffing it outward here. We're just gonna keep doing
that until we have some, some actual physical
volume to this. So that's roughly what it
looks like from the top here. I'm just gonna keep doing the, you can see from the
front it doesn't look that much different. But from the side here it really adds a lot
of volume to it. I'm just going to
keep clicking on it until it essentially looks
like what we had before. Except it's sort of
sticking straight out. It's almost like he was shocked by electricity
or something. Okay. I think that's
enough volume for now. We can always adjust this. I'm gonna switch back
to my comb tool. Here on the left. I'm going to look at it from
the top and the bottom. I'm going to do my best
not to come in at all from the front because that's how we ended up making it really flat. So the way you can avoid that is by combing it
from the bottom and the top or the sides just somewhere that's not
looking directly at it. And now we're going
to curl this back slowly so that we're leaving some of that volume and still puffing off of the surface here. But we're smoothing it out
so it doesn't look like it's just going straight
out of his face. Try it again over here. It's better to go
slower on this rather than see I'm working
with the edge of the brush and that's
because I wanted to have a little less influence
and I don't want to accidentally move too much. So the more on the edge
of the brush that I work, the slower and more gradual
these changes will be. I'm just kinda curling it
back, smoothing it out. If anything here,
like right here, I can tell that
there's some hair poking through the hat here. So I can do that from the front. I can shape the, the overall front shape of it so I can hit
the edges of this, but I really don't
want to be dragging across the middle
of it like that. The only thing I wanted
to be doing from the front is just twisting it, sort of hitting the
perimeter of the Mustache. I can introduce the curl
back in from the front, but I don't want to be overall shaping the entire Mustache. Add my curl back in here. Yours doesn't have
to look exactly like mine if you'd prefer not have to have the curly edges on yours and you want
it to go straight down. That's fine too. Coming the Mustache here is really just personal preference. This is just what I've found, looks the nicest and it
also matches the thumbnail, which is hopefully what drew
you into the the lessons. I'd like to show you how I
made that. Specifically. This is just a lot of spinning
around and making sure that nothing looks too flat
or two puffy or two straight. You're just clicking
in shaping it. I think that looks okay for now. It's actually seeing from here, from this angle here I can tell it's a little
straight here. I'm gonna try to
flatten this out again, rather add a little curve to it. I suggest you look
from the bottom and then top one yours as well, because there might be areas
just like mine that you missed more around now. Okay. Now we have a relatively back to shape and it's a
little bit more puffy. Let's switch back
to our object mode and see what these
actually look like. Someone we're combing these, obviously you can tell
we're not seeing what the hair is actually look like. We're only seeing
the guides for them. So let's switch back to object mode. We can see our Mustache. This a lot more puffy now. It's still very straight, which will be getting
to hear in a second. But overall, it's
a lot more puffy. It actually has some volume. It sticks off of his face. I think that's a good spot. Now. Next step is to try to rough up some of this really straight
hair that we have here. So overall the right, we
have the right shape, except everything is very
sort of ruler straight. It's everything, it's
a straight edge here. Let's go down to
our children menu. Here on the right. We're
going to twirl down clumping. Now we have two settings that
we need to mess with here. So first one here is
the virtual parents. So long story short, essentially what
this is going to do is it's going to make
are clumps larger, more we're gonna do
with the clumping is to pinch the ends of the groups of hairs so that they come to a
bit more of a point, but the root of the
hair will stay wide. So it'll sort of pinched down into like maybe a
paintbrush shape. It's also something that
you'll see a lot on like animal for if you see like
a 3d render of an animal, or obviously even in real life, there for tents to not just be individual hairs that I'll
just go in one direction. Hair kind of pulls
together in clumps up. Now all those clumps go
in the same direction, but the individual hairs
tend to pool into clumps. And that's what we're
going to try to do here with the Mustache. So let's start by setting
the virtual parent here. It's gonna be a
very small value. We're gonna do 0.008
and then hit Enter. You'll see your hairs
here move a little bit, but nothing particularly
exciting happens. We're now going to open the clump curve editor here so we can check,
use clumped curve. Since we have this checked, now we have this seemingly
empty, empty graph here. But we're going to
do is pull down this little dot here on
the top-right corner. We're going to pull that
down to about here, about halfway for this like Faint Grid
that we can see here. Then we're going to grab somewhere around
here in the middle, a little bit to the
right of the middle. We're going to pull
that just a bit lower than the right side is. Essentially we're just
shaping the law clump here. So this is the root
and this is the tip. So right now the root is
not being clumped at all. The tip is being
clumped a little bit and then the middle
is being clumped just a little bit more than
the tip of the hair is. Then we're going to
add our clump noise So we can check clumping noise here. You can turn that on. And now we're going to set
this pretty low, 0.05. Just add a little bit of
noise to the clumping. We can see here. I believe
we just turn this off. It should actually show it
a little bit different. So this is what we had before. Here's a very straight. Now if I turn it back on, we can see our
hairs are starting to get a little bit more, a little bit more widely. Little C, other kind of
pulling together into these little patches here where they're clumping
together a little bit tighter. So that's what we're
trying to go for. Now let's go down
to the roughness. We're going to throw that down. And then each one of
these values here, we'll just add a little
bit of randomization essentially to the Mustache, to the direction
is of the hairs, the curl of the hairs,
that kind of thing. We're just going to
go through here and change a few of these values. So first for the
uniform roughness, we're going to type in
0.01 and hit Enter. And you can see here your
moves just a little bit. For the size, we're
going to type in 0.1. So this is the size of
that uniform roughness. The first one is the amount. The second one is the
size of that amount. So essentially how
strong is it and then how small is that,
that movement? And then for our random here, so random number two,
we're going to add 0.015. This is just going to
take individual hairs here and make them a
little bit more random. So the first one is just the overall shape of the Mustache. The second one is going
to try to pick out a few hairs and then make them
a little bit more winery. And then for our threshold here, we're going to set that to 0.3. Then that's just a further level of randomization to this. This is Adjusting
the threshold at which these randomizations
will kick in. The last thing we're
going to do to help make this Mustache
look a little bit more natural and its movement
is to throw down kink. Then under King type, we can choose curl. So right by default
it's set to nothing. And we have a whole bunch
of different options here, but I'm going to use
curl for this one. Will choose curl. Then by default, yours
is probably really high. It's probably like 10 "
or something like that, which is going to make
your Mustache go crazy. But we want something a
little bit smaller than that. We want something more
in the 0.5 range. This is more of a personal
preference for you. So this is just the
size of the curl. If you want it a little bit more wiring and a little
bit more wild, you can make the value higher. If you want it a little less while you can make
the number lower. Also, if you do negative
amplitude here is just going to do the curl
except it's doing it backwards. You might start
getting some weird intersecting if you
do it that way. Maybe you're not.
If you go a little, just a little bit negative, you could probably do
it that but for mine, I'm just going to leave
mine at 0.5 " for the curl. We can see now as we
spin around here, the hairs a lot less
straight and a lot less kind of just all going
the same direction. We'll see once we
get to the rendering if it looks a little too wild. But I think for now
that looks pretty good. It's hard to judge the
look of the hair exactly within the viewport because
it might not look great here. And then once we get to the
rendering step with the, the actual Hair material, this could look a
lot, a lot better. I wouldn't get too worried about how it looks immediately. Let's just leave it as,
as it is for right now. You can do a little bit
more tweaking here. But I think what we have now, as long as yours looks
similar to mine, you should be good.
At this point. Look over the shape
of your Mustache and combed further to get the
shape that you'd like. If you'd like it to be a little bit more
currently on the edges, you can shape it now with
the particle edit using the comb or if you want to curl it down or have a
go straight out, those are all choices
you can make. Now, in the next lesson, we'll be creating the Beard and styling it just like we
did for the Mustache. I'll see you there.
8. Creating the Beard: In this lesson, we'll be
creating the Beard and styling it to match our
Mustache. Let's begin. The process for
making the beard is very similar to
making the Mustache, except we'll just becoming
it a little bit different. And some of our settings from the children's size
and hair length, those would be a
little bit different, but overall, it's basically
the same process. So to start with, make sure
you have your body selected. And then go down to your
particle properties setting or your
Settings tab here. We can see here we still
have our Mustache on, and that's what we did
in the last lesson. Now we're just going
to hit the plus sign here to add a second
particle system. We're going to
rename this beard. It entered, and then we're
going to switch this to hair. Then just like last
time, sort of explodes. We have hair everywhere. It's now we'll
scroll all the way down to our Vertex Groups. And then under density, we can click the field
and choose beard. Now we'll scroll
back up to the top. Then for our hair length here. So 10 " we're gonna do 15 " because we went
the beard hair to be a bit longer
than the Mustache. Then for our segments, we're going to type in eight. We're going to again scroll
down to the render drop-down. And then under path will choose B spline to help with
the curving of the hair, just like the added segments do. Now that we've made
those changes, we can go up here to particle edit mode and
start combing our beard. However, you might notice
possibly on your side, that when you click
particle edit, the your Mustache
actually looks like it changes shape and
it kinda breaks. Now this should be
only a visual bug. So when you go up
to object mode, your Mustache should go back to the actual shape that should be. So hopefully when you're
in particle edit mode, hopefully yours doesn't change. But if it does, It should
just be a visual bug. Tried to ignore it for now. So now editing our
Mustache should be a lot, or rather editing the Beard should be a lot
easier than editing the Mustache because
we don't need to really worry about
partying the beard. The Beard is all just
gonna get combed straight down towards
the middle here. We're just gonna kinda
comb it down into a point, straight down in the middle. And our goal here is
to just have it round up over the Feet. So it looks like
it is interacting with the legs here because
by default the hair is not actually
interacting with any of the geometry other than the
body that it's attached to. So we want to curl it up
over the legs a little bit. Then we're going to bring
it down to a point middle. Sort of try to
straighten it out again. We have it combed in
the right direction. We have the same issues
we had with the Mustache, where it's very tight
against the body. So to fix that, we're
gonna do the same thing. We're going to switch
back to our puffed tool, which is the third
from the bottom here. For our radius here, we could probably leave it
on the smaller one. You might want to turn it up. I'm going to turn mine up to
75 just so it's a little bit bigger because a lot larger
area we're working with. We're going to puff up
mostly the center here. We can leave the sides
here not too particularly puffy because we want to
have a hug on the sides, almost like the sideburns
or the bottom of the chin. Then the area in the
middle is where the most of the volume
of the hair is. We're just going to drag this up and down here in the middle, really puff up the center. Maybe a little bit around
where it comes up over the Feet and just below the
curves of the Mustache. Now we have our beard
and that's kinda just jotting straight
out right now. That's okay. Same thing we had
with the Mustache. That should be good for now. I'm going to go back
to my comb tool. And I'm gonna do the very
same thing that I did before. So in this case, I'm
going to actually want to switch into the X-ray mode. So I'm gonna hit Alt and Z. Just so it's a little
easier to see through this. I'm going to use my comb, just the edge of the comb here. The Trying to round this off. So it looks like it's
a big puffy beard that's sitting out
in front of them. A shape it up from
the bottom to give it a little bit of a
curl on the bottom. I'm going to try to pull this. Pull this a little
bit inward and we're going to try to give them
just a little bit of like a little kind of a mimicked curl on the bottom of his beard. So that the bottom of
the beard looks like it curls out and away from his body in this
sort of U-shaped, sort of like the Mustache does. Let's scroll this word
here on the science. Trying to bring it
back to a point I'm trying to, to
flatten it out too much because we really do want this sort of Puffy beard
out in front of them. Just going to curl it a
little bit around the Feet. Tried to give the Feet a
little room so we're not intersecting the Feet too much. Now I'm going to
Chrome it down again. You couldn't have to commit
inward a little bit. So you're gonna have to
lose a little bit of the volume at the
bottom in order to give yourself enough room to
actually make the curl. You can see here I'm just kinda shaping enormous into an X, like an S curve. We can make our radius
a bit smaller here. And I'm going to
sculpt the top in 50, save a little bit of a
smaller brush to work with. Kinda try to get this little curl here you can see now forming at the bottom. That's just Optional. I just think it looks
nice with the Mustache, How the Mustache has a curl. Just trying to carry
that same sort of design into the Beard. Just a cute little detailed add. Then just continue
shaping it from the top. The bottom is not quite
as helpful in this view because it's so close
to the bottom anyway. Just try to shape it from the
top and the sides mostly. And again, this is not
what really one where you want to be coming at
much from the front, unless you're combing it to
shape the perimeter of it. If you want to just
push in the perimeter, you can do that from the front. I would just suggest
you continue to comb your beard to get it to a
shape that you're happy with. I think for right
now, I'm pretty happy with this is always something you can just come back to if you're not
happy with it later. I mean, even up until
the very hinge right before the render time use is something you can be Adjusting. So don't get too
caught up in it now, it doesn't have to be perfect. You can even do a few renders, decide you don't like
it the way it is, and then come back and
just commit Quick. It's no different than combing your own hair if
you don't like how it looks in the mirror,
you just comment again. I'm happy with how it is Now. I'm gonna hit Holton
X0 to X at this. Now let's go back
to our object mode. We can see here
just like I said, the Mustache popped
back to how it was. So it's just a visual bug
while you're working it one, combing your beard, that the
Mustache sort of freaks out. But once we go back
to object mode, which is how this is going
to render, not an issue. Again, just like our Mustache,
we have a very thin, stringy beard, and that's because we don't have our
child's turned on yet. We're gonna go down to
the child settings. And then we're going to
switch it to interpolate it. For the amounts we're
going to type in. 35. 35 again. We have our beard just about as thick as our Mustache was. You can always make
your beard a little bit thicker since it's a
little bit larger, if you want it to, you can
type this into like 45 or 50. Then we're going to adjust
our virtual parent again. This time we're going to type in 0.03 for the virtual parent. Because this, the Beard
is a little bit larger, so we're going to need a,
a different value here. We're going to check
long hair on as well. Because this Beard is a lot
longer than our Mustache, basically in all,
all aspects here, these hairs are a bit longer. And if we turn on
long hair, It's just, it's generating children
that are more suited to a longer hair system rather than the shorter hair that we
have on the Mustache. You can see here it
actually changes the look of the Mustache. Are the beard a
little bit as well? So it's roughing it up
a little bit more hair. It's making them not
all quite so uniform. We're gonna go down
to our clumping and we're going to turn on that
are clumped curve again. I prefer using the clump curve
because it just gives you a little bit more control over
what the clumps are doing. This time we're going
to pull this one pretty far down here, almost to the middle here. So about halfway down. And then we're going to
round it off by clicking on this line here to
add another point. And we're going to
put it about here. Now we're rounding this off, so we're making the
tips of these clumps a lot tighter than
the Mustache was. Then we're having
round-off between those. The center of the hair
is starting to clump. Then the tip of the
hair is really clumped. We're not going to use
clump noise for this one. Instead we're just kinda go back down to the roughness area. And for the uniform roughness, we're going to put in
0.075 for the size. We're going to
leave that at one. For our random. We're going to type in 0.015. And then for the threshold
will type in 0.3. Just like the last time. Then add a little bit more
roughness like we did before. The shape of the hairs here. We can go down to kink king
type switch that the curl. Then the value that
I have here is 1.25. This is again, another value that is sort of up to
personal preference. If you'd like it to
be a little bit more straight like it was before. You could go down to
a lower value like we did with the Mustache,
maybe a 0.5. Or if you'd like it a little bit more rough, a little crazier. You go with something
like 0.1 to five or 0.15. Let's just roughing
it up a little bit. These are all the settings
will mess with here. Now I'm noticing from
the side here that I think my beard could use a
little bit more volume here. So I'm just gonna show
you a quick how easy it is to go back
and change that. I'm gonna go into
my particle edit. I can see here that I
have a flat area here. I'm just going to work from
the side here and just grab these hairs here
in the middle and just kinda puff them
up a little bit. And I'm just using
the comb here, not the actual puff tool. I'm just gonna give them a
little bit more of a chin here and he was kind of
lacking a chin, at least underneath
the hair here. I could just use the edge
of the brush to make my, my adjustments a
little less strong. Maybe go back down
in from the top view here and round this
off a little bit, squish it in a little bit. Now I can go back to my
object mode at the top. And now it's not quite as flat. So he has a bit more of a
chin where he didn't before. Okay. So I think that's it for the Mustache and the
Beard At this point. And then we'll be moving on in the next
step to texturing. In the next lesson, we'll be texturing our gnome to
add a little color. See you there.
9. Texturing the Gnome: In this lesson, we'll
be adding a bit of color to our gnome by
giving him textures. Let's begin. The first thing we need
to do before we begin texturing is to enable
another new add-on, which will help us
with Texturing. So we're gonna go up
to Edit Preferences. Go to your add-ons
tab here on the left. And the search bar at the
top type in node an ODE. And we're going to
enable Node Wrangler. This is just an add-on
that will make a lot of really tedious things
that we have to do when we're making a
texture from scratch. This will simplify a
lot of it and just make a key buying that will help auto-generate some nodes for us. So with that enabled,
we can now close this. Now, go to your class resources
and make sure that you have downloaded the
fabric color, fabric, normal fabric roughness, as
well as the leather color, leather normal and
leather roughness. Don't worry about
these backgrounds yet. Those will be for
a future lesson. The textures you
just downloaded from the project resources
I got from ambient CG, which is a great place to get public domain textures
for your projects. This would be a great
place to go for your own personal projects or for the class projects
for this lesson. If you wanted to say change the fabric on your gnome
for your class project, you could get a new fabric from this site. So you
can go up here. So the top here at ambient
cgi.com go to categories. Here we can see all the different categories
and it'll tell you how many materials exist within that category
on this site. It's maybe we'll go to fabric. Then we could just choose
a different fabric from the list here,
maybe this red one. Now we get to see all
the different ways that we can download this. So it comes in multiple
different sizes, from one K to eight K, and you can download it
as a JPEG, whereas a PNG. And when you download
this, this will give you all the maps necessary. So in this case, if
we hover over this, it gives us an eight K version
of the JPEG for the color, the displacement, the normal map to different styles for Blender, you'll be using the GL
normal map, not the DX. Then we also have the roughness and then a preview
for it as well. So I really highly
suggest you use ambient CGI in your own artwork because all of this
stuff is free. And if you liked it enough, you can donate to the authors. With all that out of the way. Let's go back to Blender. First, we're going to switch to our shading tab here at the top. That will switch
our interface here. The first thing we're
going to do is to get rid of these two panels here
on the left because they're only really taking up room
that could otherwise be better utilized by the two panels
that we actually need. To hide these panels, we can just click on
the top-left here. Then drag over, and
that'll hide that panel. Then here we can click on the top-left here and we
can see our mouse changes as we do that it
turns into a plus sign. We're going to click
here and drag over. Now we've hidden those panels. And then we're also
going to switch our rendering style up here. And we can see now that
it's actually rendering it using this is the EV render. So we're going to
switch this up here. Cycles Render. Now this will give us a quick preview of what our actual render
will look like. As we rotate around, you'll notice it gets
blurry as we rotate it. But then soon as
we start moving, it'll start to sharpen up. Now we get a better idea of what our beard actually looks like. We can see here this is what the beard looks like when
it's fully rendered. Now this has no textures on it. It's just gray. So it'll look better once it has
a Hair material on it. But for now, we get a
better idea of what the Beard actually looks like when it comes
to the full render. Let's start by selecting
the body of the gnome. We'll make sure we have
the body selected. Now we're going to
click this New button here on the bottom. This will create a
new material for us. We can resize these windows here to make this a
little bit bigger. At the bottom, at the top of this window
where it says material O1. Let's rename this body fabric. You can hit Enter. Now, this node here
basically will have all of the different
connections that we need in order to create the
fabric for this body. It also has some sliders
to affect those as well. But the first thing
we need to do is get our images that we've downloaded for the class
resources attached to this node. And that's where Node
Wrangler comes in. With this central node selected
the principled be SDF. This green one here hit Control Shift and T
at the same time. Then that will bring up
an import interface. Now this is where
you'll navigate to where your textures
have been saved. And you want to save those textures if
you haven't already. But them somewhere
where you're know model actually is as well. I'm going to navigate to
where my textures are. Now. Now that I've found my textures, I can select each texture
while holding down Control. And I want to select all three
of these fabric textures. So fabric color, fabric normal, and then fabric roughness Once I have all three of
these textures selected while holding down control and that way It's flex all three of them. I'm just going to hit this
little blue button down here. It will automatically
import all of those textures and
hook them up for us. So it runs them each one
to the correct node. And also it creates a mapping
node for all of them. A quick rundown on what
exactly these nodes here are doing is essentially the nodes are working from the
left to the right. And each one is telling the
node to the right of it. A key piece of information. Essentially, this one is telling it how to map
the UV coordinates. This one is doing a
similar operation here in terms of scale and position. Each of these orange
ones here are linking the images
that we've downloaded. So you can see here
this base color is routed with the fabric
underscore color. And then this is running
down into the base color on this principled
be SDF node here. This one here is essentially
like the the overseer node. It's the master node. It's taking all this information and then running it into
this material output, which is what we're
seeing on the model here. So each one of these is
running down into this. Then this is converting it into a material and then
outputting it onto the model. This one here is
running our roughness, which is running down into
the roughness node here. Then this is our normal. The base color does
what you might expect. It basically just gives
the color of the object. In our case, it's using this
base image that we gave it, the fabric underscore
color JPEG has the color. The roughness is changing how the fabric is
shiny essentially. So it's taking the, It's taking a black and white
value in translating that into white is really rough. So then black is not very rough. In our case, this
fabric is going to have a mostly white roughness map, which means it's
relatively rough, which means it's not
that reflective. Which in real life fabric, most fabrics at least are not particularly,
particularly reflective. Then the normal map is telling me fabric how Bumpy
It should be. It's converting the blue and purple and green and pink
map that we put in there. It's taking all those
colors and then turning that into
information that can be used to tell the
fabric how how rough it is, because we don't want to confuse that with
the one above it. So we can think of this
is how bumpy it is, how textured it is. Like if you ran your fingers
over top of this fabric, would you feel anything
or would it feel like perfectly
smooth like glass? And that's what the
normal map is doing. The first thing we need to do to make this actually
look like anything, because right now it's
just solid blue is we're going to drag
this camera node. So this little purple dot here, we can just click and drag that. We're going to drag
this up to vector. This is doing, is it's telling the camera to use
the projection of the camera as the size and
the layout of this fabric. So normally we would go
through here and we would unwrap this entire object. However, for the purposes
of this beginner tutorial, we're going to use the
camera projection, which basically just says, as we rotate around, always make sure
that this fabric looks correct from the camera. This is a nice simple
way to make sure that a beginner can just get the textures applied
to their object. And they'll look
pretty much correct from any sort of simple render
that we've needed to do. That what we're gonna
do for this tutorial. Now we'll notice here
that add as we zoom in, this fabric pattern is
laying out and we can see that it looks
like a knit pattern. However, it's relatively small. It's making our gnome
look relatively big. So in my mind, this gnome is actually pretty
small and it might only be, say, a foot tall. So in order to make the
gnome look smaller and we can make the textures
applied to it bigger. That way, the observer
looks at this and realizes the gnome is pretty
small because the fabric pattern on them is, also implies that there are small because
the fabric is large. So the way we're going
to change the scale of this is to go down here
to where it says mapping. We're gonna hit Shift and a, just like we did in
the modeling portion, except this time
we're adding a node. We're going to type in
here up at the search bar. We're going to type in value. Now let me have value here. Now we can just plug
this into the scale. This value here is just overriding all three
of those portions, or all three of those values. Rather, for this, we're
going to type in 0.4, which going to make the
fabric much larger. So the, as we make
this number higher, it's making the fabric smaller. And as we make the number lower, it's making the fabric bigger. I think it's important for this larger knit
pattern implies that this gnome is actually
pretty small because we, as humans know roughly
how large this, this knit pattern would be in real life if we were seeing it. So the smaller the gnome is, the larger than it
patterns should be. At this point, I'm sure
you've also noticed that the Beard is fabric
as well right now. Don't worry about that for now. We'll be changing that here soon to make it look like hair. Very now, only focus on
what the body looks like. One thing you might
like to change about your gnome is the
color of the fabric. So right now it's just using the color of the image
that we plugged in here, which was sort of
a blue-green color However, we are able to adjust that right here between
the base color node, which is the top of the three textures that we plugged in. Let's see, yellow line here. We're going to hit shift and a, we don't have to be on top
of the yellow line yet. It had shifted a in
the search bar here. We're going to type in hue HUD. And we want the hue
slash saturation node. Once we have this, you
can see as we drag it over top of this line
here it turns white. So we're just going to click. And then that will
automatically hookup the, the correct nodes, the
pathing for the correct node. This does, is it allows us to shift the hue of
this color here. So if we wanted to make it a different color and
we just have to move this slider here
to shift the hue. Now it moves pretty quick. So if you hold Shift down, it'll move a little bit slower. You can hone in on the
color that you like. In my case, I'm going
to make mine green. So green is, for this particular situation
here is about 0.3. I'm going to lower
my saturation down. I don't like how
saturated it is. I'll do by 0.7, which will
desaturate the green a bit. I also think I'd going to make
mine a little bit darker. I'll do like 0.5 for the value. Now I have a nice
dark forest green. Again, if you want
to adjust this, you can just type in any
of these values here. If it's now, it's maybe once
you make it darker and maybe it needs to be a
little more saturated or a little less saturated. You can just change
those numbers here. So get it to a color
that you're happy with. If you'd like to just
follow along with I have I have 0.3 from my hue, 0.75 for the saturation
and 0.6 for the value, which gives us a
nice dark green. Now that we have
the body texture, we're going to go over
here to the right. We're going to click on this
material properties tab. And that's the
little red circle. I've cut into a quarter. So once we click on this,
we can see our material here that we have applied
to this body fabric. The body has body
fabric applied, but we can add more
than one material. So now we're going to be
adding the Beard material. So let's hit the plus sign here. That'll make a new slot. However, it hasn't
added any material yet. So we're just gonna hit
the New button here. Now we'll name this beard. Hit Enter. Now I can zoom out here. Now select the principled
be SDF node here. We're actually going to be
to delete this because we're gonna be creating a
new node for this. Now we've deleted
that, makes you leave the material output here. We're going to hit shift
and a to create a new one. We'll just type in hair. We want to add the
principled Hair be SDF node. In order to see this, you must be in cycles. The cycles render into
just a refresher on that. You need to go up here
to your render settings. This renders property tab and make sure you're
render engine says cycles. If this says EV, this
node will not exist, this only works in cycles. So if you're not seeing it
and make sure you're in cycles, and then try it again. And you should see principled
Hair be SDF is a node. Now we can plug this be SDF node into the surface
for the material output. Will notice nothing has changed because we haven't actually told the hair to start using
this beard material yet. The way we tell the hair on the beard to use
this Hair material is by going over to our properties for
the particle systems. So here we have both our
Mustache and our beard. We're gonna go down
to the render tab. Then in the material here, we can see we have Body fabric, a set sign to it. We're going to change
that to Beard. So we can see it's now
changed for the Mustache, however, we need to also
change it for the Beard. So we'll select Beard
again at the top, and then choose beard
here for the material. Now we can see that
our body now is the fabric and our hair actually
has this beard material. The change the color of your
beard, it's pretty easy. All you have to do is click
on this little box here that starts out as
a warm brown color. And we can adjust this to
whatever color we like. I'm going to just bring mine up, make it more of like a
sort of a reddish brown. This is purely up to you. You can make your beard
whatever color you like. I find that the more natural colors look a little bit better, like black, brown, blonde, any of those colors in-between. But if you'd like to give
your gnome blue beard or a green beard or red beard
however you want to, however you want to make it
Guide and choose the color. You can adjust the in this
little drop-down here, we can see this is the hue which is changing
the overall color. So if we slide this
back-and-forth, we can see it's making
different colors here. The S is the saturation
of that color. So how, how colorful
is that color? Essentially? Then the V is the value of it. And so how bright is that color? Because it a really
dark version of it or is it a really
bright version? I'm going to set mine somewhere back to roughly where I had a I'd like they have that more sort of reddish reddish brown
color that I had before. So I think something like
that looks okay from mine. With those
metamaterials done now, we have both our body
and our beard textured. It's now let's texture
this little nose here. So we can just select the nose right in this view port up top. You can see as we add
more materials here, it's getting a little
bit slower and that's mostly because of
the Beard honestly, this Hair material,
while it looks very good and it makes the hair
look a lot more realistic. It's also difficult for
the computer to render it. So that's why you might
notice some slow down. Now you can switch to
the other view here. However, you'll notice that your hair is going to
turn black because this is using a version
of the EV render, which is a render that
does not support the hair. Now if you switch back, it'll look correct again. So it's just disabling
it for this one. But this will allow you to move around in your camera here. A lot smoother. That's one benefit of EV. Eb doesn't look quite as good. It takes a lot more to make
it look as good as cycles. But in general, it's
significantly faster. If you're having a ton
of slowdown issues, you might want to use EV
just for this working, like one more working here, and then only Rendering cycles. I'm gonna go back to
my Cycles render here because I want to
see what this skin material is going to look like. Now that we have
the Nose selected, we can click this
little new button here. We're just going to name
this skin at the top here, top of this bottom window. Now I can zoom in
down on this node. The main three things
that we're gonna be changing are the
subsurface value, the base color, and then
the subsurface color. So let's start with, let's
type in the subsurface value, which in our case will be 0.25. So it's subsurface
is going to do, you'll see it goes a
little rainbow up here, but that'll, that'll dissipate. Subsurface essentially
allows the light to shine through an object. So skin, things like milk. So there's a lot of things
in the world that aren't entirely blocking the light
when the light hits them, they let the light
scatter underneath the surface of them and skin
is one of those things. If you ever seen light shine through the back
of somebody's ear, if they're standing
in the sun and it looks kind of pinky or read, That's essentially the
subsurface scattering, the light scattering underneath the surface of their skin. And to make skin look a
little bit more realistic, we can turn up the
subsurface value and we can just set it to 0.25 and that's probably enough. Then for our base color here, we're going to choose
whatever skin color you'd like your gnome to have. So we can set a, we might need to actually zoom
out a little bit here, so it's not quite so large
and it doesn't cover the top. So we can set it to
whatever color we like. The only thing that
you need to take into account is you want
the base color, your skin to be a little
bit darker than whatever the subsurface color is because the subsurface color
is that sort of light, the light passing
through the skin. And we want that to be a
little bit lighter than the overall base
color of the skin. So if you want them to
follow along exactly with what I have, the values, I'll be using our
0.035 for the hue 0.7 to the saturation
point to eight. For the value. This
is our base color. And then for our
subsurface color, which is the other
color value down here, I'll be using 0.036, 0.77, 0.58. Now when I hit Enter, we can see our skin is updated up here. And the brightness
of the skin wall. So depending on how much
light shining on it. So currently we have a single
light within our scene, which is just the light that was existing in the scene
when we first made it. So when we started
out, we deleted what we will actually
be hid the camera. We left the light
where it was at. And this is that light and
the scene amount of light we have shining on this will change the brightness
of the skin. So if you're skin values
right now seem a little too dark compared to what
you've typed in here. I would wait until we get
to the Lighting step, which is in a future lesson. And then if your
skin's still feels a little too dark from
where you'd like it. Then you can adjust
it after the fact, you can go back into the
material and adjusted. But for now these are the
values that I'll be using. Now with our Nose textured, notice as we spin around, this might be more pronounced on my Gnome versus
yours or vice versa. But as we zoom in
here on the face, will notice some
areas here where we might expect to see scan. We're actually seeing underneath the Beard and we're seeing the The fabric underneath this
little gap here by his eyes. His eyes would be if we
hadn't hit them with the hat. Or you might see
a little bit here like where his mouth
essentially would be. You might be seeing between
this and seeing green here. We're going to fix that.
This is, like I said, this might be
unnecessary depending on how how tight your hair
is here on the face, or how close your nose and your beard comes up to
the rim of your hat. But I'll show you how
to fix it. Either way. We're going to start
by selecting the body. We're going to go
again down here to our material properties tab. And we're going to
add a new material. Then rather than hitting
the New button here, we're actually going to choose this little drop-down here. And this will show
us the materials that are currently in our scene. And we're going to choose skin. So now we have a duplicate, essentially a direct copy of the nose skin that
we have up here. Now we have that applied
to the body as well. And we just need
to tell it where to apply it on the body. So we're going to hit the Tab
button when our keyboard, while in this view
port at the top. And that'll switch
us to our edit mode. Now we're going to go into our X view up here
at the top right. So we just click this
little X bubble. We can now hit three on our keyboard to
switch to face mode. Then we can select
the faces that we wanted to paint with
the skin material. Then we're going to hit C
on our keyboard to switch to a sort of like a painting
method for selection. So now we can just click and
drag on this and you can see it's just starting to paint one, the polygon selection. We want to paint on roughly where we think any of the
skin might show through. Now we don't want to
go all the ways to the edges because we don't
want any skin out here. We want it to look like
he has a little face here that's hidden by his
beard for the most part. We're essentially just putting
this skin in here just in case any of this green
shows through the Beard. When we don't want it to
go all the way out here. So you just want
to make a little, sort of a little
round shape here. And this you can go up
underneath the hat with, I would suggest you paint up
into the hat a little bit. So we're almost making it
look like he's wearing like a little sort of a
knitted body suit. And then this is just where
his little face is sticking out and this is actually where
the hair is growing from. We're going to paint
it to about here. Then once we're happy
with that selection, you can right-click
and that will disable now the Painting selection
that we were doing, we can hit a sign over here. So with this skin
materials selected, we're going to hit
this assign button. Now that will assign that skin material to the
areas that we adjust selected. Now if we deselect, we can see now we've painted on this skin material that we have. And if we get out of our
edit mode by hitting Tab, are beard will pop
back on top of it. Now hopefully any
areas where you were seeing some of
that fabric poking through the inside the Beard and up near the nose
and where the eyes would be, that should hopefully
now be skin, so it looks more realistic. Now let's start
texturing our hat. We're going to select that. Click this New button here. Then we're going to choose
from the drop-down here. We're going to
choose body fabric. We're switching the
new default material to instead switching it to
the body fabric material. Now, if you'd like
your gnome to be entirely the same
color, that's fine. You can just leave this as is, and it will have the same
color on top and bottom. However, if you'd like
to have the hat be a different color like it was in the thumbnail
for the lesson. This is how we'll go
about doing that. Now that we have this selected, it's going to be using the exact same material
for both of these. So if we make any changes down
here to this body fabric, it will change it
for both of them. However, we don't
want to do that. We're going to actually
branch this material into its own unique
version of it. So we can do that by selecting, making sure we have
Body fabric selected. Then there's this two here
telling us that this material, this exact material is applied
to two different objects. So we want to break
that so that it's using a unique version for
this specific object. By clicking this too, we've now said that
this version of it, you can see it's added
A01 at the end of it. It's saying that this version of the fabric is completely, completely unique to
just this object. It's now not the same thing, even though it looks the same. The way we can tell that is by adjusting the hue down here. If we slide this hue slider, it's only changing the
Hat Before we go too far. And let's rename this material
here from Body fabric, a little one to instead. Let's call this Hat and Feet, because we're actually
going to use this color on the Feet as well. Hat and Feet per fabric. I'm going to make his hat and
his feet eventually here, sort of a bright red color. So if you'd like to follow
along with what I'm doing, I'm going to set my hue to zero, set my saturation to 1.1. Then the value to 1.1 to five,
which will brighten it up Let's now I have a nice bright saturated red for his head. If you don't want
to follow along with the exact same colors, I have no problem. Just find something
that you think matches the body fabric color
that you chose, and find somebody that's a
nice accent for the Hat. So again, if you didn't
choose green for the bottom, red might clash with that. So you might need to find your own color combination here. That works well. Now let's begin
texturing our feet. We're going to select
the first shoe. So just select the left of the right shoe one of the time
from this drop-down here, and we're going to choose
Hat and Feet fabric. Let me do the same thing
on the right side. Hat and Feet fabric. It's now it's applied to both. Now we're going to apply
the leather material that we also download it as the project resources
to the bottom of issues with either one
of these shoe selected, either the left of the right. You're gonna go over here
to the right side in your material properties
tab that we had before. We're going to hit plus on this. Then we're going to
click the New button here because we're actually
making a brand new material. Now we have a new material here. We're going to rename
this new material, leather. Hit Enter. Now we're gonna go through
the same process as we did for the fabric. So just make sure you have this principled BSD F
note here selected. You have to have it
selected or else the control shift T won't work. Now we're going to hit
Control Shift and T to use the Node Wrangler to
select all three of our maps. So hold Control and
select the leather color, leather normal and
leather roughness. Making click this
blue button here. And just like last time, it will automatically link
everything together. This works the exact same
way as the last one did. The colors, the color, the roughness is how reflective
and shiny something is, and then the normal is how bumpy and how textured
something is. So we're going to
add our value note here to make the scaling easy. We'll hit Shift and a go to the search function here
at the top, type in value. You can place it here and
then just plug it in for now. Don't worry about
the number just yet because right now
we can't see it, so we can't really
guess the number. This is just kind of getting
it ready for that step. Now we need to assign this leather material to
the bottom of the shoe, just like we did for the skin on the face
underneath the beard. We're gonna go into edit mode. Hitting tab with this, the left shoe selected. Make sure urine face mode, which is three on the keyboard. Then we're going to select
each of these faces here. Now in this case,
we need to hold Shift to make sure we're
selecting all the faces. We have all the
bottom one selected. Now we want to select a little
bit further out though. So we can either go through and just hand select
each one of these. Or you can go to Select, select more, slashed less, and then choose select more or control numpad plus
sign if you have a numpad. Now we'll just select
outward from that selection. So it's just going
out a single polygon, a single face out from the
currently selected objects. We have all of those selected. Now we can select our
leather material here. Make sure you have that
selected and then just hit a sign that will assign that leather to the
polygons that we had selected. Now if we hit tab to exit that, now we have the leather applied to the
bottom of the shoe. So now we can actually
adjust the value. So the size of this, we're going to set this to 0.45. So 0.45. For our texture
coordinates here, we're going to use
the same texture coordinates as we did before, which is just camera. So we're going to click and drag the camera node to the vector. Now it's using the same
unwrapping style as the fabric. You'll notice that it's only
applied it to the left shoe. Now if we want to apply it to the right and we can either go through and do the exact
same thing that we just did. Or alternatively,
you can just simply delete the right
foot and then just duplicate over this
left foot over here and then re-mirroring
and replace it. In our case, I think
I'm just going to redo this just so I'm make sure that I don't move
the foot from where it's at because I like the
position at it isn't now. So I'm gonna hit the plus
icon here on the right side, still in the material tab. Now this time I don't
need to make a new one. I can just choose leather
from this dropdown. So it's the same leather
that was over here. I'll hit Tab again. Select these faces. Holding Shift, go to Select, select more or less, and then select more
than I can add, assign. Actually add, make sure you have your leather selected here. So I hit Assign there
with the fabric selected, which didn't really do anything because
there's already fabric. Now I have my leather
selected, hit Assign. Now I can click off of it, hit tab to leave the edit mode. Now it's leather again.
Now that we're done, we can go back to
our layout tab here. You'll see when we
switch tabs here, it's actually going to disable the Rendering that
we had before. So if you want to
see that again, just go up to the
top right here. We're going to click
this cycles button here. Now we can see that our
gnome is nice and textured. Now that everything is textured, feel free to adjust
any the colors or sizes of the textures
to your liking. In the next lesson,
we'll be creating a nice lighting
setup for our gnome. I'll see you there.
10. Lighting the Gnome: In this lesson,
we'll be Lighting our gnome with a studio
style lighting setup. Let's begin. To begin with. Let's select our renders studio collection
here at the top-left. So we're just going
to click on this little white box next to it. That way any lights we create
will immediately go into the render studio
collection rather than the gnome collection
which we were working in. Now we're going to unhide the camera that we hit in
the very first lesson. We're just going to click
this little eyeball here. Now if we zoom out, we should see our camera
here to the left. Then we're going to make a second viewport so
that we can have our cameras set up on the left and then we can
work in the right. We're just gonna go up to
the top-left corner here. And then as we get to
the very top left, you'll see your mouse
changes into a plus sign. We're going to grab that
and then slide it over. You can make it about half
and half are a little less. Maybe when the left side you can make the left side a
little bit smaller. Then on the left, we're
gonna go up to view cameras. And then active camera. Now we can see here
that this view on the left side is actually showing with our
cameras, showing. If we select this camera, let me go into our
move tool and we move this camera around. It's actually moving it
on the left side as well. So this is giving us a live feed of what this camera is seeing. While we can move this camera over here on the right side, using rotate and move and
doing everything that way. In my opinion, it's not actually the easiest way to
move this camera. My preferred method is to go
over to the left viewport. Here. We're going to click on this view port
just so we focus it. Then we're going to
hit N on our keyboard. We're going to go to
view on this tab here. Then we're going to choose lock. We're going to choose
lock camera to view. So that's what this
actually says here. If it was a little bit wider,
would be able to see that. There we go. So we're gonna
choose lock camera to view when the View tab. Now I can hit N to hide this again, so
it's not in my way. Now over here, when
I rotate the camera, might just my viewport, it's
actually moving the camera. You can see that here
on the right side. Now if I zoom in, I can actually just
really quickly and really intuitively place my camera
exactly where I want to. So this is a lot easier
for us to maneuver because we're used
to doing it anyway while we're modeling
and texturing. I'm going to just try to frame this up right in the center. Make sure I leave
a little bit of breathing room around the edges. I think right about
there looks good. Now that our camera is
positioned here on the left, I can hit N again. Make sure I'm still
in the View tab. And then I can just
uncheck camera to view. And then hit end tie that menu. Now, this camera is
locked in position, so as long as I don't touch
it over here and move it, it shouldn't move at all. Now if I rotate my
camera over here. So if I rotated around
in my viewport, it'll pop me out of the camera. However, it's not moving. The camera remains where it was. If I want to get
back into that view, I can just go to View cameras
and an active camera. Or if you have your numpad, you can hit numpad zero to just jump right
into that view. Fair free to adjust your camera position
however you like. But for the purposes
of this tutorial, I'll be going with the
three-quarter camera setup in our left viewport. We're going to want to switch
this to the rendered view. That way we can see
the rendered view on this side as we place lights. And then we'll be
moving and placing the lights on the right side. However, we can actually
see the button that we had before to switch into
the rendered cycles view. And that's because it's off the side of this
viewport screen, so it's actually
hidden back here. So the way to, to see it is to use your middle mouse click. So just click down on
your middle mouse wheel. And you can see now I can slide this bar to reveal the
items on the right side. I'm gonna switch this to
the far-right button here, which we'll use
the Cycles Render. Now we can see it
looks like what we had in the last lesson. One last thing I can do on
the left side viewport is to twirl down this viewport
overlays menu here, the two overlapping circles. I can turn off this
wireframe now, so I don't need to
see it and it's only kind of cluttering
up the view. Now that I have that turned off, I can just zoom in a little bit. So I can fill this view
out a little bit better. With our camera in place. We can actually hide
it like we had before. That way it's not in
the way and we don't accidentally grab
it and move it. We're just gonna go
up to the top list and then just click this
little eyeball here. That means that it's not
visible in the viewport, but obviously it's
still working. Now let's select this
generic light that we had left in our scene from
when we first created it. We're going to delete that light because
we wanted to start with our own sort of
fresh setup for this. You can see here that our
gnome has gotten much darker But it's not entirely unlit yet. And that's because
this the scene currently is using some
sort of ambient lighting. The area that you can
find that ambient light in is here in the
world properties. So if you go to the
world properties here, it looks like a globe,
a little red globe. Let me can go down
to the surface menu. And in color, we can
see here that it's, the world is actually projecting this light gray color
across the entire model. We actually don't want that. So in some cases, you can use this ambient lighting to project light into your scene to
help fill in some shadows. However, I went full
control over my lighting. So I'm actually going to
switch this to black. So that's gonna make my entire
scene completely black. Now, on the left side, now over here we
can still see fine. So it doesn't matter
that it's dark. But essentially I want to
start from scratch here. I want to have full control over every light that we
put in the scene. And I don't want this
ambient light just filling in all the shadows that I'm
trying to leave behind. Now that all the old
lighting is removed, Let's start adding
the new stuff. We're going to hit shift and
a to create a new object. We're going to go
down to the light. We went to to add an
area light switch. Just kinda click area light. We can see here it pops up right below the bottom of our gnome. So we can just grab this. We're going to start
sliding this up. As we slide this up or seeing a live preview here on the left. Let's move this out to
the front of our gnome. Sort of out in
front of him here. And we're going to put this
off to the right side of him. This light here
that we're making is going to be our key light. And we're actually
going to start naming these lights that way
it's obvious what we're working with. For now. Get your light to
about this position. So it's off to the right of him. It's above his head. Then it's still in front
of his body as well. You might want to move this
out a little bit further. Now that you have it in position roughly in this area here. This little yellow
dot down here. If we grab this little
yellow dot and we move it, it actually won't
angle the light to roughly wherever pointing
that yellow dot. It's a quick way to just kind of angle the light
towards your subject. Rather than selecting the
light and then going to rotation and having to
switch to Local Rotation. It's a lot faster for us just to grab this
little yellow dot. And as long as we don't
need to be exactly, precisely, exactly 45-degree angle or
something with our light. This is a really
quick way to do that. Now I have it pointing
roughly at the front of his face here, right
above his nose. You can see where
that line is hitting. Leave it about there. Now we can go to our
light properties. We're going to go down
to this little green light bulb down here. And this will show
us what exactly are lighting setting is. So let's start by
naming this light. We can name it here,
but the top list, we're going to call
this key light. So KEY. So our key light is the main
lighting for the scene. It's the, if you want
to think of it as the sun direction or the main spotlight
shining on your object. This is the most powerful and the dominant
lighting your scene. The overall power of this late right now is pretty dim gnome, you can see that here
on the left sided. If we change the power
and we make it higher, the light will continue
to get brighter. So we're actually
going to make this significantly brighter. Let's go up to maybe to 50 as a start and see
how that looks. So it's pretty bright right now. We can always adjust
these lights as we start putting more end, we might need to go back
to one light and make it a little dimmer or change
the color on it, or maybe move the position. But for now, let's leave this
light as is at 02:50 watts. We're going to change
the size of the late, which will make the shadows and the overall shape of the
light a little bit softer. Right now it's only a foot, foot wide, so it's
a 12 inch square. We're gonna make
this closer to 50. So we type in 50 ". You can see here it's
actually sized up this light and it's also made our shadows a
bit softer here, the light sort of wraps
around the object a little bit better because the
light source itself, so this square here is
actually larger as well. So another quick way to
move that is to just hover over this square and then grab one of these
little yellow handles. And as we size it up, if you look at our left side, preview here, it's
a little blurry, but as we make the
lights smaller, the shadows get a
little bit sharper and they're a
little bit tighter. Then as we make the late bigger, they soften up and they
get a little bit wider. We're going to set this back
to around the 50 point. Then the last thing
we're gonna do is to change the color
of the light. Right now it's just
a pure white light. But we're going to
warm this light up actually in the hue. We're going to type in
one for 0.1 rather. So 0.1 for the hue, which will make it
a little bit more in the red direction. And then for the saturation,
we're going to put 0.25 So we can see here
on the left or render now is just a
little bit warmer. It's almost hard to
tell because it's such a subtle, subtle change. But you will notice
the difference between this level of warmth in your light versus a
pure white light. And we're gonna
be balancing this further into the lesson with some cool lights to give it a little bit of a
chromatic contrast. So not only are we going
to have contrast in the values of our render, we're also going
to have contrast in the colors or the render. So we'll have really
strong warm light with some cooler
blue fill lighting. Now with our key light setup
on the right side here, right viewport, we can, with this key light
still selected, we're going to hit Shift D. And then why? To make sure that we move it just
in the y-direction. So we're duplicating this light. We're going to move
it off a little bit further to the left than the key light
was to the right. So it's a little bit
further off center. Now we can wrangle this light. We're going to re-enable
it back towards the gnome. Might want to pull this
one down a little bit. We can just adjust
our positions here. So something like
that looks correct. So it's a little bit lower. It's also a little
bit further off to the side than the key light was. Now let's rename this
light, fill late. So FIL L Late. The purpose of this slide, once we adjust these
parameters here is to fill in some
of the shadows. If we just hide this light here. So if with the light selected, I'm just going to click the little eyeball next
to the fill light. We can see here the
key light is doing a good job on the
front of the gnome. But if leaving the background here basically entirely black. So anything that's in shadow is entirely in shadow because there's only a
single light source. Nothing, no light is
bouncing off any surfaces. There's no light coming
from the environment. So the Soul light source scene right now is the key light. So the purpose of our
fill light is going to be to fill in some
of these shadows here. That way things are still
perceived bubbly in shadow, but they're not entirely black. Let's turn our fill
light back on. So we're going to click the little eyeball
next to fill light. We're going to set the power
much lower on this one. So we're going to set it
back down to about 75. For the power, hit Enter. We're going to leave this
size about what it was. Then we can adjust our color. We're going to make this
a little bit more blue, like I said before. The hue, we're going to
click on that and hit 0.55. So we're pushing it
more towards blue. And then for the saturation, we're going to add a bit more saturation
that had had before. So 0.5 to make it a little
bit more saturated of a blue. Now we can see here
if we turn this off, so we turn the fill light off. So that's what it was before.
If we turn it back on. Now we still have
some shadows here, but they're not quite as dark. If you don't like the
fill level of this, we can always lower
this value down. Let's see what 50 looks like. It's a little bit more shadowed. Now. If you want a little
bit darker shadows, you can even go down to 25. In this case here, let's maybe
go with 25 for this value. I think it makes for a little
bit more dramatic shadows. We have nice dark shadows
here on the left side, but they're not entirely
black like they were before. Now we're going to create a
light called a rim light. Rim light is going
to be a light that's sitting behind the object. And it's going to
cast a bright light from behind the object. It's going to make
a nice highlight here on the edges of the object. It'll give us a little
bit of a highlight over here, and then more. So we're gonna get a highlight
on the edge of this hat. We'll see some
highlighting behind the Mustache because they, the light will shine
through the Mustache because it has that
Hair material. And we'll see some light maybe
on top of the feed here. So to start with,
select your key light, so it's the warmer,
brighter light. We're going to hit Shift and
D. And then we're going to hit X this time because we want to clone it
backwards behind it. Once it's back here,
we can reposition it. So we're going to position
it a little bit off to the, further off to the right
than the key light was. We're going to select
this little yellow dot and reposition it
towards the Gnome. And you want to be looking on the left side of your
monitor here in this case, to get a better idea of
where exactly it's hitting. So I can see here on the left side that it's hitting right, right where his nose is, that little orange line is
going through the Body. I can see it's
hitting about there. In this case, I'm
actually going to switch this one from the
shape of square, which is the default. I'm going to switch this one to disk because it's gonna give us a little bit of a
softer rounding of light, which is what we want. We're going to make the
size for this one is significantly larger
than the, the last late. This one we're going to have
probably closer to like four or 500 because we want
it to be a really big, really soft light, the software, this light is, the
more it's going to wrap around this object. Because of the job of the
rim light is to basically blast the back of
the target with light and then wrap it around. We're going to have this
late be significantly brighter than the
last one as well. So we're just going to type in something really high here. Let's just start with 10,000. 10,000. We can see here now that we're getting
this nice soft sort of outline around the model. So we're getting a
nice shadow here. Then we're getting a
little bit of a highlight here to help separate
it from the background. We're getting some
nice highlighting here on the Mustache. So I can actually zoom
in here on the left. The back of the Mustache here is getting a lot of
nice highlighting. So as the hat, all of that
is from the rim light here. So let me rename the rim light. So RIM late. If I zoom out here on the left
and then I turn this off, you'll see the difference here. So it's not actually adding
overall a ton of elimination to the main side of the Gnome. But when I turn it on, I get a nice soft highlighting here. It's making this fabric hero
must look a little bit more Fabrycky because it's giving it this sort of
sheen on the edges. It's doing a good job here
with the hair as well. The color for this light, we're going to still
leave the same warm color that we had on the key light. Now let's making brand new light rather than duplicating
any late here, we're going to hit shift and a. Then go to light. We're going to create
a point light. This is the same style of light
that we had in the scene. To begin with that we deleted. We're gonna move it
here behind the Gnome. Our goal here with
this late is to position it right
behind the TAT. So this light here, we're going to try to create
a nice sort of highlight here on the inside of this curve to help
accentuate the curve. Now that I haven't place to
roughly where it should be, I can actually move it
here in the camera view. I'm just going to slide
it on the left side here, roughly to where I
think it should be. Then for the power for this one, we're just going to
brighten this one up here until it starts accentuating this
curve on the inside. And then we need to
be pretty bright. Let's start out with like 75. See how that looks. I might not be bright enough. So as we turn this up, we should start noticing it. Brightening up the inside
of this curve here. If it seems like it
needs to be closer to hat to give it more influence. So the closer that
light is to the object, the more it's going to
illuminate the object, the light will be
perceivable each stronger. We can see here on the
left side as I move it. If you've watched
this curve here, as I move this light
closer to the object, it's making it brighter. I don't want it to
be super bright, but I'd like to help accentuate the little curve that we
have in the hat here. I think that looks nice. Then if we'd like, since we've made this
light brand new, it's just a white light, but we can just
select our key light. Hit Control C, or
rather Control C, Control C on top
of the color here. So I've copied this color. I can go back to this
point light and had controlled in V on top
of that color bank. We can see here it's actually
copied the settings from the previous color and we
can do that on any of these. If you think it would look
better as a cooler light, you can go to the
fill light instead. It control C. Then go back to your
point light and hit Control V on top of this color, and it'll turn it to a
cooler light instead. I think for our purposes, at least in my preference here, I'm gonna leave it
as the warmer light, so I just Control Z that, that last cooler change. So now it's the same color as the key light, as the rim light. And then this new
little point light, which I'm going to
rename up here to Hat light. Ones also warm. Now the last slide we might
want to create a light to help accentuate the curve
here at the bottom. So right now, this whole
area on the bottom left side of him is getting
the least amount of light. I don't want to totally
blow out the shadows here. I might want to create
nice little highlight here like we have
inside the hat. So we're going to hit
on the right side here. We're going to hit Shift and D. And then we're going to hit Z to make sure we're
duplicating it downward. We're just going to move
this down below him. Then we can just
move it a little bit closer to about here. This is roughly where my lights placed and now we can see
we're getting a little bit of a lake down here because of that thing gets a little
bit too bright now. If I move it a little bit
further away from him, get a little less lighting. The more the light is towards
the front of the Gnome, the more it's going
to wrap around him. If we move it backwards, it will wrap less and it will cause less overall illumination. So maybe that's still
a little bit too much. It's a little hard to tell
exactly how much light is casting here until the
render catches up. So you can see here it's
sort of refining itself. Now you get a better idea of
how much light is casting. I think that that
position is correct, but I think the lights still
is a little bit too bright. So I'm going to lower
this down to maybe 100 for the power. Now it's a bit
dimmer. I like that. Let's go up to our list
here and rename this light. We're going to call
this body lay. Then hit Enter. At
this point now we have all of the lights
that we're going to use to illuminate this gnome. Feel free to add any
further accentuating lights like we did with the Hat and the body late
into your scene, if you'd like if there's a specific area that you'd
like to call attention to, to get a better idea of
what your gnome looks like without all these guides
and things overlapping it. You can click this little blue
overlapping circles here. Your viewport overlays tab. So you can just click
this and unhighlight it. Now it'll get rid of all
that stuff so you don't see it in this
Viewport specifically. It's a little bit
more of a clean view. Now that you're seeing
what your gnome looks like fully lit, we can go back to our
camera view here. I'm gonna hit N on
this left viewport. Can go camera to view. Then you can adjust
your view a little bit. If you, now that
you've seen it lit, if you'd like to
see maybe more of the face or you went to your view to be a
little higher or lower, that was a good time
to adjust that. And then if any of
the lights needs to be positioned again. So like maybe this bottom right here needs to be moved
over a little bit. That's the thing you
could do now to go, I think that's might be a
little bit more flattering view of the gnome now that
we haven't fully lit. In the next lesson,
we'll be creating the final render of
our little gnome and adding a FUN background. I'll see you there.
11. Rendering the Gnome: In this lesson,
we'll be rendering our final known
picture and adding a fun background pattern with some simple compositing
inside Blender. Let's begin. Our first
step is to go to the render properties tab
appear at the top right. And we want to scroll
down until we see film. We'll twirl down film. And then we want to
check transparent. So what this is going
to do is it's going to make our background
here transparent. So if I turn this off, you can see it's entirely black. So when we render this image, we won't be able to put a
background behind are known because it will have the
black baked into the image. However, if we check
Transparent and then we render it now will be able to add a background
behind are known. Now let's switch to
our compositing tab, which is at the top center. Now that we've
clicked compositing, we have a new
workspace to work in. The first thing we're going
to do here is to get rid of this dope sheet editor down here because we won't need
that for our purposes. We're just going to
click down here at the bottom right of
this top window. So right above the dope sheet will get the little plus sign. And now we can just
click and move it down. And that will overwrite that dope sheet with just
this compositing tab. Now we're going to click
Use nodes at the top. It's a little checkbox here. Now that we have
our nodes created, we can click off of this so we have no node selected
at the moment. We're going to hold
down control and shift, and then we're going to
click on Render layers. So what that's going to do
is create a viewer node. We can space these out a little bit so they're not overlapping. The viewer node is essentially
going to let us see what we're doing while
we composite the image. So it's important that
we have this attached. We can now click the Backdrop Button here at the top right. That will create what currently
is an empty backdrop. However, we won't
actually be using this. This is just to load
up the backdrop. Eventually, we're gonna do is go up here to the top right, way into our mouse
turns into the little plus sign and we're going
to drag out a new viewport. We can hit N to hide
this side menu. We can do this on both
of the viewports here. It's now we have
them both hidden. And now on this new
right viewport, we can go up here
to the top left. And we're going to
change this instead of composite or which is currently, we're going to switch
it to image editor, will now choose from this
drop-down here at the center. We're going to
choose viewer node. So what we're doing here
is instead of letting the backdrop show
the rendered result, which is actually
going to put it behind our nodes are nodes will
lay on top of this image. And we'll see that
after we render. Instead, we're telling
the viewer node to render over here instead so that we
don't have to have all of these nodes
sitting on top of it. And we can work over here and then view it
on the right side. Now that our competitors setup, we can go to our rendering tab, which is at the top center
directly next to compositing. And then we can hit
F12 on our keyboard. So you can hit F12
or you can go to Render and then render image.
We're going to click that. Then we can see
here the process is starting in our render is
going to begin rendering. You can zoom out a
little bit so that it's not cropped off at the
top or the bottom. In this image here is
going to render until it meets the number of samples
here that we've typed in. So as a reminder, for your render settings, this is what you
should be matching. So under the Render properties, which is what we have now, it should be set to cycles. You should have GPU
compute turned on. Then under render,
you should have it at 0.07 noise threshold. And 2000s max samples. The Min samples and the time limit we can
leave both at zero. Then we're going to
twirl this down. You should have de-noise checked and you should have open
image de-noise turned on. I'm going to let mine render and then I'll come back
once it's finished. Now that my render
is done, we can see the final render time for
this was just under 16 min. So in the grand
scheme of things, that's not particularly long. However, that's pretty long for if you were planning on doing
any animation with this. So just, just so you're aware, there are a few things you can change in case this is taking more than this amount of time
when you're your computer. Or hopefully it's taking less, assuming you have a slightly
better computer than I have. So some settings here we can change to make this
a little bit faster would be the noise
threshold that one's going to change primarily. I would say this one is
probably gonna change your render times the most. Right now we have
it set to 0.07, which is already kind of noisy. I did this in order
to get the speeds down to about about
the 15-minute mark. However, it's if that's
still too long for you, you can make this number higher. So to make this more
noisy will make it render faster because it's
taking less time to remove that noise
from the image. So our first step
up would be 0.08. Then we could do Nine. Then after that, next highest step would be 0.1, and then 0.11, 0.12. And then you can see
the pattern from there. So the larger this number gets, the further it gets from zero, the more noisy your
image will be. However, it will render faster. Alternatively, you can
also lower your samples. So right now we have it
set to 2000 samples. If we lower this down
to 1,000 samples, it would render half
the amount of samples. Obviously, it's probably not going to reach this
noise threshold. It's going to run
into the samples, most likely before it
hits the noise threshold. Then the last thing you can do is just set a hard time limit. If we type in a specific
amount of seconds here, we wanted to render for, it will only render for that
amount of time. So if you type in 60 s here, it will render to the
best of its ability for 60 s. And then at the end of it is just going to
de-noise the results that have been
produced after 60 s. If you know you're doing
some tests and you only want to wait 1
min for each render. Just to do a test.
You could type in 60 s here or you
can type in 120 s. And then you can
limit the amount of time that you're sitting here
waiting for this render. Now that your
render is complete, we can go to our
compositing tag. Then we can see
here on the left. So this is what I
was talking about here with the backdrop. The backdrop here is
actually sitting underneath of this the node system. It's really difficult
to re-size this thing, especially in this case
where it's actually going outside the bounds of our image. So I have no real way
of resizing this. It's just kinda
stuck at that size, which really doesn't
help in our case. I'm just going to turn
off backdrop here. We can see it's just
displayed inside here, but we have the viewer
node over here. For this purpose,
we can actually see the entirety of
our compositing. So right now we haven't
added any background. But we still have
our transparency here and we can see right
where the transparency stops. So this is where the background
will eventually be added. So let's start by adding a
simple solid color background. On the left side here in
the composite or node, we're going to hit Shift a. And then in the search bar
we're going to type in RGB. We're going to click
RGB here at the top. And that's just going to give us just a simple color note here. Before we do anything with that, we're going to hit Shift a
to add another node here. Because we need to
actually have a way to put this color behind the node. In the search bar here we're
going to type in alpha. And then we'll see
alpha over, alpha over. We're gonna put that here.
Now we're going to drag this image note here into the bottom image on
the Alpha over node. Then we're going to drag
our RGB into the top. Now we need to tell it what
the Alpha actually is. So we're going to
drag this alpha dot into the factor for
the Alpha over. So that's going to use
the Alpha channel, which is just the
bounds of this image. Anything that isn't transparent, we're telling it to use
that for the factor. Then lastly, we're going
to connect this image dot here when the Alpha
over node, the output. We're going to run that
into the viewer node. Now we can see here that
we have this color here. So whatever color we make this, so we can just click and
drag this little dot here. And whatever color we make it, That's what color shows
up behind are known. So in my case, I think
I'm going to go with something a little bit more
of a blue-green color. A bit of saturation. I think I'll make mine
a little bit brighter. This is entirely up to you. The color that you
use behind your known is more or less dependent on what colors you
used for your num. So my case, I use some sort of a hunter green color and then
more of a desaturated red. So I think this blue, this kind of pale blue, matches pretty well with the orange beard and
everything else that I have. However, your color may vary or you might just
have a preference of putting a specific color behind your known
that isn't blue. I mentioned, we'll also be adding patterns
behind are known. Let's go through that step now. If you'd like to keep yours just as a solid color for any reason, you don't have to follow
along with this step. But if you would like to have a pattern, this is
how you'll do it. We're going to start by
creating a mixed node, by hitting Shift and
a the search bar. And we're going to type in mix. We can place that. Then we're going to run this color into the
top of the mixed node. We can hold Control
and right-click and drag across this,
this node here. So this connection
here, and that will sever that connection. We're just cutting
that connection because we are going
to be replacing that Instead with the mixed node. So we can just drag
that right here. Now we need to plug
it in our pattern. To plug in the pattern, we're going to hit shift and a. In the search bar here
we're going to type in image because we want to use
an image for our pattern. Now we can plug this image node into the bottom of
this mixed node. Then we want to choose
a new image for this. We're going to click
the Open button here. Then we're going to navigate to the images that I've
provided for the lesson. There are three patterns in the project resources
for this lesson. And they are the
leaf background, mushroom background, and
the polka dot background. So you can use any of these
three that you'd like. So these are just ones that
I've made up for you to see an example of what
the patterns should look like in terms of
they need to be black and white and they should have
a fair bit of gray values. And then that way they don't
totally dominate the image. If the really dark,
they're going to make your color
really dark as well. If they're really bright
and they're also going to make your color
brighter as well. So it works best when
they have some sort of middle gray values with some darker and
then some lighter. So I think from my
background I'm going to choose this mushroom background. I like how that looks. So I'm just going to select
the mushroom background. We can hit Open Image. And now it's plugged
it in behind this. However, you'll see that our blue color here is pretty
much entirely disappeared. And that's because we
haven't switched this from mix to the correct blend mode. So in our case here, we're
actually going to use softly. Then once we choose softly, we can see now that we're
getting a blending between this color we chose and then
the pattern that we're, we're choosing to put behind it. And we can adjust
the blending of how impactful this pattern is by using this factor value here. So as we lower
this factor value, the pattern gets more and more subtle until eventually
it just goes away. If it's at zero, that means you're not seeing
any of the pattern. But if we turn it up to 100%, that means it's soft landed
on top of this image. At 100%. We can mess with
different blend modes here to see if maybe
there's one that you like. More. Overlay will be a
little bit more punchy. Multiply is going to
overall darken it. And we can use screen which is going to overall brighten it. This one is probably getting a little bit too far
from the blue. In my opinion. I think
soft light is probably the nice sort of middle
ground between these. If you'd like to
see what some of the other patterns look like, you can just go down
here on the image node, click on this little Open icon, and then you can
just switch to any of the other backgrounds. So I'm just going to select this one and it will overwrite the mushroom background and instead use the leaf background. So I can quickly switch to
the polka dot background. There's the polka dot. Then I can go back
to the mushroom. If you'd like to make your
own background image. Like I said, make sure
that it's just in these sort of
lighter gray values, sort of like this mushroom
oneness here on the left. And you can use the ones
that I've provided as a guide to the level of
gray value that you need. And then it's also in
very important that it is the same aspect
ratio as your image. In this case, it's a square. And then it also has to be
the exact same resolution as your render as well. Since this render that we set
up is a 2000 by 2000 image, your background image also
needs to be 2000 by 2000. If it's not, then the image
won't line up correctly. One last thing we can do in our compositing
is to brighten up our gnome image a
little bit so that we have this nice bright
background are known. Seems like it might
be a little bit too dark for this bright background. We're going to hit shift and a, we're gonna go into search. We're going to type in exposure. So just e x, and then
you can see exposure. Now that we have our
exposure note here, we're going to drag that on
the sort of connection here, this cable that runs from the render layers over to the
bottom of the Alpha over. So we're putting it
between our actual render. And then the thing
that is blending the the render on top
of our background. Now we have this here. As we increase our exposure, it's just going to
increase the exposure, the brightness of
the render itself. It won't touch the
background at all because we haven't run it
through that cable. It's now if we boost this up, see our renders
getting brighter. But you don't wanna
do this too much. I think somewhere
maybe in like the 0.5 range would be enough. We can see here now it
just fits a little bit more of the brightness
of this background. Without final step done, we can actually save our image. Now. We're gonna go over
to the right viewport. So our viewer node, where we've been seeing the
results of our compositing. We're gonna go to Image
and then Save As. Now we can choose where
to save our image as and what type of image
we're going to save it as. So first I'm going
to navigate to where I need to save this image. I found my location now. Now I can choose what type of file format I'd
like to save it as. So in my case here, I don't
need the PNG because I don't need the transparency
that it offers. So I'm going to switch
this to a jpeg instead. So we can choose
JPEG from this list. We're going to set
the quality to 100%. Then we can just choose
a name down here. I'm going to type this
in as final render. Make sure I spell it
right. No render. And then I can hit
Save Image As. Now that I've saved that, we
have our final gnome image. Now that we've completed the
final render of our noon, we'll be discussing the class
project in our last lesson. I'll see you there.
12. Our Class Project!: You've made it to the end
of the class, congrats. You've learned a lot
during this class. Now it's time to put
that knowledge to use by completing
the class project. For our class project, you'll be creating a unique
gnome of your own design. Now that you have the gnome
completed from our lessons, I'd like you to save a new
version of this gnome with the Save As command and
then make the gnome unique. You can do this any
way you'd like, but some obvious
adjustments you can make are changing the fabric
colors or patterns, Trying a different skin color, Adjusting the shape
of their hat or give them hair on top of their
head instead of a hat. Changing their beard
color or styling, give them a unique background. Model them a small prop, like a simple mushroom or rock, or adjust the lighting
placement and colors. After you've made all
of your adjustments, post your new render
to the gallery to show it off to me and
all the other students. I'll provide feedback on
each render posted to the gallery and let you
know what looks fantastic, as well as anything that
could use some adjustments. As an example, here's my unique version of the
gnome for our class project. I've changed the
hat to a helmet, adjusted the materials, and combed the beard
a little differently. I've also given
the gnome lighting that is a bit more moody, sort of like the gnome
is sitting next to a campfire on a full moon night. Thank you so much for
taking my course. I really appreciate it. I hope you found this course
both PFK-1 and educational. I'd really appreciate
it if you can leave an honest review
in this course, so you can let
other students know if it's worth their
valuable time. Also feel free to check out my other courses via
my instructor profile. You might just find something
else you're interested in. Thanks again for your support. I hope to see you again soon.
 Harry Helps, Professional 3d Artist