Transcripts
1. Introduction: Hi, my name is Harry and every professional 3D artists with over a decade
of experience, I've worked most recently
as a studio director. I'm going award-winning architectural
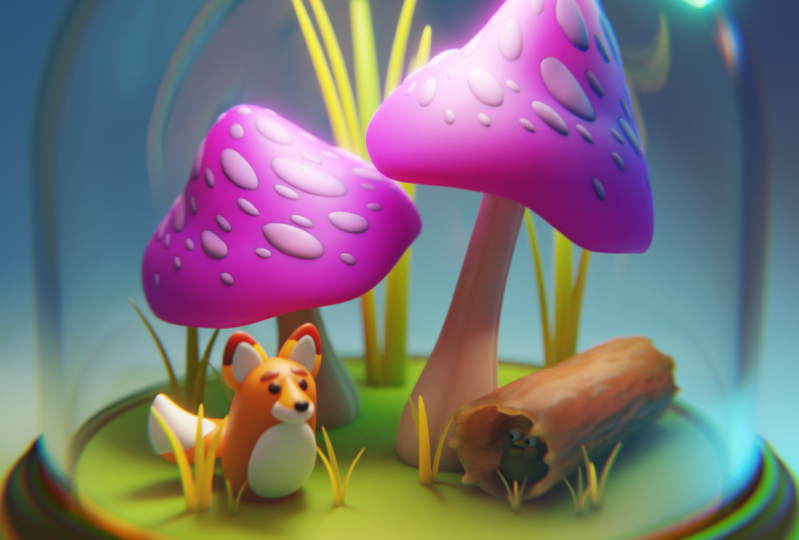
visualization studio. We're seeing on screen now are examples of my past
professional work. In this class, I'll
walk you through the simple and beginner
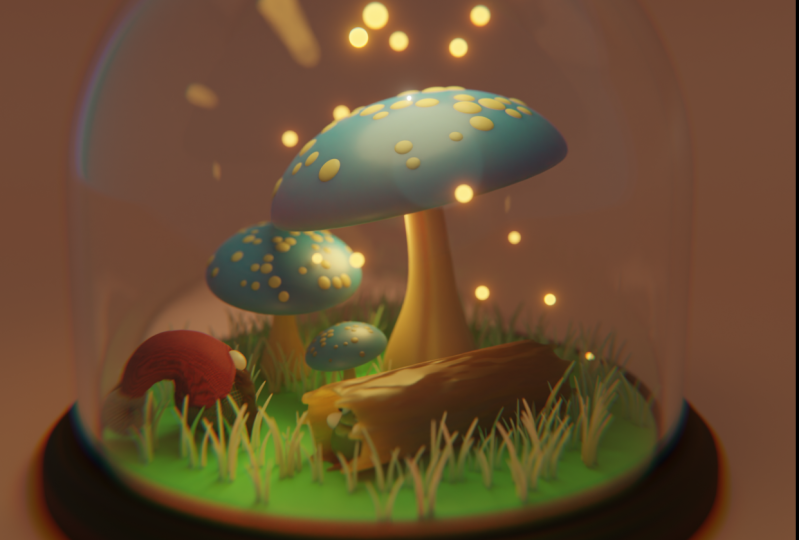
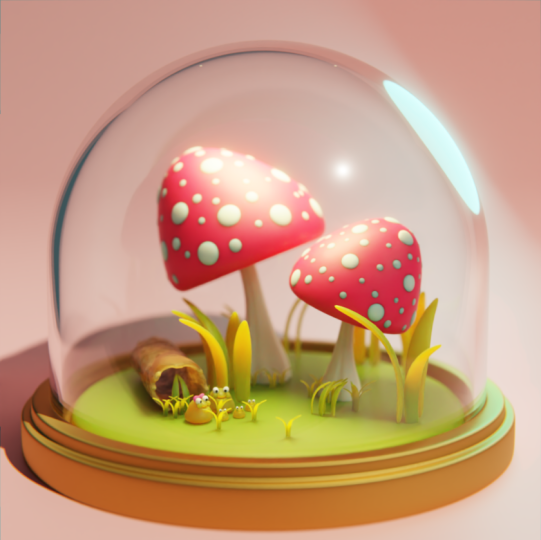
friendly process of creating a cute
Mushroom Terrarium in Blender will be going through the entire
process of creating this Mushroom Terrarium from a beginner's perspective to avoid as much
confusion as possible. That means I won't be
skipping any steps or going too fast for you
to keep up with me. We're going to be using
Blender for this tutorial, which is an amazing and
totally free 3d software, the only barrier to entry is having a computer to
run the software on. In this class, you can expect to learn the Blender
Interface and it's Tools. We'll learn about
the many basic tools and interface elements within Blender while creating
our terrarium, Modeling. To create our Mushroom
Terrarium from scratch, we'll be using basic modeling
tools and modifiers such as Snapping and Solidify Lighting. We'll set up a soft
lighting scheme to display our terrarium in the
best light Shading, Which can give the
objects the appearance of stylized mushroom,
grass and wood. And Lastly, Rendering, we'll
render our final image in Blender so you can share it with your friends and family
on social media. When we're done, you'll have
all the skills you need to create a cute Mushroom
Terrarium of your very own. For our Class Project,
you'll be doing just that. I'd like you to create
a new terrarium with a unique design and
share it with the class. I'll personally review
every project uploaded to the gallery and give you feedback on what
you've done fantastic, as well as anything that could use a little bit of adjustment. I hope you'll join me on this fund beginner's
journey through Blender by making your very
own cute Mushroom Terrarium
2. Setting Up Our File: If this is your first time
taking in Blender class, I'd highly recommend
you start with my complete beginner's
guide to Blender first, this class was designed for the absolute beginner to
Blender and 3D Art in general, we cover every single necessary
topic in order to get you up to speed and running in Blender will accomplish this, but short and focused
lessons that cover each topic from a
beginner's perspective. Utilizing a well-organized
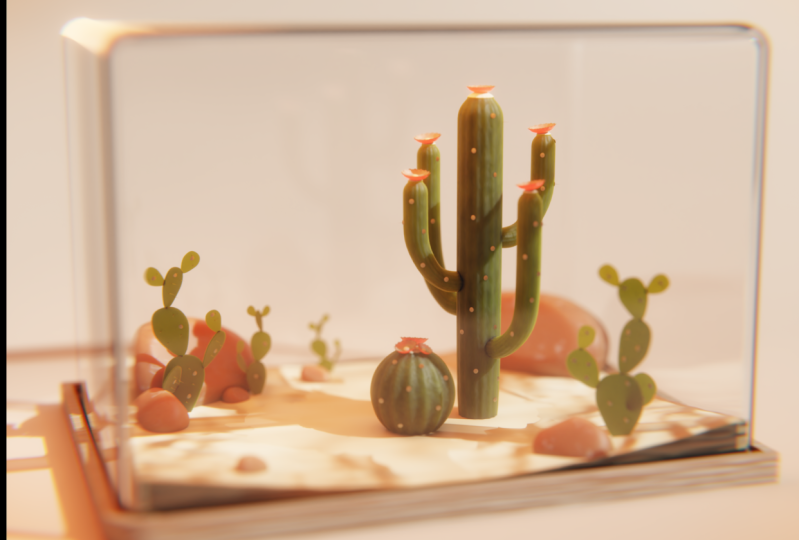
starter file, we end the class with an
easy project where you set up and customize your
very own cozy camp site. With that out of the way, let's continue with the lesson. In this lesson,
we'll be going over some settings to prepare a
file for future rendering. Let's begin. After first launching Blender, we're going to choose D
general new file type to begin our project. We're going to click that. And now we're ready
to start adjusting some preliminary settings. We'll start by going
up here to edit, then down to Preferences. Going to drag this
window over here. And then you want
to go to the system tab here on the left. Then up at the top
here these are the settings will be changing. This cycle render
devices section here essentially just tells Blender when using the cycles render, which will be using,
which software, in which hardware
should it be using to actually accomplish
the rendering? If Blender allows you to choose the optics tab
here from the top, for some reason it won't let you choose optics due
to the hardware. You can instead choose cuda. Could is just a little
bit slower than optics. Optics is a little bit newer. But if you don't have the
option to use optics, kudo will work just fine. You'll just notice that
your renders are just a little bit slower
than maybe if you were able to use optics with either cuda or optic selected, make sure you have all the
checkboxes down here checked. Now what you see in
these checkboxes will be different because this is actually showing
the hardware that my specific computer is using. Your computer will presumably
be different than mine, which means the different pieces of hardware lists
will be different. However, you should
still be checking all of them on because you want Blender to have access to every piece of hardware
that you have in your computer in order to
actually render the project. Once you have
everything checked, we can now close this window. We're going to go over here to this little tab here called
the render properties window. It looks like the backside
of a little digital cameras. So at this tab selected, we're going to go
down through a few of these settings here
and then we're going to adjust them to meet the
needs of this project. So to start with,
we're going to change our render engine from EV, two cycles, like I
mentioned before. Since we switch this the cycles, we're getting a whole bunch
of different new settings. Now we're going to
change the device from CPU to GPU compute, which will just allow it to
use the GPU and Rendering, which will be faster
than the CPU. And almost all situations. Now go down to the
viewport section. We're going to leave this
top number the same. So we're going to
leave this checkbox on and it have it set to 0.1. However, we are going to change the MAC samples from 1024. We're going to switch
these two, just 100 because we won't
need that many samples. The higher the number here, the slower the render will be. Now we can scroll down. We're going to twirl
open this little window here called de-noise. We're going to check this on. Now we're going to switch
our de-noise or to optics. So in this case,
optics will allow the de-noising to
be a lot faster. And it won't be
quite as accurate as maybe the other methods. But for the viewport render, which is just the viewport
right here that we're seeing. We're going to want
speed over quality because we're just testing
things in the viewport. We're not actually final
rendering anything here. If for some reason
optics is not a choice, you can just leave
this on automatic. Now we're going
to scroll down to the render settings
just below it. These settings here are
responsible for the only for the final
render above here. This is just for the
viewport settings server, whatever we set here has no
bearing on the final render, and then vice versa here. So anything we set
here has no bearing on the viewport render and is only meant for
the final render. Again, we're going to
leave the noise threshold checked on and leave
the default value here. This time we're going to
change our max samples from 40 96 down to 500 better
than our viewport, but not quite as high
as the default value. Let's scroll down to where
it says de-noise below this. Throw this open. I'm we'll notice by default de-noise is checked
on, which is good. And then we want to
make sure that we are using the open image denoising. We don't want to use optics in this case because
optics is faster, but also less high-quality. For our final render,
we want it to be the best quality possible. So we're going to use
open image de-noise, which is slower
but looks better. Lastly, we're going to go all the way down
here to the bottom. We're going to twirl
open color management. Scroll down further. Right now you should have it set
to view transform, and that should be
set to filmmaker. That's the default. But under look it says none. So instead of none,
we're going to switch this to high contrast. So we won't notice
any change here. But essentially once we get to the Rendering process of this, both in the viewport as
well as the final render. It's going to increase the
contrast of our final image. Just write within Blender, we will have to take its any
other software to do this. Blender is just going to ramp up the contrast
of our final image, which in this case we'll
actually make it look better. Now we're going to go to
the output properties, which looks like this
little printer here, printing out a little photo. This is where we're
going to change the resolution of
our final image. We're going to change
it from 1920 by ten at two instead
a square image. So we're going to
switch this to 2048. By 2048. So now we'll have
a square image. We can actually see
here if you notice, the camera actually switched
to a square format as well. So when we're setting
up our camera position will be actually able to set it up with that
square framing as well. Now let's save this
file on a location that we can easily
find in the future. So we can use this exact
same file for each lesson. So we don't want to
start a new file for each lesson because one, we'll lose our progress from the previous lesson
that we've done also will lose any
of these settings. The settings are per
File, not per program. So in this case, all these
settings that we've changed, if you open up a brand new, fresh file rather than the
one we're about to save now, you'll lose all the settings
we've just changed. We're gonna go up here to File. Go to Save As, or you can just hit Shift
Control S if you'd prefer that. We're going to click
this. And then once this option box pops up, you want to navigate to wherever you'd like to save this file. I suggest, like I said, saving this somewhere
that you'll easily be able to
find in the future. So whether that's a folder on your desktop or in your documents folder,
that's up to you. Just make sure
it's easy to find. I found the location that
I'd like to save mine in. Now we can just go down here and we're gonna
give it a name. I'm going to call mine Mushroom, Terrarium, underscore 01. The reason I'm adding
this 01 here at the end is just in
case in the future, I'm doing something that I
think might not look good, and I wanna be sure that I can come back to
the original file. I'll put a 01 at
the end of this. That way if I want to
make another version, I can call it 02 or 03. And I know that I
haven't overwritten the original version of it. So we're just going to
have our start out at 01. It's gonna be called
Mushroom Terrarium. Now we can just hit Save. As with these settings saved, we're ready to proceed
with the project. The next lesson we'll be starting a model
of our Mushroom. I'll see you there.
3. Modeling the Mushroom (Part 1): In this lesson, we're going to start modeling our Mushroom. Let's begin. Now before we do any modeling, make sure you've opened
up the file we saved in the last lesson with all
of our settings changed. If you haven't
done that already, take the moment to find
the file that you've saved in the last lesson
with the settings changed. Open that up, then that's the file we're
going to begin with. With your settings file
open. We can now begin. The first thing
we're going to do is select this cube
here in the middle, and then we're just
going to delete it. So you can either delete or X on your keyboard and
then just choose Delete. Now we can hit shift and a
to bring up our Add menu. Go to Mesh and then
go down to cylinder. Down here at the bottom left, we'll see an option box
that we can twirl open so that we can adjust the values
for this cylinder here. We're going to start by
leaving the vertices on 32 was just how many cuts
that it has going around it. The less number we have here, the more jagged
the edges will be. So we're going to
leave ours at 32, which shouldn't most
likely be the default. And then we're going
to go to radius. We're going to set this
by clicking on it. We're going to set this to
0.2 m and then hit Enter. So we're going to make
it a much smaller. Now we're going to
set the depth to 1.75 m. Then it entered with
these parameters set. We can now go up here
to the top-right. And we're going to rename
this cylinder to stem. Instead. We're just going to double-click
on the word cylinder. Then type in stem. So we know what this
object is going to be. Then we can hit Enter to
confirm the name change. With the stems still selected. We can hit M on our keyboard
for move to collection. Then we're going to choose new collection here at the top. Then we're going to name
this new collection Mushroom Terrarium. Then hit Okay, or enter. Now we can see here that
it's actually moved this stem directly into this new collection
that we've created. Just a quick way to make a new collection and then drag a new object
into it immediately. The point of a collection
is just to help organize our files and also lets us easily turn off and on
an entire group of objects. So you can see here that by just clicking this little
checkbox here, I've hit that entire
group of objects, which includes the
default byte in the camera, all in One-click. Let's rename this original
collection here that we had. We're just going
to double-click on the word collection
here at the top. This is the one that has the
camera and the light in it. We're going to call
this render scene. Make sure I'll capitalize this first letter
and then hit Enter. So now we know that anything
for the render scenes, so things like the background, the lights and the cameras. We're going to put in
this collection here, which is essentially a folder. It's just a way to
organize the file. And then anything regarding
the Mushroom Terrarium, we're going to create input
into this collection. To make this collection the
defaults so that any object we create will by default
go into this collection. We just need to click this
little white box here. So we can see there's a
very faint little outline here surrounding this white box. And that just means that is
now the default collections. Any new object
recreate is going to default into that collection rather than the
original collection. And let's make sure we have
our stem selected again. We can zoom in here a little bit and I'm going to right-click. And then I'm going to
choose Shade Smooth. We're going to see here
that it shades the, the top and the bottom. It makes it look a
little odd right now. But don't worry about that. We'll be fixing that later. Now let's go into our
front orthographic view, which is a nice flat view
that will be able to work in while either moving this
stem or shaping it. So there's two different
ways that we can do this. So the first easiest way to
do this would just be to click on this little
negative Y bubble up here. So as we move around
our viewport here, we can see that this also
corresponds with our movements. And the negative Y view here is equivalent to the front view. So we're going to consider this, the front side of this Mushroom, which is looking from the
negative y-direction. So we can just click on
this little bubble here. And we can see here that it pops this into a different view, which is nice and flat. We can also see the grid
binded here as well. However, soon as you
move your camera, so soon as you try to rotate, It's going to immediately
pop you out of that view. So it's a good way to know
whether or not you're in an orthographic view is
where the greatest placed. So if the grid is on the
background like this, you know, you're in
an orthographic view. Then if you rotate
and you see the greatest going flat
back into space, almost like as if
it's the ground, then you know, you're
in a perspective view. So another way to enter
that same view is to hit the Tilde key
on your keyboard here. So the tilta key is the key directly to the left of the
one on your number rho, and above your tab key, it has a horizontal
squiggly line, as well as like a kind of
almost lexicon apostrophe If you hit that, this
is going to bring up a radial menu where
you can choose all the different
views that you have. In this case, we can just
hover over the front view here and then just click this and it'll pop us
directly into the front view. So this is a really quick way
to just hit the Tilde key. And then you can switch
to the different views that you have just by hovering over this part
of the radial menu. We're just gonna go
back to the front view. We're going to click that. Now we're ready to start moving and shaping
this Mushroom stem. So our first task
here is to just move this Mushroom stem up so that it's sitting on the
zero line here. So right on this red line here, this is the x-axis. We want the bottom of
this to be sitting on the 00 origin of our world. So we're just going to go up here and select our Move tool. With the Move Tool selected, we can now lift this up by
grabbing the blue handle. We're just going to pull it
up so that the bottom of this stem reaches
the red line here. So we can zoom in here so we can see it a little bit better. I think that looks pretty
good and we're pretty close. It doesn't have to be perfect. It really doesn't have to be. So we're just trying to
get it pretty close here. Because eventually
this is going to intersect with the bottom, the base of the Terrarium. We're either way we're
going to be cutting off the bottom of
the stem anyway. The stem moved up to the origin. We can now begin the
shaping process. To do this, we're
going to start by enabling something
called X-Ray mode. To enable X-Ray mode, you just hold down Alt on
your keyboard and then it Z. At the same time. We can see here that are
objects kinda goes see-through. So now we're able to see
this grid through it. So if I hit Alt and Z again, you can see now it's opaque
and we can't see through it. Then when I enable X-Ray
mode, we can see through it. Now, another way to enable X-Ray mode is up here
at the top-right. This little button
here, by clicking this, this is the same thing as
just hitting Alt and Z. Altman Z is just the key bind, whereas this is the
interface button. Okay, so now that we
have x-ray mood on, you might be wondering,
what does X-Ray mode do? Why do I want to see
through my model? So you don't have to follow
along for this part yet, but I'm going to hit tab
to answer my edit mode. Now if I zoom out, I'm going
to turn off X-Ray mode. If I just drag select
over this objects. So first time I deselect it, I'm just going to drag
select over this. Now I dragged selected
over the entire model. So you would expect
that it's selected the entire model here, at
least through the middle. Over if I rotate my camera, I'll notice that it only
selected the front faces. So it only selected basically what was
facing me at the time. I do it again here. Again, it looks like it's
selected everything, but soon as I rotate, it hasn't, it's only selected. What I could see. That's true of this as well. Now this would be true of all of our different
editing mode. So same thing with
vertex and edge. It's only going to
select what I can see when I'm not an x-ray mode. So by switching into X-Ray mode, by holding Alt and Z, I'm gonna go back to
my face mode here. Now when I select across it, I've selected the entire
model because I've selected through the model by
using the x-ray mode. So it's really important when
you're working on models and you want to make sure
everything remains symmetrical, especially when you're
an orthographic view, when it's hard to tell what the other side of
your model is doing. You have to make sure that
you're an x-ray mode will be an X-ray mode a lot of the
time when we're modeling. And then we'll me
jump out of it. It's usually to do
something like move the model or apply a modifier. Or maybe we're working on
the shading at that point. But pretty much most of the
time when we're working on the actual model
itself and changing its shape will be an X-ray mode. Okay, so let's reset this
here so we can catch back up. So I'm gonna go
back to front view. And I'm currently
just an X-ray mode. If you haven't gotten to
this point, you just hit Alt and Z gets x-ray mode. And then make sure you're
in your front view, which is either
the negative Y or by holding down Tilda
and then choosing front. Okay, so now we need to hit
tab to enter our edit mode, which is how I'm able
to select the faces, the vertex is or the
edges of this model. Now that we're in edit mode, I'm going to hit
two on my keyboard, which is the quick way to
get into our edge mode. So edges are just these lines here connecting the vertices. Now that we're in edge mode, we can drag select over the
middle of our model here. And that'll select
every single one of the edges all the way
around the cylinder. Now we're going to right-click. Then we're gonna go
up here to the top where it says sub-divide. We're going to click that. Then we're going to
change the number of cuts on the sub-divide to three. So as we turn this up, we can see that we're
adding more cuts across the center
of the cylinder. The more cuts we have, means we have more
geometry to work with. So if we wanted to curve this or add some width adjustments, we can do that because we now have things to actually select. So before we had new
cuts in the middle, so we couldn't make any
adjustments to the vertices are the edges in the center
of the cylinder. By cutting it up, we now have more vertices and
edges to work with. So we can change the
shape of the cylinder, thereby the stem a
little bit easier. With our cuts placed, we can now hit one when our keyboard to switch
to our vertex mode. Alternatively, we could just click this button
here at the top. It's now we're in
our vertex mode. And what we're gonna
do is actually just tried to flare the bottom of this stem out and maybe
taper the top a little bit. So let's start with
the bottom here. We're just going to drag select over the
entire bottom here. Now we can hit S on
our keyboard to scale. Now we can just drag our mouse to scale this up a little bit. We're going to scale
this up to about here. This doesn't have to be
exactly what I'm doing here. You just want to visually
match what I'm doing. So don't worry about if
you're scaling it up exactly to 1.84 for your scale, just look at it and
just try to tie it up. Now we're going to
select the middle here. We're going to
scale this one down slightly, just a little bit. Then we're gonna do the same
thing for the next one. We're going to scale
this one just even a little bit smaller
than the last. Then at the top one, we're going to scale this
one down just a tiny bit, maybe about the same size. This one. You can either make at
the exact same size or just a hair smaller. You don't want it to
be quite so tapered. Okay. It's now we can see here
that we have a nice tapered, cone-shaped for the stem. Let's add a few more
specific cuts to the stem to help define the
shape a little bit more. We're going to hover
over this bottom area here where we have
the flared base. We're going to hit Control and
our to start the cut mode. We can see here where we hover. We can see that we
have a yellow line. Once we click, we have
now placed a cut. However, we're still able
to slide it back and forth. This is similar to sub-divide, except we have a lot
more control over exactly where the cut lands. It's not just going to
average them all out. So after your first click
when you see the yellow line, now you have a cut but
you can still move it. We're gonna move this down
here towards the bottom, a little bit past the, or a little bit up from
the bottom rather. And then we're going to click
again to confirm this cut. So we can now see here we
have another cut here and now the cut doesn't
move because we've confirmed the placement of it. Before we do anything else, we're going to add another
cut above this one. We're going to mouse over above here and then hit Control R. So we see the yellow line. We're going to click. Now we're going
to leave this one pretty much in the middle here. We don't really need
to move this one much. So we're just going to click again and drop it
there in the middle. Now its shape the
bottom of our stem here to make it a little
bit more bulb-like. The bottom of a Mushroom
Stan, stem tends to, at least in some
varieties of Mushroom, kind of get a little
bit more circular or Blake at the very base of it. So we can zoom in here. And with this vertices
selected here, the last cut we just placed. So these ones here, we're
just going to hit S. Now we can scale this up. We're going to scale
up a little bit past where the bottom
vertices are now. So you want it to
kinda go a little bit outside the bounds of that. Right about here. So we can see the slight angle
that we have here. Now we can select
the very bottom, very bottom of the stem. We're going to ask
again to scale, and we're going to
scale these ends. We're rounding this off
at the bottom about here. Now we can see we
have most sort of a rounded shape
here at the bottom. Now let's zoom out a little bit. We're going to select
this row vertices here. We're actually going to
slide these just upward, vertically in order to lengthen this bulb
shape at the bottom. So I'm gonna switch over here to my move tool by clicking this little
Move Tool symbol here. I'm going to grab the blue
handle to move it up in the Z. We're just going to drag
this up so that the base of this has a little bit
more of a gradual slope, more of almost like
a teardrop shape. We can drag it about here. And now we have a
lot more gradual, kind of rounded
bottom to the stem. Now we're going to add a
curve to the overall stems so that the cap for the
Mushroom once we place it, isn't quite so static and
flat and I'll actually be at site of an angle.
Let's zoom in here. We're going to start by grabbing this top set of vertices here. Then we're going to hit R
on our keyboard for rotate. And now we can rotate these. This really doesn't have to be a super severe rotation here, maybe about 20 degrees. You can see up at
the very top left below where it says
file and edit. On the top-left of your screen, you can see the
amount of degrees. So we're actually going
to move it negative 20, maybe, maybe even
a little bit less. We're going like the negative
20, negative 18 range. Then we're just
going to drag this over by grabbing
these handles here. So you can either grab the green square here so that you can still move it up and down
as well as left and right. Or you can just
grab the red handle here so you only move
it left or right. We're just going
to move this off a little bit to the side here. Balance out that rotation a little bit by just rotating
it back a little bit. It seemed a little
bit too severe as they move to
the, to the left. Now I'm going to drag select
over these middle ones here. I'm going to rotate
these two somewhat match the angle a little bit more
shallow than the last one, maybe closer to the ten range. Going to drag this
over a little bit. Then same thing again down here. Rotate these even less, just a tiny bit of rotation. Maybe just drag these
over just a little bit. You can fiddle with
the shape here to get the curvature
to how you want it. That's a great
thing about having such low vertices count
here is it's really easy to make some pretty
drastic changes to your model just by grabbing
a single row of them, a single loop, and just moving them up or down
or left or right, you can really pretty
dynamically change your model. So in this case here, maybe
I want to move this row of vertices here up
just a little bit more. The curvature is a little
bit more spread out. Same thing with these. I'm just going to move
these up a little bit. This is more personal
preference if you'd like how yours
currently looks. Don't feel the need to change anything that I'm changing here, just try to get a general curve. Okay, so now if
you're a stem looks pretty similar to mine,
you should be good. We can now rotate our camera. So I've rotate our
view port here. We get out of our
orthographic view and back into our
perspective view. And we're going to be in setting the faces on the very top here. So first, let's switch
to our face mode by hitting three on the keyboard or just clicking this
little button here. Now select this top face and you'll want to select
close to where these dots are. So when you're an x-ray mode, you tend to select through an object which is
sort of annoying, but they tell you where
you're supposed to select these faces by these
tiny little dots here. So if you collect near the dot, you should be able
to select a face. No problem with
this face selected. Now we're going to hit I
on our keyboard for inset. Since we hit I, now we can move our mouse here and we
can see what it's doing. So it's sort of shrinking the central face that we
had originally selected. And it's creating
a whole new loop of faces going around it. So it's in setting this face. So we're just going to inset
this just a little bit so that we have a small row of
faces that go around it. The reason we're doing
this is for the next step, we're going to be adding
smoothing to this. If there isn't
enough edges here, the smoothing is going to
crush the top of the stem. It's going to make
it really pointy and kind of cone like. Now we wanted to stay
somewhat cylindrical. So by adding more faces here, we're sort of reinforcing
the top of this stems that it doesn't get
crushed by the smoothing. We're gonna do this
here at the top, which we've done now, the top. Then we're going to rotate
around to the very bottom of our stem and do the same
thing because we again, don't want this to get crushed. So we're going to
select near the center of this bottom face. And I for insert. And now we can insert this slightly about the
same distances we, the last one right around there. So now we have a small ring of faces that go around
this bottom of the stem. With that done, we can now
hit tab to exit edit mode. Then we can hit Alt and Z
to exit our x-ray mode. Then we're gonna go over
here to this tab on the right that looks like
a little blue wrench icon, which is our Modifier tab. Then we're gonna go up here
to add modifier Maria. Click this drop-down. We're gonna go all
the way down here to the bottom and we're going to choose subdivision
surface modifier. You might have noticed
soon as we click this, that it actually smooths
out this object here. If I click this
little monitor icon, it'll just disable this effect
here only in the viewport. I'm going to turn this
off and we can see what it's doing right away. So at the top here where it
was a nice 90 degree angle, when we turn this back on,
it's kind of rounded this off. However, it's also doing it is throughout the
center as well, which is actually
what we're going for. By turning this one
and off, you can see how much more smooth and stem-like this is getting by just having this
modifier turned on it. It's kind of
smoothing it out into a nice smooth teardrop shape. We can control how smooth this is by turning up
the levels on this. So right now a defaulted
to one for the viewport. However, it's set to
two for the render, which means that in
our view port here, it's showing a single
level of smoothing. But if we rendered this image, it would actually have
an additional level of smoothing applied to
it after the fact. In our case, we're actually
just going to turn these both up to two so that both of them, so both the viewport
and the render, or going to display that
same amount of smoothing, which is two levels
of smoothing. To give you a really
quick example of what exactly this
smoothing is doing, you don't need to
follow along with this. This is just for
demonstration purposes. But I'm gonna go up here.
I'm going to turn on my wireframe so that we can see the wireframe even when
we're not editing the model. And then I'm going to turn off this optimal display
so that it's not showing us a nice
clean version of it. It's showing us the actual
version of the model. Now when I turn this off, you can see this is what we
originally were working with. Then when I turn it back, one, we can see that while the
model was much more smooth, it's also added a
whole lot more faces and cuts to the model. That's the way that it's able
to get this more smooth. So essentially it's cutting
up the Model a whole bunch, adding a lot more cuts based on the number of levels of
smoothing we have here. So this is the
subdivision level. So you can see here at level
one it has a lot less cuts, but it's also a lot less smooth As we turn this up, you can see it's getting
more and more cut up, but it's also getting more
and more smooth to it. To an extent at a certain point, you really can't tell
it's getting any smoother and all you're doing
is adding faces, which will make your
render take longer. It'll make your scene
run a little bit slower. So you really don't
want to have more smoothing and then you need, but if you need some
moving, this is a really easy way to do it. As it adds more of these cuts, it's just averaging the distance between all of
these cuts and kind of blending all of these edges together and
smoothing out your sides. For our situation. This two levels of smoothing here as plenty we don't
need anymore of that. So we're just going to leave
it on to for both of them. Now I'm gonna reset
my scene here by turning back on my optimal, then going here and
turning off wireframe. So it's back to how you have it. Now before we move
on from the stem, Let's add one more
final detail to it to just give it a
little bit more life. We're going to hit Tab to
go back into our edit mode. Now we can zoom out slightly. Now we don't need to go
into X-Ray mode here because we're not doing
anything where we're going to select
through the model. First thing you
wanna do is go up to your edge mode
by either clicking this button or hitting to when your keyboard and
that'll quickly switch to it. Now what we're going
to do is hold down Alt, wondering your keyboard. Then we're going
to click on one of these vertical lines here. So we can see here
by holding Alt, it selected the entirety of this line all the
way top and bottom, the entirety of the loop. Now it stops here
because the loop breaks. But it's going the entire
length of that loop. If I just clicked, it's just going to select
a single segment of that. So again, you want to
hold Alt before you click on one of these so that
it selects the entire loop. And we're gonna be selecting
for these loops on all for the different sort
of cardinal directions here. We selected one here. Now I'm going to hold Alt and shift this time so that
I'm making sure that I'm both selecting the
entire loop as well as adding to the
original selection. I'm going hold Alt and Shift at this time to select this one. So now I have both of them
selected at the same time. Then again, Alt and Shift
to select on this side. Then Alt and Shift
and then select one roughly across
from this side. It's now if four
of them selected all the way around
the Mushroom stem. It's important that
you have all four selected at the same
time for this next step. So make sure that you're
using Alt and Shift to add to your selection each time you can't do this one at a time. What we're about to do. Now we're going to switch to our scale tool by clicking
this little symbol here, this little box with
the arrow on it. Then we're going to be
scaling these inward just in the X, in
the y-direction. We're going to use this
little blue handle here. So this little blue
square here to do that. So this means that
it's going to scale in both the X and Y
at the same time. So I'm going to grab this
little blue handle here. Then I'm gonna start scaling
them in just slightly. You can see as we do this, we've actually start
adding grooves to the inside of this,
the stem here. So we don't want to
make these really deep. I'd say visually they should look something
about like this. So we can see as we
rotate it around, we have these grooves that
go up the side of the stem. So it just adds a little bit
more interests to the stem. So it's not just this perfectly smooth kind of teardrop shape. We've also got some indications
of how it's growing. With that done, we can
now hit tab to exit our edit mode and get a little bit better view of
exactly what we've done. Now we have our stem here and we have the
groups going up it. Now that our stem is done, let's make a cap
for our Mushroom. So we're going to hit shift and a to bring up our Add menu. We're going to go to Mesh and we're going to
choose Ico sphere. We can click this. Now we can see we have a sphere
pop up here and it's just kinda comprised of a whole bunch of different triangles together. Down here at the bottom left, we also have the same option box like we did for the cylinder. And we can change some
of these settings. So we're going to set our
subdivisions here to four. We can do that just by clicking
these little arrows here, just typing in four. So we can see we've added
subdivisions to this, so it has more edges to it. Then we're going to make
the radius just a little bit bigger by sending it to 1.1 m and then hitting Enter. With these settings changed. We can now go up here
to the top-right, going to double-click on
the word I ecosphere. And we're going
to call this cap, cap and then hit Enter. Now you can right-click with
the light goes through your selected and then choose Shade Smooth so that
it's nice and smooth. Point here to make
about the right-click and then shade smooth versus flat is this doesn't actually add any additional
edges to this. This isn't doing
the same thing as what the subdivision
surface modifier, this thing here was
doing for the stem. Because this is actually
adding additional edges, additional cuts faces to our model to make it
physically smoother. It's actually moving the
geometry to make it smoother. Whereas when we're
right-clicking and choosing shade
smooth or shade flat We can zoom in here. So if we see here, it
might be a little bit difficult to notice because
it's pretty subtle. But we can see here we
have these flat edges here that we're seeing all
the way around our cap. When I choose to shade
smooth, those don't change. All it's doing is
visually shading this, visually smoothing
out this ecosphere. It's not adding any
additional geometry here. Nothing is moving. So you don't always need
to add a whole bunch of different edges and cuts to
a model to make it smooth. If it's already
relatively smooth, looking from the
silhouette here and you just need the surface
itself to look smooth. You can just do Shade smooth or if you need so you
can leave it on shades flat. So I'm gonna switch my
Mac the Shade Smooth. And now we can go into
our front view again, either using the tilta key by clicking that and
then choosing front, or just clicking the
little negative Y bubble. Now let's go into our x-ray
mode by hitting Alt and Z. We can zoom in here. And now I'm going to
move this cap up here, up to the very top of the stem. So I just kinda want
to visually line it up so that this
little orange dot, which is the center, the pivot of the cap objects. We're just going
to sit it here in the sensor top of the
stem that we've made, which is going to
involve moving it off to the left slightly because
we have curved this. Now we can hit tab to
enter our edit mode. Then we're gonna go
into our vertex mode by hitting one on the keyboard. Now to easily make
this cap shape, we're going to be
using something called proportional editing. So what exactly does
proportional editing do? So by default, without
proportional editing turned on. If I grab one of these vertices, I switched to my move
tool here and I move it. You can see it's just moving
this one single vertices. It's not actually
moving anything surrounding it is just moving
this one singular point. Then if I Control
Z, I can undo that. What proportional editing
is going to allow us to do is wherever we select, It's going to give us a falloff
of influence around this. So that will me move
this singular point. It's also going to move
any connecting point or point close to that
point along with it. So it almost moves more like it's almost like
it's made of clay. So it gets rid of that
really inorganic movement, of just moving a
single vertices of an object and makes it
move a little bit more organically similar to like it's made of something
soft like clay. To enable proportional editing. We can go up here to the top. We'll see we have this
little bullseye icon here next to this
hill shaped object. We're just going to click
this little bullseye. Now we've enabled
proportional editing. So when I start
moving this object or rather this vertices, we can see here that I have
this big circle on my screen, and it's also moving much more
than that single vertices. I'm going to Control
Z, that change there. The way we're going
to change the size of that influence is as you
start moving an object. So you start moving
this vertices here. We can scroll up or down on our mouse wheel to change
the size of this influence, you can see is as I make
the influence smaller, it gets a lot smaller and
it makes it a little bit closer to how it was before
I even had it turned on. But as I scroll down
on my mouse wheel, it'll make it larger. And it makes a lot more soft and a lot more clay-like almost. You have to make sure
that you're moving the vertices or the face or the edge or whatever
you're moving. Before you start adjusting it, you won't even be able to adjust the falloff until you
start moving the object. As you start moving it, then
you can fine tune your, the size of your fall off
and then actually finished the movement you wanted
to start. Again. Let's Control Z. This is I was just
a, just an example. Now the actual movement
we wanna do is to go all the way here at
the very bottom of this, we're going to select
one of the bottom most vertices we have here, which appears to be this one. We're going to select this
the lowest possible vertices right here in the center
SCAP sphere that we made. Now with that selected, we can grab just the
blue handle here. We're just going to
move it up and down. And what we wanna do is
make this follow up. You're really pretty large. And we're going to start
moving this up until it almost starts
going inside out. So you can see as we move it
basically up through itself, we're starting create that shape of a cap for the Mushroom. Now if it seems like
it's getting too flat, we can just scroll
down or rather scroll up when your mouse wheel to
make the influence smaller. So by scrolling up or making the influence smaller
and we can adjust to see how much curvature
we actually want in this. Make mine, it should make
yours pretty similar to mine. But again, this is kind
of personal preference. Every Mushroom in the
wild is different, so there's no reason
why yours needs to be a carbon copy of mine. We're going to move
it to somewhere in this range, right about here. And then we're just
going to let go. So now that'll confirm that movement and move all
those vertices as well. Now we can go up to the
very top of the cap here. Select this top most
vertices and top center. And then if you wanted to flatten this out
just a little bit, you could we can pull this
down just a little bit. Now I might need to make the influence a
little bit smaller. So I'm gonna scroll
up on my mouse wheel. So that's not moving
quite so much. I'm just going to flatten
this out slightly Somewhere in that range. Now we're done moving these. We can turn off
proportional editing by just clicking
this button here. Then we can hit tab to
exit our edit mode. Then will notice
while we've changed the shape of the cap, the origin for this model
is still done here at the bottom center of the stem. Which means if we rotate this, if we just hit R to rotate, it's actually rotating
from the orange dot. We want to change how
this is going to rotate. So I'm just going to
right-click to undo that. Now with the cap selected, we're gonna go to
object set origin, which is that little orange dot. Then we're going to choose
origin to geometry, which means it's going to move the origin to the
center of the geometry. If you choose
geometry to origin, it's going to move the center of the geometry down
to meet the origin. So in our case,
I'm just going to move the origin and then I'll be able to place the
geometry however I'd like. We're going to choose
origin to geometry. And then when we
click this, we can see this little orange dot here now pops to the
center of mass for this. Which means if I rotate, it now rotates a
lot more logically. Using our move tool here. Let's just move this down that it meets the
top of our stem. Now we're going to have
to move it a little bit further down into the stem. Because this line
we're seeing here is actually the inside edge. So the inside
surface of this cap. So we want to make sure
that the stem at least intersects a little bit
into this line here. We're gonna move it down here. Now I can hit R to rotate. Then we're going to rotate
it so that pretty much matches the rotation
of the stem. Rotated here. And then
if it seems like it's rotated a little bit too much for your liking, that's fine. We don't have to exactly match
the rotation of the stem. We can rotate it a
little bit flatter. Maybe somewhere in that range. Then just pull it down
slightly so that it'll at least goes up through
the into the cap. We want it to inter, intersect with the inside of
the copier with the stem. Now let's hit Alt and Z
to exit our x-ray mode, because we don't really
need that at the moment. We can rotate around
to see our Mushroom. Now we're going to add a
subdivision surface modifier, which is how we smooth the stem. We're going to add that
now to the cap as well. So go over here, the little
blue wrench Modifier tab, click Add Modifier, and then just choose
subdivision surface. Now in this case, we'll
notice that the level one of the smoothing and we're
seeing the viewport actually is doing
a pretty good job. This was already a
relatively smooth Model. It wasn't super jagged
like our stem was, so we don't really need this
second level of smoothing. We're actually going to
turn the render value down to one to meet the same thing that we're currently
seeing in the report. So in this case,
we're going to have them both set to one. And that's pretty much plenty
of smoothing for our cap. It looks just as smooth
as the stem does below. The bulk of the work
done on our Mushroom. All that's left is to add
the spots to the cap. Will be creating those spots, as well as adding
a smaller Mushroom next to the larger one. In the next lesson. I'll see you there.
4. Modeling the Mushroom (Part 2): In this lesson, we'll be
adding spots to our Mushroom, as well as making
a smaller Mushroom next to our larger Mushroom. Let's begin. First thing we need to do is start
by creating the spot. So we're going to hit
Shift a, go to Mesh. And we're going to
create a UV sphere. We're going to
click that and then we'll see our sphere pop-up. Let's quickly change some of these settings down here
at the bottom left. We're going to change
the rings value from 16. We're going to turn it up to 24. That hit Enter. Now we're
going to change the radius down to 0.15 m and
then hit Enter. Now we can go up here
to the top right where it says sphere. We're going to
double-click on that. And then we're gonna
change this to spot this pot and then hit Enter. Now we can right-click
with our sphere selected, and then just choose Shade
smooth. Let's zoom out. And then we're going
to move this new spot objects up above the
cap for our Mushroom. Now let's go into our
front view by hitting Tab or rather hitting Tilda and then choosing front
or just clicking the little bubble can
now zoom in here. Hit Tab tend to our edit mode. Three to enter our face mode. And then Alt Z to
enter our x-ray mode. Now, drag select over the
bottom of the sphere. And make sure you include
up through these dots here. So we want to actually select the entirety of the
bottom half here. So make sure when you
drag selecting that you go pass these
little dots here that I mentioned the previous lesson about how this
select these faces. It's like you pass them, that we actually select this face. Then with these faces
selected and we can now delete them by either
hitting delete or X. Then we're gonna go down here. We're going to choose
Delete and then two faces. Now to, to go into
your edge mode. I'm going to rotate my
camera here just to show you what's going on here. If you don't feel like rotating
your camera, that's fine. I'm going to rotate mine. My camera. Zoom in here on the
bottom of the spot. Now what we're
going to do is hold Alt and then click on
this bottom edge here. Now you can do it
from the front view, except you can't
really get an idea of exactly what it's doing. So I have this now selected. Then I'm going to hit F
on my keyboard for Phil. So when I hit F, it's
actually going to fill this in with a new face. So rather than it being
hollow like it was before, we've selected all these
border edges here, hit F to fill them
in with a new face. That's another thing
you wouldn't be able to see from the front view. Again, you can do all
this in the front of you. There's nothing wrong with that. It won't change anything. But as a beginner, I figured it might
be nice for you to actually see what's
going on here. So with that done, I'm gonna
go back to my front view. So Tilda, then front
and zoom in here. Now I'm going to hit
tab to exit edit mode. So I don't need to be
in edit mode for this. Now I can hit N on my keyboard to bring
up the side menu here. Then we're going to
switch to the item tab, which is the very top tab here. The rendering code down here
to where it says scale. We're going to
choose the zq scale here and click on this. And we're going to type in
0.35 and then hit Enter. We can see here
that it's squashed this down into this
kind of flattens, more of sort of like a bumpy spots shape
that we've created. Now that we scaled this down, we went to apply this scale
so that Blender knows going forward than it assumes that this current
size of the object, the current scale of it is
actually the default scale. So any adjustments we
make after the fact, it will assume that
this new shape is the default shape of it. So to apply the scale, we can hit control and
a at the same time. And then we're going
to choose Apply Scale. Let's now we can see over
here on our right side, the Z no longer says 0.35. It says one, which means Blender now thinks that
this is exactly how the model started out as won't scale down different
properties going forward to accommodate that 0.35 scale that we
did previously. We can now hit N,
tied this menu here. Now we're going to go back
into our edit mode with tab. We want to be in
edge mode again, which is what we're
currently in. So to on your keyboard,
if you're not, now what we wanna do is
actually select the loop here. So the second lowest loop, we're going to hold down Alt and then click on this
second lowest loop here. And then we're going to
hit X on our keyboard. Instead of deleting these edges, we're actually going
to dissolve them. So if we just deleted this edge, it's actually going to delete every face that's attached to this edge as well
because those faces would need that edge to exist. So instead by
dissolving this edge, we essentially just
remove the edge. So when I click
that and we can see the edge goes away and it just completes these faces here as if the edge just never
existed to begin with. So with that edge dissolved, now we can hold down Alt, then select this
bottom most edge here. So the very bottom of the spot. Now we're going to
hit Control a and B at the same time for bevel So when we do that,
we can see that as we start moving
our mouse here, it's actually going to start
cutting that corner off. So as we move this metal, so it changes the size of that cutoff. If we scroll up on
our mouse wheel, we add more cuts to this cutoff
so we make it more round. So let's slide this cutoff here. So this bevel closer
up to the edge. We don't want it to touch this edge because you can see as we touch it and then
even go past it, the model turns
inside out on itself. So we want to stop a
little bit before then. So about here, then we're just going to scroll up
to add a few more cuts. You don't need a
ton of cuts here because this is gonna be a
relatively small detail. So we're just going
to have a few. We can click. In my case here, it pops up all these
settings here. And we can see the size, which is the width here,
That's how big this pebble is. And then I added six segments. So if you want to
add six segments, tears just type in six for your segment count with
your bevel added. Now we can hit one
on our keyboard to switch back to
our vertex mode. Now we're in vertex
and then we can hit a to select all the vertex. And then we're going
to right-click. And we're gonna go down
here to smooth vertices. Smooth vertices kind of work similar to what
the modifier does. So that's subdivision
surface modifier we added. So smooth vertices essentially is doing the sort of
averaging of positions, but it's not adding any
additional geometry. So what we're doing here
is we're essentially taking all of these
different vertices here and we're letting
Blender calculate what the average position between
all these vertices is. And by doing that,
it's essentially smoothing it out and making it have less corners and
less features overall. We can turn up the smoothing
value here up to one. And then if you want
to, you can change the amount of repeats it has. So essentially you're saying, however much smoothing
we have here, repeat that process
however many times. What our case here, and
we're just going to have the smoothing set to one. Then we're going to change
the repeat back to one, so we don't need it to repeat
it a whole bunch of times. We just want to smooth out a little bit of these edges here. So if I turn this
back down to zero, so this is what it looks like with no smoothing essentially, we can see here
it's a little bit a corner here that
we're getting. So by just turning
up the smoothing, it just makes it a little
bit more smooth here. Now we can hit tab
to exit edit mode, and we can hit Alt and Z
to X it our x-ray mode. The American again
change the pivot, so the origin for this object
towards the center of it. So we're gonna go to
Object Set Origin, origin to geometry. We can see here it pops it
up right to the center. With that done, we
can now zoom out. Let me can rotate our camera so that we can see
our entire scene. Now in order to
place these spots across the surface of our cap, which is currently rounded and angled and all over the place, we're gonna use something
called Snapping. So first let's turn
on our Snapping. So it's this little magnet
icon we can see here. When we click on it, you can see the little magnet like
waves come out of it. And that means that
it's turned on. Then the options for our
Snapping are here to the right. So if we click this
little drop-down, we can see all the
different options we have for our Snapping. In our case, we want it
to snap to our face. So we want it to
snap to the surface, the face of these objects. With face selected. We can now go down here and change some of these
extra options. So we want it to do
is snap center of the spot objects to
the surface of our, the top of our mushroom,
the mushroom cap. We also wanted to
align the rotation of our spot to the rotation of
the surface of the Mushroom. So we're going to check
that on the wall. So have Project individual
elements on just to make sure everything is
being projected correctly. With all these settings set up. Now with our spot selected, we can just hit G
on our keyboard. So we're not actually going
to use the Movement Gizmo, these controls here,
we're just going to hit G to quickly
move this object. Now, as soon as we move it over top of the cap of the Mushroom, we can see it starts
immediately Snapping to it. So you can see it's
nice and nice and easy. Following the shape of our, the cap of our Mushroom. We can just move it to where
we want and then click. And now we can zoom
in here and see that it's nice and flat
against the surface. So this makes it really
easy to just spin around and just kind of place shapes and spots wherever
you'd like them. The easiest way to do this is to just spin above your Mushroom. It doesn't have to be
perfectly flat on view. So maybe something like this, just so we're looking down
the top of our Mushroom. And then with our spot selected, just hit or just hit G and then you can move it
to wherever you'd like. So I'm going to move mine
roughly where I had it before. Then we're going
to make duplicates of this spot and place them around the top
and the Mushroom to make this duplicate. Just hit Shift and D at the
same time for duplicate. And now you can see we have a duplicate that we're dragging around and then that also
snaps just like the other one. So we're just going to
find another spot to snap this to, maybe here. And we're just going to
keep doing this process until we're satisfied with the amount of large
spots that we have. So we're actually going to make three different
sizes of the spots. So don't put too many
of these large ones in You'll probably want
to have maybe 67, maybe of these large spots. And you don't want
them to get too close to the edge either. They're going to look a little
bit better if you don't get any closer than probably about as far away is this from
the top of your Mushroom? If you'd like to
follow along with me, you can just look at
where I'm placing my spots and roughly placed
that yours were there at. Don't worry about the
exact placement or you can just place them
wherever you think looks good. Try to not make anything too symmetrical so you
don't want to have like a spot on each of the four corners and
then one in the center, because it's going to look sort of unnatural brick
kind of going for a more organic sort of asymmetric kind of look
for these mushrooms. So try not to make them
to even and symmetrical. It might go against what we're
going for for this scene. I'll see you here in a moment once I'm done
placing these spots. Okay. Now I have all my
large spots placed. And like I said,
feel free to just roughly map out where mine arm
or just do your own thing. Now, we're going to create the slightly smaller
version of this spot. So we're going to start out
by just hitting Shift and D. To duplicate this
to a new location, we'll just place it here. Now we're going to hit S, just start scaling this
down uniformly. And we're just going to
scale this one down. Not, maybe not quite 50%, but maybe in the 60% range. So about here. Now we have a new smaller
spot that we're going to also fill in these different gaps
throughout the Mushroom. So again, I'm just going to
speed this up a little bit. You can place yours
wherever you'd like or you can
follow along with me. Okay. We have now are
slightly smaller spot. We'll call this the medium spot, because we have the large spot. Now we have our medium spot. Now let's create a small spot. We're going to again
hit Shift and D. Just clone this to some empty
location, place it here. Then we're going to
hit S to scale this down and we're going to
make this one smaller. Maybe around here. So probably another 50% roughly from what the original
one or sorry, the medium one was. So it's about 50% of the
size and the medium. And then we can again
just place this spot here and fill in these gaps. Okay, so now we have all
of our small spots placed. So we have all the
spots placed on top of our mushroom cap. Now again, if you'd like to just kinda tweak these things around, you can just select one, hit G and just nudge them
to the left or right. Or maybe you found that
you put too many in one spot and you need to
select one and then delete it. Or you just need to shift
them around to make the spacing a little bit more random to try to
get rid of some me, like maybe in this case I have a straight line of small ones. So maybe I'll just just move these around
just a little bit to help break up that kind
of symmetry that we had here before that we
are trying to avoid. So maybe I've gotten
rid of it a little bit. We're not gonna be seeing
this from the top. We're going to be seeing
it from a lower angle, which it makes it a
lot harder to see the symmetry and the straight
lines that we had before. You might also
notice that as you rotate around their
spots here that feel a little bit bare based on the angle that
you are looking at. In this case, we can just
work from this angle here. I just quickly grab
a few of these. Just fill in these spots here that seem a little bit empty. You want to try to keep
your larger spots towards the top center and
then make them get a little bit smaller as they
go out towards the edge. Now you spin around your
Mushroom and you're satisfied with the placement of your spots on your
cap, we can move on. Our next step is going to be collapsing all of these
different modifiers we applied in preparation for attaching this Mushroom
into one solid object. Right now if we go
up here to our list, we could see every one of these single spots is all
an individual objects. So if we try to move
any part of this, it's all a whole bunch
of different pieces. So we're going to remedy
that by collapsing all this together into one
singular Mushroom object. So to start with, let's select our Mushroom stemmed down here. And we want to apply the
smoothing that we have to it by applying it were essentially baking this
change into the model. We're not making an
editable anymore. We're just kinda committing
it to the model itself. We're gonna go over here. So
this little drop-down here with the stem selected and
we're on the modifier panel. We're gonna go over here
and then just choose Apply. Now we can see the
modifiers disappeared. However, the model is
just as smooth as it was. We just can't turn the
smoothing off anymore. So it's kinda baked in, it's cemented into the stem. Now select the cap
for your Mushroom. Then this also had
a smoothing on it with the cap selected. Just go over here and
then choose Apply. With those two
modifiers applied. Now, we can attach
everything together So we're just going
to drag select over the entire Mushroom. So we now have
everything selected. Make sure you don't have
your light selected. If that happens, just hold down Control and then drag it over the things you
don't want to select. We can see here I have
just my Mushroom selected. I can just double-check that
by scrolling up through this list and make sure
nothing here is selected. So I have that all selected now. Now I can hit Control and J
at the same time for join. So now I've joined
all of these objects together into one
singular objects. Now if I move this, you can see it moves
everything all at once. Make can see over here as well. I have just a
singular object now, and it's called cap,
because it shows cap is the base
object for this join. You can determine which
is the base objects, the parent object of all these. But in this case
it didn't matter. So it just shows the cap. Now we're going to double-click
on the word cap here. I'm running call
this big Mushroom. We know that this is going to be the larger Mushroom within our scene with it renamed. Now let's apply all
the transformations that this model
has applied to it so that it sets it back to a
default sort of one state. We're just going to
hit Control a with this selected Control a. And then we're going to
choose Apply all transforms. And we can see when we do that, that it actually
drops the pivot. So the origin for this object
down to the very bottom, very center of the stem. And it's, it did that
because these Mushroom right now is currently
centered on top of the origin. Had our Mushroom been
sitting over here, and then we applied
all transformations. It would have still moved the origin to the
center of the scene. So we would've had to reposition the origin back to
the bottom of the Mushroom. But because we built
our Mushroom right here on the sensor, doesn't matter. It dropped a right to
the bottom anyway. If for some reason you did
decide to move your Mushroom off the origin point
before doing all this, you can move just the origin
itself to a specific spot. So to do that, you'll go up here to where it says Options. You'll twirl that down and
then you're going to choose Effect only and then
choose origins. So now we can see our gizmo
here has changed slightly. We can now see the
origins direction. Now if we move this, we can see that it's
actually moving the origin of the object, not the object itself. My case, it kinda messed up the, the origins rotation here because I still had Snapping on. So if you didn't have to
do what I'm doing here, but you do still have Snapping on makes you turn off Snapping. I'm going to turn that off. Now I can Control Z
that, that change. So that's back to
how it should be because I could tell
it rotated them incorrectly because the Z was no longer facing
the z-direction. Now again, if I
wanted to do this, make sure I've origins checked
on and then you can just move your origin to
wherever it needs to be. So if, if I needed it for some reason at the
top of the Mushroom, I could just move
it up to the top and then turn off origins. And now my Mushroom
as the origin at the top in this case,
I don't want that. So I'm just going to Control
Z to undo all those changes. Make sure my origin is
still rotated correctly. Then I can turn
this off that way. Now when I move this, it's actually moving
the object itself. I'm going to Control Z to set
it back to the zero point. And we've now combined our Mushroom into
one solid object. Now let's make a
smaller Mushroom next to our larger moon. With your large
Mushroom selected, hold down Alt and then hit D. Then we can move
out a duplicate of this if we want to,
before we click, if we want to make sure that
it stays on this loved one, it doesn't go below
the zero point. We can add X to bind it just then the movement
of the x-axis. So we'll do that. So we're just going to move
it over here just in the X. Now we can see that it didn't
move down in space at all. It stayed right on the X axis. We're gonna go up here
and we're going to rename this to small Mushroom. We've named it small. Then as I said before, this is not a duplicate. This is an instance. So you'll notice that we use
Alt D instead of shift D. So an instance duplicate
is a clone of an object that shares all the same
mesh data as the original, but it's still allowed to have different object
properties such as scale. Our case here. If I
scale this Mushroom, if I scale this
down, you can see here it doesn't do anything
to the original Mushroom. The original Mushroom stays
just as large as it was. However, if I hit tab, go into my Edit Mode, then I select any one
of these vertices here. So I'll say I'll select this
one and then I move it. You can see here
that it does change the original Mushroom based on one of two done
to the small one. And that's because I'm changing
the actual mesh itself. So any change I make to the mesh itself will be reflected in
the parent of the instance. So they'll all share all the
same different mesh data. However, the scale,
the movement, the rotation that can
be unique per Mushroom. So I'm just going to
Control Z to change that back it tab to
exit my edit mode. Now let's get an actual placement
for the small Mushroom. I'm gonna move
this up underneath the Mushroom originally. Then I'm gonna move it
a little bit forward. Maybe around here. Then let's scale this
down so that pretty much fully goes
underneath this Mushroom. I don't want it to
intersect at all. Maybe about that. Now we can rotate this. So I'm going to rotate
this just in the z-axis, which means it'll just
spin around in a circle. I'm gonna hit our and
then Z my keyboard. And that'll make
sure it just binds the rotation just in the z-axis. And let's rotate this so we can have it lean the
opposite direction. So it will rotate it there. Now we have them both sort of leaning in different directions. While the instancing doesn't seem super important currently, based on what we just did, we could have done that
with the duplicate. The instancing will make a big difference when it
comes to actually applying shaders and textures
to our mushrooms would allow us to just
texture a single Mushroom, automatically texture
the other Mushroom. In the next lesson,
we'll be making the glass dome and the
base of our terrarium. I'll see you there.
5. Modeling the Terrarium: This lesson, we'll be making the glass dome in the
base for our terrarium. Let's begin. Now before we get into
making the Terrarium glass, which is a be the first
thing we're going to make. I do need to correct
something from the last video and it's a
really simple, easy change. So I originally had you
move your Mushroom off here to the right side and scale it down
and then rotate it. Which is exactly
what we want to do. Except I didn't
realize that I was actually looking at the
backside of the Mushroom. I didn't realize I
was looking from the y-direction rather than
the negative y-direction. So in order to fix this, all we need to do is go
into our front view. I'm just going to hit
Tilda and then go into our front view or you can just click the little
negative. Why bumble? We actually went our
Mushroom here on the right side and
not the left side. So we're just going to drag it over here to the right side. This will allow us to
scale it up a little bit. So I'm just going to
hit S to scale it up. Now we can still
have it tucked up underneath our Mushroom here. Now we want to rotate around. Then we're gonna pull this
back towards the front side. So I did everything
that I wanted to do. I just did it almost backwards. With this Mushroom shifted
towards the front and now on the correct side of the large Mushroom
are ready to begin. We're going to start by
hitting Shift and a. It's bringing up our Add menu, go to Mesh, and then
choose UV sphere. Now on our settings here, we're going to change the radius to 2 m. So we're just
going to type in to hit Enter and then make
sure you have your segments set to 32 and your
rings set to 24. Now we can right-click,
choose Shade Smooth. And then we're gonna go up
here and name this glass dome. So we're just going to
double-click on the word sphere. Then type in glass, dome, then hit Enter. We're going to hit N to
bring up our side menu here. Then for the Z location
where it says 0 m, we're going to type in
1.6 m and then hit Enter. We can now hit N to
hide that side menu. Now we can hit Alt Z to
go into our x-ray mode. Then we're gonna go
actually into our top view. And because we need to
center these mushrooms here inside this
glass dome shape, we're going to click the
little Z button up here. So the Z bubble or you can hit Tilda and then choose top
to go into your top view. Now let's zoom in here. And we wanted to select
our big Mushroom and then hold Control. So over here we're
actually going to hold Control and then select
our small Mushroom. So that's how you add
to your selection when you're working
within this list. If you were doing it
within the viewport, you would want to
hold shift instead? With both of our
Mushroom selected. Now we can move them over and we're going
to center them up so that they don't go outside the bounds of this circle here. We want to visually
center them within this, because this is going
to be the bounds of the Terrarium glass. We can probably
have them a little bit towards the
back side a little bit because we want to add a little bit more room in
the front than the back. So somewhere around
here it looks fine. And we can always
adjust this later, but just get them to
roughly this position. With the Mushroom is placed. Now we can go into
our front view. So we're going to
hit Tilda front. Now let's select our glass dome. We're going to hit
Tab to go into the edit mode for
the glass dome. And then three to go
into our face mode. We're going to drag select across the entire
bottom of this. So we can delete the bottom of this glass dome with
these selected hit X. And then we're going to
choose delete faces. Hit to, to go back
into your Edge mode. And then Alt, click on the bottom here to
select this entire loop. Now hit E and then Z to make sure that it binds
it just to this z-axis. And we're actually extruding
out more faces off of this. So we're extruding these down and we want to extrude them down just a little bit past
the bottom of our stem, a little bit past this red line. Somewhere around here. It doesn't need to
be super far past. It wouldn't have this glass kind of go down into the base. So the mushrooms
are going to sit on the base of the Terrarium. And we want this glass
to go down and sit into a groove in an order
to make that happen, we needed to go pass
the bottom of the base. Now we can hit tab to
exit our edit mode. Then we're gonna go
to the Modifier Tab. So with our glass dome selected, go to the little blue
wrench icon here, which is your modifier tab. Click Add Modifier We're going to add a
subdivision surface modifier. And we're going to set
both of these to two. So it makes it nice and smooth. Because we want our
glass to be nice and smooth without any sort of jagged edges that will affect
the look of the glass. With this applied,
we're now going to add an additional modifier
to the same stack. So you can stack additional
modifiers on top of each other and they'll all work
together on the same model. We're just going to go
up to add modifier, and this time we're going
to choose Solidify. So let's zoom in here on
this edge of the class, we can see what the
Solidify is doing. So Solidify is actually
adding thickness to an object that by default
doesn't have any thickness. We can see here that
we're actually adding thickness to the
walls of this class. Now the thickness that we want, we actually want to use a
negative thickness here. So we're going to
type in negative 0.13 and then hit Enter. And all the negative
is doing is actually pushing this thickness
outward instead of inward, because we already centered the mushrooms with inside this, we want the thickness
of the glass to go outward from the original
starting point that we made. So by using a negative
value and we just say make the thickness go out. If we use the positive value, the thickness would go
inward towards the center. You can have your offset
here set to negative one. So this is also a way to adjust the position
of that thickness. So again, we're going to
leave ours at negative one. And then make sure you
have the rim sets of fill. So by default, if you
have this unchecked, it won't put any faces here
on the bottom of the class. So it's going to make your glass hollow, which we don't want. We want the glass to
act like actual glass. Normal glass would not
have to interior faces. We're just going
to check a fill. And now you can see
here it's added a, a face here going all the way around the bottom to
fill in that edge. You can rotate here into your perspective
view like I have. You can hit Alt Z to
exit our x-ray mode. So now it's opaque again. What we can see here
that we're having some weird sort of smoothing
around the edge. So it's making the bottom of
this look like it's rounded. But in reality this is actually a 90 degree angle here with pretty easy to fix this
with a glass dome selected. Just go over here to the
object data properties, which is this green
triangle icon here. Click that. I'm going to scroll down
to where it says normals. Twirl that open, and
then we're just going to check the auto smooth box. So you can see right away
soon as I turn it on, it gets rid of that
smoothing that we had, that sort of aggressive
smoothing around the bottom. Now it has a nice flat
face on the bottom and then nice smooth walls on
the sides and the inside. Auto smooth here is just using this angle threshold to determine where the
smoothing should break. So as this value gets higher, it's going to be more aggressive at what it tries to smooth. So right now it's defaulted
to 30, which 30 works fine. You don't have to change this. I'm just going to show
you what it does. As I turn this up. We'll eventually,
once we get past the 90 degree threshold, we now run into that same issue
because we're telling it, let, you know, retelling it. It can shade anything or can
smooth anything under 90. So as soon as we go over 90, it's starting to smooth out these edges here
that we don't want. I'm just going to
set mine back to 30. Now it's saying as long as it's 30 or below, get
and smooth it out. But as soon as it
gets any button anywhere above nine or 30, rather, don't smooth it. So we'll notice that our glass
dome is nice and smooth. Looks like a glass dome, except for the fact that we can actually see
through it right now. We're going to do a simple workaround just
for the viewport. Now this isn't making it
actually see through. This is just letting us see through it as we're
working on it. So we're gonna go over here
to the object properties. So it's this little orange
bracketed square icon here. We're going to scroll
down here to where it says viewport display. Twirl this open. Then where it says display as
where it says textured. We're going to
switch this to wire. So now what it's
doing is it's just displaying the wireframe
for the object, but it's not actually
generating any faces, at least some visual
phases between these. In terms of the actual model, nothing has changed
about this model. It's still has faces.
It's still opaque. If we rendered this
image right now, we still wouldn't be able
to see through this. All we're doing is allowing
us in the viewport to see through it as if it's
something similar to glass. In order to select through this, we just select as long as
we're not selecting on the lines for this glass dome, we can actually select directly
through this glass dome. With the glass dome created. Now we can move on to creating the base for the glass dome. Let's hit Shift and
a good in mesh. Then we're going
to choose cylinder In the cylinder options, we're going to
change our radius to 1.95 and then hit Enter. It's going to make
it just a little bit smaller than the inside
walls of our glass dome. So there's a tiny bit
of gap between them. Then we can set our depth. We're going to set this to
0.48 m and then hit Enter. With these settings changed, we can right-click,
choose Shade Smooth. And then we're going to
rename this cylinder. We're going to change
it to base be. See. Let's go back into
our front view. So Tilda front. And then we're going to drag this base down with
the blue handle, the Z handle, until it just barely intersects with the
bottom of our Mushroom. We went the bottom
of the Mushroom here to just barely
intersect it. If you'd like to
be an X-ray mode to do this, just hit Alt Z. We want this white line here and this orange line, I
guess in this case, to just barely intersect
this so that these actually contact the top of the surface. I'm going to hit
Alt C to exit my, my x-ray mode here because
we don't really need it for the things
we're about to do. Now I'm going to hit Tab
to go into edit mode. We're going to zoom in here to this bottom-left corner here. So it's a little bit hard to see here
because of the grid, but we can see the bottom
of our glass here. And then we can see the rest
of our glass going up here. Let's zoom into this
bottom-left corner. Now we're going to
hit Control and are while hovering over
top of the lines here. It may can see again
that same yellow line that we had before when
we were doing the stem, we're going to click when it's
a horizontal yellow line. And then we're going
to drag it up just below the bottom of this glass. We're going to drag
it right about here. So we can see here this is
the bottom of the glass here. And then I've placed
my line just below it. We're not going to
switch to our face mode by hitting three
on the keyboard. And now we're going
to hold down Alt and then click on one of
these bottom faces here. When I click on it,
it's going to select all the way around
this base here. I'm gonna zoom back in
here on the bottom-left. What we're gonna be doing now is extruding this outward
and we're gonna be making a few different steps
and height here to create the bottom, a slightly more interesting edge on the base of this terrarium. To do that. And we're going to hit Alt
and E at the same time. And this will bring
up our extrude menu. We can't just hit E in
this case because we went to extrude all the way
outward along this. The normals, the normals
are essentially the, the direction that all of these faces are
facing individually. We're going to choose
extrude faces along normals. Again, I brought this
menu up by hitting Alt and E the same time. To bring up this
menu, we're going to choose this extrude
faces along normals. And we can just extrude this
out just a little bit here. It doesn't really
matter where you place it because we can change it to a more exact
value in a second. So just move it out
roughly here and then click and down here
at this option box, we're going to change
this offset to exactly 0.18 and then hit Enter. You wanted to exactly
0.18 m out from where we originally started with
the same faces selected. We're not gonna do
anything else other than hit Alt and E again, to bring up that same menu, we're going to choose extrude
faces alone normals again. We're going to again
just kinda drag it out to an arbitrary place. Then down here, we can see
that the value has changed. We're going to switch this
to 0.14 and then hit Enter. And then we're gonna do the
same thing one last time. Alt and E extrude faces along normals and extrude this
out some arbitrary amount. And then again, type in
0.14 and then hit Enter. So at this point, we've extruded along normals three times. Now we can zoom back and we're going to
rotate our cameras. So they go back into
our perspective view and see exactly
what we did here. The first extrusion
we did was to extrude it out past this class. We moved it out just a
little bit past the glass. And then we extruded
it out one more time, a certain amount, and then
again another amount. So essentially what
we've done here is we've planned out where
we're going to be placing our extrusions now that we've done
the actual width. So we've gone out as
far as we need to. However, I do want to
extrude this edge up here. So these, this loop
of faces up to meet the height of the
interior of the base. So to do this, we're
just going to hold Alt down and then click when one of these
interior faces here. So the central face here that's selected the entire loop all the way around
the Terrarium. Now we can hit just E. We don't need to
hit Alt this time. By just hitting E and allow us to immediately extrude this. We're just going to
extrude this up to, it doesn't really
matter the height, just some arbitrary height. Then down here we can change the amount that it's
extruded it out. So we're gonna switch this to 0.14 again and then hit Enter. Now we can see that this Around the outside is now roughly the same height as
the edge on the inside. It's not the exact same height, but that's, that doesn't matter. We just need them to be
visually pretty similar. It's now we can see
that that groove that I talked about earlier, this glass is now sitting inside this groove inside the
base of the Terrarium. In real life, this groove
here would be placed in our, you'd be placing the
glass dome down into the groove to prevent
that glass dome from being accidentally
knocked sideways and then shifting or possibly
falling off or breaking. So we're just
replicating that kind of realistic detail here. So let's zoom in back
down here towards the groove on the
bottom of this base. We're gonna go over here
to the modifier tab. So this little blue wrench
icon, click Add Modifier. And then we're going to choose
subdivision surface again. Now we're going to add
a second level here. So we're gonna have 2.2 for both of these so that
it's nice and smooth. And we can see
here now that it's rounded off all these
corners here and made a nice rounded shape
for the outside here. So the outside actually
looks pretty good. However, you'll
notice on the inside really crushed the shape here. That mostly has to do with
the fact that this has no guarding geometry
here on the inside. So there's no extra edges here. Reinforcing this curve here. So this subdivision
surface has averaged out this one singular point that's sticking out in the
air and just decided, well, it actually
probably should be closer towards the
middle back here. So it's made this really, really smooth area here. Now just like on the stem, there are ways that we can
protect certain edges. We're going to be
doing that by using the Control R in placing cuts in areas that we want to reinforce so that it
doesn't crush those areas. So let's zoom out here. We're going to start on the
outside and work inward. So let's put a reinforcing
edge here on the side here. So just by hovering over roughly in the middle
of one of these, these faces here, control into R. We can see our
yellow horizontal line. We're going to click. And now soon as we click,
you'll notice the model kind of immediately starts
getting shaped up, like it strengthened the edge immediately just by
putting one in the middle. We're going to actually slide this down towards the bottom. And you can see the further we slide it down
towards the bottom, the tighter that edge at
the bottom is getting. So we're going to slide
it down to roughly here. We can see how much more tight like this
corner has gotten. It's gotten a lot more
crisp at the bottom. And that's because we place this edge here and
we've given it Blender more information to
figure out where to average all these
vertices out when it decides to smooth the thing. And that's probably only one we're going to put
on the outside because I don't really
mind the smooth curves that we're getting here. However, on the inside, this is a pretty, pretty important area
and we don't want it to be so smoothed out. So we're going to zoom in here. And then we're going
to hit Control R when we're hovering over this. Now, I realized
that this area here is a bit of a mass
that's kind of a jumble. But try to just do
your best to follow along and try to figure
out exactly where I'm, I'm putting my mouse. So in this case I'm putting
my mouse on the side of the face for this interior base. So right about here. I'm gonna hit Control R.
And then since I click, you can see right away
it starts showing up. That edge is kind of giving
it a guard on that edge. So as I cited up towards
the top of this edge, we get a much sharper edge on the top are much
sharper corner rather. So I'm just going to place
one right about here. We can see it's pretty close to the edge on
the inside of this. Then that's done
a pretty good job of sharing up the
top of the corner. But we do also want to prevent the bottom from rounding
out so much as well. So again, the same exact spot that we placed,
the last one. So on this sidewall of
this interior of the base, I'm just going to hit Control R. Click. And I'm going to slide this
one down towards the bottom. I don't want to sign it all
the way to the very bottom. I wanted to have it
stopped just before. We can see here. It's prevented this corner here from intersecting
into the glass. I'm going to do
the same thing on the outside of this groove. So the groove, the glasses
currently sitting in. I'm going to mouse
over the interior wall here of this Control R. Click and then slide this
down towards the bottom. This one's a little
bit harder to see, mostly because it's covered
up by the glass itself. But just slide it down
and slide it down as far as you can go and
then you'll notice it doesn't move any further. Then just slightly back
it off until you see them Model move a little bit
and then just click there. Now we can see that this edge is roughly about where
the last one was. I'm actually inside
the base right now. So I moved my camera down so
that I can see inside it. Now with those few
cuts out of the way, we can hit tab to
exit our edit mode. Click off the model
and we can see we have a much more sort of cheered up in more
realistic looking shape here. It's not quite so
blobby and doughy. It has some hard
edges and then it has some nice soft edges as well. In the next lesson, we'll
be creating the blades of grass and the Log
for our terrarium. I'll see you there.
6. Modeling the Log and Grass: In this lesson, we'll be
creating the blades of grass and the Log
for our terrarium. Let's begin. We're going to start
by creating the Log. That way we know where to
place the Grass later. We'll start by hitting Shift and a two ring up our app menu, then go to Mesh
and then cylinder. Now we can go down
to the bottom-left. We're going to
change the radius to 0.33 m. Then hit Enter. I'm going to change the depth to 1.7 m and then hit Enter. Now we can go to the top right, double-click on
the word cylinder. We're going to
change this to log. Then hit Enter. Now we can right-click
and then shade smooth. Now let's rotate this 90
degrees on the x-axis. There's a way to
quickly do this. So we can just hit
R to start using our Rotate tool and X to
bind it to the x-axis. And then we can just type
it and it'll go 90 degrees. Then we can hit
Enter to confirm. If you'd prefer to actually
use the Rotate tool. We can just go over here, click the Rotate tool, then you can rotate it just one, this red axis here. So just grab this red handle and then rotate it 90 degrees. I'm going to Control Z that
since mine was already 90. Now let's zoom in
on our Log here. Let me go to our move
tool to move this up so that it's a little
bit above the surface. We're actually going to
squish this shortly. And then we're gonna have
to move it down again. So don't worry about getting it perfect on the surface yet, just move it up above the base. So I just have it floating a
little bit above the base. Now I'm going to switch
to my Scale Tool. I'm going to scale this just in the z-direction to flatten
it out a little bit. I want to make sure that
it's not perfectly round. I want to give it a little
bit of a squished oval shape. Just a tiny bit, just
very slightly oval. Now that I've squished it, go back to my Move tool. Now I can move in and
then actually push it down so that it's correctly
sitting on this surface here. So an easy way to tell
us something sitting on the surface is to just zoom your camera and then paying it down underneath the surface. So we can see here,
I can actually see how much of it is sticking
through the surface. Now I can just move it so
that just a little bit of it sticks through and then
rotate my camera backup. Now I know it's
actually contacting to position our
Log in the scene. Let's go up to our top view
so we can either click this little Z bubble up here on the top right where we can hit Tilda and then just choose top. Now I'm going to hit Alt Z to
go into my x-ray mode so I can see a little bit
better what's going on here? We'll zoom in here. I'm going to move this down to about here and
then just rotate it. I want it to be at an angle and slightly underneath
the mushrooms. This doesn't have to be perfect. Just try to match somewhat
similar to the angle that I have overlapping a little bit underneath the
smaller Mushroom. And then it's pretty
well underneath the larger Mushroom
with a placed. Now let's rotate our camera. Then zoom back in on our log. We can now hit Alt and Z to go back out of the X-ray mode. And we don't need that
right now. We can hit Tab to go into
our edit mode. Three to make sure that
we're going to face mode. Now we're going to be in setting the faces on the edges here. That way we can make
this Log hollow. So I'm gonna select this
face here on this end. And then I'm gonna rotate
around and hold Shift before I select the second one
because I want to make sure I'm inserting both of
them at the same time. It's know I have both
faces here selected. I can hit I on my keyboard. Then I'm just going to
inset this a little bit here to worry about exactly how far you're
inserting it yet, because we can just
go down here and type it after you've clicked
the first time. We're going to just type in
0.055 and then hit Enter. Now that we have them inset, we're actually going
to delete them. So we're just going to hit
Delete or X on our keyboard. Then choose faces. Now hit to when your keyboard to switch
into your Edge mode. We're going to hold down Alt and select this first edge loop. So we're selecting
this interior border. Then we can spin around. Then while holding
Alt and Shift at the same time to make sure
we're adding to the selection, we're going to select
this edge loop. Now we have both sides selected. Now at that done,
we can right-click. And then we're going to
choose bridge edge loops. And as soon as we've done that, we now have bridged phases between these two edge
loops that we've selected Now we made are
essentially a tube, but in our case it's
going to be a hollow log. Let's switch into our
x-ray mode with Alt and Z so that we can select all
the way through her Log. And we're just going to drag
select over the middle here to select all the edges
going around the Log. Now we can right-click and then we're going
to choose sub-divide. Then down here at the bottom left where it says
number of cuts, we're going to type in seven. So essentially we're just adding seven more cuts
around the center of this Log that where we have a little bit more geometry
here to play with. When we get to the point where we're going to make
the Log look a little bit more lumpy and a
little less perfect. So let's begin that process now. We're going to hit one on our keyboard to go
into our vertex mode. We can click to deselect
all of our vertices. We don't need to have
all of them selected. Then we're gonna go
up here and choose proportional editing. And you'll remember from
when we made the cap, this essentially just
allows us to move a single vertex and then move every other vertex around it to a degree like without using
a falloff essentially, so that it moves more than
just one vertex at the time. So it gives us a
little bit more of an organic and smooth movement. So first let's just select
one of these vertices. This is, this really doesn't have to be done exactly
the way I'm doing it. This is purely
personal preference. I'm most likely going to
speed this process up here. So you can see roughly
where I'm clicking, but you don't have
to follow along to every single one
of these vertex. Just pick randomly across your, your blog and just kinda push and pull them
slightly in and out to make the Log a little
less uniform and a little bit more lumpy and kind
of organic looking. With our fall off turned on. We can just grab in this case, I'm just going to
pull this down in the Z. I'm gonna move it down. But we'll notice
that it's moving the whole log because my
fall off is really large. So I'm gonna scroll up on my mouse wheel to
make it smaller. That way I'm moving just
a smaller portion of the Log about here is good. So I'm just going
to pull this up. Just randomly start
picking places around the Log to maybe
pull this one in. Grab this part of the
Log, pull this one in. I'm just gonna go through here
and just select a bunch of little random spots
and either pull them in or out, left or right. Just, just a little
bit though you don't want to make it to lumpy, just add a little bit of
variation to the surface. I'll see you in a moment
when I'm done with this. Okay? At this point I am done moving the individual vertex. And hopefully you've gotten to a point that you're happy with the lumpiness and
unevenness of their Log. So with that done, we can now turn off proportional editing. We're going to hit three
to go into our face mode. We're going to turn off
our x-ray mode because it's just making things a little bit more confusing
than they need to be. I'm going to hold down Alt
and Z to turn that off. Now we're going to add a
little bit of a broken edge to the ends of each of
the ends for a log. So we want it to make it
look like the tree fell over and it had a rough break
there where it fell over. It wasn't so on
and fell over it. So it wouldn't have
this perfectly flat cut like it as now. We're gonna do that
by just selecting randomly faces around here. So you want to have groupings
of either 12 or three, and you want to space them
out somewhat randomly. So if you'd like to follow along exactly with me,
you can do that. Or you can just pick
and choose what feels right to you and just pick
your own random assortment. Remember when you're
selecting these that you need to hold down shift or else you're going to deselect the last one that
you just selected. So I'm just going to start
by selecting one here. Maybe one here. We're just going to just kinda just space them out as much as I can without making them
too obvious or too random. You do want to
have some that are the single ones tend
to look better. So don't have too many of the like two or
three selections. Because those tend to look
a little bit too chunky, they're a little too thick. So I would only
have maybe one of the three selections and
then a couple of the 2s. And then mostly it's
going to be three. So in this case I've
actually made mine a little bit too symmetrical. I'll move that one over. Maybe I have one there. That's probably enough
for our log here. You don't want to select
a whole bunch of them because then you're
just extruding everything out anyway and
it just looks flat again. Before we do anymore
extruding on this side, we want to actually go
over to the other side and select those as well. So we're going to rotate around and then make sure
you're holding shift at the same time on
this side as well because we don't
want to deselect everything we just
did over there. So I'm gonna hold down
Shift and just go through here and start selecting
some of these as well. This side is a little
bit less important because this is gonna be
turned away from the camera. I wouldn't be too
picky on this side. Just select whatever
you feel like I think that looks fine. Now I have both of these
sides of the Log selected. So now we're ready to start
the extrusion process. So to start with, we're
going to hit Alt and E at the same time to
bring up our extrude menu. And then we're going
to choose extrude faces along normals. Again. We're doing this in this case because we want to extrude both of them
at the same time. If we just hit E to
start extruding, they wouldn't be extruding
outward from both at the ends. They would actually be extruding
both the same direction. So one side would look correct, whereas the other side would
actually go inside out. It would go into the
Log rather than out. So by using extrude
faces along normals, both extruding correctly outward from based on the direction that they're currently facing. Just extrude this
outward a little bit. It doesn't really
matter where you place it because we're actually
going to type in a number. Down here
at the bottom. We're going to type in
0.08 and then hit Enter. So that's about how far we
need to extrude these out. Then the last thing
we're gonna do is just zoom in down here. At any of the ones that you had, either a grouping
of two or three, you can add a little bit
of variety to them by just selecting a
single one of these. Then we're gonna go up
here where it says global. We're going to switch
this to local instead. So down here we can see
that before we switch this. So if I had it set the global, it's actually just using whatever the directions
are up here. So the actual world
coordinate directions. However, that means
when I move this in any specific direction,
it goes diagonally. Now, to change that, I can make it switch and
use the local orientation. So it will look at
the orientation of the object that this
face is attached to. In this case, the Log
that has been rotated. And it will use those as the new coordinates with local set. Now we can just select one of these faces here along the 2s. Pull it back. We're just adding a
little bit of variation. So that it's not just this
big a block that comes out. Maybe in this one I
pulled the middle one in. You don't have to do
it for all of them or you don't have to
do it as much even. And we can just
grab maybe one of the singles and make
one of them shorter. Maybe make that one
a little bit longer. We're just trying to kinda
rough it up a little bit, add a little bit of
variation to it. So it looks okay for now. We'll just do this quickly
on the back. Again. The back isn't quite as
important because this is gonna be facing away
from the camera. So I wouldn't put as maybe as much effort if you put a whole lot of
effort on the front, maybe do a little bit less on the back just to save
yourself some time. But at the end of the day, you can do whatever
you'd like here. And just add a little bit
of variation to these. Now that we've done
that, make sure that you switch back to global. Because in most situations we want to be working in global. But in this particular
case, local worked best. So before you move on, make sure you switch back
to global up at the top. Now we can hit tab to
exit our edit mode. And we're going to be adding a subdivision surface modifier. Make sure you're in
your modify your tab, which is this little
blue wrench icon with our Log selected. Go to Add Modifier and then
choose subdivision surface. We're going to
increase the smoothing on this Log a little bit more. We're going to turn this up
to two levels of subdivision, which will add a little
bit more smoothing to the edges of the Log here. In this case here, don't
worry about the kind of triangulation and sort
of weird smoothing we're getting around
the edges here. The material we're going
to be applying to this, the actual brown Log material is going to do a really good
job of hiding all this. So it's really not
important that this stuff looks a little
bit odd right now. It'll be almost entirely
invisible for the final render. Now that we have our Log done, let's work on the grass. Let's zoom out
here a little bit. Then we're going to hit shift
and a good to our Add menu, choose mesh, and then pick cube. Now we can go down here
to the bottom-left and chased the size of the cube to 0.08
and then hit Enter. Now go up to the top
right where it says cube. I'm just going to
call this grass. It enter. Let's move this up out of the
base of the Terrarium. We're just going to move
this up towards the front. Now let's zoom in and slide
it down so that the base of the cube just intersects with
the base of the Terrarium. Worried about here,
just a little bit of an intersection there. And we can also right-click
and then choose Shade Smooth. Now, the cute cube is going to look a
little odd right now. But once it's into more of a Grass shape and we
apply our smoothing, you won't notice this odd
shading that we're seeing now. Now let's go into our edit mode. By hitting tab. We're going to zoom
in here it three, to make sure that
you're in face mode. Select the backside
of your grass so the side towards the
mushrooms in this case. Then we're going to move
this so that it's about us about half as thick as it was before. It doesn't
have to be perfect. We just want to thin
it out a little bit. We don't want our
Grass to be so thick, we want it to be a little
bit more flat and then wide So we're gonna pull
that in there. So it's about half
as thick because it was never going to
select the top face, consume back a little bit. Then we're just
going to pull it up. So that's about twice
as tall as it was before or around there. So now let's zoom back. With this top face selected. We can now just hit E to
start the extrusion process. And we're going to extrude
this up three times, about the same length each time. So we're essentially
making it three times taller over there. And then we'll hit E again. Do I start extruding? It? Will move it to about here. It's not about three
times taller and it has two segments
here in the middle. Let's hit S to start
scaling this down. So we're going to scale the
top of this town so we can start tapering this
into a grass blade, will hit S, then scale
it down pretty small. You don't want to
make it so small that it collapses in on itself, but somewhere around here. So pretty tiny, kinda has a
chisel shape now at the top. Now we can hit one on our keyboard to switch
into our vertex mode. Then Alt Z. To make sure that we can
select through the model. We're going to start tapering the rest of this
Grass plate. Now. We'll start by
selecting up here, the top, the second
one down, I guess. I'm just going to scale this in. Our goal here is
to make this one a little bit bigger
than the top one. That way it has a cone shape. Then we're going to
select the next one down. Scale this one as well. So I'm going to actually
need to scale this top one down a little bit more. So we have kind of a, sort
of a pyramid shape may be a really square cone if you want to think
of it that way. That's roughly the shape that
you'd like to have here. Now we're going to
rotate our view port so you can see right
down the side of it. So we're looking down
the thin side of it. We're going to add a
little bit of a bend to this grass blade now, all we need to do is just drag select over the top one here. And we're just going
to pull this out. So somewhere around here. And we're just going
to pull these out progressively a
little bit less each time to make a gentle
curve to this grass blade. Now it will also get a
little bit more curved. Once we add the smoothing
modifier to it. We can also adjust
it up or down again in case it seems like you're not getting enough
of a curve here, you can move it up a little bit. Then same thing on
this side as well. So just move these
vertices left and right up and down
until you get a curve, something similar to mine. The more you curve
it, the more curved your Grass played wind up being. Maybe we will leave
it about here. Now let's exit our x-ray
mode, Alton Z exit. Then. We're gonna go over here
to our Modifier Tab, little blue wrench icon, click Add Modifier, and then
choose subdivision surface. And we're going to set
these both to two. Now that we've added the
smoothing, we can see that the, the overall shape
of the grass blade and is a lot more accurate. However, the bottom
now is really rounded. It's kind of losing
the base of the Grass. We're going to fix this
just like we fixed other objects where
the bottom is getting crushed or a corner
as being lost by just hovering over this area
down here at the bottom. Hitting Control R. To start our cut. Once we see our yellow line, we can click once. And then we're just
going to slide this down towards the base. So I would cite it just above
the base so you can still see it floating above the
base of the Terrarium. It's just giving
us a nice kind of squarish but still slightly rounded base to the bottom
of our grass blade. So we'll click there. And that looks
pretty good. We can now hit tab to exit
or edit modes. Since we're done editing
the blade of grass. Let's zoom in down here. Just make sure that it's
still intersecting. We might need to pull it
down just a little bit. Make sure that it's
still actually touching the base of the Terrarium. Can zoom out. And then we're going to start duplicating this single blade of grass into a grass clump. And then the grass clump
is what we're going to duplicate around the
rest of the Terrarium. So first let's make
this clump of grass. We'll start by
hitting Shift and D. That will start a
duplication process. But instead of just
clicking here, we're going to hit Y first because we want to make
sure that it moves just in the y-direction. We're
going to move it here. Then we're going to
hit shift in D again. Then this time we're
going to hit X, moves just in the x-direction. We're going to place that here. Now we have our three
different blades of grass. Now let's assemble them into
an actual clump of grass. Let's start with
this back one here. I'm going to hit R and then Z to make sure that only
rotates on the z-axis. I'm going to rotate it. So
essentially I'm trying to make a triangular formation here So once I rotate it here, you can see here I have
another group here. Then I'm going to
rotate this one to fill in this gap that we have. Someone to select
this one now, our Z, rotate this, it looks like
it'll fill that gap in. Slide it back. Might need to adjust the
rotation of this one just to match this angle
a little bit better. It's about there is fine. These
don't need to be perfect. We're just trying to
get them into a group. Not add a little bit
more variation to these. Let's scale each of these just so they're a little bit bigger or smaller than the others. Maybe we'll make the back
one here slightly bigger. So I'm just going to hit S and then scale this one
up a little bit. Then we'll select this
front left one here. I'm going to scale this one
down just a little bit. Now after I've scaled these, they might have
moved up or down. So I'm gonna have to move
this one down a little bit. So that a context just about
as much as the other one. And then this one needs
to move up a little bit. And that's because we
didn't move our pivot. But that's not gonna be a
huge deal here in a second. With your three blades
of grass now placed, we're going to attach
all these together into one single group. Select each of these
blades of grass. I have all three selected. Now hit Control and J, that'll join them
together all in one. And we can see here now
that our pivot is a little off to the side and
a little bit too high. So now let's fix that
for this object. So in this case we're
actually just going to manually place it into do that. We're gonna go up here to
where it says options. I'm going to twirl that down and then click the
origins button here, which means now our
transform tools will only affect the
origin of the object. I have that selected. Now I'm gonna go into my top
view so I can just click this little dizzy bubble
here. In a zoom in. In this case here I can
still see the highlights. I don't need to turn on X-ray, but if you'd prefer to, you can just hit Alt and
Z to turn on your X-ray. We're just going to
move this so that it's basically in the middle. Again, we can see here that this isn't a perfect triangle. So your origin also doesn't
really need to be perfect. We just want to
generally in the middle, I'm going to put it about here. So that's what it looks
like from the top view. Now I'm going to go
to my front view. So I can either do the
negative Y bubble up here, or I can hit Tilda
and then choose from. Now let's zoom in here. And then I want this dot down
near the base of the grass. I'm going to put it
right where it turns into this kind of
rounded portion. So right about there. So a little bit higher than the actual very
bottom of the Grass. Now with that done, we can
go up here to the options, then turn off origins. That way we can't move
the pivot anymore, the origin of the object. Then we can zoom back in and
everything looks correct. Now. Now let's hit Alt
and Z to turn off our x-ray mode and we won't need that for this next section. Now let's start
finding positions too. But this grass in the first one, we're just going to put it right up here against this Mushroom. I don't actually want it to
intersect with the Mushroom. I just wanted to be roughly next to it and we can
always rotate it as well. So if for some reason like the long blade is going
into your Mushroom, you can always rotate
it so that the, the gap allows for the
Mushroom to sit between it. Now we have our
first position for the Mushroom are for the grass rather next
to the Mushroom, but we need to make a whole
bunch more to fill out this. The way we're going to
do that is actually been making an instance again, similar to what we did
for the small Mushroom. So rather than using Shift
and D to make a duplicate, we're going to hit
Alt D. Will me move this to make an instance
duplicate of this. We're doing this for the
exact same reason as we use an instance for
the smaller Mushroom. That's because once we textured just a single one of
these grass blades, it will adjust every single
grass blade across the scene and we only have to texture
one of them rather than say, 15 different grasp lead
groups that we have, it'll just give us a lot more time to work
on other stuff. And I'd have to tediously go through each one of these and apply the grasp material
once we get to that point. Now I'm gonna go
through and make instance duplicates
using Alton D throughout the entire bottom of this
terrarium here and just place different size grass blades
scaling them up or down, rotating them to give this scene a little bit
more variation. So I'll see you in a moment. So at this point I've placed
all of my grass blades. You'll notice as I
was placing them, I was scaling sum up really
large, some really small. Just to give some variety
to the heights of things in the scene and
just make it overall a little bit more interesting. I was also using all D and binding on either to
the X or the y-axis to make sure I didn't accidentally push it down into the ground and then have to pull it back up or push it back
down each time. So these are just some
little tricks there to make sure that you don't have to constantly adjust the heights. Notice now that
we've placed all of our Grass over here on our list, we have a whole bunch of
different grass blades. We're going to clean
this up by putting them into their own collection
that will just put that we'll put that same collection inside
the Terrarium collections. We have a nested
collection within it. So I'm gonna do
is to go up here. I'm going to select grass and then go down here and
select the very last grass. So I have every single one
of my grass blades selected. Now. I can hit M on my keyboard, go to new collection. Now I can type in the name of this new collection and
I'm just going to call this Grass, grass it. Okay. So that'll create
this collection. Now, this collection
by default has started outside of the
Mushroom Terrarium collection. I'm just going to click and
drag this Grass collection into the Mushroom Terrarium
collection. Now it's in here. And then when you do
that, it's going to make this the
default collection. So you can see here it's highlighted this
little white box. Just click on the Mushroom
Terrarium collection instead so that this
becomes the default. With our Grass placed, we have just one more
thing left to Model. A cute little frog living inside the Log will be doing
that in the next lesson. I'll see you there.
7. Modeling the Frog: In this lesson,
we'll be modeling the last part of our terrarium, a cute little frog living
inside the log. Let's begin. Due to the frog being
relatively small and also affected by the depth of field we'll be adding to
our camera Later on. We're going to make
it fairly simple. Basically a cute little
blob with eyes and mouth. We'll start by
hitting Shift and a, bring up our Add menu. Go to Mesh and then
choose UV sphere. You'll want the
segments sets you 32, the rings sets at 24, and then the radius set to
0.13 m and then hit Enter. We can now go up here
to the top-right, double-click on the
word sphere and type in Frog, and then hit Enter. Now let's move this up towards
the front of our scene. Will eventually be moving
it inside the log. But for now, we're going to
work on it outside of it. Now we can right-click and
then choose Shade Smooth. Now let's zoom in down
here on the sphere. We're going to hit tab to
enter edit mode, one tensor, our vertex mode, and then Alt
Z tensor, our x-ray mode. Now let's switch into our
front view by either clicking the negative Y bubble or
Tilda and then front view. You can zoom in here again. We're gonna be using
proportional editing to turn this sphere into a wide
blobby shape at the bottom. So first let's turn on
proportional editing. The first thing
we're going to do is zoom in with very bottom, which use the
bottom-most vertex here. So I'm just going to
drag select over that. I can zoom out. Then I'm
gonna hit S on my keyboard. Then I'm going to scroll this, this fall off in a little bit. We don't want it so large. I'm gonna scroll it into
about this size here. And then we're just
going to scale this up here at the bottom. So maybe a little bit bigger. I want to make it to
a shape like this. So it's almost a gum
drop shape right now. It's not quite as flat as a gum drop if you
know what that is. But we want it to be flared out here on
the bottom like this. Now with this bottom
vertex still selected, we're gonna go to
our scale tool, some switching to scale, and then going to
scale this down just in the blue directions. So the Z, I'm going to flatten this out a little
bit on the bottom. And again, this is still using
the proportional editing. We're just going to
scale this until it's almost flat here on the bottom. If it start, it starts
going crazy like this. You can hold down Shift and that'll make things move
a little bit slower. You also find sometimes it just doesn't want to cooperate. So if that's the
case, just let it go. Control Z. And I'll start from a
different position. So sometimes where you
put your mouse when you hit your scale key, it will affect it,
it somewhat as well. So I'm going to
start here again. Now. I can just move this flat. So I want to move
it to about here. So I have a nice flat bottom
for the frog to sit on. And we'll leave it about there. Now I have this kind
of just sort of melted sphere blob shape
with a flat bottom. With our general shape done, we can now turn off
proportional editing. We're going to go to
our Modifier Tab. Add modifier,
subdivision surface. Just like all the other
times we've done. Then we're going to
set this to 2.2. So we want to levels
of smoothing on this. Now we can add alt and Z
to X at our x-ray mode. Then we're going to hit three
to switch to our face mode. Now we're going to choose where
the mouth of our Frog is. So in this case, we want it up near the top because we want the top of the face to be
near the top of the body. So I'm going to select
somewhere around here. So maybe right around here. It's not super important that you need exactly
where I'm at, but roughly the top quarter of this is where I'm selecting. Then I'm gonna be selecting
for faces here across. So I'm gonna hold down Shift and select two on either
side of this middle line. So now I have to in the left
and then two in the right. With these four faces selected. Now, we can rotate our camera to see what it actually looks
like in 3D space here. And then we're going
to hit Alt and E to begin the
extrusion process. But again, we want the option to choose which
type of extrusion. And we're going to choose
extrude faces along normals. Now this will allow us to
start extruding this inward. Just extruded in just
a random amount. We're going to actually
type in a number here. So just move it in
and then click. Now down here we're going
to type in negative 0.06, then hit Enter. So that's the depth that
we need now for our mouth. Now I can switch over
here to my move tool We're just going to move
this up so that the mouth is a little bit more horizontal. It's not going down at an angle, it's going more directly
into the body here. Now you might have noticed as we started extreme
these faces back, that this mouth
actually is nice and round where we would
normally think that this would be square
and very hard edge. And the reason that it's
nice and round is because of this subdivision surface
modifier over here. In this case, it's
actually helping us that the subdivision surface
mount of failure is really, really go into town on the smoothing here and it's really kind of crushing these corners. So in our case, it
actually plays to our advantage because
it's giving us these nice round
corners rather than the hard ones that were actually extruding it on the real model. Now let's continue to use this smoothing to our
advantage to give the Frog kinda like sort of a
lips on the top and bottom. We're going to start
out by just selecting the bottom two faces here. I'm going to hold Shift while
I select both of these. Now we're going to move
this down a little bit. We're giving them a little
bit of a bottom lip here, maybe the bottom of the jaw, whatever you'd like
to think of it as. Then we're gonna do the
same thing or at the top. So I'm going to select the
top two faces holding Shift. We're going to move these out. We're going to move
them up a little bit. Now we can see here
with just a couple of movements of some faces here, we actually have a relatively convincing Frog mouth shape. Now we can hit tab to exit our edit mode on
this because we're pretty much done at the
body at this point. Now we're going to
zoom out a little bit, hit shift and a, and then go to Mesh
and then UV sphere. Now we can go down here to the bottom-left and we're
going to change the radius to 0.04
and then hit Enter. And then the other
two segments and Rings should be defaulted
to what it was last time. But if for some reason it's not, segments should be 32
and Rings should be 24. With that done, now
we're going to move this sphere up to
where our Frog is, that we'll move it over here. Then we can right-click
Shade Smooth. You might have already figured
out what these are for, but these are
essentially going to be the eyes for our Frog. So let's move it forward a little bit when the
body of the frog, because we want the eyes to be a little bit towards
the front of the head rather than
directly on the top. A little bit further forward. And let me want to place these. So I'm gonna go into
my front view here. So the negative Y or the front, zoom in on where the eye is at and just try to roughly place it roughly where I think this I should be. I think right about
there looks pretty good. Number four, we create the
other eye on the other side. Let's actually make
the pupil for this I, we're just going to use
this exact same sphere and we're just going
to duplicate it, scale it down, and
then make that the pupil will hit Shift and
D Start making a duplicate. But rather than moving in
anywhere and clicking, we're just going to right-click. So it doesn't look like
we made a duplicate, but in reality we have, we've just right-clicked so it jumped right back to
the original position. We do still have two spheres
sitting here though. Now with this duplicated,
severe still selected, we can just hit S on our
keyboard and scale this down to roughly the size of the pupil that
we'd like to make. So you can make yours pretty
big, are pretty small. I'm gonna do mine
right in the middle. So if you'd like
to follow along, you can do yours in
the middle size, so about half size. We'll put it there. Now I'm going to rotate my camera again
and just pull this forward till it starts intersecting with the outside of this eye, the eyeball here. We have kind of like
an eyeball here and then the pupil
sticks further out. Now again, I mentioned
that we're going to be keeping this relatively simple. This doesn't need to be really insanely detailed because
for the most part, it's going to be hidden
inside this Log. It's also going to be
affected by the depth of field that we are applying
to our camera later on, which will make this
Frog kind of blurry and kinda pushed into
the background. I guess you could
think of it as, we can keep this
relatively simple. And it'll still
look like a frog. And we add a little bit more
interests to our scene, but we don't have to
go all out and making this a really detailed Frog with our pupil placed
on this right eyeball. We're gonna go back
into our front view. I'm just going to click this
little negative Y bubble. Then I'm going to hold Shift
and select the eyeball. So now I have the pupil
and the eyeball selected. Then I'm going to
hit Shift and D to start duplicating
both of them. And I'm gonna hit X this, this time to make sure I only
move it in the x-direction. And then just try to align
it up so that you have them sort of equally
placed on either side. So think about there
looks correct. Then if we want to
make sure that they're a little bit better
aligned here, if one seems a little
further off than the other, we can just hold down, Shift, select the other side. So now I have both
sides selected and then just move both
of them so that they I've lineup right here with the middle of where our mouth
and the top of the body is, maybe just a little
bit to the left there. Okay. This doesn't have to be perfect. It'll be a little
bit organic anyway, a little bit asymmetrical. And then the last
thing we're going to do as add some kind of puffy cheeks to the
side of our Frog here. So I'm going to select just
the eyeball on both sides. So hold down Shift, and select the two
larger spheres. Now I can rotate my camera so that I can see a little
bit better on the side. Then I'm going to hit Shift and D, just
start duplicating. Then I'm going to
move these just in the y-direction. So
I'm gonna hit Y. I'm just going to move
them a little bit forward. Now I can rotate around,
slide them down. So there are about
the same height as where the cheeks would be. You can also slide them
back a little bit. Now just select each one of
these and just pull them out so that they don't intersect
with the mouth at all. They look like the he
has air in his cheeks. Maybe he's going
for a Ribot here. It's not as big, puffy cheeks. And if you think they're
pushing out a little bit too far and you can always
slide them back. That'll just make the cheeks
a little bit smaller. So if you want smaller cheeks, a little less air in them, you can do that or you can
leave them really puffy. Like we have all your
on the left side. I like the more puffy look. So I'm just going to Control Z that, but that's up to you, however you'd like to do it with the last piece
of our Frog created. Now let's begin the process
of combining all these pieces together into one
single frog object. So the first thing
we need to do is we're going to select the body. And we're going to apply the subdivision surface modifier that we're using to smooth it out because we don't
apply this first and then we attach all these
together without applying it. It's going to apply
the same level of smoothing to every
single object. Don't want that because these spheres here are
already plenty smooth enough. They don't need to have
any more geometry added. So first let's apply this
with the body selected. We can go over here to our modifier panel,
go down to the, the drop-down here,
and then just choose Apply with that Modifier
applied to the body. Now we can safely attach
all these together. We're going to start with selecting the one of the cheeks. It doesn't really
matter which one. Then we're going to hold
down Shift and go around and select every piece of the
model except for the body. Do not select the body yet. We want to select that last. We'll go through, select
all these pieces, the individual pieces making
up the cheeks and the eyes. And then when you're
done with that, now select the body last. The reason we selected the
body last in this case, it's because the last object you select when you
hit Control J will be the parent or the base objects for all
these join together objects. So it will retain the name frog. We won't have to rename
it. And it'll retain the, the object origin of the Frog, which is right in the
center of the body, which is what we want. We don't have to
replace it again. If it had chosen
and say the cheek, it would have moved the
origin for this Frog all the way over to where the
cheek is currently, by, by selecting the body last or circumventing
all of that and making sure that Blender
knows that we want the body to be the
base object for this. So now you have
everything selected, including the body last, we're going to hit Control and then J to join them together. Now we can see here,
just like I said, it left the name frog. And the origin for the Frog is right in
the middle of the body. Now the last thing we
need to do is actually just placed this
Frog inside the log. We can just zoom our camera out. And we're going to
move it back here into the Log and we'll hide it back in the
backside a little bit. I wouldn't worry
too much about it clipping through here
on the bottom-right. But if you'd like to just
make sure it doesn't clip, then we can hit R
and Z to rotate it. So that's looking outside the
Log maybe a little bit at an angle towards the general
placement of our camera, which is going to be out here. I think he looks pretty good
with our little Frog done. We've now completed the last
piece of our terrarium. In the next lesson,
we'll be setting up our render scene
and the lighting. I'll see you there.
8. Lighting the Terrarium: In this lesson,
we'll be setting up our render scene
and our lighting. Let's begin. We're going to start by creating a curved background
plane for our terrarium. First, go up here
to the top-right, and then click this
little white box next to the render
scene collection. That'll ensure anything we
create now will default into the render scene
collection rather than the Mushroom
Terrarium collection. Now we can go back
down to our viewport. We're going to hit shift and
a to bring up the Add menu, go to Mesh and then choose playing with our plane created. Now we're just going to hit S on our keyboard
to start scaling. We're going to type in nine to scale it up nine times
and then hit Enter. Now let's rotate
our cameras down. Then we're going to
pull this plane down. So that's just barely
intersecting with the bottom side of
the Terrarium base. I'm just going to
move this down in the z-direction
using my move tool. And I'm going to pull it just until this starts poking
through the bottom here. That way I know it's
actually touching. Now I can rotate
my camera backup. Then we're going to hit Tab
to go into our edit mode. Then to, to go into
the edge mode. And now we want to select
this back edge back here. So that's the edge directly
behind the Terrarium. So I'm just going to drag
select over top of this. Now let's zoom out
a bit and rotate our camera. Back here. Now we're going to
hit E and then the Z to make sure that we're extruding it just
in the z-direction. We want to extrude this up, basically as tall as it is wide. So we're kind of giving
a second side to this kind of invisible box
that we're making here. We'll pull it up to about here. This doesn't need to be perfect. The only thing that's
important here is that it's high enough that once
we place our camera, we won't see the
top of the plane. We want to make sure that
this is a fully solid, full-color background that we're putting behind our terrarium. Now we can drag select
over this corner edge. So we're just going
to drag select here. That's selected. Now we can hit control
and be to start babbling. And we're going to drag
this bevel out until just about touches
the Terrarium itself. So we want to stop a
little bit before. We don't want the curve
to go so far that it starts intersecting
with the Terrarium. So we're going to
stop it around here. That looks fine. Then the amount of segments
that we want here is 20. So we're just going to type in 20 to make sure that
it's nice and smooth. Now with that done,
we can hit Tab, texted our edit mode, and then right-click and
choose Shade Smooth. Now before we move
on to lighting, we want to place our
camera in the scene. We know exactly where to place our lights when it
comes to lighting step. To start with, move
your mouse all live to the very top
left of your viewport. And you'll notice as you move to the very top left corner, it turns into a plus sign. So once it's turned into the
plus sign, click and hold, and then drag over to the right and you're going to
drag out a second viewport. So now we can determine what we want to see in the left viewport while we work in the right
viewport on this left side, now we're going to click
this little camera button, which is going to put
us into the view of this camera here that we
have on the right side. This camera here is exactly what we're seeing through right now. And you can see
when I selected it, it actually
highlighted the frame here showing us the
bounds of this camera. Notice that our default
camera doesn't really have a great view of our
terrarium currently, but luckily, we can move it. So by default, the typical
way that you would move this camera would be actually
just to use your move tool. So you'd have to move it up
and then you'd move it over. And then you could
maybe rotate it. But you can see how
tedious this might be because it's difficult to use these controls here to visualize what it's going
to do on the left side. Now luckily, there is an
easier way to do this, which I find a little bit
more intuitive because it's similar to the way that we've already been moving
around the viewport. So what we're going
to do is go over here to our left viewport. We're going to hit N to
bring up our side menu here. Go down to View. And then down here where
it says View Lock. There's two different
checkboxes we can choose. The one we want to check
is camera to view. So if I make this a
little bit bigger here, you can see what it says. So I'm going to check
camera to view. Now we can hit N
to hide this menu. Now we'll notice that when we use our camera controls
here on the left side, this allows us to actually
rotate the camera as this, as if we were moving it with
our move tools over here. But it's a lot
more intuitive and similar to how you used to moving around
in your viewport. Now we'll move around
in our viewport here just using our regular, normal viewport
Can controls here. So rotating around,
zooming in painting, we can place our camera
exactly where we want it. I'm just going to zoom in here. I want to make sure that I have a pretty close shot here because it's regular, relatively square. Our object here and our frame is also pretty square as well. I don't want to
overlap anything. I don't wanna go to
the point where I'm zoomed in so far that's
cutting off anything. But I want it to
be pretty tight. I'm going to have
a little bit of space here on the
top and the bottom. Then I'll just try to center the best they can left and right. You can also rotate our
camera down a little bit if we don't want to be so
high above our terrarium. So maybe we'll go a
little bit lower. Angular camera up a little bit. That way we can be
a little bit lower and see more of the Terrarium. Also allow us to get a little
bit closer to it as well. Because I basically
want to just fill up the entire frame with this terrarium since we've
worked so hard on it, we want to see the most
of it, but we can. Okay. I'm pretty happy with
my camera position now. So the one thing I need
to remember to do is hit N again to bring
up the side menu. And then I want to make
sure I uncheck camera view. Because if I don't
uncheck camera view, then I accidentally rotate my view port here
on the left side, not thinking about it. I'll actually move my camera. And I don't want to do that. Once I've found the
position for my camera, I wanna make sure
I leave it there. So make sure you
uncheck camera view. Now hit N to hide
that side menu again. And then you'll notice when you rotate this camera
here on the left, it actually just pops you
right outside of the camera. So it's a good way
to make sure that you don't actually
accidentally move it. But that means once you've
turned off that checkbox, now you either have to move the camera with these
controls again, which again, I find
a bit tedious. Or you have to go back
into that side menu, check that box back one, move your camera and
then uncheck it. To get back into
your camera view. We can click this
little camera button here that'll help us in. Now we can actually
zoom in on it as well, so we can see a little
bit more of what this camera is seeing without actually zooming the camera in. I'm just going to zoom this
in as much as I can so I can see as much of what my camera
is seeing as possible. Now you notice here
on the left side that this background plane is just outside of where
my camera's view stops. In this case, it's fine. However, if you were
setting up your camera and for some reason the
angle that you've chosen, this is actually showing on
the inside of your camera. So I'm just going to move mine to show you an
example of that. You don't have to move yours. If I select this plane
and I move it over, and this is what your camera, it looks like you're
seeing just a little bit of a sliver of the
background here. You can just move your
plane over to accommodate that to make sure that you're seeing basically just plain
behind your terrarium. With our camera position setup, let's apply a quick
glass material to our glass dome so
that it doesn't block the lights that
were about to put in. Because we will remember that this dome isn't actually
see through right now. It's actually still opaque. But in the viewport It's showing us just this kind
of wireframe cage. We can see an example
of this by switching to our rendered view here
on the left viewport. So to do this,
you're gonna go up to this top bar up here. You're going to hold down
your middle mouse button. Click in your mouse wheel. That'll allow you to pan
this left and right. Because this viewport is
so much smaller over here, we have to pan to see what the entire viewport
would normally show. In this case, we're
going to choose this far-right
little bubble here, and this is our
rendered viewport. So when we click this, it's going to basically give us a quick approximation of what the render will look
like in cycles. Now we'll notice right away that this is no
longer see-through. And that's because it's
just an opaque dome with no material on it. So let's quickly adjust
the ambient light in our scene before we apply
this glass material. To do this, we're
going to go over to our world Properties tab and kinda looks
like a globe here, a little red globe. Then we're going to
click the color here. And we're gonna be changing
this color from this kind of dark gray that it's currently
projecting into the scene. We're going to change it to
the sort of a light blue. So to change it, after
you've clicked this, you'll see you have a
color wheel up here. And then we have a hue, which is the H saturation, which is the S, and then
value which is the V. And then a is for Alpha. We won't really be
using that. In the hue. We can just click on the H here and we're going to type in 0.53. Then hit Enter for
the saturation. We're going to type in
0.4 and then hit Enter. And then for the
value, we can just turn this all the way up to one. Now we have a really
bright blue value that's being projected into our scene from all different directions. That's essentially what this world properties color is doing. It's just projecting this
even shadowless light across the entire scene. Now we can also turn down the value of this
because we're gonna be adding in lights into our
scene that we're hand placing. We don't want to
be competing with this kind of
overwhelming blue light. So we're going to turn
this down to just 0.1 under the strength. And that'll make
it a lot dimmer. And it's just
adding a little bit of blue light in nursing. Now we're ready to add the
glass material to this dome. So we're going to
select the dome and you can do that either on the
left or the right viewport. They share the exact same world. Whatever you do on the
right side is gonna be visible on the left
side and vice versa. So just select it
wherever you'd like. I'm going to select
it on the left side. Now we're going to go to the
material properties tab, which is down here. It's this little checker box
circle. Right-click that. And we can see here
that this object currently has no
materials applied. So we're going to
add a new material. I clicking the New button. We can even rename it with right now it has a default name. We're just going to call this
glass and then hit Enter So that we know what
this material is. Now we can scroll down and
let me see a whole bunch of different properties
here for the materials, we're only going to be
changing a few of these. The first one that we want
to change is the base color. We're just going to
click on base color. We're going to turn this all
the way up so that it's pure white right now is an 80% white, which was just very
slightly gray. We want ours to be
entirely white. Now we can move down
the list and we're gonna go to specular, which is directly
below metallic here. So we're going to
go to specular, and we're going to
set this value 2.7. What the specular is doing is essentially the
higher the number, the more reflective the
objects lower the number, the less reflective it is. If it's at zero, it's
not reflective at all. And if it's at one, it's the
most reflective it can be. We're going to make
our glass pretty reflective by setting it to 0.7. Now we're gonna go down here
to where it says roughness. We're going to set this
all the way down to zero. This slider here affects how sharp the reflections
caused by the specular slider. Our, in our case, we're setting the
roughness to zero, which means this object
isn't rough at all. Which means our reflections
are very sharp. If we turn the roughness
all the way up to one, that would mean our
object is very rough. And the reflections caused by the specular slider are also
going to be very rough, which means there'll
be very blurry. We want our glass tab, nice
sharp reflections on it. So we're gonna set it to zero. Then lastly, we're gonna go
down here to transmission. Transmission effects how
refractive an object is in refraction essentially
just means how much the light
can pass through it. So this is essentially
the slider that makes something class or not glass. So right now it's set to zero, which means it's not glass, It's not letting any
light pass through it. If we turn this all
the way up to one, we can see right away that it's now basically become glass. With that final property set, we're now done with
our glass material. Now let's begin the process
of actually lighting or seen. The first thing
we're going to do is if you have this default light still in your
scene and you can see here it's still in my scene. It's casting some light
and chimps shadow. We're actually just
going to delete this. We're not going to use
this light right away. Just select this light
and then delete. Now let's add a new light. We're going to hit shift and
a to bring up the Add menu. This time instead
of going to mesh, we're gonna go all the way down here to where it says light. Then we're going to choose sun. So we've now created our
sunlight and it's down here. It's kinda sitting underneath the Terrarium and
that's fine for now. We'll be repositioning it. But before we move
it, Let's just adjust some of these
parameters over here. So first let's change the
color and we're going to make it a little bit more,
more than it is now. Right now it's basically white. We're going to add a little
bit of warmth to it. So we'll go up to the
H, which is the hue. Click that. We're going to set this to 0.14. Hit Enter. Now go to the saturation
and hit 0.32, hit Enter. Now we've made the light
kind of this sort of a yellowy warm color to
mimic the sudden late. With that done, now let's
actually position this light. The first thing
we're going to do is just move it up a
little bit higher. So right now it's
a little too low. Let's move it up here. Then. Actually let's go into
our front view here. So it will make it a
little bit easier. So hit negative Y or just the
Tilda and then front view. So let's move at all
the way up here. We're also going
to move it off to the right because
we want our son to come in sort of an angle right now it's pointing
directly down. But what we're about
to change that. Now we can hit R on our keyboard
here to rotate the sun. And we can see on the left side here
it's actually updating this view so we can see where our shadows
are being placed. We're going to rotate
this around here, maybe about a 45,
40 degree angle. Maybe move it up a
little bit about there. Now let's go into our top view. So we're gonna go into
either the Z button here, so we can click
little Z button or again Tilda and then top. Now let's move it towards
the front of our terrarium. It's going to move it all
the way up about here. And then again, we're
going to rotate it, hitting the R key
to start rotating. And we're going to rotate
it here at an angle. And you can see on the
left side here I'm, I'm seeing this shadow. I want to make sure
that that shadow stays within the frame. So I'm just going to rotate
it to about right about here. That way the shadow stays
with inside the frame, but we're still seeing the
sunlight come in at an angle. Then the last thing
we need to do for this sunlight is just make
it a good bit brighter. So right now we can see it, but overall it's a little dark. So we're gonna go down here
to where it says strength. Then set this to five and then hit Enter with our
main light done. Let's add a few more supporting
lights to our scene. We're going to hit shift
and a go-to light. And this time we're going
to add an area light, which is here at the bottom. Now on the right side here, we're going to need
you to zoom in here and then rotate our camera
down so that we can see. Now we're going to
lift this light up. We're going to have this
kind of coming down from the inside top of the Terrarium. So it's gonna be casting light downward inside
of our terrarium. Before we do anything
to the light though, let's rename it and we're
going to call this top light. I way we can tell at a
glance with this latest for. Now, let's begin changing some
of these parameters here. So first let's change the color. And again, we're going to
make this kind of warm. So we're gonna go to the hue, set this to 0.1, it entered. Then we're going to
set the saturation up to 0.7 and then hit Enter. So this one's a good bit warmer than the
overall sunlight. And that's because this one
is more of an accent layer. This is adding to the scene. It's not the main light
for the entire scene. Now we can change the power. So this is going to make
the light brighter, and this is being
measured invisible watts. So these numbers here aren't
going to make a whole lot of sense because this isn't
the typical wattage. So when we think
of a light bulb, like a 40 watt light bulb
or 100 watt light bulb. That's not actually
what this is measuring. These values were typing in here are going to seem
a little bit high. But that's just how
the Blender is, is using these, these units to cast
this late in the scene. In this case, we're
going to type in 75750. Hit Enter to make our
light nice and bright. We're going to change
the shape of this slide. So this is one of the
cool things about area light is you have a few
different options for the shape. In this case, we're going
to choose disk so that it matches the shape of
our, our terrarium here. It's going to make it a circle. Now let's make this light
a little bit bigger. And by changing the
size of the light to 10.6 m and then hit Enter. We can see here it's made
it a little bit bigger now. Now let's go back
into our front view. Then we're going to drag
this light up until it just about touches
the inside here. We don't want this light to
intersect with the thickness, the walls of this
terrarium glass. So we can see the thickness here and we can
follow it down here. So right about here is where the thickness of this glass is. We're just going
to drag this up as high as we possibly can without going through that
thickness of the glass. For me, seems to be about here. So I can see that the glass
wall starts around here. So I'm just gonna give
it a little bit of breathing room and I'm
gonna leave it about there. Well, notice here on the left viewport that
this light leaves an ugly glowing circle at the
top of the Terrarium here. Let's get rid of that so that
we can only see the light, but not the circle as well. To do this, we're
gonna go over here to the objects properties tab. We're going to click this. Now scroll down to visibility. Twirl that open, scroll down further until you see
you re visibility. Now we're going to
uncheck transmission. So essentially what we're
telling this late to do is be visible in all other aspects
except for transmission. And we'll remember
that transmission is what makes this glass
material see-through. We're basically just
telling this light. You can calculate and you can make shadows, you
can do all of that. Just don't show through
transmissive objects, in this case the glass dome. So we get all the
life that we want. We don't have to
see this kind of ugly white circle sitting
at the top of our scene. So the last light
we're going to add is a cool blue rim light
on the right side. Just add a little bit more
color in some kind of interesting reflections and different shadow
patterns to our scene. We're going to go over here
on our right view port. We can rotate it a little bit. Now we're going to
hit Shift and D to make a duplicate
of this light. Just move it back here. We're gonna be putting it on
the back right side here. Before we do that, let's rename the light right here where
it says top light, 0.001. We're going to
double-click that and rename this to rim light. Now let's go back
to the settings for the slight making go down here, it's where this little
green light bulb is. This is the object
data properties. And let's change
the color of this and as well as some
of the other things. The first thing will
change as the Q. We're going to set this to 0.47. Hit Enter. We'll change the saturation
up 2.93 and then hit Enter. Now let's adjust the power. So we're gonna make this
a little bit dimmer. We're going to set this
down to 500 watts. It's already set to
disk, which is good. Then we're gonna make this
light much larger so that the overall light being cast from it is a
little bit softer, as well as making the reflection that we see also a bit larger. We're going to set this to
3.5 and then hit Enter. So first let's go
into our front view and start placing this. I'm just going to go
into the front view. I'm going to hit
R to rotate this. I want this to also come in
sort of at a 45-degree angle You can move this up
a little bit as well. Right about here is fine. Now let's go into our top view. Then we're going to
rotate this again back towards the, the Mushroom here. Getting a little, kind of move my mouse a little bit further
away so it moves slower. So put it right around here. Then we can either
move it a little bit closer or leave
it where it's at. Let's see if it looks any
better by moving it closer. It seems like the light
stays pretty much the same. However, we are getting a little bit more reflection here. So I'd say this is a little bit more of a matter
of preference. If you'd like seeing
this reflection here, then the closer
you put the light, the more reflection you'll get the lay to also be a
little bit brighter, but this is also a
dim light right now, so it's not doing a ton. So I'm gonna move mine
right about here. I'm actually looking over here. As I move it on the right side. I'm using the left side just as a guide to where to place this. I'm going to leave it
right about there. That looks good. Now we can see that this
light that we just placed, this adding some cool blue
lighting here in the back. It's kind of filling
in the shadow. We're also getting a
little bit of blue on the inside here on the
sides of these mushrooms. This also has the
added benefit giving the side of the glass here a
little bit more definition. So because of this glass
is relatively clear, sometimes it's hard to tell exactly where the
glass dome stops. So right now having
this reflection here kinda gives us a
visual border to say, alright, this is where
the glass stops here. And then on the left
side we're actually seeing some reflections from the scene that
gives us an idea of where the glass stops
on the left side. With our last light placed. There's only one final
step, love to do. Well, notice that
the shadows cast by her glass dome are
surprisingly dark. That's because by default, shadow cost ticks
are not enabled. So we can see here that
this shadow here seems relatively dark given
the fact that we have a clear glass
stone casting it. Shadow cost sticks or
refractive effect that causes light passing through
a clear object to be focused into beams. This is most noticeable in
glass or water in real life. Now let's go through
the process of enabling these cost
X within our scene. We're going to start
by going through all three of the lights
that we've placed. Then we're gonna go
down here beneath the areas where we were changing
the power and the color. We're going to check
one shadow cost sticks. When we check this
on, we'll notice nothing has happened
and that's because it's shadow cost ticks or
a multipart process. There's a whole bunch
of different checkboxes that we need to check one to make sure that the shadow
caustic actually works. Right now, I've had my rim light selected and I checked
shadow talk cost exon. So now let's select my son. Go down here, check on
shadow cost sticks. Again, we'll notice
nothing is updated. Same thing with the top line. Check own shadow cost sticks. Now that we've told all three of our lights to cast
shadow cost X, we need to actually enable
shadow cost sticks within the world to even let those lights cast
the shadow cost X. We're going to go over here
to our world Properties tab, which is this little red globe. Now go down to settings. Then we're going to
go here underneath the surface and check
on shadow cost X. Again, we'll notice nothing
has happened, however, and we have now let
the entire world enabled shadow cost X. So the last two steps that are missing is we haven't
actually told the glass dome to allow shadow cost six
to pass through it. We haven't told
the ground plane. So this curved background
to receive a shadow cost X. So let's start with
the glass dome. We'll select the glass dome. Now go over here to
our object data. This little orange box. Scroll down to Shading,
twirl that open. Now on this right
here we see cost X. In this case, we need the glass dome to
cast shadow cost X. So the light passing
through this, we'll create a
shadow that we need the dome to know that it's
allowed to cast shadow cost X. Then the last part
of this sort of multi-step puzzle is to
select our background plane. So we now have our curved
background plane selected. Could see that here. We need to check on receive shadow cost X. Now that all the parts of
the puzzle are in place, we've told our lights to make sure they're casting
shadow cost X. We've told the world to allow shadow cost six to exist
in the first place. We've told the glass
dome to allow the light passing through it to create shadow cost X on
the other end of it. And then we've told
the plane to receive this cumulative shadow
caustic on the plane itself. Now we notice over here on the
left side that this shadow for our glass dome makes
a lot more sense now, It's pretty much entirely
clear in the flat sides. Then on the areas here on
the left where it's going the lady is going through
the thickness of the glass. It's a little bit darker. In our next lesson,
we'll be adding color to our render with
stylized shaders. I'll see you there.
9. Shading the Terrarium: In this lesson, we'll
be adding color to our render with
stylized shaders. Let's begin. We finished the glass dome shader
in the last lesson. Now let's move on
to the Mushroom. Start by going up here
to the very top and choosing the Shading tab on
the top of your viewport. This one, I'll move us
into the shading workspace within Blender on this
top view port here, like little camera icon like
we did on the last slide. So that'll put us
into our camera. Now we can zoom
back a little bit. We can see our entire scene. Now we're going to switch
back into the rendered, the more similar to the cycles viewport for the
top view port here. We're going to do that by the little button here
on the top-right. Now it looks like just like what we saw in the last lesson. Now we're ready
to begin shading. So we'll start by selecting
the big Mushroom. So we can just select it
here in this viewport. Or if you'd prefer, you can make this list a
little bit bigger. And by grabbing this line, then just scroll down
and choose big mushroom. Now in the bottom center, we're going to click
the New button. And that will make
a new node group, which is our going to shade
this for the big Mushroom. If this is the first
time you're seeing the node system within Blender, let me give you a
very brief rundown. So each of these squares
we're seeing down here on the bottom are called nodes. Then we can zoom in and out
of them with our mouse wheel. And then we can also
click it into pan, left and right. So
we can see more. These nodes pass
their attributes from the left towards the right. In this case, this node
here is giving all of its attributes to the
node here on the right, which is the material output. Each node will have
colored dots on it, which are called sockets. You can pass the properties
of a node on the left, a note on the right,
by connecting it's sockets together with
wires like this. To add more complex effects, you'll simply add
the appropriate node and then connect it to the other nodes in the system using the sockets and wires. We're going to keep most
of our materials very simple and stylized
for this project. So we won't be using many
nodes for these shaders, for this stem and spots
shader we're about to make. We're only going to be
adjusting the parameters on this default principled
be SDF node. Now before we begin, let's
rename this material. So we're gonna go up here where
it says material H2O one. We're going to type
in stem and spots. That way we know
what this material is actually applied to. Let's start by zooming in down here and we're going to
change the base color. Let's select the color here. I'm really just going
to make this kind of a very light cream color. So we're gonna go up
here to the hue and type in 0.1 and then hit Enter. Now go down to the
saturation type in 0.24. Hit Enter. Then we can leave
the value at 0.8. So we can see here
that we just made this slightly cream
colored a little bit warm. Now let's click in our
middle mouse button here to pan further down this list. We'll notice that
this principled be SDF shader that we have here is actually the
same thing we were looking at when we were
working on the glass material. This just showed a quick
preview of it with no nodes. Whereas in this
case it's showing the entire node as well as any other node that
might be attached to it. Let's go down to our roughness. I'm just going to
zoom in down here to where it says roughness. I'm gonna click it
and then hit 0.65. Make it a little
bit more rough so the reflections
are a little bit, little bit less sharp. We'll leave this
specular as it is. 0.5 is fine for that. Now let's move further
down the list. We're gonna go up to clear coat. And we're going to
set the clear coat all the way up to one. And clear coat is an
additional layer of reflection on top of the reflections
caused by the specular. This is essentially like the clear coat on
a car is paint. Now let's set the clear coat
and roughness to point to. This slider affects the
sharpness or blurriness of only the reflections caused by the clear coat,
not the specular. Specular and clear coat are
two different parameters. Now let's zoom out on this node. We're gonna go back
up towards the top. Now let's zoom in where
it says subsurface. So this subsurface
slider effects have property known as
subsurface scattering. Subsurface scattering
happens when light hits a surface own object, but doesn't immediately stop. It continues through
the surface and bounces around
inside the object. This is most common
own materials like candle wax or a glass of milk
or a glass of orange juice. You can also noticed this on
people such as their ears. If someone is standing with a bright light directly
behind them. Now let's change the
subsurface value. And we're going to set this
to 0.25 and then hit Enter. This effect will be really
subtle in this material. However, it will make a lot
more noticeable differences in the future materials
we add to the scene. Speaking of future materials, Let's move on to
the cap material To create the cafeteria, we're gonna go up here to
where it says slot one. We're going to throw that down and now hit the little
plus sign next to it. This way, add another material
slot to the Mushroom. Now that we have this
new slot selected, instead of adding
a new material, instead we're going to click
this little drop-down here. And then we're going to
choose stem and spots again. So essentially what
we've just done is made a new slot and then apply as an identical copy of the stem and spots
material to the cap. Now if we want to make any
adjustments to this material, we have to branch it. Because if we make
any changes to this, if we change the color to red, going to change every one of this instance of stem and
spots across the entire scene. So our entire Mushroom
will turn red. Now we don't want that. So we're going to
branch this material. So to do this, we just need to click this
little number here. This two is telling us that this specific material
stem and spots is applied to two
different unique objects. So to break this, we're just going to
click this number. And now it'll make
this version of it stemming spots 0.001 unique, which means we can now change the color or change
any of the parameters, and it's no longer affecting the original stem
and spots material. Now let's rename this to cap, cap and then hit Enter. The reason we did
this method of using a duplicated material
and then branching it to rename it is because we've retained all of these changes
that we've already made. So if we know that
we want the cap to look basically the same, except just have a
slightly different color. We don't have to go
back through here and change all of these
values again, they're already set up
because we use it as a duplicate and then just
branched it from there. Now let's tell
Blender where exactly we'd like this cap
material to be placed at. So to do this, we're
gonna go up here and we're going to switch
back to our shaded view, which is the solid
circle icon up here. We can select that. Now
let's zoom in a little bit. We're going to hit tab
to enter our edit mode. And then 310 to our face mode. Now hover over any one of these faces here
for just the cap, we don't want to
hover over one of the spots are the stem. We just want to hover over
the cap and we're going to hit L on our keyboard
to select linked. So it's going to select
every single face that's linked to that face. In this case, it's just going
to select the entire cap. Now we're going to go over
here on the right side. We're going to click
this little button here, the material properties tab. Then with our cap and material selected up at the top,
you just click on that. Then we're going
to click Assign. It's now we've assigned this cap material just to
the selected faces here, which is in this
case just the cap. We can now hit tab to
exit our edit mode. Go back up here and
two are rendered view, which is the top rate bubble. And now we are free to
change the color of this gap material and
we should only see it visible now on the
cap of the Mushroom. Let's move up to the top here. We're going to click the
base color for the hue. Set this to 0.995, the saturation to 0.99. Then we're going to
leave the value at 0.8. Now that we can see
the red on our cap, Let's adjust one last color. In this case, we can see
that that we have a redcap. However, it's kind
of washed out and that's actually because
of the subsurface. So down here we can see
the subsurface colors. So this is the color that the subsurface scattering is causing with inside our object. In this case it's white. It's making our red
kind of washed out. So let's change this to a red, pinky color so that we can add a little bit more saturation
to the cap of our Mushroom. We can do that by going up here, switching the hue
2.95, it enter. Then we're going to
change the saturation to 0.99 and then hit Enter. We can see right
away the color for our Mushroom is much
more saturated now. It's this kind of nice
red, pinky color. In most cases when you're
using subsurface scattering, you want the subsurface
color to be pretty similar to the base color that
the object actually is. We don't want to have green inside of our red
Mushroom bouncing around. It's going to actually affect
the overall color of it. In this case, in
the previous case, we saw that the
white was making the red really kind of washed out. So now we've added this red
pinky color and we're getting a nice red pinky hue to the edges of this Mushroom
with the cap material done, we're now done with
both of our mushrooms. As I mentioned in
previous lessons, the reason that both of
these mushrooms were textured together
is because we used Alt and D when copying them to make them
instances of each other So they share all of this data. So we made our job
really easy by texturing just a
single Mushroom. And then the other one
automatically updates using the exact same materials and placements of those materials. Now let's move on to
making the grass material. So let's select any
one of these grass. It doesn't matter because in
the case of the mushrooms, all of these Grass should
also be instance because we use Alt and D to make
duplicates of them. So I'm just going to
select this big one on the back here That's
easy to select. With our Grass selected, we can now go down here. And instead of making
a new material, instead we're going to
choose this drop-down here. And we're going to
choose the cap material as a base for this. So all of our Grass is going
to turn red right away. But we know that
we can branch this now by clicking this little too. I've clicked that.
And now we can adjust the colors of this material to make it look more like Grass. Before we get too far though, let's make sure we
rename this to Grass. We note its four. Then we can go down
here to its base color. We're going to change
this to a green color. So we're going to set
2.3 and then hit Enter. We can turn the saturation
all the way up to one. Then we're going
to make the value good bit darker by setting this to 0.25 and then hit Enter. Now was a quick note on
this color slider here. We've been mostly just
typing in values here, because for this tutorial, I know exactly what
colors I'd like to use. But if you were just trying
to figure out a color and you didn't really have an exact
value that you had in mind. You can also click this
little white dot up here. And just move this exactly
where you will like. And all those numbers down
at the bottom will update. To make the color either
darker or lighter. You just slide this
slider up or down. So in this case, I'm gonna
go back to the values that I had originally
for my grass. But if you were just looking for a specific color or if you if you didn't have a
specific color in mind, rather, you just wanted
to have this set to some kind of arbitrary color where you just kinda
feeling it out. You can just use
those little dots to adjust the color freehand. So now I have my colors
setback to what it was. And now we can adjust
the subsurface color. I'm going to click on the
subsurface color box down here. Then I'm going to
set the hue 2.19. Turn the saturation up to 100%, are set to one rather. Then I'm gonna make
the value set to 0.38 and then hit Enter. So if I click off here, you can see we have the base color is a nice rich Grass green. And then the subsurface color, I wanted it to be a little
bit lighter so that the light bouncing around inside the
grass is a little bit lighter, illuminates the Grass almost. And I made that a
more yellowy green. Later on. We'll also be playing
the same grass material to the base of our terrarium, at least just on the inside. But for now, let's move on to the Frog and apply
these materials. Now let's zoom in
down on her Frog. Now let's select the frog and then choose from the
drop-down menu here. And we're going to choose grass. So we're going to use
the grass as a base. So after choosing grass, make sure you branch it by
clicking this little too. Again, this won't
always be a two. This is just specifically
too because it's showing the amount of
instances that this shows up. One, in this case, grass is being used
twice within the scene. So when I click this, now
it's essentially showing one. It just doesn't exist
because you don't need to know that it's
only on one single object. Now that we've branched this, let's call this frog
instead. It entered. Then we're going to
change this base color here to be a bit darker. We're going to set
the value here, 2.06. Then we're going to set the
value here to be a little bit darker by setting it to 0.068 and then hit Enter. So with that done, the green material
for the Frog is done. However, we still have to other materials we
need to make for them. We need to make the eye, as well as the pupil. To do that, we're gonna go down here to where it says slot one. Then we're going to click
this Plus button two times because we need two more additional slots for this frog. So let's select a slot t2. It's just by clicking on
this empty space here. And now we can click
the New button. We're going to call this eyes. So EY ES, eyes will go down to the subsurface in set
this to point to. So it's a little bit less subsurface than the other
materials we've been making. You just want to make
sure that both of these colors here are
set to pure white. So I'm just going to turn
this all the way up to one for the value and then
zero for both of these. Then same thing for
the subsurface. Set these both to white. Then before we apply
this white material, let's first go to slot three. So we're going to click
on this drop-down. Choose slot three, click New. We're going to name this pupil Pup, IL. Hit Enter. And we're going to set
the base color for this, all the way down to black. So you can either just select this little dot here and
pull it down to black, or you can just slide
the value slider down here all the way to the
left, so it's at zero. In this case, we won't be adding any subsurface to this because we don't want the light to pass through these black pupils. Now on the top view port, we're gonna go up
to our shaded view, which is this little
solid circle here. With our Frog selected, we'll hit Tab to go
into our edit mode. If you have any faces
selected on your Frog, simply just click
off to the side of it that it deselects everything. Now I'm going to hover over the left eyeball it
L to select linked. I'm gonna go over here to
my material properties tab, which should still be open. But if it's not, it's this little red
checkered circle down here. Select your eyes material,
then click Assign. So it's assigned
the eyes material just to the selected faces. Now we can click
off to deselect. We'll hover over
our right eyeball, it L to select this. So it's going to select
all the linked faces. Make sure you have
the eyes materials still selected on
the right sign. Click Assign. We can click off
of it to deselect. And then we're going to
do both the pupils now. So hover over one of the pupils. Hit L, makes you switch to your pupil
material on the right side. Now, click Assign,
click off to deselect. Then hover over the
remaining pupil, it L to select it. She's still have people
selected and then hit Assign. Now we can hit tab to
exit our edit mode. And then we can switch back
to our rendered viewport, which is the top rate button. Now we can see that our
Frog is nice and textured. So both the eyes are wait, both pupils are black, and then our Frog
itself is green. With our Frog done. Now let's move on to the base of our terrarium. We
can zoom out here. We're going to select the
base of the Terrarium. This is actually going to
be a two-part process. So first, we're going to
make the entire base gold. And then once we've
made the gold material, we're going to select
just the interfaces and apply the grass material just to the inside so that the inside of our terrarium looks like it's
sitting in grass. And then the outside has
a nice gold rim on it. With the base of the
Terrarium selected. We can now hit New down here
to make a new material. We can rename this gold GLD. Hit Enter. Then go down to your base color. Click on this and we're
gonna make this kind of a muted gold color. For the hue. We'll set it to
0.08 and hit Enter. The saturation can be
0.82 and then hit Enter, then the value 0.53,
and then hit Enter. Now we have the
general color of gold, but it doesn't actually look
like a metallic material. It just looks like
we've painted this kind of a BAG gold color. The way we can change that is
by going down here to where it says metallic and just
turning this all the way up. So we can see soon as
we've done that, now, made this material metallic, exactly like the name says. To add to this metallic effect, we're going to change a
parameter called anisotropic. This is going to stretch our reflections into
longer oval shapes. This is a common effect
on real-world metal. So to change this, we're just going to go down
here on the list. It's directly below the
roughness anisotropic. And we can set this to
0.7 in the hit Enter. We'll notice up here that
are all reflections now stretch all the way
around this base now. So it's kind of pulled these reflections
and made them less round and made them more oval and stretched
out and linear. Like I said, this is
something that you see commonly on metal in real life. Now that we have our gold setup, let's remove the gold
from the inside of the Terrarium and make
it grass instead. Now we need to go down here
to where it says slot one. Twirl that open. We're going to add a new slot. With our new slot selected. We can now choose our dropdown. In this case, we're
going to choose grass. And we're actually
not going to branch this because we want
this material to be identical to the material that we have on
these grass blades. So there's no need
to branch this. We want the exact copy material. Let's hit Tab, tend
to our edit mode. Then we're going to go
back into our shaded view. The reason we're going
into the shaded view is because it's easier to
see our selections. I don't know if I
mentioned that before. But basically it's
just, it's nice and easy to see what you
have selected and what you don't when the model is basically just gray and orange. So that's why we've been
switching into our shaded view. Hit three on your keyboard to make sure that
you're in face mode. And we're going to select
this very top face. We can zoom in here. We
have our top face selected Then we're actually
going to be expanding this selection so
that it goes down all the way over
the edge to the, down to this, basically
where this corner is at. The way we're going to expand the selection is by going up
here where it says Select. Then we're gonna go
down here where it says select more or less. We want to choose more. If you have a numpad, which I don't have in this case, I'm actually going to have
to do this manual each time. You can just hit Control
and then NUM pad plus, and it'll add to your
selection each time. Or you can hold down
control and numpad minus and it will detract
from your selection. In this case, I have just
a single polygon selected, so I'm going to choose more. And that'll select out. Now it's a pretty
subtle change here, but it's actually moved
the selection out, it's added to it and selected this one extra little
cut that we had here that we added when we
were smoothing this out. Now I'm going to go
back up here again, select more or less, more. It will expand it
out one more time. And then I want to go
one more time because I remember that we added
one more cut down here. So in this case we're
going to need to do this. Select more, three times total. So select more or less, and then one last time, more. And I can see it's selected that one last little polygon
down here at the bottom. Now if we go over here into
our material properties tab, we can select the
grass material. Then choose, Assign. It's now will be assigned this Grass material just
to the selected faces. We can hit tab to exit edit mode and then switch back
into our rendered mode up here at the top-right. Now if we zoom out,
we can see that the inside of our terrarium is nice and green
like the grass, and then the outside
is remains the gold. At this point we have just two more things left the texture. Let's move on to the Log button. So again, select your Log. And then from the
drop-down here, we're going to choose
the cap material. So select cap. Now we need to branch it. So we're going to
branch it out into its own unique material
by clicking the two here. Then we can call this log
l-o-g and then hit Enter. Let's go down here and change our base color to a
dark brown color. We'll set the hue to 0.037. It entered saturation to 0.69. Hit Enter. Then our value is
gonna be pretty dark, 0.06 and then hit Enter. We now have this kind of dark brown, most chocolate color. And then we'll be changing
the subsurface color to a warm yellow color. So we'll select this. Set our hue to 0.04. Hit Enter. We can set our saturation all
the way up to one. So we're just going to
make that Max down. Then our value,
We'll set this to 0.64 and then hit Enter. Now we can see on our
Log here that we have a nice dark brown outside. Then the areas where the
light is catching it, it almost makes
it look like it's made of plastic or something. So it's kind of adds to
that stylistic effect. It's scattering this nice
warm color inside of this log here so we can get some highlights
coming through it. It's also casting
light onto the top of the frog because the
amount of light that's being cast through the Log is also kind of illuminating
the top of the Frog as well. Now this Log material will be the first material where we're going to be adding some
additional nodes to the system. We're going to do this to add a little bit of bumpiness to the logs that it looks a
little bit more like bark. So let's go down here
to the bottom viewport. We can zoom out. We're gonna be working
down here near the bottom. So the first thing we
need to do is hit Shift and a to add a new node. And then in the search bar here, we're going to type
in. So be UMP. And then we can choose
the bump node here, and we're just going to
drop it right next to this. We can now connect the
socket from the bump node one to the original
principal be SDF node. By clicking this little,
little purple dot, we're just going to drag
it from where it says normal over to the
normal socket. On this side. We can see right away it
doesn't really do anything. And that's because we're
missing some more information. Now we can hit shift and a. Then the search, we're
going to type in noise. So NOI S. And we can see
here it's filtered out some results and we want to choose noise texture and we
don't want and white noise, that's a different,
different parameter. So we'll choose noise
texture. Place that here. Now we're going to
drag this factor. So this little gray dot, drag this one down into the
height on the bump node We can see right away
soon as we plug that in, we now have this black
and white noise texture. So essentially that's
what this is doing. This is pumping out
black and white noise. So it's an image
into this bump node. And then the bump
node is converting that black and white information
into height information. For this model, we can see
that it's kind of just made it look like a bumpy
Log bark material. Now we're not done
adjusting parameters here. But you can see immediately
the difference that we have from when we didn't
have this attached. So this really smooth kind of just featureless Log to
when we attach this. Now we have this pretty convincing bumpy
Log bark texture. Let's zoom in here down on the bottom to the noise texture, and let's adjust some
of these parameters. The main Walmart I'm
really going to change here is the scale. So we're going to set the
scale to 2.6 and hit Enter. And that's going
to actually make this a little bit larger. So the smaller the number
here, the larger the, the noise texture
is going to be, the larger that image is
being projected onto the Log. If we made this number higher, it would make our bark
much, much smaller. And also, it'll probably look a little bit more
bumpy and noisy. So in our case, we just
went kind of large bumps on this log to make it
look more like bark. So overall, I'd say the
barks looking pretty good except I think it's probably
a little bit too strong, so I think it's a
little bit too bumpy. And we can change the
strength of the bump over here on the bump node. We can just have this number. So if we type in
0.5 and hit Enter, it's actually going
to make the bump half as strong on the Log. So it's a little bit
more subtle now, which matches the
rest of our scene, which is overall
relatively smooth. With the Log done, the
only thing left to do is add a little bit of
color to our background. Now we can zoom out. I'm just going to click
on the background here to select the
background plane. We can click New to
add a new material. I'm going to name
this one background. Then hit Enter. Now we can zoom out here to find where it dropped the nude. Then the only thing
we're going to change here is just changing the color. We're not going to adjust any
of these other parameters. We can zoom in here. And then we're going to
change the color from white. I'm going to make mine
a pink color here, free to change yours to
whatever you'd like. But in my case, I think
pink works well with this color or with this
color palette rather. I'm going to type
in 0.99 for my hue. Point, five-ninths
for the saturation. And then I'm going to
leave the value at 0.8. I can click off. Then we can see here
that this pink is kinda complementing
some of the greens. And then, as well as
the more vibrant sort of darker pink, pink, red that we have
on top of the mushrooms. With the last material applied. We finished our scene. The next lesson, we'll be setting Up Our File
for rendering, as well as creating our final
image. I'll see you there.
10. Rendering the Terrarium: In this lesson, we'll be
setting Up Our File for rendering as well as
creating our final image. Let's begin. Start by making sure that you've switched over to
your layout tab, which is the default
tab that we've been working in for most
of this class. We're gonna be working in this
tab again for this lesson. Again, the layout tab
is right up here, so you just click that and that'll switch you
back to this view. We're going to start
by adding some depth of field towards scene to help accentuate the miniature
look that we're going for. So in our left viewport here, we want to switch back
to the shaded view. So we're just going to click this little solid circle here. Again, if you don't see
these buttons here, use your middle mouse button to pan left and right on this bar, and that'll slide it over
so you can see this button. And we'll make sure that you're still inside your cameras. So you want to still make sure you have this camera button selected so that we're seeing through what the
camera is seeing. Now go up here to
your overlays button, which looks like two circles overlapping, and
we can click that. And that will hide all
overlays within our scene. That includes things like are the cage that we see
around our class, as well as the light
that's actually now disappeared since
we've uncheck that. This will also hide anytime
that you select something. So if I select this
Mushroom here, we can see that it no
longer is highlighted like it is on the
right for the moment. That'll just give us a much clearer view when we're setting up our depth of field will eventually be turning
this back on. Not go up here to the
top next to where our viewport shadings taps where we're going to click
this little drop-down. Then we're gonna go down
here to the bottom and we're going to check on
depth of field. This will allow us to
visualize the depth of field from our camera
within the viewport. So by default, when we adjust
our camera parameters, we adjust the depth of field and we won't
actually be able to see that interview port unless
we enable this setting. So make sure that you've
clicked this little drop-down and then turn
on depth of field. Now go up to your list
on the top right, and then select
your camera within the render scene collection. With your cameras selected, now go down to the
object data properties. So in this case it's a little
green symbol for a camera. And now we can check
on depth of field. So this one now I'll enable our camera to actually
use step the field. I'm going to scroll down here so I can see these settings. Then the first thing we're
going to change is the f-stop. So let's set our f-stop
to a really low number. So when I set this to point
to and then hit Enter, we can see right away now
on our left view port here that a lot of our
scene now is kinda blurry. And then we were going to adjust what is blurry and what is in focus is by adjusting
our distance. The f-stop value that
we just changed is essentially how shallow
our focus plane is. We want our depth of field
to be pretty dramatic. So we're going to use a really, really small number before we start adjusting the distance. Go over to your left viewport. We're going to zoom in here. And I want you to
zoom in onto one of the spots on the front
of your large Mushroom. So if something roughly
in this position, obviously your spots will be in different
positions than mine. But just find the spot that
seems to be the closest, probably the one that's over
top of where the stem is at and zoom in roughly to that. In my case here I
can tell there's some spots here, even
though they're blurry. Now what I want to do is go
to my distance slider here. And we're going to drag
this distance slider until eventually those
spots become in-focus. So the smaller in this case, I make my number, which
is moving the distance, the actual focal
point on my camera, the more in focus the spots get. So as I start getting
closer and closer to the focal distance that I need, we can zoom in here. So I can see here that
the top of this spot, a little bit more in
focus than the bottom. I want to make sure that
the bottom side of one of these spots here is in focus. I'm going to keep making my
value a little bit smaller. And you can see here
right about there, it starts becoming in focus. If you find that this slider is moving a little bit too fast, just hold down Shift
as you drag it. And it'll move the slider even slower so you can move
it really precisely. So just drag this
until the bottom side of one of these front
most spots is in focus. In my case, my distance
should be set to 7.4 m, but yours might vary slightly. Now as I zoom out,
I can see that these spots here
are nice and focus. As it goes further
back in the scene, the spots in the background
start getting blurrier. That's the effect that
I was looking for here. I want to have the center of my Terrarium be
the focal point, so it's nice and sharp. And then things in
the foreground, such as these blades of
grass or even my Frog, are gonna be kinda blurry as well as things
in the background. This is helping accentuate that miniature effect
that we're making here. So we're, we're
sort of giving it a tilt shift style effect. In other words, done
Adjusting the depth of field, we can turn back
one, the overlays. So I'm gonna click this
little overlay button here. Then I'm gonna switch
back to my rendered view, which is this little
button here on the right Now let's zoom out so we can see our whole camera. And
the depth of field here. We're not really going to
notice it because it's so noisy based on the
fact that it's having to render to all of these colors and lighting
and all the reflections. On top of this, we're not really going to notice the
depth of field, but we will notice it once
we get to the final render. With that final setting done, we're ready to render
our final image. You can now go up here
to the top center. We want to switch to the
rendering work-space. We can click Rendering. And now we're just going
to render our image. We can zoom out here so we
can see the entire canvas. Then we're gonna go up here to render and then render image. Alternatively, you can just hit F12 on your keyboard
if you prefer that. Soon as we click this button here are image is going
to start rendering. Now in our case, this image
is probably going to take anywhere between
maybe a few minutes, like maybe 2 min, only up to maybe 10 min depending on how strong
your computer is, then depending on the
settings you have, the hardware that you have. So I'm gonna click render image here and then we'll see you. My image starts to render. We get all the
statistics up here, and it's going to render all 500 samples that we originally set up in one
of the first lessons. We can see here it's counting up through the samples
and then once it hits 500 samples,
it'll stop rendering. It'll be done at that point. And then it'll run the de-noise. And then at that point, we can now save the image. I'll see you in just a moment
after my images finished rendering or render is done.
And I think it looks great. But there are few
simple things we can add to make it
look even better. Let's go up to our compositing
workspace here at the top, it's next to the Rendering tab. We can now drag this
bottom bar down here to make the dope sheet
at the bottom smaller. We won't need that. Now let's hit N to
hide this side menu. We won't need that either. And then up at the
top, we're going to drag out a new viewport. We're just going to
click and drag here. Once our mouse turns
into a little plus sign, we can drag that here
too, about the middle. When this new right viewport, we can click this
little drop-down here. And we're going to switch
this to the image editor. Then up here at the
top where it says New, we're going to click this
little drop-down here and we're going to switch this
to the viewer node. Now I can zoom in here a bit so that it fills
the whole canvas. Now let's start working
here on the left viewport. So to start with, we're
going to choose news nodes. So this little checkbox
up here and click that. You can drag this over
here to the left. And again, we're going to see
this familiar node system. This works just like it did
in the last one where it's passing attributes from the
left node to the right node. Click this composite node. We're going to drag
this over here a little bit to make some
room between these. Now let's hit Shift
and a go to search. The search here and we're
going to type in viewer. So V, E. And we could see viewer pops up, click that, place
this down here. And then we're going to
drag this image note or the image socket
rather on this left node. We're just going to click on this and then we're
going to plug that into the image socket
here on this viewer node. Now we can see right away that we now see our
render here twice. So the first thing
we need to do is to uncheck the backdrop
button up here at the top. So we're just going
to click that and that'll hide it
here on the left. So normally if you were
working with us and you wanted to use the normal
default workflow, you would actually
be using these nodes directly on top of the
image you are editing. I find that a little bit hard
to see what I'm working on. So I prefer this method over here where I've actually made a brand new kind of dedicated
space to see these. I'm going to zoom out here so
I can see the whole image. Now I can see that this is displaying what this
viewer node is seeing. The first thing
we're going to add is something called glare. So we'll hit shift into a
to make a new node here. In the search bar here we're
going to type in glare, GL, AR, see glare, click that, and then we can place this node. So by default, when
you place it on top of one of these wires, it'll turn white and
then when you place it, it'll automatically
connect whatever that wire was that turned white. Now in this case,
we actually need to connect this for both. So we're going to take
this image node here, and we're going to drag this up into the composite
at the top. It's now we have this, this first left node, which is our actual render being put through
the glare node, and then it's outputting
it directly into the composite as well
as the viewer node. Now let's zoom in here on the glare to see what
settings we can adjust. Well, notice here on the
right side that we've actually added some
glare to our image. And because of the
type of glare, in this case streaks, we're actually seeing little
stars all over our image. So if this is a look you like, streaks as a way to do
that using the glare node. However, we're actually going to switch this to a different one We're going to switch
this to the fog glow. So there's other options here. I'll quickly show you those. So there's ghosts, which I
personally have never used. It's very cool looking, but it's also very
specific and use I'm sure. And then there's
also simple star which looks pretty
similar to streaks. But again, we'll
be using fog glow. I'm going to select a fault
glow from the top here. Now we can see that
it's just added a nice subtle soft glow
around the bright spots. And this is mimicking an effect called Bloom that we
have in real life. When something is really bright, we'll see a halo, a soft glow emitting from it, showing basically how
bright this reflection or this object is. We won't be changing
a whole lot of the settings here because there really isn't
many to change. The first thing we're going
to change is we're going to switch it for a medium to high. So this is just going to make
it a high-quality bloom. So it's just gonna be a little
bit more accurate here. It's going to do a
little bit better job of picking where to put
this bloom on our image. And then we're
also going to make the size a little bit bigger. We're going to turn
this up to nine. So by default, this
slider is kind of odd. I think, I think it starts
out as six is the lowest. So me, just as an example here. So six is the smallest
you can make a, which is a really weird
size to start at. And then nine is the
largest you can make it. So in our case we're
going to set it to nine. But again, this slider for
some reason only goes 6-9. Now if we look at our image
over here and we zoom in, we can see some of these
reflections and the, some of these really
bright highlights now have this kind of soft kind of foggy
glow around them, which I think looks nice. It adds to the softness
of this image. There is one more effect
we can add though, though, add a little bit of distortion around the edges
of our frame and a little bit of rainbow fringing
on the edges of things. So to add this, we're going to go over here to the left side. I'm going to drag
select over both of these right nodes and move them over to make more
room for this next node. At deselect those,
I can hit shift and a to add a new node
in the search box, I'm going to type
in the word lens L E N, S, lens distortion. So go over here. I'm just going to drag it
over top of the bottom one so that it automatically
links that one. Then again, on this
lens distortion node, just click the image socket
here on the right side, and then plug that into the
composite so that it pumps this directly into the composite
as well as the viewer. Now the only setting
will be changing on lens distortion is just the dispersion down
here at the bottom. We're going to set this
to a really low value because this is a
very heavy effect. So Very little bit of this
effect goes along way. So I'm gonna set this up to
something really tie first. So just so you can see
how crazy it can get, I'll set this to one which
is I believe the maximum. Then on our right side here. See it's processing that. As I zoom out, you can
see it's actually warped my render into this kind
of bubble shape here. And it's made this
really kind of blurry, almost motion blur looking effect that also has
rainbow within it. So we don't want that effect
to be nearly that strong, but we do want to have some
of these elements here. We're going to set this down
to just 0.1 instead of one. So 0.1 and then hit Enter. And then we'll see over here it starts processing that effect. It's also much
faster in this case because there was
a smaller number. And now we're getting just a
little bit of this kind of nice rainbow effect that we're getting around
the edges here. And it's also kind of
stretching this and making it a little bit blurry, a little bit motion blurry. It's just adding a little bit of style to the edges of
this, this render here. It's really not
doing a whole lot of anything to the middle, but it does add a nice rainbow
effect around the edges. You can see it here on
the shadow pretty nicely. If you're not a fan of
what this effect is doing. Again, this is optional. If you don't like it, you can
just move this down here. You don't even
need to delete it. You can just move
it off to the side. Then instead take these and just plug them directly into the composite
and the viewer. And in this case it'll
bypass this because it's not being connected to anything and it'll go back to how it was. For my case, I think the
effect looks pretty cool. So I'm going to
leave it plugged in. Okay, so now it
will process that affect quickly. And then we go. Now our final image is ready with all of our
effects done on this image. Now the only thing
left to do is save it. So within the
compositing tab here, we're gonna go over to
our right view port. And then we go to Image. Then we're going
to choose Save As. And then that'll bring up an option box where
you can choose the location as well as
the name for this image. So again, click Save As. Then within your option box, you can use your folders
on the left side or the address bar at the top to navigate to where you'd
like to save your image. Before we do anything
and save it, we need to give it a name first. So I'm just going to call this Mushroom Terrarium
underscore 01. Now in case I want to say
about a second angle of this, or maybe a different color. I can just call it O2 or O3. And then I don't have to
delete the original ones, I just have a series
of them that connect. I can save out then. Then over here on
the right side, you want to make sure you
change your file format. So in this case, we're
going to be using the PNG file format, which I believe is the default. If not, you'll just
want to click this drop-down, go to PNG. And then for our image here, we can either choose
black and white, RGB or RGB with Alpha. In our case, our image
doesn't have any Alpha, so we really don't need
the alpha included. So I'm just going to choose RGB, which will just give us
a nice colored image. We can leave the color
depth that eight. And then we can leave
the compression at 15% with these settings done or location chosen and our name given making now
hit Save As image. Now that our final
image is saved, we can share it with
all of our friends and family on social media. In our next and final lesson, we'll be discussing
our Class Project. I'll see you there.
11. Our Class Project!: You made it to the
end of the class. Congratulations. Now that you've learned how
to make a cute Mushroom Terrarium with me, I'd like you to create
a new one of your own and share it with the class. To make your terrarium unique, you could try things like Adjusting the colors and the
placements of the objects. Modeling brand new objects, like a new animal, a small flower,
or a fallen leaf. If you'd rather not attempt
to brand new terrarium, try using the existing pieces of this terrarium to tell
a story about the frog. From my class project, I made this new scene. I created it utilizing all of the same techniques we
learned during this class, including the little fox. After you've finished
your unique terrarium, post the render to the
project gallery to share it with me and all
of the other students. I'll personally review
each project posted to the gallery and that you know what I love about your project, as well as anything that could use a little bit of adjustment. I can't wait to see what
you all come up with. Thank you all so much
for taking my class. I really appreciate it. If you enjoyed this class and want to know when I
release a new one, please click the Follow
button here on Skillshare. Please consider
leaving an honest review for this class so you can let other students know if it's worth their
valuable time. If you liked this class, please check out my
teacher profile. You might find another class
of mine that interests you, such as my cute Gnome
modeling tutorial. Thanks again. I hope to see
you in another class soon.
 Harry Helps, Professional 3d Artist