Transcripts
1. Class Trailer: Life can be a roller coaster, and especially in
challenging times, it's important to have simple tools to
bring a bit of calm, clarity, and joy
back into your day. Hi, I'm ta, and I'd
love to invite you to join me on a 14 day
art retreat, a gentle, creative journey designed
to help you slow down, relax, and care for
your well being, all from the comfort
of your home. Together, we'll spend a few
mindful minutes each day, creating a simple yet
beautiful zendoodle. Along the way, we'll gently shift your mindset
toward clarity, calmness, and positive thinking. You don't need any prior
experience to follow along. Just some basic drawing tools
and maybe a cup of tea. Whether you prefer traditional
or digital drawing, this class is designed
for all of you. I'll guide you through 14
relaxing zen dooodle exercises, alternating between
paper and procreate. You'll not only build
a creative habit, but my daily prompts will also help you rediscover
the lightness, hope, and self
kindness inside you. So if you're ready for
a mindful drawing date, grab your iPad or your
favorite pens and paper. I'll bring the rest, including a whole bunch
of helpful resources. And then I'll see you in class.
2. Class Project: We all know that we
understand things better when we actually
put them into practice. Since this is a totally
hands on class, your class project will
come together easily. All you need to do is upload
at least one photo of one of your s and doodles or export
your artwork from Procreate. Just head over to the
Projects and Resources tab and click the
Submit Project button. There, you can upload
a cover image, give your project a title, and share your
experience with us. How did it feel to draw? Did you try different
tools or materials? Which one did you like best? Just a quick heads
up. The cover image must be in landscape format. If your Zendodle is in portrait, it might get
cropped. No worries. Just upload it again using the upload more content option, so we can see the full version. If you're following along daily, you can also update
your project daily. Not only will you
inspire others, but you'll also build a creative habit that's
truly worth celebrating. I get notified every time
a project is updated, and I always look forward
to seeing your creations. Here's two colorful and
inspiring Project Gallery. Now let's move on to the next lesson where
we'll talk about the materials you can use to follow along. I
will see you there.
3. Materials: Let's talk quickly
about the materials you need for this class, and the great news
is you can follow along with whatever you
already have on hand, whether you're drawing
traditionally or digitally. This is a very flexible class, and I'll be switching back and
forth between two methods, one on paper with
alcohol markers, and one in Procreate
on the iPad. So no worries, you'll
be covered either way. Let's start with a
digital artists. If you're drawing in procreate, you'll need an iPad,
an Apple pencil. Of course, the Procreate app, and the digital goodies
I made for you. Just head over to the
Projects and Resources tab, and there you find appropriate version of the coloring book plus a custom brush set and color palette
in this zip file. Just open this class on your iPad and tap to
download each item. Everything will end up in your
files app under downloads. When you tap the brush
set or color palette, they'll automatically be
imported into Procreate. There, you'll find them in your brush library and of
course, the palettes library. In your appropriate
coloring book folder, you'll see all 14 designs
as individual PNG files. Make sure to always open
them from your files app. Just tap the file, hit the share icon,
and choose Procreate. That way, the transparent
background stays intact, which is crucial for working
with multiple layers. Once the file is in prorocreate, it'll show up in your
gallery and you can move it into a stack to keep
everything nice and tidy. If you are a traditional artist, that's totally fine too. All you need is a printout
of the coloring book, which you'll also find in the
projects and resources tab. If your printer can handle it, a slightly thicker
paper is nice. I printed mine on color copy paper with 100
grams per square meters. But standard printer
paper works as well. I just printed it out and cut the pages in half
with a paper cutter, since there are two
designs on one page. Because I'm left handed, I prefer not to bind the pages. I just clip them together and take out one page at a time. Just a little lefty tip here. If you're using markers, I recommend putting something underneath your page
to protect your desk. Ohuhu markers usually come with a plastic sheet.
That works great. But any spare paper or even
old newspaper will do too. As for drawing tools, use whatever you like. I'm currently loving
the alcohol markers from Ohohu They're affordable, long lasting, and come
in gorgeous colors. I also use the O
hohuFneliners to make sure the black outlines don't smudge when coloring over them. But of course, you don't
have to use those. Colored pencils, gel pens, felt tip pens, even
crayons, it all works. Seriously, you don't need any fancy supplies for
this mindful drawing date. Besides something for coloring, I'd recommend a
black fine liner, maybe in a few different
sizes if you have them. A pencil and a blending stump or just a good old
tissue for smudging. At the end of this class, I will show you how to create your own zen doodle templates and to follow along with that, you might also want to grab
an eraser and a ruler. Take a moment to look
through your materials, gather what you've got, and print out the coloring pages if you're working on paper. Then I'll see you in the next lesson where I'll
explain how the class works. No
4. How the Class Works: Hi, and welcome to this
creative and calming class. Before we dive into
the first project, let me quickly walk you
through how everything works. You'll be working on 14 different zendoodle
projects in this class, one for each day. Zendoodles can really do magic. They're simple
repetitive patterns that you draw mindfully. One line at a time. No fancy skills or tools
needed, and no pressure. While your hand is doodling, your mind gets to
slow down and reset. It's a gentle way to shift your mindset and
reconnect with yourself. And by making this
a creative habit, you're giving yourself a
daily moment to breathe. Be present and feel
a little lighter. Here's how the class
is structured. Each project begins with a
short mindfulness moment, including a breathing exercise and a gentle thought or
question of the day. It's a way to slow down, clear your mind, and get
into the creative headspace. I'll also list the materials
I've used in this project, but feel free to use
whatever you have on hand. And then we'll draw together. I'll guide you step by step, though you're always welcome to add your own ideas
as they come up. All drawing steps are
included in the videos, so you can either watch first, which is surprisingly relaxing or follow along right away. And if my pace feels too slow, feel free to speed up the video. And of course, if you're drawing along and need
a little more time, just hit that pause button. No stress, no rush. That's the only rule. Ready?
Then let's get started.
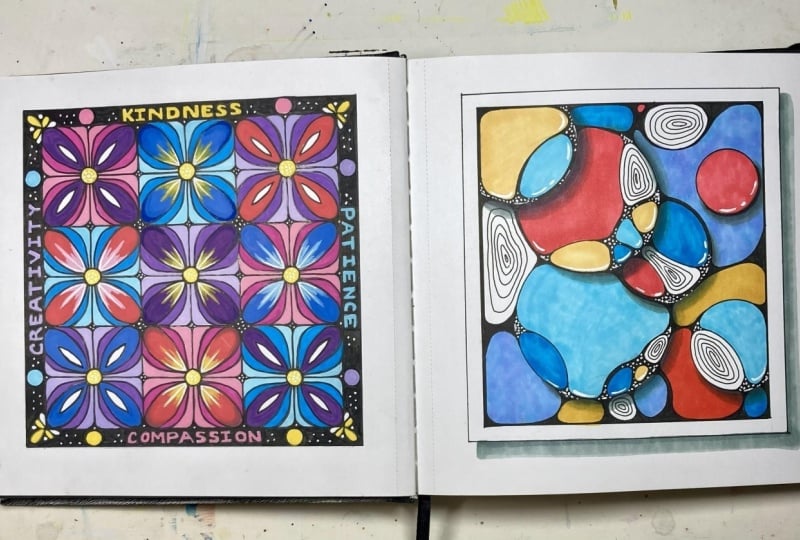
5. Project 1: Flowers in a Grid: Before we begin, let's
take a moment to arrive. Inhale. Hold and exhale. Today is a good day to start
being kind to yourself. Be kind to yourself. You don't need to be perfect. This en doodle doesn't have
to be perfect, either. Just treat yourself the way you would treat
your best friend. Okay, so let's start with our first zen doodle and I've
printed out the first one, which is called
flowers in a grid. You can print out
your version as well, or you can, of course, draw and procreate as you wish. I've got my markers and
liners ready as well. But again, you can use
whatever feels good. There are no rules,
there's no right or wrong. Just have fun and relax. I'm going to start with my
Oho ho fine liner five, 0.5. And I'm going to start
filling each box with petals. And I kind of want them
to look like a loop here in the center and to smaller one to the left and to the right to kind of fill
the box just like this. And we go all around and draw the same
pattern in each box. And we make sure we go as closely as we can
towards the black lines, and later on, we finish all the empty spaces
with black as well. And everywhere where
these dots are or half circles or
quarter circles, this is the center
of our flower. And in our next step, we want to fill all these
white corners here. We want to fill them with black. And for that, I'm using a little bit of a
bigger fine liner. It's the fine liner 1.0. And I'm going to just
fill in all the corners. And remember, just
enjoy the process. Enjoy every little
line you draw. We create something together. It looks wonderful with all
these colors and lines, and it just calms
our nervous system down and gives us a
wonderful stress relief. And here we go. It looks gorgeous already, and now it's time to finally
take a bath in color. So I start with yellow s. I have three
different ones here, and I want the
center of the petal. I want that to be the lightest and going
towards the darkest. So let's start with
my marker here, so the lightest yellow and just color the center
area of this flower. Again, that works wonderfully with colored pencils as well. And if you don't have so many different different shades,
that's totally fine. You just layer them. That's a perfect way. Or you go with completely different colors and mix them within the petals. That's also absolutely okay. And I think that's
all we need with this e. I'm going to move
on to the next one, which is yellow too. And I'm going to
draw the areas to the left and to the right
of our first petal. And again, if you
cross the line and draw where you don't want
to draw, don't be upset. It's okay. It's not
about perfection. The process is our goal. That's what keeps
us in the present. That's what keeps us grounded
and what helps us to, you know, overcome
stressful situations. The second yellow U
is also finished. And now I'm going
with the darkest one, yellow red one or dark yellow. This is how it's
called from O ho ho. And now I'm going to
draw the outside of our petals in this darkest one. Okay. And that's it
for our yellow flower. Let's go on with the next one. I want this, this,
this and this, I think, in my pinkish use here. And move on to the next one. And don't last pink you. Wonderful. And now
our last color set, which is the purple one. And onto the next darker shade. And the darkest one. Okay, now I want to embellish
the centers of our flowers. Of course, you do.
If you want to be finished like that,
that's totally fine. Please don't feel like you need to do
whatever I am doing. Just go with your own gut with
what your hand tells you. I just want to embellish
the centers here, and I have the 0.3, the thinnest fine liner here. I just want to draw circles. This way, we can also
kind of, you know, cover where we messed up
and drew over the line. And lastly, I got
my jelly roll ten, and I guess I want
to add some sort of maybe maybe water little
water droplets here. I think we need
something more here. So I guess I'm going to fill it with simple thoughts as well. Just a few And I think we're done. Look how pretty. It's
beautiful because you made it, because you took some
time in your busy day to treat yourself with a
nice coloring session. Thanks for drawing
with me today. I see you in our next
project tomorrow. Oh
6. Project 2: Circles: Welcome back to Project two. Let's start with our breathing. Just set ourselves up
for drawing. Breathe in. Hold and breathe out. Our thought of the day is, what are three things you're
grateful for right now? Could be big things,
could be small ones. Three things you're
really grateful for. Today, we're going to doodle simple circles and enjoy
the calmness of repetition. I will be working in Procreate, but feel free to work
on paper if you prefer. Just as a quick reminder how it works if you're
using Procreate. I am here in my files app where I stored the
class resources. I will open the end Doodles for Procreate file and
then find page number two. I tap that and you see
the canvas turns black. That's because there's a
transparent background. I'm going to tap
just once to get all my menus back and here
we already see the design. Now I want to tap this
rectangle with the arrow in there and say procreate. That means it will export
the file into Procreate. I know it sounds a little bit complicated,
but unfortunately, that's the only way we can open the PNGs with a
transparent background, and that's exactly what we need. Let's open Procreate and here we see the files
being imported. Let me quickly move that in
the right ZenddleGallery, and here we have the
file to open. All right. I'm going to grab
my Apple pencil and we can start with
our zendoodling. First of all, I have my zendoodle color palette ready and I also have my
zendoodle brush set ready, and I want to start with
the nice liner fine. This one works like
a real fine liner. And the streamline is
not very high as I want it to look like a
real fine liner on paper. I just need to compensate that the canvas of an iPad screen
can be a bit slippery. That's why we still have some streamline applied,
but not too much. Okay, here you can see I have
already some sizes saved. You can do that by
just tapping there, tapping the slider again, and then tap the plus. This will memorize
the brush size. These mimic the 0.3 fine liner, the next one, 0.5 and 0.7. But you can totally play around and use the thickness you
prefer for your strokes. Instead one, we're going to pick the black U and of course, in Procreate, we need to add a new layer and we can drag
it underneath layer one. We just leave this
layer empty for now, then we don't have to drag
around so many layers. We just tap the plus
once more to have another empty layer right
below our original design. I make sure I am on
layer number three right now and will start to draw. In our first step, we want to round out
all the corners. Of course, the good
thing of Procreate is that we can resize and
rotate the canvas, which makes it easier sometimes. But if you work on
the printed design, it's totally fine
to always rotate your coloring page
the way you need it. And while you're drawing, always make sure to check
in with your body. We tend to draw in super
tense body postures, and then we end up being sore and unrelaxed that's absolutely not what we want
with this exercise. So while we're doing
these repetitive steps, we make sure we check in
with our body every now and then to see if our
shoulders are relaxed, if our face is relaxed, sometimes we tend to do weird things with our
tongues or with our mouth. So just make sure check in
and relax these body parts. And here we go. All right. I think we rounded
out all the corners. In our next step, what we're going to do
is we're going to go a size down with
our fine liner. I'm now at 4%, and we want to give some sections just a
tiny circle pattern, something like
this. Just follow. Although I think this
might be too small. Let's go back to
size. What was it? 7%. So let's start and
just draw circles, following the shape of
the shape we've picked. And just pick random, random ones, make sure
you spread them evenly. You just draw circles and
circles or ovals or ovals. All right. In our next step, we want to color
the white sections. I think I want to go with purple pinkish tones and yellow green and
yellow, I guess. For that, I'm going to
pick my brush marker, and I want to make sure I'm on layer underneath
the linework layer. And let's start with this beautiful bright
purple shade here. I for sure want to start Whoops. The brush size is too
big, let's go down. When you draw with these markers here with the marker brush, make sure you do not
lift up your pencil as this makes a
weird overlapping. We just want to draw in one go. I've just decided to
go with six e only, that means we can give them
three to four sections. Okay. And a nighter you maybe I'm gonna go with
this pinkish here. Let's move on to
the yellow green. Let's see how this looks. Maybe I need I want to start with the darker
one. Let's see. And maybe the lightest one, the fourth top line. And let's move on to yellow. I think I want to start
with the dark orangy one. And the last one's gonna be
the very light yellow you In our next step, we want to give each
colored section, of course, a little bit of a
shade in Procreate, we can do that really
nifty by adding another layer and
turning the blend mode to linear burn by tapping this N here and then move
it to linear burn. Now we only need to pick
this beige color here. And draw over where
we want to have our shade again and this will create a very colorful
saturated shade. And if it's too harsh, we just play with
the opacity and turn that down a little bit.
This is how I like it. 40, 45%. When you use markers, you just go over
with the marker once more in the same color you've
picked for your section. And of course, in our next step, where there's shadow, there
also have to be a highlight. So I'm going to add a new layer and I'm going to
switch to white. Now I want to pick
my gel liner here. As you can see,
this is not set to 100% opacity because I always think the real jelly roll
keeps it's not really opaque. I want to have this little
bit of translucency. If you think it should
be really bright white, then you go ahead and just play with this opacity
slider over there. And since we have
quite a lot of, like, really black spots, I want to add another
layer at the very top and just fill
those with dots. Oh And here we go. We are finished. I
hope you've enjoyed this moment of calm
and peaceful drawing. Remember to think about
things you're being grateful for as it will shift your
mindset to the positive. I am certainly grateful that you were
drawing here with me today and we'll see each other tomorrow in
our next project.
7. Project 3: Wavy Grid: Et's take our moment
to settle in. Let's breathe in together. Hold. And out. Your thoughts are just
background noise, not facts. They come and go like
clouds in the sky. The thoughts are just voices
leftover from our past. Welcome back. Today's
en Doodle project is all about letting
go of perfection. Just focus on lines, shapes and beautiful colors. Today, I'm using the printed
coloring book version again, but feel free to go with
Procreate if you prefer. We're working on page
number four, the wavy grid. I've also prepared
a range of purple, pink and red alcohol markers, as well as a black fine liner, 0.5 this time, and
my jelly roll pen. I've also prepared some gray. One is going to be for
the shading later, and I guess one looks very
nice within those colors. So before we start
our bath in color, we will take our fine liner and the first exercise
that will help us slow down is to round out
all the corners on our grid, which means we don't
want to have any pointy, but only rounded shapes. These are much more
gentle for our eyes, and the whole process
helps us to get calm. Relieve our stress and enjoy
this very mindful process. So take your time
and just round out all the corners of those
little areas here in our grid. And step one is done. Now all the corners
are round and it's time to take
our bath in color. I've picked eight
different colors. And since we have a
eight by eight grid, we can color eight
sections with one marker. And we want to make sure
we spread them evenly. Take your time and enjoy the colors that start
to pop on your canvas. And we move on to
the next cover. And lastly, we've got
to use our gray shade. Beautiful. And in our next step, we want to go ahead and add a little bit of
highlights and shadows. And this is what I use
my red gray marker for. We're just going to go around, decide for a light source, which in my case
comes from here. So on the opposite side, we just draw a tiny little bit
of a gray shade like this. And in our last step, we're going to use
our jelly roll to draw some highlights. And I'm just going to draw
a tiny little drop like this and a few short lines
down along the shade. Just easy peasy, whatever
you think should be there. We remember it's not
about perfection. It's about the process, the drawing process to
gain some stress relief, enjoy the colors, create
something pretty, which brings us joy. After these 14 projects, you don't have to
be finished at all. You could print out
your coloring book once more and just start over again with completely
different patterns or colors or whatever
else you think of. You could even create
your owns and doodles, which I will show you at
the end of this class, I will show you two
methods of creating your owns and doodles on
paper or Improcreate. And we're done. So let's take a moment
and look at our work. And it's super pretty. We made the time for
ourselves today, and that's something we
can be really proud of. I hope you enjoyed this bath
in color as much as I did. Thanks for drawing
with me today. I'll see you in our
next project tomorrow.
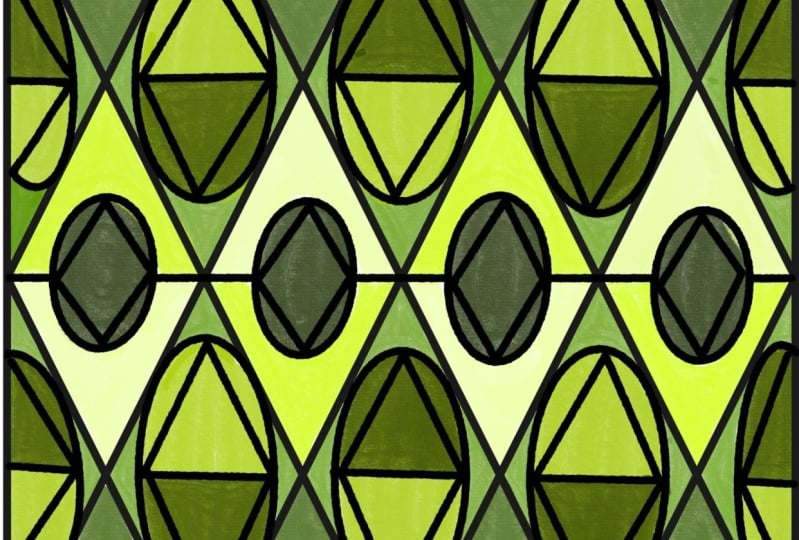
8. Project 4: Leafy Lines: Hi, and welcome back to
Project Number five. Let's start today
with our deep breath. Inhale hold and exhale. Today's thought is,
can you change it? Change it. Is it out of
your control? Let it go. Let's keep that in
mind while we draw. Some things we can change,
and then we should. Other things are just
out of our hands, and it's okay to let them go. Today, we're creating
leafy lines. Simple flowing leaves arranged
along diagonal lines. I'm working Improcreate
again, but as always, you can pick whatever medium feels most natural
and fun for you. This is an easy and
relaxing pattern that invites you to
just go with the flow. There's no wrong way to do this. Enjoy the movement and
let your hand guide you. You can see I've opened
the page number four, already Improcreate, following the steps I showed
you in our second project. And as always, we are
going to add a layer, put that underneath
the lines layer and add another one on top. This is now layer number three, and this is where we
will do our linework. I'm going to start with black
and our nice line are fine. I think I'm going to stay
in this middle 7% size. What we're going to
do is we are going to draw drop shapes, something like this,
and we just stack them on top of each
other. Just like this. And maybe just one more here. And then on the other
side of this axis, we draw them leaning
to the other side. And one more in here. Maybe a tiny one there. All right, one axis is done, and now I'm going to leave
two lines empty and go to go here in these two lines where it repeats the same pattern. Remember, you can always
rotate your paper or canvas that feels more natural to you and helps you draw
flowing nice lines. All right. And then I keep these two lines empty and do the same here. We're going to fill
these gaps later on. All right, these are
facing in this direction, and now we can rotate our
canvas and put it upside down. And now we're going to do
the same in this direction. Great. And now we can fill
all the gaps with black. But I think I want to increase the brush size a little bit. Let's see if that's working. Yes, looks good. And now we fill just all those white edges, triangle kind of shapes. We fill that with o. And from time to time, we check in with our body. Are we are we tensed
in some areas? Do we grind our teeth? Do we bite our tongue? Just make sure we
relax our shoulders, our hands and arms, and overall, enjoy the process. And here we go. Now we can continue
with the coloring. I want to go ahead and draw all the leaves growing
in this direction, draw in red shades and
all the leaves that are growing in the other
direction in green shades. I'm going to pick my darkest
red and the brush marker. So I'm going to add
a layer underneath. We can use this one layer two, and I'm going to start here in the center with my darkest red. I'm going to leave three leaves empty and draw another
one and the same here. Let's say we start here Now we move on to the next red, the medium red shade here, and draw the ones on top
and beneath the dark ones. Awesome. And then we can move
on to a lighter version. And I guess I'm going to go with this light pink you here. Or this one. Let's check what
looks better. Let's see. I guess this is good. And we draw the in betweens
in that lighter shade. All right, so that's
the red part. And now I'm going to move
on to our green part. I think I'm going to go
with this dark green here, one, two, three,
third, third column. And we're going to do
the same basically. Leave three empty. Great. And now we can move
on to the next screen. I think I'm going to go
with this version here, the fourth in the bottom row. And then we just need
our last green shade. I think I'm going
to go with this medium yellow green here. Alright, so pretty. It looks so pretty. I just want to fill in
this one black spot that's missing on this
other layer here. Yes. And now in our next step, what we could do is we could
add a little bit of shade here closest to the stem
where the leaves grow out of. But in this case, I want to try something else. I'm going to go with the
medium brush size of 7%, then I'm just going to draw something like a
little swirl in here. All right. And in our last step, of course, we need
some highlights. I want to add some highlights, so let's go to white. Pick the gel liner and
add a layer on top. And then we just draw too tiny
dots here onto our leaves. And we're finished. Great job. I hope you enjoyed this
beautiful blooming zen doodle, and I hope you take that
good energy with you now. Thank you for drawing
with me today, and we'll see each other in
our next project tomorrow.
9. Project 5: Loops: Hi, and welcome to
Project Number five. Let's first take our
moment to arrive. Let's inhale. Hold. And exhale. What makes you happy? Name three big things, small things, whatever
comes to mind. What makes you happy, and what brings you joy? Remember, this
moment is for you. Today's project is called Loops, and it's just as
relaxing as it sounds. I will be working with a printed coloring
book version again. I've printed out page
number six, oops. I'll be using my O huhu
alcol markers again, and I've picked three
different blue shades and three different
green shades. And, of course,
another gray because I want to add some highlights
and shadows again. For the highlights,
I already have my jelly roll again
and two fine liners. I have 0.5 and 0.7 here. This is what I will
be working with. Of course, feel free to work in Procreate or use any
tools you have available. All right, then
let's get started. I'll take my 0.5 fine liner. In this one, we will find a few sections where
we draw loops. Let me show you what I mean. I think I want to start
with this top corner. And by loops, I mean, we just start in this corner and draw something
like a petal like shape. And more, we just basically fill the whole box here
with those petals. And those corners here,
we want to fill them. We can do that in the end as well with a thicker fine liner, but I just wanted to
show you right now. This is how I want
this to look like, and now we will identify more sections where we draw
those petal like loops. And remember, just take
your time, enjoy the line. Don't rush and don't
be too perfect. I think that's enough. And in our next step, I want to embellish these
petals a little bit by just drawing a nice and
tiny line down here, just like this in the
center of each petal. And in our next step, we want to round out
all the corners. This is an exercise
you know already, so take your time and enjoy the process rounding
out all the corners. Make sure your body
posture is not too tense. Check in with your shoulders
or with your face. Are there any
muscles super tense? Then just think of
relaxing these muscles. I And in our next step, we're going to color the
white sections in here. So I'm going to pick one
after another and just fill a few of those sections
here with these colors. All right. And in our last step, we want to put a little
bit of shadow here again. Let's pick our gray and draw some nice
rounded edges here. And where there's shadow, we also need highlights. So let's pick our jelly roll, our white gel liner, and add some highlights as well. And this is it for
today's exercise. I think we're finished. Well done today, making
some room for yourself. Thanks for drawing
with me today. I see you in our next
project tomorrow. So
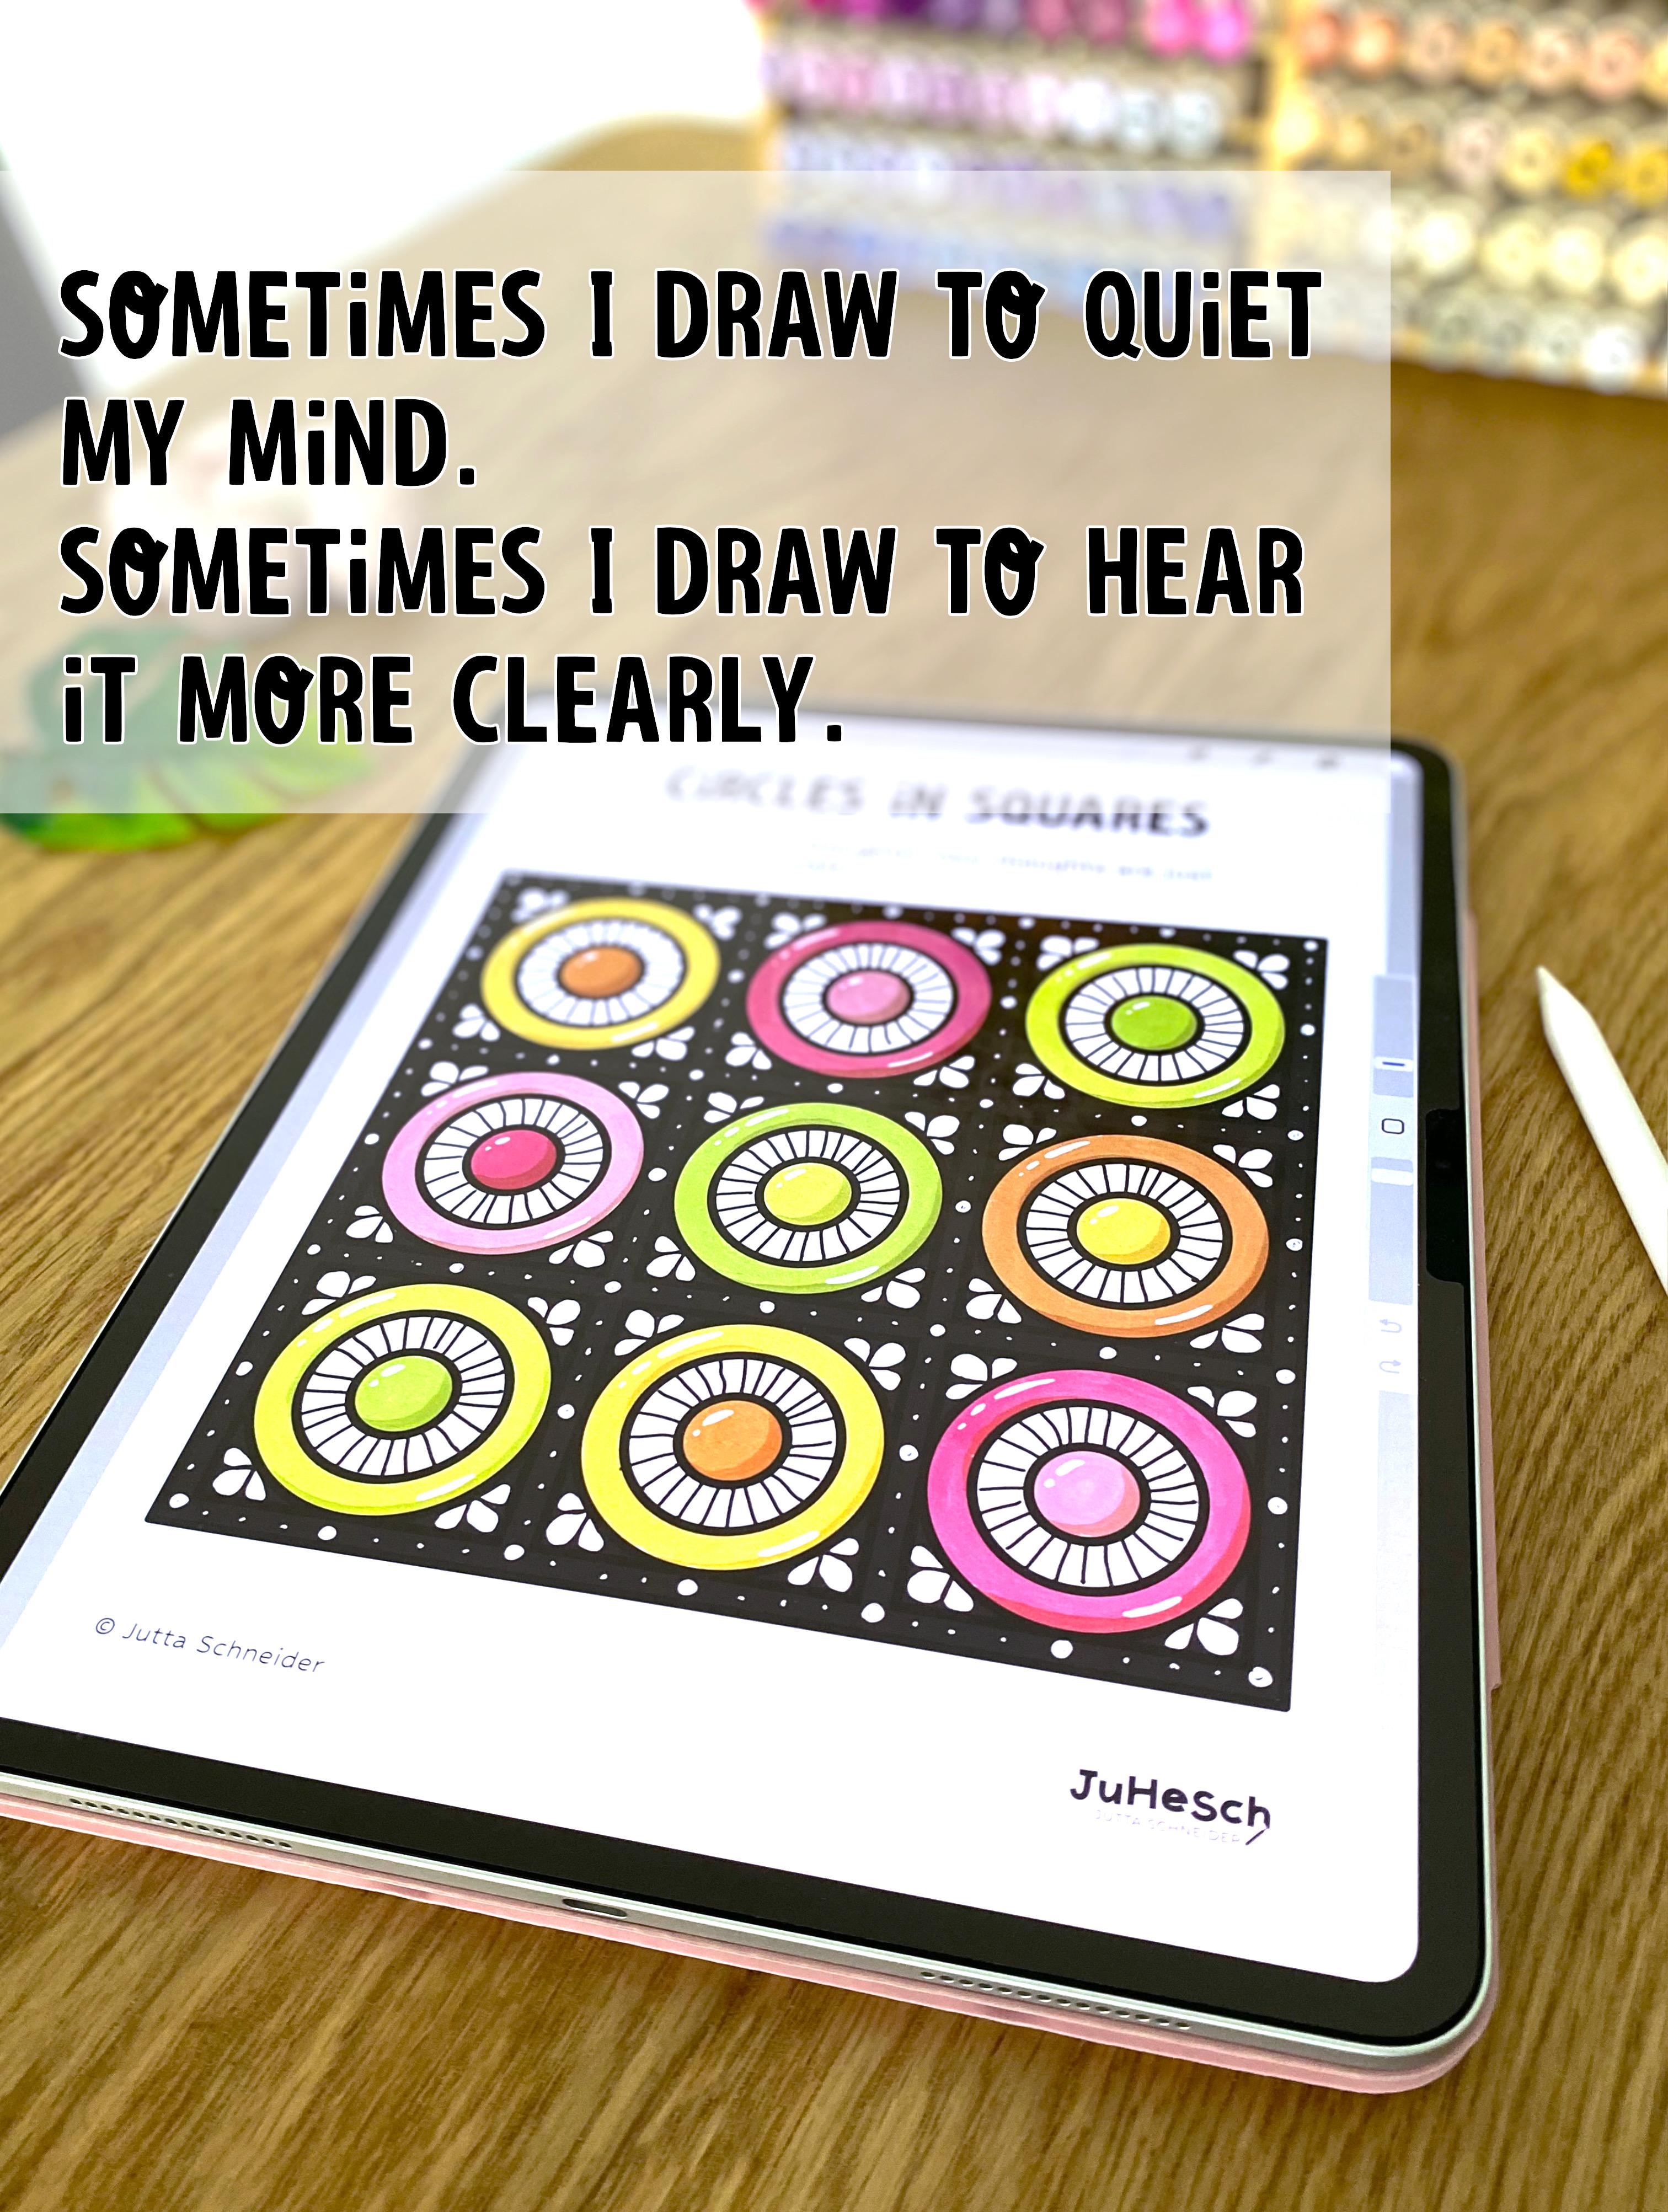
10. Project 6: Circles in Squares: Come back to project number six. Let's again breathe
together to get into the right mindset. Breathe in. Hold, and breathe
out all the stress. Today's thought is, you
are not your thoughts. Your thoughts are just
echoes from your past. Even though you might hear
them in your own voice, those thoughts aren't facts. They're often just echoes of something someone else
said a long time ago. Today, we're creating
a calm pattern of circles inside squares. I've already opened my coloring
page, circles in squares. It's page number
six in Procreate, and as always, we are
going to start by adding a new layer and
dragging it underneath. Then we got to add another layer on top on this
layer number three, we start our drawings. I am on my nice liner fine
and I want to go to the size, let's say, 7%, which
is a nice liner 0.5. Then in our first step, we're going to draw petals in these empty corners
here like this. Of course, you can go with anything else pattern
you can think of. This is what I want to do today. I'm going to draw three
petals in each section here. And I do that in each
of the nine boxes. And remember, this is
not about being perfect. It's about slowing down, getting into the flow, and letting your thoughts
drift by like clouds. All right. These are
all the pedals done. In our next step, you can switch over to a
bigger black marker. I'm just going to increase
the brush size to, let's say, 17%, and then we're going to fill in all those
gaps here, those white gaps. But also here those
lines next to the box. You want to fill
them in with black. And as always, check in from
time to time with your body. Are there any super tense, um, body parts? Is everything relaxed? And that's done now and we are finally ready
for our color work. So let's go to the layer
below the linework layer. And for this and doodle, I want to draw in
two yellow tones, two pink tones, and two
yellow greenish tones. So let's switch over
and pick our orange. Let's start with orange here. You can choose an orange
from your felt markers, and we also are going
to change our brush. We go and draw with
our brush marker now. And then I want to start drawing the circle in the center
with this orange hue. And in this row, I want to color in the outer
ring of the circle here. And in this one, I guess
I want to go and color in the circle again. All right. And then I'm going
to switch over to my yellow And in this one, I'm going to color
in the outer ring. I'm always pairing
a dark U and a lighter And in this one, I'm going to color in the
circle in the center. And here is again
the outer ring. All right. So, let's switch
over to the next color. I think I want to go
with this pink here. All right. And then I'm going to switch over to a lighter, which could be maybe
this one here. And now I'm going to move
over to my yellowish green. I'm going to pick this here. And here, let's say we're going to go with a circle again. Okay. And the lighter
yellow green? In our next step, we want
to add some shading again. You know, I love shading. I'm going to add
another layer on top and I turn the blend
mode to linear burn, then I'm switch over
to this beige color as this creates such a
nice vibrant shade. If you draw with markers, you just pick a
darker hue or you go over some areas once
more with the same ue. That's totally fine. And again, it doesn't have to be perfect. It's just something to help
us calming down and relax. If you think the
shade is too dark, of course, you can play with
the opacity of this layer. But I actually think it's okay. Of course, where there's shadow, there also needs to be light. Let's add another layer
on top and switch over to white and pick
your gliner brush, and then we are going to add
some sparkles here, like so. And since this black border
looks a little bit plain, I want to add some
embellishment there too by just adding dots. Oops, but then we need to switch over to another layer on top of our light
work, of course. So I'm gonna I'm going to draw a big circle in each
kind of intersection. And I think I want to draw a big one in the
center here as well. Like in the middle between
the other two dots. And then in between, I think I want to draw
just a few tiny ones. Maybe these are too tiny. Just three smaller dots. Oh, we forgot the
center ones here. So let's draw big
ones here as well. And then, again, three
small dots in between. Alright. And now we do the
same in this direction. Beautiful. And we could
keep it as it is. But I think I'm not so happy
with those right rings. So I'm going to
add another layer. You could technically
also go back to your linework layer and I'm
going to switch back to black and pick my nice
liner and take the size, I guess, 7% again. And then I'm just going to draw lines all around the
circles in the center. That gives the final kick. You could space them out
as wide as you want, keep them closely together. That's totally up to you. And here we go. That's it. Our zen Doodle is done. Now take a moment to look
at what you've created. No matter what your thoughts
told you along the way, you showed up, you created, and that's what counts. And remember, not every
thought is worth believing. I hope you've enjoyed
this drawing date. Thank you for being
here with me today, and I'll see you in our
next project tomorrow.
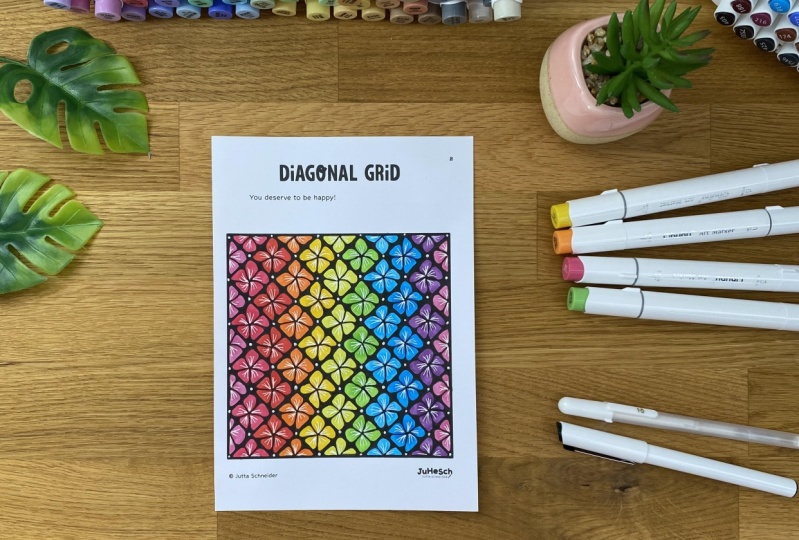
11. Project 7: Diagonal Grid: Hi, and welcome to
Project Number seven. As always, let's start
with a deep breath. Hold. And out. The thought of the day is
you deserve to be happy. That's not just a nice sentence
to hear. It's the truth. And maybe just maybe this little drawing time is a small way to remind
yourself of that. Today, we're working on
the diagonal grid design. I'm working on the printed
coloring book version again. Feel free to grab
your favorite pens or markers or follow
along on your iPad. Today, I've picked a
slightly thicker fine liner, the 0.7 my jelly roll again and ten different
markers in rainbow colors. I want to start here with the first color and then
move all the way over, giving each column a different So that means we're going to start
with coloring. And later on, we will
embellish each section, turning them into flowers. You'll see it's going
to be great fun. So let's start with
our first And again, you just go with your own taste, whatever colors you like. What I want to do is
I want to start in the center and draw
over the center more often to make sure the center is slightly
darker than the rest. I'm going to repeat
that with each section. Start in the center,
draw over the center several times until it's
dark enough for my taste, and then I move on
to the next section. And then I move my way over with each of the
markers I've picked. And as always, in between, check in with your body. Are you tensed somewhere? Are you in a weird posture? Just make sure you tell
your body to relax. That you don't end
up with any pain somewhere just after a
wonderful drawing session. And don't worry if you go
over the line at some places. That's no problem. This is going to be covered in our next step. And the last half
is going to have the same color as
we started with. And our first step is done. As soon as it's dry, we're going to move
on to our fine liner. And in our next step, we want to start in the
center and just draw whatever shaped
petals like this. And then the corners will
be filled with black. That's why we're
using a little bit of a thicker fine liner.
Just like that. If you want, you can make
a draw little circle in the center engine, then start your
lines from there. But I'm making sure that my flowers, my little flowers always
have five petals, but that's completely up to you. You can always stay
the same or mix it up. And we finished our last flower, and I'm actually going to
switch over to the 1.0, the 1.0 fine liner, which is more like a marker itself to fill in
the last gaps here, and we just fill all
the gaps all around our petals that we're left with our flowers and we can't see the grid any longer. And here we go. So all the surroundings
are black now. And in our next step, I want to embellish our petals. I want to give each petal
three little lines like so, let me show you on a dark
one from the center outside, following the rounding of the petals and each one will get three lines
in the center. And here we go. All the petals
have their embellishment. And if you want, you can just
hear where the lines meet, draw a tiny little dot that we don't have
so many black spaces here. Just like so. And today endodle is done. I don't know how you feel, but I think even just
a few quiet minutes like this can change
the tone of our day. You're doing something kind for yourself and you deserve that. So thanks for drawing
with me today. I see you in our next
project tomorrow.
12. Project 8: Squares & Rectangles: Hi there, and welcome
back to Project eight. Before we dive into
today's drawing, let's take a mindful
breath together. Inhale, hold, and exhale. Our thought for today is, think happy thoughts, and
you will feel happiness. It's a simple idea, but
surprisingly powerful. The thoughts we choose to focus
on influence how we feel. Think of something nice, even something tiny,
a favorite drink, a cozy moment, a kind word, let this be your gentle
background while you draw. Now, I've opened already the squares and rectangles
coloring page in Procreate. Feel free to use
your printout and markers or coloring
pencils if you prefer. We are going to
start by, of course, adding a new layer and
dragging it below layer one and add another
layer on top. Let's start by picking a black, our nice liner fine
and the size of 7%, which is a fine liner 0.5. First of all, we round
out all the corners. We don't need to do that
with the squares, though, because we are going to add something else to the squares. We're going to fill
the squares with kind of the elongated
circle oval things, and we fill out the
remainder white spots. And we can change the
direction of our Oval. Some will be vertical and some are going
to be horizontal. Of course, you can choose a different pattern if you want to that's totally up to you, of course, there's also
no right or wrong here. You, your zendodle and
a few peaceful minutes. If your mind gets noisy, just come back to the breathing and that little happy thought. And remember to check
in with your body. Is everything relaxed or
are there any tensed spots? You might want to stretch them. And those corners
are all round now. Great. In our next step, we want to, of course, fill
our rectangles with color. I thought of using shades
of green and yellow. Since I think I've counted
27 different rectangles, I want to pick six different hues and fill four or five rectangles
with the same color. Switch to this one,
and of course, we go to our layer number two, and we switch to the
brush marker again. And then I'm going to
fill four rectangles with this dark green. All right. Then let's move over
to the next color. I think this is going to
be this medium green here. Okay. And our next screen, let's go to the latest version. Fantastic. Okay, let's move
over to the darkest yellow. The next yellow. In the last one. This is all the
rectangles filled, and in our next step, we want, of course, add some shading as well. All right, let's add another layer and
switch to linear burn. When you draw with markers, you either go over with a grayish shade or just with a darker shade
of the same color. That's a matter of taste and you just use whatever
you have available. By the way, you could even go ahead and
shade with coloring pencils or a blending stump
together with a pencil. Up to you, you have a lot of
options. I'm on a new layer. I'm going to switch over to
the beige and then of course, my light source usually
comes from the top left, so I'm going to just give
them a darkish border here. And if that's too
dark for my taste, I'm just gonna play
with the blend mode. Like this should be fine. And when we are shadow, we of course also
need highlight. So let's add another layer, switch over to white
and our gliner. And then we draw on the opposite corner
our light reflection, our highlight, maybe
even more than just one. And down here, another one. And here we go.
That's it for today. You filled these shapes
with color and calm, and hopefully your mind feels just a little
brighter, too. Thank you for drawing
with me today, and I'll see you in our
next project tomorrow.
13. Project 9: Seigeiha: Hi, and welcome to your
ninth en Doodle date. Let's start with a
moment of breathing. Inhale. Hold and
exhale the stress. You can shape your life
with your thoughts. Choose the gentle,
positive and kind ones. They will change your
life for the better. Today, we're drawing
Segeha a beautiful, traditional Japanese
pattern made of repeating wave like shapes. I'm working on the
printed version again, but you choose whatever you
love analog or digital. I've got my fine liner,
a jelly rope pen, and three different
blue shades ready, starting from dark to light. But you go with whatever
colors you like best. I did another version with red, orange and yellow, and that
also looked super pretty. It reminded me of a
sunset or sundown. Okay, I want to start with
my darkest blue shade. And I want to draw those kind of quarter circles down here at the bottom of each
repeating pattern. I want to draw that the darkest. And I also want to
add a little bit of shading down
here in the center. So it means I'm going
to go there once and then draw over the
entire shape once more. And as always be
gentle with yourself. Don't try to be too perfect. Just draw and enjoy the
calm that comes over you. And we're finished
with a darker blue. So I'm going to
pick my next shade. And I'm going to fill the next
quarter circle area here. And I also want to
make sure that I draw over the bottom first and then color the entire
segment to just make sure I have a little bit of a
darker space on the bottom. It doesn't have to be big, just a tiny little bit. That creates a little
bit of a shade. And again, don't be mad
if you go over the line. That's no problem at
all. We can cover it up. We're just humans.
We make mistakes. We don't have to be
perfect all the time. Let's move on to the
last blue shade. But we're not going to color this third segment
here of the circles. We're going to color
the top segment here. We leave this one empty for now. And also again here, a tiny little darker
area at the bottom, and then just fill
it with color. This is the third segment, by the way, so we cannot
fill that right now. We don't see the top
of this segment. We have it at the bottom. All right, we can move
on to the fine liner, and we're going to fill
these top sections here. The ones that are still white, and I guess I'm going to go with my let's see, fine liner, 0.7. And I want to fill those quarter circles
here with other circles. I'm starting in the
center just to make sure they're kind of
evenly spaced out. And then I'm filling the corners here with black. Super simple. Let's now move on
from segment to segment and fill
it with circles. They can be big, they can be
small, whatever you want. And as always, make sure you
check in with your body if there's any tensed
spots in your body. Is it in your face? Is it in your mouth or shoulders
or in your hand? Just make sure you
take a moment to check in and release
this tension. In my next step, I want to give the second segment here,
the turquoise one. I want to give that
something like just straight white lines with our gelpan and repeat that in every turquoise
segment. Just like this. And in our last step, let's draw some kind
of light spots here. And we're finished with
today's sent doodle. It looks so pretty, and I feel super calm now. So thanks for drawing
with me today. I'll see you in our
next project tomorrow.
14. Project 10: Zig Zag: Hi there, and welcome back
to Project Number ten. Let's begin with our
slow, mindful breath. Inhale hold and exhale. Today's thought is a
really strong one. What would you tell your best
friend when they feel bad? Be your best friend. It's wild. How kind
we can be with others while being super
harsh with ourselves. So for today, give yourself
the same gentle words, the same support as you
would give your best friend. Just be there for yourself. While you let that sink in, let's have a look at
today's project, Zigzag. I've already opened it in
Procreate, but as always, feel free to use the printed version instead
with your favorite pens. When you're working
in Procreate, don't forget to add
a new layer and drag it underneath the linework. And add another layer on top just to have it
easier later on. On this layer,
layer number three, we are going to start with
our own linework where we need the black and
the nice liner fine. In the medium size, 7% I've saved here, which is the 0.5 fine liner. Then what we're going to do is in each of those
diagonal segment, we are going to round out
opposite corners like this to create something like a leaf shape and the remaining white
sections are going to be filled in with black. Just like this. And if you feel you want to zoom
in into your canvas, that's totally fine. Rotating, zooming in. Just do whatever makes you
feel the most comfortable. The same goes with
a printed version. Please feel free to rotate your coloring page
if you have to. As you can see, I'm
doing all the line work now because by my
personal preference, I like to finish one step until I move
on to the next one. But that's totally up
to your own preference. And because I have this
experience with myself, I want to give out
another reminder for checking in with your body. Check in. How are you
sitting and drawing there? Do you have any tensed spots? Is your jaw relaxed? Is your forehead relaxed? Just check in and
make sure you won't end up with any super
tensed spots in your body. All right. I finished
all the leaf shapes, and now I want to fill in
all those empty corners, and I think I'm
going to increase my brush size and see
if that's working. Of course, you could also
use a regular felt marker. That's totally up to you. Whatever you have
on hand available. I always say making
this kind of art for self care doesn't require
a ton of new stationery. If you're tight on your
budget, then please, please, please go and just get
whatever is available for you. Get your kids crayons, get your kids markers, or just a cheap set from the supermarket that
is absolutely okay. In our next step, we
want to start coloring the leaves and I want
to use per stem here, per side of a stem. I want to use, again, a darker, a medium, and a light, a medium, and a dark shade. Let's go ahead and start
with this gorgeous, bright pink ish magenta shade. And of course, we need to switch the brush and go to
layer number two. And here we are going to
fill in the color in one of those leaves and then we let three empty and
color the next one. Just like this, super easy. I want to go ahead and pick also yellow and purple and then
end up with pink again. Here I'm going to alternate the location of the
darkest leaf one, two, three, and
another one here. All right. And then we pick the next pink
shade we have here in our collection and draw the ones above and
below the darkest ones. Of course, you can alternate
within the stem between the colors I'm already curious
to see all your projects, all your beautiful zen doodles
in the project gallery. That's just so much
fun for me and also inspiration to see how you guys interpret the
prompts, the colors. What's your favorite
combination, and so on. That is really wonderful. Alright. And the
lightest pink shade, I think I'm going to
go with this one. Beautiful. This looks
very pretty already. Then I guess I'm going
to go with orange and those two yellow shades here. All right. And then let's move on to
the darker yellow here. Alright, the lightest yellow. And that's yellow done. Let's move over to purple. I guess I want to
start with this as my darkest and the other
two as my lighter version. And then our midtone and then the lightest. Okay. And also, I really want to add some
shading here again. I'm going to add a new layer and turn that into linear burn. So I think I want to go
with this line shade. And I've seen I've drawn
over the line here. So I'm going to go tops
to my color work layer, and I'm just gonna delete
it here. That's okay. If you draw on paper and something like
this happens to you, that's no problem at all. You just take your
white gel pen or Posca pen and just gently draw over to cover
up those spaces. And remember to be gentle with yourself. We're all humans. This is happening to all of us. Sometimes you draw over
the line, and that's okay. And, of course, where there's
shadow, there's also light. So let's pick the white, add another layer, go over to the gelliner and
draw some lilight. The only thing that I
think we need to do is give this white stem here
something like a pattern. So I'm going to switch
over to the black again and move back to our linework layer and I'm going to pick the nice
liner or fine once more. But this time, I think
I want to go with the smallest size and
just draw lines here. The size is 4%, and it's kind of
a fine liner 0.3. But of course, if
you only have 0.5, just go ahead and use that. And I think we're done. This is it. I think
it's such a nice work. I love how the colors go along. They look so pretty,
bright and beautiful. And I'm so proud of you. You showed up, you created
something for yourself, and maybe you feel a bit
more grounded by now. So thanks for drawing
with me today, and I'll see you in our
next project tomorrow.
15. Project 11: Acanthus Leaves: Welcome back to Project 11. Let's start with a
short breathing moment to get into the flow. Inhale. Hold. And breathe out all the stress. Our thought today is
a little reminder. Worrying won't change
the situation, but it does drain your energy. So instead of
spinning in circles, let's use this time to refill
your energy by drawing. This project is called
Acanthus leaves, a classic shape often found in traditional
decorative art. Although they might not exactly look like
real Acanthus leaves, they just remind me of them. That's why I decided to
give this pattern its name. Grab your printed coloring page or open it in Procreate
if you prefer. Choose your favorite tools. I have my markers, fine liners, and my
jelly roll pen ready. You draw, of course, like always with whatever
feels good today. Let yourself enjoy the process. There's no pressure
to be perfect. Ready? Then let's draw. I've picked seven
different shades here in orange pink and green. I counted 22 sections. Means almost every color
gets three sections to fill, and one color gets four. So let's just start
with coloring. I have this pale orange here. Alright, I want to
start by just coloring. Just take your time. As always, enjoy the process,
enjoy every line. Don't be upset. If you
go beyond the line. That is no problem at all. Most of it will be covered
up in our next step anyways. All right. Wonderful.
In our next step, we'll grab our fine liner. I have the 0.51 again. And now I'm going to show you
in the center piece here. I'm drawing a line from the
top to the bottom corner, and then I fill each side with these kind of loopy shapes here. Getting bigger and smaller. Like this. Here we go. That's one half of our Acantha leaves and the
other side kind of similar. Just fill the space
with these leaves. And now we got to do that
in each of the boxes. I really like
drawing these loops. They're just so wonderful. Such a pretty shape, and the hand basically
does it on its own. And while drawing, don't forget to check in
with your body. Make sure you don't have any super tense spots that
will cause pain later on. Just make sure you relax
your jaw, your forehead. Just try to draw as relaxed in your body
posture as possible. All right. Second step done. And in our next step, we want to get something
like a black marker. I'm using the brush pen
gear from this set. And we're going to
fill these gaps here. And if you're unhappy because you went over the
line here like this, you just take your
jelly roll pen in the end and just draw over. No one's gonna notice that. I really want to quote Bob
Ross all the time with saying, We don't make mistakes. We only have happy
little accidents, and that's absolutely true. Alright. That's how pretty already. Add on to embellishing our
acants leaves by just drawing a nice little centre line pointy and getting a little bit
thicker towards the stem. Just following the round shape of the leave itself, like this. And I think I want to add
a little bit of a shadow, but a very simple
one by just taking the pen and go over the bottom of the leaves
once more, just like this. Just one darker bottom line. You could use a colored
pencil to add your shading. And this way, you
could be certain that you won't smudge
any of the fine liner. Some fine liners they
smudge when you draw over. So I highly recommend
to make some um, tests before you start drawing precious zen
doodles and then spoil them by just smudging and wiping through
the fine liner. Not only does it
ruin your image, it also ruins your marker tips. And in our last step, we want to give some highlights where there's shadow, there's also highlights. And I'm just gonna draw tiny
dew drops, if you wish, are just kind of tiny white
dots here, tip of the leaves. And here we go. Our beautiful Acanthus leaf
Zendoodle is finished. I hope you enjoyed
our Zendoodle today. You did something kind for
yourself, and that matters. Thanks for drawing
with me today. I see you in our next
project tomorrow.
16. Project 12: Swirl: Hi again, and welcome
back to Project 12. Let's begin with
our calm breath, just to arrive in the moment. Inhale Hold and exhale. Just let it all go. And here's today's thought. Being happy for someone
else makes you happy too. There's something
really beautiful in sharing someone else's joy. It softens envy and reconnects us with the
good things in life. So if someone comes
to mind who's doing well right now,
just smile for them. That feeling is yours too. All right, I've already opened the Sword
file in Procreate. But of course, you
know it by now. You follow along on
whatever medium you like. If you follow along on paper, you might want to use a
pencil and a blending stump, but that's just optional. For now, I want to
start with my black. The fine liner in the 0.5
size 7% here in Procreate. The nice liner,
fine. Here we go. If you are in Procreate, remember to add a new layer, track it underneath
and add another layer, and we'll start with our black
linework on layer three. What I want to do first
is I want to draw lots of dots in the center,
lots of circles. And that's the center done. In our next step, we want to start with coloring. I guess I want to
start with our red. Let's switch over to
the brush marker and just fill one segment with red. I will be using four
colors in total. It's this bright red. It's a soft pink and
a yellow and a green. I leave three segments empty
and move on with my red. And this last one down here. Alright, then I'm
gonna pick a pink. Let's say I'm gonna go
maybe with this one. Ah, that's too dark. Maybe I'm gonna
use the light one. Yes, I like that better. But again, you always go with colors you like best
that makes you happy. Maybe you already have your signature colors that
you really love to look at. Maybe you have certain
color combinations that make you happy. Just go ahead and use those. All right. And the
last one over here. And my next color
is going to be, let's say, this beautiful,
saturated yellow here. As always, this
is your reminder. Check in with your body. Are you tense or
are you relaxed? Check in with your jaw, your forehead, your
eyes squinted together? Maybe you want to stretch
out a little bit, stretch your arms and shoulders. So we make sure that
you don't end up with any stiff body parts after
your last project. All right. And the last one is here. And I just saw that I
am on the wrong layer, but I'm going to show
you how to fix that. All right, so I noticed I
noticed I'm on the wrong layer, and the easiest way
to fix that is just go to the ribbon tool and make sure free hand is selected. And then we just draw all
around our center here. Then we open the copy and paste menu with default setting, it's probably with three
fingers wiped down, and then I'm going to
choose cut and paste. Now the center with
the linework is on a different layer and our colors are on
another separate layer. That's exactly what I wanted. So let's go on and
choose the next color, and I guess I want to go
with a nice yellowish green. Let's see how that looks. No, I don't like that. Then I'm going to pick this one. This looks brilliant. Very, very nice. And I color the remaining swirl
sections in green. I also want to draw in the center below the
bs, just a green dot, and then I switch
over to the yellow and draw another circle around, and then I go to the light pink and draw
another circle around, and then I'm going to go over to the red and draw the leftover. All right. In my next step, I am going to pick the smudge tool and I want to smudge with
the same brush here. It's the brush marker, and now I just want
to smudge those together to create a
beautiful gradient in here. This is something you totally can create especially
alcohol markers. They really let you
blend them nicely, and that's exactly
what I wanted here. And here we go. I hope you
can see that on the screen. It's beautifully blended. Okay. Now it's a time where
I want to add some shading. Above our color layer, I'm going to add
another one and I set the blend mode
to linear burn. When you're working on paper, you could just go and take your pencil right now and
then I'm going to switch here to the beige color
and with our brush marker, I'm going to draw here a
little darker section. And here a little bit
of a darker section. It doesn't have to
be nice and tidy because we're going to
smudge that in a second. Here we go. That's enough. On paper, you're going to switch over to your
blending stump, or you just pick a tissue. It's also working with a
tissue here in Procreate, we go back to our smudge tool, and then we just smudge that
here towards the center. And here on the raise, we smudge it our
wards. Just like this. And we follow the curve and just make sure
that we get rid of this harsh line
here, just like so. Let me zoom out. Then
you can see it creates this gorgeous shadow in towards the center as if
it would be a flower, the flower with curved
petals on paper, you just smudge with your
tissue or your blending stump. In our next step, we can move back to the linework layer with the
dots we've created earlier. We switch over to
black again on paper, you can just pick a fine liner, and I think I'm going
to stick with my 7%, which is 0.5 fine liner. Then I'm just going to
fill all these petals here with ovals. That's it. Just fill them with ovals
from one line to the next. Then we move on to the next one. And then we just fill here those narrow corners we just
fill with smaller ovals. Wonderful. In our next step, I am going to increase
the size to 11%. You could switch
over to a marker and then just color in
all those gaps here. And here we go. And since
we have some shadow added, I also want to add
some highlights. Of course, you know me.
So let's switch over to white and to our shell liner. And then I'm just gonna draw
a few dots here like this. And here we go. Ours and
doodle is done. Well done. You made something today and maybe smiled for someone
else along the way. So thank you for drawing
here with me today, and we'll see each other in
our next project tomorrow.
17. Project 13: Ovals: Welcome back to
project number 13, the second to last one. This moment is for you, so let's breathe
together, breathe in. Hold and breathe out. Our thought for
today is breathe in, calm, breathe out stress. As you breathe in,
picture a soft, warm light flowing
into your chest. Calm, steady, gentle. As you breathe out,
imagine a cloud of tension leaving your body floating
away with your breath. This little
visualization can help shift your nervous
system into calm mode. Even just one deep breath
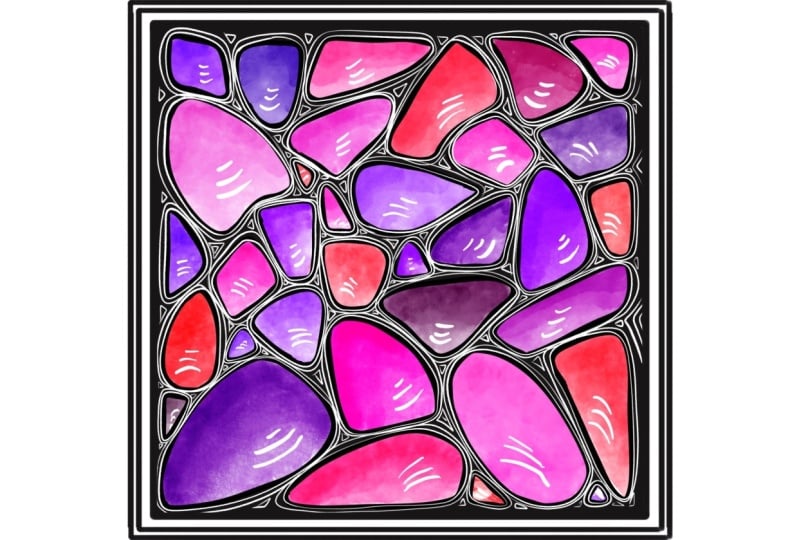
can change how you feel. Today, we're working
on columns of ovals. You can use the printed
coloring book version as I do and pick your favorite
pens or markers. Or as always, you go digital
and work in Procreate. I've picked five different
shades of purple and pink, my trusty jelly roll pen, 1.0, a 0.5 fine liner. And today I'm also going
to use a very soft pencil. I have a four B pencil
here and a blending stump. You use it to blend in your pencil strokes and we'll use that to indicate
some shadow later. Let's start now
with the coloring. As always, take your time, follow the shapes, and don't worry about
making it perfect. This is about being
kind to yourself. I'm going to start with
my first purple shade. And start from right to left, filling in those lines. I'm always going to leave one empty and color the next column. The ones in between will
stay white for now. I also want to go over
this side here once more to just indicate a
little bit of darker area. And since this is only
half and I don't want this color to be set because it doesn't
get to draw so much, I want to also draw the other half here
in that purple shade. And the same here, we want to draw the
outside a little bit darker just to indicate
some roundness. All right. That's it
with the colors for now. In our next step, we are going to need
the fine liner. And what we're going to
do is we're just going to draw like arcs, arches, whatever you want to call those, and fill those white
spaces in between, like kind of this shape. The more confident you draw, the better your lines get. Sometimes if we
slow down too much, if we get too careful, the lines are getting,
like, really shaky. And here we go. This
first one is done. And now let's fill all
the remaining columns. And while drawing, remember
to check in with your body. Are there any hypertensed
spots in your body? Make sure your
shoulders are relaxed. Your face is relaxed. You don't do any weird
things with your mouth. Just make sure your posture
is relaxed and chill. And here we go. All right. That looks perfect already. In our next step, we are going to use
the pencil and just draw very slightly
at either side of these white columns with those arches all around
the edge just slightly. Don't press too hard because
then we can't smudge it. And on the other side, right next to the black line. And then we'll take our
blending stump and just smudge that in to create a
perfect gradient shadow. Just blend it towards the
center that the darkest spot is right next to the black line and the lightest
towards the center. Of course, you can go as dark
or as light as you like. I'm happy with how
it looks right now. And this creates this
perfect round kind of I don't know,
caterpillar shape, maybe. I don't know. I really
like it. Let's go on. You could go around
and do the same with the colored areas here. You could even go and pick some color pencil
and smudge those in. I'm not going to do that
for my colored sections, but I'm going to take my trusty jelly roll pen and just draw my beloved white spots
here, just like this. And a small one here, a big one at the top, and a small one
opposite at the bottom. And here we go. Our second to last and
doodle is finished. Be proud of that. You just gave yourself a little
pocket of peace. Let's keep choosing calm and
draw one line at a time. Thanks for drawing
with me today. I see you in our next project, the last one tomorrow.
18. Project 14: Peony: Hi, and welcome to
our last project. I'm so glad you're here. Let's take one mindful
breath to settle in. Inhale. Hold and exhale. Today's thought is, what
made you smile today? Could be something big or tiny, a funny message, a good coffee, or a silly pet moment, whatever it was, hold onto
that feeling for a moment. It's these little smiles
that make up the good days. All right, I've opened the last coloring page
pony in Procreate already, but as always, feel
free to follow along on paper with
your favorite pens. For this one, I
thought about starting dark in the center and getting
slightly lighter outside. I think I'm going to go with
reddish pinkish hue and maybe some green around
for the leftover spaces. In the end, we're
going to decorate the flower with a little
bit of embellishment. Let's go ahead and
add a new layer. And wrack it underneath
when working in Procreate. Then let's just
add another layer. On layer two today, because we're starting
with the coloring, I will start with layer two. I will pick the dark red
we have here as a brush, I'm going to use
the brush marker, and then I'm just going to
color in those center petals. All right. That's
the center petals. Then I'm going to move
over to my medium red here and fill in the next
layer of petals. Again, feel free to
rotate your canvas. Zoom in and out, turn around your coloring page when
you feel you need it. We want you to be in a restful position and
just enjoy the process. Not being hunched or
crunched or tensed. Okay, let's move over
to the next pink. I think I'm going to
go with this one. And the next layer
of leaves will get or petals will get this. And then I'm going to move over to the next lighter shade. Like this one here, maybe. And the lightest pink. Oh, it looks beautiful. And for the remaining
spaces there, I'm gonna pick I think I'm going to go with this
darkest yellow green here. And this is how it looks so far. All right, as I said, we want to add a little
bit of shading. I'm going to add a new layer on top and send the blend
mode to linear burn. When you're working on paper, you could go ahead and just take a darker pink hue or a darker
green hue for your shadows, or you could go with a pencil and a blending
stump or a tissue. That's totally up to you. You don't even have
to apply any shading. I just want to because I love the color change and
the smudging as well. So I'm on this layer on
top of the coloring, the layer sent to Linear Burn, and I'm going to start in
the center and just give a few darker lines just like so, and I'm going to do
that with every petal. And in our next step, we're just gonna smudge This is how it looks now. I'm going to move over
to my smudge tool. Make sure I'm still
on my brush marker. If you haven't noticed yet, the smudge tool is not set to 100% set opacity,
but just 61%. For me, that works better. You could just go with
whatever you prefer and however you like
the effect best. But I think I'm
going to increase the brush side
size a little bit. All right. Then let's just smudge away. I just love how the
different shades and textures blend
into one another. That's really that
really makes me happy. And if you like the shading
a little bit more subtle, just go ahead and
play with the opacity of this layer and turn the
opacity down a little bit. Oh, I forgot the shading here, so let's switch back to
our brush mark or brush and just add a few
lines here and there. Alright. And that's splendid. I think I want to turn down
the opacity a little bit, especially the outside is a little bit too
dark for my taste. So I've set it to kind of 59%, and that's how I like it. In our next step, I want to add some
embellishment. Of course, you know me. So I'm
going over to layer three, that layer on top
of the shading, and I will pick my black and my nice liner fine
in the 7% size, which is, again, about 0.5, but you just pick whatever
you have on hand. And I guess I want to add a line and maybe with a dot at the end,
something like that. Let's see what looks best. Maybe like this. Yes, I
guess. I like this the most. Just three lines with
a dot at the end. And we don't need to make
sure they are too even. The more variation I think
the better it looks. And even though this
was drawn digitally, I really like all these textures and color changes
here in this petal. So you can really mimic
traditional media pretty well, even though you might
be drawing digitally. Beautiful. Yet, I think the green spaces are a
little bit too boring, so I just want to
give them lines. I'm going to go a size
smaller, the 4% size. You could still
use your 0.5 fine liner or you go a
size below maybe 0.3. Then I think I'm just going to draw lines towards the outside. And you know me,
if we have shadow, we also need some highlight. So let's add a new layer, go over to white, pick the gelliner and then
we draw a few dots here. And that was our last
project together. I can't believe it to be honest. And if you are like me, you don't want to stop right now because you're
absolutely in the flow. So I really want to enable you to create your
own and doodles. So let's head over to
the next lesson where I show you how you can do
that. See you there.
19. Make Your Own Zendoodle Template: All right. I promise
to show you how to create your owns and doodles,
so let's dive right in. I'll walk you
through both methods in Procreate and on paper. Let's start in Procreate. Since I really enjoy square
patterns for their symmetry, I've opened a square canvas
with 2000 by 2000 pixels. But honestly, any size will do. You can even go for a
rectangle if you prefer. Just choose whatever
feels good to you. The same goes for paper. I'm using a square piece of
slightly thicker paper here, but a page from
your sketchbook or even a regular printer
paper works just as well. In Procreate, I'm selecting my nice liner fine brush and setting the
size to around 7%. I'll start by drawing
a rough square shape. Then let the quick
shape tool snap it into a perfect square by holding
one finger on the screen. After that, I'll adjust
it slightly if needed. On paper, grab a
ruler and a pencil. Measure about one eighth
of an inch or just a few millimeters in from the edges and place a small
dot on each side. Connect the dots with light pencil lines
to form your square. Once you're happy with
it, you can go over the lines with a black
marker or fine liner, either using the ruler
again or drawing free hand, whatever you like better. Now that we have a frame, we'll add some guidelines to
help us build our pattern. In Procreate, add a new layer
underneath your square. Pick the sketcher rough and draw a slightly wavy vertical
line down the middle. Then add two more, one in the center of the left half and one in the
center of the right half. Repeat the same
steps horizontally, so you end up with a grid. Now turn down the
opacity of this layer. We don't want these lines to
distract us while we draw. On paper, use your
pencil to draw the same wavy guidelines with very light pressure so
you can erase them later. Be careful not to
press too hard. All right. Now it's time
to create a woven texture. In Procreate, create
a layer above the guidelines and go back to
the nice slider fine brush. Start drawing lines next to
the vertical guidelines. We stop at one intersection
and cross the next. Then draw a line
underneath that one again. In the second time, we stay to the right of
the first guideline. On the next guideline, we shift the pattern down
one space just like this. Stay to the left of
the guideline first, cross one intersection
and stop at the next. Then we draw the
next one underneath. Same to the right of the
guideline, just like this. Here with the last guideline, we go the same way as we
did with the first one. Then we repeat the same steps
for the horizontal lines. Wherever a vertical
line is open, we draw across it. When it's closed,
start a new line. On paper, do exactly the
same using your fine liner. And once you're done, erase
your pencil guidelines, but wait until the ink is
fully dry so nothing smudges. In Procreate, we can just
discard our guideline layer. And now you've got a
perfect zendoodle base. I went ahead and rounded
out the corners, filled in the squares, and added the details like those little
lines in the lanes, the shading, and the highlights. This is how mine
looked in the end. See how easy it is to make
your own zendoodle template. So go ahead, play around
and see what happens. I can't wait to see
your creations. Now it's time for a little
wrap up of this class. So let's meet in
our final lesson.
20. Wrap-Up & Thank You: And here we are at the end of these two mindful weeks of zen doodling
for stress relief. I hope you feel
proud of what you've created and maybe even
a little lighter. By now, you've explored a whole collection of
beautifuls and doodles. You've learned how to use drawing as a way to
release tension, refocus your thoughts, and
create something meaningful, even on the most
chaotic of days. You've even learned how to come up with your own patterns, and please don't stop here. Continue your mindful
drawing practice, especially when life gets
noisy or overwhelming. This is your space, your quiet time, and it's
always there for you. If you've enjoyed the class, I'd love for you to upload your projects in the
Projects and Resources tab, and let us know how it
fell to draw each day. And please leave a
review if you have a moment to help other
students discover this class. And, of course,
follow me here and on social media to
stay in the loop. And if you share
your art anywhere, feel free to tag me. I'd love to see it. So thank you for
drawing here with me, and I'll see you in
my next class. Bye.
 Jutta Schneider, Artist | Educator