Transcripts
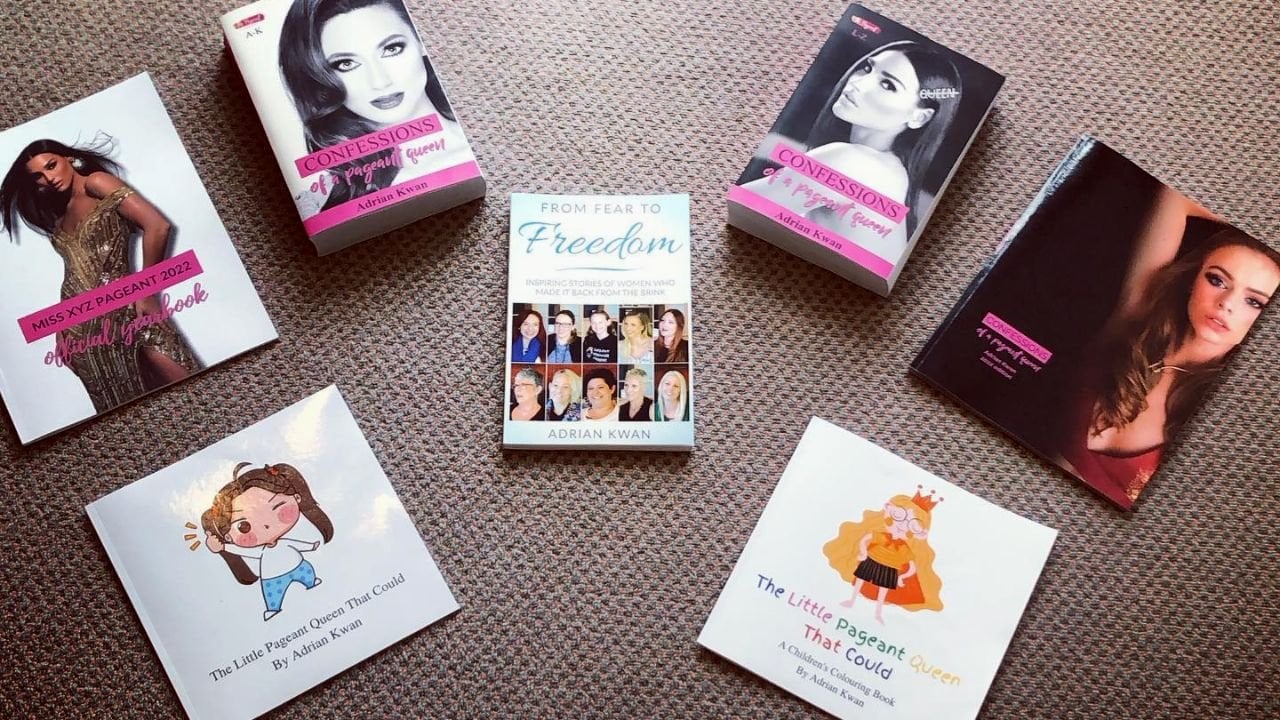
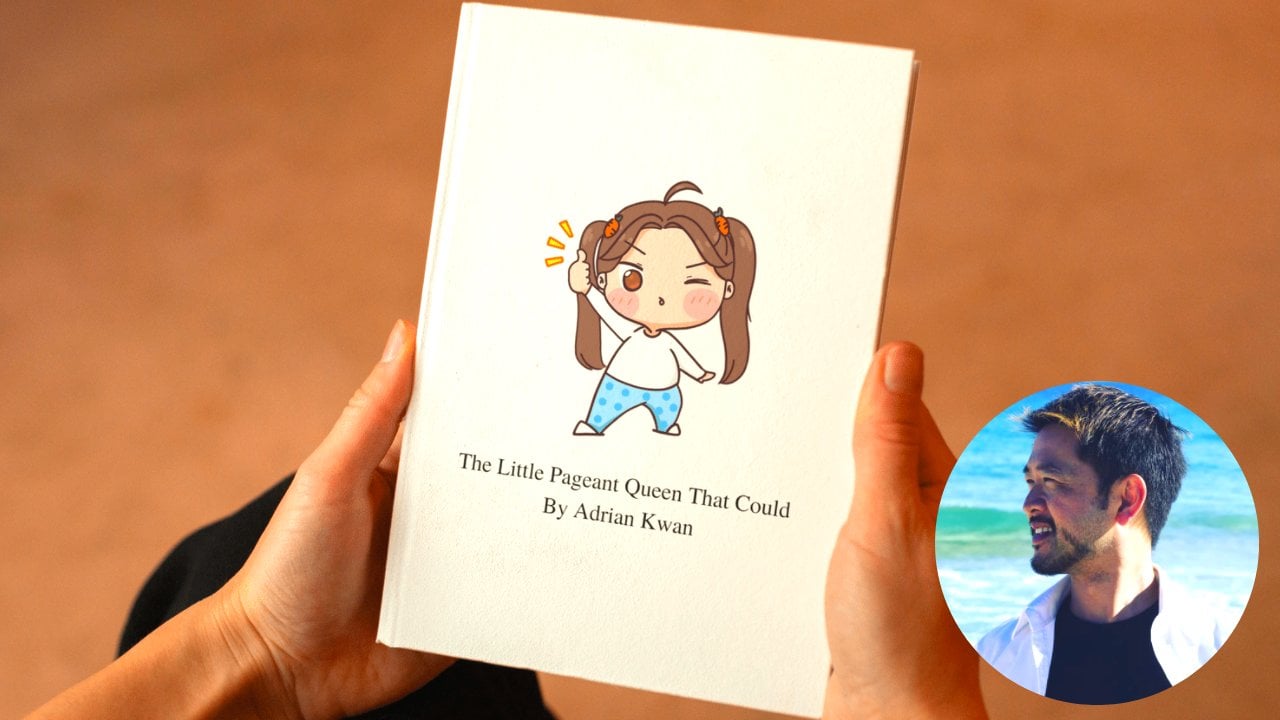
1. Course Overview: Last year I published
a children's book. I'm an author, very easy for me to write the words
for children's book, but I can't draw
to save my life. I have no artistic talent. I had to resort to using
clip art from Canva. Now, the book still turned
out really, really well. Then, fast forward
to late last year, and unless you've been
hiding under a rock chat, GPT came out and I was blown away by AI as a
computer science major. That was text. I then
I heard about art AI. I was a bit skeptical. I thought, well, how
useful can this be? The answer is right in
front of your eyes. This is the new book
that I designed for friend and all the art
in it is I generated. Now if it's not
abundantly clear already, I think you can see an
absolutely massive difference. Not only was the AI able
to generate the images, it was able to generate
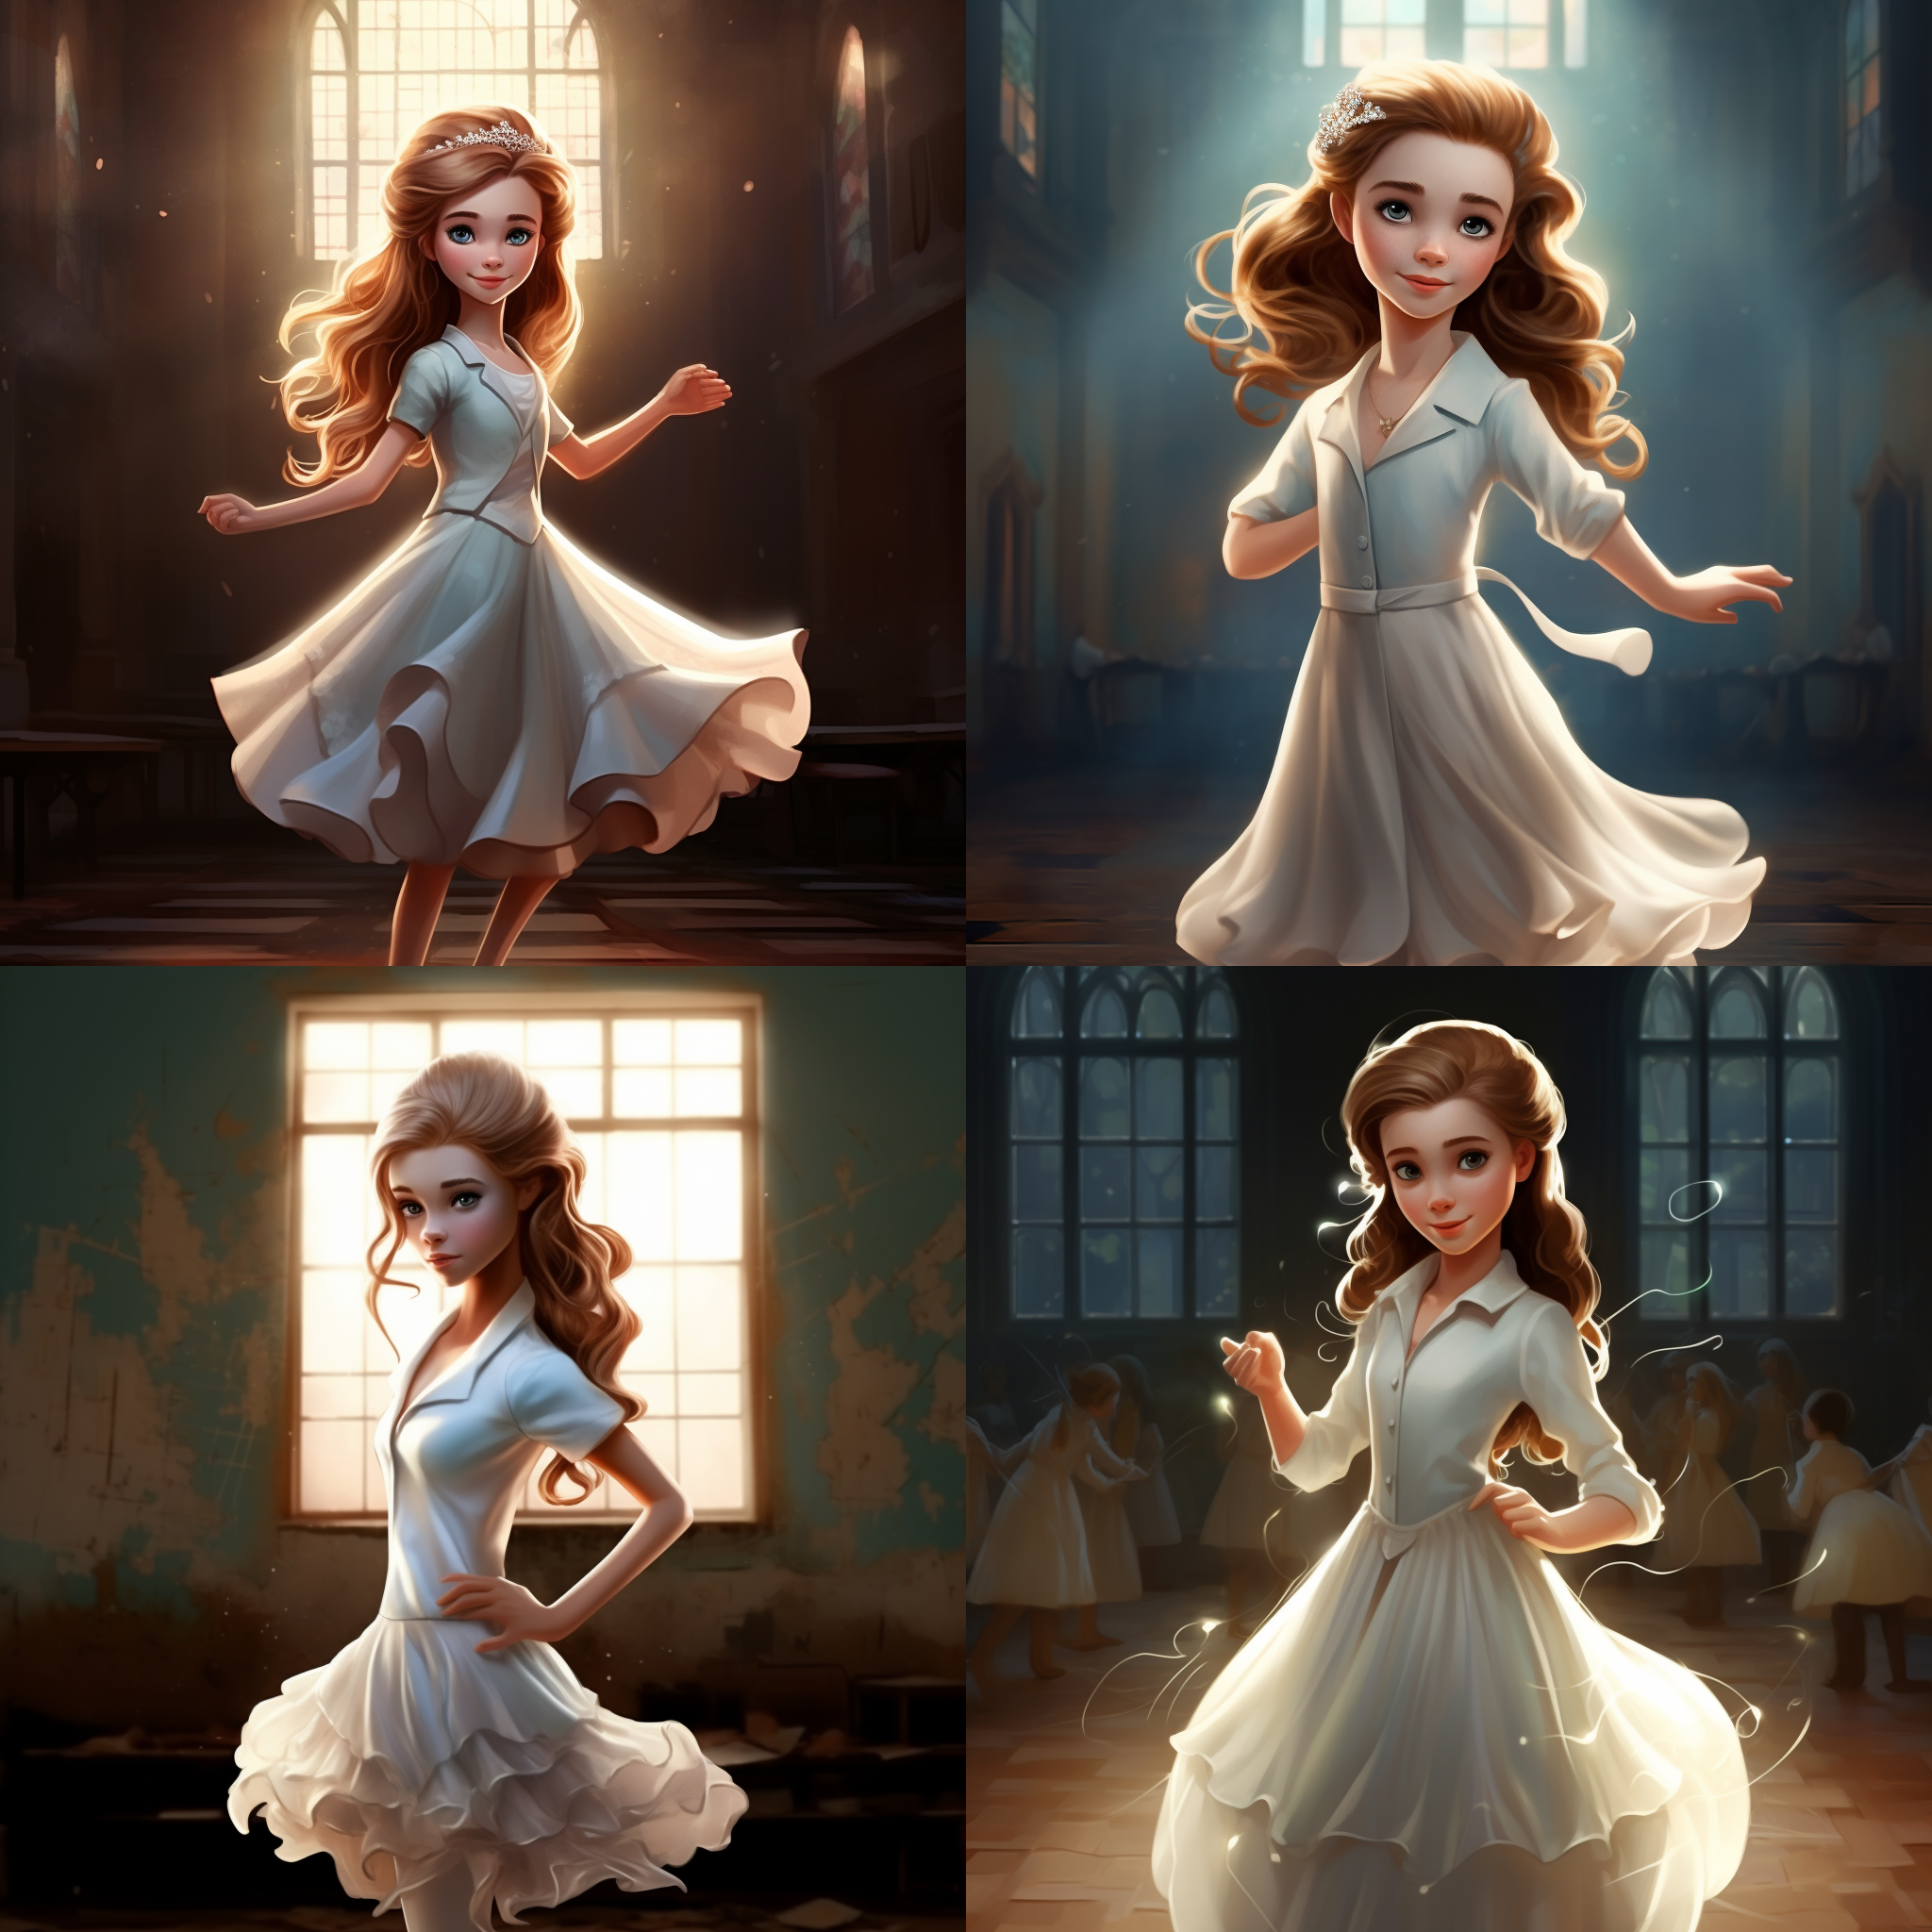
consistent images. This book about a
friend of mine named Eliza and she has red hair and
blue eyes. And guess what? I need every image in
there to be basically similar and certainly a young woman with red hair
and blue eyes. Since then, I have used
the Mid Journey app, which is the app you're going
to be learning to use in this course to not only
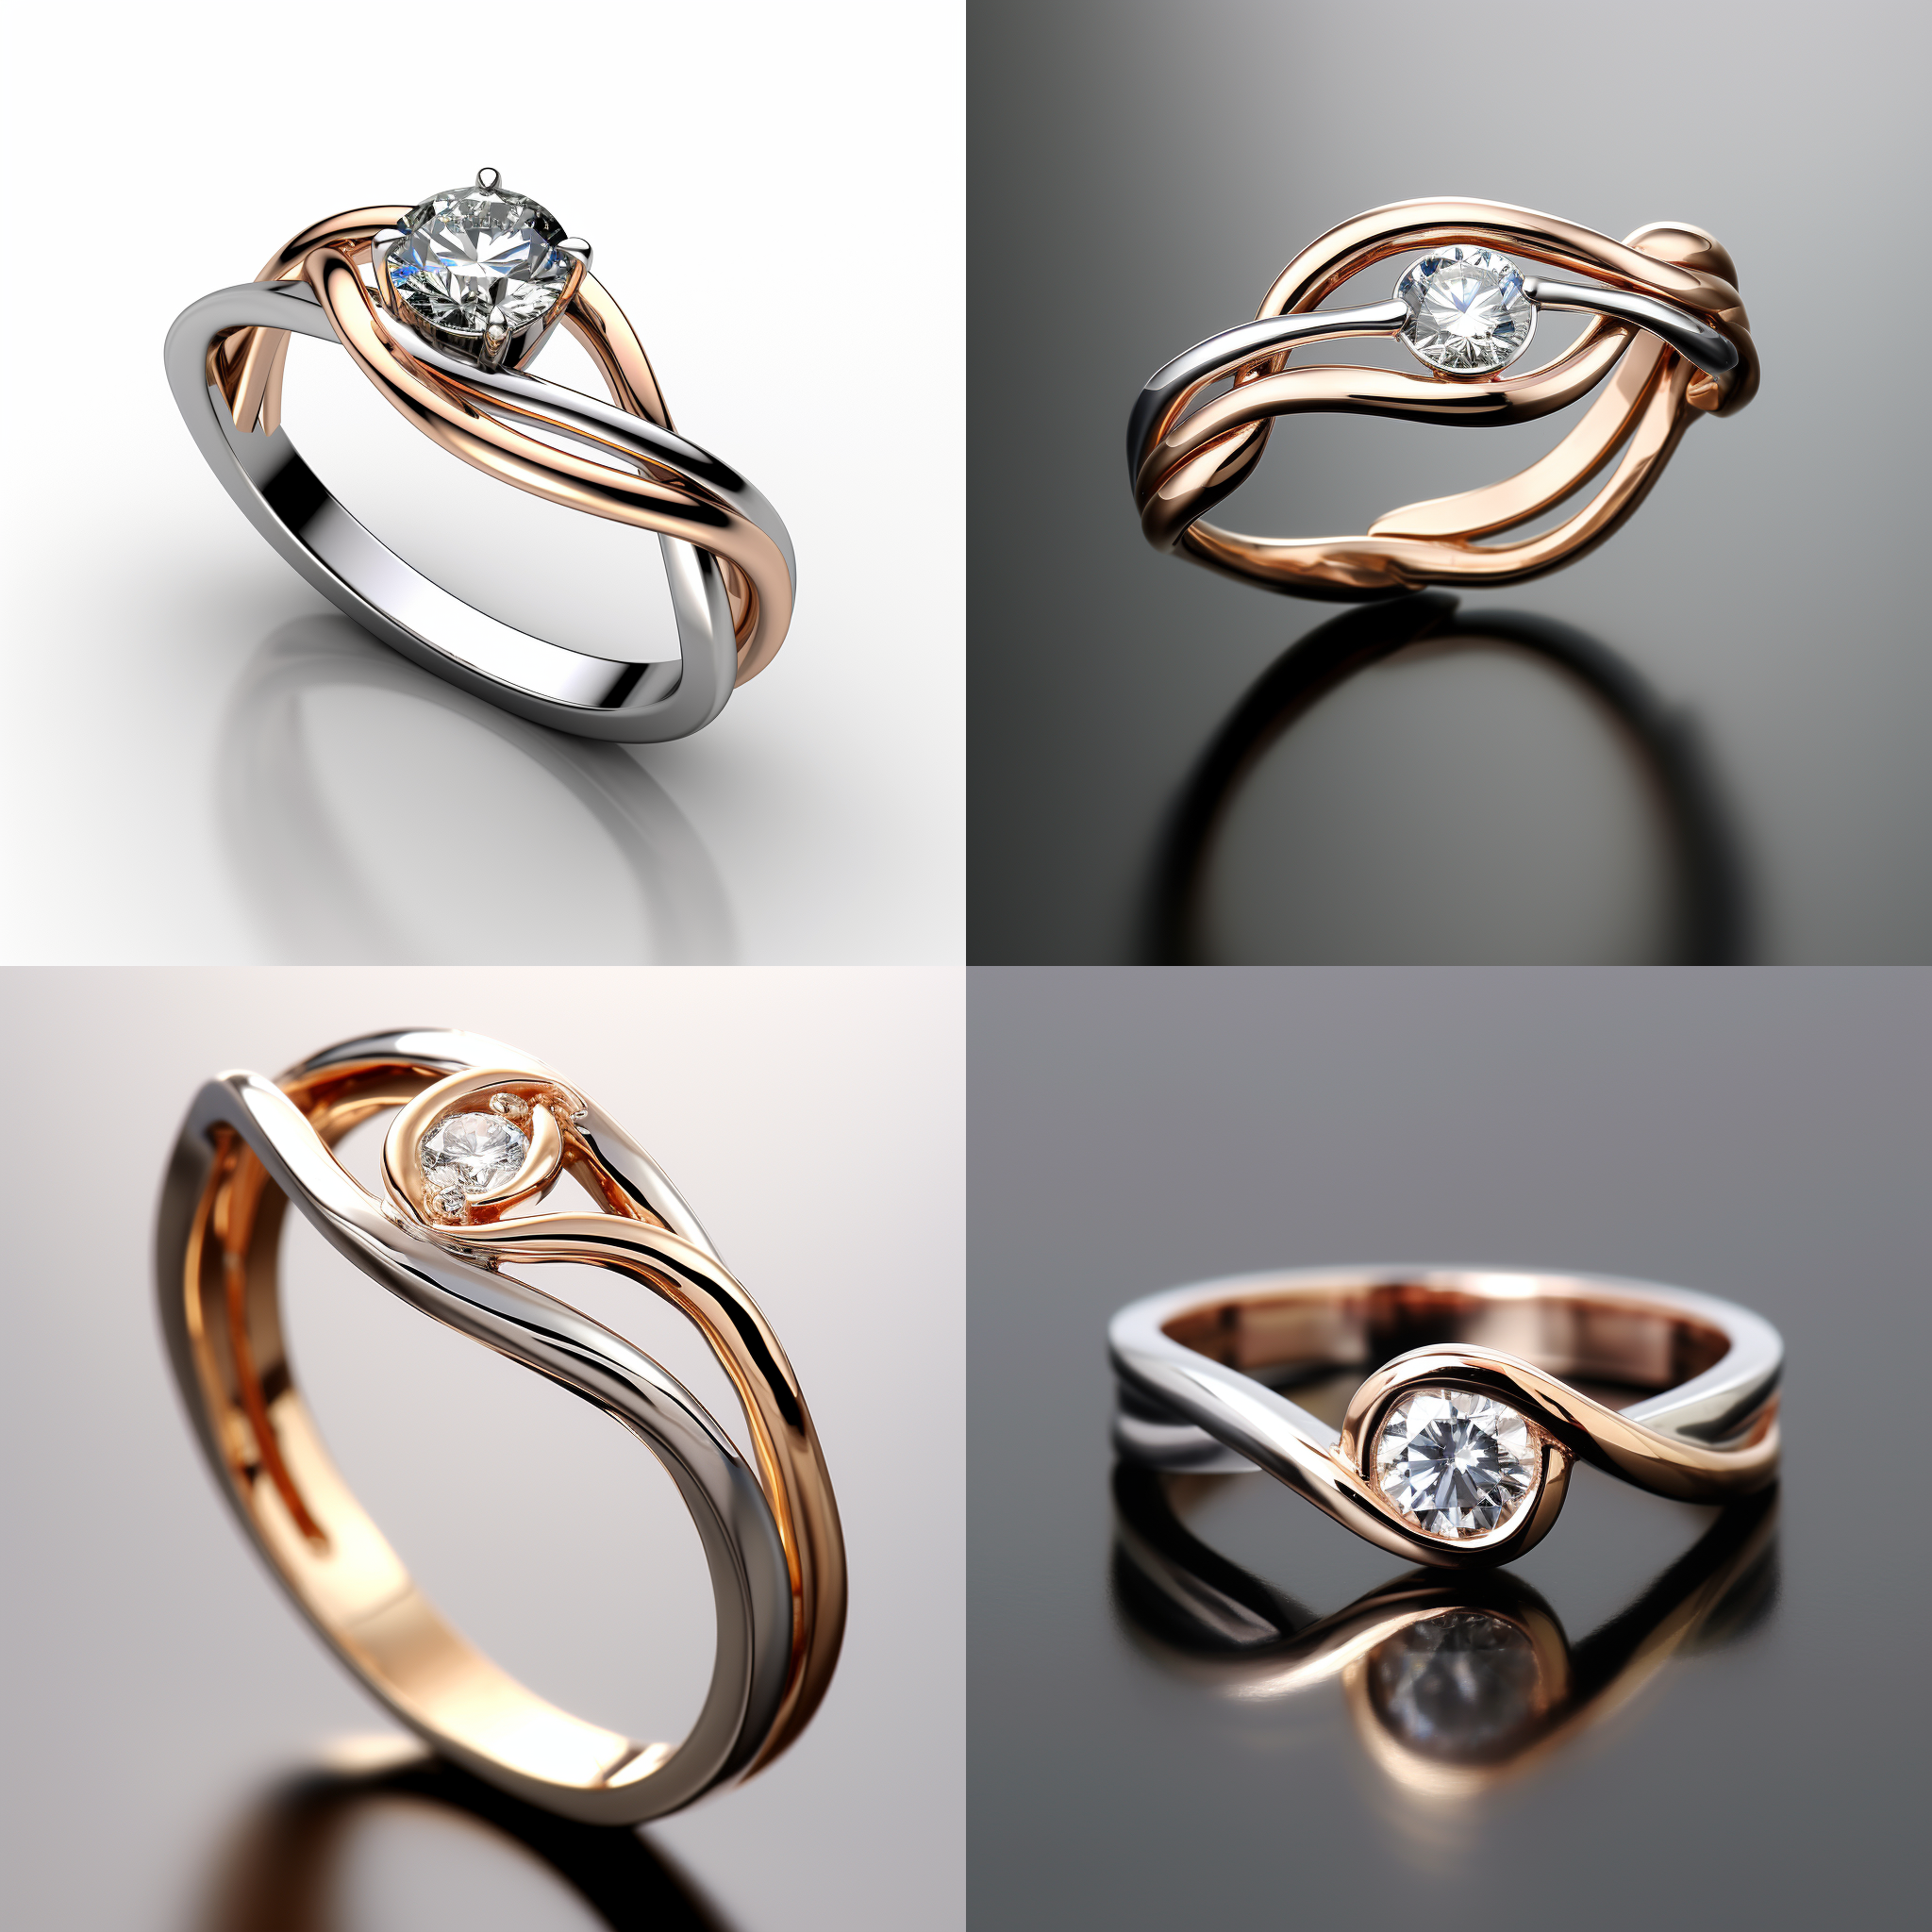
illustrate children's book, but to design everything from wedding rings to pageant crowns, to wedding gowns, to gowns
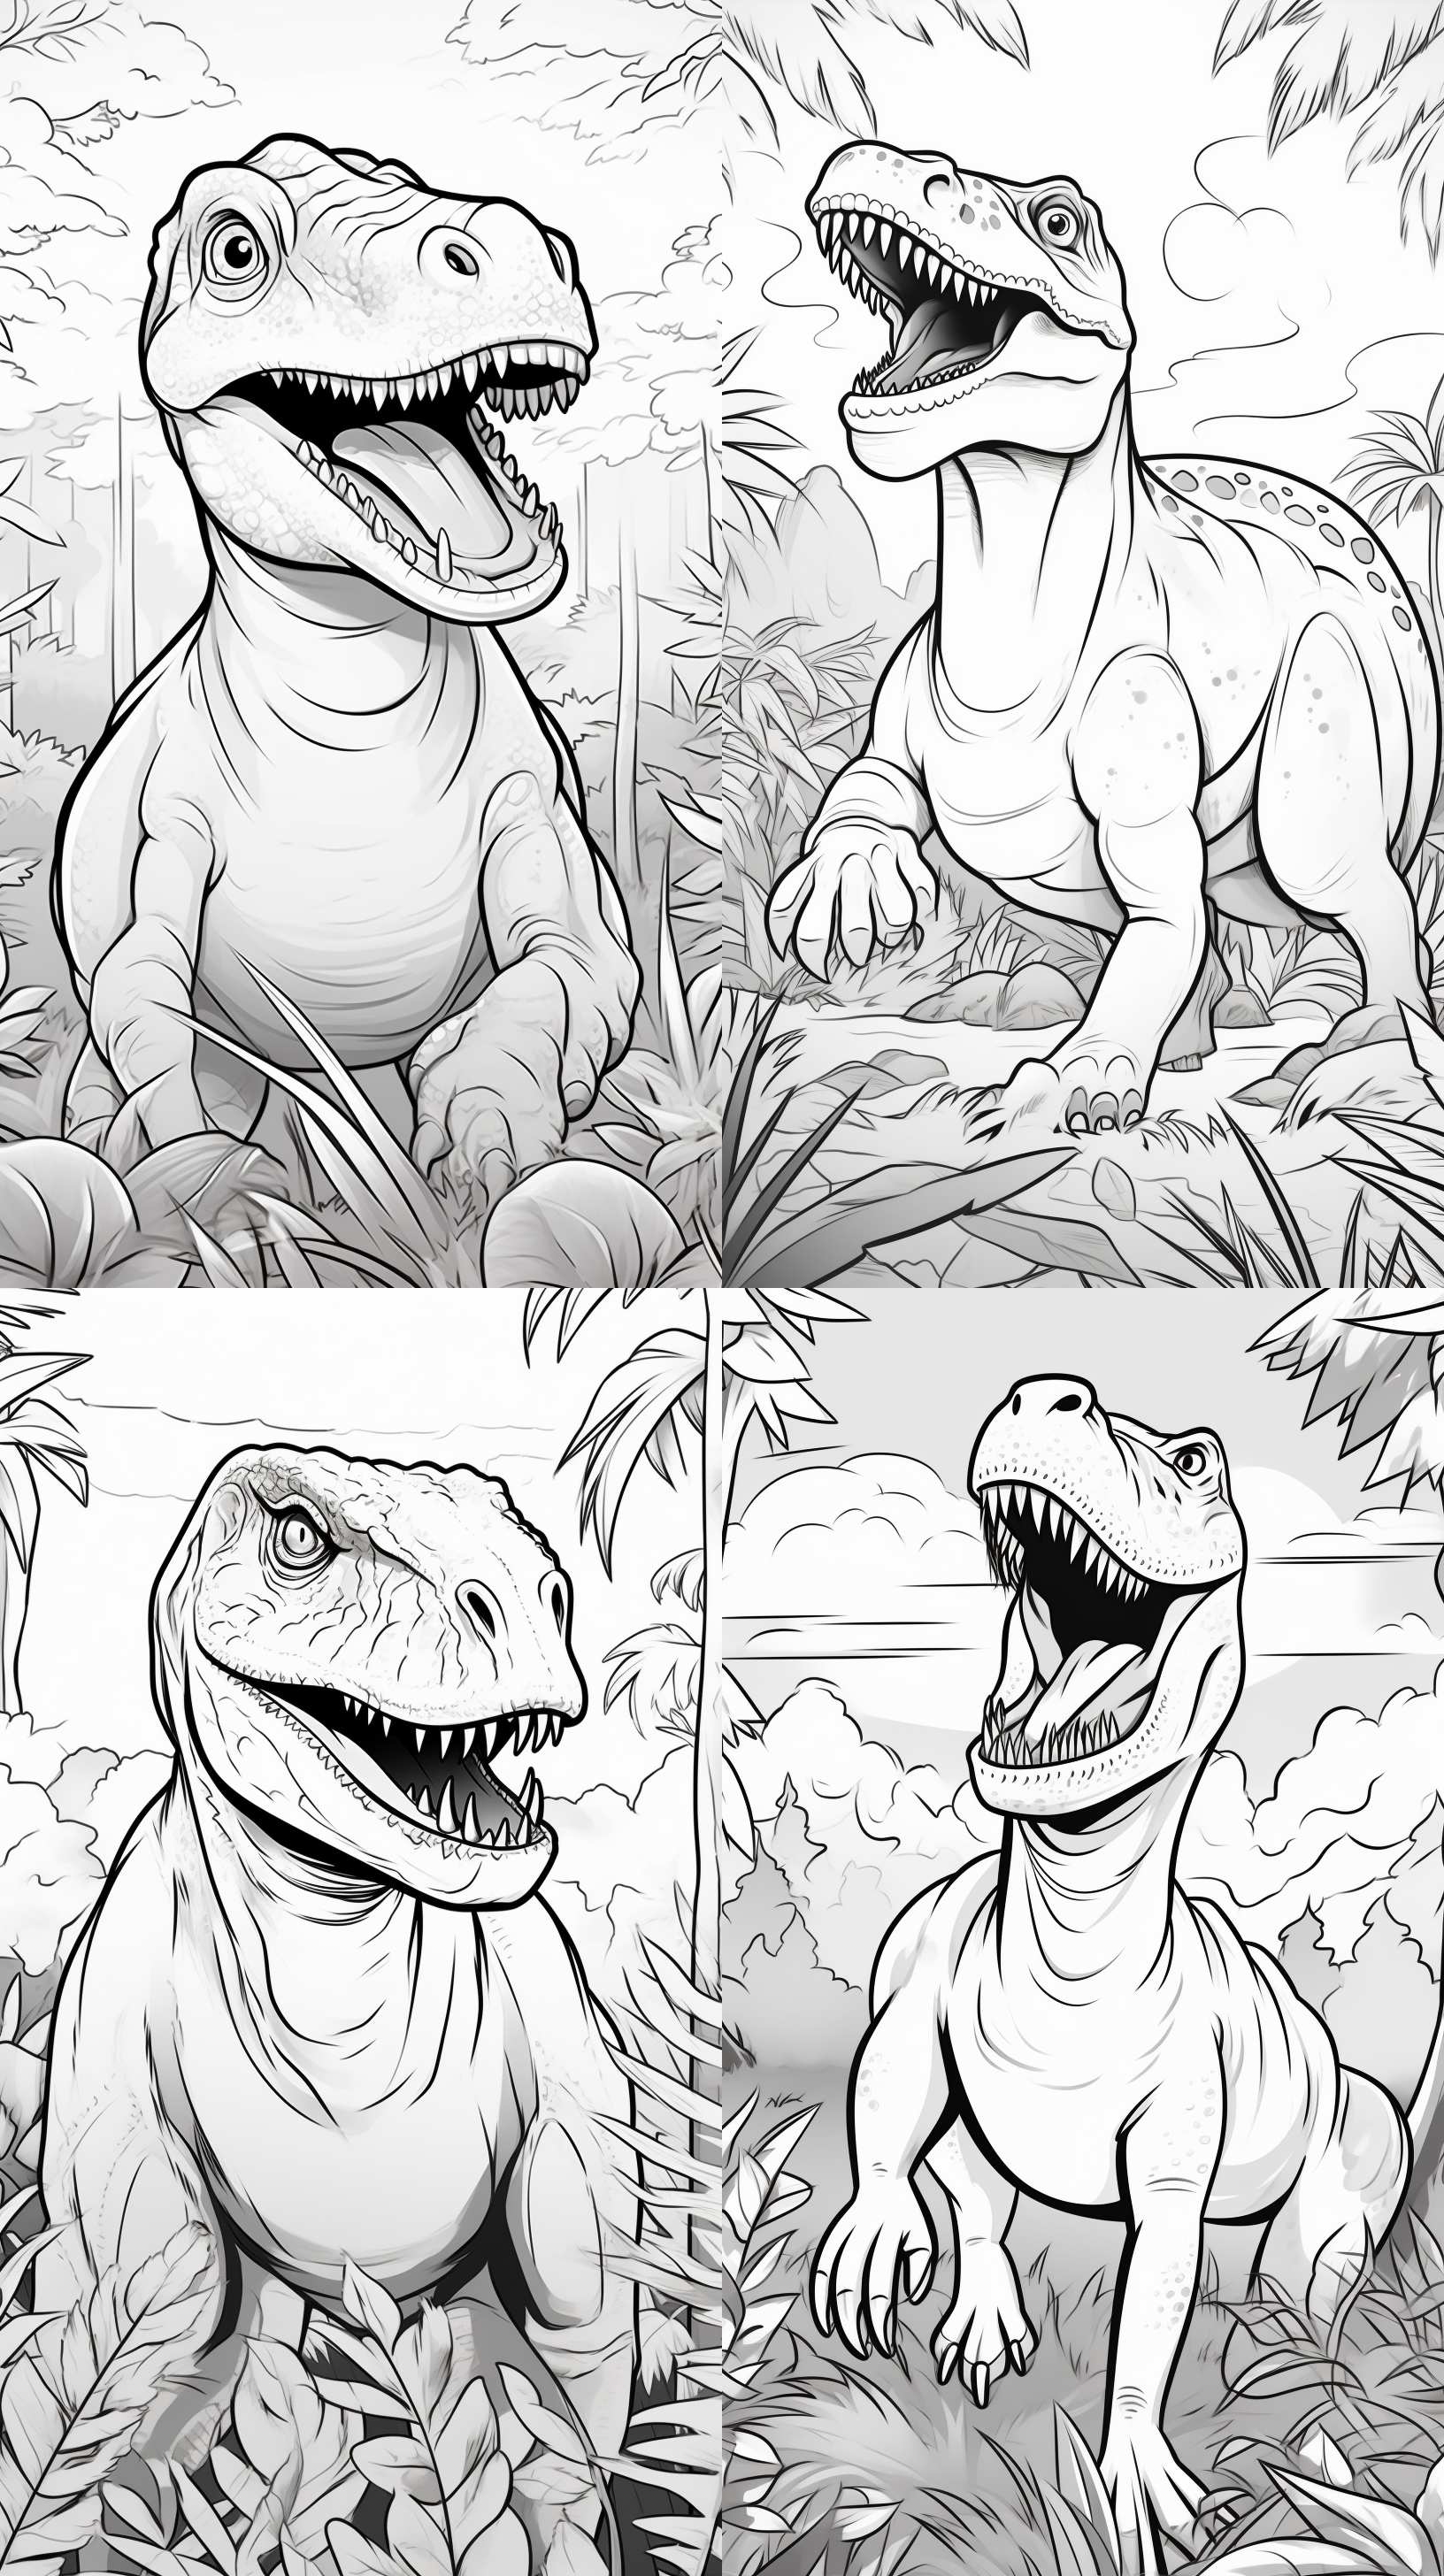
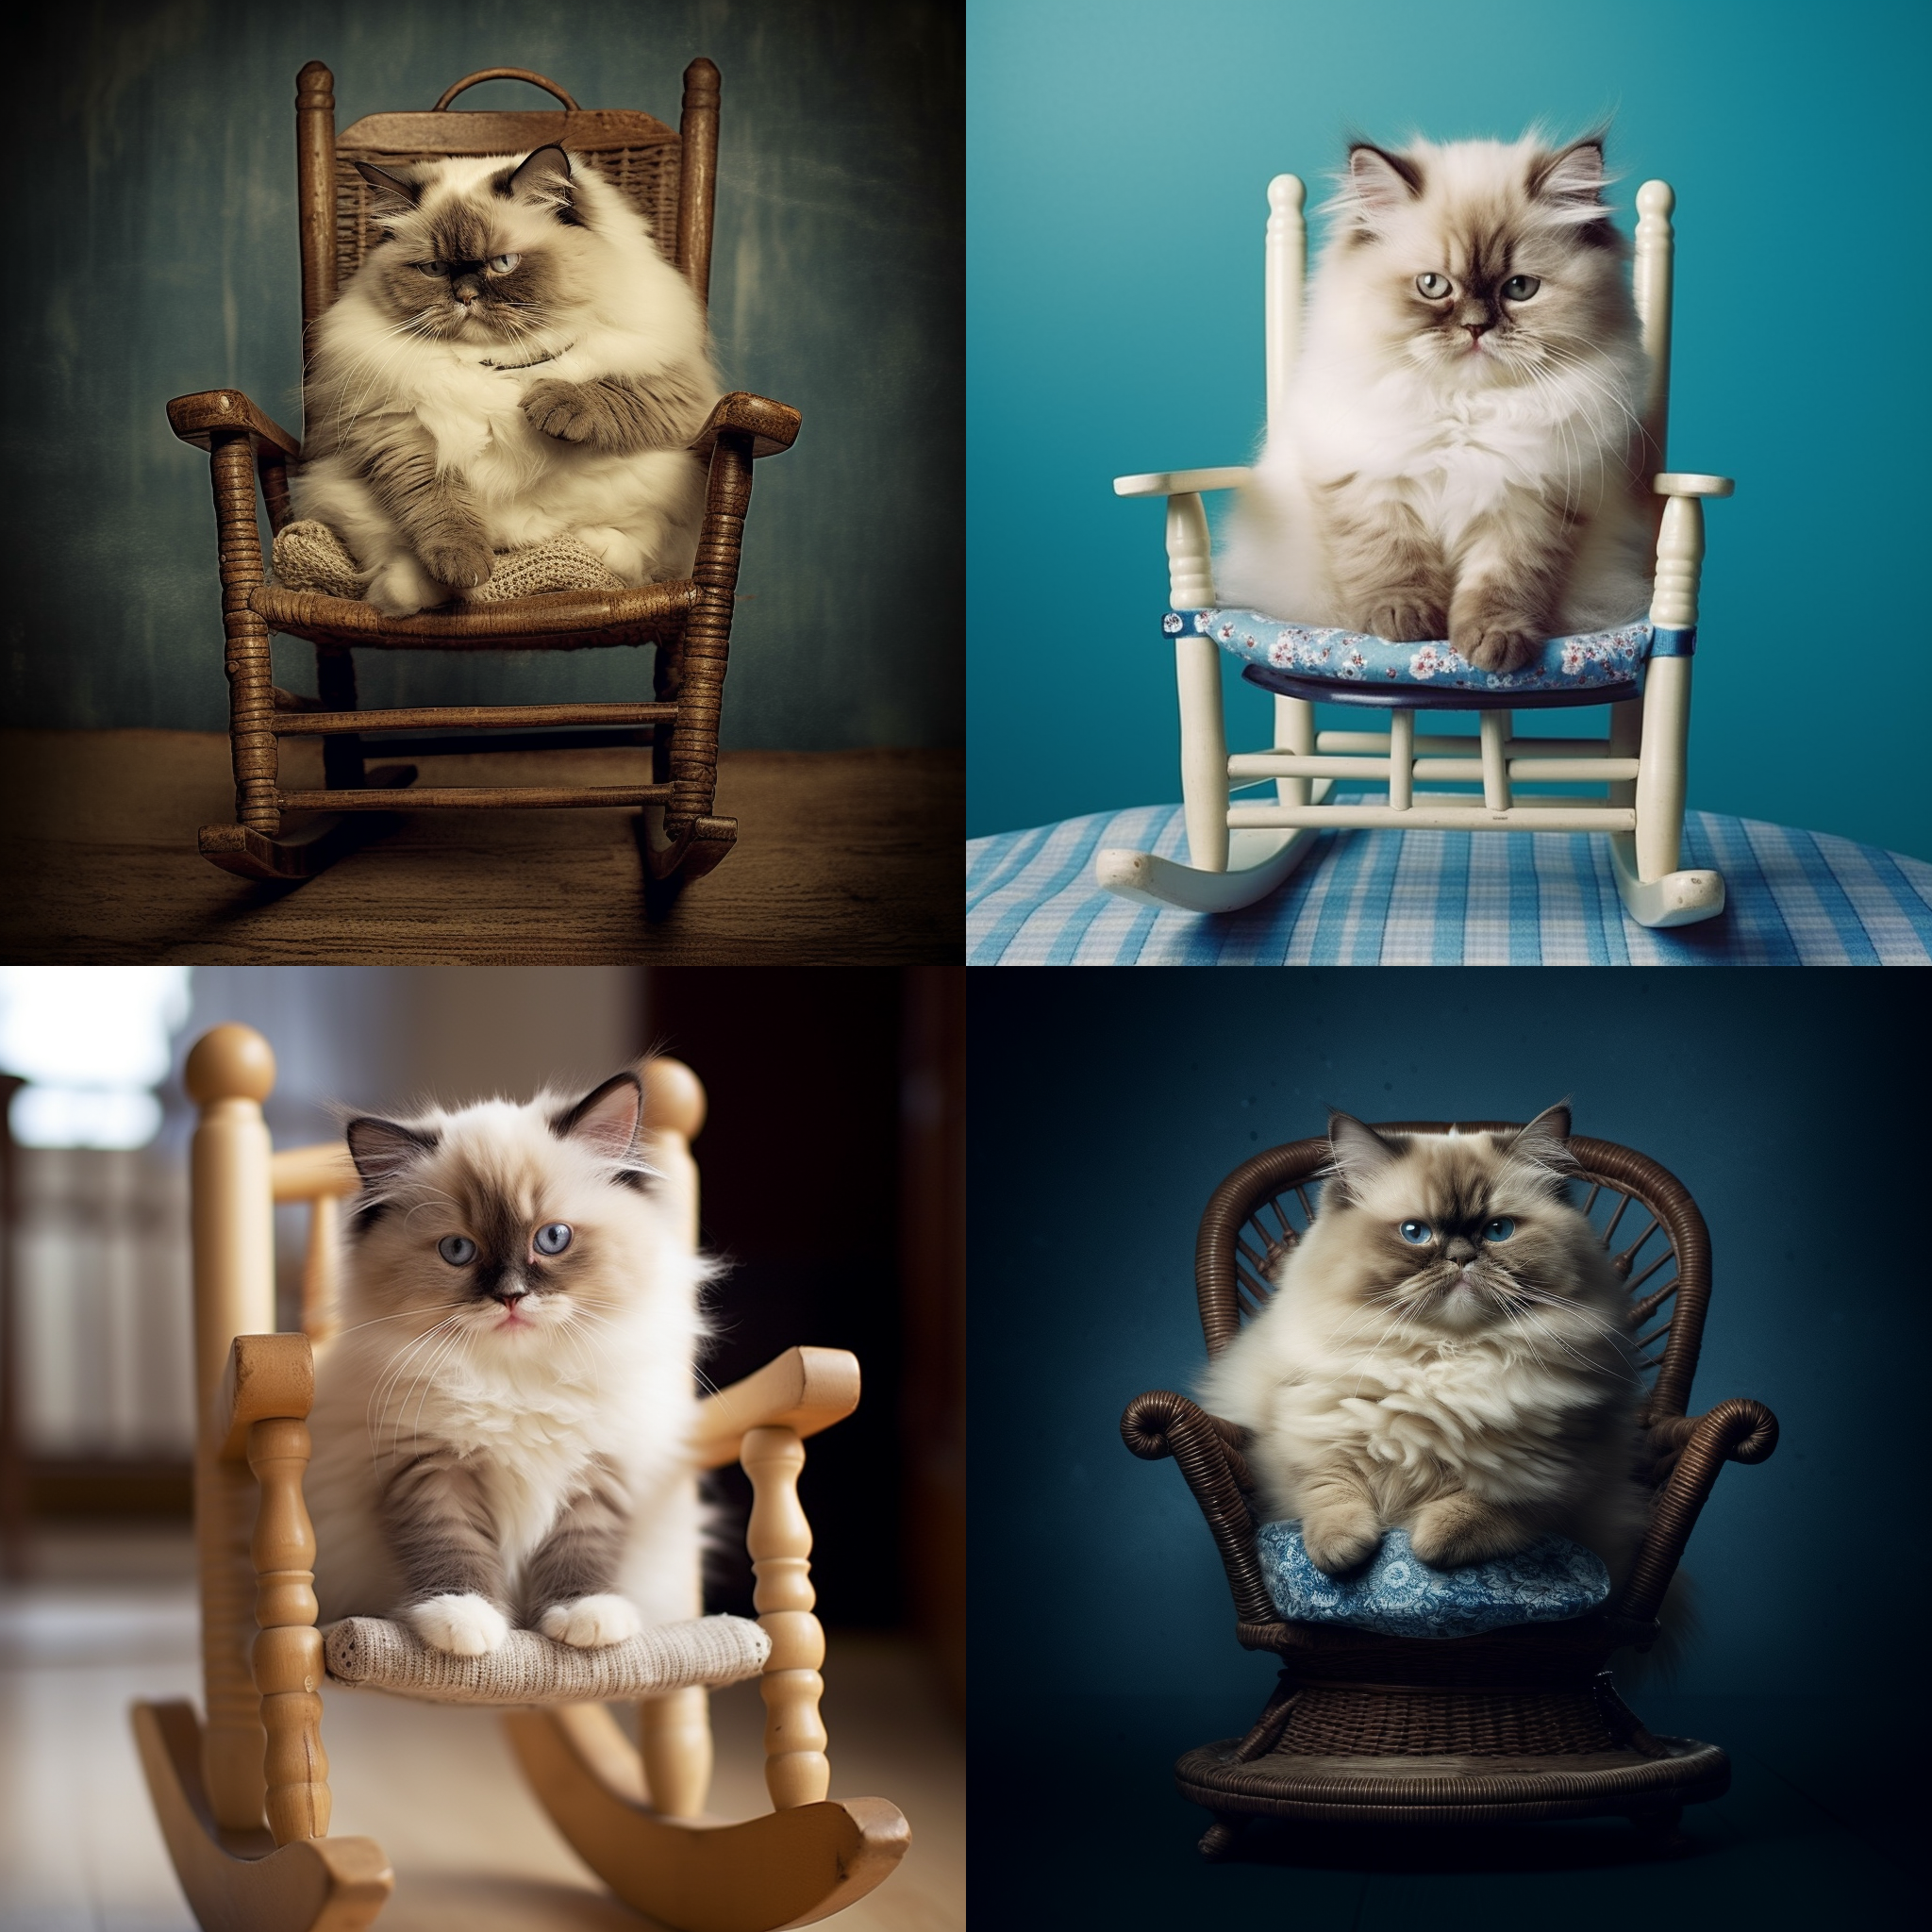
for the universe stage. And then even on a sillier note, to draw fat, silly cat pictures. And to draw children's book
coloring in illustrations, black outlines of
Tyrannosaurus Rex so that children
can color them in. I've also had a lot of fun turning my friends
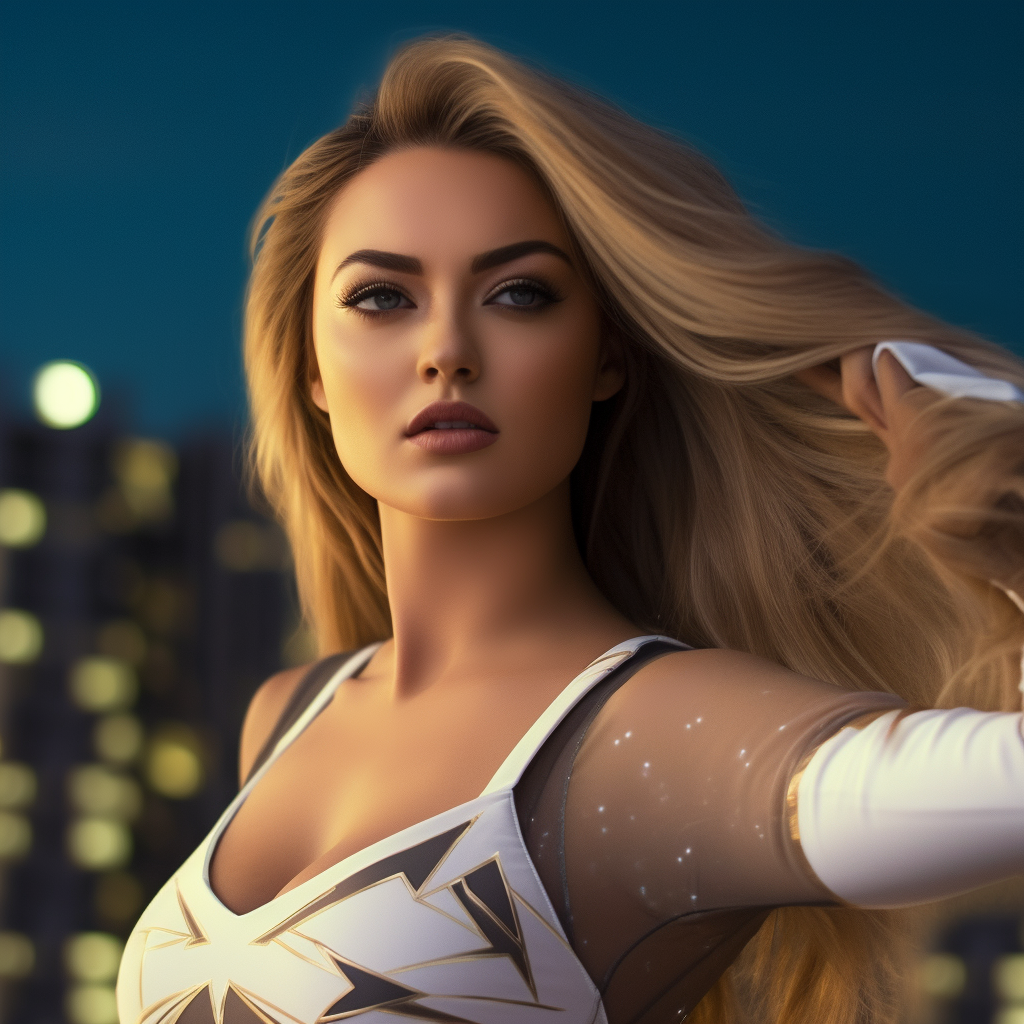
into superheroes. I turn one of my
friends over and miss Universe Island into
a female Iron Man. Mid Journey is a hugely, hugely powerful app.
There's only one problem. It's really difficult to
get started because you can't just load up the Mid Journey app in
Chrome and away you go. It actually has to
operate through Discord, which is a communications
platform gamers. Now, I don't know why
it operates like that, but even as a computer
science major, I found it intimidating
and overwhelming. Trying to work out how to use mid journey to generate
my first image. The point of this course
is very, very simple. I'm going to show you how to
get mid journey set up on discord and then show you some of the basics of prompting. And then even delve into some of the more slightly more
advanced features such as image prompting. Which allows you to
do such things as illustrate children's books
with consistent images, but also take your friends and turn them into superheroes. If you so like strap in, grab yourself a cup of coffee and follow along step by step. I've noticed that
with my courses, people have the best
results when they actually implement the steps
as I'm teaching them. Feel free to watch the
whole course through once, but then come back
to the beginning and implement step by step. Because with this
particular course, it's going to be very
important that you do the steps in the right order. Once you do, I
promise you the art you'll be able to generate
will be well worth.
2. Discord Setup Guide: Prepping for Your Midjourney Experience: Okay, the first place I'm
going to get you to go is to Discord.com So it's going to
look something like this. Now, it's very easy to
register for an account. Firstly, if you have a
Discord account already, then you can skip this step. Go to the next step, which is to set up a mid journey account. But if you don't
have an account, you can go to login at
the top, right here. And then you'll see at
the bottom here register. So just click on register, fill out the details. It's pretty self explanatory and then you will be good to go. Now this is optional, but I do recommend that you download the actual
standalone app for Windows. Maybe if you open
this up on Mac, there will be an app for Mac. I don't do Mac, so I'm not sure. But the standalone app just guarantees that if
your browser crashes, you're not going to
lose everything. So if you want to
download the app, it's free, install it, just like you would
any other app. And then you'll be
able to log into that with your Discord details. So set up your
Discord account first if you don't have one, and
then once you've done that, I would recommend downloading the standalone app
just so you have a bit more stability around it. You can see here that you can open discord in your browser. So I'm using Chrome here. I could use discord
in my browser. I just don't really trust it. Especially lately, my Chrome has been crashing or
hanging quite a lot. And I don't want to
be in the middle of something and then lose my work. So set up your Discord account. Download the standalone
app if you want to. Now, welcome to Discord. As I said, the whole reason behind putting
discourse together is because Discord is not the
most user friendly app. And you won't even have these
pictures here or anything, but yours will be
completely empty. You won't have
anything on the left, any of these text channels,
anything like that. And so we want to make sure that you're comfortable
using discord, at least as far as
using mid journey. If you want to use discord more, then certainly by
all means do that. But you won't have
anything on the left, so this is optional. If you just want to go and start using mid journeys
straight away, you can. But there are certain
issues with that, especially in terms of people
being able to see everyone, being able to see what
you're producing. So just I'm going to just quickly show you
how you can set up your own server and then you can generate whatever you
generate using mid journey, you can keep to yourself. So if you just go here, hit at a server and you can do
whichever one of these you want, I would just recommend
creating my own. And then for me and my friends
for club or community, I'm just going to
skip that question for now, it really
doesn't matter. And then put whatever name you want here for your server
and you hit Create. Once you hit Create, I've got
a server up here which I've imaginatively titled
Adrian Kuan server. You click on that, and again, you probably will have
the general text channel. And that's fine. If you want to create other
text channels, you can. It's very simple. You
just hit Create Channel. And then make sure it's
on text, not on voice. And then name the
channel whatever you want you could set to
private if you want, but that's not really
going to be an issue if you're just setting
up discord for use as mid journey and you're not
going to invite anyone else in Voice channels is
not what you'll be using. Voice channels is, as I said, if you're gaming and you're getting together
with your mates, you use voice channel to communicate vocally whilst you're playing
a game together. We're not doing that, so
just make sure you create a text channel and then it
will appear somewhere here. So that's very simple.
I've shown you how to create a Discord account. I've recommended downloading
this standalone app, which is what I'm using here. And then if you want to just
go get that extra mile, create your own server
and then just make sure you have at least
one text channel here. And that will come in very, very handy once we've
got mid journey set up.
3. Setting Up Your Midjourney Account via Discord: Okay, now we're going to set
up your mid journey account. Please make sure you
follow these steps in order to make
sure that it works. If you do the same steps but in a different order,
it may not work. So first things first,
this is discord. I want you to make sure that
you are signed in first, whether you're using
the standalone app, which is what I'm
using, or you're signed in on the browser. Just make sure you're
signed into Discord. First you can see it's
called Adrian Khan's group, but it's actually Adrian
Khan's server and my server. And as you can see,
I have a couple of text channels in here. I believe these are
the ones that just set me up with by default. Just make sure, as I said, you've got at least
one text channel now. Next thing we're
going to go over, you're going to go over
to Mid Journey.com Now that you're signed into your discord with
your credentials, hit signing in the
bottom right here. When you click Sign in a
screen like this will pop up, basically Mid Journey is asking
your permission to set up a Mid Journey account using your Discord login details or
using your Discord account. You know, it's like
those websites where you set up an account
using your Facebook account. This is exactly the same thing. There's nothing
weird going on here. It's completely trustworthy when you have all these
here these ticks. Don't worry about them,
just leave it as is. And because we are signed in
with discord at the moment, that icon is the icon. It's a profile picture
I chose from my server. That's why this picture
here is showing up. So we click Authorize. And now welcome to Mid Journey. Now I've set up an account, we're not quite done yet. First things first, you're going to have to set up a plan. Mid journey used to
have a free trial, AI being the way it is, they can't do that or they
don't do that anymore because it is very expensive
for them to run it for free. So you're going to
purchase a plan. So click here and now you can pick between yearly billing and
monthly billing. I strongly suggest if
you're giving this ago, you've never used
Mid journey before, let's go to monthly. So then you can
discontinue your account, cancel your subscription
whenever you want, and that is something
to bear in mind. And it's just $10 for the month. There may be some sales
taxes involved there, but roughly $10 US a month, we can just subscribe
to this one. You don't need any of the more
complicated ones just yet. By all means, when you get more comfortable with mid journey, you may want to bump up
your plan or go to yearly. But if you just hit Subscribe and then you're
going to be taken to a very default
sort of payment page, fill out your details, set up your paid subscription. And then when you come back
to the mid journey home page, then I want you to click the Join the Discord
to start creating. Now once again, just make
sure you were signed in with your Discord account before
you click on this button. But when I click on this
button, watch what happens. It's automatically opened up my Discord because I had it
open and I was signed in. It's going to say you've been invited to join mid journey, so you've been invited to join the Mid Journey Discord server. I obviously will click
Join Mid Journey. That's the whole point.
Otherwise you won't be able to generate any art. Now, can you see
in the top left, this little sailboat
icon with the rainbow? That's the Mid journey server. So I've joined the
Mid Journey server. Now what you can do, and this is where I got a bit confused when I was
first starting, is, well, how do I generate art? So if you go to, for example, there's announcement
and all this stuff will come out status and it's just
overwhelming as I said. Now, just before we get started, I want you to make sure that you have in the top right,
this member list. I want you to just
make sure that's open. That's going to make
things a bit easy. So if you don't see that
member list on the right, click the show member
lists and these are just the people who are in the discord server at the moment. You don't need to worry
about any of these except the mid journey bot. The mid journey
bot is going to be the thing that generates
the art for you. And as the name suggests, it's a bot, it's
not a real person. But just make sure you have
this member list open there. Now what I read or what I was advised to do by mid journey was go to one of these newbies room. And you can in fact go in here and start
generating your art. Now if you remember in
the previous video, I got you to set up your own
server and your own channel. That's because when you
generate art in here, and if you have set
up your subscription, you certainly can start generating art in here and playing around with mid journey. But if you can see,
here's your problem, you are generating art with
potentially thousands, if not tens of thousands,
of other people. Not only is it going to be very difficult to find
your piece of art, because it's all being
generated at the same time. And it just keeps scrolling, scrolling, and
scrolling, scrolling. But everybody can see
what you're generating. Now, I'm not saying
that you should be generating anything untoward, but I don't want people
seeing what I'm doing, and I certainly don't want to be seeing what other people are doing and making it
very hard to find my It's been scrolled 100 pages up. Here's a little trick
I'm going to show you. Go over to the mid journey. I left click on it. Okay, not right click on it. I left click on it. And this is why needed to have the
members list open. Left click on the
mid journey bot. Now left click, Add to server. Now down here, select your server, now
minus called group. I don't know why
it's called group, it's a server left click on that and then hit
continue again. Authorize. Don't untick any of these because otherwise
it may not work. Again, it's trustworthy. It's very much like
the Facebook login. Just go with it, Click I am
human. And there it goes. Now, I don't think you heard that beep,
but it goes, boom. That means that's the sound
for mid journey notification. Now, I will go to my group. Now I'm in my server, Adrian Kuan server
as you can see. And all that stuff that
was there before has disappeared because now I'm
on my server and it's empty. Yours probably is to set
up a new Discord account. Now in this member's list, can you see I'm online, but so is the mid journey bot. So the mid journey bot has
now been added to my server. Now if you go down here, you can see it says, good
to see you mid journey bot, go to one of the text channels. You can set up a new one if you want to make sure
it's working forward. In fact, you can see even when I type that forward slash and it comes up with imagine prompt. This is how you generate
art using mid journey. You can just left click on this and you can see
it's filled out. Imagine prompt and make sure that your cursor is still
within this blue box. Do not put it out here,
it will not work. But I want you to put something. We're going to
create a test image, and you put a sunny day. Then you hit Enter again. Make sure that a sunny day or
whatever prompt you want to put is in the blue box out here. Whatever you type out here,
it's not going to work. Now, for me, it
will come up with subscribe because I haven't subscribed to mid
journey on this account. This is a test account just
to show you for this course, but let me just go over to my actual server and show
you what will happen. Okay, now welcome to
my actual server, the one I use mid journey on. You can see at the
bottom, I put in exactly the same prompt forward slash imagine
prompt, A sunny day. Remember that's in the blue
box. Now, let me hit Enter. And now you got to wait a bit. It takes probably somewhere in the vicinity of 30
seconds to get a result. Now it's beginning to draw. Don't worry, that's
not the end result. You can see here,
15% 31% Obviously, when it gets to
100% it'll be done. Now you begin to see what
it's going to look like. This is the exciting part because when you put in a
prompt such as a sunny day, it's a bit generic. You don't really know
what you're going to get. Now it's done because it's no longer got that
percentage there. It's done now by
left click on this. Obviously there's
more to it than that, but it's worked success. And that's where I want to leave this particular video just
generating a test image. So as long as this works and whatever it
prompt you put in, you could have put
something else in. As long as you get four options. This is not one picture, by the way, there are four options. It's basically saying, which one of these do you like most? As long as you get
to this point, then congratulations, you've
set everything up correctly. Now, obviously, I'm not
going to leave you there because there's still
other stuff to go through. Like, what are this?
U1u 234 V1v 2v34. And it's like, Adrian, this is great but it's
on my Discord server. How am I actually going to
be able to use these images? So we're going to
go into that next. But if you get to this point
and you've got an image, then you've got 90%
of the way there. And now we get to what's the fun part, Generating
different images, working with different images, and then being able to
actually use said images. If you got lost at any part. I'm not going to rehash it now. Just go back in the video and make sure that you have
followed the steps in order. If it's not working, what I would recommend
is just make sure that you signed out of Discord, signed out of Mid Journey, and then just begin
the process again. And you should be okay.
You should be good.
4. Mastering Midjourney Prompts: From Image Generation to Upsizing: Okay, in this video, I'm going to go over
the prompt basics, or the basics of working
with mid journey. So we're going to pick
up exactly where I left you from with a sunny day. Now, depending on whatever
prompt you put in, you would have gotten
something different. In fact, even if you put in those exact words, a sunny day, odds are you would
get something that's quite different or maybe
radically different. That's part of the beauty of AI. A little bit of randomization
in there that helps you be more creative and make sure that not everyone has the same image, but whatever you've picked, okay, now you can
left click on this. And you can see here you
can open in browser. If you open it up
in the browser, you can see it at full size. You can see it's a pretty
good size already. And you can certainly
right click on this and save
it if you want to. Wherever you want
to. You can also right click it on
here. Copy the image. Save the image. You
can copy the link to the image in a browser
or that sort of stuff. I'd like to open up in
the browser just because it displays it at
slightly bigger quality. But we're not done here. First off, the images go, Just make sure
you're looking here. This is image one
in the top left. Top right is image two. Bottom left is image three. Bottom right is image
four. Once again. Top left one, top right two, then bottom left three,
bottom right four. I hope I got that correct because you're going
to need to know that When it comes
to 1234 V1v 234, you're asking, like, Adrian,
what do these buttons do? U stands for upsize. It means make it
bigger. Very useful. For example, if
you're going to use this image in a book
and you need to make it bigger or you would
need to bigger, you hit one. If I wanted to upsize image one. If I wanted to upsize, let's say image four, which is the lady lying
in what looks like a flower field that looks
like a moon. Not a sun. But if I wanted to
upsize, let me show you. So let me upsize image one. I think I like this image. Now hit you one again. You've got to wait a little bit. This one take as long as the image generation in the first place because it's
just upsizing an image. And you go, well, Adrian, that is exactly the same, isn't it? No, it's now upsize this. If I open this in the browser, it's just that image, one and you can see
it's made it bigger. This is very useful if
you just want the image bigger or in a better
quality or as I said, if you're using it
for print purposes, then you're going to want the
image to be probably a lot bigger than what mid journey
originally generates it. As because if mid journey generated huge
images all the time, even from the beginning,
it would be very costly to run and your subscription would
cost a lot more. That's what does, again, upsize. And it's upsize 1234. And once again, just
remember it's top left one, top right, two, bottom left, three, bottom right four. If I hit you four, it will begin to
upsize image four. And I hope you're also
seeing, by the way, the advantage of doing
it on our own server. It's not all going
to get lost with 100 people generating their
own stuff at the same time. Here's four or image
four, and you can see, again, it's upsized,
that's what stands for. And I'll come back to
these various controls. You can see here like very strong subtle
region zoom, et cetera. I'll come back to
those in a second. V stands for, at least in my
head, variety or variation. Now what happens
is if you, again, let's say you like this
image on the top left, the close up image of this
redhead with glasses. You go, I like that one. Show me some more ideas. Mid journey that look
similar to image one. I hit V one and it's going to give me a grid of images
that another four images. But what you'll see this
time is they will all look somewhat similar
to image one. This is a really good way, well, this is the way that you hone in the exact image
that you want. In general, you might go with the variations route before you decide to upsize
a particular image. When you're upsizing it, it's like, yes, that's
the image I want. Let me upsize that one,
let me blow it up. But until you get
that perfect image, you might be hitting V a lot. And you can see here, this
is a really good example. There's a lot of similarities
between these images, but they are still
uniquely different. Even the one at the top
left is slightly different. But you can see here
that the glasses on the top right have this
blue reflective surface. The bottom left, they're
more of an amber color. You can also see 4-3 image four, image three, they're posed
somewhat differently. She's facing off to my
left in image three, facing off to my
right in image four. Now you can run this as
many times as you want. You can see again here the
size commands or buttons, and the variation
commands as well. Let's say now that,
let's go for number two. You really like this one
because of the blue glasses. I hit you two. And now
mid journey will go away. It will upsize image two. Bob's your uncle, left. Click on that and it's
upsize image two. This is the basic workflow
that you go through. You start with a prompt as, again, let me just show you this prompt again.
Look at the bottom. Look at the bottom forward. Now, if you hit space, you can actually go straight ahead. You don't need to worry about
left clicking or anything. That's just a bit of a hack
to save you some time. Just make sure that
it's not working again, that you put the prompt
in within the blue box. Let me just erase. I'll show
you again go like that. In fact, you can
see forward slash and it's, imagine
it's the top one. I can click on it, or if
I want to, I can tab. And now I'm good to
go. Don't hit space. Now that curst is exactly
where you want it to be, let me put in something else. Let's put in a cute cartoon cat, suitable for a children's book. You can put in whatever
you want and you can certainly make your prompt
a lot longer than that. I have some prompts where it's almost been two or
three paragraphs of information because the quality of what you get from
any generative AI, whether it's mid journey or chat GPT, if you've played with that. The quality of what you get out is directly proportional to the prompt you put in just
to go slightly off tangent. But prompt engineering
is going to be a huge boom industry
people who know how to get the most out of the
sort of generative AI's. Because if you just put a cat, you're not going
to get nearly the same quality of output as, for example, I've said here
for a children's book. And you can see what it's done. It knows what I mean when
I say a children's book. And it's produced
a cartoon image, but one that's quite simple
and also quite friendly. But you can see here,
this is a workflow. So you put in forward slash imagine whatever
prompt you want, you'll get a grid of images. Now you can either upsize one
of these and you're done. Or you can hone in using
the variations command. If you hit this sort
of recycle icon, then it's just going to do
the entire thing again. It will take the exact
same prompt that you had in before and it will give you four
completely new alternatives. That's good if you put in
your prompt and you just go, no, none of these
are what I want. Now, you could refine your prompt and that's what I would generally suggest you do, is okay, that prompt didn't really generate the
images that I want. Let me refine the
prompt slightly, so maybe you put in a friendly, cute cartoon cat, or a happy cartoon cat and just
play around with the words. Because a little bit of
difference in that prompt. Remember, prompt engineering can sometimes make a huge difference in the images. Not always. Sometimes there is a bit of trial and error
here, if I'm honest. A bit of hit and
miss. Sometimes you get exactly what you
want straight away. Sometimes it takes
a bit of work. But you can see these look quite different to the
ones from before, but still similar
in terms of being acute cartoon cat that would be suitable for
a children's book. And this is the basic
workflow that you go through. So you put in your prompt, you hit Enter, you'll get
a grid of four images. Then you can upsize them, you can get variations on one of them if you really like
one of them to hone it in. And then you can just hit
that recycle button if you just want a completely
new set of images. Now you can do this
as many times as you want that paid subscription
that you got for mid journey. It works in terms of what
they call fast hours. Basically, you're paying
for processing time. So if you generate
hundreds of these grids, eventually it will say, hey, you've reached your limit. So you can't generate
these endlessly. And the higher, the higher tiers on mid
journey give you more hours. Basically, If you do run out of hours within any given month, you certainly have the
option of paying for more, what they call fast hours. And that's basically hours on the processor that
allow you to generate images process or on the mid journey
server flash service. So this is the basic workflow. What I want you to do
now is play around with it and let your
imagination run wild. Because this is really
where you can let your creative juices go and
it gets super exciting. You don't just have to generate
cartoon cats, obviously. Again, I'll hit imagine prompt, and then let's say a
photo realistic image of a young woman working out really in really
hard at the gym. She has an athletic build, long brown hair that's
tied back in a pony tail. She is wearing a
crop top and shorts, there are people milling
around in the background. I will also put in four K, that's like the definition. That might do something ultra high definition, high contrast. Okay, I already said
photo realistic. Now let me hit enter. Now I know that prompt is a lot longer and a
lot more detailed. It doesn't take up, it
doesn't cost you anymore. Just bear that in mind
because it's still mid journey going away
to generate an image. So don't worry that, oh, I've asked for a really
complicated image, It's going to cost
me more than no, each image costs you exactly the same and it's going to take
the same amount of time. Basically, mid journey
is not like a person. You know, A person can probably
design a cartoon cat much more quickly than a photo
realistic image of a woman. But with mid journey,
it's going to take exactly the same amount of time. So you can see here,
it's almost done, 78% 93% And this is
hugely different, obviously, to the cartoon cat. But all I needed to do
was change the prompt. Now let's say, okay,
which one do I like? I like the one in
the bottom right. Let's zone in on that. So I will go to the bottom
right and say V four. I'm telling again mid journey. Give me variations
on image four, you could always come
back and keep image four. So what I might do is hit four. Now you can run, I believe it's three jobs at the same time.
It's doing the upsizing. It's finish the upsizing first. That's where you go.
That's how it looks. When it's in the
upsized version, you can in the open and browser, that's a good looking
image to begin with. Maybe it's not quite a pony
tail, it's more of a bun. But again, you could go back, edit the prompt, and hit Enter. Also play with a prompt in terms of which part
you put first. Some people say, if you
really want the ponytail, you put it at the
end of the prompt. Some people say, put
it at the beginning. I say it's a bit hit and miss. If you don't quite get
the image change a prompt or just run the image generation again until you
get what you want. You can see here, these are the variations. How do I know? Because you can see here
it says variations strong. It didn't say that up here. This was just the
original prompt for new ones but all
looking somewhat similar. So a bit of a close up image of this woman with people
in the background. You can see now some of
them have ponytails, This one on the top right. In fact, yeah, they look more pony tails than
messy bun from before, just before we wrap this up. When it comes to
the upsized images, you've got a different
set of controls. In the next video, let me walk you through these controls.
5. Mastering Upsizing Commands: Variations & Precision in Midjourney: Okay, so here we are
with an upscaled image. Remember when you hit
one of the U buttons, you end up with an
upscaled image like this. And you can see the commands
are somewhat different now vary in bracket
strong. I'll hit that one. And what this does is very similar to the V
button from before. So it's going to take this image that we like that we've upscaled and create four images that
look somewhat like it. So it's just a bit
of a different way, a different command to get
pretty much the same result. You can see here,
it's going to take that image that we
liked, that we upscaled. And it's going to
create a grid of four that look very
similar to it. Now just whilst that's running, I will also hit the
vary in brackets. Subtle and as you can imagine, that will again produce
a grid of four. But the idea is that the
images won't vary as much. So when you say vary and strong, you want it to look similar
but still quite different. Whereas vary in
brackets, subtle. It's more like saying this
image is almost perfect. Just give play around
with it a little bit. Let's see what you come up
with. It's finished here. Now you can see
variations strong. Now, just to show you,
this is the image. She's looking off to the left and there's a bunch
of people behind her. She's got a messy bun. You can see down here. It will say at the end,
variations strong. This is the one where I've told her to play with
it a little bit. It's still very recognizable. But the woman does look
somewhat different, I think particularly
in the bottom right. She's obviously facing
different directions. She's only facing to the
left in image three. She's now facing to the
right in images 12.4 Again, this is trial and error. Trial and error, but I'm giving you the general
gist of how it works. If you look at the variation
subtle and again you can see because
it says variation subtle at the end
of the command, you notice how they're
all looking left now that it hasn't changed that the women look
almost identical. In fact, some of them
you might be going, what's the actual difference? You can see on the
top right one, she's got a bit of
red showing here. The hair looks almost
exactly the same. The faces are very
subtly different and the images in the background are also slightly different. The people in the background
are slightly different. That's very In brackets,
strong in bracket. Subtle in brackets region is actually a very recent
update to Mid Journey. Now what it allows you to do, it will open up your image in the editor and it allows you to pick an area that
you want variations on. Everything else in the image is going to stay exactly the same. Now just to make it simple, if I take this rectangular
selection tool, I like the image in general, but let's say I wanted to
play around with her hair. Let's just make it a bit easier.
Let's just say the face. If I click on this, I'm just going to click on the
bit that I want change, which in this case is
going to be her head. Now if I hit Submit, it's going to go away and do our usual variation Sing
with a grid of four. But what you'll see
is the entire image is going to be exactly the same except for the
area that I selected. This is really useful. For example, if you want
to change just her hair. Just picked the ponytail
and you just said vary. Up with that vary that you'll notice that the
entire image is the same, the hair will just be
slightly different. I've also used this. Let me have a look at this. Can you see? It's given us
different options on the face. The face looks different,
noticeably different. And the hair is completely
different as well. But the image backgrounds
are exactly the same. I'll give you another example here just so this one
really makes sense. This is a very powerful feature. I'll hit on our image of this young woman
with the blue glasses. I'll hit very region. Let me this time use the lasso tool which takes a
bit of getting used to you. Click on it, you
can see it works on almost like making a
circle with a radius, like an old school protractor. Let me just see if I can
just select her glasses. Because remember, it's
going to leave everything alone that's not highlighted. So I just want to make
sure I get the glasses. You can take your time. I don't want to get anything else. You can start doing
another area, this is overlapping slightly. I think that'll do it. Take your time doing this. And you can also always exit if you've screwed it up
and just started again. That will do. Now I'm
going to hit Submit. In theory, what
should happen here? As, again as said, AI
is a bit hidden miss. The theory here is that
the entire image will be the same except
for the glasses. And I'm hoping that
it's going to give me variation on the glasses. Like different frames,
different colors. Let's have a look.
That's my idea. Let's see if I'm correct. Okay, here we go. It's done. It's just popped
up straight away. That has actually
worked very well. Let me blow this up for you. You can see that it's left
the entire image the same. Just changed the glasses
actually, that's pretty cool. Like old school aviators. Brown rims here. More circular, curved rims there, and then a more metallic
looking frame there. That's how you use that
variations Region Command. Now let me just go over these zoom out commands is a
bit easy to understand. If I hit zoom out two times, what mid journey
is going to do is take this image, this one here, and it's going to pretend
your video camera, it's going to your
photographic camera, it's going to back up and
it's going to fill in more of the details around
our existing photo. It's not exact,
sometimes it just fills in like almost with a photo frame around
our original image. But in this case, let's
see what the results are, like open in browser and
it's not done a bad job. It's taken our original image. What you'll see is that our original image is centered
within the bigger image. The lady is exactly the
same, exactly the same hair, exactly the same face, but the expanded parts are
slightly different. Can you see on image one, you have this dude on a
treadmill on the left, but in image two,
he's not there. In image three and image four,
it's completely different. She's also wearing
shorts in image two. In images 1.3 she's wearing
looks like black leggings. And then the image four
looks like the leggings, almost like yoga pants,
has a bit of blue on it. That's what happens with
the zoom out command. It basically pans out from this image that
you really like. And this is very useful
because you say, I like this image, but
it's a bit too close. We'll just hit the zoom
out command and you can get more context around
your existing image. Zoom out 1.5 is exactly the
same as zoom out two times. It's just not
zooming out as much. And then you can also
use custom zoom as well. If you want to zoom out more, it a little bit harder to use, you'll have to edit the text. But just play around
with Zoom out two, zoom out 1.5 times
the last commands. Here are these arrows. Now these are very similar
to the zoom out commands, but it's just
telling mid journey which direction you want
more image generated on. So if I say for example, all right, I love this image, but I want to see like
more of her body, so it's more of a
full screenshot. What I will do is I'll hit the down arrow and
it's going to go away. You can always scroll down, going where's my image
if you're wondering. It will always be
generated at the bottom. So just scroll to the bottom. And remember this is why
we're using our own server, not using the mid
journey server. Because with 100 people
generating at the same time, again, it's very easy to get
lost. So that's finished. Now this one I have found the results can be a bit mixed again, it's
trial and error. Just play around with it
till you get what you want. This one I would say
has worked fairly well. It hasn't drawn in
anything strange like weird hands or six fingers
or a phantom hand in there, which is something
it likes to do any generative AI
art application. But it's given different sorts different leggings and her legs are in slightly different poses. That has actually
worked fairly well. Again, if it doesn't
work the way you want, then just play around with it. Very prompt. Go
back to the prompt. So again, if I didn't like
that what I got there, I can go back to the original image and then hit it again. Hit that down arrow again. It will go to work and give me four different alternatives. So that's basically the entire, what I would call
the basic workflow going from imagine and then your prompt to using the upsize command to using the V commands for variations. And then once you
have the upsize, I've shown you how to
do more variations. I really like this
edition of the Vary in brackets region one because
that has come in very handy, for example, when I was
designing a wedding ring. As an example, I could just highlight the ring and
say I like the ring, but just change the diamond, the cut of the diamond, or
put a different stone in. And let's see what happens. That's a very powerful command. And again, it's a
recent addition, I think only two or
three weeks ago. As of time at
recording the zoom out commands are great for
giving more context. And the arrows are very similar
to the zoom out command. They just tell mid journey, which direction do you
want to zoom out in. So that's it for the
basic prompting. What I want to do in the
next video is just show you a shortcut way of perhaps
getting some inspiration. This is going to
be super simple. We're going to go back
to mid journey for this.
6. Exploring Midjourney's Community Feed: Inspiration & Command Tweaks: So what I want you to
do here is go back to your browser and log
into Mid Journey and mid journey.com Sign in with the details that you set up
and go to the Explore tab. When you start on the home tab, you're going to
start seeing all the generations that
you've ever done. You can see here, this
is a four coloring book at Tyrannosaurus Rex. This is a ring that
I mentioned before, playing around with
some ring designs. I was also playing around
with some fashion designs and getting really lost. You can spend a
lot of time here, but what I want you to do
is go to the Explorer tab. This is a community
feed and this is where you can see what everyone
else is generating. And what you can do here is say, wow, I really like that image. What was the prompt that
generated that image? And I'm going to
copy that prompt. And I'm going to
put the prompt in myself and see what happens. Let's take, for example, this one of Snoopy. What you can do is you can click on it to see more
of the details. Left click on the three dots. First off, you can just
save the image if you want. Don't claim that the image that you generated it yourself, that's one of the
evolving areas of AI is copyright. But
you can save the image. Certainly what I want
you to do is go copy and then copy full command
that's copied. Now if I go back to my
discord and let's put in, imagine how this works. Hopefully by now I'll hit Tab. Now I'll hit Paste.
That's the prompt that generated that image. If I hit Enter, I'm not going
to get the exact same one. Remember, there's always
a bit of randomness built in to these generators. But I'm going to get, hopefully
something that's very, very similar in theme. And there you are. This is what it generated for me and this is what it
generated for the other person. I think for the other person, it actually turned
out a bit better. My snoops look a bit weird,
the eye on this one. I don't know why one is
open, one is closed, and this one here
looks, I don't know, slightly inebriated,
maybe too much Christmas eggnog or something. As I said, it's random. If I don't like
these, I can just rerun them again or I could go back to mid journey and maybe play around with
a prompt a little bit. Now, just one final
thing on this, because you can go crazy.
That's all I had to show you. You will see at the
end of this command, R one to two, Can you see that? That is what's called a switch that gives you more options, more power to specify exactly what you want
mid journey to generate. And we're going to
cover this in one of the future videos switches. This one basically means AI's aspect ratio and
it's saying one to two, it's saying, hey, mid journey, generate cute character,
Snoopy peanuts. Close up Christmas, snow,
moons, stars, garland, tree. Just make sure that
the aspect ratio is one horizontal to two vertical. And you can see
they're all generated in that portrait format. If I take you back to here, and this is a Snoopy
photo, again, if you hit Copy and
you hit full command, you get not only the prompt, but all of the
switches afterwards. And sometimes there
can be images with four or five different switches to really fine tune the command. If I just hit Prompt
to Copy and just prompt when I go to mid
journey and I go once again. Imagine right now hit Paste, It hasn't actually copied that
switch over R one to two. You can see here,
it's just copied the prompt mid journey by default as you've seen
generates square images. If you copy the full command, you'll get all the switches
and it'll be closer to what you saw on the mid
journey community feed. If you just copy the prompt,
then you're going to, depending on the image
that you've picked, get something fairly similar or something wildly different. So you can see here with
this one, first off, obviously it's a square
ratio, it's not one to two. Aside from that it's
thematically quite similar because the only switch in there was the
aspect ratio one, if I go for example,
to this one. Now this one had a,
you can see here, there's a lot more
switches here. It's got chaos which is a randomness controller
aspect ratio. And you have some
other commands here. V I know is for the version version 5.2
of mid journey star, I just copy this for example. This is the original image. If I just say copy prompt. If I go to mid journey with that many switches
I just put in, imagine I'll hit Enter and I'll finish up
on this example. My bet is that what it's going to generate
is going to be quite different to what I saw on mid journey just because
it had so many switches and me just putting in the
prompt without the switches I think will generate something probably that's quite different. We know it's going to
be square for a start. The original, the person put in an aspect
ratio of 11, 17. Again, a more portrait
oriented one. This one, even from
the beginning images, I think it's going to look quite different. But
let's have a look. You can see here, I think that looks quite sizably different, these images, as
compared to the one that was on mid journey. So
we'll leave it there. That's just the
difference between copy full command
and copy prompt. But if you're wanting some
inspiration, by all means, go explore and look at
the community feed. You can see there's hot, there's rising, there's new, and there's top ones. This could be interesting,
the most popular ones that have ever been generated. And then if you find one that
you like, copy the prompt, take it over to mid journey, generate it, and see what
it comes up with for you. You can also search
prompts or job ID, so you can hone down
on what you like. That is the complete basics of where to start your
mid journey journey. And you can easily leave
it there and go play. What I'm going to show you next is how to play
with the switches, the ones that you've
been seeing here like A R for aspect ratio, just to give you a
bit more fine tuning. This will just give you
a little bit more power in terms of fine tuning, but the most exciting one
will be image prompts. That's where you get to give mid journey an image
that you like. Now, it could be an image of yourself and turn it
into something else. Just to give you a super
simple example of this, this over here is a picture of my admittedly gorgeous
friend over in Ireland, although she's over in
Dubai at the moment. And I gave mid journey that
this picture of her on the left and then told it to generate an image of a
young super heroine. If you know, Starlight from
the Boys on Amazon Prime is quite an adult superhero show, but you can see
what has taken is her image and then repurposed it into this superheroine
image on the right. So that's what I'm going to
be covering with you next. Yes, you've got the creativity. Go play if you want some of the really cool
tips and tricks, those are coming up next.
7. Mastering Midjourney Parameters: Fine-Tuning Your AI Art: By this time, hopefully you have the basic graph of basic
prompting in mid journey. And you've tried a
few prompts ideally, and you've seen the results and you know how
to upscale them, get or create variations
on them, et cetera. In the next couple of videos, I'm going to be covering some of the more advanced features,
particularly image prompting, which as I said at the
end of the last video, allows you to take
a photo, let's say, of yourself or a friend, and transform it into a cartoon or a superhero
or something like that. And also switches, or what
mid journey calls parameters. Now just to give you an idea, switch over to mid
journey again. Now you will be
able to get to this if you sign in to mid
journey on your browser. If you go to the help and fac section and you'll see mid
journey documentation, You can look up anything here that you have
questions about. For now, I'm going to
go to the user guide. If you have a look down
here at parameters, you can see if we just look
at the parameter list, how many different
parameters there are here. Now, I'm not going
to cover all of them because I think if
you read through this, they're pretty self explanatory. But more than that,
to really get an understanding of how they
work, you need to use them. Otherwise, it's just so much
information in your head. But if you don't
use it, it's just going to go in one
ear out the other. I will cover some
of the ones that I have found to be particularly
useful for myself. Aspect ratios, certainly,
which is something that appeared in some of the previous videos and that's very useful. Aspect ratios. How horizontal do you want
it to be to verticals? For example, one to
one is a square. A three to two would be
slightly more horizontal. Tiktok, Instagram
reels, Youtube shots, or nine to 16. So that's something that's
been very useful for myself. Video has been quite
interesting that allows you to turn
that image generation when you see mid jour
generating an image for you and it gradually painted in
a little bit at a time, You can create a video out of that quality is one which
we haven't really covered, but I have found that's useful. The default setting is maximum
quality, which is one, using this parameter, you
can tell mid journey, actually I don't need
such high quality. And that allows you to use less processing time on
the mid journey server, which means you can
produce more images. And obviously they're
going to be times when you don't want to
decrease the quality. But when I was creating images
for my children's book, so for example, these ones here, because I was producing
a cartoonish, fairly simplistic illustration
for a children's book, I turned the quality down. I think one is maximum. So I think I turn
it down to 0.5, so half of normal quality. And these were more than good enough for a children's book. But obviously, you wouldn't want to be turning the quality setting down if you were
interested in producing, let's say, a photo realistic
or very detailed image. Now before I delve
too deeply into it, let me show you how you use these parameters so that
you're aware what it is. You will use the basic prompt that I showed you
in the last videos with forward slash imagine and then you put your prompt in. The parameters go at the end of, at the end of the prompt. And you can see down here, for example, giving
you an example. We'll use the quality parameter or quality switch as an example. If you have a look
here, it's forward slash imagine and then the prompt detailed
pony illustration. Then space for quality. For quality you can either put or quality, it
accepts either one. And then a space 0.25 which means it's a quarter
of the normal quality. And you can see down here the differences in
what it creates. And this is what I
suggest you do if you're interested in any
of these parameters, is to play around with it and get a feel for what
it actually does. Because it's one thing
to read about it, but it's another
thing to see it. For example, this illustration, this is a 0.25 Let me see
if I can blow that up, so that's 0.25 And as I said, that could be perfectly fine for a more
simplistic illustration. Maybe a tapestry,
maybe needlework, a template, or a
children's book. And because it's 0.25 quality, it's only going to cost you a quarter of the
amount in terms of your monthly usage that a normal image would or if you
didn't use the parameter. Because remember, if you
don't use a parameter, at least with quality, it's running at full
quality every time. This is the same if
you do it at quality 0.5 and then quality one. Or if you didn't
put the parameter in because it'd be
exactly the same. That's the more detailed one. So you can see there's more
sort of brushwork here with the black lines as
opposed to this 1.25 which is more simplistic. You can also see here, this is a good point which
I forgot about. It takes a quarter
of the minute, so uses up a quarter
of your monthly quota. It's also four times faster. So very often what I've done when I'm beginning an illustration or
beginning a project, and I'm not really
sure what I want yet, I'll run it at a lower quality
so that it happens faster. And then once I'm actually
zeroed in, locked in, then I'll go back
to normal quality when I have more
of an idea as to, yes, mid journey knows
exactly what I want. So we'll go into
parameters in a sect. But first, let me
show you the image prompt because I think by far that's the one that I
have found the most useful.
8. Mastering Image Prompting: Transforming Photos into AI Art with Midjourney: Image prompting. Let me
show you how this works. Obviously you're going to
have to open up your discord. Go to the bottom and
you'll see this plus sign. You can either click it once
and then hit upload a file. Because you're going to have to upload the picture you want. Mid journey to use, I just double click and
we'll do the same thing. Then find the picture
that you want to use. Now to start with, use whatever picture you want. I have found, and I
think this makes sense. If you know the sort of
picture you want at the end, then you want to start with at, let's say you want a superhero that's in a certain
kind of pose, the perfect picture to give. It would be, let's say you want to turn yourself
into that superhero. Have a picture of yourself
in a similar pose. So for example, if you want a photo of a superhero
from side on, you'd want to give Mid journey a photo of
yourself side on, Not from front on,
if that makes sense. Otherwise, it doesn't
do very well. Now for the purposes here, I would just put a photo of
myself wearing a suit, a tux. I'll just hit Enter and
what that's going to do is upload it to
the Discord servers. I left click on this now
and I say open in browser. You can see at the top. Or
maybe you can a bit fine. But it says CDN, content delivery network
on the Discord app, it's stored on Discord. It's not like everyone's
going to be able to see this. It's only me who can see this. What I can do now, if I copy the address at the top
from my Chrome browser, I'll hit Control C. Now let me go back to my Discord
and Mid journey. Now I will imagine now
I can hit Tab or Space. Hopefully you're learning
some of those shortcuts. Now, before you put
your prompt in, hit Paste or control V. Now that is the link to the image
that I just uploaded, this image of myself in a red
tux. That's the link to it. I've pasted that link in there. Now it's very
important that you hit space and now you
put the prompt in. I will just put a
futuristic super hero. Okay, for the purpose
of what we're doing, why don't we try
throwing in a parameter. I showed you the quality
one for quality, or you can put the
whole word quality in space 0.5 Let's just run
this at Half Quality. I'll hit Enter now. I have no idea what this
is going to generate. Image prompting is one of
those ones when sometimes you look at and go, wow,
that's amazing. Other times you
look at it and go, that looks nothing
like what I wanted. There is a bit of randomness, bit of random luck involved. As with any of this
generative AI art image, prompting takes a
bit of patience. And I'll show you
some ways around it. But let's just see
what happens for now. Okay, now it doesn't
tend to generate. I found is giving it
images of myself. It doesn't seem to like
my face very much. Does this look like this
one on the bottom left? It's got a long hair, looks like a woman, but it's got facial
hair at the same time. You can see it's
certainly used my image. The results are a
little bit mixed. Now, having said that, you can
use the usual upsizing and variation commands here
that I showed you before in the basics of prompting
for argument's sake. Let's just say I don't like any of those and I'll get
it to regenerate. Let's se if it can
be any closer. Now, let's have a look at this. I wouldn't say these
are much better, but I think you're starting
to see the idea here. It is very hit and miss. And there's a little
bit of luck involved. Sometimes I've used images of my friends and it's worked
out spectacularly well. So for example, I've shown
you these ones before. My friend Chloe. I think that worked
out amazingly well and I did exactly the same as
what I just showed you. Is that I just used her photo, maybe mid journey, preferred
her photo to my photo. But I could show I showed
Chloe the image on the right. I didn't say who it
was or what it was, but she instantly
recognized it as herself. Sometimes it works, sometimes the results are a little
bit questionable, as I found in my case. Now we'll just try one more
example with my own ugly G. We'll give it a
different photo. I'll show you another way
that you can do this. I showed you that if you
open up in the browser, you can go to the top and
copy, copy the address. The other thing that you can do, and you may find this
a little bit simpler. So once you click it here, in fact you don't even
have to click it. You can just simply right
click and copy the link here. Then imagine prompt and then paste, and that
would be the image. Once again just right click
on it and go to Copy Link. So you don't have
to go to a browser or anything like that and just hit control V when
it comes down to here. Right click, copy, copy, link. And then do your prompt. Hit control V to paste it in. Remember to put a
space after the image. Let's just say, let's be silly. James Bond. Okay, at the beach, let's just see what happens. Remember that the Mid Journey
app can only do so much. I'm going to take, for example, this close up
portrait of my face. And then turn it into a
whole cinematic universe with me in the middle
woods, James Bond. The closer you can get
the photo that you use, the image that you
use for your image, prompt to the finished product, the more success
you're going to have. Okay, Now I will say I'm still not a huge fan
of any of those, because in all of them,
I look very worried with my face, my brow furrowed. But I'll say this is probably a better job than what
it did previously. These aren't bad,
they're not great. But if I was trying to
do this with myself, I'd give it other photos of myself play around
with different photos. And as I've said,
time and time again, it's a bit of trial and error
when it comes to A I art, I'll just give it
different images until I find one that works. Now, just to give
you another example, final example, but a
slightly different one. This is a children's
book that I made based on the story of one of my friends
whose name is Eliza. Obviously, if you have a look at the children's
book I used Mid Journey. I use what I'm showing you to generate the photos
in this book. I actually used Chat GPT to
generate the story as well. So it's almost completely AI generated just
with my inputs. Now the thing with
the image prompts. For example, I'm
wanting to generate a children's book based
on my friend Eliza, who has red hair. Now when I've generated
children's books before, the difficulty was I've used Canva clip art or
stock art for example. Sure, you can download art, but on each page because
it's different clip art, there's no guarantee that the image is going to
look exactly the same. For example, to exaggerate it, you might find one clip art that you want to use in
your children's book, and the girl has brown
hair and brown eyes. And then the next one she's got blond hair and then blue eyes. And then the next one. First
one she's got long hair. Second one she's got short hair. That can be a bit
jarring because people will probably notice
and go hang on. I thought you said I
thought she was brunette. And then in the next page she's blonde and we're
following the same girl. I'm a bit confused when it came to using mid journey to
generate the art in this book. One of the things that was
really important to me, and you can see they all
look somewhat similar, a bit different. But
I was okay with that. In fact, I quite enjoyed that. But are you noticing that in
every photo it's red hair, blue eyes, red hair, blue eyes? Pretty much, I hope. Red hair, blue eyes,
red hair, blue eyes. Now, I used image
prompts to do that. Because if you think about it, if I just went to mid
journey and said, hey, paint a picture of, you know, Eliza, red
hair, blue eyed. Doing this, it would
generate an image. But it would look one way
and then in the next image, when I want to generate the
image for the next page, I could give it the same
red hair, blue eye prompts, but it might generate a completely different
looking image or a completely
different looking woman. So here's what I
did. I dedicated a mid text channel for
the children's book. Now I will say this is one of the big
advantages of setting up your own discord server and then your own channel
for using mid journey. Because this allows you to keep your different
projects separate. I've created a separate channel for the children's book
because I wanted to be able to map out the journey from where I began
with a concept, which is what you're seeing
here all the way to the end, which is where I was generating the actual images for the book. As you can see down here, if you have a look at the top
and you can give this a go. The prompt that I put in
was a character sheet of a young red haired girl
with blue eyes named Eliza, basically describing her. The reason I put character
sheet in is it puts the character in a
few different poses which can be useful. Now I've described
Eliza as med student, as a medical student
because that's what she is. I've also said
multiple expressions, poses and angles so
that when you see here, not all the photos are in
exactly the same pose. Simple cartoon drawing
suitable for children's book. And then Eliza is
wearing blue Dr. scrubs, a stethoscope and
a pageant crown. Now as I've said,
trial and error, very few of the images actually ended up having a
pageant crown in them. You can see none
of these do again, a little bit of trial and error, but the point of putting in multi generating
multiple images, such as this with a Liz and different poses and
slightly different looks, I found my favorites. And I saved them all. Again, if you look
here, these are all the images that I saved. These are the ones that I liked. Yes, they all looked
pretty similar, but they were all
slightly different. That's just the way it goes. What I have found with
image prompting is if you can give mid journey because you can give it
more than one image. That's something I
haven't shown you yet. I don't know how
many the maximum is, but I certainly was
able to give it at least this many, which was nine. If you can give it
multiple images of the same person
or the same subject, but they're all from
slightly different angles, Then mid journey seems
to synthesize them all and be able to
produce a better, a more accurate image
based off of them. Versus if you just gave it one, I fed mid journey,
all of these images. Now to be fair, I cut out all the background
extraneous stuff. So I did, for example,
with this image. I didn't leave all the five
background images there, I cropped them out. If I go back to
background removed, I actually cleaned
them up using Canva, which is a free software
tool you can use. Got rid of the
colored background, got rid of the extraneous
stuff in the background. So I didn't really need
that character sheet. After all, I could have just
generated multiple versions of Eliza and said hey I like this one. Hey,
I like this one. Remember using that
variations command here? I could have generated
multiple images of Eliza and just
said I like this one. I like this one.
I like this one. Just save them somewhere
on your computer. Then what you do when
it comes time to actually generate the
images for your book, as in my case, I gave it all
of those images as a prompt. Here was where I first started using those
nine images as a prompt. And I can tell it's nine because you got 123-45-6789 links. These are all the links to
the images that I uploaded. If I click on the last
one, for example, there's one of the
images that I used. I uploaded all of them to discord and as I said
just double click and then if you want to you can select all of them and then just hit open
and then hit Enter. Upload, all of them using
those nine image prompts. All I did was I wasn't particularly
careful about the prompt, I gave it, this sentence here. Eliza was bright with talent, so wide, but she often felt
lost and pushed aside. I got Chat GPT to write the story based on some facts
about Eliza that I gave it. I gave it the skeleton
of the story. Chat GPT wrote the story
and actually made it rhyme, which I thought was really cool. All I did was go what? I'll give me a journey. The nine image prompts and
then I'll just give it the first sentence of the
story that Chat GPT wrote. Let's see what happened
if you're eagle eyed, you can also see I used the
quality parameter there, 0.5 so that it was
only half quality, double as quick, half the usage. I was staggered by these images. I looked at these
and went, yeah, I'm happy to use
any one of those. Again, I upsize 1.2
as you can see there. But I think you can see how I went about creating this book. Let me just show you if I show you the very first
page, there it is. As you see, Eliza was
bright with talent so wide. That's what I used as a prompt. I didn't say Eliza is a met student with blue
scripts and no, no. I used that to generate
the original images and then I just started giving mid journey the actual lines from the story and said,
let's see what you do. It worked almost perfectly
for every line, not everyone. But almost then I ended up
using one of those images, actual image in the book. Actually, number one, if
I bring you back to here, I end up using this
image here in the book. This is the power of image
prompting as I scroll down. Yes, it probably is fair to
say image prompting is more accurate with a
simpler cartoon image than an actual human
face just because we're programmed to be able to detect minute
differences in faces. But when it comes to a cartoon, it's nowhere near as detailed. It's a bit easier. You can see here all the
images that I created. Yes, some of them have slightly different styles like this one, but they're all pretty
much red hair, blue eyed. And if I put these
images in a book, people would go,
yeah, that's Eliza. Yeah, that's Eliza.
Slightly different style, but yes, it's all Eliza. So this is the power
of image prompting. So yes, you can use
it just as a one off to turn yourself into a superhero
or something like that, and that can make
a very fun gift. If you put it on a T
shirt or something, take a picture of your friend
or your significant other, or your child or your
father for Father's Day. Turn it into a
cartoon and put it on a T shirt or a mug or
something. That's super cool. But it actually has a lot of potential uses for
your creative work. So as I said, this entire
text channel here, from beginning to end, was just dedicated to producing all the images for this children's book which
I published on Amazon. And all the way down to the end, those are all the images
and even the cover. So you can see this
image down here is the one that I ended
up using on the cover. Just with the power
of mid journey. I was so much happier with the quality of this book
really blown away because I had no artistic
talent compared to the quality of the
first book that I pulled out that I produced, which was using clip art. This is the power
of image prompting. In order to be able to produce what's called
consistent characters, you want to be able to produce multiple images of
basically the same person. Then image prompting
is where it's at. What I'd recommend you do now is find a couple of
images to play with, load them into your
discord and start playing with the image prompting
feature of mid journey. Get comfortable with
what it can do, what it can't do, and then playing around and seeing
what results you get. Because once you see
what the potential is, I guarantee you this is
a particular feature of mid journey that you will
use time and time again.
9. Mastering Advanced Prompting: Dive Deep into Midjourney Parameters: Now as I said, I'm not
going to run you through all the different parameters that mid journey has available. Because if you go to the
mid journey documentation, you can read it
all for yourself. It's also constantly evolving, so it's always
having new features updated or features added. You're not really going
to need all of these. What I suggest you do is go to the mid journey
documentation. So you can see up here, it's docs dot mid journey.com Docs as in
short for documents. Go through all the parameters
that you see here. Just maybe think, would I find that useful or do
I need that right now? For example, I'll go through
a couple with you and show you how to use them
just as an example. But you use them all the same. You put them at the end of the prompt to make sure you put a space between the end of
the prompt and the parameter. And then you put
the parameter in, for example, aspect ratios. Now, why don't we start
blending a couple of things. We're talking about
advanced prompting here. Let me copy the link to
my image there, right? We'll use an image prompt. So we'll go imagine prompt. I'll put the link
to my image there. Then I'll put, I don't know, Santa Flaws at the
beach. And then space. Remember that space.
Don't just run it into the previous part of the prompt because
it will confuse it. Let's put nine colon 16,
and we'll hit Enter. What this is going to
do is going to use my image above this,
one of me at the beach. And it's going to
produce something about Santa Claus with an
aspect ratio of 916, which is that aspect ratio you see so commonly now in
things like Tiktok or Youtube shots or those
vertically oriented images. As for what numbers you put
at the end of each parameter, again, the mid journey
documentation will show you. So the aspect ratio,
if I click into this, obviously with aspect ratios
you need to express it as two numbers and it's
normally separated. The convention is to
separate it with the colon. So one to one is a square, whereas your TV at home or your computer monitor is
very often 16 to nine. And as I said, Tiktok
Youtube shots, Instagram reels very
often are nine to 16. So if I go back to discord now. Oh dear, what has Cheney done? All right. So actually, it looks somewhat
like me, doesn't it? Like an aged version
of myself even got a fat belly here if I
opened this in the browser, but you can see the aspect
ratio parameter has worked. It's magic. Each one of these images is
in the aspect ratio of 916. If I take the one with
my fat belly here, and so that's image two
and I say upsize it, then you can indeed see
that is an aspect ratio. Remember 916 is that
vertical one, like a Tiktok. And you can see it's done what it's exactly supposed
to do right there. The tile parameter is one
that I haven't used a lot. What it does is
generate an image that can be endlessly repeated. So it's perfect for if
you wanted to print out wallpaper or design for
the wall of your room, or you wanted to design
a background, let's say, of a website or a Youtube
background or something. And you don't know exactly how big you need
it to be because it depends on is it being displayed on a mobile
or on a computer. You can use the tile parameter, as you can see here, to generate images that can be
endlessly repeated. So that's very cool. One that I have used is video. Now, video is a bit
of a weird one. We'll go imagine,
let's just put in a cute cartoon dog and his pal. I'll put in a quality
parameter of again, 0.5 And then hit space again, and you can put multiple
parameters in there. I'll put video. I've got 2.5
Then the video parameter, I haven't specified
an aspect ratio, Mid journey will default to a
square image or one to one. Let's just see what it does now. As you can see in the
documentation here, it will tell you how to use it if you need
to find out more. One of the things
here it says video only works on image
grids not upscale. You can see examples here. They're all grids
with four images. It tells you what to do. I need to react to this. That's why I wanted to
cover this one because it's useful to useful feature, but it's also a bit different. You need to react to it,
how do I react to it? Can you see that as I
mouse over this message, that in the top right here, these things pop up and
there's a reaction. If I mouse over here, then this would be a reaction for
my fat Santa Claus photo. But I want to reaction
to this video. One, what I need to do
is if I want the video, because you look at this and go, Adrian, it's not a video. It's just an image that's true. And you can do the
same things as you could normally do
with any other image. But if I go to the ad reaction, you need to find envelope. If you can't find
envelope for me, it's frequently
used but just type in envelope at the top. And now let me left
click on envelope. And you go, Adrian,
what's happened? I don't know if you could
hear it but I heard a bomb that discord
notification Sound Now, if I go to the very top left, can you see the sailing
boat, the mid journey bot? Because at the very top left, this is actually a did a
DM, just like on Instagram. If I left click on it, the mid journey bot has now
a direct message to me, the video, I don't know
why it works like this, but this is the way it works. And you can see it's down here. Now, I've been having
some issues with playing them
directly in Discord. What I will do is just click
on the link that it's me. You can see here what it said. Cute cartoon dog in his pal. That's the unique
ID that it's given this job seed number is something that will go into
a little bit later on. Well, right after this and then let's click on
that. That's the video. It's just a nice
short, sharp video of the generation of the image that could be
useful, For example, if you wanted to put it on your social media, your Tiktok, Instagram reels something
like that just on the subject of seeds, seeds. Remember what I said,
All AI art generation has an inherent
randomness built in. It's controlled basically by
these things called seeds. If you know the seed of
something that you've generated, a particular image
you've generated, you can actually find the
seed give mid journey, that same seed number. And then within reason, each time you
generate the image, it's going to be exactly the
same or very, very close. If you have a look here, the
example they're giving you is imagine prompt
and our pitcher, it's run the same
prompt three times. And they're all our pictures,
but they're different. Whereas if you use the
seed parameter seed and the seed number is 123, you see that they are in
fact exactly the same. You may want this
feature, you may not. But if you want to find out how to find a job seed number, it's again, using
an emoji reaction. You have to react with an
envelope emoji to a job. If I go back, let
me find my server. Let's go to my mid
journey server. Let's say I wanted to find the job number of our
Snoopy photo from. Before I mouse over it, you can see that the reaction
button has popped up. I will add, I'll click
on the envelope. And again, there's a D M from Mid Journey. And here you go. It's given me the job ID and it's given me the
seed number as well. So I could now run
that same prompt and at the end of it put
a space, seed space. And then put that set number in. And I would get the
exact same photos again. Now I've seen people
use that to generate very similar images like when they're using
the image prompts. I haven't found that
I've needed it as much. I have found the
image prompts without the seeds more than good
enough at generating, as I said, consistent
characters. For example, my children's book, I haven't had to
find seed numbers and use the exact seed numbers. If you want to play with it, then by all means give it a go. That's a brief look at some of the parameters
for mid journey. As I said, it is not necessary
for you to know what every single parameter does to be able to get a lot of
use from mid journey. I by no means know all of these parameters
and what they do. I haven't even used all of these parameters
and what they do. But it is helpful to
at least go through the documentation and just have a quick read as to what some of the different
parameters are, so that when you need
them, you will go, oh, hang on, I read something about that on the mid
journey documentation. Let me go back, find it and now work out
how to implement it. I would suggest that you learn about one parameter at a time. So for example, the ones
that I've shown you, the ones I use most often, quality aspect ratio and
the image prompt feature, which is not a parameter
but it's a feature. Those are the ones
I use all the time. And so I'm more familiar with
them because I need them. You might need the
video parameter more, you might need the
tile parameter more. So you'll become familiar over time with the ones
you use the most. So there is no need for you to memorize what each
one of these does. By all means, if you want to have a deep dive,
play with them. And remember it's on the
docs dot mid journey.com And one more time you
can get there from the main mid journey
page to just login with your mid
journey details. And then go to the
help FAQ, Help and Ac. You can see an image of
me as fat sander there. Then you can search
a mid journey documentation here
if you know what parameter you want
to find help on. Otherwise, go to the user guide and that's exactly
where we were. So visit the documentation
for mid journey, have a quick look at the
different parameters. And at least try one or two so you get the hang
of how to use them. They all work basically
the same number. At the end of the prompt, put a space and then the parameter, and then the value with
aspect ratio was R space 916. Each parameter might have slightly different
values that you use, but familiarize yourself
with how to use them. Definitely give the image
prompting a go because I think you're
going to get a lot of mileage out of that one. And that's it for
advanced prompting. Give it a go and let me
know how you get on.
10. Practical Magic: Diverse Applications of AI Art with Midjourney: Let me finish this
up with some of my favorite applications
that I found for AI art because I'm not
very interested in all the amazing things that the art generator or the A I can do. I'm more interested in its
practical applications and you probably are too. Like, what can this actually
do for me that's useful? So social media is a
big one logo design. Background designs, this
is an image, for example, I designed for my A I
art store as a logo. So I made sure that it was
containable within a square. And I said, acute
friendly robot, because we don't want AI
to take over the world. And I managed to
generate this logo, which I really, really liked. I was also able to use it
to generate a background, so I use the aspect
ratio switch. Here you can see this is
more rectangular and I have that same guy there and
added a pair of legs. Gave him a pet dog, and just put a futuristic
cityscape in the background. So another one that I did here, another logo, This time
it was for a review site. And I said, oh,
it's a review site, let's make him like a
Sherlock Holmes character, but a cartoon anime version. So another logo, you can also
generate funny cat photos. My brother has a quite fat, ragged ole kitten and this is what the art
decided to do with it. This is not an image
prompt, by the way, I just said draw some
images of an obese, ragged old kitten and you can
get a good laugh out of it. You can also put this
on merch or send this to your friends
and loved one, just as a surprise or a joke. You'd be surprised at
the mileage you can get just out of photos such
as this coloring books. Now, I already showed you
my actual children's book. The next stage that I'm at at the moment is to
design coloring books. And by just changing the
mid journey prompt to say, make it a black
and white outline suitable for coloring book, and we did a Tyrannosaurus Rex. It's come up with these
four images here. I've used the aspect
ratio parameter as well as you can see suit. An 8.2 11 inch book is
what I was going for. I would happily use
any of these images, upscale it, whack
it into my book, publish it on Amazon. But you can see just by saying black and white outline or an image suitable for
children's coloring book. It's come up with
these so you can generate images for
a coloring book, something that used to be very, very difficult to
do in the past. These are images, obviously, from this children's
book about Eliza. Eliza is a professional dancer, and these are the
images it produced. Remember, with all those image prompts that I gave
it those nine images, and it created
these four images, which I think almost
all looked fantastic. I think I use the
one on the top left. The one on the bottom left
looks a little bit miserable, but the other ones
are absolutely amazing for children's
book in particular. This one was a really
interesting one. Now if you are getting
married or you know that you're going to
get engaged and you need an engagement ring or you're designing
a wedding ring, giving mid journey
some prompts to design rings could get you
into a lot of trouble. And when I say trouble
I mean the good type. I was on a call with a
friend of mine in America. She's just getting
about to get engaged. And you know, every guy wants to give his
special lady a unique, one of a kind, ring
to signify his love. And if you're like me and
you have no artistic talent, how do I know where to begin? I don't want to just get
something that looks terrible, but I have no artistic
talent to sketch. Well, enter mid journey
and I knew that I wanted something with
rose gold and white gold. I love those combinations and
I wanted them intertwined. You can see that all
of these are sort of more very narrow wispy strand, almost intertwined
to form the ring. I don't really like
the solid band. I think this looks a
bit more feminine, feminine, and more minimal. And obviously, you
want a nice diamond, but I didn't want it to be huge. I don't like giant bling. I think it's a bit goudy
and a bit impractical. And you can create
variations on, variations on variations play
to your heart's content. And remember that variation region function
when you upsize it. You can paint, for example, the region around the stone
and just change the stone. You can just say, well, I
really like the ring design, but let me just play around with a stone and the
claws of the stone. So this is one, I had a lot
of fun with, wedding dresses. You can say I was on a
bit of a wedding motif. You can design wedding gowns, You could design shoes, you could design earrings. The sky is really the limit. Just play around with different prompts if you want a quick example of
some of the prompts, this one for the
Tyrannosaurus Rex, that coloring book
photo, I just put a simple black and white outline drawing for a children's
coloring book, which made them all default
to exactly what I wanted. This is where you're going
to just want to play around, get a bit of experience with prompt crafting or
prompt engineering. And then very
quickly, you will be amazed at what you can
produce very easily. I just said the drawings of a friendly Tyrannosaurus
Rex in front of a simplified
jungle background. I said the quality to half don't need a lot
of complexity for a children's coloring book and the aspect ratio just to 916. This one was a
simple circular logo for a hypothetical
Youtube cooking channel, and you can see what
it came up with. I probably wouldn't
use any one of these. I didn't mind the one
in the bottom left. So I created some
variations on it. But you could easily just re, run the whole thing to get
some different concepts. I do a lot of pageant coaching, and a part of pageantry
is national costume. So these, I just said, a stunning original
concept design for an Australian national costume suitable for the
Miss Universe stage. I didn't tell it how
to make it Australian, and yet it somehow, with some of these ones, has made them very
distinctly Australian. This one in the bottom
right, for example, really reminds me of
our native cocker two, which is a very famous
Australian fauna. And the rest of it, even these ones up here, the color scheme is very Australia because obviously
we call ourselves a sunburnt land and that just was really effective
with a very simple, sometimes you just give
it a simple prompt and see what mid journey can do. You don't need to
spell everything out because sometimes that
result is actually worse. Then I was playing
around with it. Playing around with it. Again, some images for
the children's book, This one just with a dog, so you don't just have
to limit it to people. You can obviously pets, flowers, landscapes, anything you want more national costumes
there cartoon. Why not Coffee mug as well. Then if I just go to the bottom, I do want to finish
up with this one. If you do want to end up playing around with things
like wedding rings, imagine which hopefully
you know by now, the concept design
for a wedding ring. For a stunning, unique
engagement ring. Multiple angles. Let's say pencil sketch, I
don't know, this will work. We'll find out. Then I'll
put in my preferences. Again, made from
intertwined rose gold and white gold with a simple yet stunning
mounted diamond. Minimalist and modern design. Well, let's just see
what it comes up with. There you got it. Those designs are
absolutely stunning. Much better than
anything I could draw, let's put it this way. Then you could take
one of these sketches, one of these concepts to your jeweler who can
make custom art. And away you go, you will have a completely unique wedding ring designed by your mid journey. As its AI, it has some awareness
of real people as well. So depending on who you put in and you might need to play with this if I put
in, for example, Roger Fedra, and I'll just
make it 0.25 To make it quick, it will probably
know who that is. What I'm going to guess is that it's going
to come up with a picture that will look
someone like Roger Fedra. I can also put in, for example, the cast
of Breaking the bad. And again, I'll put this as Q 0.25 to make it a bit faster. But then, I mean, my name is Adrian Kwan,
I'm not a celebrity. If I put in Adrian Kwan and put in Q 0.25 I don't think
it's going to draw me. I have no idea what it will do. Probably nothing flattering,
but let's have a look. So you can see that it
knows who Roger feeder is. So it's able to
draw that without using any sort of image
prompt for yourself. If I go back to go back
down to Breaking Bad again, I don't know what's happened
here with the blank faces, but that's definitely the
cast of Breaking Bad. Great series by the way, bit heavy but great series. And then with me that doesn't look like me because I'm not famous enough for
mid journey to know. So just bear in mind,
mid journey does have some awareness of really,
really famous people. It doesn't have any awareness
of people it doesn't know. So if you're a celebrity
or you want to draw a celebrity,
you can do that. Just bear in mind copyright, be very careful about, especially if you're
going to sell anything you know making
it about a celebrity.
11. Concluding Thoughts: Harnessing the Power of AI Art with Midjourney: Those are some of my favorite
uses for mid journey. You will very quickly
find your own. But I hope by the time you get to here that you've actually followed the steps as
I've shown them to you. So now you can go away and let your creativity go
wild. That's what I'll say. And it's a bit of a rabbit hole. When I first started my
journey with AI art, I just thought, oh, this
will be a bit of a laugh. And I generated some
funny cat photos because you know who doesn't
do that to begin with. And then as I dug into it, I found out that actually
this is much more useful than I thought it would be in a
very practical way. So really, for example,
in my work as an author, being able to generate original stunning art
for a children's book, or any book, or a coloring book, It's such a huge time saver. And what happened in the
past was that you'd have to get an artist to
draw it for you. And half the time what
the artist sent you wasn't great like
with logos as well. They would send you very often
three concepts for a logo. And guess what, I didn't
like any of them. Whereas now I can get, you know, 100 concepts for a logo
within a couple of minutes. And then if I want it to be embellished a bit
more or refined, I can take the concept, give it to the
professional and say, this is what I
want to make this. You can do it with a logo, you can do it with
your wedding dress, your wedding ring, anything. You now have so much more artistic power at
your fingertips. And by the way, if you're a professional artist, you will be able to get
better results than me. Because you know all about
the different styles of art, the different mediums, pencil, crayon, charcoal, acrylics,
all that stuff you can. Now, if you're
thinking about this, if you're an artist and you're doing commissions for a client, but you never really know what
the client wants, do you? Because they might say,
oh, I want you to draw this tree and you have
one idea in your head, and then you do all the
work and they're like, no, that looks terrible, I
didn't want that at all. Now you can use AI to
quickly draw up the concept, show it to your client, and then say, which
one do you like? And then you immediately know, and the client knows this
is what you're aiming for. So the power of AI art is much more than I
originally thought it was. At first I thought it
was just a bit of fun. It'll be a gas, it'll be a joke. It was great, and it was.
Then as I dug into it more, I found more and more
practical uses for it. My bet is if you have any
creative endeavor or business, or you're just an entrepreneur, you will find some
use for mid journey, even if it's just a logo or
a Facebook profile photo, a Facebook cover, whatever
it is you're going to be, you'll blow yourself away
with what you can do. That used to take
you a lot more time and frankly a lot more money. So dig in, have some fun, and I'd love for you to share some of the creative uses
you found for mid journey. Because as you saw, the hardest part of this journey by far was getting mid journey, set up on discord. Again, I don't know
why it's that way. Mid journey have recently said they're looking
at a way of just implementing it as
something you can go as a standalone app on a browser. Why they implemented it through
discord? I have no idea. But now you know how to use it, go have some fun creating
and best of luck.
 Adrian Kwan, 3x Top-Ten Amazon Self-Published Author