Transcripts
1. Introduction: Have you ever heard that wisdom? Don't judge a book by its cover, that might be really good wisdom and advice when it
comes to people, when it comes to books, that wisdom is completely
the wrong way round. My name is Adrian Kwan IN the best-selling Amazon author of this book from
theater freedom. In this course I'm
going to show you how to use the free software Canva to create an amazingly
effective book cover. So many people make the
mistake of thinking that a book cover needs
to be really complicated, really artistic, or
they need to spend thousands of dollars or hundreds of hours
getting a designed. And the simple fact is that a simple book cover often
is the best solution. In this course, I'll
be covering what makes an effective book cover
and how to create it. Marie, simply using Canva, sometimes with just
literally one click. We'll be covering
print book covers. So paperback and hardcover, and also ebook covers. And as a bonus, I'll
show you how to create some promotional material to start generating buzz and
height for your book. Even before it's published, you've ever wanted to
know how to simply create an amazingly effective
book cover for free. Then I look forward to
seeing you on the inside.
2. What makes an EFFECTIVE book cover?: Before we get into how to
actually design your cover, I thought it would be a good idea to actually
ask ourselves, what is an effective
book cover? From? Why do I use the word effective? For most people? The purpose of the book
cover is not to win awards or not even to be
the prettiest book cover. The purpose of the book
cover, simply put, is to sell copies of your book. Now, if you're not interested in how many copies you sell, and let's say you're just
doing a customized book for a friend or customized book for a project where, you know, there are a certain
number of people who are going to buy
your books anyway, and I've done those
sorts of projects, then the COVID doesn't
matter as much. What I shouldn't say that
the cover is still matters. But maybe the purpose of
the cover is not really to sell the book because a, you don't care about that or be guaranteed the sales
in some other way. But if you are looking
to publish a book in a public space
such as Amazon, kVp. Lot of people get lost
because they think, Oh, I need the most prettiest
book cover out there. I need to get a
professional designer or I need to compete with
professional designers. And I need to have all these beautiful
cursive calligraphy, calligraphic font. And it is beautiful image that a professional
photographer took. And I need all,
all these things. And honestly, that is actually normally extremely
counterproductive. Because when it comes to the
purpose of your book cover, it's to shift copies
of your book. And from my experience
and I think if you have a look at the
Amazon kVp library, or you even ask yourself, what's the last book you bought because of the way it
gravity off the shelf. It is normally a
simplistic book cover that catches your
eye for some reason. It's not normally a cover that has a lot going on that may be won a design award or wasn't necessarily designed by
an award winning artist. Let me give you,
with that in mind. That's what I defined as
ineffective book cover, is to sell copies
of your book to, let's say, people who know
nothing about your book. If they know something
about you or your famous, then that's a bit
different or you have a following
that's different. But I wanted to give you an example of some of
the book covers that I've created and
some of the book covers that I really,
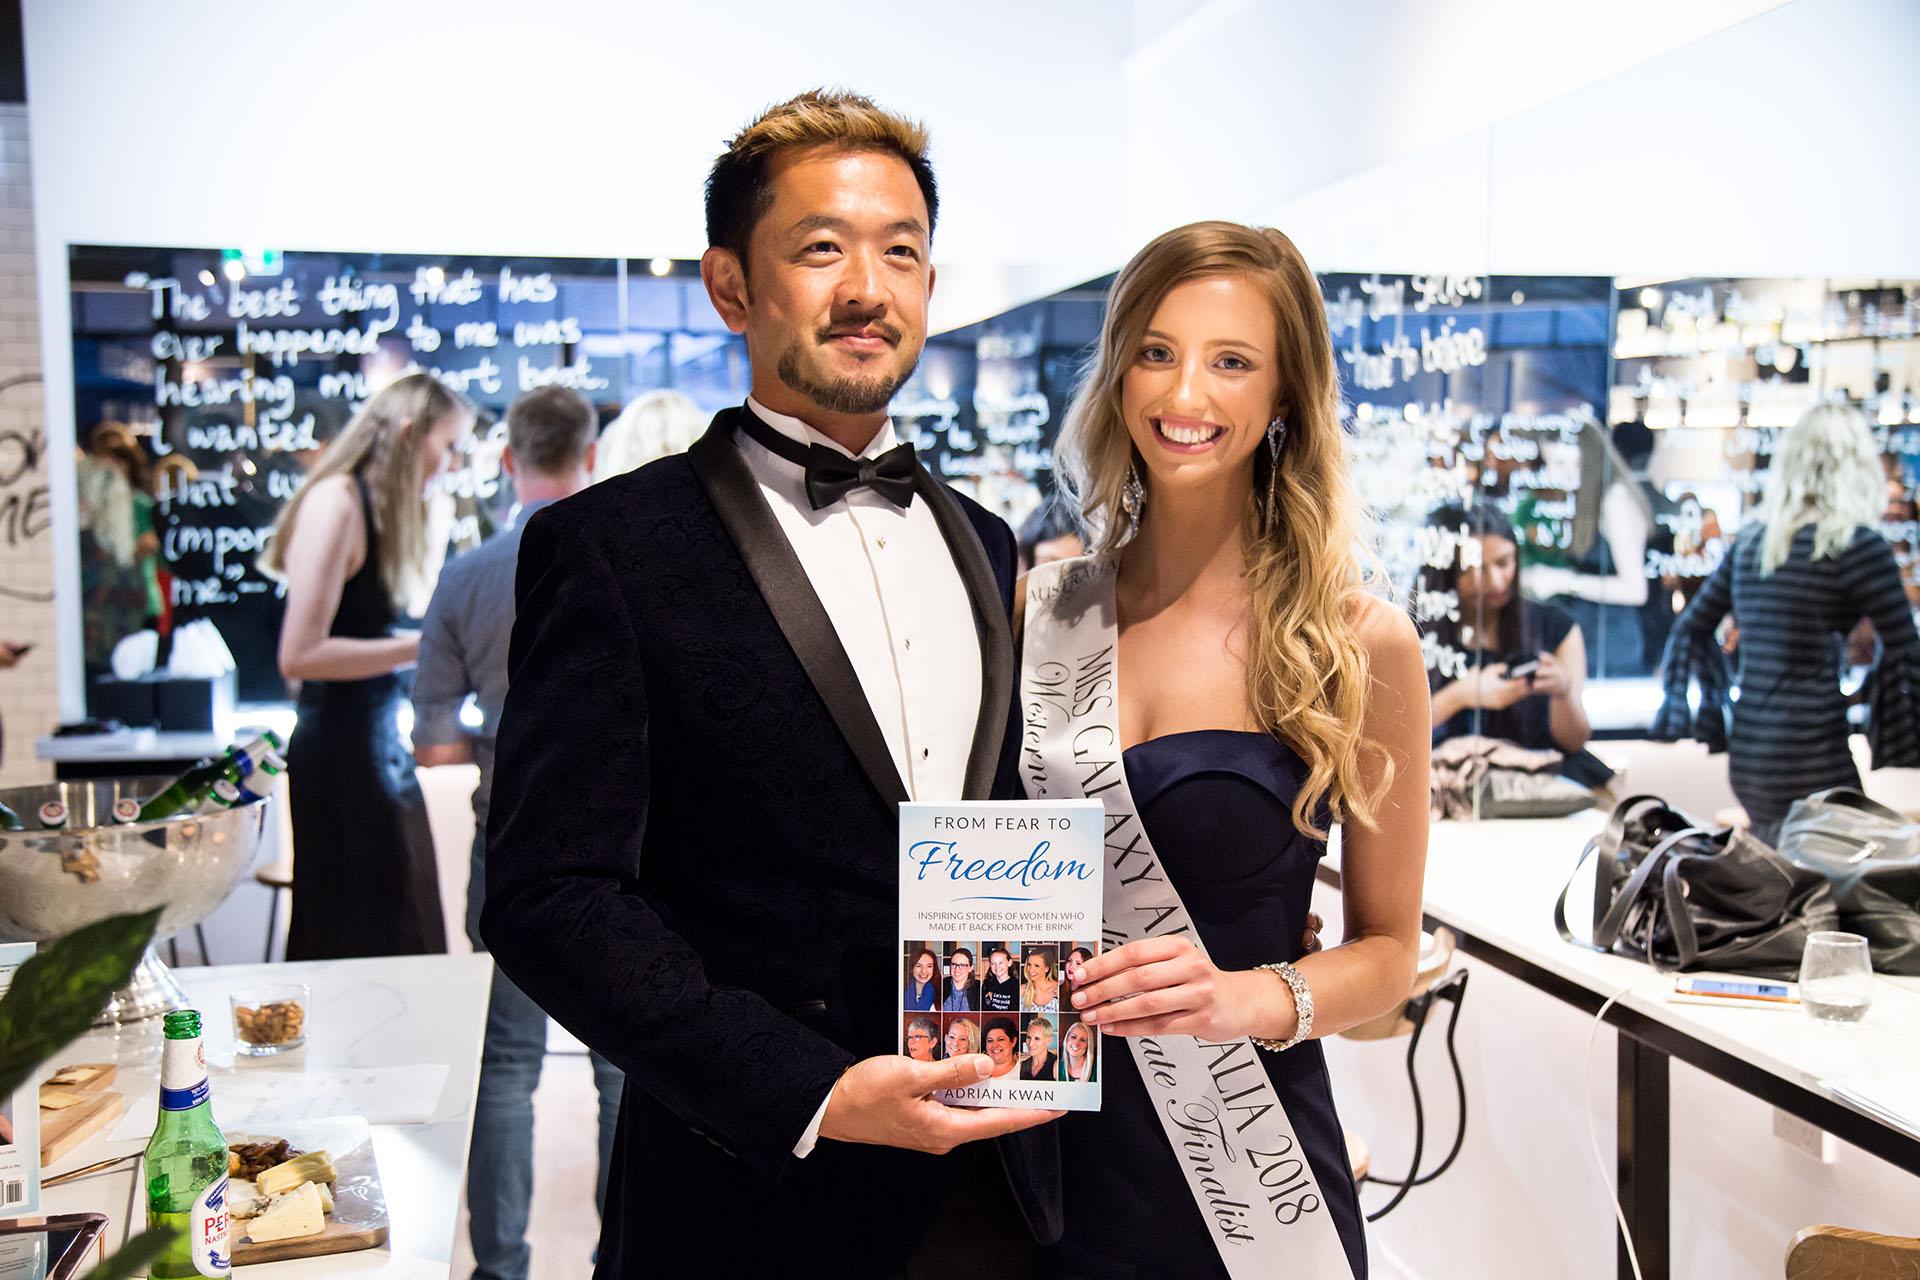
really enjoy. Now, my first book, which was from fear to freedom. This was the cover that we use. This cover, this book hit best-seller status on
Amazon in multiple markets. It definitely wasn't Australia, in the US and the UK
in two niches each, I think in the US one
of the niches, niches. Niches, niches was number two, but it did, let's say, dude, well, now you might look
at that cover and go, Adrian, That's an amazing Kaaba. I look back at this
and I don't really, really like this cover. Now, it goes without
saying that the title and the subtitle is
a big part of cover. Construction will cover design. We're not going to cover how to title your book in this course. But it is super important
to put it simply. You want something that
is almost a little bit, Let's say controversial or something that's a bit
shocking as a title. And that's why I
don't really like this title was much now. And then the subtitle is
a bit more descriptive. What are people gonna
learn from your book? But pie dough aside, there are photos of these
women and these are the women whose interviews
I included in this book. I generally am in favor of
putting faces on anything you want to grab
attention because faces tend to be what the
human eye is most drawn to. But the photos are a bit small. The color is a bit I
mean, I like blue, but it doesn't really
grabbed me and I think there's ten
faces rather than one. This is when I was like, This is my first book. Can I thought, oh, cover, what would because I've
put all these photos of these women on the cover and
I looked back at it now, and I probably would have
done this differently. So this is my first book, contrasted to my
most recent book which I just
published last week. Now, yes, this is a different
beast and this is a, this is going to be
a coffee table book. I was only able to grab
the paperback version at this time that the
hardcover version is coming from Amazon in a
couple of weeks, I hope. But you can see the, this to me is much,
much more eye-catching. Now, you could
say, Well, Adrian, That's because the
book is bigger. Yes, it's certainly is
bigger by comparison. I think there's a
six by nine inch. This is 8.5 by 11 inches.
You could say that. You could also say
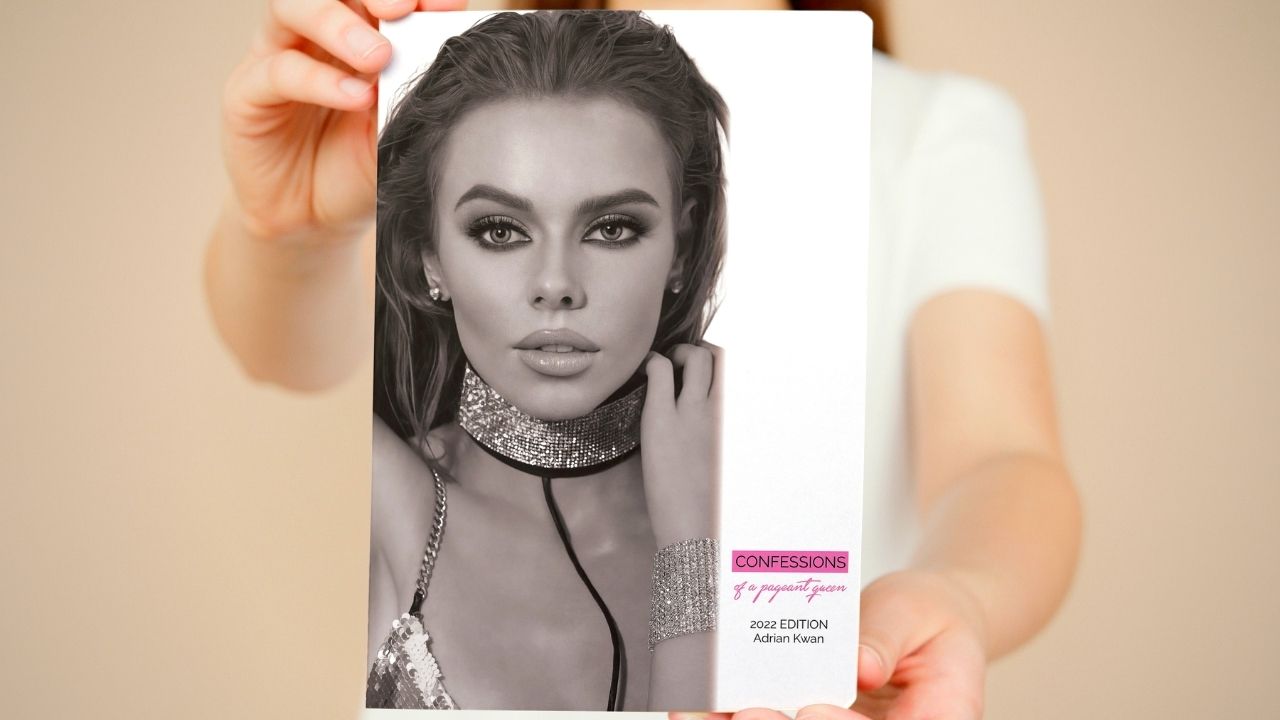
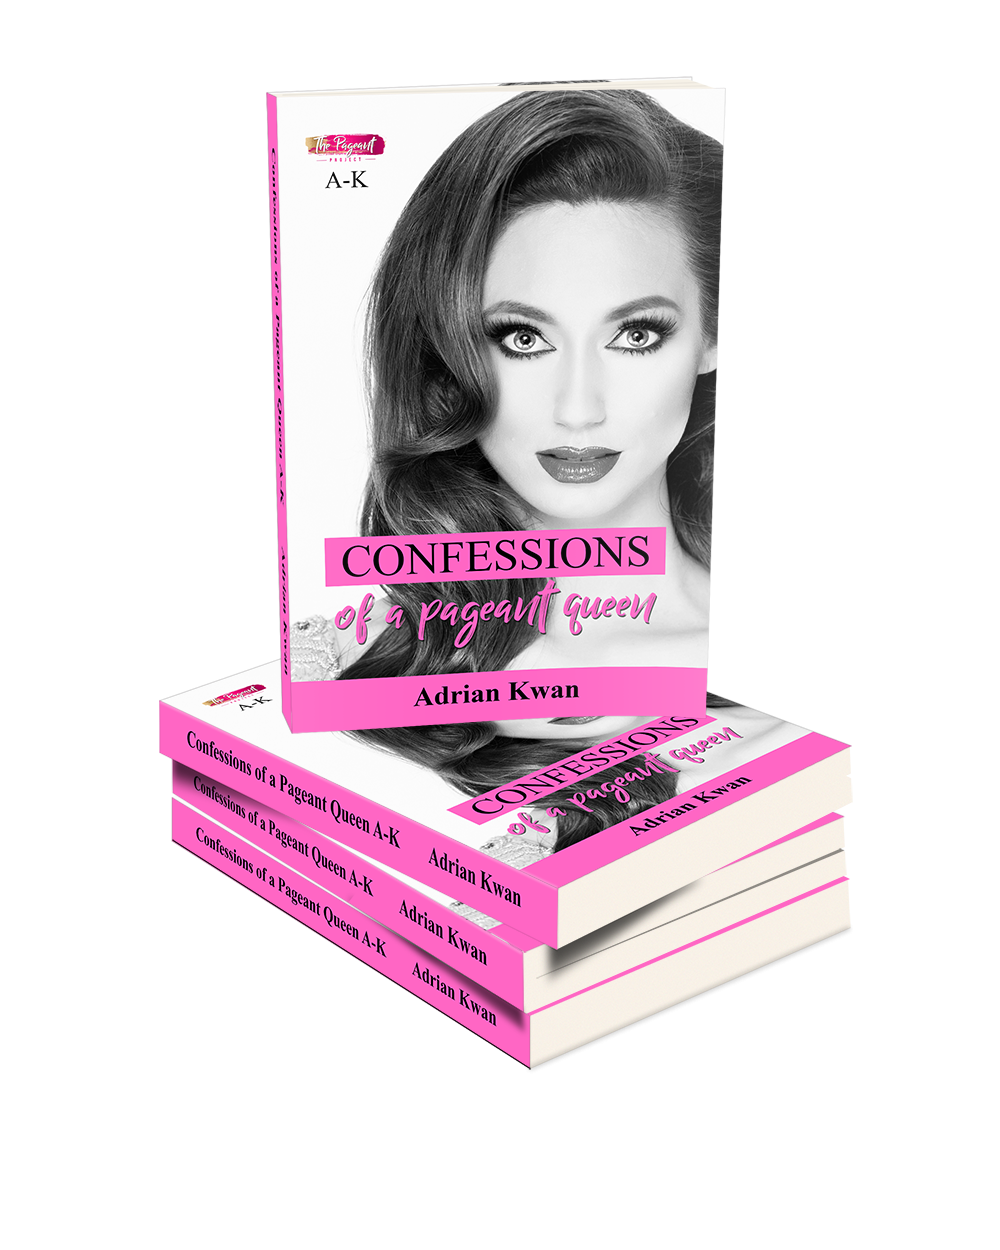
Adrian Moore, the cover, the photo is obviously done by a professional photographer. And the girl on the front
is absolutely stunning, which is all true. But it still to me, this is a more
effective book cover because the photo is bigger. There's more focus on the eyes. There's only one image. So that immediately
goes Look here, not all, maybe you can
look here or loci, or loci are lucky or look here. Look at this. And then the title
which you can see, which honestly on a cover
like this is not so important because the
images are main part, but it's Confessions
of a pageant queen, coefficients of a pageant queen. Now if you don't
know anything about the pageant industry, it's something that I know
very well, true story. But pageantry has always been seen as potentially
a little bit scandalous. People would want to
know the inside dirt. Confessions of a pageant queen almost sounds a little bit, Let's say risque or naughty. And that was the purpose
of titling it like that. And then my obviously my name is there, but it's very small, but I much prefer this design. And to me when I open this package, remember
is on, I went, Oh wow, this cover, I really, really like
it. It's amazing. I don't normally say
that about my own work. Now, those are some of
the covers that I've designed in terms of
covers that I really, really liked and maybe more
traditional covers for, let's say, I have booked
at a mainly text. I mean, this book, a lot of it was images on the inside
to coffee table book. Maybe you're not looking to
design something like that. I understand. But let me
show you some of the covers. I'll show you two
covers it I've really liked of books that
have done very, very well on Amazon. And I think in no small part it's due to the
impact of the cover. The effective covers, not
the prettiest covers, the most effective covers. Now these are both books
that I have read it. This one is by Jensen chair. You may have heard of
this. You are a bad ***. How to stop doubting
your greatness and start living
an awesome life. Now I've already said
I'm not gonna go too much into how
to tie to a book. Having said that, it is hugely important on your cover what
your title and subtitle is. And that's an amazing
title and subtitle. That being said, again, look at the simplicity
of this cover. It's just a yellow
background with the title in big simple to read, font, simple to read. So many people want these fancy handwritten
calligraphic fonts and they look fancy, but you can't read them. Especially when you figure that on Amazon you're
looking at thumbnails. I mean, this is quite large
on my screen, this cover. But if you look,
let's say down here, normally you're only seeing
the cover like that. When you shrink some
of those fancy fonts down to a thumbnail
that's this size. You can't read it. It's not an effective cover. It might look really
pretty and you go, I love this font and maybe you've paid hundreds
of dollars for it. But to me it doesn't
make an effective cover. So this, I love the
fonts are large, the background is
simple, it's yellow, so it's colorful. Grabbed your attention. And the font for the most part, the title is black. So again, it's high-impact. It's a simple font,
easy to read. And of course, if you have the Monaco New York
Times bestseller that you put that at the top. And then the subtitle. Again, it's a similar font. It's high-impact,
it's not in black, but it's not In
Rainbows of color, that blue, red, blue, red. And then the tight the
author's name again, simple to read font
just in black. I think that is an
amazingly effective cover. Then this one right here
is exactly the same. So the first thing
you'll probably notice about this cover, I can, I've read this book
you may have as well. For me, it's like it's orange. The orange background jumps out. Again. You have to think if you're trying to hit the purpose
of your book, is, the purpose of your cover, is to sell copies of your book. Then imagine that all
that people are saying, let's say on Amazon is a
small, small, small thumbnail. And in fact, if we
have a look down here, you can see down here, so small
thumbnails are down here. You can see small thumbnail. You need it to stand out
when it's that size. It's much easier to go. When I looked at my cover
in really big size, it's huge and you go, Oh, that looks amazing. But the question is,
can people see it when it's this size and
certainly discover you can see it's probably even
better than you are a bad as that orange really stands out. The font is not only
black and simple, it bolded, so you can
actually see it very, very clearly from
even the thumbnail and the subtle you
can't really read, but that title was
so high impact, it immediately grabbed
your attention. I love covers such as
this colorful background, simple, simple to read. Fonts that are large
so you can read them very easily when they
only thumbnails. Well, let's say
you're buying it. Let's say you have copies of
your book in a bookstore. It's the same idea. You want your cover, you need your cover
to stand out. I think a cover like
that stands out a lot, lot better than my book. If you have a look at my book, Let's say this first
one that I released. I don't think there's
any comparison. This one to me is like, it's kind of pale blue. The font is kind of all over
the place and then it's, this probably could be bolded. This just like this, compared to something
that looks like that. I don't think there's
any comparison to me. And effective book cover for most of us is going
to be a cover that sells the most copies of
books available possible. As I said, I love this cover, but this was a bit
of a different story because in pageantry
I have a following. So I don't necessarily need discover to sell loads
of copies of the book. Having said that,
I still think it will because it's really,
really high impact. Coffee table book,
the black and white. By the way, you could create
this cover on Canvas. I should preface, I
should have started, started this by saying that. But an effective
book cover to me is something that's going to shift lots of copies of your book. I think the main
thing is to make it high-impact,
colorful, simple, simple to read fonts, large, bolded preferably so people
can read it when it's a thumbnail or when they're going in a bookstore,
they see your book. They can immediately see it
from, let's say, 20 feet, 30 feet away, or from across the room that go,
oh wow, look at that. That book is orange
versus how many books up? And we're gonna say
why to apply because who knows what the
most common cover is. But the point is, it
needs to stand out. So that's what I believe is
an effective book cover. And I think that's an
important thing to cover just because before we get
into cover design, I don't want you to think that it's gonna be
incredibly complicated, or that it needs to
win a design award. Or on the flip side, if you are artistic, you know what artistic
types are like sometimes and I fit into
this category in some ways. You want it to look
amazing, immaculate, and you're going
to measure it by millimeters and make sure
everything is perfect. You're going to pick
this font at the end of the day, a simplistic cover. It's probably going to be more effective because it's simply
grabs a person that says, this is what the book's about if you don't want to read it fine, but this is what
the book's about. That to meet effective
cover design, very different, most
beautiful cover design, almost artistic cover design. And by the way, in Canva, it is very simple to create these high impact
effective covers. If you want all sorts of
gradients, graphics and whatnot. Camera on Canvas, actually
a bit more difficult. So in many ways, Canvas is the perfect platform for you to create an
effective book cover on.
3. The quick Canva walkthrough: Okay. I'm going to give you a brief overview of
Canva, what it is. Importantly, why I would suggest using it to create your book cover
because there are so many options out there. The main thing to
understand from this, I'm not trying to sell
your camera by any means because I'm going
to recommend you actually use the free version. But what is Canvas? So Canvas is a graphics
design platform. And I can actually show
you this and this is probably a better idea
than me talking about it. Can they is, and
has gained a lot of popularity amongst people who
don't know much about tech, or people who do know
a lot about tech. Because it allows you to create pretty amazing graphics of all sorts without any
real technical expertise. So you can see here this
is my Canva account. Here I have designed
everything from a podcast thumbnails,
as you can see. And again, I wouldn't be able to probably to
design this in something like Photoshop or a
propagate graphics program. I have certainly
designed book covers, if there is one over here, Here's a book cover
for a print book. This is why it's sort
of left and right. On the right is the front cover and on the left is
a bad government. This is certainly
something we'll be covering in the
course later on, but you can design book covers. Let me have a look at
what else is in here. There are little promos that you can do for
your social media. So this is actually
one that was animated. If I hit play, you can see
it fades in like that. That's one interview
I did with gazelle. As I said, you can
do everything. You can do YouTube thumbnails, so you get the idea. This is why I'm recommending
that you use Canva because it is a fairly
ridiculously powerful platform. That is also pretty
ridiculously easy to use. And I say that as someone who, who did graphic design
at a very basic level, years and years ago, like we're talking 20
years ago, let's say. And it was so much
harder back then to do 50% of what you
can do on Canvas. This is what I'm going
to recommend you use Canada chico of all this is that you can use pretty
much all of it for free. Now, yesterday is a
paid version of it, but there's a good chance
that you don't need any of the PRO or paid features. This is not like one of those softwares where
it says it's free. But then unless you pay your severely handicapped
because it takes all the features that you need out camera is really
not like that. Frankly, I don't know how they managed to make money doing it, but it is what it is. That's Canvas. That's why I would
suggest that you use it when it comes to signing up for account or you
have to do signing up for an account or you need to
do is go to canva.com. As you can see up
here, CAN va.com. And you will be able
to login if you already have an account
or sign up if you don't. And again, the sign-up process, you may get a prompt to pay for the pro
version if you want. You can see up here plans. If you go to pro, it comes to this page where it's Canva
pro and the pricing. And you can see that
there's pricing here. Monthly, it's $18
a month if you pay by the year, $264.99 a month. But you really don't need that. So just sign up for an account
at canva.com for free. Once you sign in, you'll be taken to a screen that looks something
like this now yours probably we will
have a lot less than it because you haven't
created anything, probably in the past. But you'll be taken
to this screen. You do have the option
to download an app. Now if you have a look where
my mouse is here you can see download Canva for Mac,
camera, for Windows. It's also available on
Android and iOS now, all again, all of
these are for free. I would recommend I certainly had downloaded the app
and I'll be showing you, I'll be demonstrating to you on the Canva for Windows app. I like having things
that can work offline. And I liked the
immediacy of when I push a button, something
happens straightaway. The Canva, if you use if you
use the website canva.com, you can do pretty
much everything well, you can do everything that
you could do on the app. You just got to deal sometimes with you click a button
and you go to white, then you do something
else and you go to white. And I just don't like
that, I'm impatient. But if you don't want
to download the app or you're unable to
use the website. If you do decide to download
the app, then again, they are for free and you can get it on
your mobile phone. I think importantly, everything will sync across
your different accounts. So if you download it, let's say for Mac and you
don't look download it on iOS, let's say for your
phone or your tablet, then everything
you've created on your Mac will be available
on your iOS device. So it sinks like that,
synchronizes like that. It's a very, very
nifty features. So if you want to
download the app, go ahead again it for free. Now, I've just
brought you back into the app to give you
a brief overview. I'm certainly not going to show you every feature of Canva. Because that's not the
purpose of this course. And frankly, I don't know everything that
you can do in Canvas. But you can see you're
out at the top. I certainly recommend you spend, let's say 20 minutes, 30 minutes an hour having a play with a camera features
to see what you can do. You can see here it's got
some suggestions video, you can create videos also, you can create
websites on camera. You can create
absolutely everything. But let's say you have, and I've not actually clicked on these before because I do, I tend to do everything
from scratch. But let's say you wanted to
create an Instagram posts. You click on that. It's sizes it correctly, so it's a square. And then on the side
you'll see some templates. So let's say you find a
template that you like. Let's say something like food, because who doesn't love food? And you can see Canvas brings
everything in immediately. Now, that's all. If you wanted to upload this
to your Instagram account, you can link your social
medias if you want to. And you could instantly say, Oh, I want to post this to
my Instagram account. Obviously, if you've linked it, your account will appear here. You can put the caption
here, hit Publish. Now, if you wanted to
download it separately, you click download, and
then you can download it as a PNG file, a JPEG file. Don't worry too much about what these different
file formats, if you're unfamiliar with
them, it doesn't matter. But you can download
it in pretty much any format you would need. Someone and someone.
You can even print your design on t-shirts, mugs, or things like that. Now, that's how quickly you
can come up with a design. And by the way, it's not just Instagram posts. This is where it
gets really crazy. If you go up to here and
you hit Create a design, you see the search up here. It's not just all. Do I want to create
an Instagram post or Facebook posts or
YouTube thumbnail. You can put, for
example, book cover. Now, if you click on, you can see how many different
options it has here. But if you click on book cover, will go straight into this. Notice that it's gone now into portrait mode because
most book covers, obviously our portrait, as in they're taller
than they are wide. And look what's
happened on the left. You don't get templates for
Instagram posts anymore. You get templates
for book covers. And I have to say, we've covered already what an
effective book cover is. Some of these book covers
look pretty amazing. So if you wanted to look
at, let's say, I mean, I think this one
works pretty well, something like this
or this one frankly. Okay. So have a look at that. I click on it once bank. There's your book
cover done already. All you need to do, and I'll show you a couple
of the other features, but these are fairly intuitive. Double-click here,
and you could change, you could change the texts from the best selling author of
another great book, right? So that's how easy it
is to change the text. If you didn't, let say
like the graphics, you go over to the side here, which is called elements. Now in elements you have everything from
lines and shapes. So if you wanted to draw
a circle for some reason, you click on this and look, it's put a circle in
there straightaway. You can change the
dimension if you want. I'll get rid of that. But in elements, these
graphics that you can use. So I'm getting confused between the Screenshare and
the actual Canva. There are all these
graphics you can use now. These are all for free. If you see a crown, that's the pro version. And I think again,
fairly simply put, if you pay for the pro version, you get access to more graphics. But if you're going for age
and I bet all the graphics, all the good ones are For behind a paywall
will absolutely not. I mean, you can see here I've used a fair few Pro graphics, but let's say you wanted to replace that graphic of an
eye with one of your own. So let's put an i Free, Free, Free, Free,
Free, Free all. And you can see that's
paid. That's paid. That's pay that's paid. That's when we'll look how
many there are for free. If you go, Oh wow, I
really like this graphic. Click on it. And that looks almost
exactly identical. You can use this and
publish it for your own. You don't have to pay for
cocky or anything like that. That's the beauty of using
the Canvas platform. So again, let me undo this. But when it comes to elements, you will find in element is kind of a whole bunch
of lines and shapes. Everything from
lines, two arrows, two circles, squares, triangles,
etc. There's graphics. If you need some graphics
on the graphic of the eye. If you need photos, very often it's difficult to find photos that you can use on a book cover for free because normally to pay for copyright, these ones are all that all taken care of if
you wanted to find, let's say you were doing book
about parenthood like this. Then you could use
that photo and look. You can move it around,
you can stretch it, resize it so that it
fits your entire cover. Boom, protects over
the top, you're done. We'll go back to here elements. There are videos you can use. Let's say if you
wanted to create an animated posts
for your Instagram, there's even audio, There's
charts, there's grids. This is really important
if let's say you're creating an Instagram post, let me go back to
our Instagram posts and I will just say
add a new page. If I put in grid. Let's say I want a grid of
four by four for some reason, I scroll down, click on that. And here's the other
nifty feature in Upload. You get to upload
all your own photos. So here are the photos that
I've used are uploaded. There's a lot of pageant girls and here because
that's where I work. But watch this, I can
quickly grab drag, drag and let's say drag. And look at that. I now have internally greater
than Instagram posts. We're using that grid. It's automatically spaced
out for me and I can change. Let's say that background
looks a bit funky, so I'll drag this out of
the way, go back to this. And let's just say
let's go with white. And now I'll drag this back in. Look at that again, I can re-size, right? I can click and replace. I could drag this in here. And you can share away. Frames are similar, but let's say those are, those were grids. A frame. If you have a look, Let's
say you click this one. This is a circular one. What happens now is I go to my uploads and drag
a photo in there. That happens, kind of frames up the photo
and a nice shape. You can see there a
nice circular shape. And if you double-click
on it, you could reposition the photo,
things like that. I hope as I said, I'm not gonna go into
everything because there's so many features and I strongly encourage you to play with it. But I hope you're
getting the, an idea, a vague idea at least
as to how powerful the Canvas platform is and
how easy it is to use. If we go back to the
book cover for a second, we go at page. And let's go back to
templates and look, look how many possible
different ones there are. It's even grouped for you. This is for you. So these are the ones camera was saying and you
probably like these, but let's go to the
inspirational book cover. Even like a book
cover like that. I mean, you could pay
someone a lot of money, well spent a lot of
your own time to create a cover that didn't look
half as good as that. This coffee here, I
think it looks cool for a female centric audience. Again, if I go up to
this and let's say, Oh, I love this, but I
don't want that image. Then go and find
one of your own. So let's say you find an image, Let's see if I can find
one that's a bit more. I don't know, like that. And click and drag it
into there somehow. There you go. Now, I don't think that looks
great because there's not much contrast between the text
and the background photo, so I need to do
something like that. But again, if you wanted
to change your texts, you can including the
color, maybe black. It works a bit better. Not really, but I'll drag it in here for
you so you can see it. You can also change the fonts. Many fonts there. And yes, some of them are pro, the ones with a crowns exhibit, you need to get the pro account. But let's say I need a bolder font to make it
really pop. There you go. Let's say it's now too small. So let's say 250 up here. And again, this is not looking great because there's
not enough contrast between the photo and the title, but that's what it looks like. I hope you're getting the
idea as to how powerful this is and how quickly you could have a book cover
that looks like that. I think we talked about
effective book covers. I think that looks amazing. So all you need to do is go
in here, change your text, change the title,
change the author. Obviously, maybe you
change the graphic. And then Bob's your uncle. You can now download
this and you've got your book cover design in a few clicks without
any exaggeration, just really quickly
before I wrap up this Canvas overview for you. There is one feature
of Canva pro. Actually there are two
features of Canva, Canva pro that you
may find useful. And I will put a link below. And if you click on that link, that's an affiliate link for me. So if you decided to get
pro through that link, I will get some I will
be reimbursed for that. But there are two features
that you may want to consider. They're by no means necessary
and I'm not going to push you to buy it if you don't think these features
work for you. But let's say for example, I take this image of broken
who's over in Wales. And let's say I really
want to use that image, but I want to get rid
of the background. Canva pro. One of the big features is
this background removal. If I click on this, it will go to work and
you can see it's going around and going around
and with any luck. It's pretty good. This feature, it will
remove the background, this sort of black
and gray background from programs photo. And boom, it's done. You can see that it's
a move the background. So I will be able
to see the color of the background
through the photon. Nope, I click on this
background here and I go, I wanted that color, let's say to be pink. You can see now that
it's showing through programs photo that can be very useful when it comes
to designing covers such as this one that I
designed for my latest book, I actually removed
this is naughty here. I removed the background
so you can't see it through this area here and
through this area here. So that could be a
very useful feature. Very often you get photos that you want to
use on your cover, but you don't want that
background in them. Canva allows you to do
that with one-click. It's not perfect by any means, but it pretty darn good. So the background
remover is one. The other one that is often very useful is the re-size feature. Now if you go up to here
and you hit resize, the one thing that
the free version of Canva won't allow
you to do easily, is let's say you are
playing around with design, this design and you really
like it and you go, I wanted to make it square so I can put
it on my Instagram. With the free version of Canva, there is no easy way to do it. Yes, you could copy paste it. Still a bit of a hassle
with the pro version, then you hit resize. And it allows you very
simply to re-size. You could then turn this, let's say into Instagram
bubble size 1080. By 1080, you can
copy and resize, which means it would
copy it to a new file. Or you can just hit resize
here, which is what I'll do. And you can see It's
actually even re-size had covered because all the images in this file needs
to be the same one. But if I go back to here,
you can see it's resized. I could now stretch this out. I can make me stretch
this out here. And now I've turned that post. I mean, it's only,
it doesn't look great because I butchered this. But you get the
drift, the resizing. It allowed the pro
version allows you to resize without having
to create a new file, copy paste, etc, etc. For those two reasons alone, the background remover
and the re-size feature. Canva pro could be
useful for you. Yes, you get access
to more templates, more fonts, more graphics
as I've showed you. But I don't think those
features are as needed as the background remover
and the resizing feature, especially for book covers. Once again, I'll
put the link below. If you want to get Canva
through that link, I think you get a
30 day free trial. You can play around with it, see if it's for you. If it's not, then you can
cancel no harm, no foul. I do use the pro version
because I get a lot of utility from that
background removal and the re-sizing feature. Having said that, you have seen how easy it is to go to
the top go credit design, putting book cover, one-click. Boom, get an amazing book cover that all you need to
do is change the text, change the author name,
change of graphics. You can do all of that for free. And that could be it. You could have an
amazing book cover done and dusted right there. So I hope that gives you an
idea as to what Canada is. Why I'm suggesting you use it. How quickly you could
have a book cover and amazing social
media posts as well. By the way, I will show you one thing at the very end of
this course where you can create some free promo material with that cover you design even though you don't have
an actual physical book yet, you only have a cover. Canada has his other
real neat feature where you can create a mockup. So it looks like you
have an actual book and drum up some excitement
for your upcoming book. But that's Canvas. If you have any
questions, let me know. But I really suggest
the best thing to do is create your
account for free, download it download the
app or user Canva website, play around with it, get used
to some of the features. A extremely intuitive, easy to use, an extremely powerful, and familiarize yourself
a little bit with it before we go into
designing your book cover, which is what we're
going to cover next.
4. How to get cover ideas & inspiration: Before you start
designing your cover, now that you've seen
how simple it can be, it's always good to begin
with the end in mind. With that. Bearing that in mind, the best place to start
is an inspiration. What's a book cover
that you like, a book cover design
that you like. And I know we've talked
about what I believe is effective book cover design in the first video,
the second video. But at the end of the day
there's no objective. This is the best
book cover, right? Having said that, I don't
think it's good to just start designing without really
having an end goal in mind. Now, two very simple ways of getting inspiration for
a possible book cover. One I've already shown you. That is to go into Canva. And when you hit
Create a design, literally put in the book cover and have a look at what
conduct with some of these. Now for example,
if you are looking at you can see it's got a
different book covers here. If you were looking
at creating a thrill, a thriller book cover, it will come up with these particular suggestions for you to just have a look through. And I'm not saying that you have to use one of these and I'm certainly not saying copy
because obviously you want to change at the very least
the title and the author. Just have a look at
these and see if anything strikes
you in particular. And if something does, and you click on it
and have a look at it. Again, you don't
have to copy this, but just bear in mind, why does this strike you? So for example, this cover
design caught your eye. Is it because of the font? Is it? I mean, it's got fairly
bold, simplistic font. Not too many words is
it may be the bank, the begging illustration
is black and white and it looks a
little bit spooky. Do you like the fact that it has a little bit of a
testimonial at the top, the title in the middle, and the author at the bottom. Just go through these
and have a log. And again, if you go
through, this is again, one of the big reasons
I suggested that you use Canva for your
book cover design. There are so many
templates here. I'm going to bet that
you'll find at least one, at least one that you'll
go, you know what? That looks pretty good. So that's the first place I would say go to camera and have a look because the
big benefit is if you do find
something and you go, I like the look of that cover. With one-click bank. You just have to change maybe the backend
illustration, the title, and obviously your author name, and you've got the
cover designed already. The other place I would
suggest to have a look. If you don't find
anything on Canva. And even if you do a
good place to look at is obviously Amazon. We're looking to publish
a book on Amazon. So why don't we have
a look at what's already selling on Amazon? And if you have a look, bearing in mind what I said, remember what I said about
effective cover design to me, it's generally things that are simplistic and things that pop, things that are colorful
and simplistic. And if you have a look
at a lot of these are. So for example, I've
actually read this book, The 48 laws of power, but you can see red, blue, and the word power
in the middle. This is a book I'm currently reading at the moment,
Atomic Habits. But the point is not
what appeals to me, but what appeals to you. And you may want to narrow it down to your niche
a little bit more. So let's say you were
looking at children's books. So you can see here, if I
click on children's books, you'll get an idea as
to what covers are working well for children's
book hot new releases. Do this a lot in
here, isn't there? But let's have a
look at Seymour. Just have a look again, you
don't need to copy these, but it's good to
get inspiration. So you can see obviously
because it's in children's books that cover design is a little
bit different. The fonts are a
little bit larger. The illustrations are a
little bit more kid friendly. For example, you can
see this one here, the bad guys and the font
used is almost like, almost like a handwriting font. And there's a big
illustration here of a scarier looking
shark in-between, looking in your niche at what? Working on Amazon. Then as I said, what templates
are available on Canva? You can probably get a
very good idea as to the cover illustration or the book cover that
you're aiming for. And then hopefully using
Canva, very, very simple. One-click, a few adjustments. You can get something
that looks very close to that cover design
you're aiming for in one or two simple clicks. Now of course, you're
more than welcome to just open up a file on Canvas
and start going forward. I've certainly done
that in the past. But I think it
always helps to have an end goal in mind because otherwise you
can get yourself lost. Book cover design for hours, days and weeks, and never really come up with
something that really works. So those are the two places I would suggest to
look for inspiration. Number one, look at Canva,
looked at the template. Another to look at Amazon. Look at your niche by all means, see what's working there. And in-between those
two sources of inspiration, I'm fairly clear. You can go. Okay, I'm
fairly sure you better go. Okay. This is direction I'm
aiming for basic design. And even if you design
the site to hire someone, a professional to
design your book cover, the best thing you
can give them. An example of. This is
a book cover I'm after, do something like this. Change your illustration,
change a title, change your author name, but this is what
I'm looking for. That's where I started
to get some inspiration.
5. Set up your cover in Canva: You're about to start
your cover design. The first thing that
you're going to want to check is what are the dimensions that
my cover needs to be? And what are the formatting
requirements are? How big does my
cover needs to be? I mean, you don't
want to design it. Design your cover, put all the work into it
and then find out, hey, I've designed
the wrong size. So what are the
cover dimensions and what formatting requirements
do I need it in? Specifically? Do I need it for example, in JPEG or tiff? Or do I need it as a PDF? Now, there are two basic
branches when it comes to books. One is e-books and one is print. Print can be hard
cover or paper. Beck, we'll cover print first. Now, again, assuming
that you are publishing on the
Amazon kVp platform. I'll show you how to do that. If you are designing
for another platform, it's going to be
very, very similar, but obviously you have
to do a little bit of groundwork to work
out the specific, specific peculiarities
of your platform. But when it comes to
designing a book cover, a print book cover
for Amazon k0 ADP. The first site that
you're going to want to go to is this one over here, which is the kVp
cover calculator up at the link below its Katie.amazon.com forward
slash cover dash calculator. If you just go to
Google and type in KTB cover template or something, you'll find it in
the search results, so don't worry
about it too much. But you will come to
this screen here. Now before you can
really use this again, this is for print
books on Amazon K ADP. You're going to need your
formatted manuscript and you'll see why in a sec. But you need to select your binding type which has
hardcover or paperback, also paperback for this one, interior type, is
it black and white, premium color of standard color? I'll put black and white paper
type green paper or white, Copic white page turn
direction left to right. I'm not going backwards. Measurement units are inches
and interior trim size is a very common
one for paperbacks is six by nine inches. I'll pick that one there. Here's the reason you'll need your formatted manuscript
because you will need to put in the number of pages and
you'll see why in a second. But let's say I'll put in 200 and I hit calculate dimensions. Now it will give you
all of these numbers. You can use those of you want. What I will suggest is that
you hit Download Template and you'll get a zip file and it will allow you to
download two things. One is an image file
and one is a PDF, both of which will
look like this. Now this is why I
suggest you download the template rather
than looking at all those numbers and
going cross-side. Because this, you'll be able
to download this, sorry, upload this into Canva, and then use these lines and guides to exactly position
everything that you need. And then you'll be able to
export it. And there you go. There's your cover. Again. You won't even need to worry
about all these words. Here are the numbers. You'll be able to use this
exact image as a guide. Now because it's a print book. Front cover is
here on the right. Our back cover is
here on the left. And in the middle is the spine. This is why you need to tell Kindle before you use this
covered template generator, you need to tell it how thick your book is or how many
pages your book is. Because the more pages you
have thinking about it, the more pages your book has, the thicker the spine
is going to need to be. And this has to be reflected
in your book cover. And then here in the yellow, That's where the
Amazon's going to print your barcode
for your book. So this is how I
suggest that you get ready to do your book cover for a print book on kVp is once again to go to this
cover template generator, put in everything that you need. And again, you can change these if you're designing a hardcover. If you're doing color,
whatever it is, put in the appropriate
selection for yourself. Definitely put in the
correct interior trim size. You might be doing
completely different. One, you might be doing an 8.5. It's 8.5 inch square
book and then put in the page count,
hit calculate dimensions. But then again,
worry too much about this if you want to be my guest. Easy thing is to hit
that download template and then you will get
a template that looks something like this
and you'll be able to work very easily
without using Canva. You'll see that what applied
this template into Canva, and we'll just use these
dotted lines and lines and colored areas to
help guide where we wanted various
parts of our cover. Now for print books
on Amazon, kVp, they're gonna want you, it's
going to want you to upload your file in a print ready PDF. And I'll show you in the
video when it comes to exporting your book
cover, how to do that. It's very, very
simple, but basically, you're gonna go and design
your book cover in Canva. And when it comes time to
download it or export it, you're going to want
to pick the PDF, the print ready PDF file format. Now when it comes to designing
an evil cover or Kindle cover to actually a bit simpler because you don't
need to worry about, as with print books, you've
got the front cover, the back cover, and the spine. And you've seen that
we need to adjust the spine with depending on
how many pages your book is. With an e-book
gets much simpler. Kindle recommend
having a look here, 1600 by 2560 pixels, 1600 pixels wide by
2560 pixels down. That's basically a ratio or the ratio of for every one pixel across 1.6 pixels down. Then it's going to want
you to export that as a JPEG file. So you go away, design
your book cover on Canva using those 1600 by 2560 pixels. And again, when you go into
Canva, It's super simple. I mean, I'll just show
you very quickly here. When you go into
Create a design, you can use custom size. Here, you hit Custom Size. And if you can see it's the
most recent one I put in. But you'll put in 1600
by 2560 pixels here. And when you do do that, it will come up with
a blank template. And if you put in up here
search templates, book covers, all those book cover
templates that we've already discussed
will come up and then you can hit one of them and one of them and
then body onco, you've got a template
ready to go. That's how you
design a book cover. As I said, it's probably, well, I think it's a lot
simpler because we need to worry about
is the front cover. You don't need to worry about the spine or the back cover. And you will export
it as a JPEG file, or it's probably the most
common image file out there. And then your export that, upload that into
the KDE platform when you are good and ready. That's what you'll
need to do right now if you're doing
a print book, go to that cover calculator. Get the appropriate template for the book that
you're designing. If it's an e-book, then using those dimensions
that I've given you, you can start designing
your cover right now. And in the next videos,
I'm going to walk you through the process
of actually using those templates or using Canva to design your
actual book cover. So let's get into it.
6. Designing a print book cover: Let's start by looking
at how to create print cover or a cover
for a paperback book, or a hard paperback book, or a hardcover book. Now, I wanted to start with this one because it's
actually a little bit harder. If you can create a paperback, you can create a cover
for a print book. You're going to find creating
a cover for an e-book. Very, very simple. That's because as I showed
you in a previous video, when you download the template. So when we go to this page, kVp.amazon.com forward slash
cover dash calculator. We are going to get the
template for a print book. And remember it's
going to have on the right side, the front cover. Show you it so you know what I'm talking about
in case you didn't see. Remember, this is the front
cover and back cover. And this narrow place here, this book didn't
have many pages. That's why it's an error,
but this narrow part here is the spine. I'm going to trust it. You have a formatted
manuscript ready to go. If not, put some values, some whatever you think
you want to put in here. And then when you do have
your formatted manuscript, manuscript obviously
come back to here and the word for real. But for now, I'm going to pretend I'm doing
a paperback book, six by nine inch, black and white, just text. And that was my very first
book that I published. In here I would click paperback. Over here I will click
Black and White. Paper type was just white page turn
direction left to right. It's almost always going
to be left to right. Measurement units. I will put in inches and interior trim size
six by nine inch. The page count was about 200. I mean, you don't want to
put a rough number in there, but just from memory,
it was about 200 pages. So I know I hit calculate,
calculate dimensions. Remember I'm not really
going to use this. I mean, it could
be useful to know. So you can see all the exact dimensions that you need here. I'm gonna click
this button here. Download Template. Now
Amazon will go away. You'll see that you
get a zip file. You want to unpack that zip file somewhere onto your computer
where you can find it. Then we're going
to open up Canvas. In Canvas, we're going
to go to create a design rather than using any
of these things up here we're going to
go to import file. Now, I will try to find where I downloaded a two
here it is paperback. I'm going to import the
PDF document right here. Give it a bit of time.
It's finished uploading. And now I can click here. He is our cover template. Now I will obviously
some text here. It's explaining what
this template is. Basically the black solid line, which you see around
the outside here. That is a six by nine inch. The blue dashed line, which is, I'll zoom it into your continued a little
bit more. Is this one here? That is where the spine
is going to be folded. If you have a look at a book, then the spine folds are
these two fall tier where the spine is folded or the cover is folded to wrap
around the book. The white area is basically
where you're going to want to put everything
that must be on the cover. And the reason being
for that is is this red area which they've
called out of live or bleed. Now, when I created
a book like this, which has all texts, and that might be is probably
the most common book, sort of book that people create. You don't need to
worry about bleed. For the manuscript to bleed is basically saying that you want images to go all the way to
the very edges of your book. If you wanted to
create a manuscript that looks something like this, where the images do go all the way to the
edges of the page. That's when you start need
to factoring and bleed. Bleed means we're
going to stretch your image all the way to the very edges of this red area, even past the six by
nine inch trim size. And then when it comes to the manufacturing process at
Amazon does it's going to chop off your cover at the black line to get
the six by nine inch. So you need to make sure when it's bleed
that your images go actually passed this black line are past the trim size
all the way to the edges. Otherwise, Amazon were
actually rejected. And then when it comes to
the actual trimming process or the printing process, amazon will chop off at
this black solid line. Now the reason you need
to do it like that, at least as best
I understand it, is that printing
process or they're chopping off process
is not exact. There's probably a 23
millimeter margin for error. So if you were to drag the image right up to the
line and leave it there. Depending on where the
cover got chopped off, that finishes not going
to be exactly perfect. What we need to do is
make sure that our cover, whatever images we use, that at least this
whole pink area here, all the way to the edges
is covered by something. Now, you don't always need
that in your manuscript. But every cover has bleed because every cover the images go all the way to the edge, even if, let's say it's
a background color. So again, if you look at
the cover of my first book, you might say, adrian, the text doesn't
go all the way to the edges and neither
do the images. That's true, but this
background blue color definitely does go all
the way to the edge. Covers, at least on
kVp, always have bleed. And that's what this
pink area is here. You're going to need to
make sure we're going to need to make sure
that whatever we do, we have our images extend
all the way into the pink. But if we don't do that, the cover will actually be
rejected by Amazon itself. It's software can detect that. But anything that we need
to have on the cover, such as title, a subtitle, author name, or any
particular part of the image. And you absolutely must have
on the cover has to fit within the whitespace
because otherwise there's a chance that
if you put it up even, let's say even let's say
here you go, Adrian. Well, that's inside
the black trim line. But the printing process or the manufacturing
process is not exact. There is a chance that okay, Amazon might chop off, I'll cover here, or my
truck off the cover here. If we're lucky, it
will chop it off at exactly the black client. But anything that you
absolutely must have, and it's called the safe
zone, should be in here. You must have on
your cover has to be in the white area here. Briefly recap. Black solid line is a trim
size six by nine inches. In this case, the
blue dashed line down here is the spine
fold, white area. They're calling the library, as you can see,
essential images. So position logos, text and essential images in this area. That's super important
if you put texts in the pink area or this red area. Again, you'll cover
will be rejected by Amazon sort of order
check software. Red area is the bleed. Now the dimensions on the right, but we don't need
this, this template. The reason we're
using it is because it's already set up to be
the right size for us. The first thing I would do, start getting rid of
the beta we don't need because if you leave this here, then it's actually going to
be printed on the cover. I will get rid of this, but this is where Amazon is
going to print the bar code. So if you have a look
again at my first book, you can see here we need to
leave space for a barcode. Every book published has it. So I'll get rid of
the texts there, but I'm just gonna leave that
yellow rectangle there for now to remind me or to show
me where the barcode is. So I make sure I
don't put any text or images over that area. Don't need this back cover. Only that brand cover. Don't need this text
telling me the spine width. I don't need any of this. Now that I've
explained it to you, if you want to keep it there
just to remind yourself what the different areas of the cover are then by all means
leave them there. Now, what I have is just this template
with the yellow arrow. Remember that's where the
barcode is going to be. If you wanted to just
start bringing in text, you could absolutely do that. So remembering
that on the right, this is a front cover here. So let me type this out for you. So this is the front cover here. And if I add another
piece of text, this is actually the
back cover over here. And obviously in the
middle of the spine. If you wanted to,
you could start creating this from scratch. What I would recommend though, is remember those templates
that we had before, and I actually pick this one because I really liked this one. I thought it was a nice,
simple, bold cover image. You need to do, I'll
hit Control a on PC. I believe it's Command
a on a Mac, Control a. And I'm going to
copy it, control c. I'm going to select
all and copy it. And then going to come
back to our template. And I'm simply going to
hit Control V or paste. And you'll see that it
brings it all in for me. Now, there's a few different
elements in this group here. There's the image, there's
the text at the top, the title, the subtitle. Just to make sure that
I move it all as one. I'm gonna hit group up here. Now I can move this all as one
and I'll ungroup it later, but just a bit easier when
I'm trying to position. So I'll get rid of front cover. I'll get rid of back cover. And remember what I remember what we discussed
about the pink area. We can't have any text
in the pink area. So what we'll do is we're
going to resize this a little bit just to make sure that it
all fits within the white. Obviously, we're going
to try and center it there as best we can. I'm going to bring in a little
bit more because I don't want to risk the
cover being rejected. So making sure that
it definitely fits in the white centered
on that front cover. And there you go. That should pass muster. All the text is in the white or the images
are in the white. Now if you wanted to change it, now that it's
positioned correctly, you can ungroup it. And you could go in here and put whatever text
you want it in here. You could change the
image you wanted. On the other hand,
it may be simpler for you to change it over here. The initial cover template, the one that you
selected from Canva. Maybe change it here
once you've made the changes here,
hit Control, all, hit Control C or Command a, command C and then
paste it in here. But importantly, you can change it here
as well if you want to. You can put awesome title here, et cetera, et cetera, et cetera. So that would be the
front cover done. On the back cover. You usually put
just a little blurb or you could put an image there. For the purposes
of what will do, I will just click some
little text here. I'm not going to make
this too detailed at all because I'm sure you
get good what I mean, but I'll just put put some blurb about this book that might be a
little bit small, it's hard to see. But that's something that
cover was shrunk down a bit. But you can fiddle with
the size yourself. So remember, if
you want to change the font, go up to here. Maybe we'll make it
a little bit bigger, just as a bit easier to see. I think that's a bit too big, but it makes it easy to see, so we'll leave it like that. And again, this is a
back cover of the book. I'll try and center it
just on the back cover. And this is what's going to
appear on the back cover. If you wanted to put a photo of yourself or an
image for the book. Again, you could get one
from elements over here. You could find a photo in here. This is, let's say, kind
of like a spy book. So if I put in spy into Canva, Let's see what it comes up
with. Maybe use this one. I'm not trying to make a perfect
cover here by any means. I'm just showing you
the rough process you would go through
to get this done. Your blurb would go,
let's say somewhere here. Your image could go there, or you could change it around. And that's about it. This cover would be good to go. You haven't covered
the yellow area here where the barcode
is going to be. We have our front cover. We have our back cover. Now, if you want to, if you have enough
pages in your book, the spine, remember
the spine increases in width depending on
how many pages you have. So the more pages you
have in your book, the thicker the
spine is going to be n of the spine
is thick enough. You can put spine text on. That's another way of
saying you put your title, your name on the actual
spine of the book. The book is less than a
certain number of pages. This template will say the spine is too narrow to
fit any text in. This spine for 200 pages is
wide enough. You need to do. Let's say, we'll put in our title apparently for this book is
an awesome title. What I will do to make the
texts on the spine vertical, I'm just going to
hit Duplicate here. I've got a copy of this
text or some title. And you can see right
here that it's got this little merry-go-round
or circular button there. I grab it, I turn it
around towards 90 degrees. Drag it onto the
spine like that. Somewhere in the
middle like that. You could do exactly the same for the author,
your author name. So you could copy this, paste this, and just
put your name there. So that's how you do the spine. The only thing that's
missing from this now is some sort of image to go. Remember, all the
way to the edges, we can't just leave
this red area here. Because if we do, first off, the cover would be rejected. Secondly, even if
it wasn't rejected, Amazon is actually, it's simply going to look at
your pharyngeal arch. He wanted red printed
at the edges. It will actually
print this red zone and this red area
near the spine. Obviously we don't want that. In order to keep things simple, I will go to elements. And I'm going to go back to graphics over here
or lines and shapes. Beg your pardon. I'm just
going to pick a rectangle. Now I am going to get the rectangle all
the way to the edge, bring it all the way across, pull it all the way down and you go,
Adrian, That's great. It's covered everything in pink or you might
like that color. But let's say I wanted to
leave it as white like that. And you might notice
that the graphic on the front cover and the graphic on the back cover
have disappeared. That's because this rectangle
is in front of them. So we need to move this
rectangle behind them. All you need to do. So if you click
on position here, it is, these controls here. You want to move this
rectangle backwards. I mean, you could say
all the way to the back. The problem is centered
appearing behind that template. And again, we've got that
pink area showing there. But you can move as
white rectangle forwards by using Control,
right square bracket, as you can see up here, with a backwards by the
opposite Control, Left Bracket, there's
a left square bracket. What I'll do is
I'll make sure I've got that rectangle selected. And I'm going to, you
can see it right there. That's perfect right there. If I bring it forward again, it starts covering The bring it too far forward
or begins covering all the text and then
move it back, back, back. It's now that yellow rectangle where the bar-code
uses now hidden. But I don't need that anymore
because I've made sure that I didn't put any of
these texts in front of it. I know that this title
is in the right spot. I know that my front cover
is in the right spot. Now, that is good to
go because I have this white rectangle at the back all the way to the edges, my cover is not going to
be rejected because I didn't think fulfill
those bleed requirements that I told you about earlier. What you need to make sure
that at least some image is going all the way to the
edge of your cover file. If you wanted to
change the color, the background color
of your cover, you absolutely can just
make sure you've got that rectangle selected and then change it to whatever color you want there could
actually look okay, blue, that looks okay as well. All right. If you ever want to make
some changes and you need to make sure
that everything is still in the right area. Just click the rectangle, move it out of position. Check, then bring it
back into position. Just make sure it's aligned
all the way to the edges. And cameras pretty good about snapping
things to the edges. So there should be good there. So that is how I would go about creating the
cover for a print book. A print book being either a
hardcover or a paper back. If you wanted to, you could do that completely from scratch. But I've shown you
how to start with our template and sort
of cheat that process, copy paste it under
control All to select it. Copy paste it onto the template, drag it into the right area, remember the right side. So remember that
the right side is the front cover, but
it's not the other way. This is not the front cover. The right side is
the front cover showing you how to
create this texts or the spine and how to rotate it. And remember also not to cover up the yellow area
for the barcode. And then we've used our
background rectangle to make sure that our image goes
all the way to the edges as per the
bleed requirements. You can change it as you want. You could make a much, much more complicated
title than this. But remember what I said
about effective book covers. It's not about winning
a design award. It is not about having the most number of fonts
or the fanciest want. It is about looking
colorful, attracting eyes, and actually trying to
keep it really simple so that you can sell
copies of your book. That's the print cover. Now let's look at how to
create an eBook cover.
7. Designing an eBook cover: Okay, ebook covers. Now if you watched the
previous video about how to create a cover
for a print book. As I said, it trickier to create the print cover than it is
to create the Ebook Cover, which is, which is what
I'm about to show you now. You need to watch
our previous video a few times just to
get the hang of it. Then by all means do that. The Ebook Cover is
very, very simple. By comparison, you need to do is go into Canva,
create a design. Now remembering that the
dimensions that we need was 1600 pixels by 2560 pixels. That's a bit of a weird number. It's more than ratio. For every one pixel across, it's got to be 1.6 pixels down. Just think of your phone or tablet for every
one inch across, roughly 1.6 inches down. That's why the dimensions
might look a little odd. Please make sure it's in pixels, not an inches, millimeters
or centimeters. So PX or pixels. And then we hit
Create new design. Camera goes away. Here's our blank template
or a blank cover, no template in there
yet, just whitespace. And again, to make
it super simple, Let's go into book covers, or actually it, Let's go
to the e-book covers. Let's see what happens. Here we go. You can start from scratch, but why would you do that? When, if you have all these
templates to start from? So depending on what sort of
template catches your eye, this one looks good
for a fiction book. And there you go. I wish there was more
to it than that. But obviously, you
change the author name, change the title,
you might change a subtitle and you change
your background image. But this is now done. This is a 1600s by 2560 image that you'll be
able to download export. And I'll show you how to do that in one of the following videos. But this is going to be
your cover for your e-book. And that's all the
work you have to do. Remember, you will change. Double-click, put your
name here, your title. That really doesn't look good, but you get the drift. And then you could
put something here. And then remember if you
want to find an image on Canva will go to
photos for this probably. And let's look for sunset
background, see what happens. We're trying to find
one that looks good on this aspect ratio. So this one here with
a bird looks okay, but that's a sideways image. This one here looks okay. So if I click on that,
it will bring it in. I will delete if I can
this old image there, drag my new imaging, resize it to fit my cover. You can see here that it's
gone a little bit wider, so it's a little bit wider
than our cover image. That's fine. Normally at the edges
are chopped off. If not, you can resize it again, I'll use a
different image. You can see that camera
is really good at using these purple lines are
showing me when it's centered horizontally and when
it is centered vertically. Right there. There you go. Again, you might go, I can't really read
this bottom line anymore than I agree. What I will do is
I'm shift clicking, Shift clicking to
get all of that. And I will move it up. And how's that covered on? Literally could be done
in under a minute. And remember, you don't
need to start from scratch. Why start from scratch? You have all these
covers to choose from. So I'm hoping, I'm
really hoping it makes sense why it's
suggested to use Canva. Because you will get done
in two or three clicks. What used to take, take other people hours
and potentially hundreds, if not thousands, of
dollars and hours to do. So. That's your ebook cover.
8. Designing a cover from scratch: I think it goes without saying, but if you go through all
the templates on Canvas, you don't find one that
really meets your needs, then obviously you can
start from scratch. Having said that, I still
think it'll be easier to start with a template
and modify it. But let's say all the way back, all the way back when
I asked you to find an inspiration or
direction for your cover. And for some reason
you just can't find a template that
helped you at all. Let's go back to this
book cover here. This one I said I thought
was pretty impactful. I like the fact that it was a bold color on the background and it's just simple text
and it's bolded text. I think that really stands out, whether it's a
small thumbnail on a website or even
in a bookstore. I do think once again, a lot of that comes
down to the nature of the title being somewhat
controversial and shocking. But let's just, for example, take this and see
how you might go about creating it
from scratch or something similar
to it on Canvas. I won't do the whole
thing because I think by now you can see that. You can see how Canvas works. But the first thing
you'd probably do is go get your text. And let's say, let's just
say for argument's sake, we'll use the same title. The Subtle Art of Not having. And we will put like that,
I think that's right. That's the way they're headed. Organized Subtle Art of
all not giving. Yes. Now on their title,
it's left justified. So we go up here. We'll walk it over to the left. The font is not quite right. It looks a little too
elegant and thin. I might just go to where
he's railway heavy. And again, you can play
with the, I like that. You can play with the font
until you find one that works. So we'll go here now, and obviously we need to
make that a bit bigger. Probably is a bit right. It looks a little too. The letters look a little
too close to one another. If you look at the the letters here that a little bit wider, It's taking up most of the book. So let us go back to Canva and maybe you could
try changing the font. But you also have
these options up here. I've clicked up here
next to the Effects tab. This is where you
can make the line spacing bigger or smaller. Where also you can
make the letter, the distance between the
letters a little bit bigger. I think this is
probably the font. I would change the
font if I really wanted to get it closer
to the way it looked. But that's pretty
close right there. You've got two elements
for the background color. We'll do the whole book
in a bright orange, which is what they had there. And I thought that cover
looked pretty good, going all the way there. And that looks reasonable. It's by no means perfect, but that looks reasonable. And then if you
wanted to do things like let me just move this
out of the way for a second. If I wanted to do things, I bring in bestseller badges
and things like that. Just go to lines and shapes. You can bring this over here, maybe shrink it down. And you could then
get your text. You could put whatever it says from the best
selling author. You get the drift. I would put that in the middle. Again, if I should zoom in here, you'll be able to
see that camera is really good at showing you
when things are aligned. So you can see that there's some lines there to show you at all aligned in the middle. Again, I don't really like
the way this looks with the best and the selling
on different lines. But I'm just giving
you an example from the bestselling author. You could change the be
white if you wanted to. You could change the
size if you wanted to. The best-selling
author of x, y, z. Doesn't look like it in
the middle, there it is. Okay. Whoops, there's an
undo button up here. By the way, in Canada,
super-important. I pick the wrong
room and pick this. I'm gonna pick this. Remember the group random
group button up here. I'm going to hit that. Now whenever I move it, I can move it as one. So there's our badge. I think maybe the font
is a little bit too big, so I will shrink that
down a little bit. You would be making again, I'm just doing this on the fly and doing
this super quick to give you an example of how
I would do it from scratch. But you would obviously referred to the cover that you're
drawing your inspiration from. And don't directly copy it, obviously do make it your own. But within reason because there's only so many
different things you can change on a book cover. So obviously if you change the title and you
change your author, that's already 80 or 90% of the way there
to making it your own. Then they're obviously you
have somewhere where you put your author name. Some author. Again, you play with a
fonts that they use here. With a fund I use
look very similar to the font that I
used for the title. So I use railway heavier here. I will use railway heavy there. By the way, you want all caps. There's this neat
little button here. It will CAPSA will do that. But do you want it to
be a bit smaller so the alternating doesn't
detract from the title. Look, that's by
no means perfect. But I'm been doing it whilst I'm talking
to you, narrating it. And for how long it's
taken me That's not bad. I would drag my
rectangle back across. Look, you do the
same for the spine. You do the same for
the back cover. That's how you create
it from scratch. I mean, with that
back cover design, you can see that we can't
see our badge anymore, so I would need to
change my badge. Let's change it to yellow. Then. I can't read that. This is where you
really just start playing around with things
and find out what works. But this is why it's always, always a good idea to
start with what works. Like this cover may
not inspire you. I like it. The point is, go and find the book
cover that you like. And you can start
from scratch in Canva and get very, very close. If you wanted to use
more images, remember, Canada has in its
elements and in photos, or these photos. Remember, you can use
all of these for free. The only exception is the
ones with a crown on it, which is what you have to have a pro subscription
for like this. If you need a graphics, maybe you are doing a book that you don't want a
photo on the front. But like the previous curve I showed you the
head an eye on it. All those graphics are in here. You've got graphics. You've got photos. Down here, you've got lines and shapes. So it is actually fairly easy to create a book cover
from scratch in canva. Having said that, you
saw how easy it was to create one from a template,
literally just one-click. And then it's all there. I just need to change
the title, the images. So all in all, probably best to start with a template and then change it until you
get the way you want. But if you wanted to start from scratch, That's how you do.
9. Exporting your cover from Canva: Well done. You've done the hard part, which is creating your book cover. If you've been smart and done it the way
I've showed you with templates and starting with a directional
inspiration in mind. Even the hard part, hopefully
it wasn't that hard. Or we need to do now is export
your cover so that you can upload it to ADP or whichever platform you're
going to publish your book on. Once again, we come to Canada. Let's start with the print book. So this is the cover
for this book. This book right here
which I produced, which is kind of like
a concept program, except it's a program
for a pageant. So this is a print book
in order to export this, remember I mentioned
it briefly before. Kvp want a PDF file. So we need to do is come up to the Share button
at the top right. Click it. And we're
going for download here. So we need a print
ready PDF or PDF file. Pdf Print. Click on that. Don't crop marks and bleeds. Yes, there is a
bleed in your cover, but we don't want to print
any additional marks, so leave that unchecked. This file of mine
actually has six pages. I'm only going to
print the top ones, so I will just click
here, unclick All Pages. Click page number one
and done color space. Don't worry too much about this, but we might as well
change it to CMYK because printing is done in CMYK
screen colors are RGB. Don't worry too much about that. It's just slightly different
than color scheme. You can say that the
analog settings if you want and you hit download, and then camera will go
away and do its thing here you can see
the progress spot shouldn't take too long. Then obviously save this
wherever you need to save it. I'll save it to my desktop. That is done. Now that image is ready to
be uploaded or that PDF, beg your pardon, is
ready to be uploaded. And here it is as a PDF file. So what I would need to do is
when I'm uploading my book, take ADP and it asks for
my cover in a PDF file. Just upload this PDF file, take ADP, and that's my cover done and hopefully I've
done everything correctly. There'll be approved
the first time. This is a good
chance, by the way, to check everything looks right. You can see it looks to me
like I've got a little bit of a pink line still over
here which is not right, almost looks like
I haven't drawn, brought the white rectangle
all the way to the edges. So there's a good chance
to go back in here. Let's find out if
I can fix that. So if I go here and
I'm gonna zoom in a bit and you can see
probably right here, this white rectangle is not dragged all the
way to the edges. So let's just fix it. Returns to show you
how to fix something. All the way to the top. All the way to the edge. Again, Canva is pretty good at showing you these lines when something is
snapped to the age, like you can see right there. I think that's done it now. If I have a look. Yep. Note concedes, missed again. That's because I've drawn some maybe there's some other
lines in the background and Canva snapped it
to the wrong line. If you need to
zoom in on camera, you can do that to make sure that you can see that
everything is right. Okay, That looks right now, what we'll do again,
we'll go to share, will go to Download PDF, and this has saved it from before. So I'll
just hit download. We'll open it up again and
see if it's done it right this time we'll see if I've
done it right this time. I'll save it to my desktop. Again. Overwrite it. I will go find it
now, open it up. That looks a lot better. I think I can't see now. There's no white eye, there's
no pink showing through at the edges of
this cover anymore. That's really important.
I wasn't planning on showing you one
where I screwed up, but Eve, I had uploaded
that to Amazon. Chances are Amazon would have detected that the cover image, that white background had not gone all the
way to the edge. Probably that's better case. Worst-case is it would've
allowed through. The problem, isn't that
every book that was printed, the cover would've
had that pink border. Print it on the edge. That's how you do
the print cover. Now I'll show you how
to do the ebook cover. We'll use this example
that I created before. Remember the ebook
covers even simpler, it's just one image and this one needs to be
shared as a JPEG file. So download it as a JPEG file. So we hit Download
and we find JPEG. Besides just leave it as one, as in 1600 by 2516, if for some reason
you needed to double the size, That's
how you do that. Leave it at one. You can bump up the
quality if you want to. It's not necessary. I think it download. Again, save it somewhere
where you can find it. I'll save it to my desktop. And now let me find it
and open it up for you. And there you go. That's a cover file done
when it came when it comes to the
uploading process on Amazon kVp in it asks me for my book cover file,
for my e-book. I would just upload this
file and that would be it. So as you can see, it's
super simple just to remember, for print books. Print books to use a
hardcover or Paperback, to use a PDF print. For eBooks to use JPEG. Jpeg, save it somewhere where you can remember
where you've saved it to, and then upload it at the appropriate time when you're uploading your book
to the KDE platform.
10. Creating a promotional mockup of your cover: Just one final trick
when you have created your amazing book cover and you want to show it off and you want to start building hype
for your upcoming book. It is cool to be able to
create what's called a mockup. Which means it looks like you've actually got your new book, even though you
don't or you have as a cover file. And
here's what I mean. So if we come to this is the ebook cover
that I created before. Now Of do a few things
here, bear with me. We'll make sense in a second. I'm going to add a page. This is a blank page. Now going to upload the cover
that I exported before. I go to here upload media
and it's on my desktop. And here's the cover file here. I'm going to upload it. You can see it uploading here. All I need to do is
drag it across to here. I'm going to make
it the right size, get it to fill the whole page. Now. I'm going to hit,
I'm going to select it. I'm going to hit Edit Image. I'm going to go to what's
called smart mockups. And you'll see here basically what this does is it
allows you to put that image onto things like
books, phones, t-shirts. So if you were
doing a design for Margot t-shirt, you
could make it look. Actually had the real t-shirt or mark in your hand even
though you don't. Here's one for a book.
If I just hit this book, watch what happens here. Now. It looks like this person
in the background. It's holding a copy
of our new book. Now the only thing is
it looks like it's maybe extended a little bit too far to the edges so you
can fiddle around here fit. That doesn't look so good
because that's cropped up. The edges could custom here. And I might just see if
I can shrink it down without it looks like it may not be the best fit just because it's
an e-book cover. But I might be able to fiddle around with it to
make it look a bit better. There are other
options here as well. So let me undo this. Let's hit Edit Image again. Back to Smartmockups is
someone gonna scroll down. You'll see all the different
options for books. Let's see if we can
find one that fits our cover a little bit better. Because in book one, book two, book three, Let's try this one. Looks pretty good. It still looks a little bit the topics a
little bit too close. What you could do
if it doesn't fit completely the way
you'd like it is to do a slightly different version of the covered just
with different sizes. Maybe resize it so it's
a little bit shorter in this case that it fits on this
cover a little bit better. But that's a mockup. You can now go and share
that on your social media. And it looks as
though you've got a brand new copy of
your actual book, even though all you've done
is create a cover and you can start building up hype
for your actual book. Now the reason I
had you upload be downloaded version
of your cover in the first place is because
this is the actual cover here. If you try and create the
mockup from this image here, what happens is it only uses whatever part of the
image you can click on. And unfortunately, even
if I hit control a here, if I hit control doesn't
actually let me edit the image. So I can't get to
my Smartmockups. And i've I just hit
the background image, it edited image, and
then do a smart mockup. What you will find
is that it only puts the background
image onto the mockup. It doesn't put the title. That's why I had you re-upload. I know it sounds a
little bit convoluted, but that's why
that's done a few. That sounds something
funny there, but it could work here. So that is how you can create a mockup with your
new book cover. If you wanted to
put it on a phone, you could certainly
do that as well. If for some reason
you wanted to put it on a t-shirt or a mug. You could do that too. Nifty way of promoting your
book before you actually have a copy of your book in your
hand or on the Kindle Store. And building up some hype.
11. Conclusion: That's about it for this course. Thank you so much for watching. What I would really
like you to do now is to go away and
actually create a cover. It's one thing to watch. A course like this will especially a course
like this and go, yes, that makes sense,
yes, that makes sense. I can see how Canada would be really good
for creating a cover. I can see the power of the templates and
things like that. But you learn entirely at a different level when you
actually go away and do it. For me, I'm all
about making it as easy as possible for
you to publish a book. And I keep saying
this, but I know so many people who want
to publish a book, but for some reason
they get stuck. And very often they get stuck on things like
the cover because they assume that to create a
great cover for your book, you need to know
about Photoshop or be really artistic and
looked at the fact is, it's so amazing what you can
do with literally one click of a button as you
saw when I click from the Canva template
and then boom, there was, there was
my cover straightaway. What I'd really
like you to do is go away, create a cover. You can share it with me and
I can give you feedback, or you can share with me in the project section
of this course, if there is one posted,
get some feedback, and then get started or continue going on you're
self-publishing journey. When it really comes to books. I mean, you hear the
saying all the time, don't judge a book by its cover. I got news for you. That's exactly what we do. And we also say substance is
more important than style. But initially style is more important than that WE
applies to books and books. No one is going to
pick up your book. Unless I get, again, as I said, they know you or your famous, no one's gonna pick
up your book to see, to discover how amazing
it is on the inside. Unless the cover and the title catch their attention
in some way, go away, create a cover shared with me and we'll give you
publish it as an Amazon book. Share that listing with me. I'd love to have a look, see what you've got enough to give you some
feedback if that's what you want or just give you some praise if that's
what you want. In the meantime, if you'd
like to connect with me, you can hit to my website, Adrian jay Kwan.com
or put it below. I cover a few things,
such a cell publishing. The main thing that's
probably going to be of importance or interest to you is I put a lot of the Canva
templates that I work with on a special member's area on my website and you can get
access to that for free. There's no charge for that. And you can actually
get templates, not just for covers, the covers that I
created in Canva, but actually templates
for entire books such as children's books or
children's coloring books. I mean, if you've
got a 200 page novel or full-color coffee table book, you generally don't
create those in Canada, but for the simpler
books that I create, I share with you the
templates that I've used to actually
publish real books. And then you can take those
templates and download them, import them into Canada, edit the text, edit the title, the author, the cover
image, whatever it is. And then Bob's your uncle,
Adrian, jQuery.com. As I said, Go away,
create a cover. Let me know how you go. If you have any
questions, you can always email me on info at Adrian jQuery.com or connecting with me through this platform. But in the meantime, I hope
you enjoyed this course. I guess the best thing you
could do for me if you have, is to leave a positive review. But more so than that, I hope you got a lot of value
and you saw how easy it is, how easy it was to create
an effective book cover. I look forward to
seeing what you create.
 Adrian Kwan, 3x Top-Ten Amazon Self-Published Author