Transcripts
1. Introduction: Have you ever
dreamed of becoming a self-published
author or would you like to be able to
put a customized book together for your child
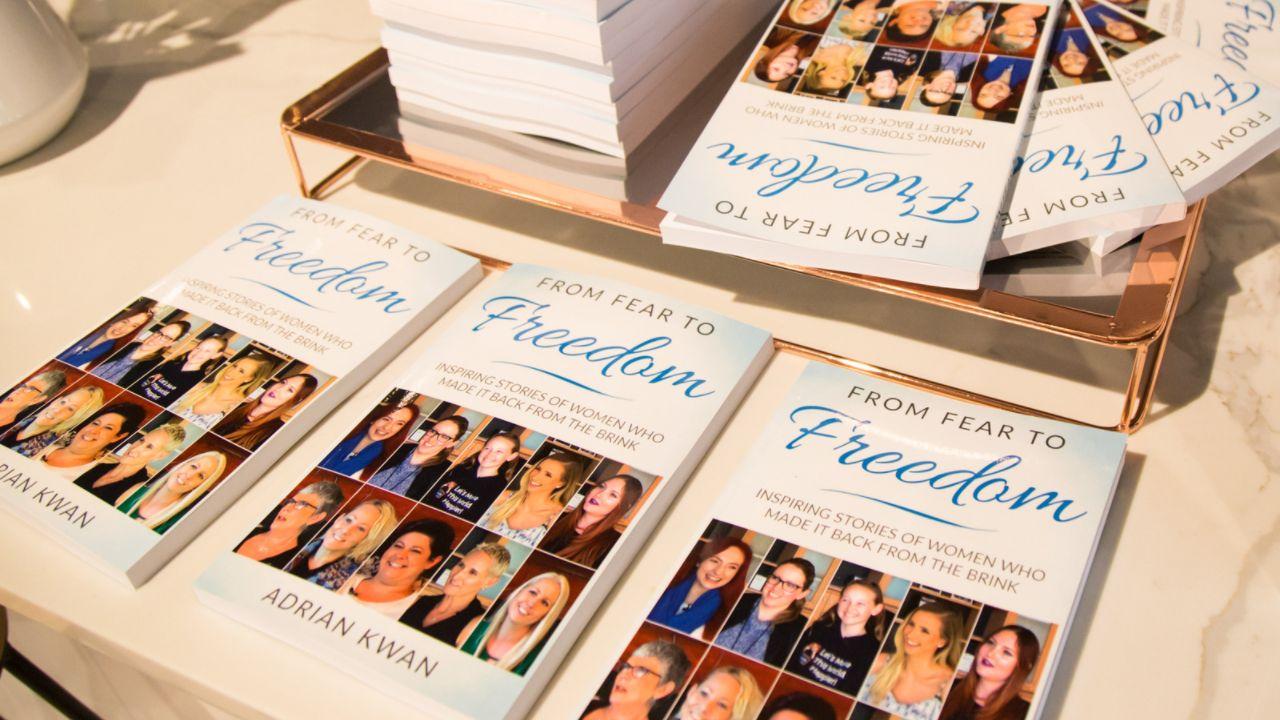
or your loved one. My name is Adrian. Back in 2017, I published air
best-selling Amazon book called from fear to freedom. And in this course, I'm going to show you what so many people have
been asking me, which is, how did
you get published? Now, it's not complicated, It's not a complicated process, but it can be quite finicky. And if you don't know
the ins and outs, you could write the best book in the world and never
get published. Which to me is a great shame. In this course. My promise to you
is we're going to get you to being a
published author, a self-published author
on Amazon or Kindle, kVp, Kindle Direct Publishing. As long as you follow
along step-by-step, you do the class project. And then from there
on, the best part is you'll be able to
take the lessons we learn and apply them to
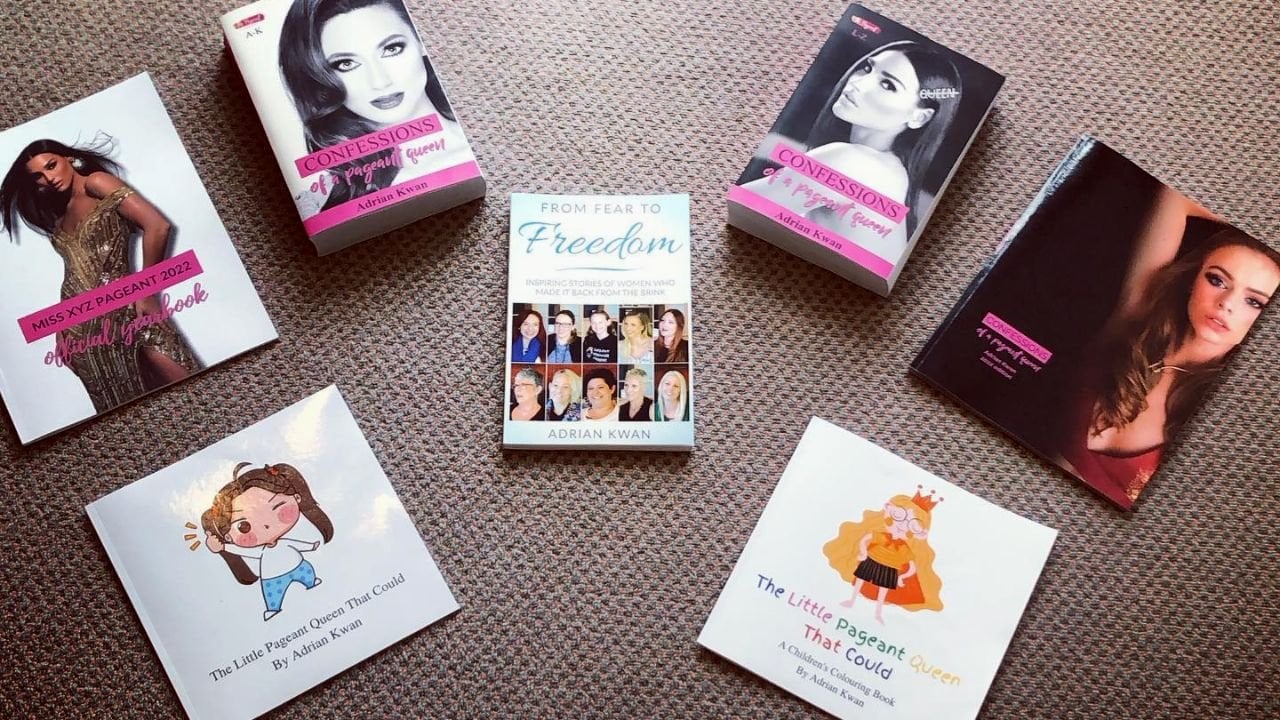
other book projects, whether it is large, full-scale, full-color yearbooks,
something like this. Whether it's a traditional
black and white paper back, this is from fear to freedom that hit number one on Amazon. Or whether it's something else. Whether you want to
take this seriously as a business or just
produce a really unique, cool, customized gifts for friends in children,
for loved ones. The world is going
to be your oyster. Let's get into this. And as I said, my promise to you that if you follow along, you'll become a published
author on Amazon or Kindle, hopefully within 24 hours.
So let's get to it.
2. Your project = get PUBLISHED!: Okay guys, for the
class project, we're going to be very
hands-on and you are going to publish children's book. And it doesn't have to
be a children's book, but it is going to be an 8.5
by 8.5 inch full color paper book to Amazon's Kindle
Direct Publishing platform or kVp for short. So I encourage you
the way I've laid out this course is to be
very, very hands-on. So I actually recommend that you follow along in real-time. Pause the video if you have two or certainly pause between the classes and do the steps
that you see me doing, do them in real-time. I think that's the
best way that I can guarantee that at
the end of this course, you will be published versus if you watch
all the classes, but don't do anything. If you watch all the classes
from beginning to end and then try and come
back and do the project. It's not gonna be that easy
because there's a lot of very finicky things
that you need to learn when you're publishing
as a first-time author. And they're not really common
sense things like bleed, margins, text being
in the right place, images being in the right place. What colors can you use? What colors can you not use? What paper, what covers? So I don't want you
to get frustrated. And this is where a lot
of potential authors sort of give up. They get the manuscript done, they do all that stuff
or the creative work, which I think is a hard work. And then they get stymied at this point of getting
published because it's not maybe as intuitive
or as easy for them to understand as
simply writing a book. And to me that's a big shame because if you have the
talent to be an author, to put out that creative work, then let's get you published. So if you follow
along step-by-step, I can pretty much guarantee
that you will have a book just like this published
two kVp by the end. And I say this because
I literally published, printed this book to the
KTB platform just last week for the soul purposes of this course, I know it works. Now. You don't have to make
it a children's book. You could put whatever
copy you want in here. You could make it a unique
gift for a loved one. You can make it the story
of how two of you fell in love and lived happily together
forever and ever after. I think on that it's very
important to note as well, the lessons you learn from
this course are applicable to whatever self-publishing
you want to do from this point on, whether it is you
want to publish a nonfiction paperback book, it's about a 100150 pages or so. This is a first book I
published back in 2017, then went on to hit
number one on Amazon. The lessons apply to that. If you want to publish a
giant full-color yearbook, something like this, then you can absolutely do
that to same lessons apply, just maybe a little jump up
in the creative and the copy. Or if you wanted to
go for the full Hogan publishes his one volume to volume mega project that I did that had 160 interviews
with women around the world, then you can absolutely
do that too. Yes. Whilst the project
that you're about to do is maybe appears simple on the outside.
Don't be fooled. The lessons you learned from
it are going to put you in a really good
position to start or to further yourself
publishing career. So once again, I
encourage you to do it in real-time
and do it with me. And if you do that, then I can promise
you that we will get published because that
book, that template. And by the way, I'll put the
template in the project area that got approved by Kindle just last week
ever worked for me. It will work for you. What I want you to do, what I encourage you to do
is once you have published, you get that email from
kVp from Amazon saying, congratulations, your book is available for sale and
you're able to do that. You add a charge for it, get royalties from it, upload it to the project
gallery with a link to the actual listing on Amazon
so we can all have a look. And obviously if you
have any questions, ask them in that area, and I will do my best
to help you out. But that's what this
project is about. So do it in real-time and I can pretty much guarantee
will get you published. You will be a
published author on Amazon potentially
earning royalties, or that's what you want
to do within 24 hours. So let's get started.
3. Set up your free KDP account: Okay, Your first
and super easy step to take is to set up
a case ADP account. Kvp is Kindle Direct Publishing. Now, Kindle is run by Amazon and kVp is where you're going to
upload all your files, publish all your books right
now and in the future, hopefully, e-books,
paperbacks, hardcovers. And the good news is if you
have an Amazon account, which most of us do, then you can use
the same email to create a KDC account if you
don't have one already. So you just go to
kVp.amazon.com. Hit Sign Up here. If you don't have
an Amazon account or if you do already
have an Amazon account, hit Sign-in, use
those credentials to sign in and then
set up your account. Now, it is super easy and
I'm not gonna walk you through it because it really is just information such
as what's your address, your banking details,
so you can get paid. And then there is
some information that's context or
country-specific, which is namely the
taxation information because you're gonna
get paid hopefully. And Amazon needs to know
how much money you should keep as text tax
withholding of that depends on which
country you're in and also whether you're
registered for certain taxes, such as here in
Australia with GST and obviously I'm not a
tax professional icon. Give you that information. Go to kVp, set up your account. I really want you to
do it now because it's one of those things
that if you set up the bulk, you have all your manuscript, your images ready to go. Then you hit Katie Ping, you going to go to
credit an account. There's just too much risk
of you stopping right there. And what should be
the easiest step? I want you to do
that right now I hit the KT P.amazon.com. As I said, use your Amazon
credentials to sign in. It should be super easy if
you have any questions, just put a comment
below or send me an email and I'll be
happy to help you out.
4. Write your manuscript: Okay. You've set up by now, hopefully you're KD PPE account. If you haven't set that up, go back and set it up. I don't want your
authoring career to be derailed
because you set the, you left the most
annoying task to last. So go set up that KTB account. The step we're
going to cover here is writing your manuscript. Now you might say, Adrian, That's a little weird. What
are you talking about? I thought this is
a children's book. It is. But you're still
gonna have words in it. And look, because it's a simple children's book
and I have it right here. So in the example
that I have here, you can see it's really just
one sentence per spread. A spread being two pages are
left page on our right page. And to be honest, when I was mocking
this book up for you, I just wrote it as it, as it came sentence per page. But if you want to make your
manuscript a little bit more coherent than that and
you want to plan it out. I highly, highly
recommend that you go to a Google document or a word processing document and do something
similar to this. You can see here that I've put each sentence in
a bulleted list. Now, why have I done that? That's because as I
said, each spread, at least while I'm
showing you to do it in this, in this instance. And of course, once you've
mastered the basics, you can change it
to suit your needs. But each one has a
sentence and an image. And that means for every
sentence basically there's gonna be two
pages because for every sentence There's an image. It's just a simple
way of keeping track of how many pages you're actually going to have
in the finished book. Now, Kindle has a minimum
page requirement of 24. As a new can't have
fewer than 24. I guess you could
put in 20 pages and then have four blank pages. But let's say you want to take, take advantage of the
full 24 more is okay. By the way, there is a maximum limit which
has several 100 pages. I'm assuming you're not gonna be doing that with a
children's book. But we want to hit 24. To hit 24, we need a
minimum of 12 sentences, because for each sentence we're also going
to have an image. So 12 times to being 24. You can just see I've used
a bulleted list here. And for each bullet point, I have portfolio for each
number in that list. I've put a sentence. Now, when we're writing
the manuscript, the bit that will trip you up is there's no real
technical term for it. But what you have
to understand is that this is the inside cover. Of course is nothing printed
on the inside cover. This is page one. Odd pages go on the right. And the first page doesn't have a corresponding image because
this is the inside cover, so this is page one. Then obviously you
turn the page, page two or the even
pages on the left. And all the odd pages
are on the right. And for this example, I'm putting all the
sentences on the right. So all the sentences, war P on the odd pages and all the images will
appear on the left pages. Why this is super
important for you to understand is
because every book starts with a page one and doesn't have a corresponding
page on this inside cover. This is not paid to you
or this is page one, page 1 tenth to appear by well, page one appears by itself. And then you have a recurring
pattern of page two, even page on the left, odd page on the
right. Turn again. This is now page for
even page on the left, odd page on the right. For the example of this book, I am putting all the
images on the left. So the even pages and
all the sentences or the manuscript or the copy on
the right or the odd pages. This is super important for
you to realize because when it comes to creating
this document, this one that I've
put as number one is what is going to appear
on that page one by itself. And for me, I've put a dedication that you
could put a title there, put whatever you
want there, but just be aware that that's going to appear by itself on the
opposite to that inside cover. So maybe an easier way just to visualize
this for you would be page one is that is right
here as the dedication. Page two is actually
going to be an image, page three, which is
here is the title. And then you'd get into
the manuscript proper. So all right, on page four, remember on the left side we're going to have
a white images. Look, you can flip it and put all the images on the right. That's completely up to you. But the principles
remain the same. I think it's good when
you're starting off in this authoring journey to
put the word image in there just to remind you
that there is not just words and the images have
to be fitted in somewhere. And this will actually make
your bullet point count, your numbered bullet list count actually be exactly the number of pages you're going to have. So if you see here, I'll just put image. Image. This is what it
looks like at the end. This is a complete
manuscript for this book. Again, you can see
that first page. Again, it's a page that appears by itself at the very front, opposite the inside cover. I put the tip, the
dedication there. And then after that it's
a repeating pattern of images on the left, the even numbered pages, and then the sentences or
the copy on the right. So this one happens to be the title of the book
with my name there. And then again on the
left image on the right, once upon a time there was a
young girl named Savannah. And this is how I recommend that you script out your manuscript. It's just a bit easier I feel to write the
manuscript out in one go rather than trying to create it as you're creating
what we'll be doing. The next step, which is
creating the canvas Document, trying to create on the fly. I don't think the manuscript
will flow as well. I know you're probably
not looking to win a writing Prize for this book, but it still makes it easier
for the manuscript to flow. So this is how I recommend
that you script it out. You can see it goes
all the way to the end with that again, image on the left. And in the end she wanted the pageant and
made her mom proud. That's on the right. And then I've just put the
end or at the very end, you can see that's an even paid, so that doesn't
appear on the left. It's not so important how you end the book in terms of how
many pages are leftover. It doesn't matter
whether you ended on the left page or right page. What you will generally find. You can see that here. The end is on the left
as it could, as I said. And then Amazon tends to
put in some blank pages. You can see there's
a blank page, blank page, blank page. And then it's a
barcode on the back. And a little thing
they put by Amazon, which has manufactured
by Amazon.com.AU, Sidney, New South
Wales, Australia. That's because to actually
print a book that are a certain number of pages
that have to go into it. I believe they need to
be multiples of four. I won't go into the maths here. But basically it
doesn't matter on what number page you end. Amazon will probably put in
some blank pages at the end, however many they need to. And then the last page
will be a page like this. Basically what I'm saying
here is that you can't really have your book and with the end and had
that and have that be the very last page
facing the back cover. It doesn't really work that way. It's more important that
you begin at the right way. Remember that page number one is by itself facing
the opposite cover. And then all even pages on the left or odd
pages on the right. And script that the
manuscript in a document. You can get the flow so
that you're aware of how many pages do I actually
have, as you can see here. So 24 pages in total. And that is the minimum that's
required for our document. So pause this course now, go and write up that manuscript and then hit Play again
when you've got it done.
5. Layout your book in Canva: Let's get into the nitty-gritty
of how to actually use Canva to set up your
book manuscript. And the good news
is this is actually going to pick up pace a lot. It's going to actually
become quite quick. So here we have the Canvas app. Remember I said I
recommended downloading the app versus doing
it on their website. If you do it on their website, it's gonna look very
similar to this. But you're gonna come
up to create a design. I want you to come up
to create a design. And you'll have all
these different options, but I want you to skip
them and I want you to hit Custom Size here. Now, we're not worried about px, which is pixels with
designing a book. And our book is 8.5
inches by 8.5 interests. That's what I want you
to put an 8.5 by 8.5, make sure you've got in for
inches, they're not pixels. And then hit Create new design. And here we are. We have
one page, one blank page. And we're gonna add as
many pages as we want. And remember, we also
have our document, that manuscript, the copy that I had you run up before
the plan which is here. This is where we
get to work now, so I'm going to copy. You could type this out
again if you wanted to, but there's no reason to
come to your manuscript, copy the what you
mapped out before, and then come back over to Canada and you hit
the text on the left. It doesn't matter
which one of these just put at a heading for now. And you can click in
here and hit paste. Now, I will get rid
of that number one, which has copied over from our Word document or a
Google Docs document. Now here's where you
get to pick your font. It's completely up to you. There's no best
font or worse font. I do find that there
are some that are easier to read and some that are perhaps a little bit
harder for our book. Used Times New Roman, which I guess is
Canvas version of Times New Roman but
not spelled that way. I do recommend that you take the text in from the
margins quite a lot. And the reason being you, and I'll show you
this in a second and I'm going to
center it from now. The reason being is when
you open up the book, what you'll see is that the
words go quite to the side. And especially here in the
middle where this is fold, it can be a little bit
difficult to read. In fact, it's something
I'd probably change in if I was to revise this
book is to bring that text in from the side a
little bit because you can see it disappeared a
little bit into the, into the center of the book
where that spine folders. What I want you to do
is bring that book, bring that text in quiet a
file ways from the side. You can see camera is
actually really good here. It helps, you know, when
the texts It's centered, which is what I'm going to do. And also sort of gives you these margins on the side,
I'm going to ignore them. You can see them keep
popping up that square. But I'm going to put it
right in the middle. I'm gonna go with
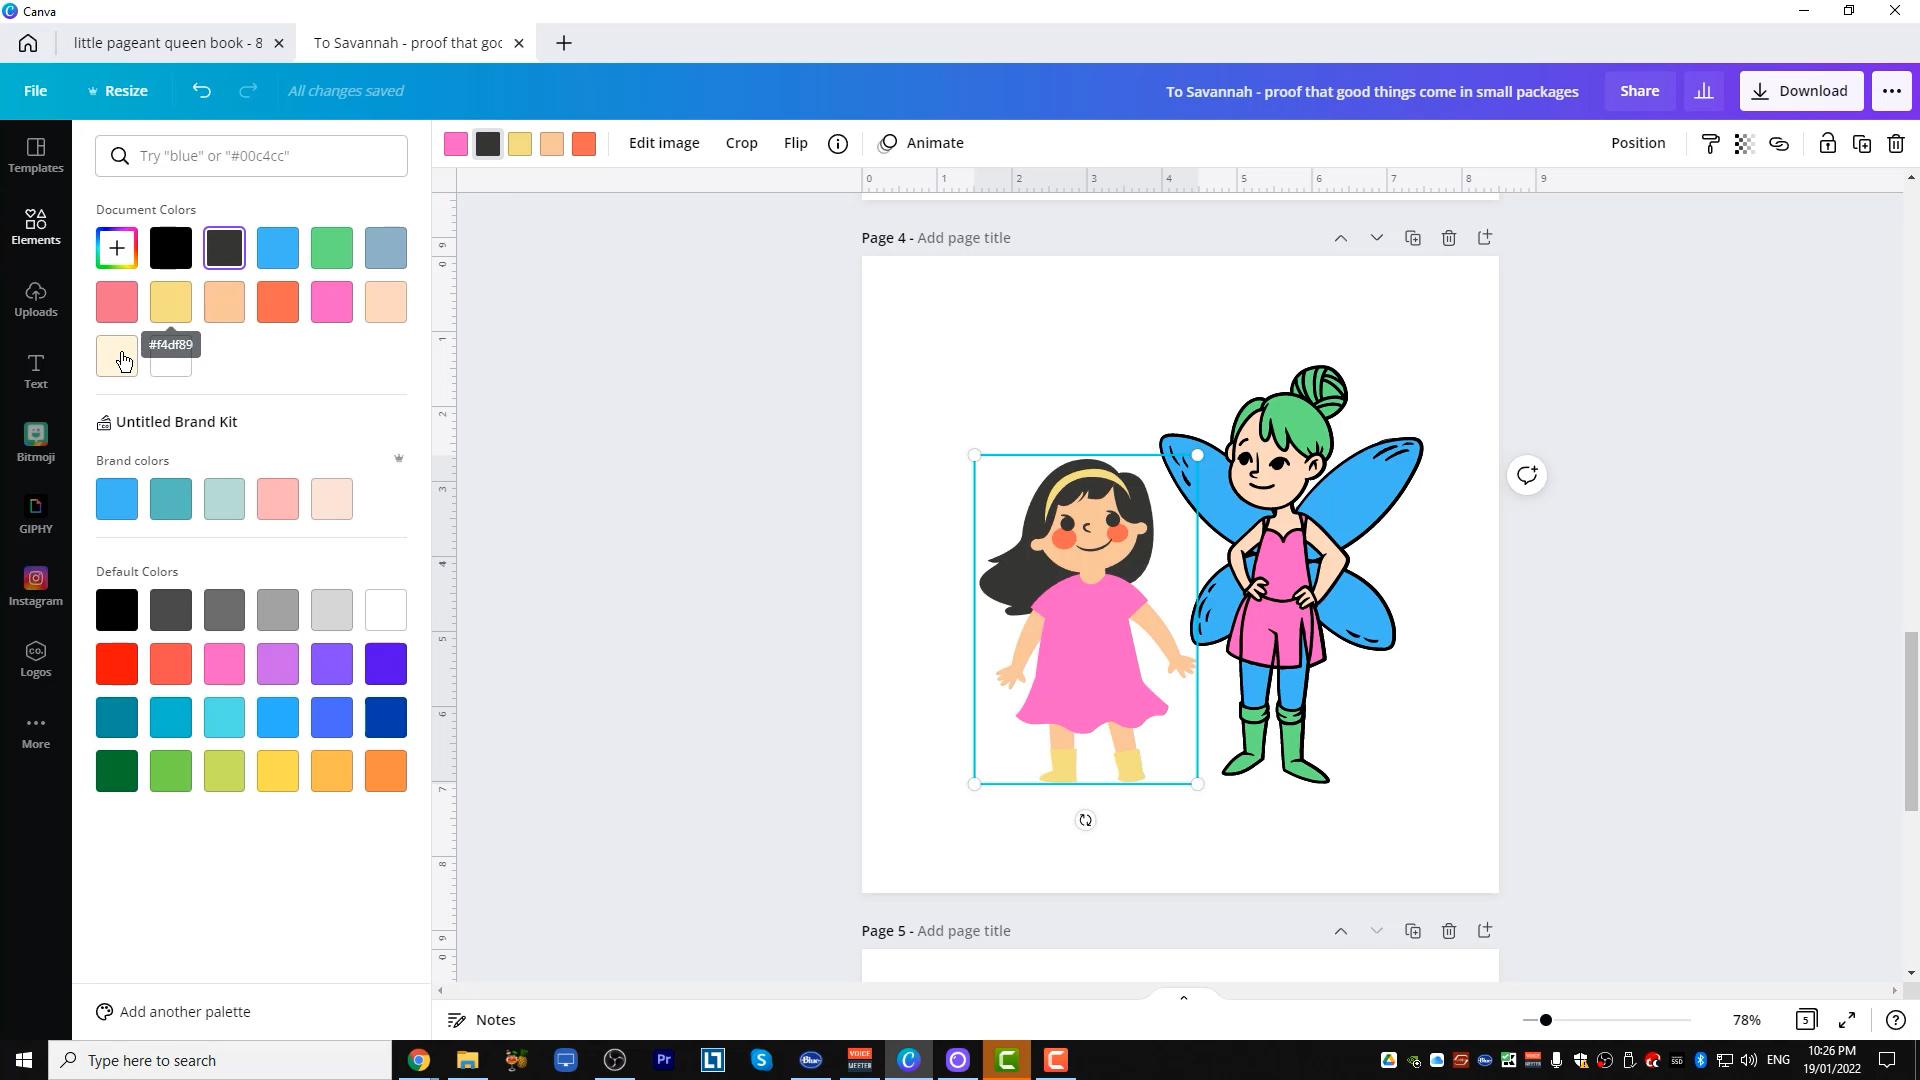
his Times New Roman. And that size looks great. So to Savannah, proof that good things come
in small packages. Now, remember that's
the dedication, that is the page that appears by itself at the front of the
book opposite the cover. So there's not gonna be
anything opposite this page. That's page one done. Now let's pick up the
pace a little bit. We know if you remember back
from our manuscript here, that we're now going
to put all images on the left and text on the right. So coming up next, you'll see the ad
page down here. And we're going
to need an image. Now, whatever image you decide
to put in is up to you. This is going to be opposite the title page from
me on the left. So I'll go to elements here. And the title of my book is a little pageant
queen that could, if I put in young girl into
Canva here, I don't want, although we certainly
don't want photos because this is like a cartoon
as children's book. Instead go to graphics. Now here are all the options. Let's see if I can find. I can't find the one
that I use straightaway, but this one, this could work. I think this is actually
a graphic that I did use and make it a
little bit bigger. This is an 8.5 by 8.5 inch page. But remember that Don't
take it all the way to the sides because that will then disappear into
the spine of the book. I recommend again centering it, make it big but not too big. That is page two. So remembering once again, this is a trickiest part
to get as a new author. That is page two. That is this page
here on the left. Now we're going to put
page three on that right, which if we go back to
our manuscript, is here. So I'll copy this little
pageant queen that goodbye Adrian Kwan is indeed
the title page, so I'll hit the page again. In fact, what I'll do
first is I will copy the text from page
one because I want to keep the same font
and the same sizing. I don't want that changing
on all the pages. And I will then go
back to my document and copy over the
little pageant queen that could copy over my title, go back to the Canada
document and hit Paste there. Again, you can get
rid of the numbers and something like that. If you want to change it up, fit it on one line, maybe you don't like the
way this title was looking. Of course, you can
change the size. You could even change a font, font from page to page. I don't usually
recommend changing the font because if
every page in a book Had a different font. I think you would find that quite distracting
and off putting, and it looks a little weird, so I wouldn't
recommend doing that. But if you wanted to
change the size of a font, let's say on one page
you have more to right? And it doesn't really fit. You might want to make
it a bit smaller. You can absolutely do that. We're going to
repeat this process. I won't show you the
whole thing here because once you get going, it's very simple to understand. I'll show you one more,
add another page. In fact, let's skip another page and let's
go to the text first. And that's one thing that
you could do is you could do all the texts pages first and then put all the
images in later. But the next page, the text which is over here, is once upon a time there was a young girl named
savannas are hit Copy. I'll go back to Canva. And I will put that in there. Get rid of the excess
space at the bottom, get rid of that number. I know that slightly
annoying, but believe me, copying and pasting
as much better than trying to write it on the spot. This is a text that we're
trying to find an image for. Once upon a time there was a
young girl named Savannah. This is remember Page four is on the left and page
five is on the right. So page for the image, for page five, the way
we're doing things. So again, I put in
young girl here, you could find anything that really suits, takes your fancy. There's no right or wrong. Let's say that we are going for this 11 with a fairy wings. Now. I've hit left my mouse click on it and it's gone the
wrong page, that's fine. You just drag it up to here. There it is, onto page four. And remember, make it
bigger center definitely. Unless you have
some reason not to. Now, once you drag the
image into the center, you can absolutely change, change a few things about this. So obviously you've seen
that I can resize it. If you click on the up here, you can see certain color
panels or color swatches. Now, if you go in here, you can change the colors
of this image around, which could be super
useful for your book. Let's say that it's looking
a little bit too pink and maybe you want
the wings to be blue, which I believe is
this color here, fiddling around that you
better figure it out. You go blue. And let's say that dress, we wanted to be a
brighter shade of pink. Go there. And let's say the
young girl that we're writing this book four is not a blonde, She's brunette. So we go up here and
we change that to a brown or something
a bit brownish, not gray, probably not pink. But you can also then pick whichever colors
you want here. So let us give her aqua
here because why not? Don't think that once you
drag an image in here, you're stuck with
how the image looks. So to give you another example, Let's say you dragged in
this image over here. You can actually drag
to images in as well. There's no reason you
only have to put one. We'll leave our fairy over there and let's
give her a friend. There's a guide showing
us it's in the center, but maybe we want the feet
to be on the same level. And again, when I click when
we have this image selected, you'll be able to see
anything that you can change or pop on the left. Now this one actually doesn't look like we can change
any of the color. Unfortunately, you
can't have some of these filters over here
and play around with this. The options are
pretty limitless, but let me get rid of
that for a circuit, find something that we
can change the color of. Let's see, we could
change the color of this. Now I had to pause for a
while to find an image I could actually change the
colors for I finally found one, this one I can change
the colors for. So again, let's say we
don't like the green dress. So you can go up here
and find and see, oh, that must be the
color for the address. Let's give her a pink
dress because why not? Then let's make her hair, which is this kind
of grayish color. So it's probably
this box up here. Let's make a blonde. Well, that hasn't worked. Let's give a blonde, but then it's changed
the color of her eyes. So that's not
looking really well. So we'll hit Undo. Undo. Maybe we should just
leave it at that. Maybe we could change
the color over boots to, I don't know, green. There you go. So you bring in the images, you resize them,
you play with them. You can change the size of them, the color of them within reason, you'll find some of the
images that you can't. But have a play. It is super easy
and super quick. It is much quicker and much easier than getting
a graphic artist, Believe me, to design an image for each and
every one of your pages. Go through this, go
through the whole process. So remember Page four. So even though on the left, this is the image for page
five, which is a copy. Just as up here page to that image is the
image for page three. Now what I want you to do, and you can pause
this video here, go through the rest
of this menu script and copy all the texts into it, pick images for it. And when you've
finished doing that, it should look
something like this. Now this is the actual
manuscript to this book, the published book,
the one I've had printed by Amazon
and shipped to me. So I know it's a little bit
hard to see you like this, but I'll scroll through
it just so you can get an idea for what for
what it looks like. You can see, as I
mentioned before, that I feel that
the texts went a little far to the side
which made it a bit hard to see in the spine so that it's something that
actually would change. But to give you an idea, if
you look at the bottom-right, I can hit this which
is called GridView. These are all the pages. So this is a good time to
remind you once again, page one is opposite that inside cover by itself,
There's nothing opposite. And then after that, I
want you to think in terms of spreads. Page spreads. Now page spreads are a left
page and a right page. Again, evens on the left. Here is a spread,
this image with his copy four with 567891011. So you can see I've
kind of matched up the image to the texts
that I've put in. It doesn't have to be
exactly two children's book. You could spend a whole
lot of time doing that. You could spend five
seconds during that. It's up to you. Again. You could play
with the images, you could resize
them a little bit. 16 goes with 17, etc. You get the idea up
to the last spread, which is 22 or 23. And then just that, the end
page at the very, very end. Once you get to this stage, just makes sure that
the spreads are the right way around. Again. You could flip it so
that all the images, for example, on the right and all the text is on the left. So if I went around and put all the images on the odd pages, just with these two. So now the hex would
be on the left, the image would be on the right. If you wanted to
change this spec, you could have, let's
say the first spread have the image on the left. The second spread has
an image on the right. Then the third spread is
back to the left force, whereas back to the right,
the options are limitless. I think you understand
the sky's the limit. We're going to move on
now so I can actually get you into the publishing
and uploading phase. But understand, once
you all for warning, once you upload this
to Amazon took ADP, it is not final. Your uploaded and it will go
through an approval process. But let's say you
go back and go, oh, there was a spelling mistake or I don't really like that image. Or as I told you, I thought that
text disappeared a little bit too much
into the spine. You can go back even after people have bought
your book, change it, re-upload the manuscript and as long as everything
is still correct, that correctly formatted,
correctly sized, then everyone after that
who purchases a book? Purchases a book will
get the updated version. So don't go for perfection, go for speed in this case, just get bang this out. So I want you to get to your version of this
however it looks. And I want you to then be ready to begin the
uploading process. Let's get to that.
6. Export your book from Canva: Congratulations you
have hopefully by now your manuscript laid out in camera looking
something like this. Now, the next stage
is super simple. We're going to
download this as a PDF because that is the format
that kVp is gonna want. We got to the top. You can see download
here in the top right. And we hit this drop down
and we want PDF print, not PDF, Standard PDF print. And you'll leave it as all pages because we want all
these pages in our book. You can choose to save download
settings if you want to, which means that if you change anything here next time
you go to download, camera's gonna
remember about it. But that doesn't really matter. Hit Download. Canada will go away and
have a little think and get ready to prepare this file and download it for you to hopefully
your computer somewhere. You can see it'll give you
a drop-down list here. So I'm just going to
put it on our desktop. It's got a name here, call
it whatever you want to. So it's got a little
pageant queen book dot pdf. Hit Save. It's done it. Now camera at the moment
actually has this bug where it comes up again and
once we save it again, so I'm just going to
hit cancel because I've already saved at once. Now, I will go away and I
will find it on my desktop, which is right here,
this PDF file. And if you have
something that can read it, so Adobe Acrobat, you can double-click
it, open it, and you can see what
it looks like here. Again, unfortunately,
it's a little difficult to see it as a wound. The book, you'll be
able to see it as it will look in the
book in a second. But for now, it is still
sort of looking at the interval per individual
pages by itself. But it's a good chance just
for you to have another one. I want to make sure
everything looks right there, no spelling mistakes
or anything like that. But this is now ready to go all the way up to the last page. At the end. We are now ready to
upload this tick adp. We're almost there. But before we do that, we need something called cover. We're going to disappear
back to Canva to do it. And then we'll be uploading
them will be publishing. So let's get to it.
7. Create your book cover in Canva: The fun part, we get
to design the cover. You'll probably now going, Adrian widen, we do
this at the beginning. There is a good reason for that. I have personally designed
books where I've designed the cover for us because it's cool to show people that cover. People get excited
about the book. However, I wanted to make
sure you did it in this way, just to show you one thing here. So you have your book now, now that you've written
out the menu script, right now that you have
something that looks like this. And you know that there
are 24 pages in it. What you need to do is go to what's called the ADP
cover calculator. Katie p.amazon.com,
forward slash covered Dash calculator or
Coke cover hyphen calculator. Now, why you need
to put this in, this is going to spit
out a template for your cover based on the
dimensions of your book. But really importantly,
and this is why I got into the manuscript first based on how thick the spine
of the book is going to be. Now because this
is a 24 page book. The minimum size you
can publish on Kindle. There's the spine
is not thick enough for me to even put
a spine on to put any text on the
spine because it's so small so the spine
text doesn't matter. But if you're thinking about it, if you publish a book
that's 200 pages thick, that spine now is a little bit thicker and you'll
cover is going to need to take that into
account because I cover is a front end, the back. I now need if my page in
my book is thick enough, text on my SPY. If you then go and crazy and you publish an 800 page book, then the spine definitely
becomes noticeable. And again, your cover
is going to need to reflect that because
the spine is thicker, I'll cover needs
to have more space and a tour reflect that. We're going to go to the cover calculator and we're gonna put it in the
following information. Please watch carefully
to get this right. We're doing a paper bag. The interior type is premium
color, not standard color. Now premium color is just
a little bit fancier. The reason we're picking it
is not because it's fancier, but because for some reason, standard color on Kindle, the minimum number of pages you need to print a book is 72. And I'm not going to print
a 72 page children's book. Having said that, if
you in your manuscript, if you have 72 pages and you want to go
to a standard color, you can, if you wanted
to do black and white, you absolutely could
do that as well. But I think the images and color and nice for the children. Premium color paper type, one whitepaper page
turn left to right. We're not going backwards now. Measurement units, inches. The interior trim size, if you remember, was 8.5 by 8.5. So obviously we pick that. Now here's a big thing
we need to put in the number of pages
we put in 24. Then we hit calculate
dimensions. Now you can have a look at this. This will give you all
the dimensions because your cover is not going to
be three separate ones. It's not going to be front
cover, back cover spine. It needs to be one PDF file. Are you seeing now
why I wanted you to do the manuscript
before doing the cover because there would've been no way you could have done this without knowing
the width of the spine. First. You go, Adrian, this is super-complicated unless
you're a graphic designer, like how am I going to do this? Well, we don't worry about this. We're going to download
our templates. So go here, hit
Download Template. Now it gives you a zip file. I'm going to find this
folder here on my desktop. I'm going to open it up now. Hopefully you have some
sort of Instagram. You probably will. If you don't, then just go
on to do an Internet search, how to open a zip
file or a ZIP file. But we'll hit extract all this. I didn't install
anything. This is just the software that
came with Windows. Hit extract. And then it opens up and
you'll see that there are these three files inside. There is a PDF, these are templates
for your cover. There's a README which you can read if you want to.
I've never read it. There's a PNG which
is an image file. So if you know how to work with image software
such as Canada, you could use this is how you can see it's got
the guides for the, I will go through
this in a sec that basically the solid black line around the outside is where your cover it's going to be cut. This pink areas,
what's called bleed. So you need to know
is that the covers printed all the
way to the end of the pink and then it's
chopped off at the black. That's not an exact process. So the reason they've given
you this sort of pink margin is to say anything you really want to make sure
you get printed. Don't put it in the pink. Because depending
on how the machine cuts off the edges of the book, it may or not be visible. So basically you want to put
everything in the white. The dotted blue line is where the spine is going to be folded. Again, it's not super exact. But I believe it's anything
less than 50 or 70 pages. It's not going to be thick
enough, as I mentioned, to put any text any
text on the spine. We don't really
need to worry about the spine in this case at all. But you could use this
or you could use a PDF, which looks exactly the same. It's just a different
file format. But what we're going to do
now is import this into Canva and then create
our cover in Canada. Okay, so here we
are back in Canva. Create a design that's
where we're gonna go. We're not gonna go custom sizes. What we're gonna
do is import file. Hit this Import File button. We're going to navigate to the folder where we saved
the template that we just downloaded from
ADP, which is here. And I want you to
import the PDF. Let's double-click that. It's finished downloading or importing uploading.
Now we hit this. And while up there is our image file
while cover template. Now we don't want any
of this text here. You might want to
read it to make sure it looks right,
but I hope it is. So for example, paper
book, yes, paperback book, cover template left to right, our images, the
dimensions are right. We're gonna start
getting rid of this now. Just hit it, hit delete
all this stuff here. It's what I've told you
before. So for example, black solid line is
where it's going to be cut to produce a
final trim size. Basically, we know all this. We're gonna get rid of it. We're gonna start actually
creating our cover. I will get rid of everything except that little
barcode reminder. So this is where every
book that's ever printed, including this children's book, will have a barcode on the back. You can see it right there. I just want to keep that
place holder there. I know exactly where the
barcode is going to be. And then once I've got my cover, I can remove it. But remember, we want to
design inside the white. You go, Adrian, how
do I design a cover? What exactly the same way
we did the manuscripts. So we'll go for the
text and we will put in here the little pageant
queen that could. And again, you can put
any text you want. We'll put a leak Spartan
in for this one, just to be a little
bit different. Now, you can see that the
edges of the texts are getting dangerously
close to the pink. I don't want that. I do like the size of the text, however, it's nice and big. So I will bring in
the edges here. And it will do a text
wrap and we will go. That's gonna be a little
bit difficult for Canada to find the middle. So you would either
have to guess to me, this is the easiest way,
just make sure it looks somewhat roughly in
the middle of this. Cable will go, well, this is in the middle here, but that's in the very middle
of the entire cover design. So that's gonna go
right over the spine. This will be on the back cover, this part will be on the front
counter, not what we want. The top and vertical will work. So yes, sets in the
middle and that looks about middle for me. Then I probably want to
have an image there. So we'll go back to elements. Let's look for Super Girl. Let's look at graphics again. Remember I don't want a photo. Let's say if you want
to put this one here, I think this is one that
we used before perhaps, but it's okay. Let's
use a different one. Let's use this, a
flying, flying go. Now, let's move this
down a little bit. We'll move that across again, just trying to find
the middle roughly. There. You can see camera,
that dotted line is meaning that this
text and the image, the middles are aligned,
which is useful to know. I probably should put
my name in there so I'll just hit go up
here, hit Duplicate. Give me another textbox
that's exactly the same. And I will put by nutrient
because that's the author. I might make that a little bit smaller so I can go
up the font size here with this selected
and let us go to, I don't know, 24, little bit
smaller and in the middle. Okay. How's that book? Title? Name, images looking good on this down a little bit. There's our front cover
done. The back cover. Let's hit a duplicate
on this and just come up with something
cute for the back. You can put another
dedication here you're dedicating
to a young child. And let's say you could put
to my youngest daughter who who will one day
up to be a superstar, even though she
probably already is. That'll look good
again, we can try and get that in the middle. Does that look about middle? That looks about right. Now. This is ready to go
except for one thing. If we export this now, I'll say this, it's
going to have the pink, the black, and everything. The blue dotted lines
and the fault and this, we don't need this
anymore because wood that barcode be okay
down there. Yeah, absolutely. Because we have this is our back cover and this is
the text on the back cover. It's not covering our text, and our text isn't covering the barcode so we
can get rid of them. That's irrelevant now, whoops. Actually in fact,
that's not so bad. Weekend delete everything. We don't need to leave anything
here except our images and probably a
background now you probably don't want
a pink background. I used white for mine. So if I go up to here, because there's actually a
rectangle here on the Beck. Don't know if you can see that. I can't move it,
but that's pink. I don't want a pink background. So let's go one. Now that is ready to go. I understand it doesn't
look like a cover now, but that is the back
cover on the left. The front cover on the right, the spine is in the middle. But Amazon, when it printed
out in its giant machines, is gonna take care
of all of that. I kept the guides whilst I was
putting all this stuff on. And then at the end
I wonder remove the guides because if
I don't remove it, the dotted blue
lines and the pink around the outside for the
bleed and the black lines, they were all gonna be printed
and I don't want that. This is all I want. This is now ready to go. What do I do? You say? Well, I need to export this
the same way as before. We need a print ready PDF files. So we go to the top. We are going again
to the PDF print. We go to download. By the way, this
image was already the correct size because we
downloaded it from the cover, the cover template,
the cover creator. If you actually
look at the Resize because I have a
pro feature here, you can see it is number
of pixels doesn't matter, but if you go to inches, you can see this is
very close here to 8.5. The reason it's a little
bit more is that bleed. I was talking about that
little extra at the end to make sure the image or goes all the way to the end and
then gets cut off. And why is it 17 across? Well, because 8.5
by two is roughly 17 because there's a front
cover and back cover. This is already the right side, it's suffice to say so download, PDF, print, hit Download. It'll go away, do its thing. Let's just say that the desktop, and rather than calling
it paperback underscore 8.5 by 8.5 underscore
24 and the scoping, Let's just help out. We call that cover. I was at Save. Again, this is his bug with camera at the moment
at asks you to save it twice. I'll
cancel out of that. We now have our
cover ready to go. And you can find it
on your desktop. If you can. Find it on your desktop,
hit double-click on it. Opened up. There's our cover. We are now ladies and
gentlemen, boys and girls. We are ready to upload all this and we're
just about done. We've done all the hard work. And let's get this thing, upload it, and let's get
it submitted for approval.
8. Upload your files to KDP: Okay, homestretch. Well done for
making it this far. We need to go back
to ADP.amazon.com. Obviously, that was
the very first thing I got you to do because I
didn't want to have to worry about it now
because it's so close, you wouldn't want to be
going all I have to set this up now and then I'll
come back and do it later. And later becomes never
come to Katie p.amazon.com. We sign in. We are producing, following my mouse
here, a paperback. I might actually going
to do this with you. I'm not going to
publish his book again because I've
already done it. But let me walk you
through the steps, follow through, pause
it if you need to. But this really
doesn't take very long Language,
English, book title. We already had that, you
put it on your cover. So for me it's the
little pageant queen. But could I don't
have a subtitle. It's not part of a series
is just one-off book. The edition number
don't need that author. I don't put my prefix in there, but I'll put firstname Adrian, quiet, contributors,
That's Pete, other people who've
contributed to the bulk. If you have an outside
Illustrator, which we don't, You could put them in
here, but we don't need to description now, if you do want to
sell a million bucks, you want to find people, you want millions of people to find your book and
create the next JKL, the next JK, Rowling
sort of thing. Then the description
is important. You need to put in
the correct word, keyword stuff that
people search for. But this is just a first off. Remember you're gonna be
able to change this later. For now. Just put in whatever
you want to put in. So I will put in for here. This is the story of a young
peasant girl named Savannah, who had the courage to
pursue in her dreams. That will do for
now. Now you can put formatting in here so you
can see there's bold. If you wanted to
italicize underline, you can put a numbered
list, bullet list. There's all sorts of, you
can even put headings, etc, that you can put in
links in here as well. This is this source button here. But you can put HTML and
they don't worry about it. Let's just leave it
at that for now. Let's get it done. And we can worry about
all the finicky stuff and trying to optimize it
later, but that'll do for now. Now publishing rights. Well, this is not a
public domain work. Obviously I own the copyright and I hold necessarily
publishing rights. Now, using Canva, all the things that you use it
you're able to use. That's one of the reasons
you don't want to just take images
off the Internet and put them in because it
had someone else copyright and then you put them in
a book that's not legal. So that's another reason I
had you use it in Canva. I own the copyright. Now keywords, this is again for people who are
searching for your book. For mine, I might
put in pageantry. I might put in children's
story, picture book. It's really easy. You're just going to print
this out for your daughter, for your son, you don't
need to worry about this. It's optional, but if you wanted to do that,
you can do that. Again. If you want to do
it later, you can do that. Don't worry about
that part too much. The two Browse Categories, you get to choose
agreed for your book. This is more if you are aiming for best-seller
status on number one, which I've hit, I've
had top ten on another, on other occasions as well. You can rank in two
separate categories. And if you really want
to rank at the top, it's better to put yourself in a category that isn't
hugely competitive. So for example, if I was
to put in, I don't know, not put myself in nonfiction
and put myself in business or computers or any of these big ones,
health and fitness. There's no way in a million years I'm gonna rank
and number one, not for a book like
this anywhere. And that's not the point. But a nice such as
health and fitness, a competitive that's not
one that I'd want to pick. There are some niches
in here obviously. But the idea that you can
pick two niches for this one, we're not nonfiction
and fiction. Could be a comic
or graphic novel, but let's go in here fiction. And let's have a look. Just pick one that's close
to what you're looking for. So we could put in fairy tales. Let's put in fairy
tales, there's one. And is there anything
in here about children, magical realism, not really. Romance, science fiction
should be short stories, superheroes, juvenile fiction. Here's one juvenile fiction. External adventure
biographer, biographical. Let's just say juvenile
fiction in general. Then we hit Save. Again, this
is not hugely important, but you're trying
to pick ones that are probably two categories. My advice would be pick
categories that are accurate. Don't pick ones that
are not accurate, but stay away from ones
that are super competitive, like business, for example. Don't worry about the large
print. What is large print? 16 points and higher. I mean, you could
if you wanted to, but I certainly didn't. Does this book
contained language, situations, or images
inappropriate? Are not. This is a
children's book. Save and Continue. By the way, if you do produce an adult book, which I have done hitting, Yes. That's fine. You don't suddenly get pulled up by the police. It's fine. You can print adult
books on Amazon. Now, ISBN is a unique
identifier for each book. You've probably seen it
on the bar codes and you can see on this
one maybe you can make it at ISBN number there. Normally you have to pay. But for an ISBN and
I think they costs, I think I paid
about a 100 or $200 for a pack of ten or
something like that. They do cost a fair bit. This is another reason
to print on Amazon, you get an ISBN for free. So let's hit that. You can use a free kick or yes, please assign me an ISBN. It does its thing and now have
an ISBN publication date. Just leave it blank.
It will automatically, when you leave a blank, workout, when you upload it,
when you publish it. And we'll update that
as basically today. If you wanted to put
it in a different publication that
you absolutely can. Now remember we're
using premium color, not standard because
standard needed a minimum of 72 pages and we want to
go 24. Premium color. We're not explain nine. Make sure you get this right. We are 8.5 by 8.5. Where are we? Bleed settings? It's no bleed. Bleed is for another day but
just trust me on this. I know that I've talked about bleed very shortly when
it came to the cover. But the book inside
does not have bleed, so we don't have images
basically going all the way to the edges of
the page, so no bleed. Now the paperback cover, finished mat or glossy, there's no one that's
better or worse. This one you'll see is glossy. So it looks really
nice and shiny. It does print up a pick up, let's say some thumbprint look shiny, which
is a good thing. The bad thing is if, if this book, someone's gonna
be taking a selfie with it. And like with that ring
light or flash photography, it will bounce off
the shiny cover. And you weren't seeing
anything, you're just basically see what's
happening here. So a matt cover may not
look quite as fancy, but it doesn't reflect
the light the same way. This is actually a Lindsey the image that I took the
background out of four, you see how there's
no ring light. So it's really up to you. Met glossy, met glossy, shiny but reflective, not shiny, but absorbent and
better for selfies. If you want a whole bunch of young children or your son or daughter taking a
photo with a book and you're gonna be a flash
photography there, then you probably
want to go with Matt, but it's completely up to
you personal preference. I will leave it as glossy
because it's a children's book. We wanted to be shiny. Oh, now here's the moment
you've been waiting for upload the menu script, that PDF ready manuscript
we got from Canva. We need to find it. It is here. Double-click that. It's gonna go and upload
it, give it a second. It shouldn't take too long. And depending on your internet
connection obviously. But our book files are not huge. So just wait for it to upload. Successful, right? So it's done that. Now we're going to go
to the next state. So we uploaded the manuscript. We need to upload the cover now. Upload a cover you already
have because we've made one. We're not going to use
the inbuilt cover crater, which by the way,
you absolutely can. It's a little finicky to use and you certainly
won't be able to probably make it look as nice as easily. But you can use it. Upload a cover, finite cover, which we very imaginatively
called cover. It's gonna go and upload again. You can see another we've
got green boxes here. Manuscript uploaded
successfully. It's processing the file
cover uploaded successfully. It's processing the file. Does your cover
include a barcode? No, it doesn't. Remember that little blank spot that we left for the barcode. We didn't put an image of a bar code in there,
nor would we want to. But we'll leave that
space blank and Amazon will go away and put
that bar code in there. A little place holder that
we had on the back cover. We're not done. We're now going to
really importantly, this is where you finally, finally the hard work pays off. And you get to see, you're about to get
to see whether you've laid out this book
correctly or not. And if you followed my
instructions up to this point, it should look
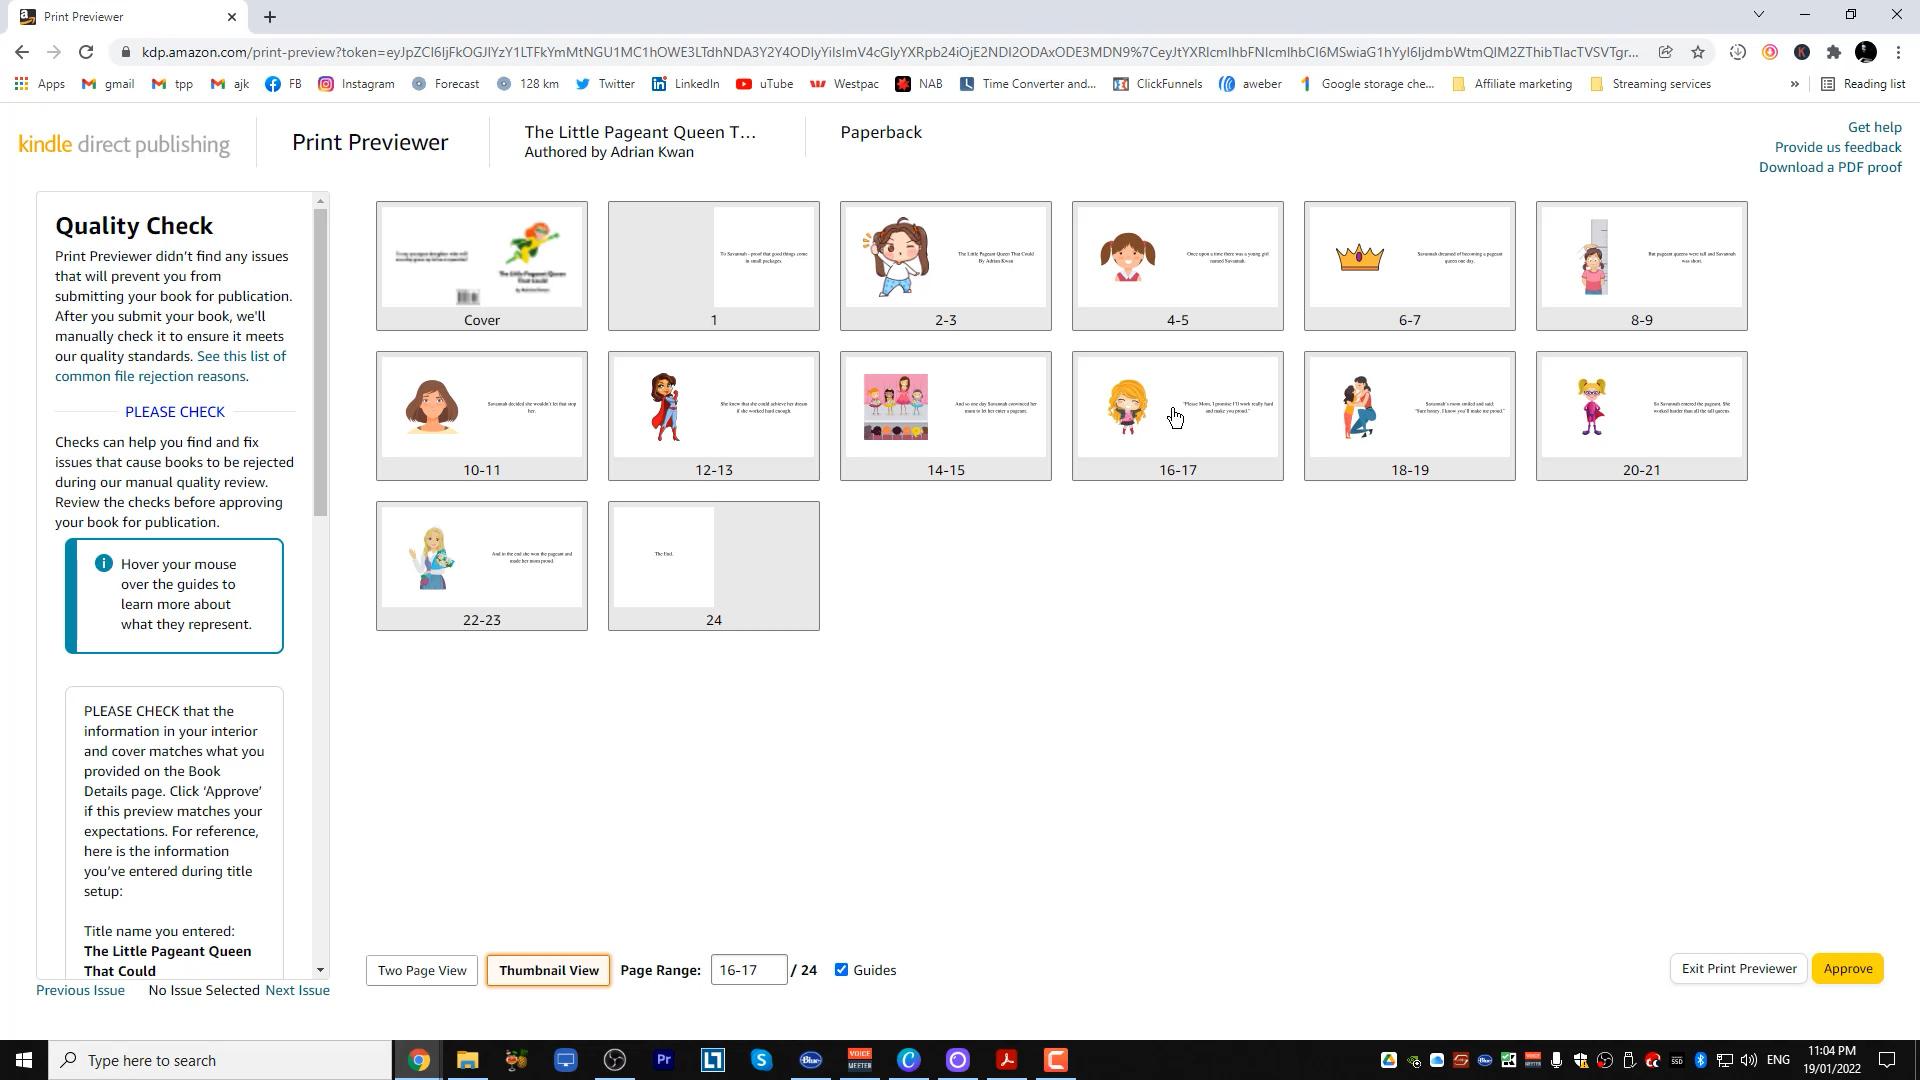
something like this. We've hit that long, that print preview a button. And here it is. So
this is our cover. You can see down
here what is this is a cover out of page
total number of 24. You can see the guides have come back now because of the overlay, but they're not
going to be printed so you can get rid of
them if you want to. But let's keep them
in for an hour to make sure everything's
all right. So you can see it's
put the barcode, their back cover, front cover, there is a fold for the spine. There's nothing outside of
the red, so that's good. Now we finally get to see
what our book looks like. This is page one, that's the inside cover and I think it would
be printed there. Does that fit with
inside the gray? Yes. Now you get to see how your book we're actually
look image on the left, texts on the right, next one, left, right, next
one left, right. This is all you're checking. This is your last chance to check that you don't have
any pages muddled up, that there are no
spelling mistakes, etc. Really taken a bit of time
and just go through this. Having said that
attorney or 24 page children's book Social
didn't take too long. If you want to, you can, rather than hitting
the two-page view, you can hit the thumbnail view. And this shows you in
rubber and spread. Spread is a left page
on the right page. And this is kind
of useful because page one you can
see there's nothing on the left because as I said, page one appears by itself. Then here's a spread,
spread, spread. You can see all the images
seem to be on the left, which is what we wanted. You could have put
them on the right. You could have mixed it
up the end at the end. And you know what? Everything looks good. Amazon here is not saying that there is anything
immediately wrong. What we do is now hit
this button, hit Approve. We are very close
to finished now. We've done the previewing. Kvp now goes away
and goes, okay, what sizes your book was a
collar was a black and white. What paper we're using? How many pages is it? Will work out the printing cost. This is how much it's gonna cost amazon to print
your book, $3.65. We hit Save and Continue. All we need to do now is
work out the pricing. Now, leave this territory. This is surprising. All territories around
the world just leave it as there's no reason to go
to individual territories. Choose a location where you expect the majority
of your book. So sales, you might be in America in which
go to Amazon.com, UK, DEFRA, Germany,
France, Spain. I'm in Australia,
so I'm going to hit.com.au ru just
for reference. If you are not listed
in one of these, then just go with.com because the dot-com or
the American stores, the one that tends to ship
the international orders. But I'm in Australia. That means is when
I say When it says choose a location
where he spent the majority of your book sales, it just makes the.com.IU
price come up to the top. It's gonna get me to
pick a list price, so how much I want
to charge in total. And then it will
base the prices and all the other Amazon stores
on my Australian price. If I had put Amazon.com, it would put
Amazon.com at the top. And then based on the prices of the exchange rates
for the American dollar, I'm gonna do Australian. And you can see here
it's giving you minimum a $1.42 maximum, $350. The minimum is based on the printing costs
was, I think $3.65. Amazon needs you to
charge a certain amount beyond that in order
to make any money. A $1.42. Look, if you want to know the
ins and outs of this, people like prices
that end in dot 99. So I wouldn't charge $8.42. You could charge a $1.49. You could charge $8.99. And when you see
here, you'll see the royalty that you make. The basic math of it is that you want to work
out your royalty. It'll be your list price, takeaway or subtract
the printing price, which was I think $3.65 or
whatever it was printing, sorry, $5 or $3 again, it's $9 minus $5 and then
you get 60% of what's left. So $8.99, Let's
just charge $9.99. That's what I did. You can see then then it goes
away and calculate fairly accurate based on
the exchange rate at the moment for the
other Amazon stores. So at $7.18, for example, in the US store, five pound 28 and
the British store. And six pounds or €634. You can play around with this. I'm really not
interested in this because I printed this book. You probably putting this
book just for your child. You're customizing a book if you want to play with
the prices, you can. But I'll just put $9.994 here, which is $10.99 including
AUG EST for us. And I will now hit Publish. Now, when you hit Publish, you then go away, celebrate, have a glass of
wine wherever you want to do. If you've done everything right, you will get an e-mail back from Amazon in about 24 hours. That looks something like this. Here's one that you
get I got a while back when everything went right. So it says, Hey,
your paper book is available on the Amazon store. And I'll tell you which
one case you've forgotten the name of your
book or in case you had multiple titles available. They're available to
buy an Amazon will take you straight to your
link and then you can send that link to people
to purchase your book. Taking over everything here. As I've said, if you want
to change anything you can, then people will tell
you update one of the images or you can upload
the update the title. What will happen then is
if you change anything, amazon will have to go through the approval process again. But unless you change
anything majorly, once you've once your
book has been approved, once it'll probably
be approved again. But you can see here changes to contribute a series names, Here's another page count, anything like that can take
up to 72 hours to appear. But congratulations. If you get this e-mail, then you are good to go. You can send the link
on Amazon to anyone to purchase and you will start making some money if that's
what you want to do. There is a PS here which
is ordering author copies. Now, author copies
means you get to, because in the old
days what you'd have to do is buy a 100 copies of your book and then you have to sell them
out of your garage. Author copies allow
you to purchase copies of your own
book at price, so you just have to
pay the printing costs and the shipping cost. Then you can order it and you can order as many as you want, and then you can
sell them yourself. As I said, out of your
garage if you want to, for whatever you want, that's what all the copies are. And you can order those
in bulk if you wanted to. If you are going
to a book signing and you needed a 100
copies of your book, you wouldn't want to
buy them directly of Amazon because you're
paying the marked-up price. Remember the printing
costs was about $5, but we're charging ten. We don't want to pay the time, we just want to pay
the five author copies is how you do that. Now, if something
wasn't quite right, maybe one of the margins was off or your cover
wasn't quite right, or you left something somewhere. Amazon does a pretty good job. The approval process does a
pretty good job of finding bits that are not going
to work correctly. In fact, sometimes it's a
bit too good and find stuff that is correct and incorrect. But you'll get an email
that looks like this. And it will say attention
needed, please review. Then it will tell
you the reasons why. Now in this case, this is a different book, but it's an interior. I needed to add baba,
baba, baba block. Now, as it turned out, the automatic approval process had gotten a little bit wrong. This is an issue with bleed, but I needed to go away, fix the issue and
then re-upload it. And then I needed to trigger off the approval process again. And then the second time I put I put it through it worked. I believe it went fine. I think that's
still going through the approval process now,
but that's what happens. So if you get an email like that saying
that it's attention, you know, that it
hasn't been approved. Don't fret about it. It doesn't mean all
my God, I'm so wrong. Amazon didn't like my book. I can never print. No, no, no. It just means there's
probably some small detail you've overlooked in terms
of it's normally margins, images or something like that. You go away, find it, fix it, re-upload it, and then you should be golden. The entire process,
the approval process, they say it can take
up to 72 hours. I have found it's
generally taken around 24 hours at the moment. If you've finished
publishing your book late at night and
you go to sleep, generally by the morning
or by, let's say, before you go to bed tomorrow, you will have that email back, but it can take a little bit longer than it can
take up to 72. So as long as you hit
that published button, amazon is going
through the approval process and you will get an e-mail one way or the
other within 24 to 72 hours.
9. Conclusion & Congratulations!: Well look massive. Congratulations for
making it to the end. And I really hope
as I said back in the project video that
you followed along and executed with me that
if you're watching this, I hope you are either
now a published author, congratulations,
or the very least, you've uploaded to the kVp
platform and you're just waiting for that
confirmation e-mail to come back from ADP, which again can take
about up to 72 hours, but they've been coming
through in about 24 hours for myself at the
beginning of 202022. This is where I'm
supposed to get you to follow me and self promote. I am just going to
recommend if you want your journey as a self-published author
to continue van, to visit my website. I've just put it together
again for this course. Adrian jay Kwan.com. You'll see it below. Putting your e-mail address. It's not a
super-complicated website trying to sell you
anything like that. Putting your e-mail
address and you will get access to all
the templates that I am going to be bringing out for future Skillshare courses in
terms of self-publishing. As you can imagine, well,
if you didn't know, this children's book course is the first course that
I've put up on Skillshare. So there'll be a template, there'll be templates
and resources for that. But moving forwards, I will be showing on skillshare how to do other projects such as a yearbook or
full-color yearbook. How to obviously publish a traditional sort of print
book, black and white. How to take on full on massive mammoth
projects like this and turn that 1162
views into a book. If you want to further yourself
publishing career or this, got you hooked in
your went, okay, now what do I do? Then? Go to my site, Adrian jay Kwan.com, putting
your e-mail address, you'll get a weekly
newsletter from me with author tips,
author resources, and also if you
have any questions, I'm thinking of starting up
a Facebook group or discord, some way of communicating
with you so I can help you along in your,
in your author journey. Because as I said, it can be a pretty lonely place and sometimes
it can be pretty confusing when you
don't know why you're getting rejected or
something's not working. And I'd love to be
there to help you out. Not because I'm some
sort of genius, but just because
I've been there, done that and been
through a lot with the heartache and a lot of
head scratching late at night, and I don't want you
to have to do that. Go to Adrian jay
Kwan.com if you've enjoyed this course and I encourage you to
leave a great review. And if you didn't enjoy
it or there's something that you needed to know
that I didn't tell you, then let me know that as
well so that I can improve. But congratulations
on getting published. And I will speak to
you again very soon.
 Adrian Kwan, 3x Top-Ten Amazon Self-Published Author