Transcripts
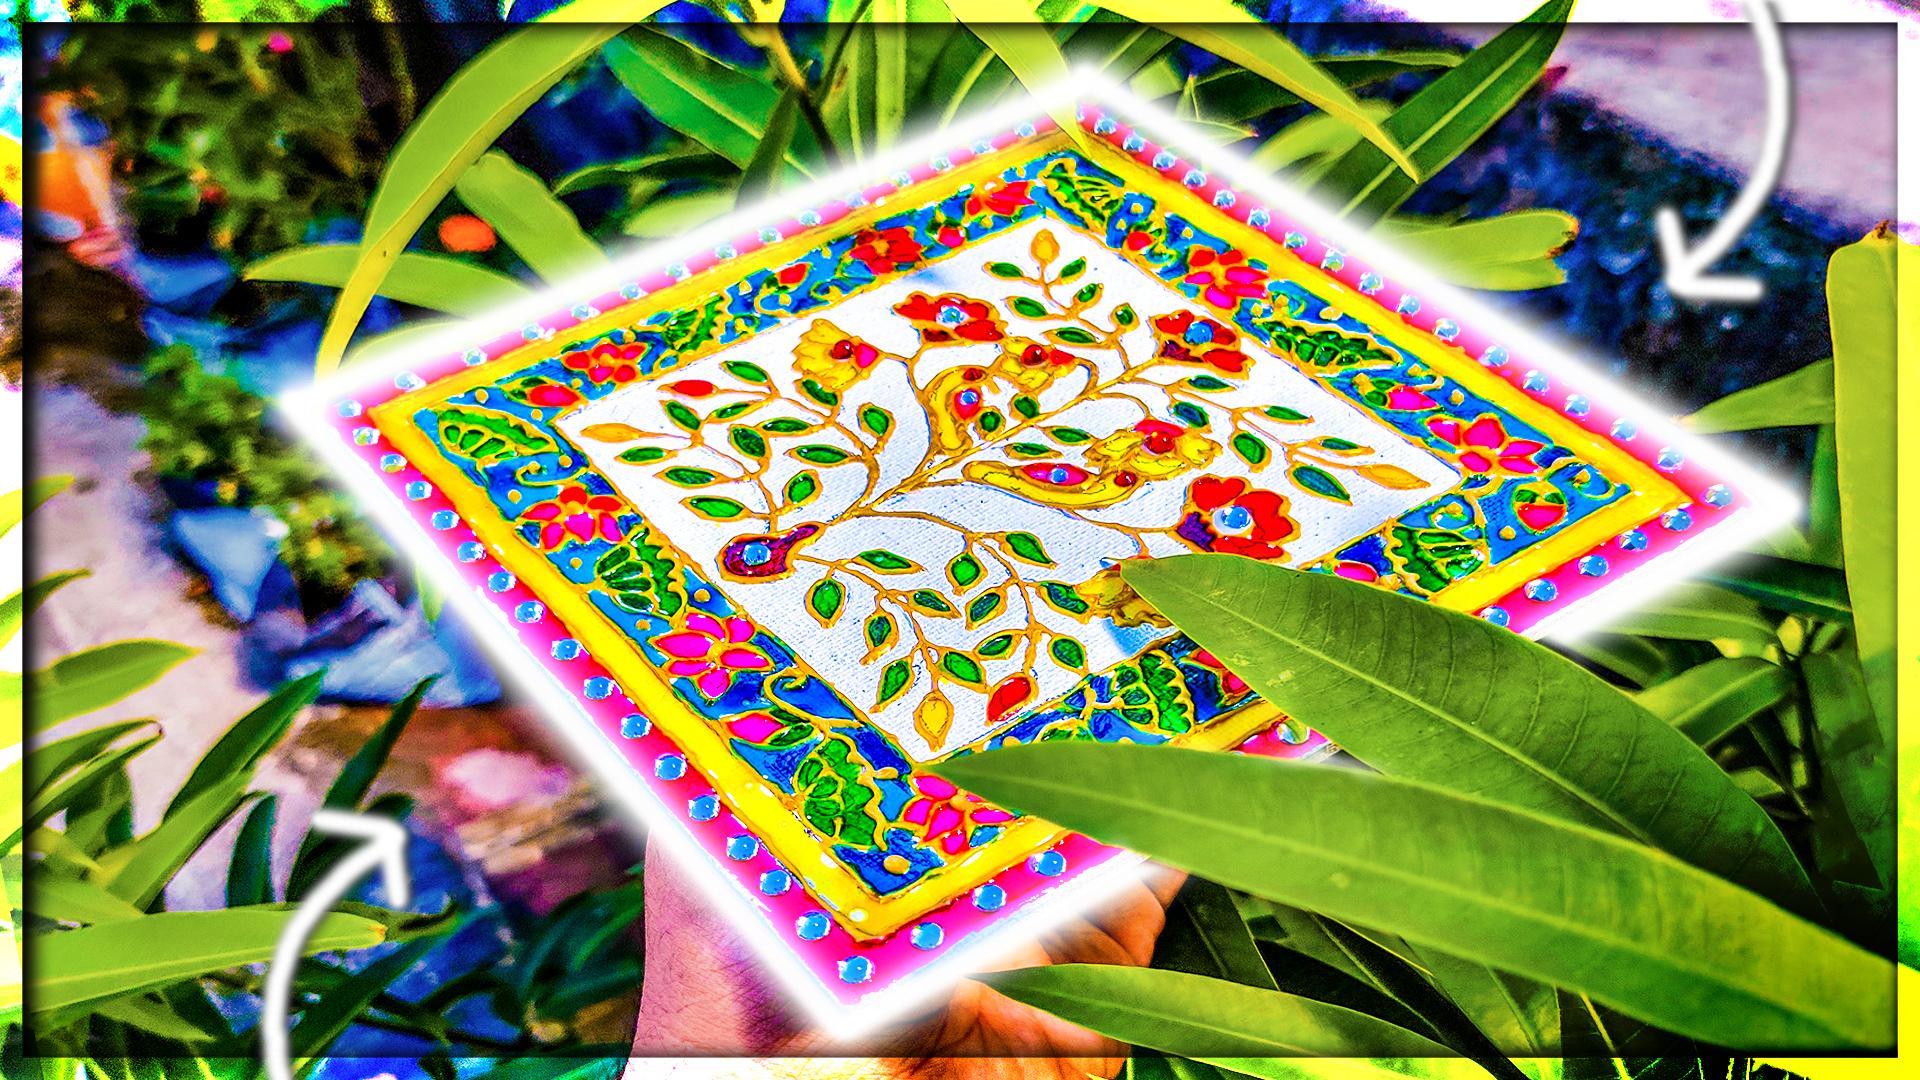
1. Meenakari painting: Introduction: May not ID is actually a portion kind of painting nowadays, it is being only practiced in Iran, Pakistan, and India. In India, this kind of painting is called at condemned painting or condemn art may not already are, usually involves intricate design, mainly using the geometric shapes and designed and is applied as a decorative feature to serving dishes, containers, whizzes, frames, these ornaments and jewelry. The void NO3 is a compound word composed of the order of Mina and Patti. Nina is a feminine radiation of the word meaning, which means paradise or heaven. Clery means to do or place something on to something else together the word mean FID means a place of paradise on object. The meticulous ornamental work is seen today, can be traced back around 15th century. The movers introduced it into India and perfected the technique, making the design applied on objects more intricate. That craft reached its peak in Eden during the 18th, 19th century. In the 20th century, Iranian art design specializing in monopoly really invited to other regions to assist with training local craftsmen in India, Rajasthan, Gujarat are most famous for their military artifact tangibility in this series of Painting video first, we will learn the phone work. After that, we will do the coloring, and finally we will complete it with fine stone. But a nominee is the art of colliding or decorating a metal surface by attaching or fusing species of different minerals substances over it enter mainly is considered the most alluding and technical of all metal decoration in the past, in a milling was only done on gold, but presently it is done on metals like silver and copper, et cetera, due to modernization we are using here glad spins and gold coin worth for the decoded in part. I hope you will like this lesson. If you have any questions, don't forget to ask me the question section and also give an honest review so that I can make sure that you will get more amazing videos like this. Where the second Have you followed me on YouTube? And a British and Indian folk art is a specialized YouTube channel for Indian folk art. I hope you like the amazing tutorial that I already have uploaded. With that being said, let's start the course.
2. Meenakari painting: Material: Let us look at the materials that we need for our Mina heady painting. First, we need a canvas as scaled and one pencil tracing image will be provided to you. You just need to print it out. And Tracy, in the canvas, the password is a given in a video. So make sure you watch every video for addressing. Of course, we need a carbon paper. Here. I am using a yellow carbon paper. After the tracing is done, we need the CIDI outline it here I am taking camel gold glass slider and with the help of this, I will be making the Cornwell. You can use any kind of 3D at Lane like freebie cred, Altamont, Marty for this kind of work, corn work are very difficult to do. So I would highly suggest what's my video fully and carefully and practice it another sheet, and then finally do it on the canvas after the work is done, it's time for the colouring, for coloring. I'm using glass colors. As you can see the camera glass colors which are water-based, You can also use for democratic glass colors which are also utter based. We also need a needle to spread out the glass color evenly. If you don't have a needle in your vicinity, you can also use any NAEP pin, which will be as good as a needle to spread out the glass. Skylar also there can be an issue of bubbling in glass color. So it will also help in picking that bubbles. The final step after colliding is the mean of y, also known as the stonewalled. For that we need radius colorful stones. We also need some glass slide not to do the most work. You can also use a fabric peeled fabric glue for picking up and tasting the stone. All of the materials linked are given in the description box, also in the Contents section. If you have any question or any doubt about the materials, don't forget to ask me. I will be happy to answer each and every question with this easy may clears you can easily do the Minecraft painting. I will be looking forward for your projects. So what's waiting? Let's start them in a hurry. Work.
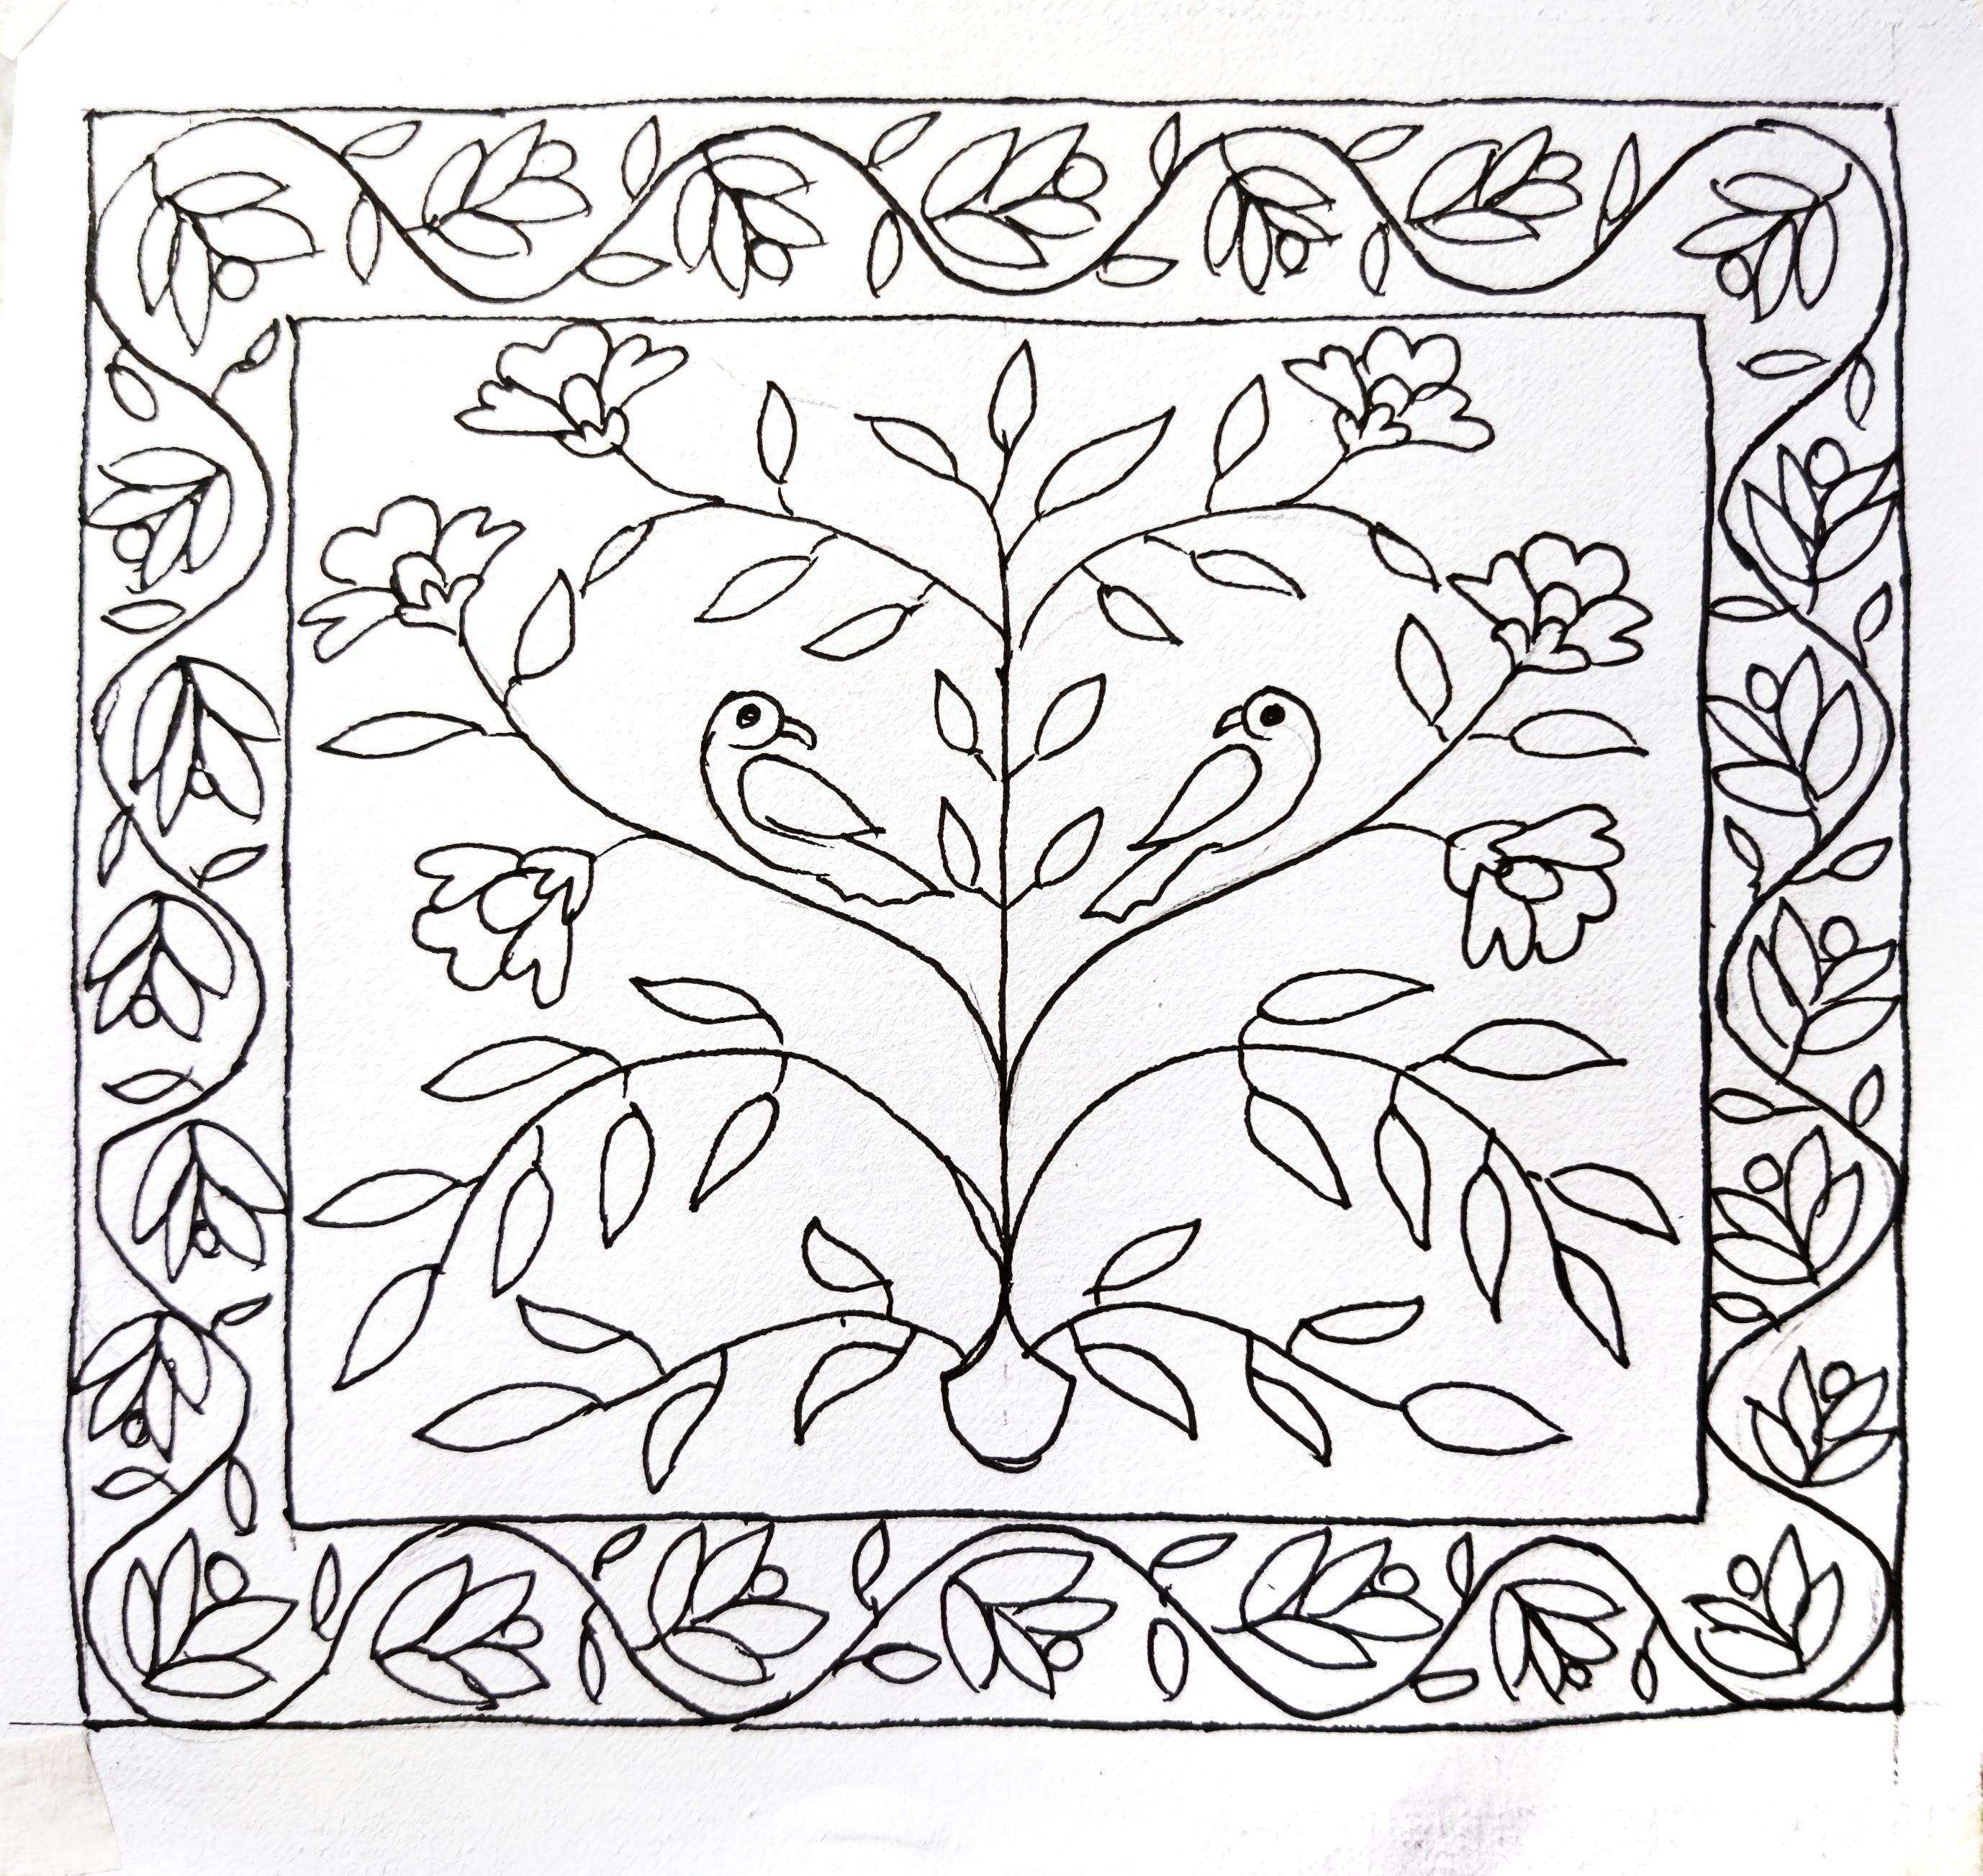
3. Meenakari painting: Design drawing: This is the six inch canvas that we're going to use in our amino therapy. So I have got a six by six inch paper so that I can show you the design. After attaching these with a masking tape, I am making a one centimeter border. I am using a transport in scale and the mechanical pins in, you can use any scalar anyway, instead you have, after the four borders is done, we will move to our next step. I'm creating one more border with 1.5 centimeter of thickness. These steps are really crucial to make sure there is no mistake while doing this. If you don't want to do these steps, don't worry, I will give you PDFs of each drawing so that you can print it and easily traces in your canvas. Let us now remove some of the excess paints in line. And further, I will do using this separate I'm micron pin. This comes with a set of six pins, which are really, really pigment it and also waterproofed before starting with the support up in, let's now find which is the center point of our canvas and just measure the width of the idea. And then you can find the center point as here, the total is 10.5. So I am taking around 5.75 fish. Then make a straight line to find the symmetry. After this is done, we will start with our supporter might complain and start with the dub. This flower to a will be the center of our attraction from where the whole tree will grow. First, I'm going to make some branches. We will do some US buds, also Flowers. Make sure there is a symmetry between the whole painting. That's why tracing is a great option if you don't want to do this symmetry team. I just made one side with a brand and some leaves. We will mimic the same side so that it will look exactly symmetry and feed like there is a meta in-between them. After that branch is done, we will do again the right portion. Now, the branches and little bit longer and it will have more petals or leaves. Here I am first made. The main branch is invoked side so that my main symmetry is become maintained. And then. Adding the leaves one-by-one. My patient while doing this, because this needs a lot of craftsmanship. When this R one side branch is done, we will now move forward to the right-hand side. Now, I will take another way so that you can do the symmetric thing more easily. First, I will use a pencil, and then I will override that with the Martha pin. Because of the permanency of Malthus when it is wise to use the pencil first and then do the rest of the team with your mouth open. After the pencil work is done, we can easily remove with the eraser. So don't worry in that case. Now, I will make two little birds in the branches. They also should be symmetry. Birds are one of the beautiful motifs are Mina Heidi painting. After the Penzias structured is done. Now we will move forward with our quota micron pin. Just make sure you don't do any mistake because if you do any mistake and been work, you can't reward. After the birds. Now we will do the branches with flowers and leaves. We will make trumpet tell flowers. These are very simple flower and I'm also making a small gap in between the flower where we will add the stone. In the last part, we will replicate the same design in the lift portion. Now we will quickly fill the whole painting with more leaves and more flowers. Now it's time to fill the gaps with some small leaves. And Phil appeared in there with some small, small motifs. Now we will outline the border One more time with the micron pin. After this is done, now it's time to feel the 1.5 centimeter border that we've done previously. With the help of a mechanical pencil, I'm first making wavy lines, which will be the base of our painting. And then we will draw over it. Make sure, you know the border carefully. The end of the, each corner shouldn't be a loop so that everybody is same in the structure. So be careful, right, doing this. C, I'm also making mistake. It's completely frying and using it is that it's not at all crime. You can also do the corner first and then feed the line section. This way the mistake part will be very less. After that is done. Now we will use the secular micron pain and feel each of the gap with floral design. I'm doing this kind of floral design, but you can do any design new one. You can also take my Madu Bonnie cause where I have shown you plenty plus a flower designs. Make sure to have a look at the orientations of the flowers so that it won't look any habits or be slow. And patients as they listed the main key off any kind of graphical and sheep art, art, Voc. Now, I will quickly make the border more presentable by using the support of micron pen. This is permanent, the pigments are good and also it floats ready fluidly with the paper. So I prefer using this micron pen. Now we will quickly make the border. I have to tell once more that I have already given this image to your project section so that you can download each of the image and printed for the chasing. You don't need to do any kind of hard well that I'm doing right now. But if you are someone who loves to give I would highly suggest this kind of work and then directed draw it on the canvas. Now, I will add a stem and some leaves to the border so that it will look more fuller. In the main artwork, I will partially take this design and partially take the other design. This will also give you enough confidence to incorporate your own design into Domino's ready painting. Let's now just quickly make the leaves on the borders. So first design for the minified painting is almost done. That thing remained is to remove the pencil mark with the days. Let's now quickly removed that so that we can move forward for our next rain. I hope you'll really like the previous design. If not, there is some more here. I will do another designed for them in a hurry painting. Here, I'm first making a two centimeter border in each side. This design is heavily inspired with the lotus Jarl design. Here there will be random branches of lotus leaves, lotus flowers, and small Lotus bugs. We will make the basic skeleton with the help of a pencil and then make each and every details with DOM micron pin. Let's now see how the drawing with looked like after the details. Okay. Okay, right. Because at last we need to fill the design with Mina worlds. So the design should be very simple. See how easy and simple. I made the design of the flowers. Also the birds, if not the leaves. The design are also Should we really lose seeds so that you can easily do the load lining all the 3D work that we do in the later part. And patients, rather than doing this work. Again, you can also use any fend off flowers instead ofs dot. Notice. Let's quickly finish the Indian design so that we can look for a works file, the modern design. Right? Now it is a time to proofread if there is any gap you were feeling inside the design. I am feeling some of the gappy ideas where I will now do some small, small motifs. For example, I'm adding some birds or the small leaves. This kind of examination is really declared so that you can make a holistic idea of the painting. So now our design of the interior, but it's completely done. We are now free to do the border wall. Here. The border work will be frustrated different from the previous one. So let's have a look. And using the same motifs of the leaves, Notice and the birds from the interior one and making a very random borders. Here. You don't need to figure it out how the flowers will look like. That's why we don't need any kind of pen still, the adequate dream with the micron pin also boost your confidence. The next step. But let's now complete the design. And I will see you after finishing this. I don't know. If they're feeling bored. You can also speed up the video. It's up to you, but I see at the right speed so that you can understand it better. Now I will slowly peel of the masking tape from the painting. As you can see, the painting is really looking very gorgeous. And once you do the treaty outlining, it will become more pretty. The details are incredible. If you rightly incorporated the same design in the canvas, the main minify the pedal thing is also going to look really nice. I hope. We will again meet in the next video.
4. Meenakari painting: Canvas: You can always do tracing in the canvas. Here i will be directly drawing over the canvas, so I need a scale and appearance in. First of all, I'm making a mark and half centimeter on each side and joining them with a pencil. Remember, my canvas size is six by six inch. So if you have a different size of Canvas, please scale according to the need. This step is very crucial. So I wrote highly surges in wasting your most of the time in aligning and the symmetry after the one side is over. Now we will do another side. After the four initial signs are done. Now moving again, mark a half centimeter border and make another four more days in each of the sides. If you have any note at any point of time, go Forget the link me and come into me in that project section so that I can discuss with YouTube and it will benefit all of your students. Don't forget to rotate the canvas according to your orientation. Because rotating the canvas, it's really helps. I would highly suggest to always rotate and don't fix the canvas when making the borders. Now, I will make 1.5 centimeter mark on each side and join them. For the water design. I will draw the notice Wanted Design that we already learned in previous lessons. Let's now complete the border and I'm come back basin. You can speed up the process and skip to the next part, but I will suggest to watch each step carefully. This follow my profile so that you can get a lot of more amazing video tutorials off, amazing beautiful paintings off all over the India. Now the borders are being done. Let's look at the design that we are going to transfer. We're only going to transfer this MAN 0.5 centimeter thick border design. So first I will start with the pencil and start making the leaves. Doing work on paper is completely different than doing work in the canvas. The canvas surface is really too. You need to make sure your pins in is not harmed as well as you are getting the right amount of design over the canvas. So drawing in the canvas is quite a bit of hard task. You must practice before doing it directly. You can also eat is the drawing like a paper, but it is much more difficult if it's on the canvas. I hope you are liking this wrestle and if so, don't forget to write a review on behalf of me. I'm making the same design. The flowers are really simple. It's, the birds are also very simple. Only the leaf is a little bit of veins, but it will look very gorgeous when we will do the CIDI outline. Makes sure the orientation is right. So then the words and the lotus flowers look like they're sprightly oriented. Take your time. Do the needful and always feed the gaps with curly lines. Now probably were getting how difficult I'm finding to directly drawing it on the canvas. See my pencil is not moving as fluently as it should own up paper. So I will again suggests practice, do If you can able to do it with pins, otherwise read on paper and just dance party. Another option is your paint my design, which is given in the project section, and then trace it. What each and every listen really carefully because I will be giving the password of the mean project inside of any video. So you must watch every video so that also you can get a detail holistic approach to the brain team. And with that, our floated borders is done. I'm just checking whether any places blank or not and adding a little bit of 3D lines in that place. Now the modeling done, the only remaining thing is thus enter pipe. So the center portion, I will take one from this painting. I love this bird and the whole concept of a tree. So I'm just making again the center part. And then I will do the symmetric portion. In the previous lectures, I have already showed you several techniques that you can implement for your symetric painting. I've been not repeat the same mundane thing. Again. You can go back and watch it. And then infants start doing that. The symmetry thing is completely depends on person to person. One person likes it or not. Why are you doing this procedure if you find any problem at any point of time, don't forget to millimeter or light in the project section. I always happy enough to clear out any of your doubts. You'll get mismatch. Any design also contains the leaf and the flower shape. It's completely up to you. You can also make a big bads if you want. Always lead to you're creating 3D flow and lead them inside of your so does making the flowers. And there is a little bit section remaining that I will do at the top. And when that our drawing on the again was this automobiles is done. You can see it's looking, saw Bill, different eat and 3D delta. So nice. I hope it will come out amazing in the next two sections. Grid then being said, don't forget to ask me any question if we have in the comments section, I will be always happy to answer any war, all of your doubts.
5. Optional video on Tracing process: This is the activity we're going to get rich. You need to print it out and make sure that decides is similar to adopt Canvas ACF daikon, as we're gonna see, i am marking the spot size of the canvas so that I will get the idea how much the bean D I should need. Law as we marked, we are now proceeding to the main tracing plot. Now with the shadow Caesar. I am cutting the markings according to the canvas. Won't be careful while using the sharp Caesar. As I already told before, make sure the size of the painting is matched exactly as the canvas size. For the meaner study painting I have directly drawn on the canvas. So if you want to trace, you need to follow the steps which I am borrowing from my other course, which is called ten GD painting as we're finished drawing. Now, we will set the picture in the canvas and see whether it is matching it or not. Now, I have taken Nike yellow carbon paper for the testing purpose. You can use any other colors, but the yellow color give a soothing Luke and would not destroy your drawings. I will not cut the carbon paper, but if you want, you can cut it according to the canvas size. Let's have a look how the canvas when Luke. Now, we will keep this aside and with the scale and a pencil mark out the center point of the canvas, we can easily found the center point of a canvas if you join the corners of opposite side. So let's join it and find the center. Now in this same way, we rid of phi in this data type point of the drawing. After finding both of the center points, it's time to align them with the help of a sharp bends the light, aligning both of the center points of the drying. And again, let us see how I am matching the standard point. Please do this tape with extra clear as you can easily do a mistake. Now, I am adding Cellular tape in the top side of the painting. Follow carefully how I'm doing this interruptive. Now, we will turn the page and insert that carbon paper in between both of them. Keep in mind, we don't need any sedative for the carbon paper. Tried to edges of position slowly. Don't rush while doing use. Now I'm attaching one more sensitive to the other side. You can also use masking tape in the place of stellar tip here. Now, for this case, I am not attaching any facilitating the bottom path. But for a beginner, I would highly suggest to add separative at the four sides are debating. Now with the sharp mechanical pins in, I'm outlining the drawing. Do it slowly and steadily. Try to do it in one go. Don't rub your pins sin against the carbon paper. Make sure to cheat by lifting one side of the paper and seeing whether it is already working on not as you can see, I can clearly see two strokes by yellow colours. Now we will place everything in exact same location and start tracing. Again. See how I'm doing all of the line in single stroke. Don't rub your pins status by creating multiple short lines like this. This method is not right and don't try to emulate me in this part and go slowly and steadily. Keep in mind which line you already did tracing. You can also use a pin or the empty pin for the tracing part. It doesn't matter. So without wasting any more time, let's just quickly finish the pressing part. It is the same process of George. Perfectly fine. With that. You don't need to do all the intricate details while tracing because we will go it later. Let's now lift the carbon paper and a little bit to see whether we have done all the paintings and all the tracing correctly or not. Once if really we're done. Let's now remove the drawing part. Keep the Bible dripper side. Try to fold it, it very nicely so that it won't be destroyed and we can use it in the next painting. And now we will slowly open. Thus, yellow tape from the Canvas do not make any Scratch or any tiers Divide, pulling out that stellar death. Now let's have a closer look to see how the tracing would look like, as you can see. So the tracing is done in quite the yellow lines are visible. And we can see side by side that tracing picture. And the canvas.
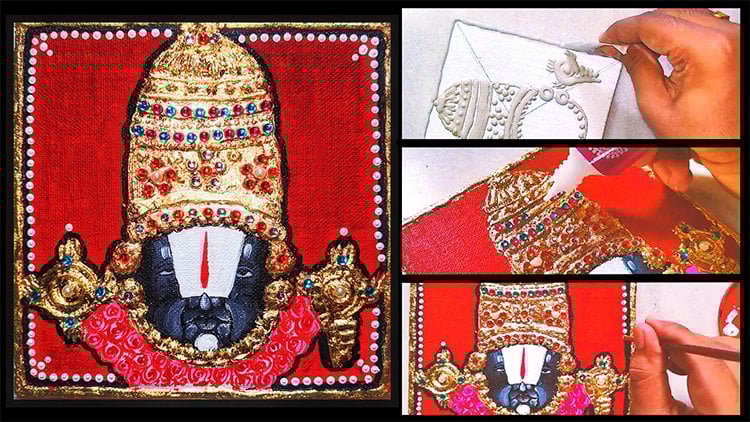
6. Meenakari painting: Cone work: After the drying, this is how the canvas is looks like. Now, I will be using this camel grass 3D liner for my artwork. You can also use the previous methods that we already showed before. I'm using a 3D glass liner because of the availability. It has a very sharp deep as you can see. So it will be very easy to draw. Now, in spite of this, you can use any colors of CIDI liner. Gold is inevitable because then you can collect it using gold acrylic colors. As you can see, I just started making one leaf from the border and going very slowly and steadily so that the thickness of my line is maintained. This is how the real-time speed looks like. I hope we'll do it this way. Now, event C, As the bottle is full, I am giving very gentle pressure from the bottom part. By doing this way, your hand will feel less stress and your finger will be less painful. You can see how gently and slowly undoing each and every details. This is how the painting should look like the 3D outliner. These job so that each and every line should be uplifted from the canvas. This is how you need to rotate your canvas each style, when you are doing very difficult path, for example, the petal of the lotus shouldn't be done in very meticulously. Well, that is an, I am rotating the canvas each and every time I'm doing the lining well, heat myelin once again that the standard of living world needs a lot of patients. Once a mystic is done, you can't undo. Okay. When that our top portion of them bothered is almost done. Now if we do that the left portion, you can see how gently using the 3D lines also known, forget to clean that deep so that you can get off. He says listen. As you can see, I'm doing the betas really slowly. I would highly suggest you to stop your bit while doing this lining work. Stopping your breadth can make you more focus so that you can get a precise looking and write them on both detailing. So the lotus is almost done and making the Steyn connected by a lotus bud. Right? You can also do some practice in any graph sheet before doing directly on the canvas. That isn't a love sheet. And when you are getting the perfect result and desired outline with stain them on top stroke size, we can then start using the Canvas. Don't hesitate if you're doing mistake for the first time, it happens to everyone. This will be the flow and I hope you will get the amazing results. I hope this thing lightning can using various other buildings to, if you're going to visit my profile so that you can get eaten every other being okay. We're halfway done to alert lower border. Being a right-handed, I will now start the intermediate portion because some it can smudge the whole border. You can do another thing then first do the whole border, then keep it dry, and then do the inner portion that is also very visible. If you are left-handed, make sure you start from left to right. And if you're right-handed like me, you should start from the right or another and slowly move to the left part. This way you obtain t will be smoke-free and there will be less chance of accidental damage is when the treaty liner is used. The liner is really, really liquid form. And a little bit gentle touch also can destroy it. Let it give a little bit time so that it can configure it. And then we will move to the next part. So I have done flowers, birds, and now I'm doing the leaves. Make sure the leaves in is pointed because that can give a really nice look to the leaf. You can start the leaf from the top portion that I am the lead now. Also, you can start it from the bottom portion. It's completely up to you. With that being said, in this time, we don't need to talk about the symmetric because it's already taken care of in the previous section. Now we just need to follow the mark where they dispensing mile audit spacing length. We just follow that mark equals then we fill up the gap again and eventually the right-handed always make sure you go like to Neff and vice versa. They have to do it from left to right. Let's now look at from another side to see how they're being DES, looks like. You can see how slowly and starting the leaf and making other perfect leaf-shaped nobody plasticity law, this sheep on beluga love Canvas. It's completely fine to leave adding different of shape. There is no hard and fast Fulani. Mistake it filled the outbound calling portion so briefly and draw ethylene. So make sure you're doing eating a distinct pretty carefully and follow each and every my videos. If you have any confusion, don't forbid to lie to the comments section of the project section so that I can answer each and every doubt of yours. With that being said, there is a display might be that you don't need to follow the exact line of the JSon means also lupins city because you can easily remove the basin line using some white academics. Come back. So the left part is done. Now we are moving too fast. At this point of time, your hand, we'll get a little bit painful. You can take a bet or you can take a one-day full brake and then you can start doing, believe me, your fingers and your whole hand in tremendous pain after doing this much of gain T. So kudos to the artists who have done it from a lot of days and who have made this kind of immunotherapy to popular among the youngster. Really pray and God bless them. They then see the flower I am doing. It's really simple. It's three petaled flower and there is a small gap in between for the leaner work, let's the feed to the whole interior part after that and come there. Okay? Or both. So you have a vector. Now the only remaining thing is the borders and start with the lotus and Suzhou. And I'm doing that center part, the center bottom path and followed by the other 20 months. See from starting to end, my poll speed is not increased. So from the starting to the end of the sprint d need to be very consistent according to the speed, so that this pressure is similar in coal into it will give the whole painting a very even roof. And it wouldn't be very pleasant to the eyes. Thank you. Again, I am repeating the whole procedure that if you have 3D outline, it's great. You can use it for the monotherapy NP. If you don't have to make the goal, you'll make the piece using the marble powder and the chalk powder. And then you can start doing that corn one. It's simple and it will give the same result. Only this tape is renaming is you have to add it. Then the goal after leak over the phone bottles, as it is a bold outliner, you don't need any kind of extra acrylic work. I'm trying to make each and every step very clear to you. If you have any doubt, don't forget to ask me internally when nail me ought you can ask me any question by commenting in any video. Also, don't forget to write it quickly review so that I can see how you're feeling about this force. Now, I am just making straight lines has a portion of the body after this is done, how aligning work would be complete. Okay? They have successfully done. We will meet again in the next video.
7. Meenakari painting: coloring 1: This is how the 3D outline and looks like after the painting is dried. It can take approx, two to three days to die completely. Now we will colored it. I will use this gamma1 glass colors. You can use any brand of glass colors for domina Hadi colored in Word. Now to spread the color over the canvas, I need ready pointy needle. Also, you can use pointed teeth material you have. If you're age is low, I will set is due to take proper guidance from the senior you have in your home. We have really small, small pores like the leaves in the canvas. So this kind of sharp needle will help to move the colors along with the needle. You can also use this kind of NAEP pin. This has a Finance need top. And using this name you can easily spread the color all over the canvas. Now will start coloring. After opening the box, greeted me with six different color of glass fillers. It's red, blue, yellow, green, magenta, and Brown. Using glass color will give the whole painting amazing finish. If you don't have glass colored, you can use acrylic color. It will refine. On top of that religion can easily use racing for making the law in Luke of the glass color. Now we will start coloring. I will start from this inner border and make it a vibrant yellow in color. So I'm taking the yellow glass color. Now using the glass color comes with I didn't responsibilities First, you don't need to shake the last color. Second, if air bubbles comes, you need Provost deck tone. You have the whole team really slowly, ambitiously. So using the pointed nib, I'm just spreading the colors that last colors. It dried up really quickly. So sometimes like this case, I'm not able to do it with mainly. So there is another option that using a paint brush, you can really gently moved up paint brush over the glass corridors and give written even look. Make sure you're doing very gently and slowly. And in your, any action is not incorporating any kind of bubble in the painting. Now we will learn using the tip only how we can spread the whole glass Conor. This follow the steps. This technique contains two great principles. First, you need to squeeze, need the color out, and then using the same deep, you need to spread it. So it squeezes and spread CM doings within and spreading all over. Okay. So our yellow borders is done. You can see how beautiful the border is. Looks like. It's glossy and super amazing. Now, we will move to the next step. For that. We will use magenta color. So it will start from the outer water and slowly, steadily start putting the magenta color over the canvas. Muslims. You can sleep how slowly I'm rotating the whole canvas and doing farm work. Make sure while lifting the color, you don't incorporate it anytime of bubbles in the pilot tube. The only villain in the glass printing works is the bubbles. If there is bubble, it will be stored that there's a bubble and it will dry as a bubble. So it will look very early after it's finished. You need to pick each and every bubble you are incorporating. At this particular point of time, if you have any question in your mind, don't forget to ask me in the comments section or the project section, see how easily I finished the outer border with magenta color. Now we will look forward to our next session. See some of my imagined tough alert is going towards that, the yellow. So with the help of a small needle, I'm just incorporating the measure maintained his own position. I really hope you are liking this painting. You can see how beautiful this is looking right now. You can also let the broadest dry before doing the inner part. But due to time constraints, I will do that. But now onwards, now I will make the 1.5 inches thick border and start with the lotus using the median. You can see I am giving some magenta color and spreading it all over using the needle. It's huge. Yes. Okay. As you can see, I did a little bit of a mistake. So I am taking a clean cotton bud and gently remove that magenta color. This kind of artwork really demands your time and connects your patients. So I would highly suggest, don't try to do it in 1D, otherwise, your whole painting will be messed up. Most law and day by day it will be completed as amazing, beautiful, unify repainting. Now it is time to do the leaves, but that I'm mixing yellow with the green if we have a light shade of gleaning winnings that also you can mix the Greenland and yellow in the other part, and then you can apply. As you can see, I pause, did the yellow and now over the, I will add the green color. So you can see I lost my control and I added a lot of green over the so I'm just removing with that tissue paper. Now it's time to redo all of the steps once again. Last time might be indeed overflow. To stop that now, I will first try it on a paper and then apply it over the leaf. You can see the color is not overflowing this time, but it's DID incorporate some of the Year bubbles. So using a needle lambdas willing to pick their bubble and continue doing the rest of the world. They'll give some dial logs. I'm using my benzene and adding some graphite lines as a glass colors. It's transparent in nature. It will look a little bit of darker shade, then that will lead to no green was. So I'm adding some graphite lines and then adding the greens. I haven't done the older birds together. Now the only remaining thing is the leafs. Let's now complete the leaves. Yeah. Okay. I hope you can clearly see how many times I have. Now I am adding some graphite lies so that it would look more directly on their list of the leaves. Port brown color. And you can see how much of bubble it got incorporated. I have eaten everything. I hope now you got the idea how to remove bubbles. You can also use a pencil to remove the bubbles and completely up to you, how are you gonna manage it? Now we will do the leaves with the green colour. Here also, I am using some graphic lines so that the leaves are not becoming monotone us. Now the top of the branch, I will add some yellow color so that it will represent a bug. Right.
8. Meenakari painting: coloring 2: Okay, so I've spent much of stamp, this is how the painting is looking now you can see it's really, really amazing. Flowers and followed Dad, I'm using yellow in colors. So let's apply it to the top flower, followed by the bottom portions. So now we're going to know the top portion of the leaves. The rest of the story. So, yes. So as you can see, we are almost done with our monopoly work. This is how the painting is looking. You can see that glossy effect it's giving when it is reflected in the light and in front it is looking more beautiful that Canada is not doing justice at all. I decided to go the inner part with white and the outer, but I will do Lewin color. These. Okay, right. The exact same length. Let us see. Thank you. But some patients to do so. Okay. To recapitulate all the things once more, we have done the lining work and this project we are doing the coloring. First redeem though yellow color. Then we did the imagined develop border, followed by the median, that's the left flowers. Then we started doing the inner portion and they'll clean levy per idea, followed by the flowers are red and yellow. And now we're finally completing it with blue color. I hope you are liking this lesson. You can use any color you have not necessary that you need to do blast color. You can also achieve the same result using equity colored and adding visiting on top of it. So if you have accurately color, you can go on or you can do it postal color unless you wouldn't need the glossy Luke you have. With that being said, I hope you like this lesson. Don't forget to ask me any question and also give an honest review and that review section. For now, let's buy, we will see again in the next lesson.
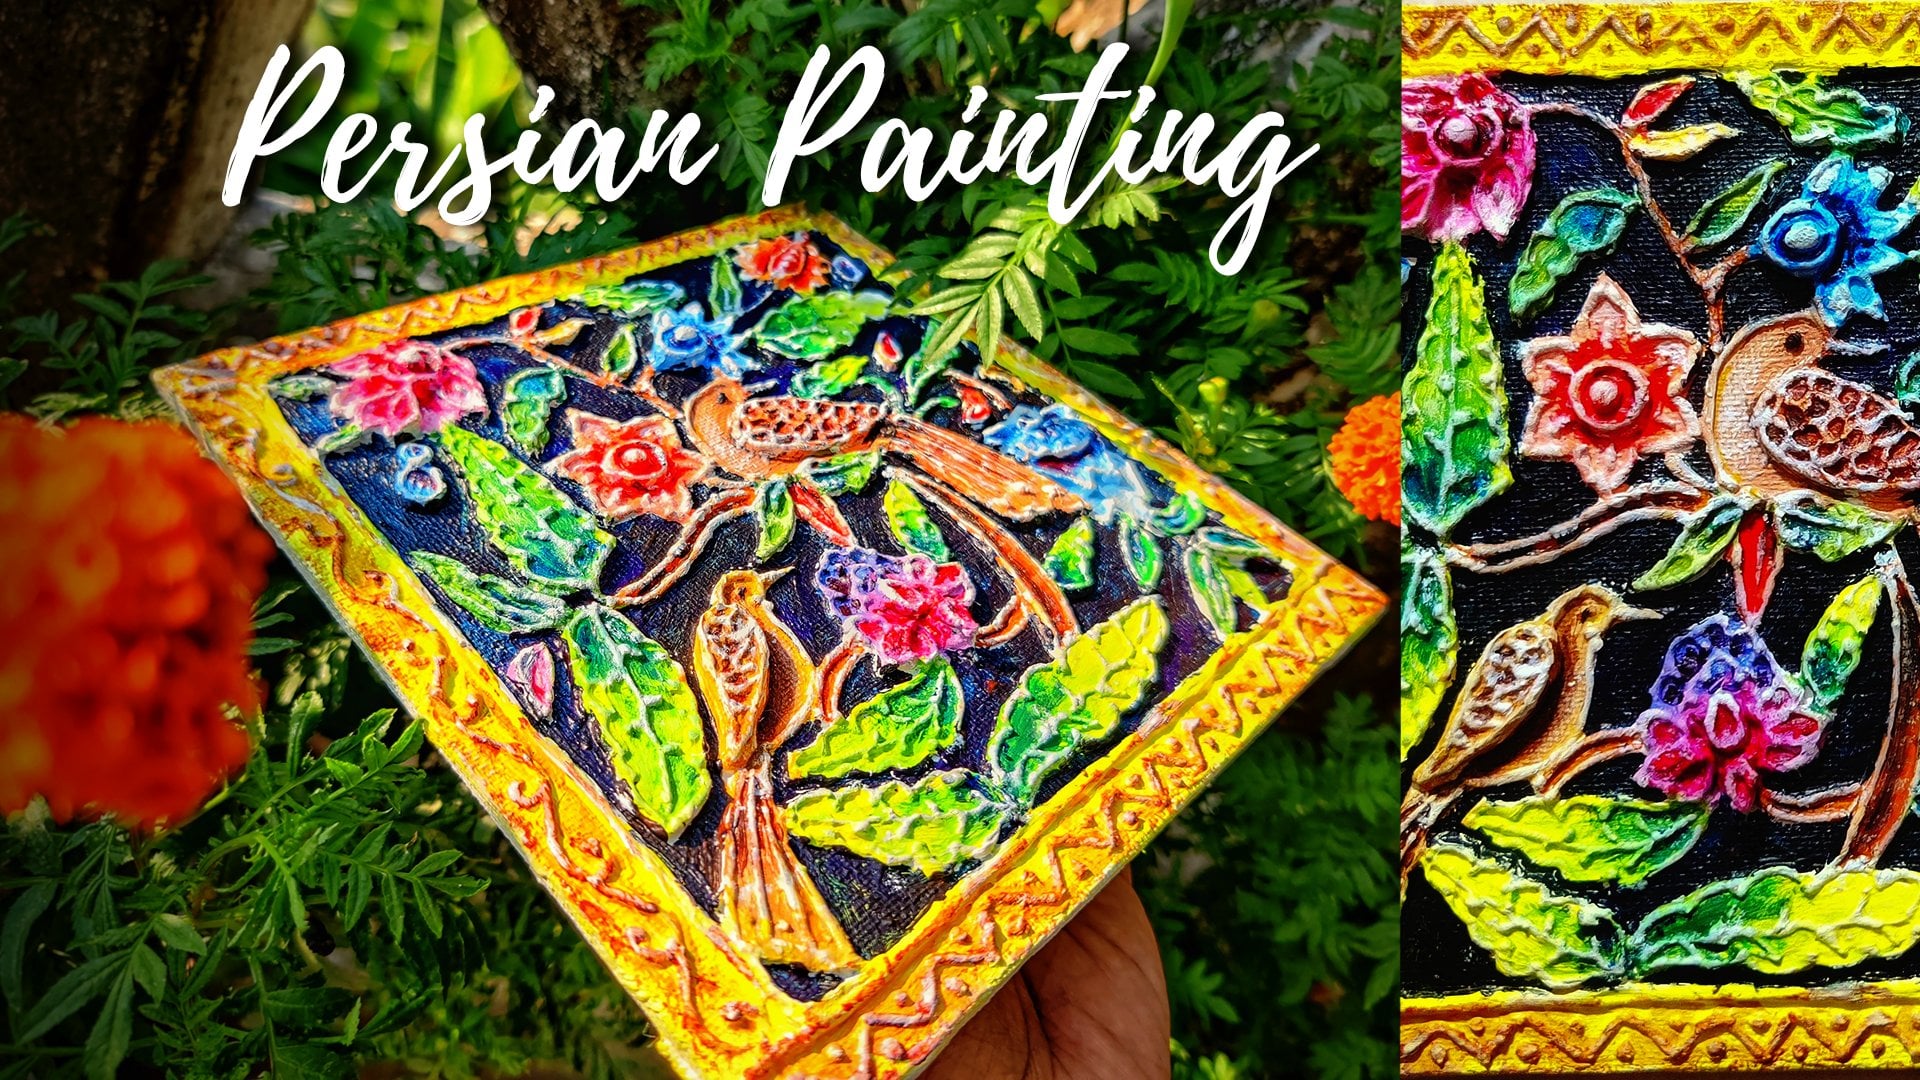
9. Meenakari painting: Stone work: This is how the painting looks like after the colliding session. See how glossy and beautiful it is looking. Now it will look more beautiful afterwards when you do the stone work. For the stone work, as the name says, we need reading much colorful literally this don't do Connors any stone you have. Then also we need this glass liner for finer details to stick the stone beneath our fabric glue. Remember we need the strong fabric glue so that it can stay ready properly over the canvas. Now, let's just start with the first stone work. And the centre of the tub. I'm adding a little bit of glue so that we will add the stone in the later part. Now you can see how small I have taken the group. Now, very slowly, I will place a white stone inside. Handling these kinds of small, tiny stones are really difficult, so make sure to handle it properly and see how the stone look like in the Canvas. It's looking really nice. Now we will do the other works. In the Florida section. I decided to go with the Redstone for the yellow flowers. So same wise, we will add a dot of glue in the center. And now, and I'll Redstone inside the, you can see real-time how I'm adding the stone very slowly and precisely. You need to be that much precise while doing it. Now, we know that red flowers by some white and some millstones. Now it's time to London bonds. The bonds that are really, really cute. I have not made better. And so then the final will be green. When I have made a cunei, the failure is yellow for the modes I, we will be using a very small stone, red color. And for the fader, we wouldn't be using a white stone. Okay. The white glue because when it will be dried, it will be completed transport in saw drawn by the fund that and this is how the building looked like after decolonization. Now, there is some portion where you can see the main 3D liner, what inundated by the thunder. So I will just add some of the line and add some more details to the empty parts. Whenever you see any gap in between the painting and the small dot of the 3D outliner that will give the painting amazing Look. If you don't have the 3D outliner or you have run out of eight, you can easily use acrylic color of gold and add a small dot-dot-dot acrylic colored using the brush. Right? So that doesn't work. You can see the painting looks like this. After the gold outline is done, it will really highlight the fainting, Not that much, but a little bit so that it will look very much presentable. Now we will do our stone work for that, we need some stone and fabric glue. So first I will start with the outermost border and add a dot of the fabric glue. Now we will take the stone very close vicinity to the canvas and using a tweezer or paint brush and just putting one by one in the outer border ocean. Working with glue and stones sometime can be very much hectic. So you can use any of your method you are preferable to. But make sure we're doing it very nicely and very slowly. As you can see here, I am using a bedside of a brush and using these, I am adding the Stones also. You can use it to pick up the stones and aligning them in a straight line over the border. Okay. Yeah. In spite of this clear direction, if you're still having some doubts, don't forget to ask me in the project section on, in the discussion tab, I will be more than happy to answer each and every query of yours. Again, I'm seeing this kind of stones may not be possible available at your place, so you can use any kind of stone, just make sure the border thickness you are doing. It's also matching with your stones so that you can put it later part this good enough stone work needs a lot more precision. So I would suggest just add a little bit blue on bottom of the tape of the brush and then use it for picking up the stone that's local, very difficult, but believe me, that some most easiest process I have. With that we have completed three sides of the border. And a little bit of boredom by design solely will complete soon followed by the next module. Okay? I've been highly said this to make only four to five dots beforehand, because sometimes we don't really think about the stone size and we have difficulty by putting the dot and the exact position, what to do when we are doing it really bang, we're getting idea. So always make four to five maximum spots beforehand. With that, our total painting is complete. You can see how beautiful and gorgeous it is looking. I hope you will avail to make this kind of amazingly enough body painting in your home and it will all sink, press any guests that comes over your home. Thanks again for taking my class. I wouldn't be really excited and looking for your artworks, know, amino therapy and things in the project section. So now pace. And
10. Meenakari painting: Project work: Congratulations, you've successfully completed this mean acai painting, cause now it is time for the project section. There are two designs which are already uploaded and ready for you in a PDF version. This print them in a paper Andrew tracing, as I mentioned before in the video. In spite of that, you can also draw dry directly on the canvas as already told. Now you can choose glass color or acrylic color and start your beautiful journey of creating inaccurately painting after completing it. Don't forget to upload it in the project section. Also, please don't forget to give an honest review for the course. I've really been looking eagerly to see your reviews as well as the questions. Please follow my other courses like ten GD painting, Madani painting, and painting that are already uploaded in the Senate. Went a second. Have you followed me in on you do an aberration. Indian folk art is a specialized YouTube ten. And for Indian folk art, I hope you like the amazing tutorial that I already have uploaded. See you in the next class. In the next tutorial.
 Nabojit Kar, Folk Artist + Youtube @An Aberration