Transcripts
1. What is Phad Art?: For that is home to more than 2500 tribes and ethnic groups, a large part of India's culture and diversity over the years, these ancient form of art have undergone tinges, natural pigments and dies every NAEP plays by actively paints. And moreover, while the traditional paintings for use mostly for decorating the walls, now being portrayed on canvases, inspite of these tribal art and folk art today gives us this sheer joy and a profound positivity. We've learned before Motwani painting, early painting, Terrible painting, painting. In this video we learned five painting. Hello, I am no budget artist, educator and a creator. I have been teaching folk art from last five years. I already had radiation, national and international livers prizes and acclimation. And today I will be showing you fat painting. Fad is an Indian folk art that originated is real-world EG and of RAD Stan more than 700 years ago at type of scroll painting made on cloth. The art file is associated with storytelling tradition. In the golden days, five paintings, narrative stories of local deities, warriors and rulers such as Daimler Ireland, baboon. Over time and efforts we have to make the art form more relevant to a broader audience. And now footprint is debit a variety of religious fingers stories including Mahabharata and the Ramayana, a 100 months Elissa, the entire process of making a fat painting is natural with cotton cloth being used as a base and natural paints made from stones, flowers, plants and hubs are used to create the art for what are the alert or F relics are sometimes used in newer five paintings. The paintings are vibrant in color with prominent black outlines. Whereas traditionally fart paintings, they pick the elaborate story with different section or episodes. In the smaller paintings made by today's painters, could they pin just a single character or just a portion of stories in this fight painting course. Firstly, we learn radius fired motifs like eyes, nose, lips, and chin. After that, we will learn how to form a perfect looking fat painting phase. We will learn both male and female face. Followed by we will learn the body structure and the dress designs for both the male and female. After that, we will learn very popular drawings of fat painting, followed by a basic composition with 3D minimum amount of colors, followed by in the final mega composition, we will make a full coloring session of fat painting. The main colors of fat painting are red, green, yellow, and blue. And we're going to use this for making our final composition. I will be giving you PDFs and print out so that you can practice far painting at your home. Moreover, I will be guiding each and everyone throughout the session via comment and discussions. After this painting is over, don't forget to leave your honestly rule so that I can believe in myself and create more sun amazing contents for you. Traditionally fight paintings were made exclusively by the members of the Joshi family who were the commission by the Voc bus to create the paintings. Progresses members or Joshi family broke the tradition to promote the art form and train people outside of their family in the art of FADH. So today with me, you are going to learn this beautiful art form where the second heavy followed me on YouTube. And traditionally in therefore God do this specialized cell in four only Indian forecasts. I hope you liked my afford and radius kind of Endian format there. So what's waiting? Let's join the class and we'll have a lots of fun.
2. Phad Painting Materials: I hope you like the intron, that's where you are here for the Mencius, We don't need various kinds of Mencius 4-5 painting. First of all, for the modem design bodies ALL phase drying, we only need a multiple and a normal paper and pencil font is practicing. I like to use a forgiven brought us like this and a highly suggest. And this same Vincent van Gogh has said 0V and really loves nature. One can find beauty everywhere after we learned. And that is a morpheme. It's time for the thumb position towards the first composition, it's very minimal, only really three colors. And some Marta's, I have used a really cheap, affordable permanent marker for the lengths final composition 3D invidious colors like green, yellow, and blue, followed by some brushes, are taken by the discard handmade paper on 300 DSM caught on paper. I ever used artist sweaters or let, it is completely up to you which material you prefer. You can always try with really washer or any kind of material that you have in your vicinity. Material was labored and probably with n level, it would be for then being seen without any further ado. Let's start with our first class.
3. Phad Art Basics: First we will make the eyes for that I am making a curve at the top portion, followed by our curve at the bottom portion. Make sure the bottom portion has more amount of color than the top portion where the curvy line, I am making the eyebrows followed by the island. Now we will try another way in which you can draw the eyes. You can see the eyelid, the eyebrows and upper portion is almost same. Only in the bottom portion is different. In case of this, I won't IS heavily used in the case of fun painting. I believe working with pencil is not as visible as working with a marker. So lets me connect with the marker. And with that, I will be making eyes but in different direction. The main concept is still same. Just I am using a camel permanent Martha, and showing you, you don't need a pencil always. While doing it. You can do it in one line marker, but make sure you cannot undo this step if you are doing with marker. So as you can see, how easily you can draw eyes far, far painting. Now we will look at the Knows. Four knows. It is very simple. Just I'm adding some curvy lines and making a W kind of shape. There are many ways you can do the nose. Here we will see this kind of knows later part. We will see some different kinds of nodes. After the nodes, it's time for the leap and the bottom phase part. It is very simple and just adding some half circus to small half circles followed by bigger half circles. Now I'm making them more stature, which is very popular among the male faces of hard painting. Now do the same thing with the martyr. The first two semi-circles at same size. The last one is way bigger than the first one. The exact shape will be mentioned in the face part, where I will teach you to draw male and female faces. Now we will draw some of the hand movements and some leg movements. So first we will start with the hand. As you can see, we don't define fingers here. It is just an abstract kind of hand movement. Now don't forget to separation of three lines because this will define the Bengals of the fingers. Let's now look at another type of hand motion. This simple yet informative motifs are very useful for far painting. In the later portion of this course, we will utilize this kind of fat motifs. So it's really important for you to practice this shapes. Now, if you find any difficulties at any point of time, don't forget to ask me in the comments section or I will be happy to answer each and every question of yours. If you'd done by Madu Bunyan verticals, then it's very easy for you to adapt with this system because these are quite difficult. Then the earlier courses, we already completed three hand movements. Now this is the fourth one. It is the simplest one of them. With this, our footprinting headset done, now we will move forward to the legs. We will start with the legs. Remember to add, please remember footprinting hand and legs will always start with the broader end, an end Rita, narrower end. I will explain these in a detail manner in the course. You can see how undoing the legs, this leg can be used for female and male both. But as I'm adding some jewelry which makes it the leg of a freeman. Now we will add another leg for, for that, even make first the dress followed by the legs, don't Verde. I will clearly explain each and every dressing sense of male, female in my next videos. So keep watching this video. You can practice it with any normal paper as I'm using a normal sheet of paper for practicing. Whenever I do a composition, then I really used PR or cotton paper. A handmade paper or paper f of t 100 JSON will be perfect for doing five painting. After adding some details in the dress portion, we're completed with our fire paintings motives. Listen. See you in the next video with something more.
4. Male Female Face Drawing: We will start with making a circle. So first, using my pencil first I am making a circle. It should not be perfect, but we will try to make it perfect by adding additional layer. This method of making circle is called quartet or a third, where you try to add some more layers and ultimately making it to a perfect circle. The eraser, which I am using is called Tombaugh mono eraser. It has a very pointedly which helps me getting precise erasing. Now I will make another circle with another method. You can easily see before touching to the bids, I'm first just rotating my hand and slowly I touched the hand towards the beds. Now, it is also not perfect. What we should do, we will overwrite it and we will remove the excess line using a It is for making circus. Always try using your hand because this will give for organic looking perfect circle. Now we will divide the circle into three parts. We will utilize these three markings while doing our face. This same shape will be utilized for both the male and the female. So it will be same. Now it's time for drawing a complete phase. I hope you remember how we do on the motifs like the eyes, the nose, and the lips, we will draw the same techniques. So I'm first making the circle. While you've practicing for the first time, you of course need a circular guideline. But if we are doing it regularly at last year field, you don't need the circle at all. Now at the top half marking I am stopping and adding the nose. You can see how different I am making the nose. Just below the nose. I'm making too small curves, as already taught you before. And the bottom curve will be exactly same as the circle. This makes a prophet looking, footprinting face. The speciality of fat paintings. You always see a face which is side face. You will never find frontal face, in fact printing. Now it's time for the eyes. The eyes will be exactly in-between the two markings. Or we can say it will align with the nose. So I made the ice followed by the eyelid and the eyebrows. This will be the basic phase of any person, no matter it is a woman or men. In the central part alone with the eyes. They're really year. So I'm making a year just below the years. There'll be a section for the hairs. So don't forget to add the. Now we will see how we can draw a perfectly looking. Male face. Now I will be drawing a male says, So let's look how we can easily draw it. If we're not getting at this angle Dolan Buddy, lets look the standard thing, another angle. These all of the steps that exactly same as we learned before. To start with, we will make the head portion, which is the traditional drives for mail. This kind of hit portion has seen and we will add this kind of here for only male figure. You can also add mustaches as every learned before, but I am not adding in this case. Now we will complete the top portion of the head and add some additional details. See how easily we made the human male face. Now, it's time for the female worm. As I already mentioned up to this part, it is same. Now, I will just credit my eyes a little bit. You can add bigger or smaller eyes. It's completely up to you. Now we will start adding the quintessential woman at tires. So first before it making the years, We will make the band, the hair band kind of structure. And after that we will make the ears. But we will also make the buildings, which is very prominent in female triggers of fat. Now see the hairline, how it's looks. Followed by we will make the ears, and then we will make the hair line. Remember to make the hair lend graded thin because on top of that there will be the cloth line. Yes, the five painting has woman figures which has clots around its head. We will also have to make it for your better understanding. I am making the hair length so that you can figure it out which layer is white. Now, I will add some more here that the top part. Now our female CS is complete. I hope you liked this technique. If you have any questions, don't forget to ask me. I will be happy to answer each and every question any of you had. We'll meet again in the next lesson.
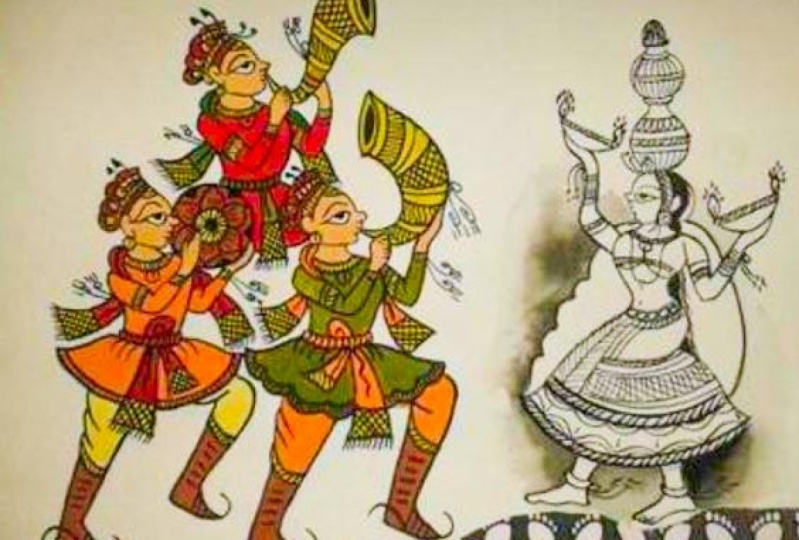
5. Phad Painting Human body: After the phase is done, now, it's time for the port. Yes. Now I will make the faceless bodies for the male and the female first and we'll start with the male one. C I just started from the N8 portion and making curvy lines for the body. This is a typical human figure for the fat painting. After practicing this body, you just add the face towards the body and it will be done. See how I am making the top portion. It should start with a broader end, and it will finish with the narrower portion. Same will go for the hands. As you can see, there are two parts of the hens. And each port should start with the broader end and should end with the smaller end. After the hand, we will make the face ten the fingers. Be careful well, making it. Because some students have great difficulty when making. You can make the hands like this and make a perfect looking further fat finger. I hope everyone is liking this lesson. This art is going to die. And really to save it. After the upper part of the body, I just make the boundary at the baseline. I'll forward that the fingers. So let me quickly add the fingers. Now, we will make that divider of the hand. You can give a full sleep or a half sleep. It's completely up to you. In both the cases you need this marker, which plays an important role. In fact, painting. Now I will be making another tough, eager same. I am marking the top portion. How much we should be starting with the neck, and it will be much simpler one, without any hands. You can clearly see how easy the simple, the second bodies look like. I've made them built and the upper figure without any hand design. Now we will go to the third one. This kind of design is very much prominent. In fact, painting when people are playing some kind of instruments, here the person is playing a drum or it holds in India. So now let's look how easily you can make this figure. I hope you will now God how we can make the upper portion of a human segal. I left one hand, some just quickly making the right-hand off the first finger. After that, we will start with the bottom half. Before doing the bottom part, let's measure how big it should be. Normally a five painting fingers bottom part should be double as the top part. So I'm just measuring how much the w should be. And I'm making the bottom portion, the first race. Typical kings, this fraud, the five painting. The king is usually where these kind of Lanka or I would say at semi gown. But it should not be having any kind of designs. Plus there will be a small scarf hanging from the bottom. We will add a little bit designing this. Followed by we will make the legs. After a little bit of designing our first race is completely ready. Now, we will make a dress. I will make it a t and wear it around the legs. And just remember where the legs should be and how much length it should be. And it will be very easy for you to make this kind of risk. Now remember, my, This figure is standing. Your fingers should change everything to the neat if it's running or working, the leg movement will be according to them. With some more designing, our secondary is also reading. Now we will move forward for our tied one. Before making this leg, let me show you how you can figure it out, how the legs ought to be. First, I'm adding one single line for the lake ship, how the leg movement should look like. Now, according to that, I'm adding the dress. See the single lines. I hope you can see it. Now. I'm making the dress and making it aligning to the legs. Here one lake is upward, another leg is downward. So I'm making the dress according to that, you can change the leg movement here. The right leg is up, you can make the left leg is up. It's completely up to you. Please show me what creativity you have. I will be looking forward for everyone's painting in the projects. Also, you can send me personally with some additional detailing. Our final third human figure. Male human figure is ready. Now we will move forward for the female figures. Here I will be making seem female figures at the same position. First I'm marking so that I can get a clear understanding how big our body and how big our bottom portion will look like, marking three sides. After that, I will start for the first printing. This kind of woman figure is very much popular. In fact, painting, this kind of figure expresses the fineness of the artist. It shows the moment is accepting someone or praising someone for the starting. It will look same as the male figure with the left hand in front of it. I hope you remember what is the key step for the body making? It should be always start with the broader part. I'll end with a narrower portion. I am making the same hand as the male figure, followed by the fingers and the Feast. Now, we will make the next ten, which will be different for the female figure. Don't make ever full sleep for the females because they usually have a blouse. So it should be half sleeps four or five painting. Now we will make the jewelry followed by the blouse. Take your time. You those Slowly. I have given everything in the PDF section so that you can practice along with me. Just practice device. I hope until you reach to the final section, you can do completely amazing looking fat painting. So believe in yourself practicing ETL every motifs day-by-day. You can see I made the drilling in the very tall, so I have made three Liddy, unlike the male fevers. Now, second woman figure. This kind of woman figure in fight painting is fairly typical, where you can see are for men integrating something or just accepting someone with some flowers or some light or the US. So you can see this figure, a very popular figure for the font painting. Now, all of this figure has the cloth around its head. So for making it, I am making the plot from the backside of the body. Followed by, I'm going to add some additional lightings. Now it's time for making the third woman Fricker, this woman Fieger offer Rani. So we will see in one hand of the fingered there will be a lows and in another way, inlet dancing position. So let me make it and see how we can make a different kind of female figure. Okay. After dividing the hand written several parts, our fight painting upper portion of female body is done novel really make towards the bottom portion. Let's make correct something which I've missed while doing it. Now we will start the bottom portion. Fat painting, woman's always wears the gown kind of dress. For that reason, I'm making the down. It will be similar to what we did for the male figure. But at the end being here should be wavy better. I'm making some Hofstadter. The baton. After some heavy designing in the bottom part, followed by the bath. We had done with the first human females. More forward for the next one. Then drill redesign. A little bit different in this case, followed by the bottom portion. I will add the whole bottom portion. After this, we will make the bed. Now it's time for our it will be a slide from the first fever. Still, the desire is completely different for this one also, everything can be downloaded from the PDF, so don't forget to download it for more guidance. Believe me, is not at all complicated. After design, we will complete our female body design.
6. Phad Art Ganesh: Congrats. If we made so far in this fight painting tutorial, we're going to learn garnish Lord Ganesha is a Hindu god. The head of Lord Ganesha is looks like elephant. He has four hands and also he is very popular among the five that east. So today I will be showing you how to make Ganesha, in fact, painting state. For that first, I'm making some outline for the whole body. After the outline is done and sat down with the head. Here I am using a mechanical pencil, which is gamma1 mechanical pencil. I also have support a mechanical pencil, which is also very good, slowly and gently and making the drunk. After that I will make D, followed by the mouth section and the ears, all of the tutorials in real time so that you can follow me and also make it. Moreover, you will be also getting a PDF with this kind of paintings where you can print it out and practices so that you'll get more practice and your site, ben David, looks amazing. After the head is done. Now we will move forward towards the body. You can see how beautiful the head is looking. The eyes are different than normal human, so you have to make sure you follow that. The hand side is considerably smaller than the head. So make sure you maintain that. Moreover, the hand will be similar to the normal figure. I will be here showing only the drawing of the Lord Ganesha if we want to compete. In the last section, I will show the coloring process. Definitely you can take an idea from that and use your own color. There, Ganesha fat painting. Now I will make some more hands. Moreover, it's time for the body. When we will do the last one position, you will feel in the central part even also made that the inertia, in spite of rather Krishna, it's completely up to you. But make sure you do a final composition and show it to me. I will be happy to review. At this point of time, if anybody has a smallest amount of doubt, don't keep it with you and just ask them in the comments section, I will be happy to answer each and every comment by answering your comment, it's also a great chance for me to check my knowledge. E, D, C, B, a. Okay. Now, the good news in the hand. Now I will add one lotus followed by, we will do the feet. Ganesha, our declination is the elephant headed God in Hinduism. He is the Son of Shiva and biography. The inertia is a very popular god in Hinduism and was on of the most worshiped in. The Hindu tradition states that Ganesha is board of wisdom, sexist, and good luck. So good luck to you all. I hope everyone is doing amazing, loving part painting. I will be eager to see this kind of work by Yu. Moreover, this kind of art is really dying. So people like Yo should come forward and make fat painting so that we keep this artwork in our tradition. Okay. Okay. Drawing is not what one sees, but what one can make other C's, I wish you all the best for the five painting up till now, we have already learned that drawing steps. Later we will learn the coloring process. And this is only the drawing off Lord Ganesha. You can make additional fingers around him. It will perfectly fine and looks amazing. And why? And so the mouse, sand just making a mouse. In fact, painting style will be completed in the next section. See you then. Okay. Okay.
7. Phad tress final: In this video, we will make amazing looking fat painting trees. The first thing but I am making is a banana tree, which is very typical in most of the fight paintings. It's a half men and a tree. It will peak from side of your painting. First I made a thick line, followed by the place where the leaf should be and filled the whole portion with better lines. We will make concentric leaves, which means they will strat from the same point but in, in various direction. Then making the main stem first and later I will make the whole tree. After that quintessential Half bell on the tree. Now we will make towards a full band on a tree. That first I will start from the central leaf, and then I will make the leaf around it. As you can see, it is a little bit elongated. Leave, I'll read heavily designed the whole leaf I like the previous one. You can see I have given first a plane outline and now I'm making a little bit curvy outlines. The curvy outlines are our main outline. The first normal straight line is just the guideline 48. You can see how beautiful the leaf is looking like. Now it's time to make other leaves. It's very easy, same as before. With that our second trees also done. You can make it top portion of European thing. Or some time you can make at the very bottom of your painting, as you know, footprinting don't have any kind of bare ground. It should ever White bare ground and no soil. So there will be only trees. Now I will make a banyan tree. For that, I am making a short trunk and it's light outline so that we know how much to feel. We need to fill the whole tree. Which circular shape? Yes. You seems to be very difficult. But believe me, once you do, you will feel unlike the whole process. No matter how the size of the circuits at doing this should be almost same. And you have to feel the whole painting or the whole tree with this circular design. Only the portion or heavy leaves should have the circular design which represents leave. The wood or the trunk portion should be empty. Let me speed up a bit and complete the whole painting. Right after finishing all the leaves with the circular shapes, now we will make some additional leaves which will be peaking outside the main leaf. These leaves it exactly similar to the other leaves that we learned, but the size will be smaller. Each and every step of file painting is different. Difficult also. So you must be patients and believe in yourself for doing flat painting. It's a folk art, it's a traditional art and we should not tamper the traditional list of the five painting, including our own motifs. So using this kind of figures or these kind of leaves will always make and feel fat. Painting looks spatial and distinguishable from the other folk arts of India. With that being said, at this point of time, if you have any questions, don't forget to ask me in the comments section, also write a quick review how we're liking this step-by-step process of fat painting. Now we will make another tree for this trunk, a lot longer and bigger than the previous one. If you are making a journalist, celebrity infarct, mentee, this kind of tree comes in really handy for you. Always make this kind of circular mark in tree. That leaves section will be exactly similar to a third degree. Just making the outline and filling it with circular shapes. Let's now quickly do it. And coming back right after. This kind of trees has shrunk like roots which comes out from the branches. It supports itself. Also it will having some of the floats. So after making the wavy lines, I will make round for the fruits. In this session, we are learning only the drawing part of the tree. In the next and the final session, we will be learning how to color each and every tree. All of the shades would be seen because there is only one shape, maximum two shared of clean in used for fat painting. Now, we will make our ultimate tree. The trunk will be exactly similar as the previous one, but then leaves will be different. In this case. The leaves are very different for these kind of trees. As you can see first, I made two small leaves after the allots them and around that an expanding the leaves with the rounded shapes. This kind of tree is very rare and rarely seen as fat painting. It requires a lot of space. So people usually avoid this kind of trees. But if it's my duty to every painting, the painting and the same as the other side. The opposite side. There shouldn't be exactly, looks like a military mate. Okay. So our, all the trees are done now with the bigger pencil and just outlining the main stem with darker color so that you can distinguish whenever I sent everything to your PDF section. So remember, every image are given in the previous section so that you can practice after seeing that. With that being said, this lesson comes to an end. We will meet again in the next lesson. It's something new. Hello.
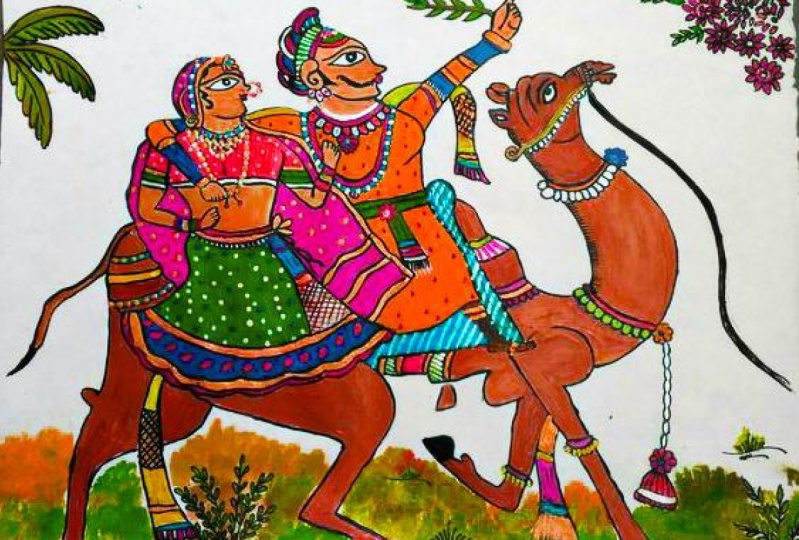
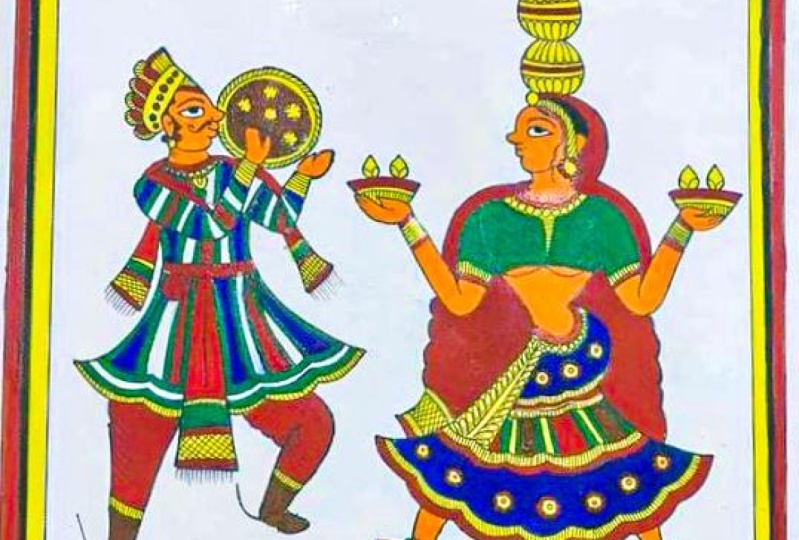
8. Phad Compostion: In this session, we are going to learn a beautiful fat painting composition. This will be a mono composition, only one color we used here. Let's start with the drawing. First, I'm making a border with the skill and the pencil fired painting always consist of a border. So after making one border and re outlining it and making a double border picture, the basics I already taught. So there will be no problem if you practice already the bases, and this is the simplest composition that you can have, in fact painting. So today we will learn this one. Here. We're going to draw a Raja one R1, that means one king and queen and thus your sad when we're welcoming them. Fujian fat painting is very popular theme. So today with me you will learn a beautiful baboon Zika fired painting. Our border is now done. Now I will slowly start making the figures. All the details are already explained in the previous section, so I won't elaborate them much. Let's see how we can draw a beautiful looking. And I highly suggest you to watch did end each and every step very carefully and meticulously so that you don't miss any of the steps. With that, our Quinn with fat painting is done. All the details of the dress, the hands, even the bath cloth, all that explained in the previous lesson. So I hope it will be very easy for you to do one more thing. Raising is not a crime. It's completely fine to erase and redraw the. Now we will make baboons drawing with the same techniques the human triggered already explained in the previous lesson. At this point, if you have any questions, don't forget to ask all the cement section, I will be happy to answer. Let's now complete the feeder. After the king is done. Now, we will make some architecture. This kind of architecture is very prominent, in fact painful. Now you can use gill also, you can do it free hand. It's completely up to you. Though. Freehand can be a little bit more organic. But I failed. This section will be very much perfect if I do with stale after the boundary is being made. Now it's time for making the servant. So she will be accepting them with the plate off candles. This kind of posture is already taught in the human figure section. The differences here, the human is facing towards right. In my painting, it was facing towards the lift. Let's now complete the figure and I will be coming after this. Okay. With this backside of the Sadie design, our this free guide is also done. Now I will make some additional architectural design. You can see how symmetric I'm going by measuring each dime, by making me Bayesians. And while doing this, no matter what, don't Heidi, don't rush. I believe you can make an amazing looking fat printing for this kind of composition, I am repeating, always use a 300 GSM or every paper. And met paper will be perfect for fat painting. The practice session, you can do it any paper, any conceived kind of paper will work because that is for setting up your hand. The more you practice, the better you will be doing the fat painting. After the drawing is done. Now we will start filling up the color. The main protagonist of the clutter is medal. I am using gamma1 artists watercolor. You can use any brands of artists, wetter color like Winston interim, Daniel Smith, MONGO, etcetera. Here, the main color is metal. If you don't have this color, don't worry. It is same as taking three quantity of red and one quantity of black. On the other hand, you can also do it with accurately color. There is no limitation of color while doing is, I will suggest not to use any pencil color while making it, because that will become too unreal. The size of the brush is two. I am using a small size brush because that gives me more control over the dark colors. Okay. I hope you saw how slowly and steadily I am doing each and every work. Always keep patients while doing water color also, you will need to be illegitimate 30 because the water can dry. But you also need to be patient while doing this difficult portion. As you can see, the boundary, how I'm doing. I think I explained every doubt about the colors even though if you have anymore question, don't forget to ask you. You'll have some in section also you can personally also contact me in my profiles. After the Meidum collecting is done. Now it's time for the highlight. For highlight, I will be using golden yellow. No, it's not called golden yellow. It's called Gameboy shallow in Camel, what does alert and some different bands through should have some different color. Moreover, BT is a little bit more data and then the lemony yellow and quite less than delta, then the Indian yellow, all the highlighting part. Now I will slowly do with my yellow color, maybe with me. Each and every step is important. Don't miss any step by skipping. You can speed up the video if you want. Okay. So you can see how beautifully and easily I drawn the, all the highlights. Now, the last step is making the border. Remember, we did two boarders. Now it's time to color. The second one. The last Border should remain empty. This will fill with color. Now, at this point, it's very important to discuss what is method you can use. You can use gold acrylic color, you can use mole liter color. Anything can be used, but remember, the colors should match with each other. Also, there should be a harmony between the color appears. Now my gold acrylic, I'm just blushing a little bit. I'm Altos Gore fellow, and I will then make pieces and the highlights. Now our colliding is almost done. It's time to outline. Yes. You have identified it, right? I am using a CTD weeding permanent writer for the outline in my Madaba Nikos or in my voice because I have used suffered a micron pin. You can also use depth one. It's completely up to you which material you are preferred width. I will suggest if you can, you can also do this outline using black color and very thinly, doing the border with a brush is also option. So I will open my end for this portion. I will quickly double outline the, each of the pins in lights that we did before so that the color and the whole composition will be popping up. Okay? Yes. Okay. I highly suggest you to watch didn't end each and every step very carefully and meticulously so that you don't miss any of the steps. Don't forget to write means you have any problem was any doubt regarding. Yeah. Okay. We're almost end of our fat painting session. We have done a beautiful composition in mono fellow here, only yellow and metal, which are complimentary color used here. They gave a good color harmony of one looked towards a painting. Now the ology remaining things, the border, you can also designed some border. I will show some border designing some other session. But for now, this border is enough. We have come across a lot of steps in this five penalty. There is some more steps remaining to, let's wait for that steps and learn together a beautiful Indian folk art called Fight painting. I hope you liked this lesson. If so, don't forget to give a kind g0 root for this course. With that being said, let's complete it. This is the final look of our today's world. It's amazing, isn't it? You can easily make this fat painting at your home. See you in the next lesson. Okay. Okay.
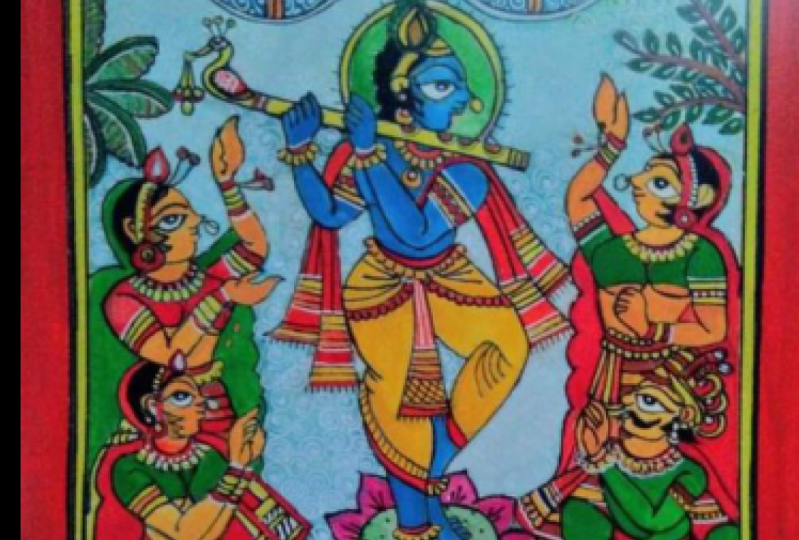
9. Phad final composition part 1: We are almost very last staple for being. We are now doing a flat painting final from position i will come Everyone who are joining right now. So let me start by saying ever the paper, the paper I'm using, it's called handmade paper. It's a 300 GSM paper that you can easily create in Amazon or any kind of online store. This is my favourite pencil, which is a mechanical pencil. Today we're going to make the final composition of fattening too. Let's now remember some of the steps. I hope you'll remember the main figure or the male body we learned also should remember the female figure we learnt. So we will be incorporating all of the learnings. Even we are going to incorporate the trees and make these kind of beautiful looking at painting composition and starting with the central figure. So the theme of today's painting will be rather Krishna and there will be some villages. So the whole composition consist of six figures. The central two figures. You can see the whole body as long as the feet. But the side triggers, I will only make up through the waist size. Plates zoom into VT. And this will be the Krishna. The face will be exactly similar that we're learning in this course. At any point of time, if you forgot how to do the face or any details, lay eyes on the nose. Go back to my previous lectures and visit it again. You should remember each and everything detail way and then you can start any composition. This will be same for the canvas paper. The paper will be rough, but unfortunately you have to draw it on top of that. Most of the figures, the central figures are dancing. So I will be making the hand according to their movement. So let's complete the male figure and I'm coming back after that. While making the goal. Make sure your noise. Make it like a woman smile. And also make sure it's right by the flow of the dancing. I hope you load or how to do the hand movements and just making the hand so that it looks there dancing. So after this hand, our figured is almost done. Now we need to make the crown portion. And this will be different from Kish snazzy because Krishna Z has a certain kind of Brown that's very typical and very quintessential for him on loop. So now let's make that. After making this, we will move forward to our data. I hope you'll then see how builds outward struggling. Bow. Let's see how we can make the heads off the goal, which is data, because now there will be an overlapping of hand. So make sure that you take certain steps properly because now the two figures that are going to combine, you'll need proper blends throught the Seeger's. Otherwise, you will be attending some problems while finishing the painting. Moreover, drawing with Canvas or any handmade paper, it's very difficult to erase once it's done. So unique to be quite well-prepared while drawing it. Good. Okay. For me, I think the feet and the leg is the most difficult part of any kind of drain thing. So I would say this if it seemed for you this Take your time, practice Monday, only the freedom, the leg. And I think it will be perfectly fine for the hot painting fingers. Now and we'll be adding some of the details. At this point of death. If you have any questions, don't forget to ask me in the project section. Also, you can direct message me and contact me in any kind of social media. All the handles that I have. I hope. Not a problem reaching to me because I am 247 available for all my students. Any doubt, any query or if you need some guidelines, some practice books I always welcome and I will always suggest to DM me for some more courses also after this class, don't forget to rate and review it in the review section because that's makes me a lot more on freedom for my next course, I will now do some additional details, some small, small mistakes that I feel like done. Now, I will add some jewelry. Every artist improves day by day and with practice, anyone can be perfect. So-what centered to figure. Now we will move forward to our other figures. Measurement plays an important load in any kind of composition. As you can see, my finger is almost at the center and in both side there is equal amount of space. Now we will start making some of the villagers are some of the additional environmental elements. First, I will start with the men and followed by in the bottom portion, I will make one goal. All of the designs, all of the dress, heads, phase design, everything is previously learned. So I've cleaned, there will be no problem while making this. I hope you remember what we have learned before. Okay? Hope you are liking my composition. If you want, you can make your own composition in your own style, but it's completely up to you. If you want to view any difference, just Google it, or you can go the best website which is called Pinterest, where you can find thousands and thousands of idea of fat printing. The woman figure is quite new. I am adding one musical instrument to the hands of the woman. So here also you learned a new figure. In fact, painting knew to space constraint. I'm unable to make the bottom part of this people, but I think it will be looking good. Say if we have a good amount of paper and you want doing this, you're bad. You can make a big compositions and show it going after the basic formation is done now will make additional design. Okay. Fat fainting composition don't have any kind of soil, are grass in it. So the bedroom always remained in d, the top part we will add some trees and some additional design. But I think the figures are looking nice, so we will move forward to a live site figures. You need to make sure the head length and the head height matches with each other so that it will give a sense of symmetry inside the painting. While practicing the fingers, I hope you will practice both sides of the faces so that it will be not a problem for me king, this because some of my students really struggle. But at other site they can excel. So always practice both side. Okay. The bees. Good. It should be. It's good to see you. So for erasing, I'm using Tumblr monoid is a, this is my best eraser and measure every one also because it has a very sharp deep, which gives me enough confidence and enough flexibility to work with my space. I first start giving it a different shape, but next I figured out that it will be too cluttered. That's when changing the shape of the bottle. After that, I will give the additional designs to the woman and the male figures. If you also need a practice sheet for the sprinting or also on PrEP piece PDF. According to this painting, always let me know in the foreman section I will be adding this to you, Brits and final, that's our drawing, will be almost ready. The only thing remaining is the additional detailing and the trees in the background. If you make this kind of painting, don't forget to tag me in social medias because I will be happy to share each of everyone's work throughout my profile in the top and bottom. Now, I will be adding.
10. Phad final composition part 2: I welcome everyone to the next session of our fat painting final composition. Now we're going to do the coloring for that. I am using Kamil watercolour, artists based watercolour appellate. This will be my brush. There are various quality and radius size of brush. So the size of brush is, doesn't matter. I'd taken a bowl of water. And now I will start coloring. First. I will take color of cobalt blue, and white. I will mix them together. This will be the body colored skin colour of Krishna. Mixing white is giving the color a little bit of coercion color look. So it will be not transparent like watercolor. It will be opec. After mixing and getting the right amount of color, I will start adding in the skin. I'm losing up to point. Synthetic brush. You can use any British you want. Make sure it's Quayle to free. See how slowly and steadily I am adding each and every details while doing this kind of opec painting. I'm losing some of my pencil lines and some additional details. But it will be completely fine because when see, I've drawn some lines. After the skin is done. I'm now adding the blue color in some other parts of the painting. Remember, fat painting has very limited set of color. It's yellow, blue, green, and red. So sometimes it becomes quite a challenge him to figure it out which place you should add, reach color. So in the musical instrument, as well as in the canopy, I am adding the blue color. Font, painting has radius, traditional way of drawing. You can use what does alert? The color is up to you, but the originals alert is always be the organic color, the color that the people gets from fruits, flowers, leaves, and stones. After doing this, we would move forward for skin color and do all the skin tones of this painting. Now we will start making the skin color for that. I am taking two portions of gambles, yellow or gamble seal. It's a little bit lighter than Indian Oscar and it's darker than the lemony yellow. With that, I'm adding a little bit orange or one portion of vermilion hue, followed by an add. Mom does white skin color. The moral, I do add the skin and the skin color to each of that field. Please do each and every step phase slowly. Ridiculously, I highly suggest to enjoy the process and to enjoy the journey. The journey is the destination. Now, I'm adding a little bit more yellow ochre or awkward yellow or raw Sania. And I'm making a darker complexion. List. Coloring is not through racism, but due to the increase of brightness of this painting, the composition will be reached if we had different shades of skin tone. It also tells about the sheer amount of communal harmony. The next concept that I will be yellow. I'm taking gambles, yellow from Kamil artists watercolor, and adding a little bit white. It will give a thick look to the paint. Always use your non-free shares or used old brush for the mixing process. After the mixing is done, you can use your new brush. Always make sure that your new brush is not damaged. But the truth. Okay. While colliding, we need to be very sure that you don't mix two edges and color. Because for example, if you mix blue, yellow, it will create a different green. Also 1345 painting it always bright yellow. And also I will give some of the dresses, this kind of bright yellow. So let's finish the yellower. Be with me. Let's see. Okay. I really said is to watch the full video once and then you're all ready. Doing it will find no problem. You'll come back to the video once again and watch the video and this bind off down if you have any question, loans are good, but ask me in the comments section or also can personally messaged me wherever. I haven't been, always answering each and every day, my students that some belief and trust that I have. Okay. Now, we will make some sap green Gauguin was yoke and apply the sum bark of the leaves. For the dress, we will add a different shade of green. Okay. And she's done with that. This I will be taking nine portion of Sap Green and one portion of crimson lick. Rows are green has, doesn't have that much of opacity. So mixing it with a little bit brown Sania or Princeton leg, we'll give it a high texture. When you are using this kind of watercolor. Make sure you mix them well so that they get incorporated very well. If you watch this video, I don't think it will be having any problem in waters enter in later future. Okay. You might see exactly incorporating them. At the last one we'll do the border and the outline. Everything will be distinguishable. So just make sure there is no white inside after feeling and do it in a small block of pain. I think it will be amazing. This try once and let me know. Same way in the Verde painting I have shown how to use watercolor four wildly painting and make a beautiful composition. If you have not watched, make sure you watch after this is over. Now in a plastic container, I'm taking vermilion rate. This is vermilion rate, Kamil artists watercolor. After taking these, I will be adding met this yellow. If you don't have nipples yellow, you can use Canvas you at two part of Canvas you and one part of white to get the desired product, I will add now a little bit of light brown, which is just the combination of vermilion with black. So this will be a rusty red. So you can make any color and make this kind of resisted it. The fat baneful. Now precisely apply. After some down. Okay, fine. I now look at from the top, followed by, I will just lead to our next fingers. That's right. Once Henri Matisse's says that creativity takes courage, yes, of course, before one could learn anything, it named the first cut Ids. It means the first Porsche. After you make that effort, you make that push. You can make amazing looking paintings that you can't imagine. You will be successful when Qin Brush Picker is using filling. Right? Okay. After some of the work is done at this point, I would highly suggest to leave the painting too, went outside and see the nature, spent time with the family. And then after some time, come back to the painting again. And this time you will see that you can find free videos, other things, and radius small nuances, also some mistakes that you oversee In the first time. It is a technique that I always follow and I want you to follow one's and decide whether to follow it for further or not. Okay? Okay. Yes. We're almost done with the MD, but remember, the background should be always right? So that's it. I prefer keeping it right, because this really be the attendee painting. Just adding some highlights and some details that say missed every damn cross tick. That is a lot of element going on in the painting. So that is a high chance that you missed something. I'm just adding each and every details wherever possible to make a more beautiful. So we are almost video. There is very less. The main thing now is remaining is the black outline. In the next video. See you in the next video. Okay.
11. Phad final composition part 3: After the felony is done, now, it's time for the outline for outlined pattern using this micron. It is called Sephora micron pin. Its come with six set of bins with different size of leaps. These are waterproof and perfect for the any kind of 4-pack. I've taken two size, first in 0.05. and next one is 0.8. Or some idea where I need very thin line. I'm using 0.5. NAEP. For some ADL, I will be using 0.8 while using I will try to tell you each time whenever I using which if we had a right-handed person, always start from the left side and slowly, gradually move towards the right side. This way there is very less that you're painting will be damaged. At this point, I felt that my can destroy the whole paintings. So I am just giving a support with a white sheet of paper and I will raise my right hand on top of that paper. Let's start continuing the figure. So first we have done the tree, followed by now I am doing the woman's eager. Lets look closely our editing, each and every details. Okay. Unit two will 3D patients while doing this kind of love now adds the penultimate state, but if you do any kind of mistake, it's scandal be undone. So makes sure think twice when making these kind of slots because these are Palmer and Martha, no matter what, you can't remove this. So whenever you are doing Make sure you have planned it and have a clear thought process, how we are going to do it. Keep the practice sheets with you. Also can print some of my fingers and keep that with you while making these so that you will be having a guidance throughout this course. So now I will make and design the instrument. After that didn't make the bottom figure, which is a figure of a male. Before proceeding, I talked plot because it's looking really so widths of the woman. After this is done. Why? Okay. After the two lift figures that done, we will now move forward for Ellis Center figured we will now do our ralph hand Krishna. I will start from the eyes. For the eyes I can rule 0.8 pin, but you can also try and get the same effect with 0.5. so the lining part is actually pretty easy. There is no some additional steps. It's the same repeated lines. What will lead for pencil? You just need to repeat the stain lengths for the marker. At this point of time, it's very important to let you know the authentic Near toggles up force using the brush. Brush size of double 0 is profit for this kind of outline. You can use gamble acrylic color or any brand that really color plus watercolor. Same at any brand. Even you can use Gua Shi color for making the outline. It's completely fine and it's up to you. It's your creativity, your painting. So it's completely up to you what you want to do. Sure. Slowly I am transitioning towards the ground and just adding a little bit of highlights. And as a portion, you will clearly see how using this kind of outline gives us different dept to the painting. Everything is popping up and our whole painting is looking complete. Once Bob Ross's state, all you need to paint is a few tools, a little instruction, and a vision in your mind. I hope you will learn a lot, if not a little bit from discourse. Painting is a new kind of DNA for everyone. We practice our homes and show me how beautiful fall painting composition that you have made. Cool. Why? The first style, anyone, not anyone for everyone. And with practice, you can get amazing results throughout your journey. At this point of time, if you have any questions, don't forget to ask me in the some instruction. Also the discussion. Add your own paintings, followed by in the review section, piece DVR, honest attribute. And let me know how you like this course. Putting all of the jest of a fart painting in a two to three hour course is really difficult to me. So I always incorporated the best part of the footprinting and always try to show the best things that you can get. Cool. Okay. Why? We are very close to the end. Again, I'm using watercolor further here. You can also use the Martha. You can add your own import. Also, you can add some boards in the tree is completely up to you. I recently did a CT and it changed my life. When you want to make the main color pure and bright known, just keep adding bread colors on it. Just make a list of the spot darker and done. It will give the scene dramatically fake, I think, than life is the same. Now let just quickly outline the whole venting. Good to see. Okay. We know it. In the next step, we will see you in the next class. Yes.
12. Phad final composition part 4: So in the last videos, we have learned outlining Coachella and using the blessed. In this portion, we will learn the bordering, the framing. Let's get started. First, we will make the top border. Hope you remember that I have made a one centimeter grep plus also inside of that masking tape there is one more layer. So there will be two borders, one thick border and then one thin border. So first with the micron pen, I'm making the design. It will be alternate design of a leaf and a flower. It's alternately we employed to make one leaf and one flower. And after that we will feel the whole portion with color. Now I am using my point to round brush. And with help of that and taking flat watercolor, applying all around the border, it is a very detailed process. You need to be very patients when making it. Moreover, adding this kind of small details in a canvas or the handmade sheet is really difficult. So make sure you take your time. If you don't want to do, enjoy your day and come back after, really have much time. By this way, you won't be bored anyway, we'll get a constant motivation for the European thing. Vincent van Gogh have said, if you hear a voice within you, say you cannot paint, then by all means paint and that voice will be silenced as we're coming to the end of our Pat painting. Have a highly request to see all of my corps that is available here if you like for card, if you like, tribal art. I hope all of the painting courses that I have will really appreciate by, with that being said, let's complete the top part and then we are continuing with the bottom one. Okay. After the top border is done now it's time for the bottom border. You can make same design. Normally it's the same design it for side, but due to time constraints, I will show here two different kinds of borders in one single painting. This border is also a flora and fauna alternate design, mine, leaf, and one flower. But it's slightly different from the previous one. Let's compete the drawing. And after that, similar to the previous one, I will freely with black color. Okay. Then the name. So the first row here. Now that's the allele is done with the marker pen. I'm just adding some details over the leaves and the flowers. That's completely optional. It is just some optional additional details. Now, as our top and bottom bar does it done, we can remove the masking tape. Remember, the masking tape itself a border for me. After removing masking tape, I will add some additional color in the thin border. You can add black color, but here I am using rusty red color for the border. Let's quickly unwrap it. Now I wouldn't make the thin border with arrested eight color. You can also use a yellow for this. It's completely up to you. We learned create scales in this fat painting course. I hope you can incorporate it. Details of the skills you have learned. This will not only help in the fight painting, but also in general, what does allow painting. Painting to me is primarily a verb, not a noun, an event first and only secondarily image. In this kind of outer border designing, it's really important to rotate the canvas or the paint. This way, you can do the perfect orientation and you're painting will be not smudged only because of that reason, I removed my masking tape. I got so lovely comments in my previous courses that I can't thank you at all. This is the time that you can go to my section and review each and every course, I will be really honored and really humbled to sing each and every review. Okay, with that, our fad painting final composition is ready. You can see how beautiful the whole painting is looking like. I hope you learned not only about this painting and its origin, also all the techniques I'm color that is used for this kind of painting. Only the youngsters like you can save this kind of painting from dying. It's my request. Please make a PendingIntent that can be I will be happy to review your work with that being said, we will meet in the project section with some guidance and PDFs for you. Okay.
13. Phad Class Project: Thank you all for taking this class, as well as Congrats you all for completing this. You have completed the fat painting course offered by me and art isn't made out of intention, you will start to deviate your take strange path. You feel loss if will, incompetent, you'll find a reason you survive, your ad becomes alive. In this course, we have learned and use too many materials, but materials and not a constant for me, you can get any kind of result with materials that you have. You pauses at this point if you like the class N12, learn morning dear forecast. So you can check my profile and enroll other courses like Myrtle Bernie was wildly J Paul, Getty, et cetera. All the colors of moment blend together into one coaches painting we call life. And yes, it's our duty to make our life beautiful. If you learn folk art, you will also support all the folk artist around you. Furthermore, you can see what traditional folk art from dying. In this class, we have learnt radius, flood motifs like eyes, nose, hands and legs. Followed by we have learned the headship or the face. We have learned face of both the men and female. And then we have learned the body formation and radius days designing of men and female, followed by redolent of beautiful minimal composition of fat painting. This is a picture of baboons in part painting which is very popular among the foot culture. Then we did the border design just before completing our flat painting min composition. And art is worthy to be shown to the world we proud for what they have made because you were just starting to reach your goal. Yes. I hope you all reach your goal really soon so that we can make amazing creative arts for our art community. With that being said, I tell you once again, for taking this course and completing your PDFs will be in the project section. And you are ready to make your own fat painting composition, so all the best to you. Okay.
 Nabojit Kar, Folk Artist + Youtube @An Aberration