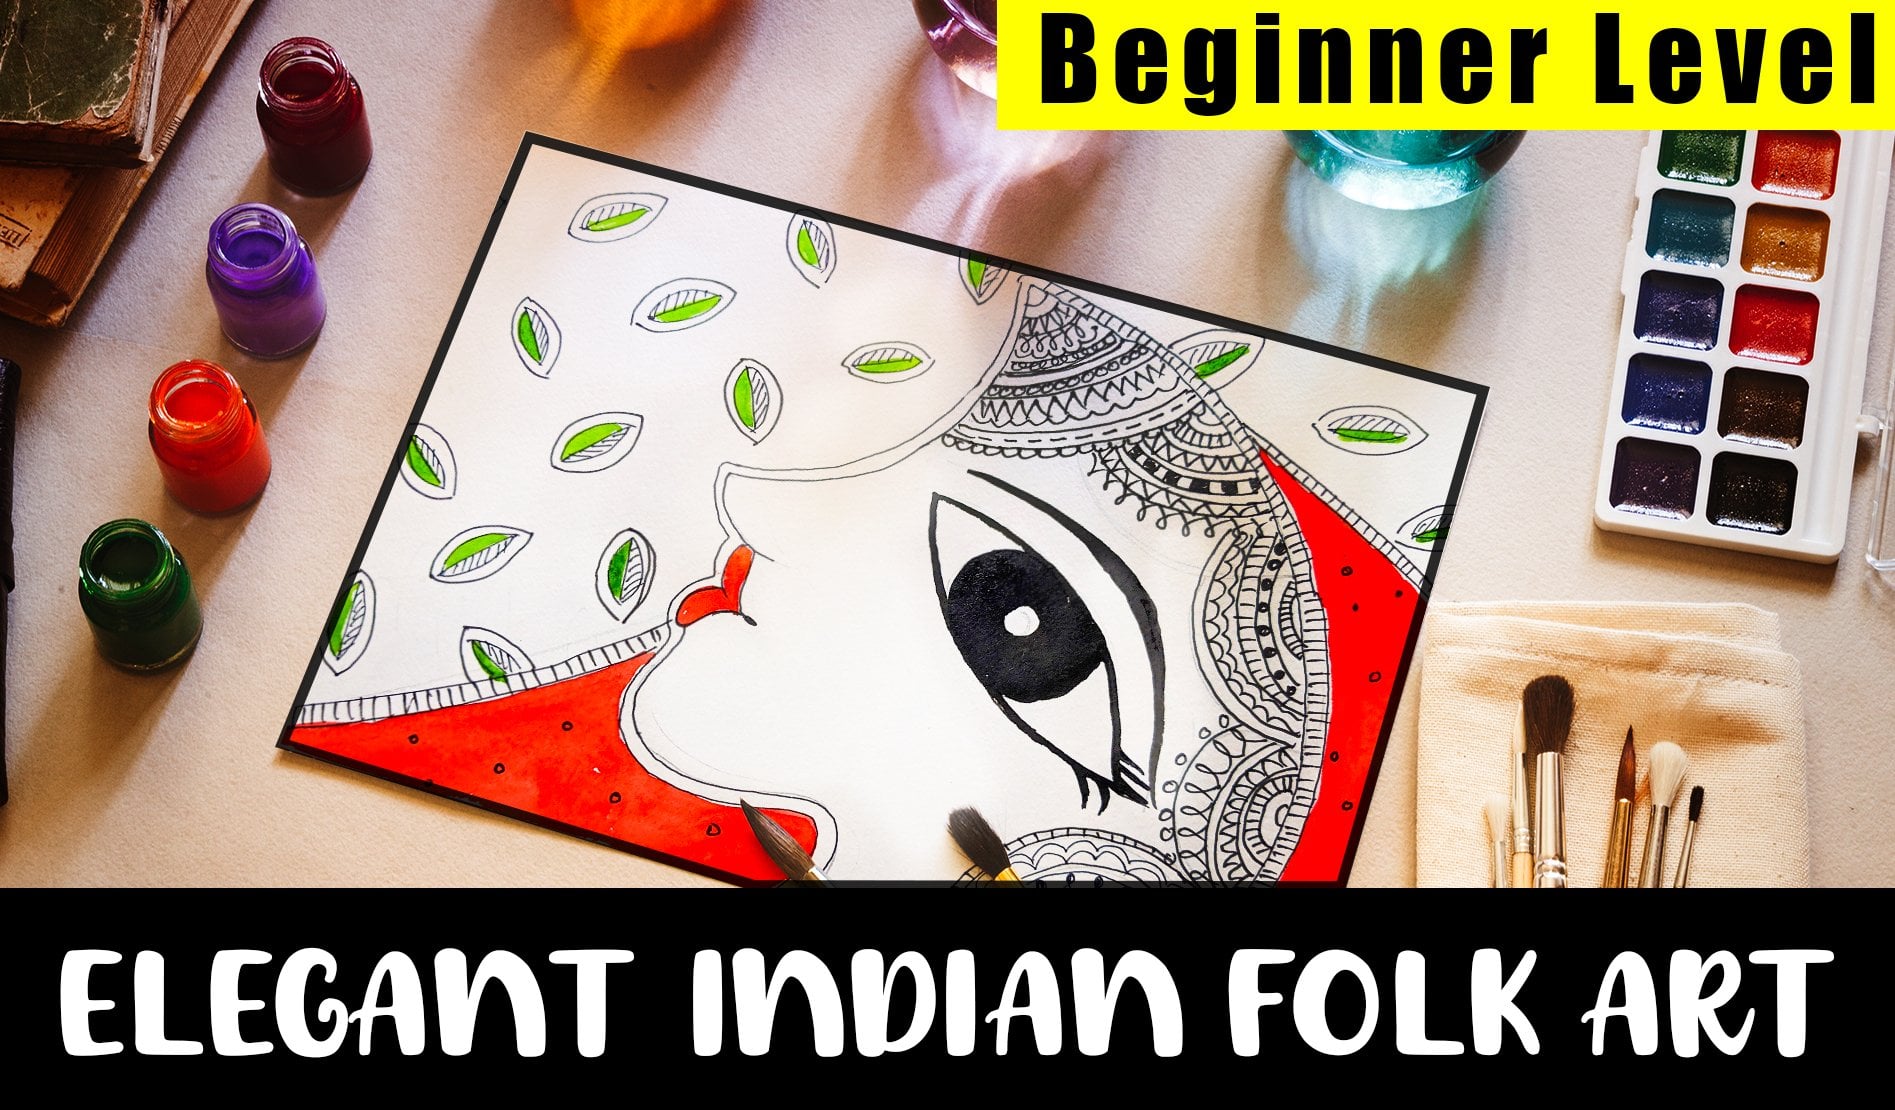
Transcripts
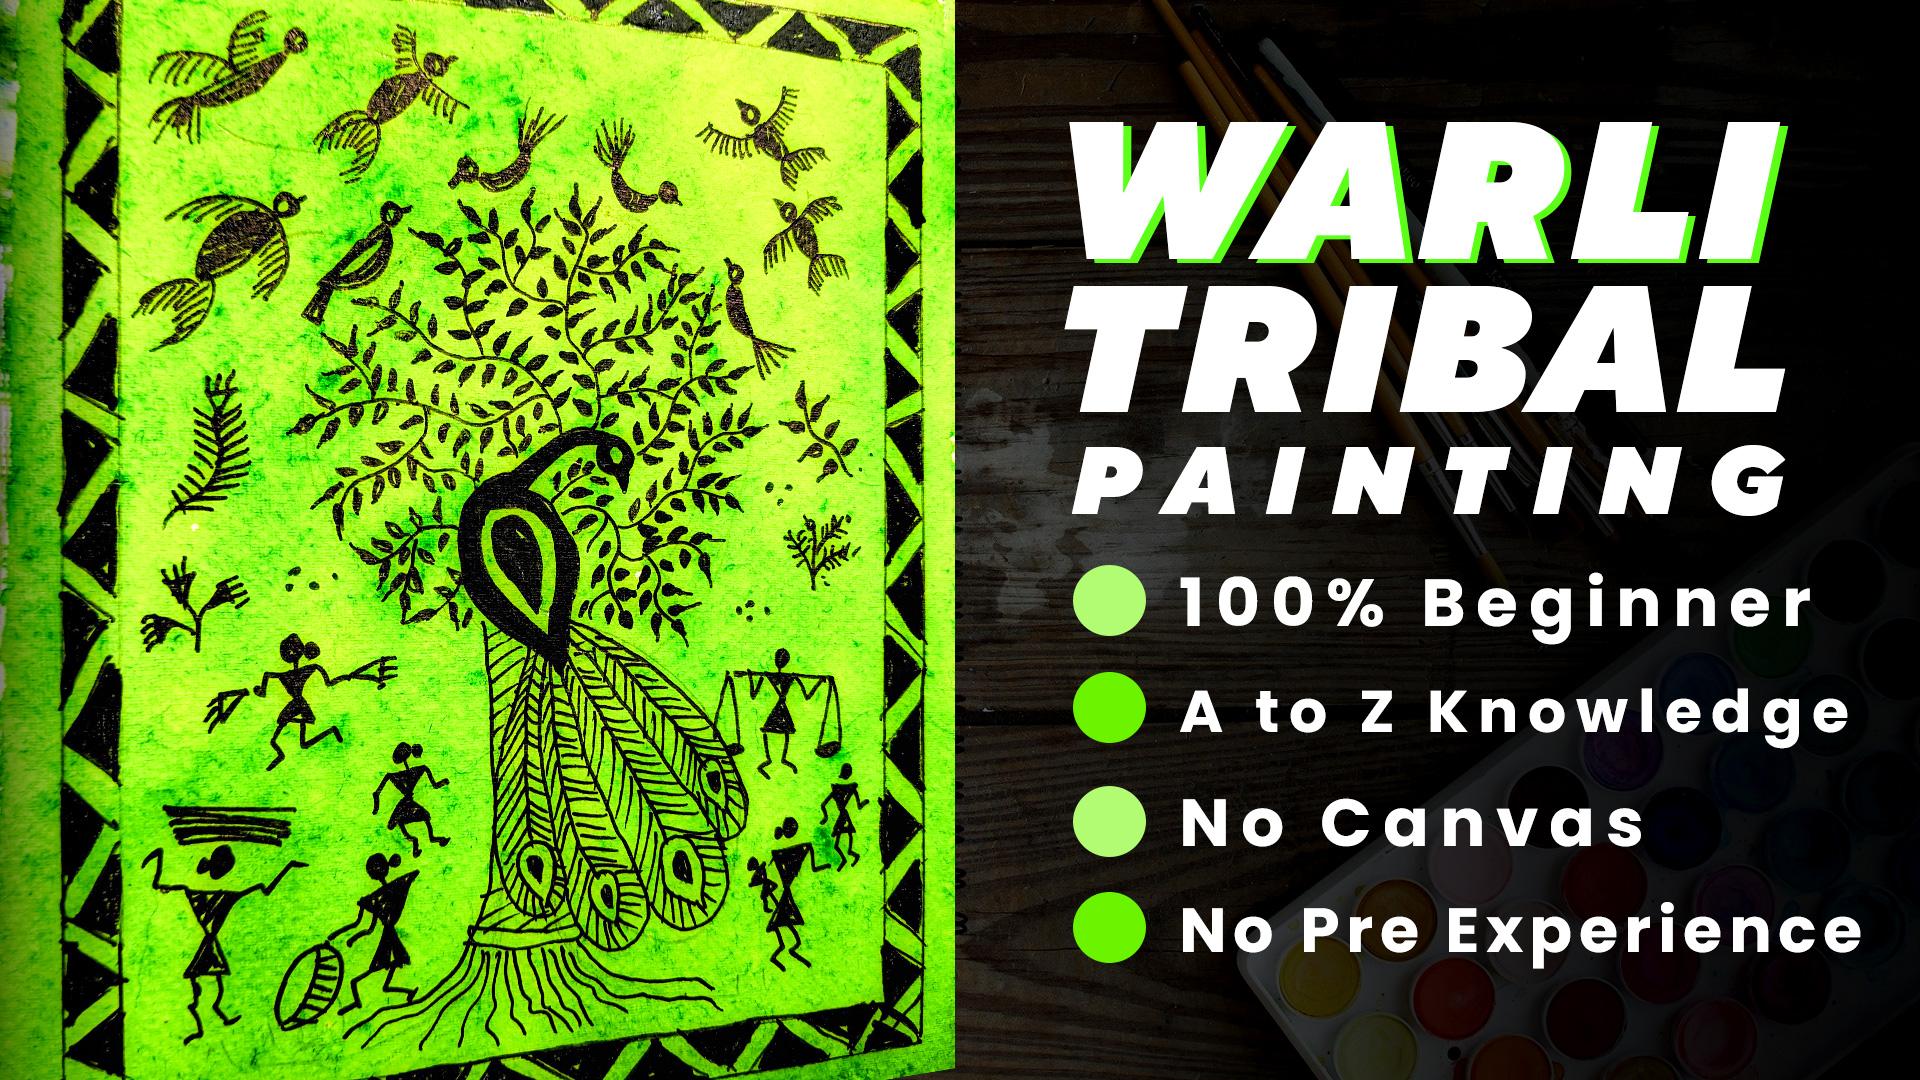
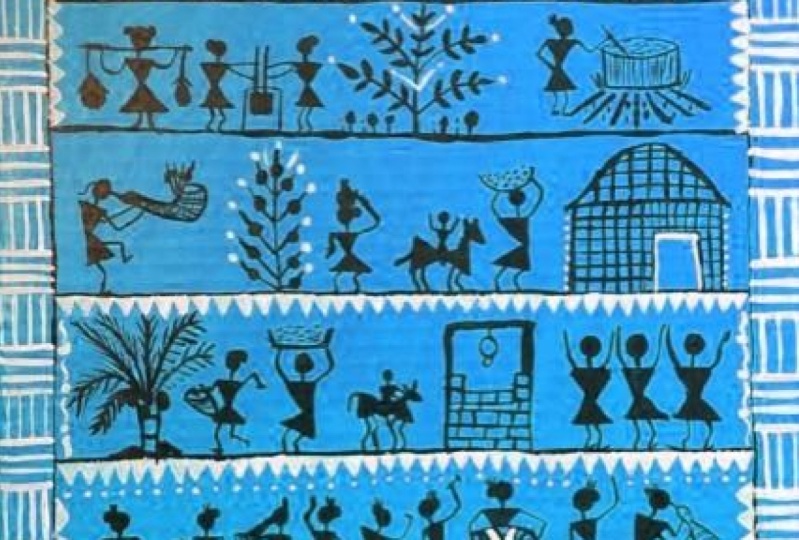
1. Warli Painting Introduction: Thank you so much for showing me love in the beginner level of mother-baby painting. This video tutorial is about Wiley paintings in this series of lessons, firstly, we learn different motifs and then using those motives or we learn borders. Then riveted, drawn simple human figures. After that there will be less than of dwelling birds, were fairly elegant and were lead trees. Finally, we will make use of everything we learned and put it in our feed composition. If the artist has outer and inner arise for nature, nature rewards him by giving him inspiration. It is always so inspiring to work with the additional four parts of different countries. The colorful liquidity form of the flora and fauna is the main source of inspiration for folk artists like me, high and novelty of file atleast, author and educator who loves what Othello. While it paintings to be one of the oldest form of art in the history, it is pollen of tribal art which owes its origin to the state of my Rashtriya, India. This art is very popular AML that tribal community, however, till did it has not gained in spatial recognition outside India. While the painting is a style of tribal art, mostly created by tribal people from the nacelle x_3 range in India, these rains in some places, cities such as Cairo, Palestine, Java files her know, Hannah and Vikram bugger. This tribal at, resonated in my Russia where it is directories today, I'm assuming while he figures painted in white on stalker was might not seem like much to the untrained eye, but a closer look will tell you that there is more to wild leek, then walk needs die. It is not this the art form, but a way of life for the villi or the valley diets from mountains and the posterior region in the allowing foreigners of Maharashtra and bootstrap, this app from that corrugated around 3 thousand BC, has an enigmatic appeal to eat. The intricate geometric petals of flowers, raiding rituals, hunting scenes, and other everyday activities are quite popular among fashion design, LM, the home De Quan brands, thus pimple, the kid, beautifully dedicated, better, have a certain row at real about them where they are to some extent, make us think on being environmentally conscious and finding joy in simple things of life. The worldly people lead freely sinful lives. They worshiped nature and independent on the nature for food and everyday living. They did not believe in disrupting nature and taking more than they need the worldly people believe in harmony between nature and men, and these beliefs are often reflected in their paintings. This train of thought also holds true for our lives today. A lot of I14, I'll now at optic millimeters thing lifestyle by staying away from technology wherever possible, eating clean, investing has room and taking a closer look at the science behind the ancient customs and traditions. So it isn't much of a price that reshuffle art from say, virtually, are making their way back to our society to remind us of simple pleasures of life, the tribes had also use burly paintings to embed knowledge and spread the word of love MLS, I will provide the PDFs of the exercises and slides in that class for better understanding at the end of the class and trying that completely created by you earn. So get ready. I hope to see you and Linda, why repainting? You are free to join the advanced forces present on left profile. And if you haven't watched mother winning one, you'll have to visit and watch it later after this session. So let's begin.
2. Warli Art Material: Let's now look at the materials that are really require to do the sketches and paintings. All of decelerate is simple materials. And to do the painting, you are free to use any kind of medium you normally use. It will first require a pen and pencil for drawing. You can use mechanical pencil for better skills. Then we need markers and Judaizers. Then we need a Washington Carter masking tape of bare of seasons and the tissue around. After this, you need the sketching paper, watercolor paper. Our schedule is the paper before US to see whether it works with decent quantity of water. After this unit, the painting materials you can use, any material you are comfortable with. I've invoked with watercolor today. I'm using Tamil artists, watercolor or acrylic, white, secretary rolling pin, part detail, opaque color. I will be using a set of brushes as I am doing a small painting here, I will mainly perform my tasks with the smaller brush. Now, you require that color palette to water container. One is for dirty water and another one for the freshwater. You can find. If efforts to the resources and the slides will help you in the process as you can openly quickly for better understanding BDD with older materials and download the resources. Let's have a lot of fun in the class.
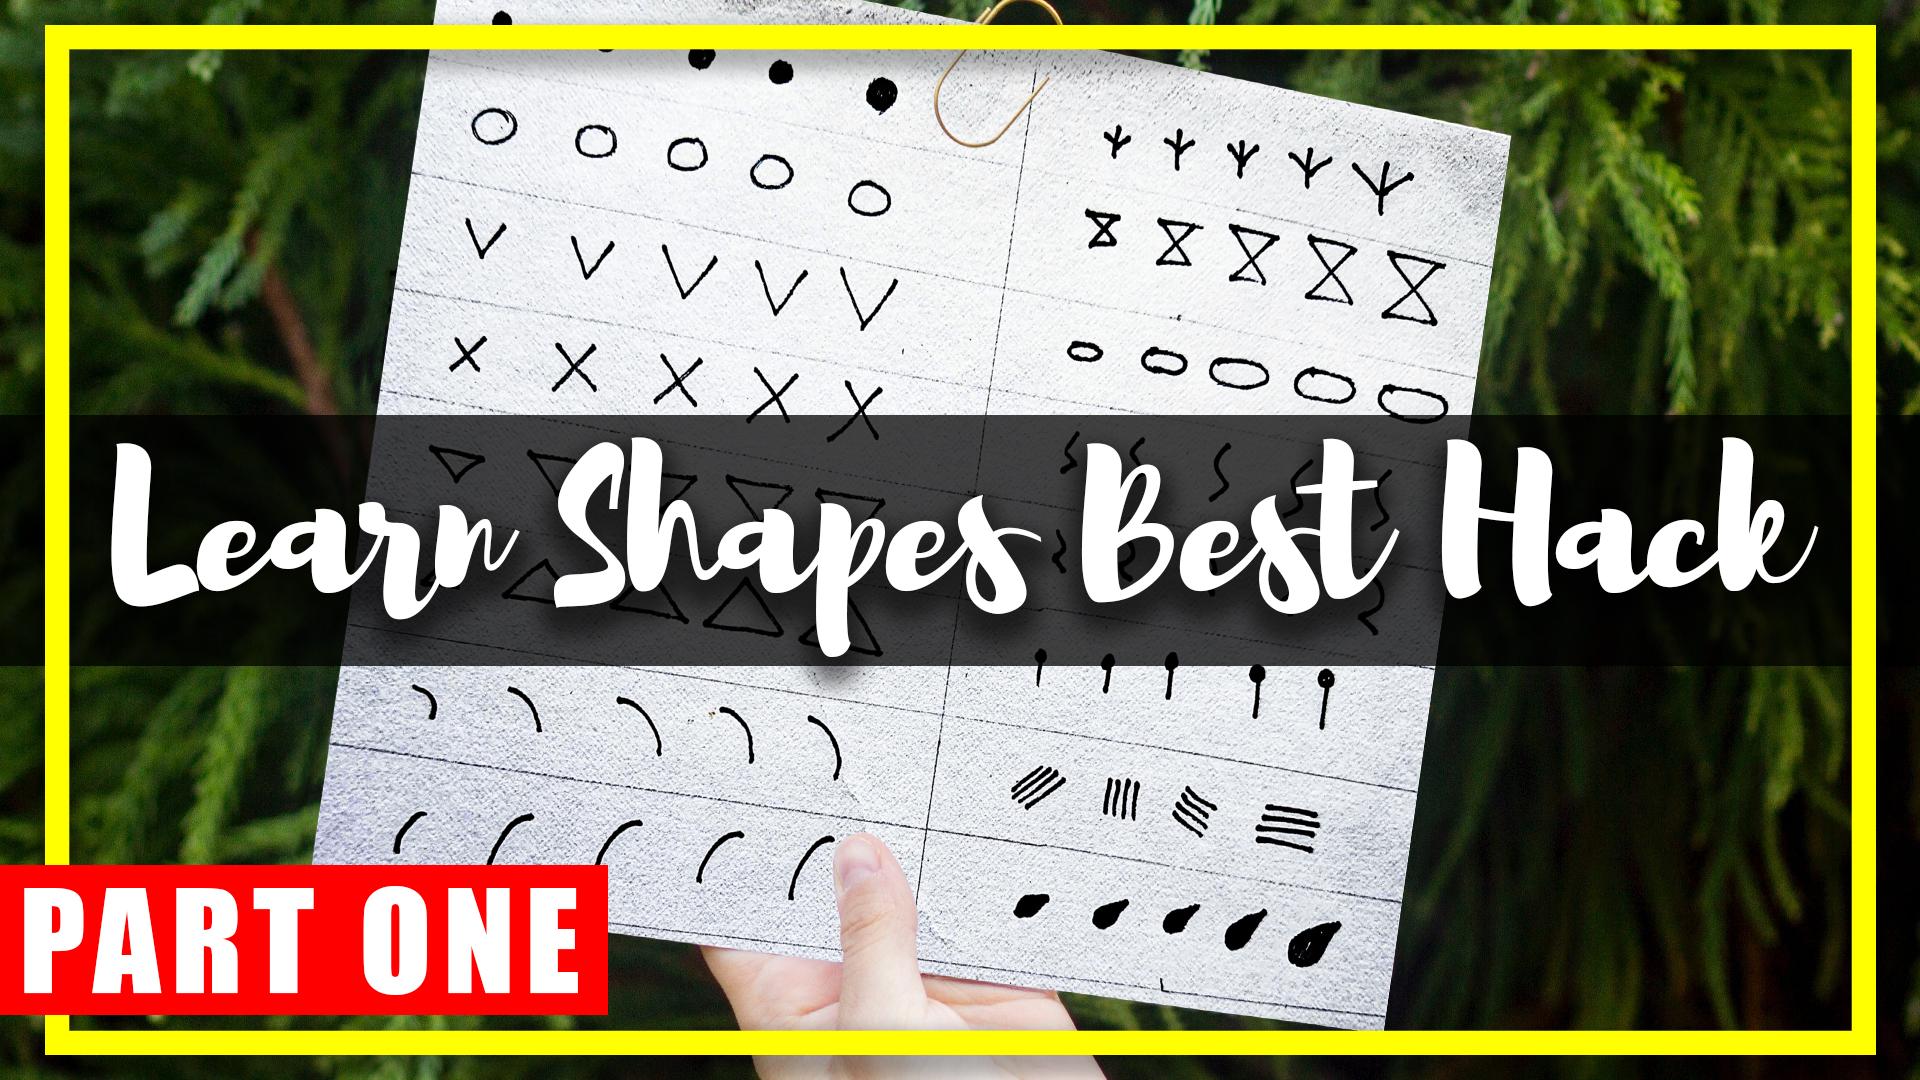
3. Warli Painting Basic Shapes: Thank you so much for taking this course. In the first lesson, we will learn simple shapes. More than ten types of shapes are here, which you will be utilizing in the next sessions. You'll learn this step very carefully so that in the next step, we can create a beautiful looking wildly composition. First, we will start making circles. We will next on itself and gradually increase the size. Next, we will draw normal circles and gradually increase the size same as before. Then we will make simple v-shaped and increase the size and shape and increase the size. I will suggest you to use marker for this session. This process will help you to gain confidence and belief. Your strength, propping up the triangle shaped me upward and downward. Now it's time for making small arcs gradually increase the size, as I mentioned before. We will repeat it with the mirror image. Similar to equals sign. Next needs to do the same task in a horizontal manner. The stats are very important and believe me, it is much, much more higher than the normal three-line modular. And increase the size gradually. Will join two triangles share and place them in a motive. This motive are very useful for making the man and the woman rather slightly bland, oval-shaped, is very similar to the English alphabet s. But the point that we will make the mirror image of it, which looks like the English alphabet zed. This shape is very similar to the shape of a lollipop. Now we will make patterns with multiple parallel lines. Kind of motives are very useful for making trees and leaves. Let's make some prescribe shaped battles borders, and designing many accessories. Next, we will learn this pattern for especially borders. I hope you liked this tutorial. In the next tutorial, something great is coming up. So see you in the next class.
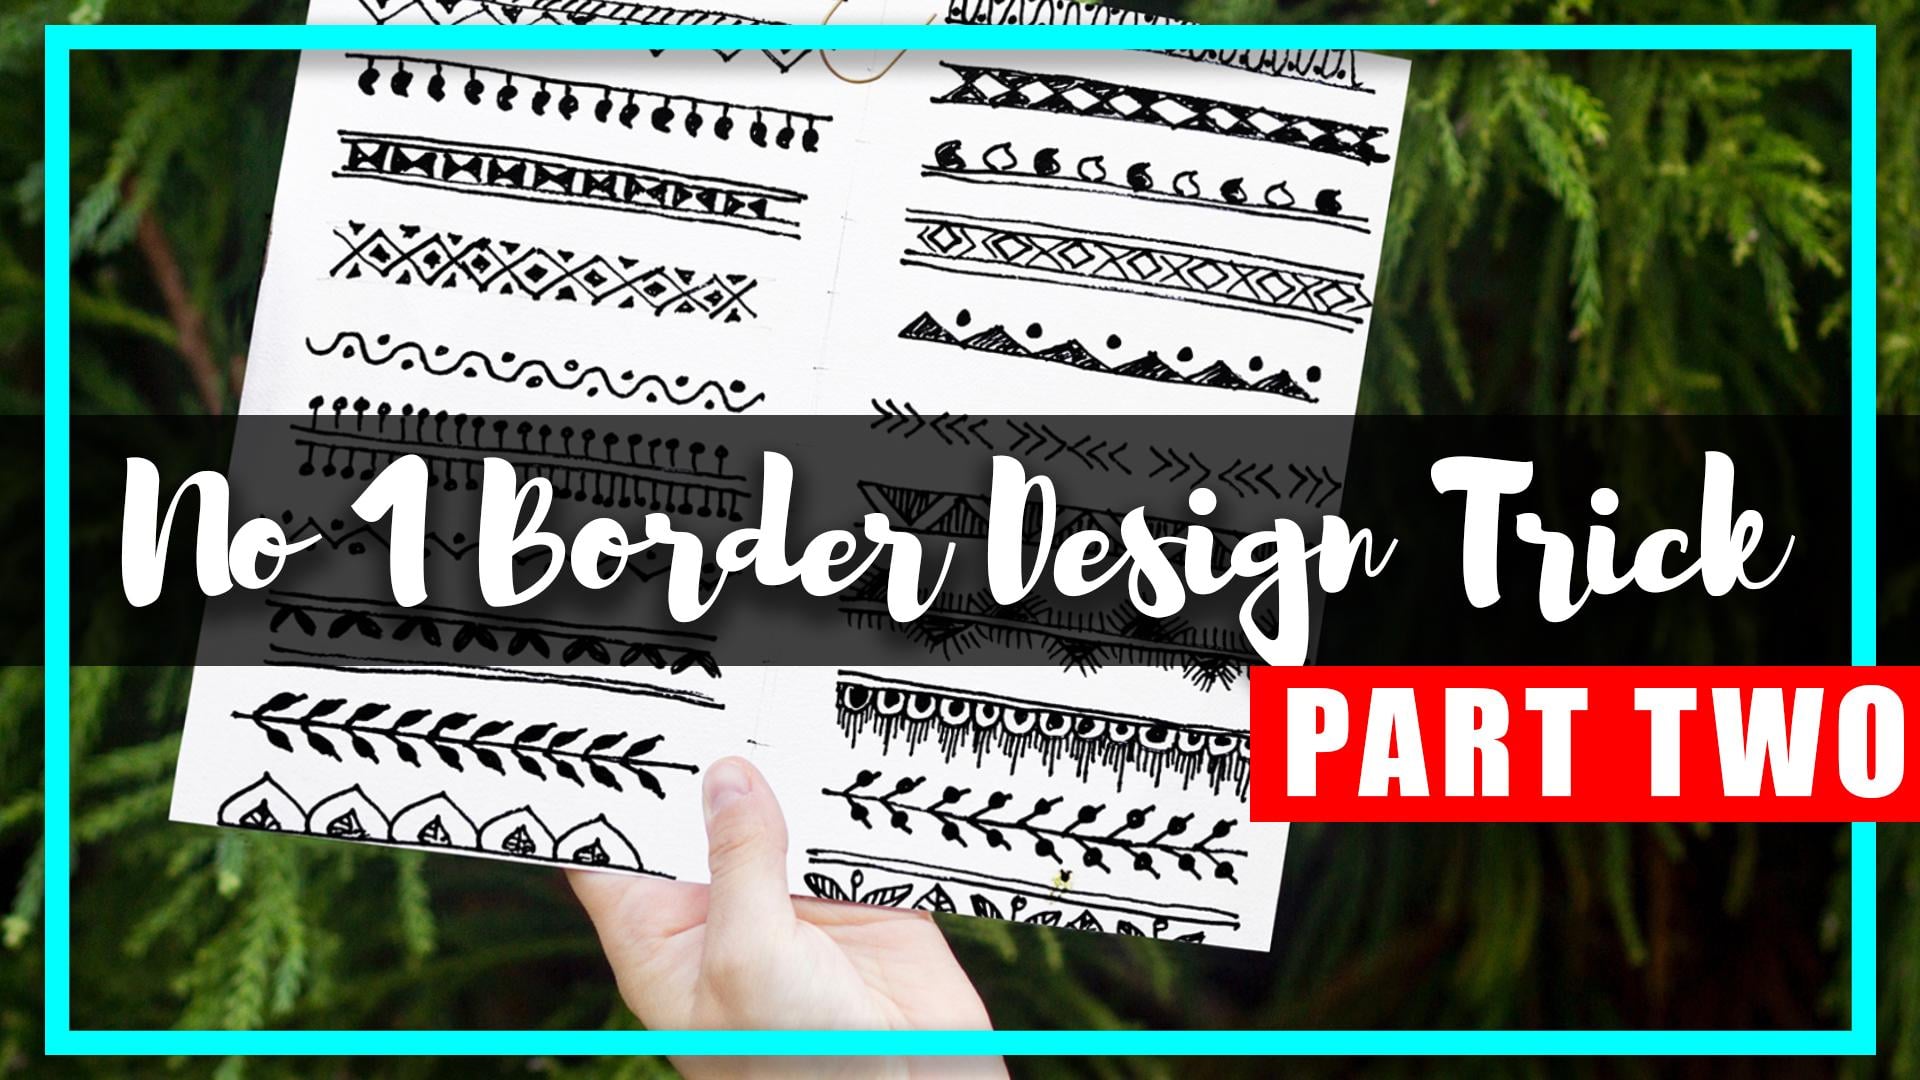
4. Warli Tribal Borders: In this video, we will learn wildly borders. We will try to learn ten different types of borders incorporating the shapes we learned previously. And ultimately this border will be used in the big picture, the sprinting is almost dead. And nobody outside of India knows really about this. Now it's high time that we should come forward and stay tuned for that. So we start with a simple line, which will be our border. Now we will fill that gap using the parallel lines. This is one of the simple border of the worldly painting. But we'll start with simple and gradually go to more complicated one. For the next one will do the same. But we draw a line inside it. Now we will make small lines around that. And the third one, simple box ships or made. It don't have to be a perfect square. But it should be very similar to unready ornamental. Now I'm simply putting one dot in each of the gaps. And using camel permanent marker, you can use any kind of molecule. You have. Two and the next one we make two parallel lines and make new shares around it. You can feel the colors or you can leave it as it is. For the next one, I am making one line and adding triangle shapes below it. It is the most ornamental borders I ever seen. Same way, I am adding one dot in each of the gaps. Alumni make low parallel lines and filling it up with box shape. You can put any designing one to make it look more ornamental. Next one, after drying parallel shapes, I'm filling it with parallel, horizontal or vertical lines. Again, after two parallel lines, I am creating re-design inside it, decorating it with my dot design. These are very easy to draw. You can use your own creativity to make new, new borders. Please tell me in the project section so that I can see your designs. This design is mainly combination of two borders. You can use also paint brush to make it. Because ultimately in big picture we will draw it with a paint brush. So you can try with milder first and then practice them with the paint brush. Now we make inverted boxy shape. The skeleton of the design is same, but we will feel the outer side of the box. A very famous mango border. Here. The motives looks like mango. Let's see how we can make that. Don't forget the stem part of the mango. Next one is simple, upside down mandible. I really hope you're learning something new in this video. If a learning 1% of new things, I will encourage you to glider review on this. With that note real here, with another model where the pair of triangles are used. These border is specially made for line are feeling will be there. You have to be very patient for while painting. Next one is a very ornamental design off while the border. First we will make this kind of shape and fill the gaps with small motifs. The opposite to the last one. This model is filling order. Every part of the model is filled with color. The next one is the screen. And in the gap, the remainder. See how simple it is. Design is a special event for me. I call it open bracket, close bracket design. I hope you remember the lollipop motive we made earlier. In this order, I will be using that same design goals for the bottom part of the model. In the next model design we will take Hill form a triangle shape and the parallel lines. As you can see, I am trying to use my hand for making the lines. You can also use ruler, but I will say always use hands. It gives, these are organic look, which is ready there for the ruler. Meanwhile, I finish another design with exact shape and in that gap. Next design, there will be triangle both of the side, but with a distance because we will feel the distance with parallel lines. This border design is really time consuming. But the end result is what? Waiting for. This model, we will take the help of the leaf shapes and complete the border every day. I hope you practice the ships and the borders in your home before deciding the final composition. This border is very ornamental, looks like exactly a jewelry. Remember one thing. The size of the border will change according to the picture size. If you're making a small picture, then this model is perfect. For A3 and A4 or lesson than that, we can combine many of the borders and stack it one upon another. Again, this border is utilizing the leadership that we learned before. This border is pretty much the previous one. I am replacing the leaf-shaped red belly like shapes. If you have any questions regarding this, don't forget to ask me. With that, we come to the last two sets of borders. The shapes are really beautiful. And the last one is the, my most favorite one. Where the leaf and the flower design populate this whole tutorial, I hope it's helpful for you. And the next lesson.
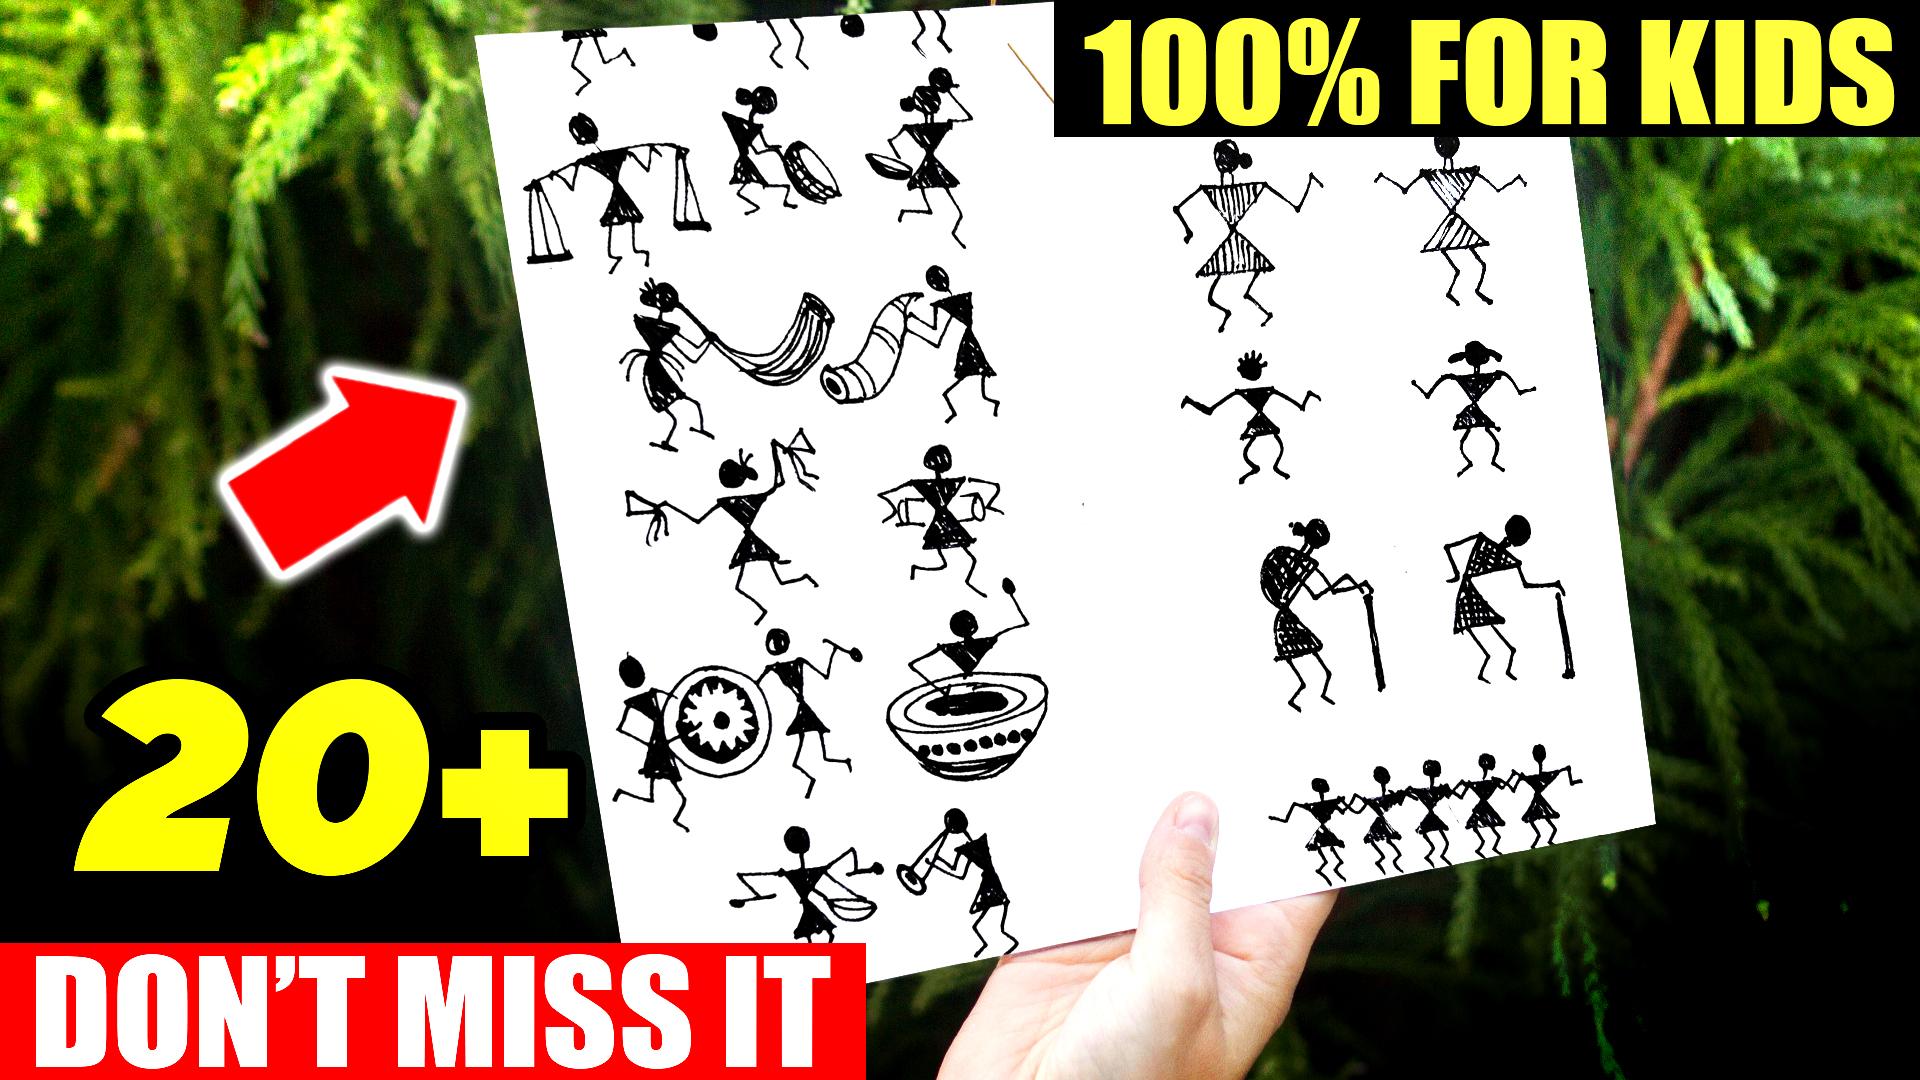
5. Warli Human Stick Figures: Comrades, If you made so far last video, we learned a word radius worldly motives. Then according to the series we learned radius borders. And this renewal we rely on human figures are realistic so that ultimately we can find compose, beautiful composition. We're going to start with our boiling motifs that I already shown in the previous video. That in that shapes the links are that description box. I'm using Cameron mechanical pencil. Always is mechanical pencil. The sharper. It will give you a lot of confidence and make your picture perfect. Now the shapes we learned, I'm making the human figure. As you can see, it's really simple and really symbolic. We will draw the body, the hand, and the hands and the legs slowly. Now we will make a boy and a girl figure. There is not that much of difference between those. But you can see the difference in their head. See for the head of the woman who will make extra one circle for the hills. Then there's no difference in the body or the body movements. Filling the body with parallel lines. Now we will make a baby girl and a baby boy. Similarly, we can find the differences in their head, not in the body. I hope the head difference is clearly reasonable. Now I am making an old man and a woman. They should have a sticking their hands. While the bending is really simple, if you focus a little bit, you can draw a beautiful paintings. This is a figure of a woman. Similarly, we are darkening the body, but again, we're using the shapes and making new freedoms. Next set of fingers will be working people. Here we can see people who are working. This work style is mainly village oriented. The hardworking men and women. From the violin tray, but taking the works and doing their jobs. Make happen that line for the glasses. This kind of legs significance of their running. Now let's see other people with various other postures OPR practicing with me so that there will be no problem in that demand composition. If you have any questions, feel free to comment me. I will try to answer them as soon as possible. Fixing some body parts. While the painting mainly shows the village life, culture and the harmony between nature and human. So these fingers are really, really relevant to the Wiley paintings and subjects. Celebration and communal harmony is one of the biggest object off when the painting here you can see some people who are celebrating. As you can see, a musical instrument for the festival. Many instruments. I tried to accumulate some of the musical instrument by making a man and a woman figure playing the same instrument shows the gender equality in the violet. Right? Now I'm making a different kind of musical instrument called whole. Is it possible that someone celebrating and people are not dancing? Yes, the next figure is the dancing freedom. While dancing, people tend to use the different kind of object. Next, musical instrument is the biggest one. Then the polyculture has it closely resembles drum that we usually say's. Don't forget to add some details in the instruments. Every Valley painting should have this kind of celebrating people. Here you can see one single instrument is playing using two of the figures. Add some more fingers in almost every way. Let's make a human body structure. And finally, I hope I will see you in the next video.
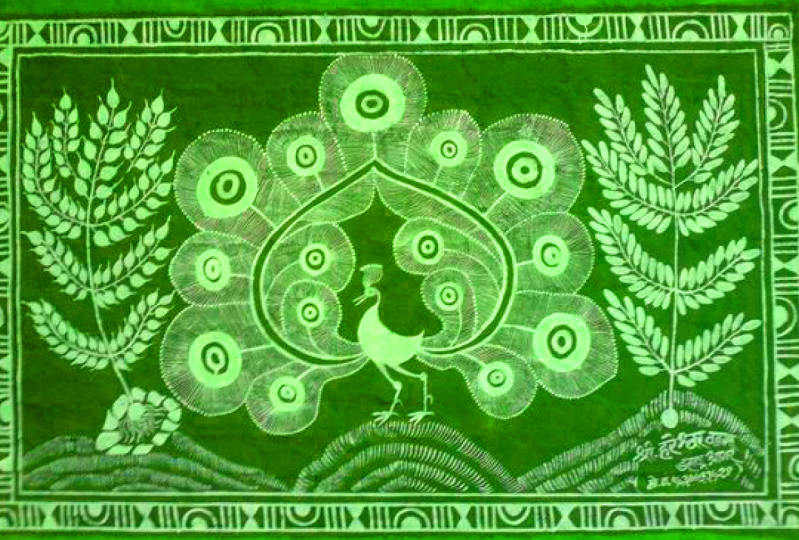
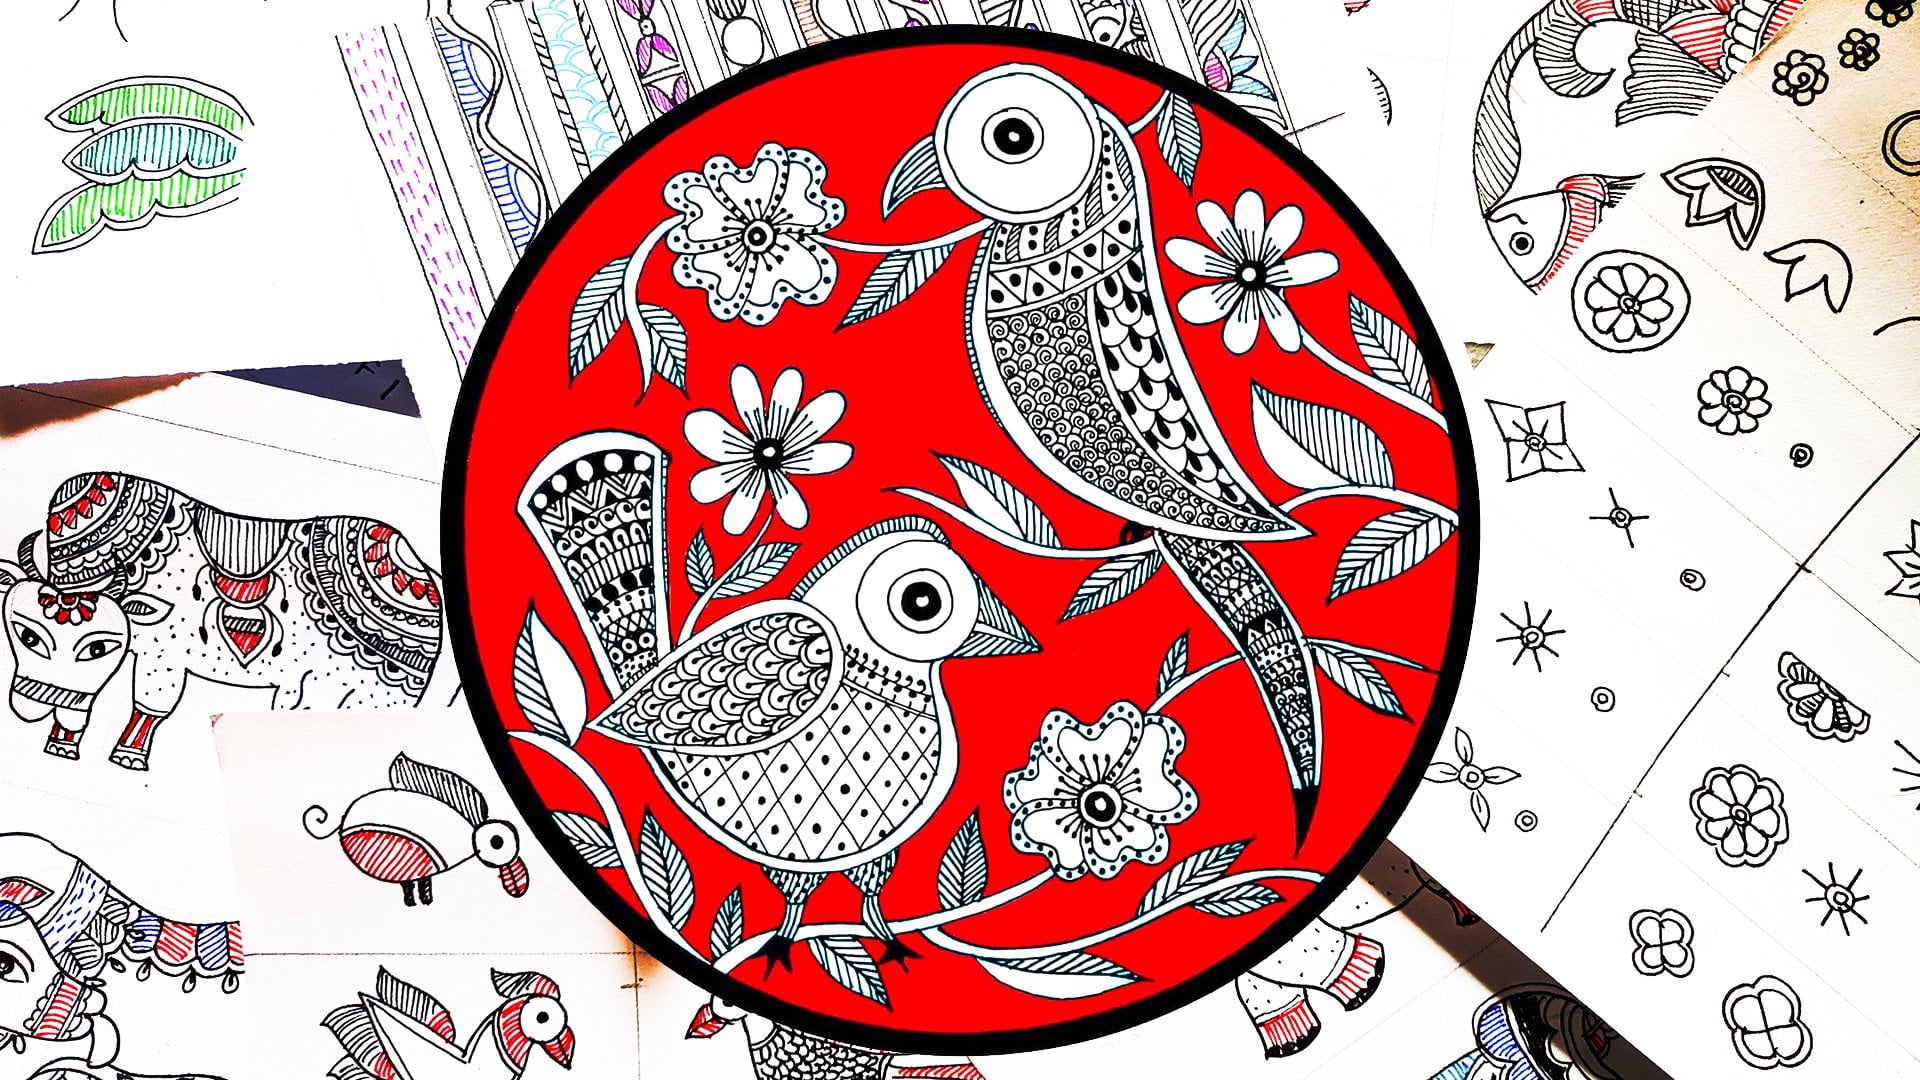
6. Warli Various Birds: Painting is one of the most famous tribal paintings of India. In this series of painting, first, learn basic shifts to form. Human Caesars didn't, didn't really learn. We will take samples from each of the lessons and finally compose a beautiful piece. So stay with me. Now let's start with the head, followed by S ship nature. Then we will make the body followed by the legs. Using a pencil and just making outline how the tail will be looking. Now requires a lawyer and the zero-point brush and stashing the color. Please have patience while filling the seller. And low carefully how I am doing it. If you learn the basics, then the home position will be very simple for you to. Now I am using a hydraulic pin and making final details to the bird with a permanent marker. And I started the tail pink or has wonderful tail among the birds. So we extra careful while doing it. This video is not real dying. It's faster out, so take your time, do as slow as possible. Always try to use permanent markers. By this way, your artwork will be protected from water for a longer time. You can use any brands marker or any brands pay per 48. There is no boundary for that. As soon as this will be finished, we will go to heaven next peacock, this peak called his seating in a different position. When we start with the body, followed by the head and the lower part of the body. Loke, this tail is different than the previous one. Tried to come out another design. You don't have to do my designs. There is a lot of design you can think of for the tail of beautiful peacocks with black watercolor, I just fill the body of the recalls. Now let's make some small bugs for enzyme grilled chicken ducks, Barrow and Milan. These birds are pretty simple with simple organic shapes. I'm trying to portray as simple as possible with simple strokes and simpler shapes. Seem really simple strokes and making the wings. And this is a bird in a flying posture. Time to finish up scholar. And using that, what does alert? You could also use acrylic go Usha as n-dimensional. You have seen Hi, I'm leaving some wide between these. So it will look more. I guess. You were free to mismatch the tails and the bodies are the heads and come out with new designs. Try incorporating your values. Try adding your tissues that will make your painting more unique. Decide the birds rebuilding she found in India. If your place as a different kind of bird tried to draw it these short to me so that I can read through it and send you print back. In village area we can see many people have birds. Thus, birds become an integral part of the Wile E r. Let's now make some food bank using simple dots. Some of my students has still difficulty for the peak, okay, shown before for them, this is more simpler version of a peacock. You can also use a scale issue one. But hand-drawn will be more organic to me. Adding minute details and filling the tails of the pico. Now come another because here the body's a over-share rather than triangle in before. Dale almost lose singular as well as the head. Try to practice every item shown in this video and other videos to you will notice differently a significant amount of change in your painting skill. I design the wing with curvy lines and making the tail a big more rounded. Adding some spikes for the printers. You can take inspiration from a real life Pete or till. And then, right, I'm making simple Laos ship motifs and filling it out, surrounding it with a circular shape, filling the gaps with random lines. We're almost end of this tutorial. Let's feel the body with black color. Also the blacker is also not necessary. You can use any color you want. This keep, remember one thing, there should be a contrast. For a lighter background, there should be darker color motifs and for darker bear loan there should be lighter color motifs. So vital now see you in the next video.
7. Warli Painting Animals: I hope you learned a lot from the previous videos. These videos won't be any much different. In this video, we'll learn different animals in wildly painting. You can easily use this animal shapes and make a wonderful Wiley painting composition. First, we will start with a horse making the same triangular shapes for the human feelers and place it horizontally at the tail and the head, followed by the links. Now I'm filling the body with the camera marker. You can use a watercolor or accurately called quash, any medium you have. Next, we will start with the D or the body shame is a broader v like structure. Then we will make the head, which is triangular. After then the Hans welcoming to front lakes and descend the body with Dutch shape. Now the best lakes followed by the cute little tail. Now it's time for a bull. We will make two circus followed by a small circle for the head to make the horn, and then tail followed by the limbs. Now we will add a pattern for the body, which will look more interesting and I pleasing. Now it's time for a cow. We will make the triangle body shape. They left triangular head. In this case the head is a little bit more larger. The tail will be longer. And then we will make the head a little bit more data followed by the body. Make sure your marker or your micron pin is permanent. That is this shapes and this animals, I hope after this tutorial, even learn to create new animals, which is not even a part of this tutorial. Now it's fun of them and most favorite animal, Richard giraffe, ES to novel Nick mixes so much adorable. The body triangles would be a little bit more distorted and there will be a long length followed by the head, tail, and the legs. Now with bad waters, I am filling the body. The patient, while doing this, we will learn many types of deer. First one, The body shapes will be a dropped like structure, followed by the legs and the Ted's. The dot design will be same. 12, the body next year has a rounded rectangular body. Same way, the head is a rounded rectangle. Diaz or one of the most important material envoy early painting. Because this is dow, domestic enemies of most of the world. E-types theme-based using past water, so the AMS filling the body. Now it's time for elephant. First we start with the head, then the body. And try Lily competing with the feet and the tail. Don't forget the years. I am using a very normal and the affordable paintbrush. There is no need for high-quality, costly paint brushes for painting. All of the MEMS that used in wildly painting are all domestic, which is found in the village. Now we make another type of pole. Don't forget the beckham for bull. Honda motifs in worldly painting add mainly impressionism and very less attribute to their sheerly stick with the organic shapes. Simple structures are the most important for this kind of paintings. Same way like before, I fill the boating Blackwater fellow, along with cows, the goats are one of the most important element for the domestic life or the Wiley type. So now readmission the goat. We've made two equal triangles for the body, followed by the head, tail, and the legs. The body shape of dogs are more or less similar than the god. But here we don't find the Hans. Now, I really feel the body of both of the elements with black lattice on. One thing that I convey to my students that the watercolor quality is also not matter. Winning, losing artists water further, there is always a good amount of improvement from student gave to utter select two artists get watercolor. With this, I also started my bulky and finish the fight of number of animals. I hope this tutorial will be fairly useful for you. We will meet again in the next video is the new tutorial. Till now, bye.
8. Warli Art Trees: It was indeed a long journey. In this journey we learned radius where the shapes, motifs, as well as radius worthy shears. In this tutorial, we will learn wildly different kinds of trees. With that being said, let's roll the intro. So we will start with guava tree. I am using a permanent marker, and this is also used for lemon tree. We will start with the base, which is a drop like structure. And then added branches will little swells in it. If you can't do at once, fill free to first use pencil and then use them Arthur, stat adding small leaf-like structures. Make sure they have a pointed in. A leaf with the pointed end makes a little bit more attractive. I am now filling the branches. Be patient when you're doing this, as this can be really much time consuming. These small intricate details makes Wiley painting so much spatial. See how I am making every link appointed data. Next Tree is a modern iteration of pine trees. We start with the long steak and then added triangle like structures, followed by the bristle like structures. Now I am adding dots here in there for the full lens. This tree is a rendition of a tropical tree called a viscous restart with the main stock followed by the little branches. We will add the leaves, but in this case the leaves will be rounded in shape. The top of the branches is always having a flower-like structure, which is made using triangle shape and same bristle like structure like before. You can use any kind of material for making this. Here I am using prominent Mercer or micron pen user also use watercolor, extra legal coal ash for your convenience. After finishing the third stream, we will go to the next stage, which is palm tree. In this case, I fully colored the main Stout and satirizing the leaves. See how different this leaf looks. The leaf is comprised of easy and simple parallel lines. The X-ray made the fruits followed by another leaf. Keep practicing these trees so that you can come up with new ideas. After finishing the fourth number of tree, I start in the next one. This is a small bush like trees, which have the quintessential foliage designs. With the pencil, I'm making the boundaries. And then according to that, I'm filling the leaves of this tree is also in trying tricking tree. Don't worry, take your time. The end result will be amazing. Let me finish this tree quickly so that we can go to the next one. Don't forget to add a little dot in the top of every branch. After finishing. Don't farther to erase the pencil lines. And remember, the racing is not a crime. Makes turn is for day three, we will start with the main steam and added some details to it, followed by some fruits. Now we are ready for the leafs. The leaf structures closely resembles number four. With more curvy outreach. This tree is most realistic one as a real De Shi Hou, exactly similar to this one. The village Lego for the treads are full of trees. So the trees are important subject for this kind of painting. Now we are making the stinks of this tree. This tree is my most favorite one as this is the banyan tree. Yes. I meant the stem a little bit thinner, but it's okay for the foliage is I made a random round with a pencil and then finding the depth with my micron pin. This kind of tree is my most favorite one. And in the final composition, I will be using this tree. See the leaf survey small. So you have to be extra careful while doing this. This session is now almost over. Less quickly. Do the last one. This is a coconut tree. Let's make it trickling. Actually, there is no certain hard-and-fast rule for bomb Kuffler and the trees, they all look similar. You can use any kind of interpretation from my site. It's all about your imagination. Joe painting. This is nothing hard and fast rule for it. Let us complete the painting by adding a wildly human motif. Finally, this tutorial is coming to an end, but don't worry, there will be more tutorials behind it. I home how each is useful for you and my insights to the paintings are also adding value to your life. Practicing each motifs day by day will not only improve your skills, but also improve your confidence. In the next video, we will complete the full picture. Okay.
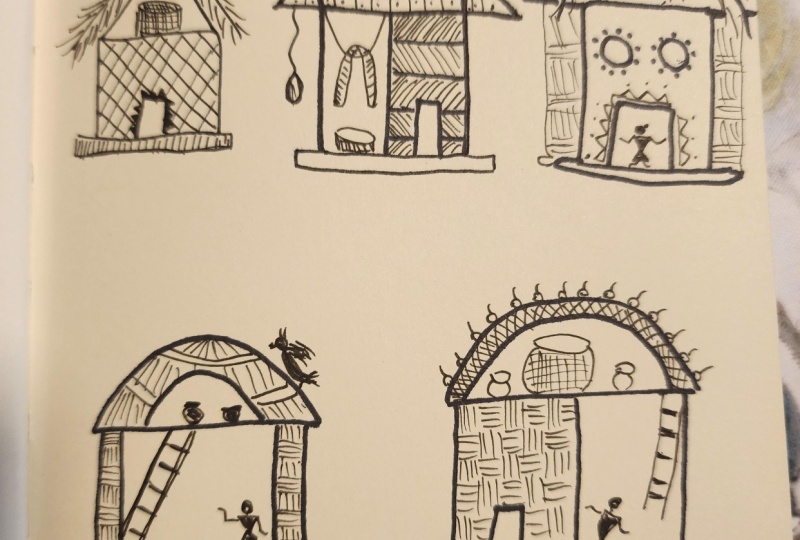
9. Warli House Drawings: One of the most famous piece of India indices of the first basic sheets. Human fetus didn't receive different borders. Then after that, samples from each of the lessons and fundamentally a beautiful beings or stepping. Let us start with this bonus lesson where we're going to learn no wildly houses. Hi, I'm using Saqqara Micron pens and permanent marker for this. For the first one, let's start with making a square followed by a triangle on the top of it. After this take outline, less transferred to a thinner one. I'm losing 0.3. size of name of Sakura micron pen. Let's make the dough, followed by the basement. Let's fill the baseman part two with parallel lines. Who contains the link size according to the size of your painting. Though fairly tribal people used to store their useful items in the top of their house. So I'm making a basket we will design into later. Now let's make the shed. The house shared is simply made by elifs. Because of this reason, I am making the leaves that we learned in the previous lessons. If you Brett, is those, then no need to say then this will be very easy for you. Let's quickly do the other half of this change. Then we can move to the next part using the same micron pin. And now designing Nawaz. First there will be an inclined line. After this, we will cross it, print the same median line. You can change the space between lines according to you. You can also been one of the alternate gaps that we also look good. Now let's design the doors with triangular shapes. After the door is done, we now move to the bucket section and filling our simple design. Whereas design is very popular in the early paintings. Finally, with the top portion, I have completed the first Laos. Without wasting any much time. Let's jump into the second house. For this one, I am first making some rectangular shapes. By this way, the drawing would be much more easier for understand. After making two adjoint rectangles. Let's make the shed. We will work on this later. Let us make a small base. So my muscles work, some problems I need to change it led some bandwidth problem to the one side of the house and making the dose and filling up pretty simple designs. I hope you well chandelier with the designs as we learned this motive design in the first lecture of this teas. Filling up half of the house with this kind of designs, zigzag shape. This is the quintessential type of picture that we can see. Houses made up of trees. Always be patient while you're doing this. I know it's a bit time consuming, but believe me, the end result will be superb. No leading is remaining is the shed and filling it with cross-shaped and adding a small dot in the center of each of those squares. This kind of shades and made using bricks in the village who are in a top of the positions they are usually deciding under this kind of houses. Let's add select series. I am adding a clade hanging from away. Let's make of what a drum beside it. By this way, the houses through more natural and more close to reality. Do remember though humans tree lists we learned, I'm using one of the fingers from Dethlefsen. Lates added basket. There's, this human is carrying. This really leads to the third one. We start with the half circular shed, followed by the square body. Lets me to take stems for the body supported by taking base. Let's design the shed. This kind of shifts are made up with class. And for desk trees and I'm feeling the whole ship with long grassland structures. Let us quickly do it. I'm also adding a cute little bird to recap and to lead all of the lessons we learned before. After finishing the shade, let's feed them preloaded with zigzag designs. This design is already taught in the previous lessons. An adder is a very important subject forwardly tribe. So I am adding a letter followed by some of the essential parts in the top of the house. Now I'm making void men. The older generation people are reduced to stay in home. And to convey this, I am adding in the village works are real divided according to their age. This proves that to hear, almost half over to the painting sees place-making The fourth one. Similar to the third one. We make a half circle and then a square followed by the door on the left side of the house. Let us now add some detailing through the house. And using parallel Cantonese style of designing for filling up the upper limb. It's not looking good. Adding another set of lines. After this is over, let's add a big chart in the top of the house and the smaller beside it. Adding some details to the chair. You can use any kind of details filling of distinct. Let us quickly fill the left side of the house. Probably already noticed how this kind of house has one empty space and another frame space. This out quintessential died box where the tribe allows us to see how I finish this house with making a human shape and then making a letter. Now it's time for the fifth one using the Baumann marker. I am again, making the basic outlines. Believe may descend, not even difficult. Practice with me, practice atleast once a week. The top side of the shade is covered with the urban part. After designing it lives now design the one thing that a key for letting, telling that you can also mismatch the shade and the body of this house. Come up with new ideas, new kind of house, and show me in the project section. Let's now make the base. I am making a cow shelter. For that. I am adding the top and the bottom bar, followed by a cow. You vividly remember how to make a towel. If you don't, please go to the lessons and learned. After finishing the design, let's add two Schulman fevers to enhance the house. I just made a mother and son and then looking super cute. This a finishing touch with the ladder. Adding some of the essential in the top of the house. Adding them with details and radius designs. We're almost done with the fish one. Let's jump into the next one. The last house is my most favorite one. This is the smallest one, having one door and two equal-sized window. Similarly adding then part followed by the branches of the trees. This kind of trees and mainly coconut trees, where the leaf size is so much bigger than it can shape the whole house. Let's complete the shade by using intricate details of the leaves of the coconut and speeding up the process. But you do it slowly and steadily. After this is done, we have to decorate the walls and doors and ending retained, followed by cell colored dots around the window. This kind of home designs are SRE, much popular in the tribal community of India. The door look quite empty, violent, human to fill that. Let us also treated the details we made around the dose. Again. Take your time, do slowly. I hope this Tutorials and giving value to your life and creative inputs to the daily routine. Credit is this liberal early. I hope it will make perfect thrillers lately. Ladies, and a small dot in front of every triangle. I have not used any kind of house design in my files and composition, but you are free, free to use that. Oh, I follow to an untrained pot in design. So let's add to the fort number of hours. With the addition of this, we have completed the violin. Houses, would have learned six different kind of Wendy house. I hope you learned something new from this non-floating CSR.
10. Warli Full Composition: A big congratulations if you made so far in this final video, after learning so many steps, we're finally ready for making the ultimate big while the primal art composition. If you followed my last lessons carefully, this would be a perfectly easy video for you after this session, don't forget to review and show me your artwork. We will start with coloring the paper. I am using a mob brush and camel watercolor for this. The color I'm using is permanent green. If you don't have this green, you can mix sap green with gambles who led the paper dry after it is dried up, we can start making them early paintings. First we will take the difference from the borders and start making borders and using scale. But you can use your hand if you want. And Ising Kammen permanent marker. The border design will be familiar for you because we have learned this in the previous lessons. Now, fill the gap using simple reshape my ring this make sure you have a particular designing your mind. If you have any questions, feel free to comment it down, and I will be very happy to answer all of them. You can easily rotate the paper according to your convenience. But I will say to make the paper fix and rotate yourself and make the perfect design. In the center of the painting, we will make a beautiful peacock that we learned previously. Let's start with the wings and slowly make the name followed by the Head. Start making the tails. Please go in a step-by-step manner. We will start designing the further. You can take inspiration from a real peacock feather. Now with minute find the tailings and filling the tail of the pico. I know this process is very tiring, but believe me, the end result will be superb. Let's quickly finish the tail so that we can use Blackwater color for the body. I'm using size to brush, to make the body and the wings. There is no limitation of the painting mediums. You can use either watercolor, acrylic, or wash. I am using a fine liner for this. The brand is Luxor. You can also use Sahara, which is available internationally. Now we will make a tree on beads. Peacock will be sitting very delicately. I'm making the roots of the tree. The branches of the tree at the most intricate details of this painting. So be careful with that. Make the edge of the branches in a rounded ending. That making the leaves. You can either use pins are markers, are watercolors. Please make sure the leaf has appointed always. Til now if we have any questions, feel free to comment down. Let's quickly make beliefs. Make sure you follow me and see all of my tutorials that are available in my profile. And honest opium Nian from you is always appreciated. Now take a look from another angle. For your convenience, I am changing my medium ones. Permanent marker, once watercolor and one span. Now we will make small buds that are sitting on the branches of trees. Don't forget to take the ideas from the spreadsheet given by mean. Time for making some flying birds. Now, let us fill the sky area with this completely okay, to make mistakes. For this kind of ornamental paintings, mistakes are a really overlooked. See the sky is almost filled. We can start making the human figure. Now. Don't forget to take inspiration from the spreadsheet provided my me. From a single posture, You can make thousands of posters. Just tweaking the hands and legs and making the angles of the two triangle. Let us encode for it some more figures. In this composition, I am showing the integral harmony between environment and human beings. You can also add hearts, rivers, and clouds in this picture. I haven't added standing this picture. A son is very important motifs in the Valley paintings. Let us feel that bottom part with human figures and complete the painting. Finally, we can see that we have come to an end. Please upload your outwards in the project section.
11. Warli Painting End thoughts: Success is a journey, not a destination. Thank you all for taking this class. I hope all of the lessons are really useful for you. The journey of creating is endless, so never forget to enjoy the process. I would appreciate your feedback and we'd also love to see your projects in the class project section. Some of you are happy with your results and some of you are not. But always remember the starting line. And if you are new to main profile, don't forget to visit my profile. Look at the other available lessons and learn new kind of forecasts. Please don't forget to take the discussion section and the project resources band and also don't forget to review. I am very much reading 40 or renewable reviews. Also, don't forget to visit my YouTube. There are a lot of forecasts is waiting for you.
 Nabojit Kar, Folk Artist + Youtube @An Aberration