Transcripts
1. Madhubani Painting introduction: Hence a lot everyone for loving my courses previously have
learned early painting, which is very beginner live in. And we have also learned to create art called
tangible building. In case you don't know me. Hi, I'm nobody. Our educator, a teacher,
and online instructor. I may lead to folk art. And here I am presented to
the mother when the painting, one-to-many painting is
a folk art of Bihar. The vibrant color, the
beautiful details and the bold outline makes it
different from other forecasts. This painting is done
using fair IT tools like finger nip
pens, brushes, etc. In the past, only
natural colors are used. But due to modernization, we are using accurately color on normal watercolor for
our modal money being. Undoubtedly this is
the most famous cry for part of India. In this beginner level of
Madaba Nicole's first, we will learn various ships. After we'll begin our
confidence in ship, we will make boarders. Borders are very important
from a do any painting, you'd gone find any Modigliani
painting without a border. Without a border of painting
is look really incomplete. Here we will learn 20 different kinds of
Madame, any border. After doing the border design, we will learn flowers, leaves, cows, birds,
fishes, elephants, etc. I hope you liked this lesson. Manova. This course consists of ten different videos and
more than 500 motifs. So I believe you
will learn create muddling being done after
completing this course. As you come to the
end of this video, I believe you've
got the password, this Download the previous from the description and
printed in A4 size paper. After that, you need to follow the right part and exactly draw the same
in the left panel. You can use marker
accurately or watercolor, whatever medium you
are comfortable to. Plans done, don't
forget to send it to me for review session.
2. Madhubani Shapes: Today we are going to learn ten different model
of any basic shapes. Shapes are really, really important for doing
lots of money painting. So today we will learn
Dan said shapes. First, we will start making
straight vertical lines. These are straight lines
which do 90 degree angle to the top and bottom bar and parallel to the
side of the page. This lines are really
very useful for doing cartoony style of
Modigliani painting. We already know what cosine
is in modernist style. Now, we will practice the same lines in a
blood thinner skin. Snakes will, will do better. Little lines which are horizontal or
horizontal to the top and the bottom and perpendicular to that
side of the page. Same way, first time doing it in a smaller scale and then
increasing that larger scale. Practicing this shape
will give you a hand. Great amount of flexibility. So practicing straight line
is very much necessary. The third one is the same lines, but these are inclined
in the light world. These are the very beginners. Their former do money. If you don't do
this step, right, you are in really travel
in the next steps. So always preferred. Starting this basic shapes. Now we will go to
the four design, which are parallel lines but inclined in the
leftward direction. Some people had some preference. For me, I can do that right
angle better than length, better than the left one. So making the next one perfect is very much
necessary for me. There is no hard and fast rule how much gap we have to make, but makes sure the gaps as sin, the lines do not touching. Now, we will do our fifth
design, which is circle. Yes. Practicing circles are very essential for
murder. Many paintings. We will use circus in birds, in human faces, in flowers, etc. So the use of circuit is
very vast in the mud. When again, I will suggest
you practice making circle. Here. I'm making two
semi-circles and joining them for making
a perfect circle. Now, we will go to our six
step, which is semi-circles. Practice semi-circles
because we are going to use semi-circles
and various places. Semicircle also can do a great amount of
background designing. For example, this I'm doing, you can see mainly
metal money paintings having background design. With this design. We also use this half
circles in fishes, in trees, and in flowers. We will all know this
in the next part. After this half circle is done, we are moving towards
seven position or the seven number of
design. Every design. Now, we will do the way
we design for that. And just making
wave-like structures and making parallel lines. I know making this kind of parallel lines that are
quite difficult task. But you believe me, if you practice this, we will definitely get it. You don't need to be
as perfect as me. But practice roughly, use a
paper and make rough designs. You are not eating so you
don't need to mention any numbers or any
kind of cleanly. Let's just go and design by combining the three end design we are making this
cross hatching design. This design is also very
famous in modernity and, AND Now the eighth number
design is the exact lines. Yes. You need to make
triangular zigzag line and practice this
according to other designs. Now I'm making better
little zigzag lines. These are all will be useful
in the later sections. So practice this well. After this design, now comes my most favorite design,
which is designs. These designs are
also useful for eyes. Every time we are doing eyes, we will take care
of this design. This kind of basic
shapes are very useful for trees,
leaves and eyes. So I'm also practicing some
bigger size of the shape. Now we come to the end. We will start by doing the
tenth number of design, richest. It's really designed. It's almost like
the seventh one. But in vertical ship, you can write several S to
form this kind of shape. We will take care of this design while making
the trees branches. Maintaining the gap
between two lines are very difficult for
this kind of shape. But I think if you
practice, it will make it. So today we learn
beautiful model. We need basic
shapes and designs. I hope you like this course. See you in the next video.
3. Madhubani Border Design: So today we're going to learn 20 different model
bunny painting borders. So to make the borders first, I am using a scale and a marker and making
segments so that we can make border isn't the
first time making the board half and then
making ten cuts to hit. So that there will be plenty segments for
the border design. Let's make quickly. For this tutorial, I will be
using this Luxor fine liner. We test then set of
different colors. You can use any marketing have. In the last video, we have learned many shapes
and using that shapes today we will make border first and
double lining the border. And then I will fill
it with designs. These are the
designs we learned. We will use the third design. You're going to make this
land right angled lines and fill the whole border. This is the most popular, yet the simple one for
doing much of any painting. So first simple border is done. Next, we move to the second one, making the double line. We will be using the
second design here. We'll just click it and make
it a dashed line structure. We can use this border
in any kind of design, especially if we're making
a seed composition. This border will be
perfect for that. Now we will do the
second design. And for that we will be using
the eighth number of shape, which is a zigzag line. So let's first start with making the double line followed
by this exactly. Now, we will add additional designing with the
help of red Martha. I'm using very thin nib, often lead marker, and using that I'm making
vertical lines. This is also one of the easiest, yet the most popular border
designed for modernity into. You can also feel the other
side with various colors. If we want. For the Ford design, we will again take him from the basic shapes and
making the swirly lines. This pretty lines looks easy. But sometimes people really
get overwhelmed by this. Be careful while doing the
double line for this 3D lines. This way redesigned really looks good and give you a painting. Different dimension. Now with a blue marker and
making vertical lines. But here I'm adding a little
white gap in the bottom. With that, our Ford
border design is done. Now we're moving
to our fifth one. Here. Again, take help
of the shape layer. Here we will be using the
leaf or the eye shape, which is situated
at the 9-point. Using my permanent marker. And just making the double line before doing the leaf shapes. Now we will make the leaf shapes and making their corners joint. You can also feel the leaf
shape with green color. Today I will be using cartoony style design,
using my Martha after the leafy border. Now we'd be using this
six-point design, which is a design of
a semicircle to make a border so fast
using the black, I am making the border. I'm also attaching a little bit of gluttony design
around the double line. Now with help of
my blue Martha and just making semi-circles
to fill up the gap. Now, moving into a tree petal
flower designed for that, and again making
double lines and filling the gaps
with small flowers. After that, I'm also feeling
it with guts any design. The eighth number of border, I will be using a
flowery border. For that. I'm making
a full petal flowers. First-time make room
for the flowers. And then I did a center circle, followed by Ford leaves, which looks like beetles
want the flower. With the same design and
filling the whole body. Good, the outline is done. I'm now using my violet Marco and just got sneak dove petals. Now we're ready to
do our ninth border. For that, I will be
using squared design. I've replaced the square at 90 degree angles so that it will look like
a diamond shape. After the squared
is done making, I'm just filling up the square, vertical and horizontal line. I've been using, left for the horizontal and orange
for the vertical lines. That makes our ninth
bundled ready. For the tenth one, I will be using simpler designs that we learned in the shapes. The five-point ship design. Using that circle, I will be
filling the whole border. Followed by, I really do
some good study design. This is called
alternate kitchen, and it's looks beautiful. After that, we will
take inspiration from our third border and make a similar looking
yet different border. I'm making the zigzag line after that and taking
inspiration for the Ford border. And then instead of
filling the top part, I'm feeling here,
the bottom part. I'm using very
beautiful pink color and making the vertical
button design. Now for the next one, we will take this 2.5th
design and we will add the design in a bigger
form in the boardroom. Does double lining the circles. Now using a brown marker, I will be filling the top
of the border design. Now, we will take
inspiration from the seven design and making
the three petal flowers. The difference is, I will make. Both facing and the bottom
facing flower design. Be careful when making
the proportion. Make sure it is pointing. Now I'll start, the
designs are done. I making us really
lines around it. It is the time for coloring. So using a red and
a black marker, I haven't been feeling
with destiny design. Nice border is also what
inspired by the leaf shapes. But here we will place
it very differently. First I'm making a swirly lines. And then in each gap I've
really been making a leaf. You will ever heard of the leaf shape from
the previous lessons. So I will be not
teaching that again, just making leaf shapes
and filling the gaps. Now using a violet
permanent marker, I'm making the leaf strings and then filling
the leaf button. Anything. With that, I will leave for border is done, but we're not done yet. Now, I will make another
leafy border design. Here. I've only
used great amount of leaves to fill
the whole border. Now, let's make the big leaps. From the bottom of one leaf, I will be making another leaf, thus making the full border using vertical lines
and gets new design. I'm feeling one side and
another side. You can paint. Here. I'm using a marker
to feel another state. For the next one. Again, it's inspired from
the third border design. This will tell you
from one border how many different kinds
of borders you can make. After making similar kind of designed and filling
up the top portion. I'm now making a leaf or a flower structure
in the dark. Yeah. This is a three petal flower. We will again fill it
with cosine design. Next border I will be utilizing flower
design and then leave this first time making a
double for the flower. And then from the bottom
pattern making the leaf. Then again making a
loud and here for the top part and mixing it
again from the bottom part. This design can be
very tricky sometimes. So be careful and freshen
up your mind before dreams will feed at the center of the
flower with the design. I'm using crosshatching.
Who feel this? I hope you remember
cross hatching. This is dark cross
hatching technique. Now we will design the leaf with catching the design
and the black color. We have five more
remaining to complete our 20 designs of mother
when he bought us. Next is a very beautiful
border width fish design. Yes, we will. Mainly the
border with hagfishes. Moving in detail how fishes or fish design
in the next session, then just complete the
fish very quickly. Now we will see
that the excess of the fish border design
with a dashed line. The next border design, we will be taking help of the
design or the tent shape. And we'll start with by making scribbly lines which
has verticals. And then add the small flower. Again, we will make us really
lines and make a flower. So there will be alternate lines and flowers for this
kind of wonder. Now, the basic design is done. We will add red
detailing street. The last and the
penultimate border design. I'm just mixed matched to design and adding it
to make a new border. Same way you can
also do mismatch and make a wonderful new
kind of border busy. Don't forget to add any if you make any new kind of border. With some more coloring, finished our final
20 border designs. Each and every border design
is very special and unique. They look beautiful in any
kind of mental mini painting. The next videos we will be learning a lot of
muscle when the arts, so stay tuned for that.
4. Madhubani Flower: Today we will be learning 15-plus model many flowers that are really,
really variable. In the last few videos, we learned Madani borders
and one-to-many shapes. Using that, today, we will be creating modal many flowers. I'm using my Sakura Micron pen, but you can use any
marker you have for the first flower I first
started making across. Now we will again make cross and join the outside with
circular shape like this. After that, I'm double
lining the whole flower. Let's now practice it again. This is the simplest model
of any flower to draw, but starting with
the cross is very much crucial to make
a perfect flower. So with that, our
first flower is done, we will move to our next one. Next flower is quite
familiar to you as I've used this flower as the
design in the border video. We will start with a circle, then make four petals at the
four corner of the circle. It's not over yet. We will make it again and join the bitters with another
circular petals. This is the reason I told you to practice the circular
designs before. But the next is n, will make a circle and then add straight lines from the
center and the opposite side, same as parallel and vertical
and in-between them. Next, we need to join the top portion of this
lines by down the ship. Then your flower is ready. To add a little bit
more prettiness. I'm adding one more
double led around it. The fourth one is
almost similar, but instead of joining
it enormous circle, I will be joining in
a curvy circle nano. Have a look at the flower. It is very hard to make a choice between the
third and the fourth one. Water looking very pretty
and very beautiful. Now we will make a
half flower for that. We start with a half circle. Adding some spikes
around the circle. Make sure it's similar in size. And joining the top portion of the slides with the same
manner as the third one. Now, or you will feel alternate petals
with cosine design. So our fifth flower
is also done. Our six flower will be a Ford Pinto flower that we will again start with the round. Then we'd make a cross and
in the center, the ground. Now we will join the class
with the point D-shaped. Don't forget to add a little line in the
middle of each petal. Next level will be
similar to that one. But instead of f-orbitals, there will be eight. It can start a new
line if we want, but always make sure
after doing one, you do the opposite, exact opposite one, right this way also you can
do the four petal one. It will be steamed, just
a little bit of rotated. Now we will make our
flower same way we are making the lines and
joining in a pointy tip. This pointy flowers and not very popular in modern
money paintings, but where it is used, it's looks very beautiful. Now I will make another flower. This flower almost looks
like the third one. But instead of the double line, I will be adding a plane circle. Coloring, leave the
circle as white. It will look awesome. This next flower is
my most favorite one. Because this is the most
closer to the nature. I'm making five points
around the circle, like star, and then joining
it with natural curvy petals. This is how the
natural looks like. Again, I'm adding a
small line in between the petals so that it will
look more naturalistic. Next flower is very familiar as many borders we have used
that kind of flower. Yes, it is a three petal flower. We will start with by making a half circle and then
fill with petals. I'm just double lining the flower design and filling
up with cutting design. Next is a very easy
circular flower design. Let's see how we can make that. Thus add some spikes
joining the outer shell and the inner part and feel alternate petals with
Kretzmann design. This flower is also
looking really good. In the final part, we will be looking at some
feeling flower designs. These flowers and
necessary if you want to fill the background or do some additional
detail while this is a beautiful three
petal flowers. See, now I'm adding Wonderwall and petal
width gets InDesign. And it's looking so pretty. Let's now make two
additional flowers, which are very small, tiny flower but can be
useful for some times. I will show you when to use
this in the next videos. Today we learn beautiful looking 15-plus flower design
for your model. When they asked for,
I hope you like this, they are more coming
in the next videos. So stay tuned.
5. Madhubani Leaves: In the previous videos, we learned flower
and the borders. In this video we'll learn five different Modigliani
painting leaves. Florida and the floor now are essential parts of
multiple new painting. I'm so excited as I
am teaching today, lives as in the shape video, we already know how the
leaf shape will look like. So this is how the leaf will be. So let's make some leaves. First one is very simple. I'm just making the leap. And in between I'm
making one line. This is the simplest
form of leaves. You can paint it with green or yellow color
or leave it white. Let's just fill it up
with my green marker. Next we will draw, I've got PS10. Leave for that. First. I'm making simple leaf shapes that
we already know. Now, I will give cuts name is entering it. In the one side. I'm making slight
angle parallel lines. And the other side I'm making
the mirror image of that. See how easily we did a
gutsy style lives design. Next we will do a
half gets new design. That again, I'm
making some leaves. And here with one side, I will be doing that touched me. And another side I will
read remain white. You can also color it, but one side will be cutting. The fourth leaf is a little bit. Because here the outer part of the leaf and the
design says same. Instead of adding a single line, I will be adding a
double line in it. The next leaf is also
very simple and make normal shapes and then filling it up single
cosine design. This leaves are also
very popular and it's looks good in any kind
of Madame any painting. Now, I will be using my
marker to do the cosine. With that are for easy model
when it leaves are done. Isn't it quite
simple? Indeed it is. I forgot to mention one thing. You can also color
the fourth leaf. It will look as good
as the normal one. Let's device again all the four leaves that
we learned today. Lift, lift, lift, lift four
and finally the fight. I hope you liked this lesson. In the next lesson, we'll be
learning many new things.
6. Madhubani Trees: Today we will learn
model when it treats multiple branches in really
quick and easy method. To do branches were really take help from the very
first ship lesson. We will use the tenth number of shape and then some leaves from the leaf lesson and create beautiful looking but
of any painting branches, branches cannot be
completed without flowers, so we will take help
from the flower. Listen to it. First.
Let's start with some really designed
using my micron pen. I'm just making some lines. The lines from branches
are not parallel lines, they will join at the end. These are very different, but we learn the shape layer. So here we need to
join not better lines. You can also start from the
top part and make line. Also. You can start
from the bottom and join and the top like
this I'm doing now. There is no hard and fast rule. How many branches
you need to make? Just make generous
amount of branches so that leaves you can
fill up the whole area. Also, the branches shapes are according to you,
according to space. Also make sure there are enough number of gaps
between the branches. Now, we will add some
design on the branches. I am making, or three
parallel lines in the design. This design in branches is very popular in
Modigliani painting. After the designing is done, I'm just converting the
branch to the black color. I'm using my market
to paint it black. You can also use
water or actually, you could also use a
brown color if you want, because that's the original
color of branches. Same way I'm doing it in the
main and the sub branches. Keep the design white and do
not include any kind of In. See, our branches is
looking so beautiful. Now, we will add leaves to it. For that, I will be
using my lesson. Now, using my fine liner,
I'm making leaves. I'm making smaller leaves
at just sent to each other. See how edges in there I'm making and their looks
so dense like tree. You'll need to
practice this thing, makes sure you don't
leave any space empty. Feel every part with leaves. Maybe it's small or big. You'll just need to fill it. To look more beautiful. You need to practice branches regularly
to make it perfect. Perfect branch is
always looks beautiful. You can use this as a background
or as a main subject. It doesn't matter
where you start the leaves from the
top or the bottom. You just need to feed it. For example, now, I am
starting from bottom. Before that, I did
it in the top. So the orientation
doesn't matter. Here, we just need to make
sharp looking leaves. I showed one example of leaves, the most simplest one, you can use any kind
of leaves you want. Let's recap again. Swirly lines, join
the lines, slowly, grew that design with parallel lines and fill
the branches. That's it. Your first branches is done. In this type of brands. I will be using curly shapes. See how the shapes are
looking similarly. And we'll be joined and
another will be open. It should not be parallel lines. There should be the same
design that I did before, but the overall shape will be different
from the previous. Let's do it again to check how you can make it very easily. Just flow your hand. Now, let's apply this in
real life branches designed. I'm making the main
branch long and thick. And in the side, I
will make sub branches of the tree in similar manner. See, this is how it looks like. Now. Now I am adding pedal
aligned designs to it. Now, I would like to add some flowers in the
branches for that. And as usual, taking example
from the flower, listen. So this flower I
will be doing today. Let's now start
leaking the flower. I will be using the
half flower design. So let's make it. Don't add too much flowers. Just add nominal. What ever you need it. I'm adding some flowers in the corners and some flower
at the top of the branches. Always be patient while
doing well WE painting, it's very essential to make
yourself very patient, steady so that you can
get a great lesson. Now, I will add some leaves. The leaves us similar
to the previous leaves. Just I'm adding to make
the space for the flower. Make sure at sufficient
amount of leaves, but it will not congested, but it will look beautiful. So be careful by adding leaves. Practice will make you perfect. So just keep practicing. I will slowly add more and more leaves to make the branches
look more fuller. If you have any question, don't forget to ask me. I'm always there to help you with that. Our tree is done. Now in the case of leaves, I've been doing gutsy design. In some of the alternate leaves, I will be adding black
gluttony design. And later part I will add
green cosine designs. It is so beautiful, looks like you can use any kind of design that we learned
in the previous lessons. The more time we will
take to make it, the more patients you have. And the more detailed work the Modigliani
painting when low, the more beautiful, don't
apply any kind of shortcuts. Always try to follow
what you have learned. Fall only one teacher and he
will gain everything else. As the last finishing touch, I'm just using my red marker
and making colored petals. Again, I'm saying you can
use whatever academic, any kind of color
to make it just, I am comfortable with
markers to animate using it. Now we will learn
two more trees. So first is the banana tree. So the banana is one
of the favorite tree. It's looks amazing and
many of them are doubling. Artists use this. We don't do full banana tree. We will just keep some of the leaves floating
from the subjects. Speaking through the border. Creating vanilla leaves
is very easy and simple and just
double outlining it. And now I will fill
with Katrina design using my light green
and dark green marker. This speed is very
real-time speed. If you are not that
much speed while doing the cosine design don't vary
in the initial days of mine. I am also not that fast. So just practicing
will make you perfect. Make sure the gaps between the parallel lungs
are well maintained. Let's now do a very
simple style of branch. Here. We will not make double
line from the branches. We will make a single line
and then make leaves. This branch also looked fairly
good in some condition. But you have to find when
this speed look good. You can also add leaves from different shapes and many kinds of flowers in this branches. If you want to make
birds in the branches, make sure the previous
two branches, because thin branch and
boats will not go together. Now I will make small, small flower buds, or you can set flowers at the
top of the branches. This will give the
total tree or grid. And it will be
visually pleasing. I'm just adding a
little bit touch of red so that it will look
more like a flower. That I will see. Our lesson is over. We have learned
today many branches. I hope you like this lesson. We will again meet
in the next lesson.
7. Madhubani Lotus: Today we're going to learn six different Modigliani
Lotus designs. Let us first look at the first
law does the simplest one. Here we will be using only the outline instead
of sakura micron pen. Today I'm using bomber
and Martha from camera. You can use any colors or
any brush if you want. Just start with the inner side and expand the petals
in the outer way. That is very simple yet flexible kind of look available
in lotus petals. So make sure you turn that on. I'm making some
upside down petals. This almost looks
like the leaves, this and we learned before. I'm just adding additional
details before completing it. You can collect it or you can
give separation and color, two separate color
in each petals. Awesome, adding some
questionnaire design in the downside,
leaf structures. I've said the first
law does, is done. We are now moving to
as the second lotus. I'm making a small heart-shaped and centering
that I will be adding petals. This case, the
middle petal is very small and it will increase
as the outer petals grows. Let's have a closer look. See here, without doing
all petals together, I'm doing one-by-one and
designing it with gutsy style. It's up to you which method
you want to proceed. But I need to show you
everything. So let's complete. The second flower was very slowly and patiently. The mode patient to have. The more beautiful your
work will look like. I will make stem and
stem spider design. This design we already
learned in Modo, any trees are multiple
named branches lesson. Now after doing the
second load test, we are going for our third one. This lotus is the
most extravagant one, glucose, it will be having a lot amount of
petals around it. You can see how many number
of papers and added and then adding gutsy designed so that each and every petal
add distinguishable. I'm using to style
of cutscene design. One nice, right-angled
one is left. See how beautiful it is looking. You can also give
red colors, lining. Next color, color
feeling to this thing. Be careful while doing
the test study design. Make sure your lines are
not touching to each other. The gap should remain same. You can do right
amount of practice to make this streak accessible. Now I'm just double
lining the whole flower. So how easily we have
completed our three load? Now we will go to
the fourth one. For the fourth one, I will
make a whole composition. For example, I will
start with the flower, then mix them leaves, and find any mix some
water around it. With this really
designed, we learned, I'm making the stem
of the flower, adding two circular design
for making the leaves. I hope you are familiar
with this design. We have used for making one of our border designed
with the dashed line. I'm alternating, filling
the petals of the flower. Finally with some
bit more dashed line and making the water around it. With that, we are moving
to our fifth Lotus. This lotus is very simple, but sometimes to the eyes, it will look very difficult. The main reason is the new design that I
will be using here. Now, I started doing
that, that's neat, is see how I'm making
it look more appealing. In the main petal, I did two lines compared to the adjacent better when I am
doing one line of business. Now, I will feed the bottom
mass of the alternate bit. See how magnificent it is looking after that
and going towards my most favorite flower design or most favorited
load as designed. This kind of load test
is very auspicious. This load test is used
for many pictures having gotten goddesses
in the modern painting. I will request you to don't
look at PS10 everywhere. No, it really carefully and
keep some spaces empty. It will look more
beautiful if you do that. See, Hello, I am
stacking of the petals. Isn't it looking super amazing? Yes, it is. Let me know which of these design our
favorite to you. Make sure to practice
the lotus petals because it is a little bit difficult that students sometimes found. I really hope you
liked this lesson. We will meet again
in the next lesson, in the next video. See you then.
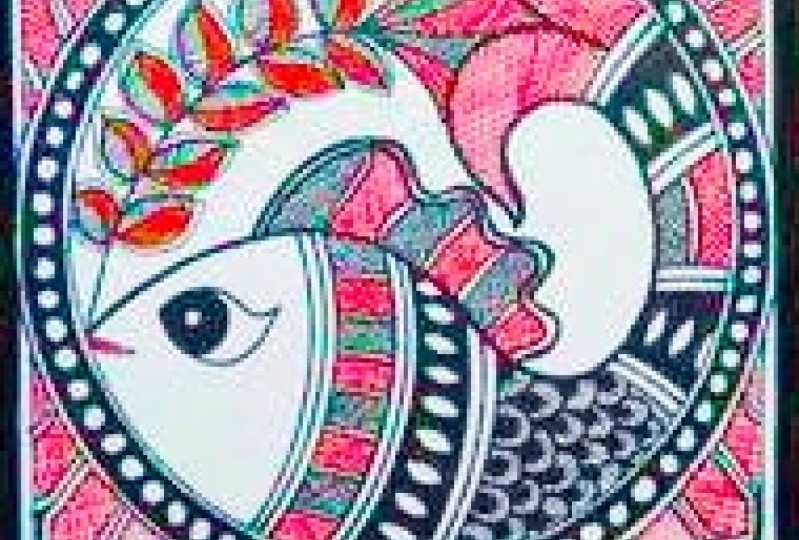
8. Madhubani Fish: Today we will learn model
when a single fish, as well as Moldova
need dual fish. Before starting the
fridge designs, I'm just using my
scale and pencil, making some spaces
for the fishes. We will learn clean, normal brushes and to
circular bearing fishes. We will start with
the fish shape. First. Three shapes are quite difficult. So if you can get
in the first time, don't worry, it's
completely fine. In my initial list, I feel the same, but
keep practicing Monday. We'll definitely give this. I'm making the friends of the fish adding some club design so that it looks more beautiful. And then the remaining spaces, I will be adding extra bit of friends so that it
looks beautiful. After this is done, we
will make the eyes, we will make round
eyes for Fisher's, not the elongated one
we learned before. Now I will use my two markers. One is red and one is black with Justin Nick buffer and adding
details through the fish. If you want, you
can use nip pen. Does deserve some
acrylic paints in water. And using your nib pen, you can do this kind of design. You can use any of
these then new want, Not necessarily,
you need to follow exact same design at mine. After the basic lining is done, I'm now doing the cosine. Well. First I will start
from the tail. After this is done, I will go to the Finns, see how I'm leaving some part and doing the
cutscene, the remaining stuff. Now, I will use my fine liner and some
shapes we learned before. I'm using that shape. This is simple catch any design. I hope you remember the shapes. Let's recapitulate once more. These are the shapes.
And for fins, I'm using the sticks
number of shapes. Don't put less amount
of that snake, or don't put too much
amount of money. You need to understand
this very carefully. Now, using the sixth number
of half circle design, I'm filling the whole
body of the fish. I'm not speeding up the video to make you feel the
real time speed. Sometimes people get really uncomfortable if they're
seen as good of videos, especially when they're
learning something. Now, I'm adding one to each of the spaces to make it
look more beautiful. I forgot to add the leaves. So let's make the fish lips. Let's just complete
this to finish by adding some more
details to the cider. But after the first fishes done, We're now moving to
as a second fish. This fish, the body
structure will more or less looking
similar to the first one, but the designs are
completely different. You can see the fish then it's so much curved than
the previous one. Let's make the neck
portion and the eyes. Now we will make a long beautiful looking
spin set on the fish body. You can do as many experiments you want for doing
this fish design. It's completely up to you
what you want to draw. Let's now feel the design
with cosine design. And we will come back later. After this, I will do
crosshatching using my red pen. So there will be red to
black cross hatching design. Again, I'm doing crosshatching
at the tail part. Now for the fence, you can experiment a lot, but I am using one Walter net, red and black design. I just love getting the design. It's more detailed and
look beautiful in Canvas. Exactly same way like other one. I'm filling this field with
Walton net, black and red. Don't ever do to fins.
Different design. Always make sure there
is a symmetry and a symmetrical
structure happening in the mud when you're painting. Now, with the help of
my black fine liner, I'm just adding very
small amount of scales and on the whole
body of the fish. Our second fish design is done. In the third slot, we will be designing small kind of fish that we always use. The previous two
fishes are really big, so it takes more time. But if you feel you have a smaller space and a
little bit amount of time, this fishes are
appropriate for that time. It's just the body. No such friends or designs. Yet, this fishes looks
very beautiful in Canvas. I will fill the whole body
with processing design, but makes sure the gap is
very large in this case, in the tail steam question
design as previous. Now we will do another
small fish which also looks very similar
to the first one, but no fence around it. Who can see how cute
that fishes are looking, even though they are
not as extravagant. And the previous two, after we learn single fish now
we will do the joint fish. The joint period of fishes are very popular in modern painting. You need a little bit more
extra care while doing this. First, I'm measuring
where my head will start and where
my tail we'll finish. It always should have opposite
designed from the start. So once we start the head, the tail will stop at the exact opposite
point of the head. This kind of fish we already practiced in our border design. You can see this, but it will be more designed
and more detailed. One from the tail of one fish, we will start another fish. At first glance, it will
look beautiful, difficult. But believe me, it's
not difficult at all. Then the circle, I used a
compass for making the circle. By the way, you can also
use freehand method. After the main body is done, we are now starting doing
the other details like fin, eyes, mouth, and scales. You can always make a little bit more bigger
fins in the right fish, but due to space constraints and making smaller, in this case. Now it's time to
fill the fish with the same kind of design
we learned before. If you want to speed
up the videos, but I will keep the video as real time as you are
learning from this. Soon the Fisher Body, I
do add different design. I just separated it into two parts and adding
red gotten into it. And then the other
half of the body, I'm adding blacks. Hello lines. Next I will do it cross
hatched. For fins. It is normal that she isn't, so I will keep that as it is. In the next part. I'm using cosine and I will give the same
design to the other fish. Also. You'll first
need to practice single fish and then you
can do the join bare fish. So I'm just doing the other fish as the same design
as previous fish. You already know how
to do giant fishes. Let's make another giant fish. I will be making three points, one top when middle,
and one bottom. In case of despair, the head will be joined and the Tailwind
joined at the center. Because of this reason, the points are very important. My fish have no spaces
for fields anymore, but you are feel
free to add friends and good amount of
big size of fins. You remember the big finish, the more detail you can port, and the more beautiful you
are painting with look like. Now first I'm adding
some black gluttony. And then at last I will add the Red Guards new
designs and making the eyes and slowly move
towards the bottom. Here I am doing a different
kind of Dove Body Design. Let me know which of the
fish design is fairly two. You see how beautiful is looking by red and black
that's in the design. This is not very difficult. You just need to practice. If you get the
basic shapes right, you are free to work in InDesign and every design
will be a masterpiece. Frightened. Let's now quickly finish the whole fish design. Let's speed up and watch. I love my previous designs
are exactly the same. So I taught making a
new design to you. I still like the
first one is best. But let me know what you taught. With this tale of disjoint fish. We finally made our lesson
for Module many fish. I hope you liked this lesson. We have more to come
in the next videos. So stay tuned for that.
9. Madhubani Bird: Today we will load aid, beautiful looking
mother value by design. We start with the first part, which is very easy and simple. I have already made eight boxes so that I can draw
the bird more easily. Organized nano. So I will start with a circle that we learned from
the shape lesson. So this is the
shape listen sheet. I hope you remember. And I hope now you can perfectly make circles
without any problem. After the head, I made
the big N by oval-shaped. I made the body. Now in the lower part, I'm just making one curve, making rings and the legs. Now using my Luxor fine writer, I'm just adding cuts redesign that we already
learned in the ship lesson. You could also fill it
with colors if you want. But today I will show
only cuts in InDesign. Now with another color, I'm doing cosine
in the wings with my Sakura Micron pen and just adding some
details in the legs, followed by the beak. Now, we will do a very
popular looking bird, starting with the head, with the popular circle, followed by the sharp beak. This kind of birds
as V-shaped body. So see how I'm making the body. It is very easy to
make this a bit, even be perfectly fine. Making some wings, some team
design followed by the legs. It is a perfect time to add some new designs in the wings. So here I'm adding, again, make sure the gaps are equal and the lines do
not touch each other. Now, I will fill
the whole body of the bird using circular shapes. Make sure that the circles are not overlapping each other. You can distinctly see each of the circuits when
you look at the body. That note, I have
completed the second buds. Now we will move
to the third one. The third bullet is more or less similar to
the second one. The difference is in the
wings, the head design. So let's look how
different it is. Yeah, I mean, some
moral beings in the body and some more
designs in the head part. Using my dead Martha, I'm just feeling some
glitzy design student body. I hope the Rings design
are well-known to you because we learned
this in the fish section. In one part, I will add black, and in another part
I will add read. This black and red
Catholic combination. Looks amazing in paper. With that, we're
finished our third volt. Now we will move forward
to the fourth one. Start fourth one, same as head, but we won't complete
the circuit. Instead, we'll start the neck, make the body, and
finish it in the tail. Now we will make the
lakes and the wings. Now we will start adding
details to the body. Just make the colors. And then we'll fill the body. Fish-like skill design. After this, we will add some
red actually designs to it. Now, we will make our fifth, but the head will start
with the half circle, followed by the V-shape
week after that, and making the eyes
followed by the body. This shape is very
easy to make and the bird is also looks
pretty proficient. This kind of birds we
usually see in spring. So these birds are very popular
in Modigliani painting. I just made some
additional design and double lining the boat. Now with my red marker, I will do I'm canceling works. With that. We are moving
towards our next bug, which is our sixth bud, will start with the round head, followed by the sharper. See here, the two weeks
are different in size. We give it the look of a better. We will make the wings
first and then the body. The body shape is very
similar to the previous one. I am making the branch on
which the blood is sitting. Then I will feel the whole book with
similar Mandela designers. There is no hard and fast
rule about the design. You can use any design you want. Just adding a little
bit amount of gluttony in the
wings and the tails, followed by some
design in the head. We are almost at last. We have only two birds
remaining. To start with. Start with the head. This is one of the favorite
position of a bird. See how beautifully it
is sitting on a branch. This figure needs a lot
more practice to master. So keep practicing to
make this perfect. I'm just adding a beak and
joining it to the body, followed by a tail. I don't have enough
spot for the tail, but you can make a
longer tail if you want, and just making the branches. And then I will fill the
board with various designs. I am not using any debt color, but you can definitely use Read that. Are this bird is also
almost complete. We will go to the next one. This bird lesson will
be very incomplete if I don't teach you
about in a flying motion. So let's make a boat
which is flying. I will start with the
wings instead of the head, and then make the head
followed by the eyes. And the body shape is leaf-like structures
that we learned before. And there will be
very simple tale that we already learned. Double lightning the rings
to give it the highlight. Now I'm adding some floral
designs in the rings. Don't add too many designs so that it could look congested. Just add the right amount of details in the
wings and the body. Just filling up the body
with dotted design. The legs will look like this. Finally, we have done completing
our eight bold designs. I hope you liked it and everybody let me know which
is their favorite word. In the next lesson we will
be called because pico, again has a lot of
variety. So stay tuned.
10. Madhubani Cow: Today we are going
to learn beautiful to magellanic cow with a
great amount of detail. To make our first cow, I will start with the head. We're going to make
a swirly design where the upper side
is thicker than lower side and make exact same readymades
to form the head. Then we made it the horns, followed by the ears. For the ears, we can take the inspiration from
the leaf shape. Now, we will make the body that we will start
with the upper portion. Slowly mix codes and
joining to the legs. Be careful while making
the legs because legs or something that always people
for what, and do mistakes. Slowly and carefully. There is no hunting for making a beautiful amount
of money being paid. After the legs that done. We are now moving
forward to the tail. After adding some good
study designs in the ears, I will color the horns. Now we will start
making the eyes. We will use the leaf or the Irish shapes that we
learned in the shapeless. And if you follow what
I've read requests to kindly go once more and
then come back again. See how am I am designing
the mouth part of the cow. Just adding a little
bit of gutsy design. You can use any design
new one in the forehead, I am making a flower. Now, we will start designing
the cow body part. For that, I am using my
black and red marker. You can easily find this
designs in the border. Listen. Additionally,
you can use any Mandela style design for filling up the
body of the cow. Take your time when making the design where you will
be reading more confident. Now, also in the other part, I'm making similar design. I'm not speeding up the process, but if you want, you can. But I went to feel you
how the real-time, like we lost you at
learning something. I really get into you learn
something by saying this. After the Black Death
steelworks is done, we are now moving
towards the dead works. But before that, let's make some details in the
middle of the body. This Gowdy's and is very
popular in mud when imprinting. This represents to the belfry sometimes attached to our cow. Now we will do, they'll read that scene works. The red and black work nearly
pops out of the paper. So I'm loving using that. You are free to use any
kind of colors like what are echolalic or postalveolar
for making this section. After that, I'm doing
the needs of the legs. I will also add some
additional details to the legs so that the cow will look more beautiful
and pleasing. With some dots all
over the cow body. We are finishing our first cow. Now, we will move
forward to the next one. We will first start
with the curb, because that's a
little bit difficult. Rather than the main cow, you need to fit the calf in-between the two legs
of the mother cow. So it takes a little
bit amount of planning. After the cuff is done, we are now proceeding
to the mother cow. In the first column, we learn how we can draw
a face looking forward. In this one we will make a side looking face.
After the head. We will make the eyes, make big looking way
too many eyes because that's the specialty of
modem and inventing. Now we will do the horns. They, yes, and the whole body. See how slowly I'm making
the whole cow body. Just make a little bit
cause and then make the leg make sure to place
the calf in between the legs and slowly make
their own mother cow. After the legs are done, I will now make, now I will start
adding some designs on the head using my blue pen. I'm just adding
continue designs to it. Just follow me and see how I am doing each and every
designs to it. Now, we will feel the
body with designs. We will take a
different step for the designing the body
than the previous one. You're not necessarily
have to do my design. You can choose your
own design if we want. This design is very familiar because we learned it
in the border session. After this, I am using the micron pen and adding a little bit more borders to it. And adding one to each of the clubs so that it will
look more ornamental. After that, we will
do its thing kind of design in the lower
part of the body. After doing this, we will join the two design with
another set of design. Now I'm quickly doing the
lower part of the body designed exactly same
as the first part. Take time and make a
perfect match when the cow. Now we're going
to make the calf. We may start with
maneuver any type of I and then eyelash, followed by I will do
some designs on the body. Now, we will do the
legs of the cow. Again, I'm saying I'm using red and blue color for
filling up the cow and calf. You can also use brown, yellow, red, any watercolor or
accurately color for this. Read some more details. We have finished with our cow. Read that final
touch in that tail. Our model mini
painting cow are done. I hope you learned and
loved this lesson. We will learn many more
things in then next lesson. See you in the next video.
11. Madhubani Elephant: In today's lesson,
we're going to learn different types
of Madani elephants. Let's start with
our first elephant. I will start with the head, making a circular shape and to making the trunk
of daily friend. This head movement is upward. So I'm making the whole
figure according to that. After the head is done, we are now making the years. This shape is very
familiar for you because we did this kind of
shape in the fish lesson. Just making a big ground for
the body and the lower part. Making the legs. Make the legs in
motion so that you can feel the elephant is moving. Now we will make the back
legs or the hindlimbs. So does making similar
to the first one, but in the movement
so that it will feel the elephant
is moving forward. After all of this is done, we are making a very thin just adding some good
studies and to the tail. Now we will start with the eyes. Making a leaf shape and two circles to make the
modal mini painting eyes. After that, we will add some designs using
my pin left marker. First, designing
the trunk portion and slowly move
towards the body. I just have filled the yard. Now. I will slowly, slowly fill all the body. That designs will be almost similar what we have
learned in the cow lesson. So you are getting almost total for designs because you can also utilize this body
design in the form of a cow using my red micron pen and just adding some
cuts need design. And now we will start doing
the front part of our body. I've stood the form part
of our body is done. Now. We will do exactly the same design in
that bottom part of the body. Mainly mother Bernie paintings. You can get this example. We have always done
the hidden design. Now in between them, I am making a small
flower leg designs. This flower design knew already learned in
our flower lesson. So I hope that is no
problem understanding it. Now, when it is done, we will slowly move
towards the legs. After this, we
will make males in the feet and then
design the legs. See one simple cuts. Any design that you can make so many different
designs from it. It's really incredible.
So follow me. All of these shapes that are available in the first
lesson of matter. Now in the whole body, I will be adding dot design
to fill the whole body. You can also paint the
whole body with black, but I like to use this kind
of dotted pattern design means that our first
Modigliani painting, an infant is done. We'll move towards the next one. I already made two drafts are cooler size for the
head and the body. So with that respect, I'm making the elephant. Now. The trunk will be
not upward like previous. Here, the trunk would be downward and the elephant
will be standing motion. You can see the year
is also different. So as the head shape, the eyes, on the other hand, will be same because this is the general
eyes that we used to do. After that, we will
make the body. This legs are really simple
than the previous one. Has less curved, rounded. So I feel it will be very
easy for you to follow this. Now, we will make the tail. After it is done, we will start doing
the designing. This is how I'm
decoding the head. Now we will slowly
go to the task and just removing
the pencil marks with that unwanted right now. And then we can start
designing the whole body. This is the real-time
data you are getting. So you are doing a little
bit slower than me, then it's fine for
you. With time. It will be perfect. Now, I'm making the years. I just double outline deals so that it will be more prompt. Then I'm filling it with
some flower design. Now with the dead fine liner. I'm just adding some new design so that it will look
more beautiful. The main color will
be blue for this. So also adding blue highlight in the ears and the whole body, I will be using two
shades of blue. Now, we will do the body
designing for that first time, making a square, outlining it. And in the center of the square, I will be making a flower. Are four petaled flower that we already practiced so
many times before. Enjoying each petal to the
east side of the square. And then fill the whole design with Pitney odd when you study. Let's zoom it a bit so that
you can see every detail. Clearly. Does designing the petals, the desktop, the part I
will do blue outlining. Filling the gap with light
blue cuts new design. Seen this two elephants and looking so beautiful together. Now, we will do the
remaining parts. So the dress is done. Now, I will do that
gutsy style in the tail. After this, the only
remaining thing is the legs. So let's do the legs quickly. See in the opposite
side of the leg, I'm making the nails now in the previously we did in
the opposite side. So you can use any
method you want. Now I will fill the whole
body dotted design. Yes, this part is
indeed time-consuming. But if you want a perfect
looking one-to-many painting, then it's a really
necessary for this. Take your time, make the whole body filled
with the dashed line. This dashed line will look amazing in the canvas or paper, whichever material
you are using. We will do the same dash
design in the legs. So let's quickly do it. The whole body is now done. Now using my micron pen and just darkening and
filling up the teeth. After this additional details
are two beautiful looking, a ligand looking Muslim and inventing any friends are ready. I hope this lesson will
be useful for you. We will see again in any
other course. See you then.
12. Madhubani class project: Success is a journey,
not a destination. Thank you all for
taking this class. I hope all of the lessons
are very useful for you. The journey of
creating is endless. Sun. Never forget to
enjoy the process. I would appreciate your
feedback and we'll also love to see your projects in the class projects section. Some of you are headed, your results and
some of you are not. But always remember
the starting line. And if you are new
to my profile, don't forget to
visit my profile. Look at the other
available lessons and learn new kind of forecasts. Please don't forget to check
the discussion section and the project resources band and also don't forget to review. I am very much reading for
your valuable reviews. Also, don't forget to
visit my YouTube account. There are a lot of forcats
is waiting for you.
 Nabojit Kar, Folk Artist + Youtube @An Aberration