Transcripts
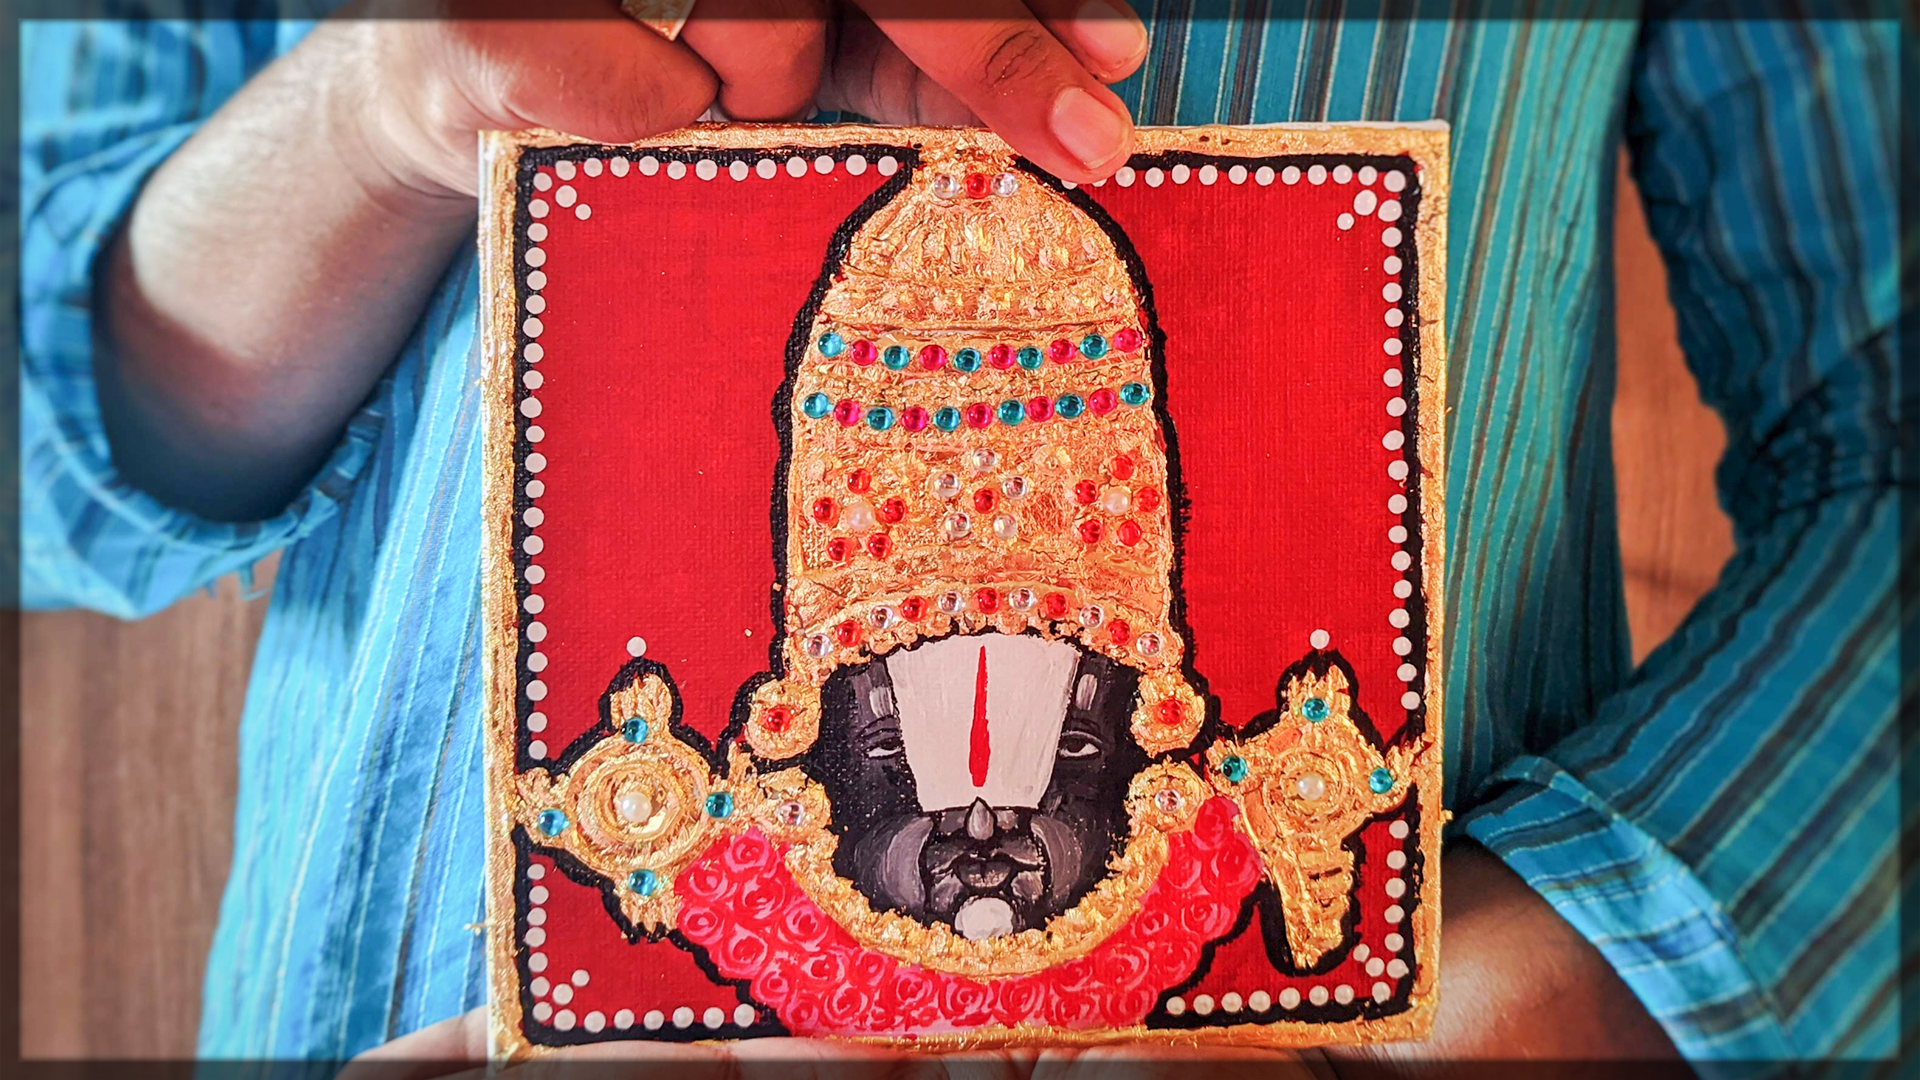
1. Introduction of Tanjore Painting: Thank you so much for showing love in the previous courses like Mother when he invited. In this course, we are learning that agile painting then retro style of painting is one of the most popular and classical M0. All the South Indian painting forms. A native of timezone, which is also less than Zoran Tammy learning the inspiration of this great solder art from places bed around 1600 AD. They are dense artistic work along with their vibe done at gutsy colors and reach surface make this tanager paintings distinguishable from the other forms of Indian painting. This painting also has a pretty discredited. These classical painting style of South India originated from the town of tunnel joke. These are called flourished way back around 1600 AD by the lattice. Often as you're under the reign of Visa and other allies. The dense composition, surface richness, vibrant sellers distinguished under painting from other forms of paintings. The subjects of the painting are mostly Hindu gods and goddesses. There are also many instances from the history when gene sequencing and other deletions and every secular subjects went depicted in Penzu Twinkies. Nowadays tanzer Keynesians are preferred by all art lovers. That's why I'm showing you today. Every child is an artist. The problem is how to remain an artist once we draw up high and novelty, five, this educator, and today I will be showing the ad from called Penzu. The courses are very detailed and you have to be a lot of patients by doing a tangible painting. To start with, first relearned how we can prepare the mug vote. We will make several layers and prepared the mark vote. After the Bode is done, we will do the tracing there and many important steps you need to follow while racing. So I will be discussing all of them. After that, will we learn how we can make perfect consistency mixture? And then we will do our phone work. The phone work is the most important part of Athens or 20. So we will do it in a very detailed manner. I will also give additional tips and tricks for the home births. After the lining work, we will do the bedroom colliding and followed by the gold foil were the gold foil work is one of the significant step four Pennzoil painting. After the world war, we are ready to do the meaner fatty work with lovely colorful stones. This step is my most favorite step. After some more step, our tensor painting is now done. How beautiful the 3D, the Punjab painting looks like. Visited called yes. Now it's time for you to join and enjoy the class X2 one to see more such kind of beautiful, lovely folk art. Don't forget to visit my YouTube page where I regularly upload this kind of videos. Till now.
2. Material for Tanajor Painting: In this video, we will look all the materials needed for making Daniel Joel often and showed being dean. To start the project work for us. We need a base. You will need a waterproof lightboard. On top of that, we will redo the layering. This is liable. Make sure it is. Take the techniques should be four MM per ten MM. Make sure it is taken because the way here doing the painting, it need a strong base, otherwise, the whole painting will collapse. To do the authentic tangible painting, this monotone. Now, for this work, I will be showing a canvas because Canvas is easily available at any places. Some people also don't want to do all the steps for making the board. So I'm using a tape canvas board. Don't worry, I will show you both the authority and the normal method so that you can choose whatever you like. Additionally, we need a white cotton clot. Make sure it is a 100% cotton. By holding it and see how the transparency is, no colored cloth will be working. So we only need white load four times or painting with speculation. Plus we need additional clots for the MBA Rosenberg. We need french of powder of powder and marble dust or my bell powder always strained powders before using it. So far straining, we need the safe. On top of that, we need a sharp Caesar, a camel permanent marker. Our compass, which has a sharp L, then a tick transplant PayPal for making the cone. This is the cone River looking at, I will definitely show how to meet coins. On the other hand, you can use a empty glue bottle in spite of the cone del, we need a freebie call AMR. I'm so sorry, it's so big that my camera could not do justice. Additionally, we need at this step pretty colors and some paint brushes to use it. One tick and 0 size blush when we do an a for this painting. Next is my most favorite park with this mean AS this stone with various colours, like yellow, red, blue, pink, etcetera. We are going to use this in the minute realistic. You don't need to do with exact same stone as I have. You can do it with a stone, then we need a carbon paper for the tracing work. I'm using white carbon paper. It is pretty obviously use of white carbon paper. Joel, painting has a lot of mixing going on called that we need a flat brush grab later mixture. Additionally, we need several bowls like plastic or steel bolts. Aluminum modes will also work the same. After that, we need gold foil. Here I am using gold leaves. Leaves are cheaper than gold foils. Let's open and see what's inside. You can see the pin golden leaves, which are available in the sheets. So I will be using this score sheets. We are free to use original gold foil, but they occur very costly forum normal people. So I will refer to this code lives. So these are the primary material for making the ten Euro tunnel chirping. Don't worry, in the start-up, every session I will mentioned, but material needed for each of the states. This painting will be very beautiful and I hope you all can do wonderful tangible painting which will decorate your hand. With that being said, let's join in the next video.
3. Thanjavur Painting Board Preparation: In this renewal of in-law and how we can make that underpin thing boards in some easy steps. For the broad preparation, You need a hard surface, are empty or board apply vote or any kind of paper will work. This is a waterproof ply board that you can use for making. But for this painting, I am using a normal thick cardboard. Additionally, we will need a white cotton cloth. Make sure it's a 100% cotton so that it can serve the more easily. Please don't use a synthetic paper otherwise the base will not recreated. The size of the cotton cloths should be more than the cardboard as we're going to fold it, flattened the plot, and then place the heart boat to see whether the size is accurate or not. You can clearly see the wanting to get from each side so that we can fold it easily while doing the base. Additionally, we need a free buckle white glue. You can use any kind of white glue available. And then we need chalk powder or French or powder. Make sure to strain before adding it. I kept chalk powder in this yard. Then we need a flat brush to apply the mixture to the base. We need a bowl to make them mixture. Then we need the measuring spoons. You can use any spoon. The measurement will be according to the spoons size. Let us once again look at all of the materials for the board making. Now in this poll, I'm taking a full school of Febby called white glue and adding it in the bowl. I am using a 2k KG bought the lawful glue, so I'm a little bit careful when using it. Now, I'm adding the glue to the bowl and shaking the spoon so that every beat of the glue is in the bone. Now with one spoon of Febby call an adding eight spawn off water while ending the wada, the glow when not been dissolved, you will need to mix it so that it would have been dissolved. So I start mixing it and see the wada is becoming milky white slowly and steadily. So I'm mixing is done, but some of the glue is attached to the spoon. So with finger, I'm just putting it in the water and mixing it again. So my glue mixture is done. You can see the consistency of the mixture. That mixture should be buttery consistency. Let me show you again how the mixture is looking like. Now with the mixture, I am putting the white plugged in it, soaking the white club will and squeezing it. Then again soaking To make it properly with. Now, we need to wait for too long hours so that the whole cotton cloth will be stretched and width so that we can apply it. You're gonna also covered it with the lead so that no extra particle is getting incorporated. Soviet bad after two hours. The cotton is when Lee stretched and width. Now we will still excess water and put it over the cardboard. There can also weighted gloves if you want, but I'm doing it in bare hands. So I'm just opening the cotton cloth in softly. Applying it over the cardboard makes sure there is no wrinkle over the top surface because that will create problem in later part. So I'm just creating the cotton and making it very smooth and perfect. Please take your time as this initial steps are most important because if the sun not right, then the next step will be also be problematic. As you can see, the Board has no wrinkles. Now let's turn the board and seal the cotton cloth. So this step is pretty self-explanatory, that you need to fold the courtroom sets that there is no path peeking from the top. See how I'm doing and stretching that cloth over the canvas. Once the folding is done, I am using the same mixture and adding with the fled brush. This will help to keep the cotton cloth at the same place. Do not overdo it as the cotton cloth is already wet. Fold the corners with extra care, and slowly covered the whole Beth part with the clue mixture. See, that top portion is pretty wrinkled list. Now I'm adding a layer of the Misha in the top as well. I'm going horizontal direction first and going from top to bottom. After this is done, we will left it to dry and then again give one court in vertical manner. After this is done, we will also keep it for drying. Sometime has already passed and you can see the body's pretty dried. Always check with your hands whether it is derived or not. Now we will make our chalk powder based for that, we are using the same mixture that we're using from before. Now with the Febby call and the wonder mixture, we will be adding our job powder or the fringe dark dust. So this is my chalk powder. Make sure to strain the chalk powder before using it. Now with the same spawn, I am giving one spawn off chalk powder into the mixture. There is no hard and fast rule about the measurement, but the consistency should be similar. After adding the chalk powder. Now, we will mix it. I'm using a bedside of a blush to mixing it. Don't use the friend side of the brush as this can destroy the brush, bristles. Mix it thoroughly. To check there is no lumps in the mixture. As you can see, this is will be the consistency of the mixture. For the race we partition the mixture should be lottery. And for the next steps we will p at different consistency mixtures. You can see the consistency once again, how slowly the mixer should be. Now I'm taking the already dried board and putting them mixture with the help of the brush. Same as previously. First we will go with the horizontal direction and slowly move from top to bottom part. After that quote, we will again go vertical direction with the same mixture and the same brush. After this quote is done, we need to let it for list. And after he died, we need to repeat the same steps as we did previously. We need to do four to five coatings for this. So now it's dried. Check mint, the back part of your hand, whether it is dried or not. As we told now, I am doing the second layering in the same way we did previously. Now let's give the vote for drying. And after it dies, again, do the remaining score these. After two days of drying and 45 quotes, the board is now ready. The surface will feel a little bit more drought. For that, I am using a sandpaper and just cutting a small piece of sandpaper to make this edifice smoother. Be cares by losing the sandpaper and sand grains can be very much dangerous. Port your fourth finger at the back part of the sand and the thumb in the front. And slowly we rubbed the sandpaper against the board in a horizontal manner. Will very slowly and don't rush. You can see the smoothness after doing it. Don't know the whole board at lines, it will create a lot of problems. Always go slowly at one part to the another part. After you go vertical. You can also have to do horizontally. So ten to the board, and then do it another side. After doing it for quite sometime, you can feed your vote surface is now up quite a bit of smoother and you can easily feel the difference from previous and before. Now, there is a way to skip all of the steps before by using a cotton Canvas. Yes, this is the cotton canvas board. This board is a six by six inch, quite a thick, kind of bold, and the texture is also very good. As you can see, the grains are very prominent and the thickness is very prompt. In the next videos, I will be using this canvas for making the tangible painting. So see you in the next video. Peace.
4. Tanjore Painting Tracing: In this video, we will learn how we can draw tracing on your boat by stuff all with the help of Sahota micron pin, I am outlining the design. You will get this design already done. So you don't need to make it. But as I have to give the original design to use. So I'm drawing from my own. I will start from the right portion and slowly move to the left one. And let's now speedup the process to save you time after the paperwork is done and just it is in the pencil lines. Creating your own design intangible painting. It's not yet difficult. Everyone can do and new picture while doing that than your this is the bacteria will get which you need to print it out. Make sure the picture size is similar to the canvas ACF taken, as you can see, I am marking the spot size of the canvas so that I will get the idea how much the painting I should need. Now as we marked, we are now proceeding to the main tracing plot. Now with the shadow Caesar. I am cutting the markings according to the canvas. Won't be careful while using the sharp CSU. As I already told before, make sure the size of the painting is matched exactly as the canvas size. As we're finished drawing. Now, we will set the picture in the canvas and see whether it is matching it or not. Now, I have taken Nigeria low carbon paper for the testing purpose. You can use any other colors, but the year local or give a sodium Luke and would not destroy your drawings. I will not cut the carbon paper, but if you want, you can cut it according to the canvas size. Let's have a look. How the canvas with no OK. Now we will keep this aside and with the scale and a pencil mark out the center point of the canvas. We can easily found this interpolant of a canvas if you join the corners of opposite side. So let's join it and find the center. Now in this same way, we redefine this datatype, boil off the drying. After finding both of the center points, it's styled to align them with the help of a sharp bends the light and aligning both of the center points of the drawing. And again was see how I am matching the stand-up wines. Please do this step with extra clear as you can easily do a mistake. Now, I am adding Cellular tape in the top side of the painting. Follow carefully how I'm doing this elliptic. Now, we will turn the page and insert that carbon paper in between both of them. Keep in mind, we don't need any sedative for the carbon paper. Tried to ads is a position slowly. Don't rush while doing use. Now I'm attaching one more sensitive to the other side. You can also use masking tape in the place of cellular tip here. Now, for this case, I am not attaching any facilitating the bottom path. But for beginner, I would highly suggest to add sedative at the four sides or Dupain t. Now, with the sharp mechanical pins in, I'm outlining the drawing. Do it slowly and steadily. Try to do it in one go. Don't rub your pins sin against the carbon paper. Make sure to cheat by lifting one side of the paper and seeing whether it is already working or not. As you can see, I can clearly see two strokes by yellow colours. Now we will place everything in exact same location and start tracing. Again. See how I'm doing. All of the lines in single stroke. Don't rub your pins by creating multiple short lines like this. And this method is not right, and don't try to emulate me in this part and go slowly. He had been lying, which lay knew already the tracing. You can also use a bin empty pill for the tracing part. It doesn't matter. So without wasting time, let's just quickly finish pressing bar. You don't need to do all the intricate details while tracing and because we're really enjoy it later, but let's now lift the garment. They've been a little bit to see whether we have done all the paintings and all the tracing correctly or not. Failing, we're done. Let's now remove drying part. Keep the carbon per, per side. Try to fold it very nicely so that it won't be destroyed and we can use it in the next painting. So now we will slowly open. Thus, yellow tape from the Canvas do not make any script or any tiers by pulling out this delta. Now let's have a closer look to see how the tracing would look like. As you can see, the tracing is done in quite nice way. The yellow lines are visible. And we can see side-by-side the tracing picture and the canvas. In the next video, we will learn coordinate reputation base.
5. Cone Making for Tanjore: In this video, we will learn various tables on making cluster foiled. You're named antique paper as invents the FDIC enough take transparent paper for making the corn. Now, we will slowly start making the phone or link with your thumb in the middle of the page and just rotating from one corner slowly as you can see, the cornice forming. Now as the deepest formed, hold tightly and then fit the right-hand thumb, just routed that inner part of the phone and make it smaller in size. Slowly, you can find the cone is forming at just the inner portion so that the thickness is according to your Sieyes. Remember, for bigger picture, you'll need to make a big cone. And for smaller part, you need to make a smaller form. And just one thing to keep in mind. The end of the tape should be a single straight line. If the coin is becoming straight, then your phone is perfect. Now, we need to seal that endpoints so that the material will not be out. As you can see in the inside, there is a lot of opening ports. So using a similar table, I'm first attaching the inner parts. Make sure to attach every opening ports insight. As sometimes material gets incorporated it in the creek sender threats of the insight. Very gently, I'm attached. Are there. It's not destroying the ownership. Now we will add AdSense that are there in the outer site. We always use one hand to hold your paper because it is the mean for making the corn. Now slowly attaching accelerated around that thing to make that a little bit more stronger. Now gently roll the steam so that it will cover the sedative. Previously, we have used a square from making corn. Now I'm using a rectangle. This corner will be fairly small, which we can utilized in the final detailing word. Remember one thing, the smaller the cone, the easier to handle. Notice that the coordinate making is that I am adding the center there from the outset. As previously, you can use any kind of masking. Masking distinct does BGN. So you do not destroy the whole shape of the court. Just speeding up to things so that you don't get bored. So as you can see, finally, our phone is done. If you don't find that tidbit, but don't worry, you can always use any kind of thick paper. This plastic I got from the milk container. And preparing a cone from this, separate the two sheets and remove any rough edges from the sites. As I showed previously for link the other side with the left hand, I'm just folding a corner with the help of the right-hand. Adjusting that so that the people become sharper. And later we can fluctuate according to our needs. We can see the straight line it's farming. And the straight line at the end of the cone. And inside you can see are open-end. Now with the right hand thumb, I'm just facing it and moving it outside. We then see my hand movements. Now our corn is almost done. You'll need to fill it out of the coal. Remember this thing? Because otherwise you couldn't get the material. See how easily we can make a cone. And every time you will get a perfect looking corner like this. Now, using this, I will be ceiling every sides of the full. Now there is a gift-wrapped paper available, which is not yet take, but some people also like to use phone maimed by this stepping paper. Let's now have a look how we can make a code using a thin paper. No. These are the cores we learned a big cone from the middle container and two small poems from the transparent think sheet. Let's not talk about the thin bed, but now you can always keep this depths y, but you can use an empty bottle. This is the empty glue bottle and it has a very small team. As you can see. It will be really great if you fill this container and use it for the cone. But it will be as good as the conduit. If not better in the whole tutorial BY using this cone. But you can make your code and do it according to your neat. With that being said, let's continue to the next session where we will learn how to do the work and make the mixture denote. See you, bye-bye.
6. Cone work in Tanjore Art: In the last video, we make cone and this video we will do their own work. To do their own work first, we need to make them mixture for that. I am taking a black bowl and in that I am adding my marble powder. Make sure to strain several times the Marvell powder so that you can get the fine dust for the mixture. Now I am adding one spoon of Marvel powder in the plastic container. After the measurement is done, please close the lead and keep it in a dry place. Now with one spoon of marble powder, I'm going to add one spoon of baby called white glue. It's not a hard and fast rule to add one spoon of glue to one's pool of dust. But is a general rule. You have to make the consistence is same. You can add a little bit more or less glue for the mixture with the help of scrape by and just gripping the excess glue which are attached to my spoon. At first you will feel like you need more glue, but later second and mix it again more solidly. You can feel that that much of blue is sufficient enough to make the best. Please clip all them. I will powder form the corners so that you can get every bit of the dust. As you can see, my mixture is almost done and the consistency you can easily see. Let's have a closer look how the consistency it should. We, it's almost looked like the better of your cake. So if you're a cook, well-done. Now let's see how we can feel the cone with the mixture. Just hold your cone and be careful with the mixture. And when the hint of a spoon gently pour the mixture inside the cone. Remember, you need to feel only 1 third of the cone. If you feel like you added some excess amount, don't Verde using this paper's scrape off the excess amount of material inside the cone. Now we need to seal the top portion with 3D much carefully. And gently try to close the lead and keep us relative ready for the top portion so that you can see all of the materials inside if its leak. That means you have more material inside the phone. Now, with the help of a cellular tip, I'm fixing the top portion. Also, don't forget the extra foreigners would use as much as cellular tape. You needed. This seal that top portion to check whether the coal is performing or not. Just squeeze a little bit into the wall. Now if we feel the thickness is a little bit less, using a Caesar credit from the top. Make sure to hold the cone at 90-degree angle so that you can get a perfect mouth. As I told before, I'm going to use the empty favorite call glue bottle. So this is the word lie amusing, which have feed with the same material. Now let's see how we can apply them we showed on the board. Now, go always from the right to lift. If you are right-handed, always grow from left to right. This quiz, the wattle and tried to put the design from the top of the picture. The yellow carbon line will always guide you. So follow the line and do the broader designs. We will do the lining designs in the later part. Put a little bit more material because after he tries up, it will be flat in. Be careful not mess up with the neighbor designs. After applying the material, the material begins to flow a little bit. So always give a little bit more, get that what you desired. Rotate the board according to your need so that you get comfortable. The same way you have to do if you're using a cone. I'm just placing it and just lifting aids. So it's like pressing, getting them material and then lifting from the edge. This process seem to be time-consuming, but believe me, the end result will be superb. So I skipped one of the circuits here because if I do that, it will mess up the whole painting. So once these things is dried up, then I will come back to this part once again and do the outer circle. Now you can see the two circuits have attached due to the flow in case of the material. Now, using a sharp compass or anything sharp, I'm just making the separation. This is the problem everyone faces. So it's my duty to show you every possibilities. You can also use a pencil. Sharp pencil to do the separation. Even if dissipation extends to flow. So you have to do it continuously until it's not getting attached. Now, I will start with the middle portion. See how I'm making an holding the cone for the cone work. Just give gentle pressure. So I am making one circle and just rotating the canvas and making the circle. After this we will make another silicon and the bottom. Now with the help of pins and just making the round more prominent. This process will take time. So invest a whole day for making the phone work. Now, I will do one thick line. So see how you can feel that thick line. And just going horizontally. And making credit lines. Have a closer look to how we can do a thick line with a thin name. If you follow this step, I can clearly get into you that you won't get any kind of Greg in your painting. Give some time to dry a single design. Don't do the neighbor designs just after that, it will mess up the whole painting. Now, I am doing a design which is well separated from the previous designs. Using the same technique, I am filling up the thick line. Take your time. See full Radio One's then do eat yourself and then again come back. The cone preparation needs time to master. So always give time to it so that you can master the cone work. Now, just speed up a little bit so that I don't vote. You see how we started from the left side and slowly moving to the right words. This will give a light position for the hen to place. Now I'm making a similar design from the left part. Both shapes almost seem just a little bit of difference. See how I am making a gap so that we will come back again and do it later. Now I will do the violin for that. I am making some dots. Then we will join me with the single length. Make sure the dots are evenly placed, otherwise they will come by. This is a near real time video law speedup. So you gotta get the right kind of direction, how the speed will beat. Let's now add some more details. And the top of the painting, this is a flower leg design. So I am ending five gods. And even between these, I will add a single dot. Now for the top portion, I am again doing that take length is equal to vertical strokes I'm filling up take ln. Now we've written those some long straight lines and join dead. Oh, the top B. Keep the distance between the line so that they won't get messed up. We will give again another set of lines when these lines are trade up. Still two lines attached, Soviet the pencil and now separating them. To make the peak point, I am adding a big dot. Now the starting point is dried up. Use your hand to see whether this dried up or not. Now, I am making the outer circle as the previous result is already died out. It won't mess up the new circle. Radius slowly and very steadily. And doing each and every details that my carbon paper says. It's because of this reason that tracing part is so important. I have now the speeding up the process a little bit so that I won't talk anymore. So why does take lens and I'm adding to Edison lines, tried to incorporate in more materials so that it will give more 3D law. Always check which is dried and reach by distill wit, and do your own work accordingly. Right? Third, the designing said done. Now we're outlining the crowns Bartlett. Now, let's give some time to dry. We will come back again and then again do the design side of competing dried-up. Now, I am making some more additional designs. If you're messed up like this. Don't vary. Just get a pencil or a sharp thing and just remove some excess parts. We will design one line with this dot design. And we will leave one tick line with empty, because we will do mean authority, stonework in that lens. This is very crucial to do this step after the whole work is dried out. Otherwise, you know, it will mess up the whole of the painting. Filling the gap. And knowing the final detailing work, let us now speed up the process to see the final outcome. Okay? This is how the Canvas will look like after doing the corn work. Still we have some big remaining. Now the corn works is done. We are left with the bordering, using the same bottle and doing the bordering part. We will keep the voters simple because there will be a lot of Mina Hadi works in inside. Rotate the canvas according to your need and make sure that all the other designs that dry it out. Otherwise, there is a great chance to mess up the whole painting. For border, I feel this bottle is not sufficient, so I will be using here is my gone. Now, let's make the border every day. Always do double-blind to fix your border design. There is no hard and fast rule that your border need to be straight just to recreate dead so that the painting with low. Sure. After we have completed one more step towards Sudden Job painting. See you in the next video.
7. Fine Cone Work Thanjavur: In the last video we did. In this video, we did all this for a minute. Now, I've taken the same leg bowl and adding chopped powder in it. Yes. The last time I used mobile powder and this time I'm using chalk powder. It's my personal choice. You can go with Marvel powder and add a little bit amount of less glue to make a thick paste. The chalk powder also need the same amount. With one spawn off chalk powder, I'm adding one spoon of Febby called white glue as previously, always make sure that the paste is thick enough as we are doing fine detailing work. Mixing them thoroughly. Makes sure you skim each and every part from the bottom. You need to create a very thick base for this method as the lining where you don't want your material to be flowing. So a thick paste we do justice for your work, makes We'll see how long I'm mixing to get the perfect consistency. If you feel your mixture got a little bit more flowy. Don't worry at the little bit more chalk powder. We need very less amount of chalk Bowden in it because we are doing the fine dining world in a six by six inch off canvas. I've failed them mixture in a small cone. Make sure to use a small core because it will give you more control. Now, don't cut it from the side. Always fold it in a 90-degree position and cut it from the top. This way you will get a perfect mouth for your lining work. Now let's begin the line session. Make sure to check before applying it to the Canvas how thick the paste is looking. Now we will start doing our own work. This is the fan was before doing the cone work. As you can see from the last video, this is completely dried up, so we can do our own work. Look out till I will give you the lining. I will just hold waiting. With the desires that we have already made. You're gonna see how slowly and steadily and making the designs. Here also, I am giving small small details. It's called verifying the tenants. You can or cannot do this, but I'd prefer if you do this step. This detailed work will be more visible when we will do the Foil work in the next video. The patient and slow while doing this. Now let's look it from a different angle. Always going from left to right helps to maintain a good sustainability. As previously said, I'm just outlining, hovering and giving thin lines, thin details over this shapes. Have it close and look to find out that the data links may patient you'd already. And that's the main point. Because we are using a thick based. The mixture is not flowing like before. So always keep in mind. For the first call work, you'll need a tenant based and for the detailing work, you need a thick paste. Then you are good to go. Let's continue detailing the whole painting. I have tilted the painting so that I can do the lining work more easily. Let's now zoom it up to see the details more carefully. There is one 3Q can apply, which will work 99%. Then while lightening a straight line, stop your bit. By stopping your breadth, you can gain more control to the lining section. It sounds a little bit odd, but believe me, you try once and then let me know. Always keep up handy so that you've been wiped them out. And then again, start working. See how slowly I'm adding everyday deaths. As long as the wallet. But make sure you add bring it with SSH. If you can reuse it really is a leak. Let's now speed up the process a bit. Now I am adding some more detailed links in that island section. It's completely optional, but you can add some bit more detailed links or some less. It's completely up to you. And just uplifting the border of the crown with one more detailing line. Then GD paintings are really detailed. That's why it is so much pressures and everybody loves to learn this painting. See how the help of two when I am doing the corn work. Believe me, after doing this much of works, your hand start beaming. The main thing is that after this step, the bending is looking like this. Don't worry, there is a lot of what's happening. So the boat, this steps we're going to meet again in the next video. See you.
8. Tanjore Acrylic Coloring 1: In the last video, we do lightning work. In this video we're going to do color feeling it. To start with the colliding, let's look what material we need. We need a pellet, some brushes, and few colours like white, black, n, p print. Also keep up full of water handy so that you can wash your brushes of. Now, I am taking some red color which will be applied to the bed load of the painting. Many people use poster folder for the ten GD painting, but I am using here at pretty color. Now I'm adding a little bit left. Don't use water while mixing acrylic color. Because acrylic has different pigments, I'm taking very less amount of Black because we intended to create a raiding medal kind of look with the small flat brush. I'm just mixing the red with the black. You're gonna also took hell of a pallet knife. If you have that. I'm mixing more amount of red so that I can get the perfect decidable maroon color. Now we've prepared the color. I'm taking the canvas. I am doing it after two days. So the whole painting is almost right now in the bed blown and thrilling with critical. I am using here at UF sled brush, but you can use any brushes you have. There is lonely state if you overlap this color when he leaf works. Because ultimately we are playing a gold foil on top of that, so it won't be visible. See how slowly I'm creating the first layer. Always make sure there is one to two layers of colors so that you can get more richer colon Look. Don't worry about the small parts colored it as you wish. Please try not to use any kind of water in it really pins. If you are using a poster color, you can easily add water to the homeless. I am using Canon brand equity lead. You can find Likud ticks and many more other brands to. Here I can use a bigger flutter rash, mood, but I'm referring using this small brush because it's gives me more control. Rotate that canvas according to your need so that you can do all the work more comfortably. It is not necessary to brush every time you're going to get very amazing Luke seafood depth some paint with the paintbrush. Now, let's look at the painting procedure from a different angle. Each work is real-time. So I hope you don't have any problem understanding. I am leaving a white gap for the Garlin work, the rows Garlin that we're making at the last. In the other side. Also, I am doing the same. Be careful while doing. And don't just rush through it slowly and patiently. I hope you will get the amazing looking result. Now we will do the Garland for that in a palette. I'm taking red and a little bit of white and mixing them to become a lovely pinky colors. Now I replaying the pink color in those island position. But so far line giving the flat wash. And after that, we will create some depth in it. So a flat colliding is done. Now I'm adding a little bit more relate to the bank and from the site just to making the shape so that it will give a 3D island. See how it's looking more 3D now. Just blend everything with the brush so that everything looks more seamless. And just blend it. Light strokes. You can also use the acrylic retired or if you want to blend it more properly. Now, at the center of the violin, I led the acrylic white so that it will get more 3D depth look. Now we will do the face part. For that. We need black, white colors. From the pressing you can see there is a white tea love in the forehead, so we will keep it white and collecting a list of the push. Now I have taken some black color in my pellet and with the remaining white, we will do the face first with the dark. Let I am outlining the whole face. I hope you probably know at chronic pain deep beneath the war from that. So all the data physicians now, we're almost done during that dark outline. We're going to continue doing that phase shift bots makes showed that is low white 5G, meaning when dreamed up the left portion. Now I'm mixing a little bit of white and adding to the black so that we are getting a grayish kind of looks. With that I'm filling up the face rotating that Ken was so that I get an even kind of look. See how I am mixing the white, yellow, black, and the just giving a great, great kind of colors. Always look at the final image that I have given, how the final outcome will look like. That will give you an idea how you need to do the official lot when Cretaceous always represented in black color. It's his degree d. Now, I didn't make that leaps out by lips, lower lips as well as the chin. See how I am keeping some whitespace says in-between the black face. Okay. So I hope you have the patience to do it. Ie. Okay. That is really great. Saudi Indian templates, which are really magnificent. This is our slope and I will give at the last step. Finally, I would just adding your white Gullah step. Our bad loan colliding is done. And the most important. If you have a lot. See you in the next video.
9. Tanjore Gold Work 1: In the last video, we finished doing the Cornwall and then detailing work. Now we will know the wolf while work. After two days of drying. This is how our Tangier painting looks like. Now we will do the goal for L1, but that I am taking a small leap of a plastic container. And in 08:00 AM, adding our frame, we call vital clue. You can use any kind of white fabric glue. Please don't use any enamel paint or something because that will stain your gold foils to black. So I will always suggest to you craft glues for this, I need to put some paint brush to apply the blue and cotton plot to emboss the work. Then we leave voted leaf. You can use gold foil to do this. First of all, let's look at the gold foil that I'll be using. This is how the packaging look like. After you open it, you can get ten gold leaves. And these are really very thin leaves. They are very delicate, subtle touch them very carefully. And just lifting the foil. As you can see, this is how the gold leaves comes. I am using the cheaper version, but you can use real goal that will cost you a lot of fire, like 20 times higher than this. So I prefer for beginner level, you will use this word leaf. Now, we will apply this on the relief parts or the 3D parts of art painting. I will show you in really detail how he can do volt coil work in your tangible painting. Now with help of a paint brush, I'm just adding some little bit amount of glue each time in their relief, but see how slowly I'm doing it and make sure it reaches every freezes on the really false. See how slowly and gently I'm doing LU, work than Joe painting demands a lot of patients. So be patient while doing it. Now also gamma beta, I am just DID a little bit leaf, which will be exact to the shape of the left circle. So see how gently I am placing the leaf over the design. And then with the help of the cotton cloth, IGM titers, dabbing it lightly, and then we will debit pressure. You can see how beautiful the embossed part is looking like. Don't worry with the excess, but as we will be going to remove it. See, this is how this will look after the gold foil work. Isn't it beautiful and Super 3D? Yes, the ti's. Now we will remove the excess back from the design. For that, I am taking a compass which has a sharper in. You can take any pen, knife, or up paper Center for these, but a compass for me will do the job. See how slowly I am marking the excess part. And as there is no blue in that part, it is easily removable. This processes can create a lot of boulders just for that I'm using a very fled brush. You can use any makeup brush if you have. And then I'm just removing the excess gold foils. I wanted to show you every details in real time. If you want to speed up, you can speed up the videos, but I will refer to watch in real time. And then second ten, you can watch it by speeding up the video. See how I'm doing the porphyrin justice to the shape using the compass. Now, as I am using a thin gold leaf, I need to give another layer of gold leaf. So using the same technique, I am adding one more layer of bone leave air above the previous version. If they had any credits up into the war leave unfortunate that these, so this method will see neat. You don't need to do double layering if we are using the audience and we'll pull foiled. With that being said, let's now move to the right. Desire. Again, I will be applying glue with the same brush. Let's have a closer look to the subject. See the incorporated rate in the relief work is now what sale by the gold foil war. So doing the read round, if you did some mistake, it will be seen by the gold foil. Now, after this is done in the background of camera, I'm tearing up a little piece of gold foil through attach in the top. Our gold foil is ready. See how delicate and thin it is. Then I'm slowly applying to the design and with fingers first time giving a light pressure. And then with the help of cotton cloth, I will be pressing it hard. Sometimes there is some foil to your plot, so off-camera and also removing it. You can clearly see how I am rotating the canvas to work with more convenience. Now I find some more pieces have been to the whole file. So I will be at that seeing one more layer. This really give it more detailed Luke and the wolf while will give more or I don't want to eat. So this is the loop after we did the two side designs. Now we will do with that ground part. Now, the last two pieces are very small, so a single gold foil worked 40. It is lot while for the Crown, as it is so-called brink. So for controlling it, we need to do is part by part. So in the top part island touching, now glue and we will do the Volvo and work in that part only. Please don't waste this exist but stored them because we're going to use it at the later part of this video. Okay. Now, while doing the edges in path, remember, we need to overlap the gold foil. Otherwise it will not look good. Just slightly overlap. And then we can proceed with our next packed. So following. Okay, so I'm now doing a mistake is this kind of happy accidents are part of our work. So don't buddy, once it's out or something had been, use it. And don't just disheartened by doing it. Make sure you are not wasting the gold foil because it's really precious and really costly. Remember, the first small p's to be saved from the top of the Clown. Now I am using that. See how I am saving a lot of foil by using the site excess portion. Same way I am Debbie with the cotton cloth to do the embarrassing work. And the bottom part of the problem. So I've worried about getting much less follow. Okay. You can see by using my hands, fingers content blood, I'm always dabbing the whole file so that it can seem a little bit more better by adding glue and file in some of the places where we can see the double bass. This is our bending is, isn't it? Yes, indeed it is.
10. Tanjore Gold Work 2: In the last video detailing what is It's a secret? Yes, sir. That's it. The After the jury learning designs done, I am now doing the island. This is the tricky part where the xylem this kind of roundish, but we can tear the whole foil according to the shape. But that we need to be extra careful while doing this. Okay. Like we did previously, I'm just there being with the bottom clot normal debit with a lot of pressure because it while cleaning the portions very carefully with compass, you can see how slowly and steadily I'm going. Again, don't lose hope. Please be steady. The more slowly you will know more beautiful you're painting. We'll come out. Now I reshape the canvas so that the excess hole file will be removed. You can see how the dust is following. You feel that stellar, gee, make sure to wear a mask. Now I will add small parts of the whole file to fix some mistakes. Okay? If you look closely, you can file some cases happening where I can see though Canvas only in that part I'll ending smaller gold leaves. These are all the x's before. After the main motifs who had done, we are now left with the borders. So I'm adding glow with the help of a small brush and then similarly ending the gold foil. We need very thin amount of gold foil for the modeling. So make sure that see how breakable the world foil Sal, make careful while working with it. Don't forget bookcase it using the Korten plot. And similarly, the whole borders at the four side of the painting. Yes. Okay. So finally the border in one state is done. We will quickly do that other sites. Let's see. So a lot of times what about adding? So doing very patiently and reading carefully. You can also do stone about cinder border that we will see in the next video. Okay. Anyway, it's the beauty of the cannabis. So I still don't always give a Korean border to your tangible painting. The exit node name to me perfectly straight because we knew bled outlined over the edge in the next video. This is how the border should look like after tearing up. When that we're almost in this video. We will see again in the next video with any works.
11. Meenakari or Stone Work: In the last video we did gold foil, but in this video we will do the ratios mean acai work, I hope you remember. This is how our canvas look after we did the gold foil, but now on top of it, we will be doing the mean IF anyone for that, we need various types of mean us. So PFAS, these are been these and this can be used as this may now. And then we have a set of Nina's which looks like this, which have I shipped and round shaped mean us. Then we have this kind of stones, which looks like Paul's. Next we have a set of 400 pieces of stones having colors of red, green, yellow, blue, and purple. You don't need this much amount of stones. I'm just showing you what are the different kinds of stones that you can use for your 1000 painting? This tones looks gorgeous, but in this painting, I will be using the first 400 state of stones. First thinking the stone on the canvas, I am using this fabric gum. You can use the previous light blue that we are using. But this favorite gum is a little bit stronger, so it gives spin so that the mean AS won't be falling. I'm just taking out the mean as in a flat surface so that it will be easier for us to pick up them, Nina, and apply it on the canvas. See, before applying to Mina, I have added some Nina's already. It's not attached, but I have put it on the canvas to see how the minerals will look up to applying. Now, I'm putting a little bit of fabric glue in the place where Nina we've replaced. So now with the help of the backside of a brush, I'll picking up one Mina and placing it on the canvas. Now I'm using a tweezer to place them in or you can also add a line and then place meal as step-by-step, the global dry up and become completed transferring. So nobody's in debt. As you clearly, that I am doing one white and one red meaner work. There is no hard and fast rule about the colors you can give to all, while all bread. I am giving alternate red and white. Okay. With that, the bottom line with meaner Freddy works is then we will add a little bit of Rena's right or the left side of the painting. Here, I am using local or MLA, but it's upbringing 2P, one colored blue, one kilojoules. Be careful not to tiered up the foil part by putting the mean us. Now in the center part, I'll ending the toilet structure. You are free to use the white stone in this case. Now, due to some mistakes, I misplaced some of the Minos. So don't worry, lead just predict everything and taking the handful per tweezer to fix everything position. Now we're gonna do the four links in the both side of the face. So I will chose the red and white stone for this kind of work. Let's now put the stones on the restrictive place. Now I will use, again blows thoughts, right? But be very patients where you're doing it and it's speeding up the process. Because sometimes it's very hard to pick up the mean as M-phase state. Remember we made up flowered in the crown. So now we will fill it with stone. The Stones surrounding our lending fly right in the center of the flower. And then I accidentally. So if we make some happy accident stone buddy, it's focused in five hours, Right? Right. Okay. As you can see, the first stride of attempting the putting the stone in the center is not work. So don't vary. It happens to everyone. So we will try again. You can clearly see how beautiful the banjo painting loops with the mena. Some people also do, first me laugh at IED before doing the foiling. Well, in that case you again need to cut the whole foil so that the VLSI visible. So I prefer this lip art. So I have to update ten was 11 playing your landing. Told fellows, low pink laptop anymore. Let's have a look. Two. Who would have completed another line with another stepped off alternating stone. Now, I am giving the same layers. In the top portion of that layer, there will be two sets of lines with pink and blue stones. Again, you can use any color of stalls. As far as you have said, you could use the exact same amount. Bush stones are exempt, same credit of stories, copied. Everything. That being done, there is very little amount of work still left. So let's do it. With this. We have completed. I hope you liked this video. We wouldn't all the fine details in the next video.
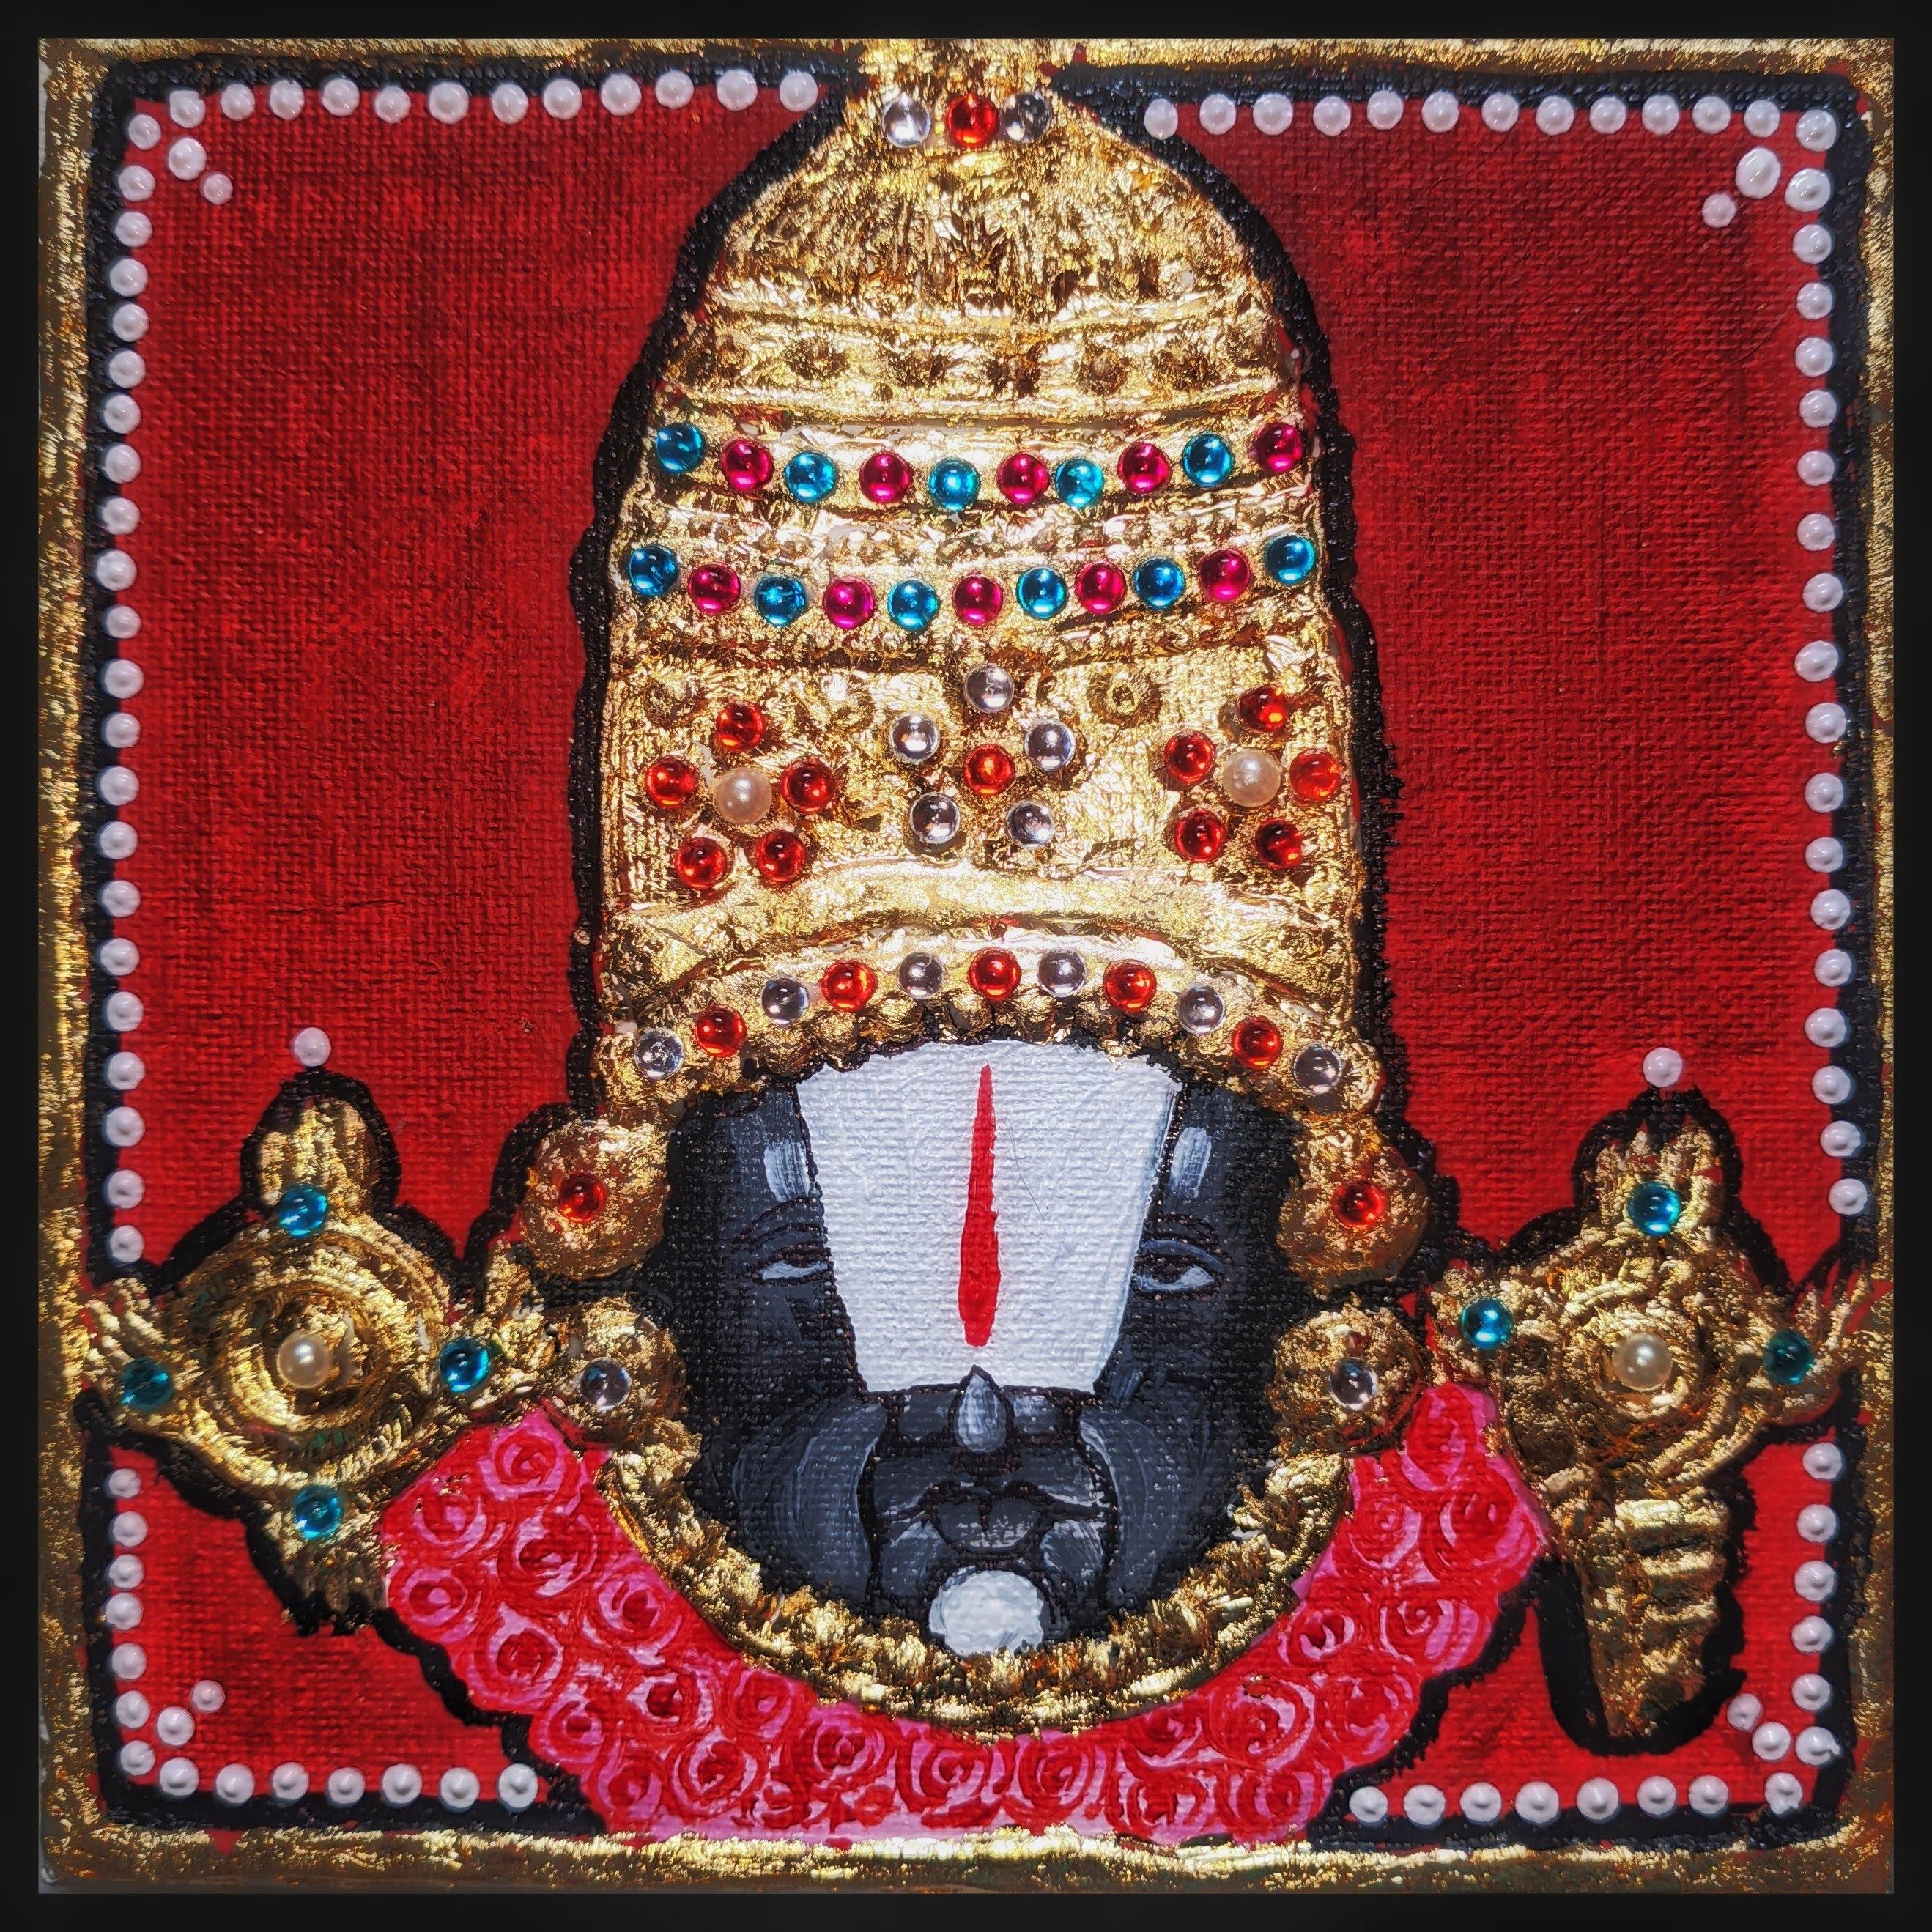
12. Tanjore Acrylic Coloring 2: In the last videos, we did gold foil work and then we lack IT work. In this video, we will complete the painting by doing the finite crediting. Let's start with the face shield part. So I will be using a camel permanent marker and outline the nose part first. Using the at really black and white, we already made the shading, but now if we just make everything pop-out after the nose, I'm just slowly moving towards the leaps. Tried to see the reference picture given my me, and then do the works. So it will be easier for you. It is very easy to use a permanent marker for the fine detailing. You can also use brush and colors for this. Sometimes it's very difficult to control the blush with colors. So I visit prefer you to use a marker if you're a beginner. Try not to make any kind of mistakes. But as it is actually colored, you were free to make any kind of mistakes because we can fix easily any mistakes in equity colors. Meanwhile, I have done the eyes. Now. I'm just making a rough outlines to the black borders so that it looks more clean. Now, I had to use the acronym leak because there is some portion which demands at really painting. While doing the Foil work in the border. I said we're going to do our bled border. So using a two-point brush, I'm just making one straight line across the borders. Tried to rotate the canvas so that you can work more conveniently. We will do in the black outline, but every part of the painting, from borders to face to crown, the blend water, weight and make every subject come out of the canvas. As you know, I don't like to use water in my acrylic paint, but here, too vague. Acrylic paint, a little bit of flowing. I have added a vaguely deal off what're you could also use acrylic retarded if we'll have it. With that point, we are almost finished outlining the border. Now. We will outline the main portion. After the border is dried up. We are starting the outlining From the left part. See how slowly I'm going and making eaten every details. Make sure to Deb the brain brush in the corner so that each corner gets equal amount of colors. For the bed ground in spite of using grid or may rule, you can also use black, crucial blue, or the dim green. Let's see. Here. Now, we are slowly doing the crown part. I'm doing the one side of the cloud. And then we will do the other side. Be slow. And patients while you're doing that. Because if you do now mistake, it will be very difficult to predict. Because if you put extra legs in the gold foil, it will look very bad. And it's very difficult to remove black paint from the Wolf well-worth. So make it very carefully. Now, I almost dealt a ground piped, and now we're doing the design at the right portion on the left and the right designs is nothing but some instruments, or I will say, wire material for the God of Hindus. 80. Lord biology is a what are of Lord Vishnu. He has other names like Swami, Lord Vishnu, acquire ma, and large Krishna. Now in the palate I have taken great color and using it, I've been making roses in the xylem. I'm using very thin size of brush so that I can make the hospital really easily see how giving some random strokes, it's been look-alike, grows. You can use this rose making techniques in other paintings too. It looks really amazing. Now let's just complete the whole garlands made the roles. I'm using yellow, red, but many people also use white roses. Also, you can see the gray aliens using leaves. So you are free to make any kind of Garlin 1D. I preferred the Rose Garden and it is really easy to understand and easy to learn. So I, rose Garland will be very easy for the beginners. Let's now have a more closer look to the roses. Now, the guy Lind is almost done. We will now outline it with the black acrylic paint. See, I am making the new bottom part very uneven so that it will more give the look of a garland. Now as we done all the steps, we will make the mark at the top of the head. This is a red forehead mark for that I'm using a red paint and very thin color. Make sure all of the other acrylic colors at dried up. They're lazy, will go to the top, a little bit, ticker side at the bottom, but normal, ready if we have a new stake, will get, again, predict it with white acrylic paints. So do your best. Now using the white acrylic, I'm making the ice. I'm also shading the upper leads so that it will give more 3D look. I am giving some more white to the chin part. I wanted to make them more bright. That's why I'm doing that. Now. We will going to create the whole dotted white border. But that you can use any dot Mandela tool. But here I am using the bedside of my paint brush. See each tie line dipping the paint brush in the color, and then making one dot. Yes, This process is really tedious. If you don't, your brain brush every time, every time we will get a different size of dots. So be careful in that. I am rotating the canvas and making myself easier to do this work. I have a lot of patients and steaming up Gottman de la border. Now have a closer look to the bottom of the ballot. Does the brush over the planet and gave each stem. Now let's calculate the remaining three sites when the dot design. So finally, our building is almost done. All reds to yourself because you have the most difficult paintings in the word. Yes, it is. Now, with some more dots. We are ready to showcase our final banjo painting. See how beautiful and detailed a painting looks like. Hope you like the whole tutorial. In the next video we will discuss about the projects. They love.
13. Class Project: After doing ten to 15 steps, we're finally at the end of our tangible painting course. Thank you so much for taking this class. Probably now you know that in patience and perseverance at the key terms for making them than Joe painting. Not only that, in the Mencius section, I have uploaded five plus of new designs for your tangible work. You don't need to do exit sale as my work. You can do any kind of work by the tinting them and placing them in the Challenger board. As Pablo Picasso said, Every child is an artist. And Ralph Waldo Emerson says, Every artist was the first major. So don't worry if we make any mistakes. If you want, you can see same reduce twice or thrice to clear up your concepts. I hope, and I am a 100% sure you can do creating tangible painting if not better, but same as my, With that being said, I am signing off. I hope he will show me your artworks in the project section. Or you can also instead graham me or email me. I'm always available for every students. With that being said, I'm finally saying goodbye for me. We will again come and meet in another course.
 Nabojit Kar, Folk Artist + Youtube @An Aberration