Transcripts
1. Introduction: Welcome to my
Skillshare class on mastering the wet and wet
watercolor techniques. I'm Suzanne, and I'm a watercolor artist
and an urban sketcher. One of the biggest challenges as a beginner watercolor
artist is to understand how much
of pigment and water you need to create
a vibrant painting. Of the time we're left with a subtle painting with
not a lot of pigment, so it's not very vibrant, and sometimes we are left with a patchy outcome due to less
amount of water being used. It is also very important to
understand the type of paper you're using and how
much to wet your paper. Depending on the local weather. Understanding this will help
us tackle the problems of paper warping or buckling while
you paint in watercolors. I will also demonstrate
what blooms and cauliflowers
are in watercolors. These are not necessarily
watercolor problems. However, if you
understand that better, it can be used for creating beautiful
textures in your painting. And finally, we will also discuss about the dry
brush technique and the wet on dry
technique that will help us complete the
project in this class. This class is for anybody
who loves watercolors. It is also great for
absolute beginners who would love to understand a little bit more about
the watercolor materials and the paper you're using. Watercolor is a medium
that requires a lot of practice and a lot of understanding of
your local weather, the type of paper
using, et cetera, and it takes a little bit of practice to understand
these aspects. So please don't
feel disheartened if you don't get it
right the first time. If you like to learn more about the watercolor materials
and how to use them, stay on to find out more.
2. Suggested Materials: Here is a suggestion of all the materials that we
require for this class, starting off with
watercolor paper. It is good to have a selection
of watercolor paper, some rough sheets of
watercolor paper, and a good sheet of
watercolor paper. The paper that I
personally like using is Sandra's Waterfood by
St. Cuthbert's Mill. This class, we will also
be discussing about using watercolor paper
of different weights. You can either use a 200 GSM, 300 GSM just like this and
you could even give them all a try and see which
one you prefer the most. We are going to use a very limited palette for this class. I have four colors here. You can even use just three of these colors,
mainly cobalt blue, quinacridon red,
and cadmium yellow or cadmium free yellow if
you're using Winsor and Newton. And for the deeper
tones in the painting, I'm going to use a deeper
blue, which is danerneblue. If you don't have danrine blue, you can use indigo as well. For watercolor
brushes, I'm going to use a variety of brushes, starting off with this large
flat brush or a hake brush, it is good to have a
large brush like this to wet the paper during
pre stretching them. I also have a 1 "
flat brush as well, and this is great
for the first wash. The two smaller brushes, mainly this round brush here is great for starting off with the foliage and other details. And finally, this
is a sword brush. You can see the tip is chiseled, giving me a very fine tip
and this is really great for beautiful fine lines for the finer details of
the foliage, et cetera. If you'd like to try out how it will work with
a masking tape, you can have a masking
tape with you. But if you're pre stretching the paper onto a drawing board, this is absolutely unnecessary. You can also have a pencil and an eraser to do your
quick idea sketches, or if you want to do any
preliminary sketches on your main paper, you would need two
jars of water, one for washing and one
for fresh clean water. It is also a good idea to change the water every now
and then if you think it's getting messier, if you're using paint from
tubes like how I have shown, then you would also
need a mixing area. I've got these two
ceramic mixing palettes. You can also have a
larger palette like this where you can squeeze out all the colors
that you require. If you're using
watercolor cakes, you can use a mixing area
in the set that you have. Finally, it is a good idea to have drawing board
or a form board. I have a form board
mainly because I like the smooth texture
of the form board. And I can free stretch the
paper and it sits really well without having to
use a masking tape. These are all the
materials that we require for today's class.
3. Different Types Of Paper: Here are three
different types of paper that can be
used for watercolor, and these are most commonly
used watercolor paper. I'm starting off with a paper
that is 160 GSM in weight. This is a cartridge sheet, but is not as heavy
as watercolor paper. Next, I have a watercolor paper, which is 200 GSM in weight. It is cold pressed, which means it has a
slight texture on it. And then finally, I have
a much thicker sheet. This is 300 GSM in weight. You can see that it's
considerably more thicker compared to
the other two sheets. All these sheets are really great for watercolor paintings. The 162 hundred GSM are really great for a quick
line and wash sketch. However, the 300 GSM one is
the best when it comes to a full blown watercolor painting with different
layers and washes.
4. Experimenting Paper With Watercolour Wash: Now let's experiment with these three different
types of paper. I'm starting off with a quick wash on the hundred
and 60 GSM cartridge paper. So I've grabbed some blue from my palette with a little bit of water so that I can do a
quick wash on this paper. Go really random and free
with the brush strokes and see how the paint
spreads on the paper. You can already see how the paper is buckling
a little bit. Now, let's put that aside and try our next sheet of paper, which is the 200 GSM paper. I'm going to use the same color. You can use any pigment
for this practice, and I'm going to make a mixture which is a
medium consistency. You can see in my palette that there's enough pigment
and there's enough water. However, it's not too watery
and it's not too thick. It's somewhere in the middle. And I'm just going to
try and paint over this 200 GSM sheet of paper. You can already see
that it is a lot better than the hundred and
60 GSM cartridge paper. I can also see that if I want to add a little bit
more paint over this, then it may begin to buckle. Let's put that aside to dry, and we're going to have a
look at the 300 GSM paper. I'm going to do the same type of wash for this paper as well. Now let's take a look at all
these three papers together. You can see that the 160 GSM, which is on the far right
has already buckled. Can you see the puddles that have been
created on the paper? The one at the bottom
is the 200 GSM. Although it's not
as bad as 160 GSM, there are still uneven
surfaces creating little puddles because of the buckling that the
paper is going through. Let's look at the 300 GSM, which is fairly straightforward. It's not buckled or it's
not warped as much. Now that we know that both 200 GSM and 300 GSM
are okay for watercolor, I'm going to try
and see if I can do a wash by taping the paper down onto my
table or drawing board. So for this, I'm going to
tape both the paper down, both 300 GSM and 200 GSM. I have realized that the
hundred GSM paper is not right for the type of paintings that we are
preparing to do today. I'm going to do a quick
wash on these two papers, but I'm going to start by wetting the paper first
this time with plain water. This technique is
called wet and wet, where we wet the paper first
before adding in some paint, and the outcome is
quite different compared to painting
a dry paper. And you can already see how the paper is
beginning to behave. The 300 GSM is intact. However, I can see that
it's slightly lifting off if not for the masking tape, it would wp slightly. The 200 GSM, you can see, it's got a little
bend in the middle. You can see the reflection
of the water on there. And now let's apply the
wash onto this wet surface. So a medium consistency of wash with a fair
amount of water, fair amount of pigment, not too flowy pigment and
not too thick pigment. And you can already see how the paper is
beginning to buckle. You can see there is a bend or a few bends creating little wave like
texture on the paper, and you can see the light
reflection on the paper. And let's do the same
wash on the 300 GSM. You can see how different
the wash looks here. There is no buckling on
the paper whatsoever. However, if you look
a little bit closely, you can still see that the paper still whoops
ever so slightly. This is usually not an issue. Now, let's go ahead and add a little bit more
pigment onto the paper, starting off with the 200
GSM one on the right. I've gone into the same blue, taken a little bit more paint on my brush without
adding a lot of water, and you can see how it sits
fairly well in that wet area. And I'm doing the same thing for the 300 GSM paper on the left. You can have a little play
around with the pigment, add a few brush strokes onto these wet surfaces and see
how the paper behaves. It is a good idea to explore
the paper that you're going to use and feel
comfortable with that. Let's leave these
two papers to dry completely to see
the best results.
5. Stretch Watercolour Paper: Best Results: Now let's try pre
stretching the paper. This method has been the most
successful for me so far. For this, I'm going to use the thickest paper
that is 300 GSM paper, and I'm going to flip it first and start wetting the
back of the paper first. And then I'm going
to flip it over and wet the other side as well. This method not only holds the paper in place
onto your board, but it also enhances
drying time, which means as a beginner, you can take a
little bit more time working in your wet
and wet washes. I'd like to try the
same method with the 200 GSM watercolor
paper as well. So I'm going to get another
board and see if I can do the same thing wetting
both sides of the paper. And now I'm going
to continue doing the same things I did for
the other papers as well, starting off with wet in wet wash because the
paper is already wet. On both sides, I can start straightaway with a wash
of the color that I like. You can see how nicely the
paper is held onto the board. It is held in place with the
water that is underneath, and this helps it to stick onto the smooth
surface of the board. With the 300 GSM paper, I can do how manyever washes I like while this
paper is still wet. I can include different colors. I can add a few
details depending on how much pigment
I use at each stage. I'm going to do
the same thing for the 200 GSM paper as well. As you can see this paper is also sticking down quite
well onto this board, enabling me to do
a beautiful wet in wet wash at this stage. I'm not really sure
how many layers of paint can go on this paper because it is slightly lighter compared to
the 300 SM paper. However, so far, it is
holding up really well.
6. Water-Pigment Ratio: Avoid Blooms & Cauliflower Effects: While that paper is still wet, I'm going to add a
little bit more pigment to this paper to
this first wash. So I've gone into my
palette and this time, you can see that I haven't
used a lot of water. I'm activating the paint that
is already on the palette. You can see how it sits beautifully on top
of this wet surface. So I've just created
a cloud like texture using a
simple brush stroke, and you can see how the paint spreads and flows into
that paper naturally. Let's try that same technique onto a 200 GSM paper as well, in case you're using a 200 GSM watercolor paper
for this project. You can see how that
sits nicely as well, onto a pre stretched paper. The paper is still
damp, as you can see, but I'm going to see
what happens if I added some more water into that mixture that I'm
mixing in the palette. So making the mixture of
paint a bit more watery, and I'm going to
see if I paint with this watery mixture onto a damp or a wet
surface, what happens? You can see that the mixture is a little bit more
weaker compared to the first wash that we did or the second
clouds that we did. And as I'm painting, I can observe that I'm
lifting out more paint, creating a small puddle in that area rather than
placing more paint in. And if you wait
for a few minutes, you can actually see the white of the paper shining through, and I have accidentally formed a cauliflower effect over there
or a bloom on that paper. Let me try the same thing
on a 200 GSM, as well. So a weaker mixture
into that wet paper. And I'm actually lifting out more paint that I'm putting on. And if I leave that to dry, it's going to form a large cauliflower or a flower
bloom like looking shape, which is not really
what we want. Although blooms and
cauliflower effects can create a lot of
texture in your paintings. Sometimes it may not fit really well with the
theme you're painting.
7. Results: Stretching paper/ Using Masking Tape: After we've left all our
practice washes to dry, let's have a look
at the results. Here's the result of
what happens when we have painted with a
much looser consistency of paint on a wet surface
where there was already a wash. We've created these blooms or
cauliflowers, as we call it. I've also accidentally
lifted out paint, and it hasn't really served the purpose of
painting in a cloud. However, if you look at
the paper in itself, you can see how it has dried out flat because we pre
stretched the paper, and because it is 300 GSM paper, I can say that it worked really well without it warping
or buckling at all. This is the 200 GSM paper, which we did the same
technique of pre wetting, pre stretching the
paper onto a board. It has warped a little bit, as you can see, compared
to the 300 GSM, which is a lot thicker paper. The 200 GSM has slightly, but it's not as bad as
we thought it could be. So I would say 200 GSM
watercolor paper could also work in case you are practicing
with that weight of paper. Now let's look at
the paper that we taped onto a table or a
board using a masking tape. You can immediately see the difference between
two types of paper. The 200 GSM paper
was taped down, but it buckled a lot, and you can see the result that the watercolor has
dried in puddles, leaving this sort of a
texture on the paper. 300 years of paper has
dried out really flat. So this is another option
if you are not too keen on wetting the back and the front and pre stretching
a watercolor paper. However, if you would like
to increase the drying time, and you would like
to work wet and wet slowly and steadily, pre wetting and pre
stretching the paper is a good option as it
increases the drying time. And finally, let's look at
the 200 GSM paper that we worked on first without taping it down or without
pre stretching. You can see how that paper is folded or warped completely. And if I attempted to do any more layers or
paint on top of that, it would just flow into that
warped area and creating more cauliflower or more puddle like texture onto the
paper once it dries. And this is probably one of the main reasons why
sometimes it feels really frustrating to work
with watercolors as we do not know how the
paper is going to behave. Other factors that can
affect the paper or the drying time is usually the weather
in your local area. If it's too dry, it can
dry out really quickly, and if it's too wet or too cold, it can take a long time to dry. So it is a good idea to research the type
of paper you want to use and understand its
behavior in your local area, depending on your
local weather as well.
8. How To Fix Blooms & Cauliflower Effects: Now let's try to fix some of these cauliflowers or bloom
that we accidentally created. The paper is completely dry now, so it is safe for
me to go in and wet this paper with
some fresh water. So I'm wetting the area where there is a cauliflower
or a bloom. And once it's wet, I'm going to use the same pigment that I used to paint the
clouds initially. Again, be mindful more
pigment, less water. I'm going to paint over that wet area, creating
another cloud. You can see how
well that pigment sits on top of that
wet area covering up the blooms and the
cauliflowers that we had created initially. And
9. Create Blooms For Texture: As mentioned earlier, blooms or cauliflowers are
not all that bad. Sometimes it is really great to create some textures
within your painting, and especially it works
really well with foliage. So let's try creating
a few blooms. So I am starting off by
painting a small area with one color with a medium
consistency of paint as well, so you can see that it's not too thick and it's not too loose. I'm going to make another
patch of color as well. This is purely experimental, and I am not sure
what's going to happen. We're going to see
what happens if we add some more water into
these wet areas of paint. So into this mixture
on my palette, I'm going to add a few
more drops of water, making it really
diluted and weak. And I'm going to introduce
that onto my first square. You can immediately see how some of the areas have
turned slightly lighter. Now I'm going to
wash my brush clean, and I'm going to introduce some water onto the next square. Now it's a waiting game to find out what happens when
this is completely dry. While I'm waiting, I'm going
to grab some more paint and paint in some foliage at
the bottom of this page. So using my round brush, just creating trees and bushes, you can see that the consistency of paint is a little
bit more thicker. There's more paint, less water compared to the squares
that we painted earlier. Next, I'm going to
wash my brush clean, load it with some fresh water, and introduce that into
this painted foliage. You can see an almost
immediate effect of what happened when I drop some fresh water into
this painted area. You can see that the foliage has beautiful texture
created by these blooms, whereas the swatches
just above it has a little bit
more subtle outcome, and this is because of the loser consistency
of paint that we used. I hope you have enjoyed
experimenting with your paper and creating
bold wet and wet washes. Feel free to play around with these techniques to gain
confidence before we move on to our
project of creating an easy winter scene
using these techniques.
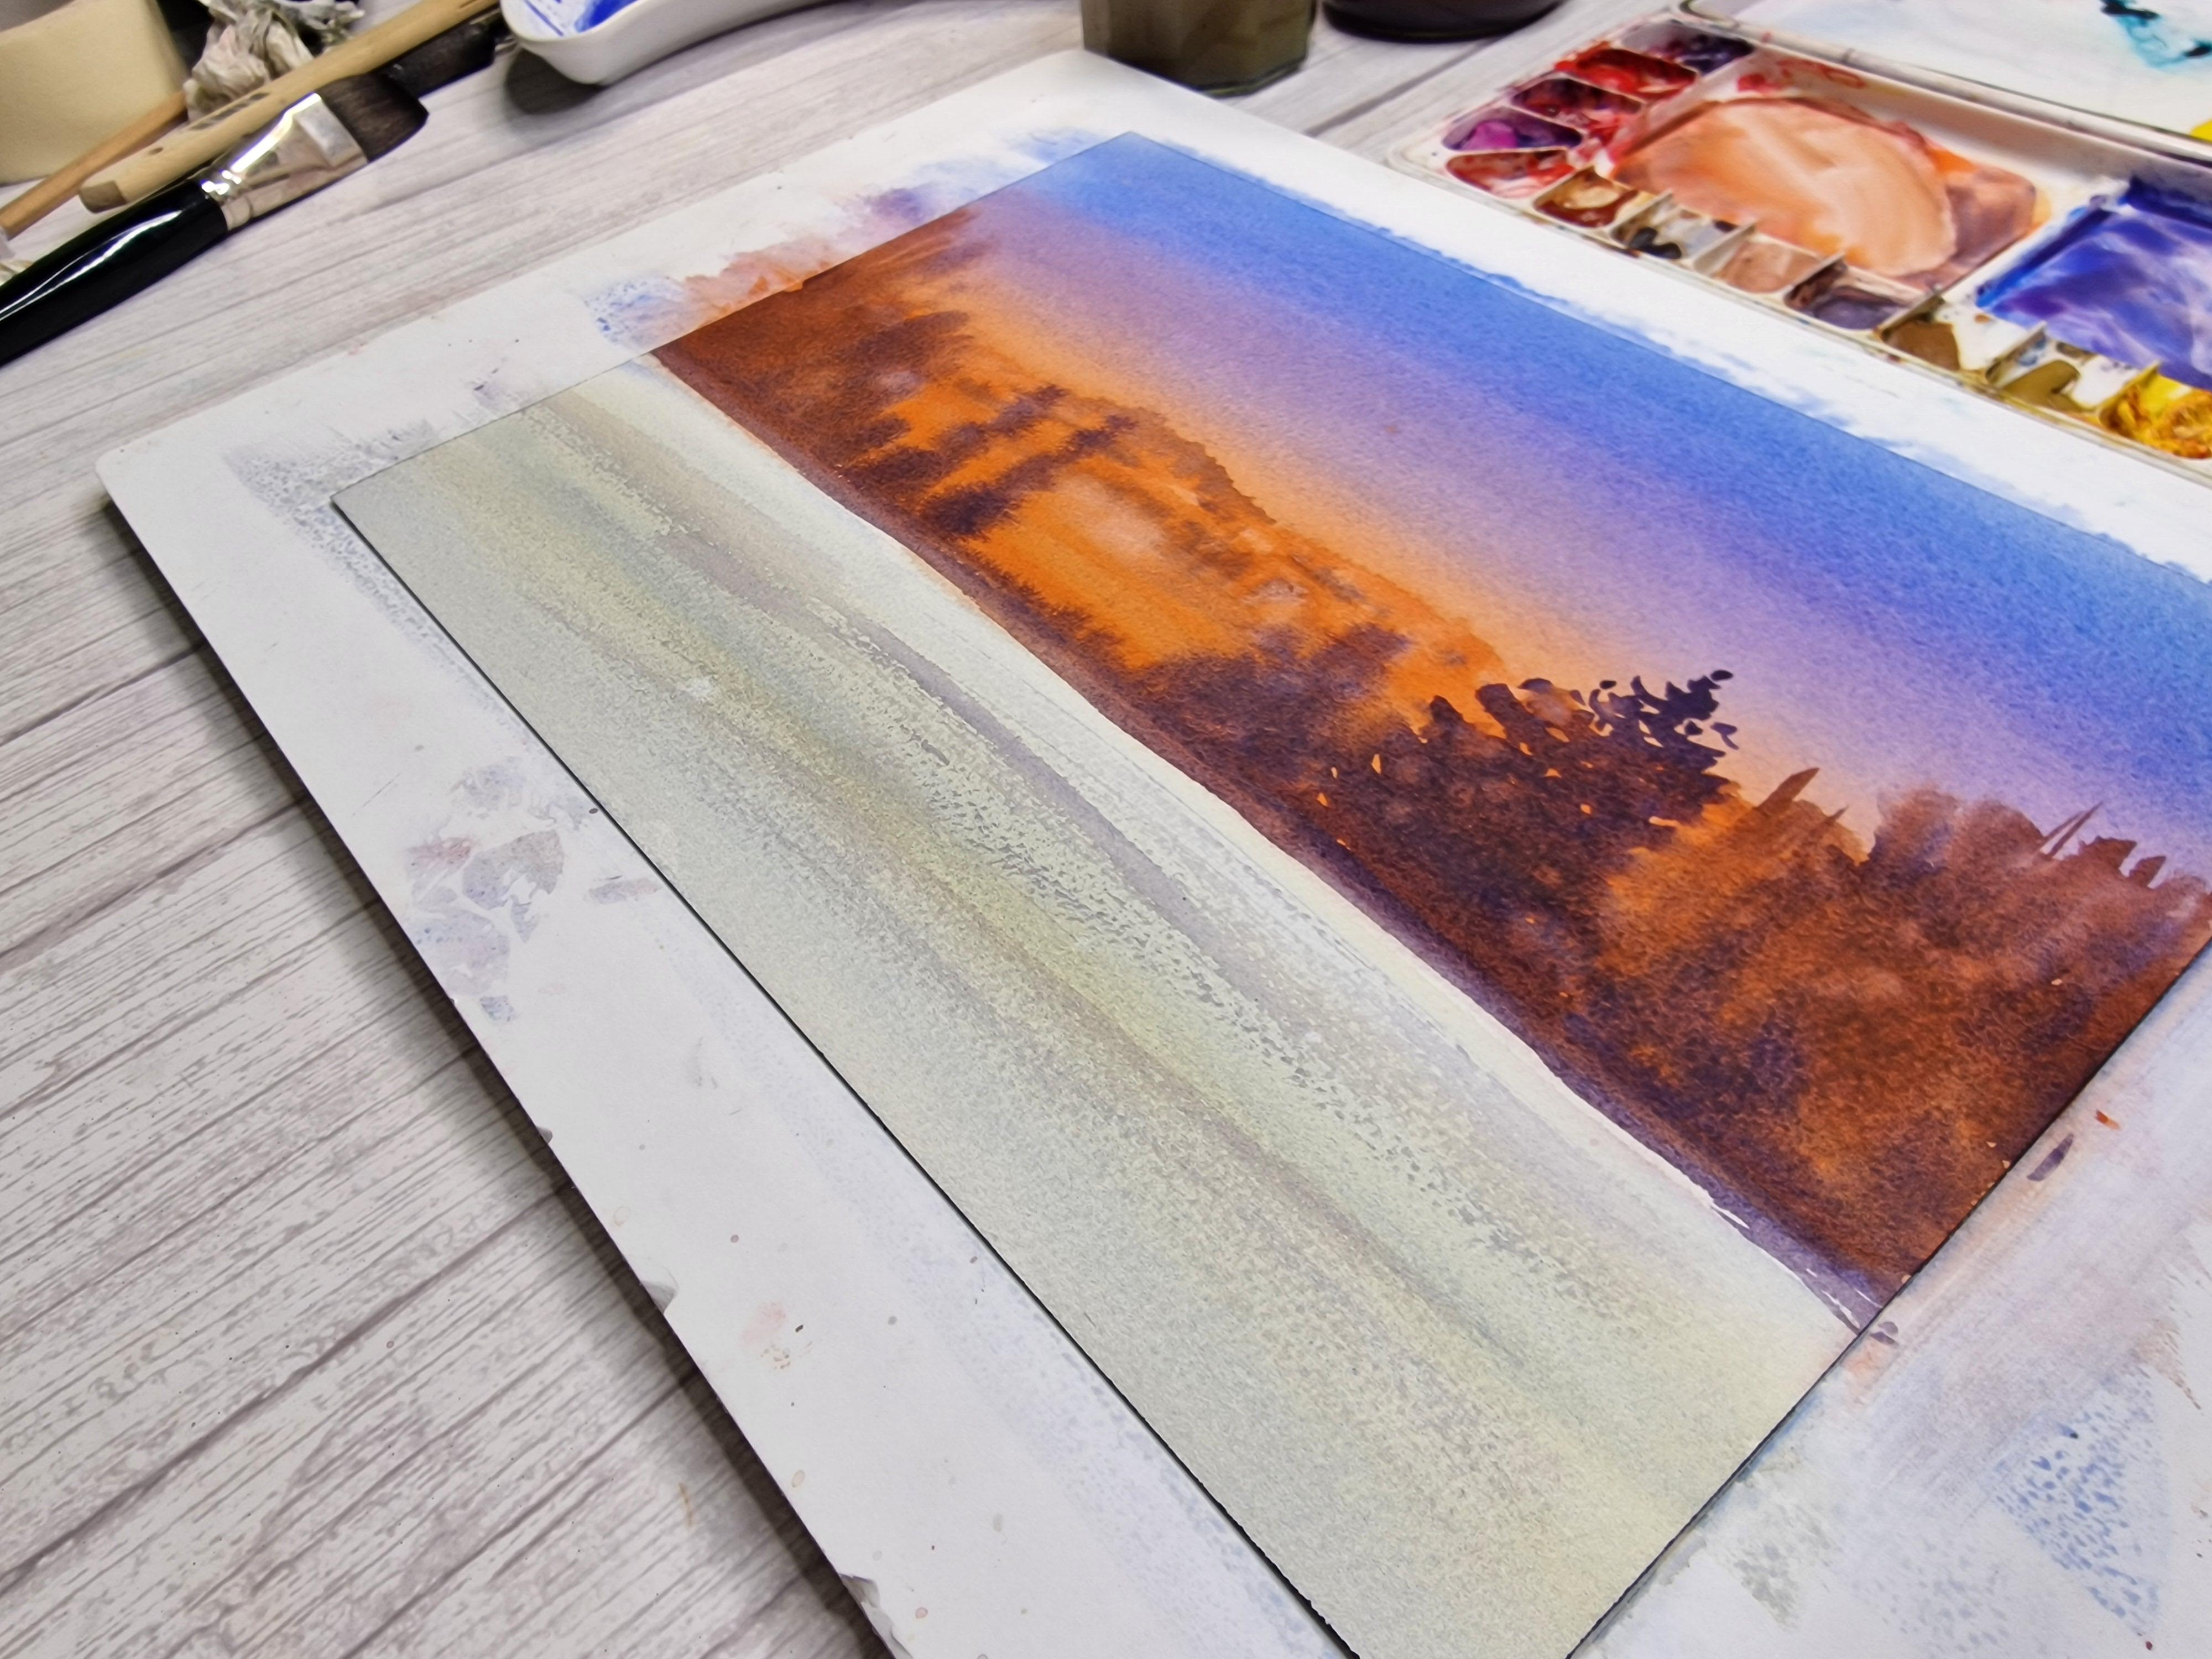
10. Project: Create a Winter Scene (Rough Sketch): Let's put all what we
learned into practice by creating a simple
winter scene project. So I'm starting off with a
rough sketch using my pencil. I'm using the back of
some rough sheets. So it's good to do an idea
sketch or a thumbnail sketch. This sketch that
I'm going to do is definitely larger
than a thumbnail. This is just to get your
idea onto the paper, and then we can start
drawing it out, or we can start painting
it on the main paper. So I'm starting off by drawing a fairly straight
line at the bottom, one third of the paper, and this is going to be the end of our ground or the middle ground that you can see in
the reference picture. And beyond that ground, there are some trees, some foliage, which I'm
just going to mark out. It doesn't have to be exactly
like the reference picture. I've used the reference picture just to bring my ideas out, but you can change the placement of the trees if you like. And you can see how
scribbly my lines are. This is just for an idea, and you can be as scribbly as informal as
you like at this stage. I'm also going to mark out a little bit of the
horizon at the back beyond those trees is just to give me a guidance that that's where I need to stop painting land, and the rest of it is sky. And then right in the
foreground is a shrub. I'm just going to mark
that out, as well. So it's just to bring
your idea onto the paper. You can chip and change some
details if you don't need so many trees in the
background or you don't need the shrub
in the foreground. That's also completely fine. So to explain a bit
more in detail, the shrub is the foreground
that's right in front of us. The white space that you see beyond that is the
middle ground. Then we've got the foliage that's moving towards
the background, and then we've got a
horizon just beyond that.
11. Stretching Paper & Wet In Wet Wash: Let's start by preparing our watercolor paper
for the project. First, I'm going to use my
pencil to draw a quick line at the bottom third of the paper just to mark out
the middle ground. You can also draw the foliage
and the shrub in front, but I feel that
it's not necessary as we would be going
in stages anyway. Next, I'm going to flip
the watercolor paper and start applying water at the back of the
watercolor paper. And you can apply a generous
amount of water at the back, like how I'm doing here, and you can see that the paper slowly begins
to warp or bend. And then I'm going to
flip this paper and apply water on the good
side of the paper as well. It is very important to
make sure that there is an even layer of water on
the paper at this stage. So you can use your flat
brush to even out the water. And this avoids the paper
drying out unevenly and also avoids having a huge puddle in the
middle of the paper. And once it's completely wet, you can see that it sticks
really well onto the board. And you may not need a masking tape if it sticks
just with the water. While that is slowly
beginning to dry, I'm going to start preparing
my palette with some paint. The three colors that we will be using today is cobalt blue, quinacridone red, and
cadmium yellow or cadmium free yellow if you're using a Windsor
and Newton range. And I'm preparing the paint
in a medium consistency. So you can see that there's a fair amount of water and
fair amount of pigment. It's not too watery and
it's not too creamy thick in such a way that it's harder
to move on the palette. But you can see
that the pigments prepared here moves
really on the palette, but it's not too runny. The fourth color is optional, and you need to use it only
if it's absolutely necessary. I'm using a darker deeper
blue called danthrineblue. If you don't have this color, you can also use indigo. Let's go back to our
pre stretched paper. As I mentioned in
an earlier video, your pre stretched paper
might dry out really quickly, depending on the weather
in your local area. If it's too warm or if you have an air con or a fan
directly hitting the paper, then it can dry out
really quickly. Or it might take a very
long time if it's too cold. Depending on how your
paper is at this stage, you can choose to re wet just need to make sure
that the water is placed evenly across the paper
and that it's not drying off in puddles in
any area of your paper. Let's use a flat brush to load up the cobalt blue that
we have mixed initially. It is very important to paint
across the paper in long, gentle, soft brush strokes, rather than small brush
strokes in a corner. This way, you'd be able to get a much smoother outcome with
the paint across the paper. And I'm going to paint all of that paper
right till the bottom. That is including
the middle ground that we had already marked. You can see it's a rather
pale consistency as of now. This is because the
paper was already wet and we were using a
medium consistency of paint, which we had prepared
in our palette. To increase the consistency, to increase the
depth of that paint, I'm going to add a little bit more cobalt blue
onto this paper. This time, I am not going
to add a lot of water, but instead, I'm going to go straight into that pan of paint. You can see it's a lot
more thicker inconsistency compared to the first
wash we had prepared. Now let's apply that onto
the top part of the paper. You can see how
it's consistently darker compared to the first
wash that we put down. I'm going to stop at
where I placed that line about one third because I only need a pale color
to the bottom third. The paint from the top can
move down to the bottom, but because there's not a
lot of water at this stage, it will flow down a little bit
softly and more gradually. In case you think that paint, the darker paint is
flowing down into the brighter or
the lighter area, you can always lift out some
pigment using a damp brush. Now let's move on to adding
some red quinacridone red. I have washed my brush clean. I don't need a lot of water, so I took it out on my tissue, and I am going to use the pre
mixed paint on my palette. I'd like the blue and the red to blend and bleed
into each other. So it will happen gradually because we are
working wet and wet. I'm going to add a little
bit more quinacridone red and begin to move my brush stroke
slowly into that blue. And where the red
meets the blue, you can see how it's turned
a little bit purple. Let's continue
washing our brush, taking out extra
water on my tissue, and I'm going to go into some yellow and placing that
yellow into the red area. Definitely not the
blue area because I do not want the yellow
and the blue to mix to create green
at this stage. So I'd like a little bit of an orangish yellow moving
slowly into rose or red. At this stage, I'm topping up
the pigment using my brush, just going straight into
that pan of fresh color, no water on my brush. It's just a little bit damp. I haven't washed my
brush clean or anything, and I've just topped
up that paper with a little bit more red
and a bit more yellow. I'm going to let
these three colors bleed into each
other and settle in. Next, I'm going to mix a
little bit of quinacridon red and cadmium yellow to give me
this bright reddish orange. This time, again, definitely no more water but more
pigment this time. I'm going to place that color in the middle
section that is the bottom of that sky and that area is going to become the landscape that's beyond the middle ground. And I'd like that purple and blue to mix a little bit more, whereas I'd like
the orange to stay as it is because that's
going to be the horizon. So I'm going to go back
into some blue and then place that blue
into that wet area, as well as a bit of red, getting the colors to mix, just helping it
along with my brush, but not really painting
and deliberately mixing. And it's always important not to keep painting over
this wet area because we can lift out more pigment than we are placing in
while that paper is wet. Now you can slowly see
how at the bottom, the colors are bleeding
into the midground. So I'm using my
tissue to wipe out any excess paint that is flowing into that pale blue area. And usually when you use
a tissue to lift out, that area becomes dry
and you can fairly stop the movement of pigment from the top half to the bottom half. And now for the middle ground, I'm going to mix a little bit of yellow and cobalt
blue, cadmium yellow, and cobalt blue to create
this sort of pale green, making sure to leave
that lifted out area and just paint underneath that so that color doesn't
mix with the orange. And you can see it's a
mixture of yellow and green. I haven't really mixed it
completely on the palette. I've let it mix on the paper, so you can see a
variation of blue green to a green tone in
the middle ground, and that's completely intented. You can try that out
by mixing your paint on the paper rather than the palette to get
this sort of outcome. My local weather here
is still very cold, which means it's taking a long
time for the paper to dry. I do not need the paper to
completely dry at this stage, but I'd like a little
bit more to dry. I'm going to quickly
use the hair dryer to dry a tiny bit, but not 100%.
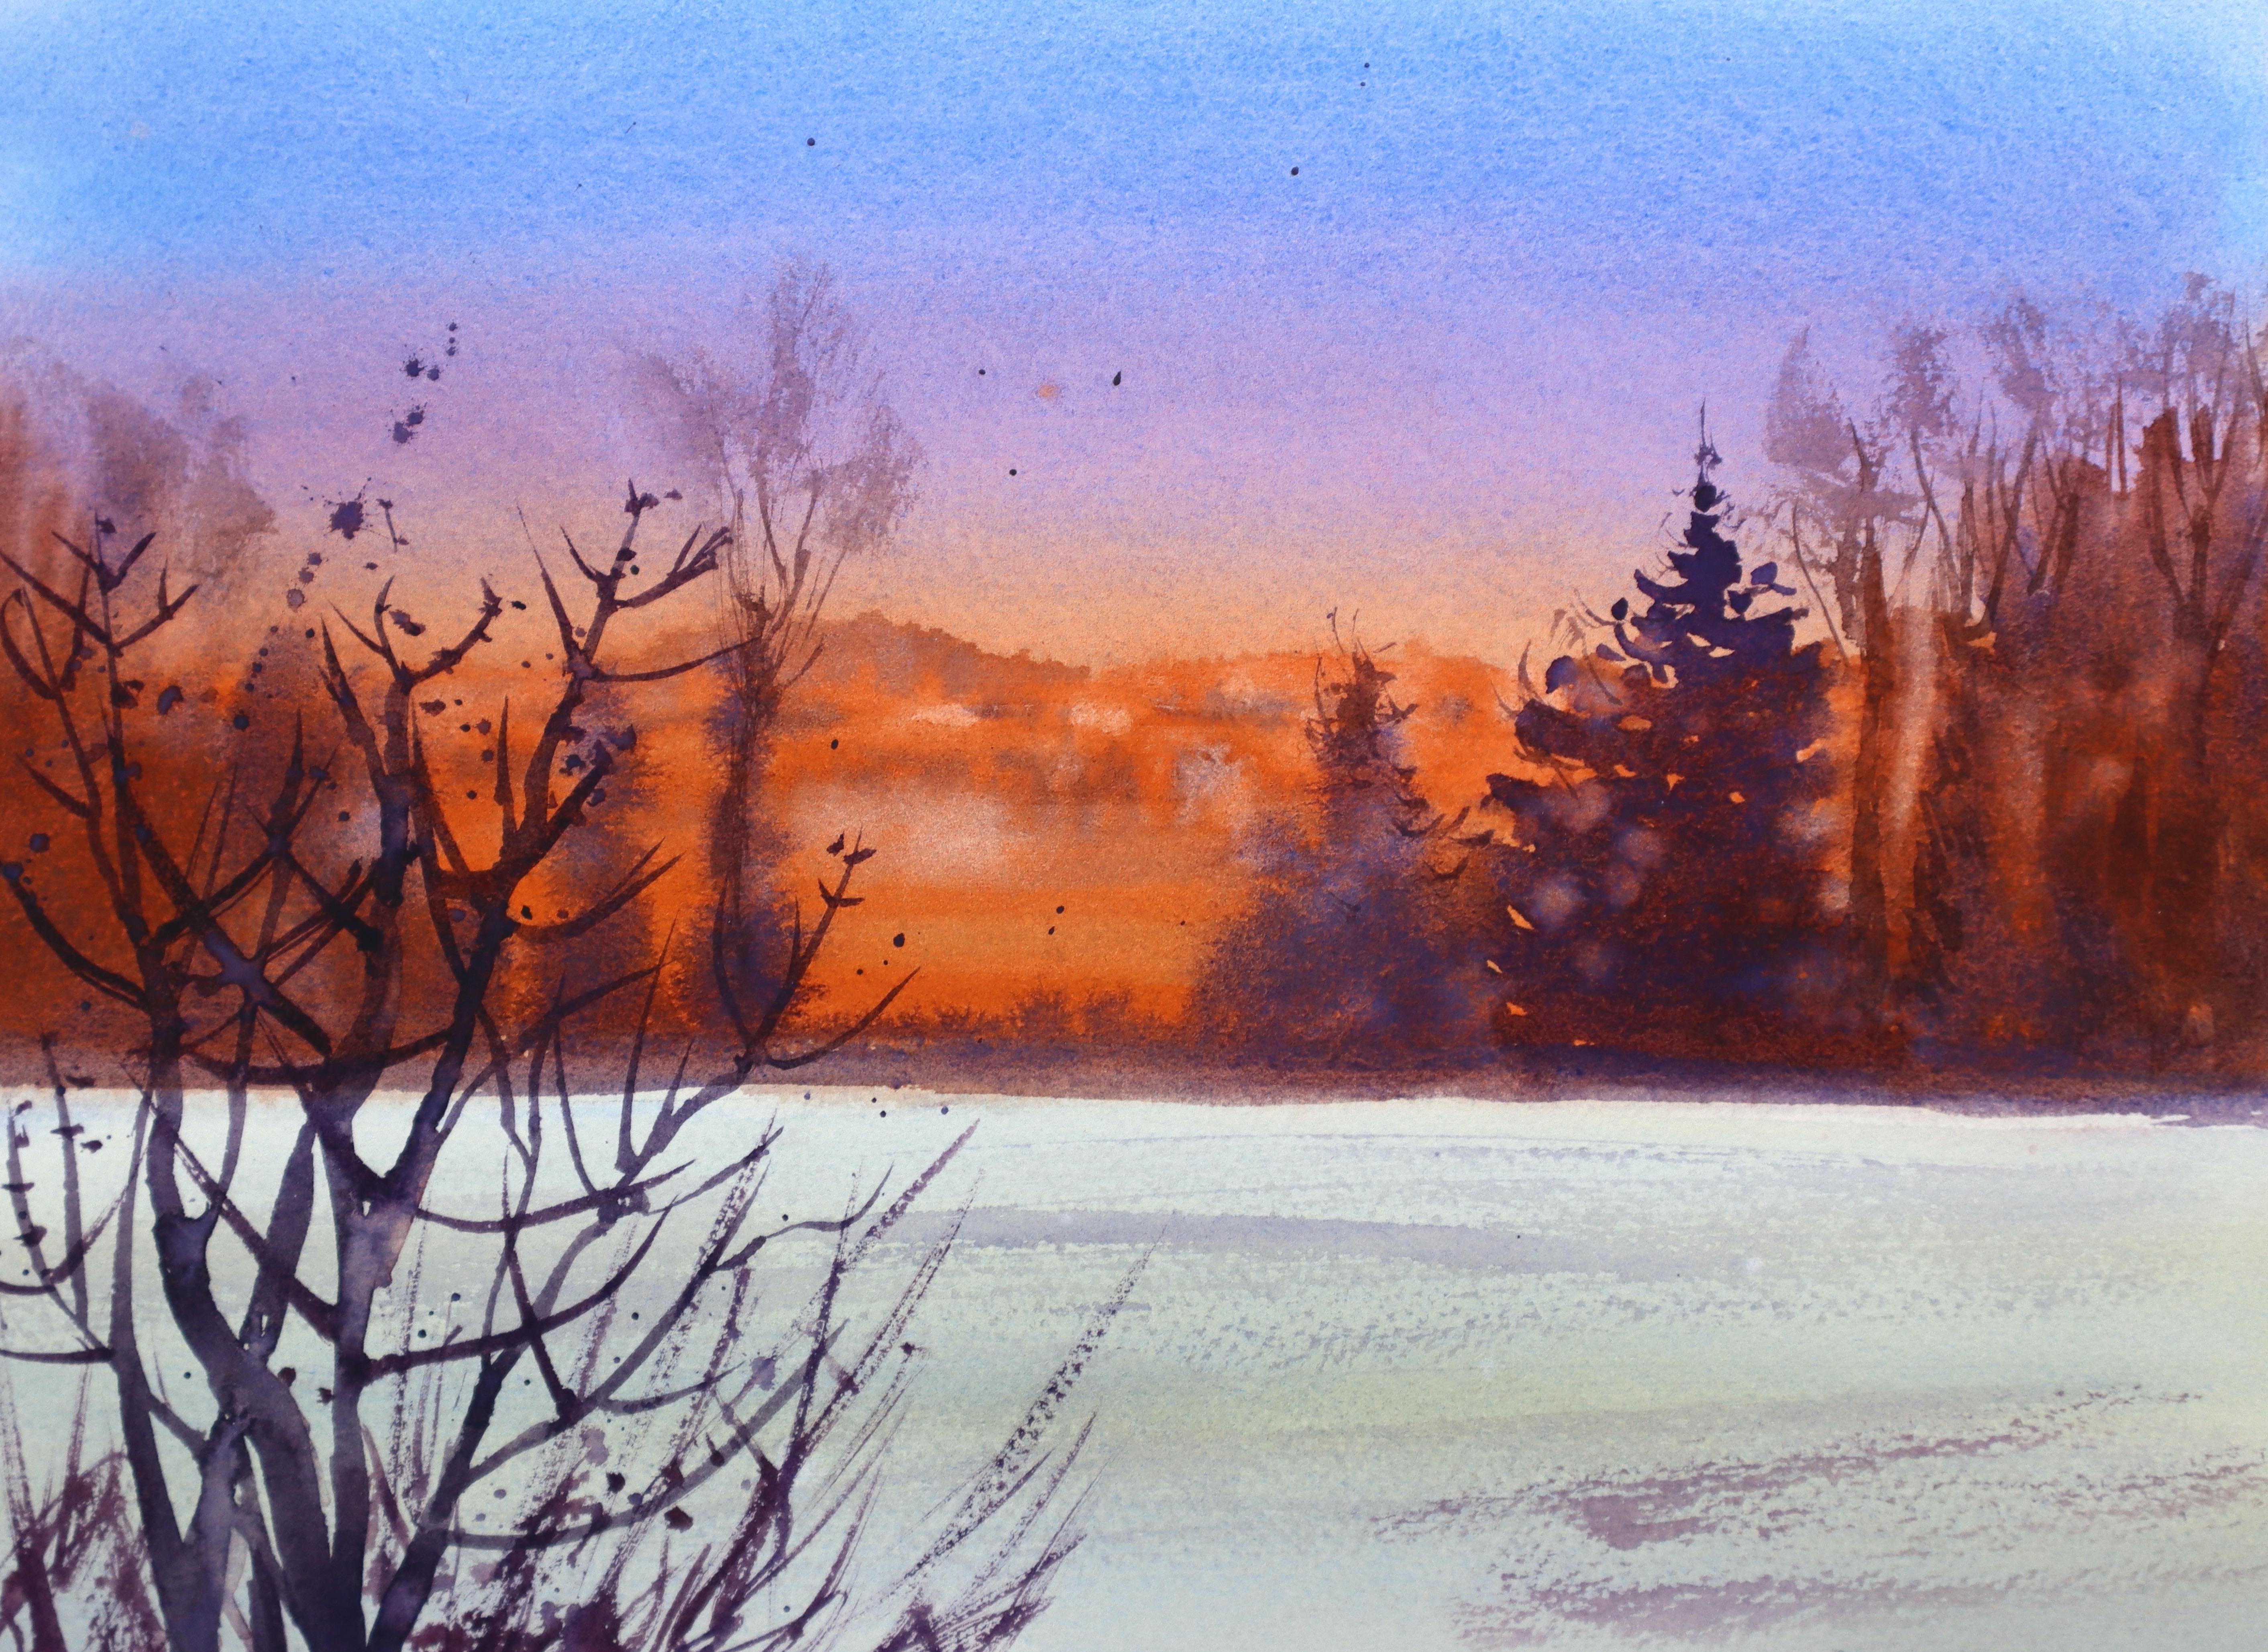
12. Adding Foliage (Wet In Wet): So I have dried
out a little bit, but you can still see
there's a fair amount of water on that paper.
It's quite damp. And at this stage,
I'd like to add in some details of the horizon
as well as the foliage. I'm using the same colors cadmium yellow and
quinacridone red. But this time, very less water. You can see the consistency
of paint on the palette. It's much thicker, and
I'm using a round brush to add a few brush strokes
over this orange area, creating an impression
of landscape. You can also leave a
few areas unpainted, as you can see what
I'm doing here, leaving a few
unpainted areas so you can see the first
layer shining through. Into this mixture, I'm going
to add a tiny bit of blue, cobalt blue to get this
deep purple brown color. Make sure that you do
not wash your brush in between because we don't need to add any more
water at this stage. And I'm using that dark purple
brown muddy purple color to create texture, to create little
details in the horizon. I have painted something that looks probably like
a faraway city, maybe some rooftops,
some foliage. Again, using a kitchen
towel or a tissue, I'm going to lift out some
paint in that horizon. Leaving some white spots, a few areas of white
or lighter area. And that contrast between the dark brush strokes and a few lighter areas is going to create the impression of a faraway town or a
city in the background. You can also use
a wet brush with fresh water on it and
spatter some water onto that wet area and let it dry to create a few blooms in the
background to create texture. Using a hair dryer to dry out
just a little bit, again, not 100% because I do not need the foliage to
stand out drastically. Now, let's prepare some
paint for the foliage. Again, I'm using cobalt blue. And this time, you can see how thick the
consistency of paint is. If you think it's creamy thick, you can add a few drops or
maybe one drop of water just to activate it and make it move a bit more
smoothly on the palate. Otherwise, it's better not to add a lot of water
at this stage. I'm going to mix a bit of quinacridone red to
get the purple and a tiny bit of cadmium yellow to tone that
bright purple down. Using a round brush, I am going to start creating
texture of the foliage. As I'm painting,
I do realize that my paper would have dried a little bit more than
I wanted it to. So I'm going to place that one tree over
there and then maybe use a wet brush to make the sides a little
bit more softer. So here I am using my flat
brush with some water on it. I'm going to re
wet that orange or the background area so I can work a little bit
more wet and wet. You can also touch the edges of the tree that I just painted, so that also becomes a bit more softer and it doesn't
really stand out too much. And then going back into my round brush and the
paint that I had prepared, I am going to add a few
more details of foliage. Now you can see how the paint feathers out
into that wet area. If your background
wasn't as dry as mine, you would not need
to re wet that area. So always make sure to check the paper and see if
it's still damp or wet. If you think the
paint is sitting on top instead of
feathering out like this, then you may need to
wet ever so slightly, but make sure that you don't
rub your brush too hard into that area because the layers underneath can lift
out accidentally. I'd like to give a
little variation to the color of the
foliage in the background, although this is all silhouette, and I know there's a sun
rising from the left. So some of the foliage maybe would be a little bit
deeper into the background, and I'd like to
show a little bit more lighter or a
more orange color. So I've mixed more yellow and red into that mixture
with a little bit of blue so to get a deep
brown orange color, make sure that the consistency
of this color is also same as the purple brown color that we started with
initially for the foliage. I'm also going to
add a few drops of fresh water into that foliage
in some areas and let it dry so I can get a few texture and lighter color tones
within that foliage. These may create really strong
blooms or sometimes just create a very subtle bloom because we have layers of
paint underneath this, and the paper is
still quite damp. I'm guessing that the blooms
may not be as strong, but sometimes depending
on your weather as well, it could dry out too quickly
to create beautiful blooms. No matter how they dry out, I feel that they
are going to create really beautiful texture for the foliage in the background. I For the middle ground or the lighter color of ground
at the bottom of the page, I am going to use
a technique called the dry brush
technique to create some texture in that ground. So I'm going to use
the same color that we have been working
on with the foliage, and I'm going to try and
create some brush strokes, so I'm trying it out on
a rough piece of paper. So with the consistency
that I have on the palette, I would be able to
create a wash like this. However, I do not need a
wash or an area of paint. I am looking for just
some brush strokes. So for this, I'm going
to load my brush and wipe out or take out
excess paint on a tissue, and then just run
the brush across the paper to create
this sort of texture. It's very important to
take out the extra paint to your tissue before you
run it over the dry paper. Now, let's try that out using a flat brush on
our main painting. You can either have a
brownish purple shade or an orangish brownish
shade for these textures. Just a few brush strokes, and you can see it's already creating excitement
in that foreground. If your paper is still too wet, then it may not
work that easily. You may choose to
wait until your paper is completely dry for you
to try these brush strokes.
13. Adding Details: Dry Brush & Wet On Dry: This painting is
completely dry right now. You may stop at this stage or add on the shrub in the
foreground, as well. But before we do, let's
have a closer look at the subtle blooms
and cauliflowers. Not many cauliflowers here, but we've created some subtle
blooms in the background. I'd like to lighten a
few of them a bit more, just to suggest light
falling on them. So I'm going to use a wet brush, just drop in some more
water and lift it out using a dry tissue. Gentle rubbing of
the surface with the brush also works if you
want to lift out gently. Now let's start working
on the foreground. That is the shrub. I'm mixing
all three colors together. That's cobalt blue,
quinacridone red, and a little bit of cadmium yellow to give me
a muddy purple. I'm also going to
use a tiny bit of endanrine blue at this stage to deepen the color a bit more. Now, let's also look at the
water and pigment ratio here. You can see on the
mixing palette that it's not too watery. This layer also requires
more pigment and little bit water just enough to get the paint
moving on paper. And using a round brush, I'm going to start painting the shrub right in front of me. I'm going to use the brush in a very firm way to create the
thicker stems of the shrub. And for the finer stems, I'm going to use the tip of the brush to create
the fine lines. You may use the
reference picture to refer to the way the
shrub stems are. However, you don't need to stick to it exactly the same way. Feel free to play around with the stems and see how you
like your shrub to be. You can use your
imagination to place the stems and the branches
the way you like. And to give a more
realistic texture to those stems on the shrub, I'm going to add
these tiny stems, dots and dashes to create
the details of the stems. I can also use a bit of spattering technique here
to add some excitement. By using a dry brush, I'm going to paint
in some details of
14. Final Touches: And finally, to finish off, you could have a closer
look at your painting, see if there's any more paint
that needs to be lifted out or if you'd like to add any
more paint to your painting. It depends on how you see
your painting at this stage. For me, I know I
needed to lift out a bit more paint that
background foliage, just lightening it out. That way, it recedes into the background
without standing out and gathering a lot of attention because I'd like that to
be part of the background. And not the foreground. Just lifting out just makes it recede into the
background a bit more. With this, we have
completed our project of creating a winter
scene in watercolors. I hope you found
the techniques that we discussed in
this class useful. Please feel free to
upload your process or your projects in the
projects and resources section. What color is a medium that takes a lot of
practice to understand. So please don't feel
disheartened if you haven't been able to get a result that
you've been expecting. Whatever stage you may be at, I would love to
hear your feedback on how these techniques
have helped you. I look forward to seeing
some of your work. Happy painting, everyone.
 Suzanne Abraham, Artist