Transcripts
1. Welcome to the Challenge: Every great portrait artist
started with a single sketch, not a perfect one, but a sketch they were
willing to learn from. Hi, everyone, and
welcome to the class. I'm Anakashda, a self taught
portrait artist from India, and I'm very excited
to have you all here. Portraits have always
fascinated me, but getting started
wasn't really easy. Like many self taught artists, I struggle with proportions, perspectives, facial features, and even figuring
out where to begin. I spent around two years experimenting with
different methods, making mistakes, and finally learning through
trial and error. Over time, I realized
that improving at portraits wasn't
about talent. It was about understanding the fundamentals and
practicing consistently. So that approach completely
changed my portrait journey, and that's exactly
what I want to share with you all
in this class today. So this class is a ten base of mastering portraits
challenge where we'll break down portrait
sketching and painting into simple
beginner friendly steps. But this class is also the beginning of
something much bigger, which is going to be our
hundred heads challenge. So together, we'll be
working towards completing 100 portraits and by
taking one step at a time. There is no deadline
and no pressure. So the goal here is to simply
practice consistently, learn from each portrait, and also to enjoy the process. So in this class, we'll be completing the
first four heads of the challenge while building a strong foundation in
portrait drawing and painting. So during the first
half of the class, we'll focus only on sketching. So here we'll study
facial proportions, perspectives, construction,
the Loomis method, and other essential
concepts that make portrait drawing
easier to understand, followed by which
in the second half, we'll move into
the painting part. Where we learn how to make skin tones using limited
palette and bring our portraits to life using wash. And this class is
perfect for beginners, artists who struggle
with portraits or anyone looking for a structured way to improve their
portrait skills. And by the end of
these ten days, you'll have four completed portraits and more importantly, a much better understanding
of how to approach portrait sketching and
painting with confidence. So grab your sketchbook,
gather your supplies, and let's begin our hundred
heads challenge together.
2. All about Projects: Before we begin, here's how we share projects
throughout this class. Since this is a
challenge based class, I encourage you to complete the exercises and upload
your work as you go. Our focus should be mainly
on practice and improvement. To upload your work,
go to the projects and resources section and click Create Project after
completing your first project. Because this is a
multi day challenge, you only need one project
for the entire class. So simply update the same
project as you progress. Example, upload your Davon work, then use Edit project
or update project in the same section to
add your future works. So this also helps in creating a visual record of your growth
throughout the challenge. The challenge is
completely self paced, so work at whatever
speed it suits you. And mainly focus on learning and practicing rather than
rushing to finish, feel free to share not only
your finished portraits, but also your practice pages, lumis exercises,
perspective studies, and even the random sketches
you make along the way. Trust me, the
biggest improvements often happen during
the practice sessions. And if you have any questions,
if you have any doubts, post them in the
discussion section, and I'll do my best
to reach out to you. And most importantly,
enjoy the process and just know that every
sketch is a step forward. I hope the project
part is now clear. With that, let's move
on to the next lesson.
3. Materials Required: Now, before we begin, let's get our gear ready for the next ten days
of the challenge. For sketching, you'll need a sketchbook or a
few sheets of paper. Since we'll eventually
be working with gouache, I would recommend
using paper that is at least 245 GSM thick so that it can handle
multiple layers of paint. I'll be working in a sketchbook, but feel free to use any paper that you're
comfortable with. Next, we'll need a
pencil for sketching. You can use any pencil that feels comfortable in your hand. We'll also need an eraser in case you need to
make any adjustments. For some of the
lessons in this class, we'll be creating
a few simple tools to help us understand
perspective better. For that, you'll need three different colored
sheets of paper, preferably in squis,
a pair of scissors, and a pen or a marker. We also need some foam clay, a craft knife, and a piece of thread to
create another tool. So while you're working
with a craft knife, please make sure you work
carefully and also safely. Now moving on to the
painting supplies, I'll be using this Hi
mia jelly gouache set, but you don't need
the exact same set. In fact, we'll be working with a very limited palette
throughout this class. The main colors you'll
need are white, black, yellow, red, blue, burnt
umber, and violet. These colors are more
than enough for us to mix a wide range of skin tones and complete all the
projects in the class. We'll also need a few brushes. I recommend having a mix
of round and flat ones. Addition, you must have water to clean your brushes
from time to time, a mixing palette, a waste
cloth or paper towel nearby for cleaning
your brushes. You can also keep
some washy tapes with you if you like working
with clean borders, and that's pretty much everything we'll need
for this challenge. So gather your supplies, get your workspace ready, and once you're all set, let's move on to the next lesson and begin our portrait
journey together.
4. Warm Up : Lines and Circles: So let's start with
a few simple lines. Now, this is a warm up exercise
where we'll gently warm up our hands before getting into the main portrait
sketching process. These exercises will help
you get comfortable with your pencil moment and make the sketching process
smoother later in the class. We'll begin with
some vertical lines, so you can go ahead and make a few vertical strokes
of any length. Make sure you feel comfortable
with the way you hold your pencil and also don't
worry about perfection here. Next, let's move on to some
straight horizontal lines. You can actually do
this exercise on a rough sheet or anywhere
you have empty space. So simply fill the page with lines to loosen
up your hand. Next, let's try a
few diagonal lines. You don't have to
follow any specific technique for this exercise. The main goal here is to get comfortable with your hand
movement as you draw. You can quickly
skitch a few lines without worrying too
much about precision. So this is just to prepare your hand for the main process. Now that the lines are done, let's move on to some circles. Now, this exercise is all
about free hand circles, and we'll be filling this
entire page with them. So while drawing, make sure you're not using
just your wrist. Try to use your entire
arm from your shoulders, to your wrist and fingers. So that's how you should be
controlling your moment. Also make sure it is
not just restricted. Let the flow be a little natural to get
that circles right. During this exercise,
let's focus on slowly controlling the motion and
gradually building the shape. Also, you don't have to stick
to one particular size, start with small circles and gradually increase your
size as you continue. As you can see, I'm using
very light strokes here because I don't want the circles to be dark from the very first, as we'll be slowly building
the shape over a few rounds. That is, instead of drawing
just one circle outline, I'm going over the
shape a few more times until I achieve a cleaner
and more balanced circle. So don't worry if your first
circle doesn't look perfect, even in my case, as you can see, the first one doesn't nearly
look like a perfect circle, but I slowly build
the illusion of getting a circle
after a few rounds. So the idea here is
to correct and refine the initial circle into
a more balanced one. So take your time and
fill the page with a few circles before we
move on to the next lesson. With this warm up session, we are all set to move
to the next lesson.
5. Tool 1 : Paper cube: Now, for this, we'll require three different
colored papers. First, let me show
you how to make a square in case you don't
have a square sheet. So I'll start by cutting
the paper so that one side is slightly more than the width of the square
I'm planning to make. Here, I'm simply
dividing it into half. Since I'm not aiming
for a very neat cut, I'll just press the paper firmly and then tear
it with my hands. Now, to get a square, I'll fold this part diagonally. After folding it diagonally, you can further fold it this way so that you get a square. Once again, before
tearing the paper, make sure you press it well
so you get a cleaner edge. Well, you can also
use a scissor. And with that, if
you open it up, you'll get a perfect square. So using these papers, I'll create two squares
from each color. So here I'm repeating the same process since I'm using the same
paper as before. So in case you didn't
understand the previous method, you can take your time
and watch this again. O. But if you look here, luckily, the entire length of the
sheet is twice its breadth, so I'll simply divide the sheet into half
to get a square. Luckily, the half of this paper
turns out to be a square, so I'll be repeating
the same process for the remaining three colors. So now we have a total of six choirs in three
different colors. So the first step is to
fold the paper in half. So let's start it vertically. Oh. And Now, open it up and you'll have
a crease in the center. So using this as a reference, bring one edge of the square to the center line and
press it nicely. Now I'm going to repeat the
same on the other side. This way, you have divided the square into four
vertical sections. Now, let's do the
same horizontally. Rotate the paper, fold
it into half first, and then use the
center crease as a reference to both
the sides inward. Uh and with the final fold, you'll have all the
crease lines ready. Next, fold it in one way, and then in the next step, you can fold it in the
opposite direction. So I'll show you once again. First, fold it vertically and
then fold it horizontally. This way, you'll get a
small square at the back. Now I'll repeat the same process for the remaining
five square pieces. And with that, we have
all the six papers ready. So the same colors
represent opposite sides. So consider these two
as opposite sides. Now I'll take the next
one, which is orange. So orange is going to be
the next opposite sides. So let's say this goes in
the top and bottom part. I'll start with
orange as the base. So place it on the table like this as it'll stay
at the bottom. Next on the open
sides of this orange, place the side squares
facing each other like this. If you look at it now,
this becomes one side. This is the base, and this is
going to be the other side. Now, similar to how we
place the orange one, we'll place the top piece
in the same manner, but on the opposite side. And with that, we have four
sides of our cube ready. Now for the remaining two sides, you can use the open sides and place the squares
facing each other, same way, like how
we did earlier. So find the gap, and then you can insert one side
of this piece. And mainly in the step, don't apply too much of pressure
since it's just a paper. So take your time and hold the other pieces in
place while doing this. Now, once this side is inserted, you can slide in the
other side as well. Now that this part is done, we'll move on to
the remaining one. Place the piece accordingly,
identify the opening, and repeat the same process, slightly open the space, and then insert the
paper carefully. And once done, press all the edges gently
so there are no gaps. And as I mentioned earlier, avoid pressing it too hard as
it might damage the paper. So if you prefer,
you can also use a bit of glue to
secure the sites. And with that, cube is ready. This will be an important tool to understand different
perspectives, not just for this class, but
also for your future works. Finally, to mark the
reference lines, you can use the
existing creases. For that I'm using
a pen and a scale. Using that you can
mark over them and repeat the same
on all the sides. Now that our cube is ready, let's move on to the main
class and its application.
6. Perspective Study : Using a Cube: H now to study the
perspectives using this, I have marked the sides.
This is the front. This is the bottom part.
We have the top part here, and these two would
be the sides. First, let's keep the cube
in a straight position. When it is facing
directly towards us, only the front part is visible. But once you slowly rotate
it in either direction, you can begin to see the
side phase coming interview. As you can see, the blue side of the cube slowly
starts appearing. The more you tilt the cube, the more visible
the side becomes, while the front face gradually starts diminishing
in appearance. Oh Notice how when
the cube is straight, the front face appears
evenly divided vertically. But once you begin tilting it, the visible area of
the front face starts reducing as the new
side emerges into view. So the more I rotate the cube, the more the front
side diminishes while the side face becomes
increasingly visible. Also, the side closer to the
direction of the rotation appears compressed depending on the direction in which
the cube is tilted. Now, if you do the same
thing on the other side, that is slowly, if you tilt
the cube towards the left, you can see that the side
of the front face gradually reduces in size while the blue side starts
emerging into view. As I continue
rotating it further, there comes a point
when the cube is fully turned and now only the
blue side is visible to us. So the same concept applies to top and bottom faces as well. As you tilt the cube upward, the front portion
slowly reduces while the orange colored bottom face
begins to come into view. As I continue tilting
it further upward, the orange face eventually
becomes fully visible. Similarly, when
looking downward, you can see that the front
face gradually reduces while the top face increasingly
comes into view. And at one point, the top face becomes the
dominant visible surface. So basically, the amount
by which the front face reduces is the amount by which the other face
becomes visible. Now, let's relate
this to a human head. Suppose the person is
turned to the side, similar to this cube position where only two
faces are visible. But what happens if the
person is looking upward? If I tilt the cube
slightly upward, you can notice that not
just two side faces, but also the bottom
face becomes visible. In the same way, if the
person is looking downward, while also facing
sideways, again, all three visible planes
begin to appear together. So by experimenting with
different tils and directions, we can clearly observe how the visible size changes
according to perspectives. This is a very simple
and effective way to study perspective
using a cube. Now that we understand
this concept, let's begin with the exercise. Now let's practice
a few perspectives. For that, I'll begin with
a front facing view. Now, when the cube
is kept straight, only the front face is visible. So that's the reason
we are starting off with a square in the middle, which is nothing but
the cube itself. But once I till the cube
in different directions, we start getting
different perspectives. So first, I'll mark all
the directions clearly. Now I have tilted the cube
towards the right side. The yellow face is now
facing towards the right, so let's study this
perspective carefully. Instead of appearing
as a perfect square, you can see that the front shape now becomes slightly distorted. The line I'm starting
with is still straight, but if you observe the
side edges carefully, they are no longer
perfectly horizontal. As the direction changes, the lines begin to shift and distort according
to the perspective. So you can sketch them as such. I'll also add the
guidelines on this one. Now, on the other side, instead of completely straight line, you can notice that the
line bends slightly inward. You can connect
the edges this way to understand the
form more easily. Again, the middle line is no longer perfectly
straight, either. Instead, it bends
slightly downward. I'll shade the sides so that we can differentiate
the different planes. Next, when you tilt the cube towards the
left side, here, again, the front face shifts while the side face starts
emerging into view. As you can see,
the vertical lines remain almost straight
in most cases, but the horizontal lines change according to
the perspective. They are no longer
perfectly straight and instead appear at an angle. So carefully observe
the cube and you can try sketching it the same
way in your sketchbook. Now, I'll shade
the side planes so that we can
differentiate between the front and the side faces. Slowly, take your
time to understand the perspectives by using this model and also try to replicate them in your
sketchbook while you practice. Now, in this case, the
cube is tilted upward. As you can see, the front
face is reduced in size, while the bottom face
is more visible. Also, in this perspective, all the horizontal lines appear mostly straight and
parallel to each other. So before we start sketching, let's observe the
cube carefully. If we take the center
line as a reference, you can notice that all the horizontal lines
remain parallel. However, the vertical lines
begin to bend slightly. So in this perspective, both the vertical
lines are slightly bending inward towards
the center of the cube. So I'll begin by drawing
the horizontal lines first. You can see that
the middle section appears larger in comparison. Before connecting the edges, notice that the bottom part
has more visible space, so I'll make that
area slightly bigger. Next, I'm simply connecting the edges this way
to build the form. I'll also add the guidelines
for better understanding. Next, you can shade
the bottom plane so that the different faces
are clearly visible. Now let's take a look at the cube which is
tilted downward. Again, all the horizontal lines remain almost straight
and parallel. Let's also consider
the central line as mostly straight here, although a slight distortion
can naturally occur. Unlike the previous one, I haven't tilted the cube
to an extreme angle, which is why only
a small portion of the top phase is visible. Now, this process is similar
to the previous example, but here the front
phase is more visible, so I'll make it slightly larger. So this one is basically the opposite of our
earlier perspective. And always remember,
there would be a slight distortion depending
on the perspective. Now, if you look at this case, the cube is tltered downward
as well as towards the side. Because of this, you can see multiple planes
at the same time. Here, all the vertical lines appear mostly straight and
parallel to each other. So I'll begin with the
intersection line first. So I'll start with
the straight line as the base reference. Since the cube is
tilted downward, both the front and top
faces are visible. At the same time because it
is also turned sideways, the side face becomes
visible as well. To draw this, I'll first catch the front facing
plane this way. Now, if you observe the
side face carefully, you can see that the edge
is not perfectly straight. It is slightly tilting upward. Most of the lines in
the same direction remain almost parallel
to each other. So the vertical lines
are nearly parallel and the horizontal lines are also mostly parallel
within the plane. Now for the top face, only a very small
portion is visible. So I'll skitch that
shape lightly. I'll darken the visible top face slightly darker than
the previous one. Next with a new perspective, if you observe carefully, the side plane is the
most visible part here, while only a very tiny part of the front face can be seen
along with the top face. And if you use the bottom
edge as a reference, you can clearly notice the angle at which
the cube is tilted. The cube is almost completely
facing this direction, so I'll use these reference
lines to construct the cube. Here, the horizontal lines
are tilting downward, while the vertical lines are slightly tilting
towards the left. And using those directions, I can easily build the side. The front part is
barely visible, but a small portion
can still be seen, so you can continue following the same directional
lines while sketching. The opposite edges will remain almost parallel
to each other, so you can simply sketch it out. Now for the top
part, I'll simply connect these lines to
complete the shape. Imagine the cube is facing upward while also turning
towards the right side. So let's begin with
the intersection line. I'll start with the straight
line as the main reference. If you observe the
horizontal lines carefully, you can see that they are
not perfectly straight. Instead, they are
slightly angled downward. So using that direction, sketch the front face. Now for the side plane, the lines again bend downward, but this time it is in
the opposite direction, so I'll make them accordingly. Also, since the visible side
plane is smaller in size, I'll make it slightly narrower. Next, we have the bottom plane. To complete the bottom phase, notice that these
lines are mostly parallel to the lines already
present in the structure, so I'll not complicate it more. So directly go ahead and draw parallel lines to
finish that portion. And to differentiate this side, you can darken it a little more. Now, in this case, the angle
is positioned this way. So basically, the cube is
not directly facing us. It is turned towards the side
while also tilted upward. I hope this makes the
angle a little clearer. Here, I'll begin by drawing
the side plane first. I'll use the directional lines
as reference for the side. The lines follow a
particular pattern, so I'll sketch them accordingly and then
connect the edges. You can also notice
that the lines are slightly angled
here as well. Once the side plane is ready, I'll shade it lightly to
separate it visually. Next, let's look
at the front face. You can see that it
is also slightly angled and distorted
according to the perspective. So I'll skitch the
front face this way and connect all
the edges carefully. Now for the bottom plane, you can simply draw
lines parallel to the ones already present in the structure like
we did earlier. Once the shape is complete, I'll darken it slightly to indicate the
bottom face clearly. So this is how you can study perspective using a simple cube. So using just this one cube, we explored multiple
perspectives and understood how angles and visible planes change depending on direction. This is a very easy
and effective tool, especially for beginners who
struggle with perspectives. So by using this cube, you can practice many different
angles and viewpoints, apart from what we did
in the class just now. Feel free to rotate it
in different directions, sketch those perspectives,
and use it as a study tool to improve your understanding
of forms and angles. Now that this concept is clear, it'll become much more
easier to understand the next topic where we'll
introduce the Loomis method. So now let's move on
to the Loomis method.
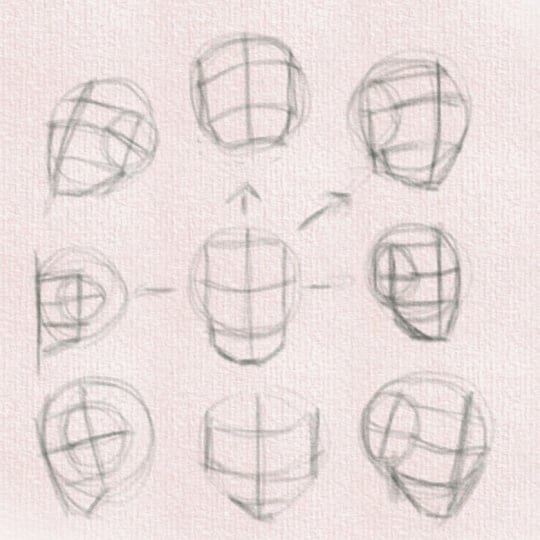
7. Introduction to Loomis Method: Oh now for the Loomis method, the very first step is
to begin with a circle. Basically, this
circle represents a sphere in three D form. So go ahead and start
drawing a free hand circle. And most importantly, take
your time with this step because this is going to be the foundation of the
entire construction. And you slide strokes
while sketching the circle and don't try to finalize it
in a single stroke. Instead, go around the
shape multiple times, slowly refining it until you
achieve a balanced circle. It usually takes a
little more time when you are drawing
larger circles, so don't rush the process, take your time and
slowly refine the shape. Once the circle is ready, the next step is to draw
the central guideline. Here, I'm dividing the circle vertically through the center, and I'll extend this
line slightly downward. Next, we divide the
circle horizontally. Instead of drawing this
line completely straight, I'm curving it slightly to
match the form of the sphere. So this basically gives
you the eyebrow line. The next step is to slice
the sides of the sphere. We usually cut the sides at around two thirds of the
height of the circle, so that's normally
the proportion we'll look for while
making the slice. So I'll roughly shade the sliced area so it becomes
much easier to understand. Now, if I connect both the
tips of the sliced part, I'll be getting the hairline, as well as the nose
line at the bottom. Now, if you observe carefully, these divisions almost
form equal sections, creating a structured
framework for the face. So now we have the hair line a line and the noseline
clearly marked. Next, at an equal distance
below the noseline, we can mark another
line to place the chin. I'm using the pencil
here to roughly measure the length and
maintain the proportion. Now, you can connect the chin to the sides near the nose
line to form the jaw line. To define the overall
shape of the face, I'll slightly curve
the outer edge of the hair line down
towards the eyebrow line. This actually helps in shaping the side
structure of the head. Now at this stage, major
guidelines are now ready. Now, to locate the eyeline, divide the space between the ebrline and the nose
line into three equal parts. The upper division will roughly indicate the eye placement. For the mouth, divide the space between the nose line and
the chin line into half. This gives us
approximate position of where the mouth would end, and the ears are usually placed between the br line
and the nose line, so you can sketch them
within that region. Next to locate the eyes, the eyes do not extend all the way to where
the ears are placed. Generally, the
width of an eye is approximately equal to
the width of the nose. Because of this,
we usually divide the ebrline into
five equal sections. So roughly measure the space and divide it into five equal parts. These divisions actually
help us understand the placement and width of
the eye as well as the nose. Simplify the eye placement, I usually begin with
simple oval shapes. So for now, I'll go ahead and roughly sketch the
eyes this way. Next, if you drop a
straight vertical line downward from the inner
corners of the eyes, it has defined the width and
the placement of the nose. So this is where I'll
roughly mark the nose. Now we have the eyebrows
placed along the eyebrow line. I'll shape them this
way and connect them naturally towards
the nose area. At this point, you
can slowly see the face beginning to take form. Next comes the mouth. Earlier, we mark the line
where the mouth ends. Now, if I divide the
space just above that line into roughly
three equal parts, it helps me place
the mouth properly. So using the center point
above the mouth guideline, I'll extend the lines
outward to shape the lips. After that, I lightly shade the upper and lower portions to define the lips more clearly. So basically, I'm not getting
into the details now. Next, we can add the neck. Finally, the hairstyle
will completely depend on your reference image or
the look you want to create. Usually, because of the
volume of the hair, it extends beyond
the original circle that we drew at the beginning. So I'm simply sketching a
hairstyle this way for now. So this is the basic idea. Now let me define the
details a little more. I'm softly smudging the areas that I want to refine further, and I'll also add
some shading just below the chin and
around the neck area. As I mentioned earlier, I normally begin
with oval shapes for the eyes and even for the
nose and also for the mouth. So oval shapes are
my to go forms for placing and defining
the facial features. You can also give it a try
because it's pretty easy to then define it into
a proper feature. So once the placement
feels right, I'll slowly start developing
the details from there. So here I'm simply
shaping the eyes first. Once that is done, I'll move on to the nose. For the nose. The lower portion is usually darker because
of the shadows. I'll also define the nostrils and corners of the nose with
a little bit of shading. Later in our projects, we'll study these details
much more deeply. So here, you can simply try
to understand the concept. Next, moving on to the lips, I'll begin with the
center line first. I'll darken it slightly, especially towards the corners. You can notice that the
initial oval saves already help me establish the structure and placements of the lips. Next, I'll slightly darken
the chin area as well. So in this way, we have created the basic facial features. Now, this gives us
the fundamental understanding of Loomis method, but let's go a little further. A face is not just made
up of one flat surface. Instead, it consists
of multiple planes that change direction according to the structure of the face. So let's understand a few
important planes that will help us understand this
facial structure better. The face one is the
side plane of the face. This plane generally
extends from the eyeline towards
the end of the chin. Similarly, just below the
lips, we have another plane. Next, let's look
at the eye area. The eyes are actually placed
inside the eye sockit, meaning they sit directly inward rather than directly
on the surface of the face. If you observe
yourself in a mirror, you can notice how the area from the eyebrow moves inward
down to the eyes. So these are some of the most important planes that we need to keep in mind while understanding the
structure of the face. The planes present in the
nose is quite complicated, but let's simplify it. So this is basically the general form that
you can follow. And these are the side planes. Overall, this is the
structure you'd get. Similarly for the lips, these are basically
two different planes. And for the forehead here we are considering with just
one single plane. So this is basically a simplified
version of ARO method. The original ASRO method
is much more detailed, but here we have
simplified it for the better understanding and to make it more
beginner friendly. As we discussed earlier, we have broken down the
face into simple planes around the eyes we define the inward plane
of the eye socket. For the nose, we kept
the structure simple by focusing only on
the major planes. Similarly, for the mouth, you can notice the upper
and lower lips act as two separate planes facing
different directions. When light falls on the face, these planes react differently depending on their direction. That is why some areas appear darker and fall into
shadow in the reference. These are actually the
main ideas you need to keep in mind while
studying facial structure. So, based on your reference, you can always refine and
add more details later. For example, if you
observe carefully, the forehead can actually be divided into several
smaller planes. But for now, let's not get into too much of details.
Let's keep it simple. So this is the basic
understanding of Loomis method, combined with a simplified
introduction to facial planes. I hope the method is now clear. Just keep these major
points in mind, and now let's move on to
the perspective study.
8. Tool 2 : Loomis Study Tool: And so just like the cube, let's make another simple
tool that will help us understand perspectives even better using
the Loomis method. For that, I'm taking two to
three sets of foam clay. First, you'll have
to condition it and then shape it into a ball. Since foam clay can dry quickly, make sure you shape it as fast as possible and then let it dry. Once the ball is ready, let's divide it vertically and horizontally to establish
our basic guidelines. For that, I'm using a thread
and wrapping it around the ball so that it divides the sphere equally
into two halves. Now using this reference, I'll mark the line with a pen. Similarly, to divide
it horizontally, I'll adjust the
thread so that it sits perpendicular to
the previous line. Now the next step is
to slice the sides. Before doing that, I need to identify the center of
the side planes properly. So let's make one
more guideline. I'll once again wrap the thread
around the sphere so that we get a perpendicular to the line that's
already existing. At this point, now we have both the vertical and
horizontal lines on the front. Similarly, on the sides
where we are going to slice, we already had the
horizontal guideline. Now we have added the vertical
guideline at the center. With that, all our
reference lines are ready. Now let's slice the sides. Carefully cut the side
portions on both ends. I'm using a craft blade that I normally use for
clay projects. So while you're doing it, please be careful
while working with it. So repeat the same process
on the other side as well. As you can see, this
side is slightly soft, so I'll leave it aside for
a while to dry properly. Initially, for the
entire ball to dry, I did leave it for
like 24 hours. Now that the sides are all dry, let's mark the guidelines and marking these lines just
by connecting the ends. Now, for the final step, I'm taking a thin strip of thick paper and placing it
vertically through the center. So this will act as
our central axis. If you look at the
strip separately, it is just a straight line, but by attaching
it to the sphere, it becomes much
easier to understand the head direction and
perspective in three D form. So I'll stick it in place, and with that, our
tool is ready. Now using this model, let's study perspective
through Loomis method.
9. Loomis Perspective Study: So, based on how we studied
perspectives using the cube, we'll now repeat the same
exercise using our new tool. So we'll be covering all
the same perspectives and angles that we
practiced earlier. The only difference
is that now we'll be applying them directly to
the Loomis head method. So let's begin with a
straight facing view. Here, we can clearly see
the front of the head along with all the main guidelines
and also the sliced part. So just like before, we'll begin with a circle. For a straight facing head, we can simply draw the central
vertical axis like this. Following that, we can mark the horizontal line which
is the eyebrow line. You can then slice the sides. You can compare it with the Loomis tool so that you
can understand it better. Next, you can connect
the other guidelines. So in the end, you can connect the jaw line this
way to the chin. So this much of
details would do, and that's our
front facing head. So in the straight
facing position, this was a structure we had, but once the head starts turning slightly
towards the side, you can compare these
two halves of the face. So this part slowly
starts reducing in size. So notice that the
side to its width, the head is turning gradually
reduces invisible width. At the same time, the sliced
part becomes more visible. So the more the head turns, the more the front
portion diminishes, while the sliced part becomes
increasingly exposed. This is basically how we
did previously with a cube, but now it's just the
sphere with a sliced side. You can take your time,
observe the Lumi stool, and using that, you
can start sketching. So again, I'll begin
with the circle. As you can see, the central
axis is towards the sides. So first, I'll mark the
exposed side plane, then add the central axis, following which I'll go ahead with the
horizontal guideline, which is our eyebrow line. Next, I'll add the
remaining guidelines, like how we studied
the Loomis method. You can use a curved line
to mark the jaw line. So simply you can connect the corner of the circle
towards the chin, and I'll do the same on
the other side as well. Now let's look at the
opposite direction. So as the person turns
towards the other side, the front portion on
that side begins to reduce while the sliced plane
becomes visible instead. Now, let's assume
that the person is turning completely
towards the left. Here, the sliced side plane is fully visible
without any distortion, so I'll place it almost
in the center like this. At this stage, it almost looks like two
overlapping circles. Next, I'll add all
the guidelines. So for the central axis, notice that it touches the outermost left edge
of the circle. And since the head is completely
turned towards the side, the far side of the jain
is no longer visible, so we only need to connect
the visible sideline. In the next case, let's see what happens when the head
is looking upward. If you recall the Loomis method, this is where the nose line and chin line are normally placed. So as the head tilts upward, the lower portion of the head becomes more visible
in this case. In other words, the underside
of the chin starts getting exposed while the forehead area appears reduced
from our viewpoint. So I'll start with a circle. The central axis remains the
same in this case, as well. Now we can slice the
sides as we did earlier. However, the horizontal
guideline now changes. So instead of curving it horizontally across
the vertical axis, you can curve it
upward in this way. So you can also see that there is a shift in
the proportions. So the upper portion
appears smaller. That is the forehead area, while the lower portion now
becomes more prominent. So I'll mark the
distance between the nose and chin a
little bigger now. Following that, you
can simply connect the jaw line to
complete the structure. In the next case, the
person is looking up but also turning
towards the side. As you can see from the tool, this is the perspective we get. So you can start with
a circle as usual. Then just as shown in the tool, mark the sliced
side plane first. Next, you can go ahead and
draw the central axis. Since the head is turned, the
axis is slightly slanted, so I'll draw it as a gentle curve following
the direction of the head. Now, if you observe the
horizontal guideline, it is no longer a straight line. Instead, it bends downward, just like we observed earlier
while studying the cube. So here we are applying the
same perspective principle. Also, notice that the
vertical guideline on the sliced part is generally parallel
to our central axis. Keeping this parallel
relationship in mind, it makes it much easier to
construct the head correctly. Finally, you can complete it
by connecting the jaw line. Now let's look at
the opposite side. In this case as well,
the person is looking upward but turning
towards the other side. Again, start with a circle and carefully observe
the Loomis stool. Now mark the slice side first. Then identify the angle of the central axis and you
can draw it accordingly. I'll repeat the same angle
on the sliced part as well. Just like we mentioned, you can make these lines parallel. Again, the horizontal guideline
is not a perfect curve. Instead, it bends slightly
towards the sliced part. After that, I'll add all
the remaining guidelines and connect the jaw line
to complete the structure. At this stage, we
are only focusing on understanding the
angles in construction, so there is no need to add
any further facial details. Now let's move on to
the downward tilt. So when the head is
looking downward, the chin begins to
disappear from the view. Earlier in the case
of upward tilt, the forehead disappeared,
while in this case, the chin starts disappearing. So we'll follow the same
construction process, start with a circle. But this time, notice that
the horizontal guideline, which represents
the eyebrow line sits lower than the
center of the circle. Now, as a result, the lower
portion of the head appears compressed while the
distance between the ebrline and the
hairline appears larger. So this shift
intraportion helps create the illusion of the
head tilting downward. Once the guidelines
are in place, we can roughly connect the jaw line to complete the structure. Next, let's see what
happens when the person is looking downward while also
turning towards one side. Again, we'll begin
with a circle and use the Loomis tool as our reference to constrict the head
from this angle. You can first observe the angle at which the head
is tilted downward. Once you understand
the direction, you can mark the central
axis accordingly and then slice the sides
based on the angle. So in the upward tilt, the horizontal guidelines
were curved upward. So in this case, it would
be curving downward, so you can use that
knowledge to mark the guidelines and
finally complete the overall shape by
connecting the jaw line. Similarly, let's look
at another case. Suppose the head is
turned completely towards the side and is
also looking downward. In that case, this is the
position we would get. As usual, we'll begin
with the circle. Then I'll identify the angle of the tint and mark it
using the central axis. However, in this case, the entire side
plane is visible. Because of that, I'll place the slice section almost in
the center of the circle. Now to make the eybrline, I'll make it perpendicular to
our existing central axis, and following that, I'll mark the remaining
guidelines and connect the jaw line to
complete the structure. So now using the omis tool, along with the
perspective concepts we learned earlier from
the cube exercise, we were able to
construct and understand all these different head
angles much more easily. These studies help
us visualize how the lumis head changes
in perspective and provide a strong foundation
before we move on to drawing actual portraits
from different angles. So with the help of
these two tools, we were able to study a
wide range of perspectives. We spent a good amount of time understanding
perspectives using cubes, and then applied the same concept using the Loomis method. I would highly encourage you
to give these tools a try. They are not very
complicated to me, but they are incredibly useful when it comes to
understanding proportions, perspectives, and portrait construction from
the very basics. So don't feel restricted to only the angles we
studied in this lesson. Try exploring different
angles on your own. The more you
experiment, the better you understand the perspectives, and it will help you
improve much faster. As you can see, with
the help of this tool, I was able to do a few
quick studies of my own. Let me show you one that
I worked on recently. So this is a very
simple exercise where I focused only on the central
axis and the eyebrow line. So by changing the
angle of the head, I was able to get different
results and was able to better understand how perspective affects
the structure. Next study, I followed the
same process that we just did, but I took it one step
further by roughly placing all the facial features
along with the structure. So this gave me a much
clearer understanding of how the head would eventually look as a complete portrait. As you can see, this tool was the primary reference I used while studying these
perspectives on my own. All you need to do is
draw a few circles, set a particular
angle using the tool, and then try to replicate the same angle in
your sketchbook. The more you repeal
this exercise, the more naturally perspective will start making sense to you. So with that I hope this lesson was informative
understanding perspective and construction is one of the most important
foundations of portrait sketching and
everything we learn from here onward will build
upon these concepts. So based on everything
we have studied so far, let's move on to
our Day one project and start applying these
ideas in practice.
10. Day 1 : Practicing Loomis Method on References: So based on everything
we have learned so far about perspective
and using these tools, let's practice a
few heads together. And in this project, we won't focus on
the facial details. Instead, we'll concentrate
on the basic head, structure, shape,
and perspective. And I'll be guiding you through
all these six references. So if you find it confusing, you can first watch the lesson and then try it on your own. So now let's get started with
our very first reference. For this, the face is
positioned in this manner. If you observe carefully, the eyeline is not
exactly at the center. Since the head is
slightly tilted upward, the eyeline also appears
a little higher. Keeping that in mind,
let's begin with a circle. The central vertical axis
remains almost the same. Next, you can go ahead
and slice the sides. Now, since the head
is tilted upward, the horizontal guideline
will curve upward, as I mentioned earlier, whenever the head tilts upward, the horizontal guidelines
tend to curve upward as well. Next, I'll add all the
remaining guidelines. Once those are placed, we can then connect
the jaw line. If you look at the reference, the jaw is not very sharp. Instead, it has a softer curve, so I'll shape it accordingly. Now I'll roughly
indicate the hairline. I'll also mark the neck. As the ears are
slightly visible, I'll mark them as well. Now, without spending too
much time on details, I'll quickly block in the hairstyle based
on the reference. For this lesson, especially, I would like you
all to fix a time and try to finish the painting within
that particular time. So try to quickly analyze and focus only on the
major guidelines. Since this is the very basic, let's try to focus on that and improve
that concept first. Now I'll use some
simple diagonal strokes to suggest the hair. Without adding any
further details, let's stop here, and that
completes our first head study. Now moving on to
the second head, here, the person is
turning towards the left, but not completely to the side, since a small portion of the far eye is still
visible to us. So I have positioned the
Loomis stool in a similar way. As usual, I'll start with a circle and establish
the basic structure. Once the circle is ready, I'll add the central axis. You can see that it
is slightly curved, so I'll replicate
the same curve. Next, I'll slice the side plane, making sure that it begins roughly from the end
of the eyebrow area. The eyeline is again
slightly above the center, so I'll curve it gently upward. Remember, this guideline
passes through the eyebrows, bends across the side plane, and generally aligns
about the top of the ear. So that's actually what makes
the bend incline downward. I'll also mark the vertical
guideline on the side plane, which remains roughly
parallel to the central axis. Next, I'll add the
remaining guidelines. Now because of the
small upward tilt, you'll notice a small
change in the proportions, that is the lower part
is more visible now. Once the construction is ready, I'll connect the jaw line, paying close attention to how much it curs
in the reference. After adding the neck, I'll roughly sketch these
flowers from the reference. Again, we're not
focusing on details. As you can see, these are
very loose flower sketches. The goal here is to simply capture the overall
shape and structure, and that's what
we're doing here. Finally, I'll block in the hair. Now, if you're a beginner, don't worry about the speed. Take your time, observe the reference carefully,
and then proceed. And with that, our second
head study is complete. Now for the next head,
the person is looking slightly downward and
also towards the side. You can see that both
eyes are visible, but the far eye appears slightly reduced because the head is
turning towards the right. If you observe carefully, this would be our central axis. Using that idea, let's
begin the sketch. You can start with a circle and then mark the central axis. Next, I'll mark the side plane. As the head is slightly
tilted downward, the horizontal guidelines
will now curve downward, just as we discussed earlier. You can also notice a
slight compression in the lower portion of the face because of this downward tilt. Now, let's connect the sides. First, mark the chin properly and then connect
it to the jaw line. On the side plane, we have the vertical guideline which remains parallel to
the central axis. You can extend it slightly
down to connect the jaw. M Next, we have the
scarf in the reference, so I'll quickly
outline it first to understand the overall shape of the head and the neck area. Remember, even if you are
not able to replicate the reference exactly,
that's completely fine. Our main goal here is not perfection, so
keep that in mind. We are simply practicing
multiple head angles so that we can better understand proportions and perspective. Now that the basic
structure is complete, I'll quickly indicate the hair by using some simple shading. And with that, the head
steady is finished. Now let's move on
to the next one. Here, the person is looking upward while also
turning to the side. Observe the angle
of the line passing through the center of the
face through the nose. So that will help us identify
the direction of the head. And here, precisely, it'll help us define the direction
of the central axis. You can also see part to the side plane because
the ear is visible. So once again, begin with a circle and then add the
central axis accordingly. Because of the
turn, the far side of the face is
slightly compressed, so keep that in mind while
placing the central axis, I'll position it slightly
towards the side so that the left side is
slightly diminished. Now, while marking
the side plane, leave enough space for the front portion of
the face before placing it as this half of the face is slightly
bigger than the other one. Then we can add
the eyebrow line. Using the position of
the ear as a guide, which we used earlier, I'll curve the eyebrow line
according to the reference. After that, I'll add the
remaining guidelines. Because the head
is tilted upward, the lower portion of
the face becomes more visible while the upper portion
appears slightly reduced. Now around the eye area, there is the soft subtle curve, so I'll indicate that as well. Now we can mark the chin
and connect the jaw line. Once that's done, I'll
also add the neck. Finally, I'll block in the hair using simple
shapes and shading. At this stage, there is no
need to focus on details. Just try to capture the
overall shape and direction. So And with that, this head study is complete. Now for the next head, the person is looking upward while also turning
in this direction. You can see that the side
plane is visible and the far side of the face appears slightly reduced
because of that turn. So this would be
our central axis. With that in mind,
let's begin the sketch. So start with a circle and
then mark the central axis. I'll make it slightly curved to match the
angle of the head. As you can see, the ibline is
not exactly in the center. It is positioned a little higher because
of the upward tilt. Accordingly, I'll mark
the side planes as well. I normally align the oval of the side plane with the
direction of the central axis. So after a few practice, I hope this would get
easier for you all. I'll also add the
vertical guidelines on the side plane now. So if the central
axis is tilted, the side plane will generally
follow the same direction. Next, using the placement of the ear and the
eyebrows as reference, I'll mark the
horizontal guidelines, starting from the eyebrow line. Then I'll add the hairline. Because the head
is tilted upward, the lower portion of the face becomes longer and more visible. So I'll extend the proportions downward and mark the
chin a little down. Now, let's shape the head. You can take your time here and observe the
reference carefully. Notice which areas are straight, which are curved and where
the face changes direction. Understanding these
subtle changes will help you constrict the
head more accurately. So give some time, observe the reference, and
then start your work. For the jaw line, I'll
extend this side a little further down before
connecting it to the chin. I'll mark the year as well. Next, I'll add the neck. Once the basic
structure is ready, I'll move on to the hairstyle. Again, take a moment to observe the overall
shape of the hair and then simply outline it using
simple lines and shapes. M. And with that, our fifth hit study is complete. For the last one, the person is again turning
towards the side, but is also looking upward. Now, observe the
angle created by the central axis and
the eyebrow line. That will help you understand
the direction of the head, so I'll arrange the
Lums tool accordingly. You can see that the side
plane is clearly visible here while only a small portion of the far side of
the face is visible. So keeping that in mind, I'll begin with the circle. Here, the central axis is positioned close to the
edge of the circle, but not at the extreme end. So you can leave a small gap and then place the central axis. Next, estimate how much
space is needed for the front portion of the face and then mark the side plane. Now, observe the eyebrow line
because of the upward tilt, it curves like this and bends as it moves
towards the side plane. And you can see it would
roughly connect the ear, even though it's not
visible in the reference. Next, I'll add all the
remaining guidelines. As we have discussed earlier, the upward tilt slightly
changes the proportions, making the lower portion of
the phase appear longer. You can also notice a slight in and out curve around
the eye area, so I'll indicate that as well. For the reference, the jaw
line is relatively straight, so I'll keep it slightly slanted and then
connect it to the chin. Always, pay attention to
the angle of the head and the direction in which it is tilting before you start
drawing the jaw line. Next, I'll add the neck and then quickly
sketch the hairstyle. Again, you can first sketch the overall shape and then
go ahead and do the shading. And with that, our Day one
project is all complete. So take your time,
carefully observe the reference and give
these studies a try. I have attached all
the references we have used in this lesson in the
resources section below. Once you have completed
the exercise, don't forget to upload your
work in the project section. I'd love to see your progress
throughout this challenge. So make sure you upload
your Day one project. And if you have any
questions or doubts, feel free to post them in the
discussion section below. So thank you for
joining me today, and I'll see you tomorrow
for our next project. Oh
11. Day 2 : Sketching Session Overview: Welcome you all today too
of our ten days challenge. Before we begin today's project, I'd like to quickly explain what the next four days of this
challenge will look like. So over the next four days, we'll be completing
four portrait sketches with one portrait each day. For this challenge, I'm
using an AFI sketchbook, and I have divided
each page into two halves so that I can fit two portraits
on a single page. I would highly recommend
working on smaller portraits rather than filling
an entire page for this entire challenge, because when you're learning
portrait sketching, it's better to focus on
understanding the structure. Proportions and placement of features rather than spending
too much time on details. Smaller studies
are also less time consuming and allow you to
practice more efficiently. Later on, in our hundred
heads challenge, we'll gradually move on to
larger portraits as well. To make the learning
process easier, each day's portrait will be
divided into two lessons. In the first lesson, we'll focus on understanding
the reference and constructing the portrait using the major guidelines
and proportions. Since this class is
beginner friendly, I've already marked the
important guidelines directly on the reference image. So this will help you
understand the placement of the features and follow
along more easily. Next, in the second lesson, we'll refine the sketch by
adding the facial features, details, and also
the final touches. So this is the format
we'll be following for the next four days before we move on to the painting section. Also, once you complete
each day's portrait, don't forget to update
your class project. Simply edit your
existing project, add the new portrait,
and say the changes. By the end of the challenge, you'll have all your portraits documented in a single project, making it easier to track your progress and
also improvement. With that set, let's begin
with our first portrait.
12. Day 2 : Portrait #1 (Building the Guidelines): Now, let's start with our
first head of the series. So this is the reference that
we'll be sketching today. Before I begin, I have
divided my AFI sheet into two equal halves so that we have enough space
for our studies. So let's start with a circle. Once the circle is ready, we can mark the central axis, take a closer look
at the reference, and then try to identify
the direction of the phase. Then you can replicate a similar central axis
on your circle as well. Next, let's slice the sides. Notice that the
side plane begins roughly from the
end of the eyebrow. Once that's done, I'll add the vertical guideline
on the side plane, keeping it parallel
to the central axis. Now using the top part of
the ear as a reference, I'll draw the curved
horizontal guideline that passes through
the eyebrows, so that suffers
horizontal guideline. Next, I'll add the hairline
and also the nose line. As you can see, because the head is slightly
tilted upward, the proportions are not equal. The lower portion of the face appears slightly
longer than usual. You can even measure and compare these distances
if you'd like. So I'll be using the pencil
for measuring the gap. So I'm making the
distance between the nose line and the chin line, slightly larger
than the previous. Once done, I'll mark the
eyeline around this area. It's not exactly at the
halfway point, but very close. Once all the guidelines
are in place, take a moment to study the
overall shape of the head, observe where the face
curves, where it straightens, and how the jaw
line is structured, then you can slowly start outlining the shape of the face. Here I'm noticing how
much each line is angled and in which
direction it is leaning. So based on that, I'll make the changes in
my sketch as well. These small changes in
angles are what help create the correct perspective
and likeness of the head. So pay attention to all
these minute details. So slowly, we have
completed the shape. So here, the mouth lies just below the center
of this section. So based on that, I'll divide this area further and
mark its placement. You can check the reference on the left so that he
can get a better idea. Then we have the ear
placed over here. Now, this will be the plane
for placing our eyes. The next plane is the
side cheek plane, which would be
located around here. Also notice that this plane
does not touch the lips, so make sure you leave enough space for the
mouth while placing. This would be the side plane, and on the opposite side, only a small portion
of it is visible. Similarly, for the
chin, I'll mark an oval shape to
indicate its plane. Now the overall
structure is ready. We can now start
placing the features. For the eyes, I'll use small oval shapes on the eyeline to indicate
their placement. Notice that the eye is not positioned directly
on the central axis, but slightly to the side of it. Likewise, the other eye is placed further away
from the central axis. Observe it carefully and
then mark it in your sketch. Next, let's move on to the nose. I usually begin with
the bottom plane, which contains the nostrils
and lies on the nose line. Once that is established, I'll create the
bridge of the nose extending towards the eybrline. So this becomes the
front plane of the nose. Finally, I'll add
the side plane of the nose to complete
its structure. After that, I'll
connect the eyebrows. Once that is done, let's
move on to the lips. Start with the central
line and carefully observe the overall
shape and its placement. You don't need to
define the lips precisely at this stage. Instead, you can roughly
indicate them using simple oval shapes for both
the upper and lower part. Now that the features
are all in place, we can move on to the hair. First, I'll block in the
overall shape of the hair and then use simple shading to indicate its mass and volume. And with that, the
basic structure of our first head
reference is complete. Now let's move on to
define the features.
13. Day 2 : Portrait #1 (Adding the Details): Now, in order to
define the features, let's first lighten some
of the pencil strokes. I'm not touching the
lip area because I feel it is already
fine as it is. So let's start
with the eyebrows, observe the reference
carefully and begin shaping them
according to what you see. For the eyes, we already have the oval placements
marked earlier, so I'll simply refine
those shapes now. As you can see, I haven't completely erased
the initial sketch. Instead, I'm using
those guidelines to build the final shape. Here I'll begin with
the upper eyelid and then slowly add the remaining
details of the eye. Here, I want you all
to take your time and compare your sketch with the reference
as you proceed. Not just the eyes, so I'm also marking the lines that
are surrounding it. Now let's move on to the nose. I'll start with the
top plane and connect it to the bottom plane to
define the overall structure. As you can see, the
nostrils are located within the bottom plane
that we had marked earlier. Using those guidelines makes it much easier to place
the features correctly. So now on the side,
we can further refine the side plane of the nose and define its
shape more clearly. Now, you can start marking the darker areas that you see in the reference
around the nose. For example, the dark
shape beside the nose is actually a shadow
cast by the nose itself. So you can replicate that
same shape in your sketch. At this stage, I'm simply
observing the reference and lightly shading wherever I
notice the dark shadow areas. Don't worry about
making it perfect. Just focus on identifying the major shadow shapes
and place them correctly. While doing so, you're already halfway
through the portrait. So focus only on
what is required. You can also add a little
shading just below the lips as this area often falls into shadow and helps define the form of the
mouth and the chin. Next, I'll continue
defining the phase using the shadow shapes that
I observe in the reference. In the area where we had marked the side
cheek plane earlier, you can lightly add
some shading as well, since you can clearly see shadows falling there
in the reference. Now I'll define the neck and
roughly sketch the clothing. After that, you can add the earring as shown
in the reference. For the hair, I have already blocked in the main
shape with shading, but you can further
enhance it by adding a few loose strands here and there to make it
feel more natural. As you can see, the
neck area is quite dark in the reference
because of the shadow, so I'll deepen the
shading here to create the same effect and
improve the sense of depth. Finally, I'll go over
the sketch once more and strengthen any areas that
appear darker in the reference. So this helps
improve the contrast and makes the portrait
feel more complete. And with that, we have
completed our day two project. Once you have finished
your Day two portrait, don't forget to update
your class project. As shown in the
image, you can edit your existing project
and add today's work so that both your day one
and Day two projects stay together in the
same project submission. This way, you'll be able to track your progress
throughout the challenge, and I'll also be able to see your portraits improve
from day one to the next. So take your time, complete the portrait at your own pace, and once you're happy
with the result, go ahead and update
your project. So thank you so much
for joining me today. I hope you enjoy the lesson
and learn something new. I'll see you tomorrow with our next portrait study
until then happy sketching.
14. Day 3 : Portrait #2 (Building the Guidelines): I welcome you all today
three of the challenge. This is going to be the
reference for today's project. As you can see, this is the space that I have
reserved for the portrait. Now, let's begin with a circle. I won't occupy the entire space. Instead, I'll use
roughly three fourths of the available area to
construct the circle. Next, let's mark
the central axis. Just like in the
reference, I'll make it slightly curved rather
than completely straight. Also, try to make your circle as accurate and symmetrical
as possible. It doesn't have to be perfect, but the closer it is
to a proper circle, the easier it will be to
transfer the measurements and proportions from the
reference onto your sketch. Next, you can see that
one half of the face is much larger than the other because of the
angle of the head. Based on that, I'll mark the sliced side plane
using an oval shape. Once that is done, I'll divide
the side plane vertically. Next, let's mark the
horizontal guideline. Following that, I'll add the remaining guidelines
as shown in the reference. If you observe the
proportions carefully, the forehead section
is the smallest. The middle section between the eyebrow and the nose
is slightly larger. The bottom section
from the nose line to the chin is almost equal in
size to the middle section. So take a moment to compare these distances in the reference and mark them accordingly. Now, let's shape the eye plane. Once that's done, you can start defining the overall
shape of the face. So just below the lips, you can see a small curve that helps define the chin area, so I'll add that as well. Then on this side, I'll connect the jaw
line accordingly. Around here, we have the ear. Next, I'll mark the neck and
roughly sketch the clothing. After that, you can lightly
outline the hairstyle. Now, this would
be the side plane and because of the angle, only a smaller portion of the opposite side
plane is visible. Then we'll also add the
plane for the chin. Now on the eyeline, I'll use a leaf like
shape to place the eyes. Notice that one eye is positioned closer to
the central axis, while the other one appears further away because of
the angle of the head. So make sure you place
them accordingly. Next, I'll mark the eyebrows. Once that is done, we
can move on to the nose, slowly break the nose down into its basic planes and
construct it step by step. You can also use the
shadow beneath the nose as a guide for its
placement and structure. Next, let's move on to the lips. As always, I'll start with
the central line and then roughly shape the upper and lower lips based
on the reference. Take your time to observe
these details carefully. At this stage, accuracy is
more important than speed. Finally, I'll darken
the upper eyelid slightly to give the eye
a bit more definition. And with that, all
the major guidelines and feature placements
are complete. Now let's move on to
the detailing stage.
15. Day 3 : Portrait #2 (Adding the Details): Now, to define the
facial features, I'll first lighten all the construction lines
using an eraser. So this will help us sketch more clearly while still keeping
the guidelines visible. Now I'll begin by refining
the shape of the face. At this stage, I'll also correct any mistakes from the
initial construction. If any proportions feel slightly off or if a line doesn't
match the reference, now is the good time to
make those adjustments. So take your time and compare your sketch with the
reference as you proceed. Now, I'll start
refining the portrait by defining the most prominent
features of the face. I'll begin with the eyes. First, I'll darken
the upper eyelid and then add the pupil. Small details like these can immediately bring more
life to the portrait. So carefully observe the
reference and then proceed. Next, let's move on to the nose. Since we already have the
basic structure in place, I'll simply define the nostrils, refine the shape of the nose, and then strengthen the
shadow areas wherever needed. For the lips, we already have the overall form established, so I'll only darken the areas
that need more definition. So I'm not fully
shading the lips because the initial tone
is already present, and that helps maintain
a softer look. Next, we can refine the ear. After that, I'll
shade the neck as it appears quite dark in the
reference due to the shadow. Just as we did in the
previous portrait, I'll now identify
the darker areas of the face and gently build
them using subtle sheading. So this helps define
the planes of the face and also adds
more depth to the sketch. Finally, let's move on to the hair. You don't have to draw
every single strand. Instead, focus on the
overall shape and add a few loose strands
around the neck and the collar area to make
it look more natural. Here, I'll darken
some sections where I feel the values appear
darker in the reference. We have almost
completed the portrait. Now at this stage, you can step back and compare your
sketch with the reference. For example, I feel
the far side of the face looks slightly
wider than it should, so I'll make a small
correction there. You can also do
the same wherever you notice something
that feels off. And with that, our day
three project is complete. I hope you enjoyed
this portrait study and found it easy to follow. So thank you for
joining me today, and I'll see you tomorrow
with our next portrait.
16. Day 4 : Portrait #3 (Building the Guidelines): H I welcome you all today four
of our ten day challenge. So this is going
to be a reference. I'll now divide the page
into half and around here, I'll start with a circle. I'm not using the
entire half page, only about three fourths of it. Once you have roughly
sketched a circle, I'll begin with a side
plane instead of following the usual order because I find it easier to understand
the structure this way. Next, I'll place
the central axis. Once you understand
the concepts, it doesn't really matter in which order you
follow the steps. So don't feel intimidated
because we skip the original order that we followed in the
previous class. Understanding the concept
and being able to apply those concepts in
your portrait is what matters the most.
So don't worry. Anyway, the final result
is what matters to us. After dividing the
side plane vertically, I have now started
the eyebrow line. After that, you can add
the remaining guidelines. As you can see, the
middle portion and the bottom portion are
almost equal in size, so you can measure and see and
then add them accordingly. The more you practice
with portraits, the easier it would get to understand these
measurements visually. Next we have the eyeline. For the mouth, I'll
mark the bottom of the lips slightly below the halfway point of
the lower section. You can see the reference and mark the
remaining guidelines. Now that all the major
guidelines are in place, let's start shaping the face. I'll begin with the nose. So the nose extends
beyond the phase outline. So this is how you can sketch it using simple shapes
in a side profile. Next, I'll add the small
visible portion of the eye. For the mouth, I'm not fully
shaping it at this point, so I'll simply block it with basic shapes to help
outline the face. On the other side, we can now mark the jaw line according
to the reference. Once that's done, you can
go ahead and add the ear. Notice that the
bottom of the ear roughly aligns with the
bottom of the nose, so this is a useful
proportion to keep in mind for most
of the portraits. Next, we'll add the neck and
all the remaining details. Now, observe the reference carefully and take your
time outlining the hair. So this area here will
be our side cheek plane. And here goes the
plane for the chin. For the eye, I'll once again use a leaf like shape to place. Then we have the eyebrow. Also, don't forget to add
the eyebrow here as well. Now, to place the mouth, I'll start with the
central line and then slightly shade
the shape of the lips. And with that, all our
basic guidelines are ready. Now let's move on to
the final details.
17. Day 4 : Portrait #3 (Adding the Details): Next, to define the features, I'll first light in all the
dark lines using an eraser. I'll begin with the eyebrows and then I'll move down
to refine the nose. Following the angle, you
can notice that the tip of the inner corner of the eye falls directly to the
corner of the nose. Now observe the reference carefully and add the
details for the eye. Also, don't forget to
add those subtle lines around the eye that actually
help define its shape. Since a very small portion
of the other eye is visible, we'll make sure to
include that as well. Now let's move on to the lips. I'll start by darkening
the central line and then shape the lips based on what I observe
in the reference. Again, you don't have to fully shade the
lips at this stage, simply define their shape, and that would be enough. Initially, we had just blocked
the shape of the lips. Now you can refine
it a little more. Just below the lips, you can see a shadow that helps
define the chin. So I'll lightly mark that area and then continue with
shaping the jaw line. Now, as you work, pay attention to the shadow
areas in the reference. So wherever you
see darker values, make sure to reflect
them in your sketch. These subtle shadows play a huge role in defining the
overall value of the face. Oh if you feel certain areas need
a little shading to better define the features, go ahead and experiment. Unless you try, you won't
know what works best. So trust your observations
and do what feels right. Let these small
experiments teach you how to approach portraits
in your own way. Finally, I'll finish
the hair by shading it and refining
its overall shape. Once that's done, go over
the portrait one last time and strengthen any areas that appear darker
in the reference. This final pass helps bring the entire sketch
better together. And with that, we have
completed today's project. Tomorrow will be the last day of our portrait
sketching session before we step into the world of colorful portraits
and begin painting. So stay tuned and I'll see you tomorrow with our
final portrait study.
18. Day 5 : Portrait #4 (Building the Guidelines): I welcome you all
to our final day of our portrait sketching
session before we step into the painting
phase of the challenge. So this is going to be
our reference for today. As usual, I'll begin
with a circle. Here again, we are not necessarily following the
same order of construction, so I'll start by
slicing the sides first and then add
the central axis. Oh following that, I'll place the
horizontal eyebrow line slightly above the center
and in the same way, I'll add the
remaining guidelines. As you can see in the reference, the middle section and the bottom section are
almost equal in size, so I'll mark them accordingly. Next, by dividing this
section into three equals, I'll get the eyeline. Now using the guidelines
on the reference, I'll also mark the
placement of the lips. Once the guidelines are already, you can begin shaping
the overall pace. So take your time to
carefully observe where the contours are curd and
where the angles are leaning. So adjust your lines accordingly and slowly build up the
outline of the face. Now for the hand, it may look a little
complicated at first, but it's actually quite simple. So this part is optional. If you want to give it a try, go ahead, and if not, you can leave it as such. So start by using
straight lines to establish the direction and
placement of the fingers. Once those guidelines
are in place, you can connect
them and then add the remaining shade to
complete the hand structure. You can watch this clip again in case you
didn't understand. Next, let's outline the hair. So take your time to observe
the reference and lightly sketch the overall shape before
getting into any details. After that, we'll
proceed with the planes. So I'll start with the
one around the eye. Then we'll add the side
planes of the face. Well, these planes actually
play a huge role while painting because that's where the shadows and highlights
fall most often. Now, to place the
facial features, I'll use small oval shapes for the eyes and also for the nose. Like I had mentioned, these simple shaves
help us establish the correct placement before we refine the features
more precisely. After that, I'll move on to constructing the
planes of the nose. As you can see, the
tip of the nose roughly aligns with the
inner corner of the eye. So to check the placement, I'll simply drop a
perpendicular line and see if everything is
positioned correctly. Next, let's move on to the lips. As always, we'll begin with the central line and then slightly shade the
overall shape. And with that, all
our major guidelines and feature placements
are complete.
19. Day 5 : Portrait #4 (Adding the Details): Now that the guidelines
are in place, let's move on to the
final detailing stage. To begin, I'll lightly erase the lines and remove any
harsh pencil strokes. We'll be refining
the eyebrows first. Whenever you're
detailing a portrait, make sure to observe
the reference carefully before
making any marks. Next, I'll move on to the eyes. I'll start with the upper
eyelid and then add the pupil. As a general rule,
the space between the eyes is roughly equal
to the width of one I, so I'll quickly check whether
the placement is correct. If not, like in this case, the eyes appear a
little too far apart, so I'll make a slight correction by bringing one I closer. I, in fact, know
the one that's far, so I'll correct that I. Also, just as we did in
the previous portraits, don't forget to add the
subtle details and lines surrounding the eye as they help define the
form even better. Now, to place the
side of the nose, I'll simply drop a
perpendicular line from the inner corner of the eye
and I'll use it as a guide. Then on the lower
plane of the nose, I'll mark the nostrils. Focus on overall
shape of the nose and try to replicate what
you see in the reference. Here, the shadow around the nose is quite prominent
in this portrait, so I'll mark those
areas as well. You can lightly
shade the sides of the nose while leaving
the top plane lighter, since that's where the
highlights would typically fall. Next, let's move on to the lips. Since our initial construction
is still faintly visible, we can use it as a guide. So I'll start by defining the central line and then
refine the shape of the lips. Unlike some of our
earlier studies, we're not fully
shading the lips here. Instead, we'll focus mainly on the outer line and structure. Now take a moment to study the
overall shape of the face. If something doesn't quite resemble the reference
yet, don't worry. This is a stage where
we carefully observe, compare, and make
corrections where needed. So even small adjustments can make a significant
difference. So take your time and
proceed with this step. Once the face is properly shaped, I'll move on to the hair by blocking it with darker values. As I continue observing
the reference, I might notice additional
areas that need corrections, so I'll refine those as well. Around this area, we can see
a small portion of the ear. So I lightly erase that
area and then add the ear. And the same goes
for the earring. Now, to bring the
portrait to life, I'll add a few finishing touches such as loose strands of hair. So these tiny
little details help make the sketch feel more
natural and complete. Before moving on,
take one final look at your reference and
compare it with your sketch. Try to identify any
areas that could be improved and make
those adjustments now. Finally, I'll
strengthen the shadows. The most prominent
shadow areas in this portrait are
beneath the eyebrows, under the nose and
below the chin, so I'll mark those first. We also have softer shadows
along the side cheek plane, which are lighter than
the main shadows, but still important for defining the structure
of the face. And with that, we
are wrapping up the sketching session
of our challenge. Tomorrow, we'll begin
a brand new phase as we step into the
world of gauche. So take your time and
finish all these sketches, and tomorrow I'll see
you in the next class.
 Anagha Sivadas, Artist, India