Transcripts
1. Intro: In the previous series, I walked you through
my Blender workflow, including where to start, explaining the basics, and how I created
this certain scene. In this series, I'm going
to talk about one of the biggest factors in
any artistic, lighting. Now you probably know
good lighting can tremendously help your work and take it to the next level. Learning the essentials
of good lighting is an important skills whether
you're doing photography, film making, digital art
or simply taking a selfie. In this series, I will explain the essentials of good
lighting and help you to take full advantage
of it when it comes to creating an
artwork in Blender. We'll talk about all
the available lighting and cover in details
which one to use. Later on, we will dive into my lighting workflow and explain why I make certain decisions. We'll start with two
ready scenes and begin the lighting process
from scratch and end up with
results like these. After that, I'm
going over some of my artworks and break
down each one of them to demonstrate the motivation
behind my lighting and for you to understand
the overall workflow. You see when it
comes to lighting, you have to be intentional. You cannot just rely on luck by moving around your lights
and expect a good result. Sometimes you might just get lucky and make a good mistake, but 99 percent of the time
you have to be intentional, and to be intentional
with your lighting, you have to understand
the lighting in itself. For instance, if you take
a look at my artworks, you see right away
notice that my lighting convey a type of message
and sets a scene. Now, I don't mean they are
always super meaningful, but what I mean is they make
sense within this scene, and that is called
intentional lighting. I believe if we want to take full advantage of lighting
and use it artistically, we should first
understand how it works in the real-world
and in other art forms. This series is inspired by
Blender Guru's lighting, a course on YouTube. I personally learned
a lot from it, and I highly suggest
you guys check it out for more detailed
explanations. Now if you are here, I would assume that you
are probably interested in my lighting workflow and that's what we will mainly
be talking about. But before we do that, we have to go over a
few characteristic that define light source. These are light direction, light size, color, emphasis. Without further ado,
let's get to it.
2. Light Direction: Hi, guys. Let's get into it. We have light direction, and this cool animation was
made also by Blender 3D. As you can see, the direction of the light changes from the
left side to the right side. You can see the effect and
an impact that it has. We're going to get into
light direction in details. For instance, we have
this example here. If you put your light directly
in front of the subject, it is called flat lighting. This allows us to see a trace
outline of certain feature, but it doesn't show depth. As you can see, it's
all pretty much highlighted and we don't
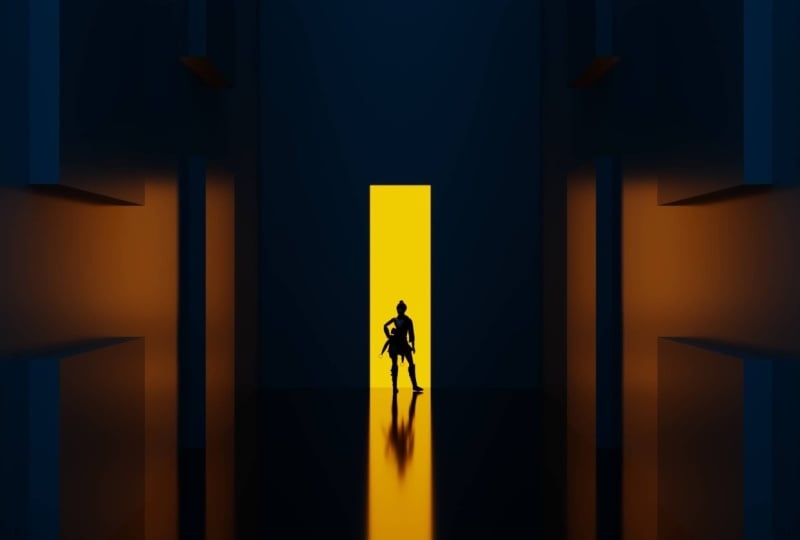
see much of the shadows. Now let's jump to
another example. If you place the light
behind the object, aka, rim lighting, this create a silhouette of an object and convey
a sense of mystery. I've personally
used that technique many times in my artwork, and it's probably one of the techniques I've
used the most. These are some of
examples, as you can see, and I mainly did it because I love to add a little touch
of mystery in my artworks. I don't want to completely
give out the story. I want the audience
and the viewer to decide what
actually happened, or what's about to happen,
and things like that. I'm going to jump into
another example here. Now if we place the
light on the side, this will help create the depth by casting
shadows over the side. As you can see, by the way, this is a very huge
light and we're going to talk about
this later on. But as you can see, this
side is beautifully lit and here we can
see the shadows. You automatically like
to look at this figure. With this lighting we have a beautiful contrast on the
right to the left side. Now when it's come
to environments, it is essential to consider
the time of the day. When it's noon, the
sun is directly above and this flatten things and
make them look harsher. As you can see here,
we have these shadows. But later during the day, you start to create
interesting shadows and you're really guiding the viewers to where they will be looking at. This is one example, but obviously you've
seen sunset pictures, you've seen other examples. It's just much better than
a harsh sunlight here. As you can see, we have
these long shadows here and a very soft, subtle contrast shadows here, and this create depth. That's why most of my
scenes are pretty much in the evening or at night because I like
to play with light, and it gives me so
much power in terms of actually direct the
viewer where to look at. Also when it's come
to environment, it's all about composition. You want to reveal
the right form and think about the message
you're trying to convey.
3. Light size: In this class, we are
going to talk about the physical size of the
things emitting light. It's actually one of the simplest and most
effective things to apply. Now, to understand better, smaller light source create hard shadows and larger light source
creates soft shadows. Here we have comparison. This is lit by a small source of light,
as you can see here. This is lit by a
bigger light source. As you can see, the
difference is huge. This is much softer, better to look at. This is just harsher. Now, obviously it depends
on your situation. I'm not saying this
is good, this is bad. In fact, sometimes this is
better than this if you want to try to focus
on the finer details, but we will get
to that in a bit. Now, one very important factor to consider here is that this is actually relative to how close the light source
is to the subject. A good example of
that is the sun. Even though it's huge and it's probably the biggest
light source out there, it's still very far away. So to us, it looks like a smaller sized light and that's why it creates sharp shadows. On a cloudy day, the light get
diffused by clouds, which are way closer
and therefore, relatively bigger
light source so they create soft shadows and
better portrait image. That's why most
photographer, including me, love to shoot on a
cloudy day because it offer a delightful
natural soft light. Another example is
with landscape. Here we have during
the golden hour, the light source becomes bigger and the
scene looks better. However, that's not
the case all the time. Sometimes we want hard shadows for rocky structures like here. We just want shadows like this, so it really depends on
what you want to emphasize. Now, for models, if you
want to emphasize youth, you can use a larger
light source here. If you want to
create some drama, then you might want
harder shadows. For landscape, if you
want to emphasize form, then use a larger light source, and if you want to
emphasize finer details, then use a smaller light source. An easy way to remember this, is smaller light
source emphasize smaller details and larger light sources
emphasize larger details.
4. Color: Ladies and gentlemen, we're talking serious here. We're talking about colors. Light can fall into two camps, and these are natural
and artificial colors. Natural light colors include
the one on the Kelvin scale. Here we have Kelvin scales, so if you've never seen
this temperature chart, a simple way to describe
this, basically, these are the colors we
see on our daily basis. We have early sunrise, candlelight, electronic
flash, blue sky, and so on. It goes from 1,000 Kelvin scales up to
10,000 Kelvin scales. It's good to know about
this because it's not only beneficial to
know about lighting, but it's good for any art forms. You're into like if it's
drawing if it's photography, film-making, these are
essential to know about. Here we have two examples
from my NFT collection, the pyramid NFT collection. As you can see here, we have a very bluish,
dark cold colors. This is the opposite, which is completely orange. Maybe these two
artworks are a bit over-exaggerated to show as an example for Kelvin scales, but this is just to compare
and show how much of a difference you
can make just by changing colors of your scene. You might have noticed that my approach with this
type of lighting is to make these colors play off each other in
the same scene. This is done by making the environment blue
and adding warmness to the subject or desirable parts of your image you want
to draw attention to. As you can see
here, I mainly use these orange tones in parts
where I want you to look at. Here we have this window, here we have this fire, here we have this tram or train, whatever you can call it. It actually works because these
are complementary colors. I would highly suggest you to actually experiment
with this color wheel. If you don't know where to find, you can go to Adobe color
and write down color wheel. I might also just put a
link in the class project, that would be even better
to find, but yeah, it's really essential to experiment with
this color wheel. You might even find
your own colors. There's not only complementary, there's also split
complementary. There's all these color harmony
rules, so Check it out. The second cam that
light colors falls into is artificial colors, and those signal
location and symbolism, that's because
they're emitted from a man-made sources and are not usually found within nature. This example here
we have some of the screenshots
and photos I took from playing this game
called Cyberpunk, I probably familiar with it. These are some great example
of artificial colors. Here we have pink, we have some mixture
of blue, green. Here we have another example of this neon blue sign
and then here, this whole mixture
of red, green, blue, it's pretty vibrance and it could be your
type of things. It could be the things
you actually like and you want to pursue
this type of lighting. But these are just
the difference between artificial
and natural colors. In conclusion, when
it's come to colors, it really depends on
what you want to say. If you want neutral,
keep it wide. If you're going for
a natural look, then go for some hot,
cold Kelvin scale. If it's center around
location and symbolism, then use vibrant Kelvin
scale colors and in addition to a man-made ones like purple or pink, or green. In my approach in
artworks, generally, I try to extenuate
natural colors to create a unique blend
of natural-looking scenes.
5. Emphasis: We briefly talked about some of these points before
and we know that you need light with the shadows to create contrast and emphasis. It is really important
to note that light intensity decreases
over distance. There is an inverse relationship between distance and
the light intensity. As the distance increases, light intensity
decreases as well. This is because as
the distance away, light becomes spread
over a wider area. To demonstrate better,
let's talk about fall off. The further away something
is from the light source, the less fall off will get. An example of that would be sun. It's so far that the
subject will experience almost no fall off and it will be totally lit the same way. On the other hand, the closer you bring the light, the more fall of you will get. This helps create more contrast and in turn more emphasis.
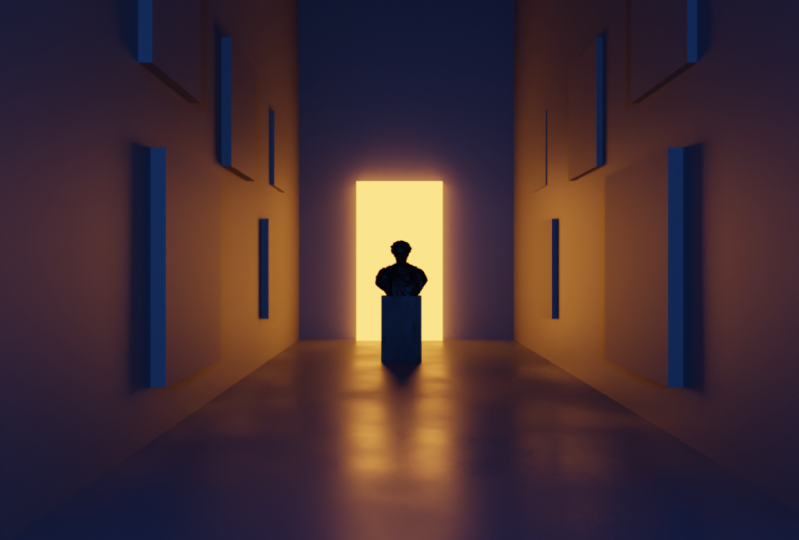
6. Blender Lighting Type: In this class, I'm going to talk about Blender lighting types. Here we have the
actual example live. We have this statue. I've already made a couple
lighting example here. For example, we have this big
side light here, key light. Here, we have the rim
light on the back. What we are going to do in this video is to explain all
these type of lights that I've used and just to basically understand the possibility
that you have using Blender. If you press Shift and
A on your keyboard, here you have four
different types of lights which are point, sun, spot, and area. Let's start with point. If you click on it, you basically should have
your point light here. I'm just going to
drag it and put it right around our subject, which is our statue model. [LAUGHTER] The best way
to explain point would be point lamps emit light in all directions,
as you can see. For instance, if I back it off a little bit and then just
add more power here, by the way, you have all these adjustments that
you can play with. You can change the
color of your light, you can change the
size of your light. We talked about this, the bigger your
light source is the softer it becomes,
as you can see. I'm just going to
keep it right there. Here we have our max bounces. It's very cool to have all
these different options. Now, if you ask me, why we would use point light and when we would
use it actually? Point lamps can
actually be useful in scenes where there
is a small source of light or let's say
like a candle or to illuminate one side of the
scenes as we have right now. If I, let's say, just put this point light here and make it a
little bit bigger and we have a nice soft light and then if I turn on my right side, you have something like this. It's not actually
bad. This is before. In this scenario, you can
use it as a fill light. But you can definitely play
around with this light. But the more you
experiment with it, the more you will
understand how it works. Another thing to know
is that your lighting is depending on the
scenario that you have. First of all, what
you are creating, you have to think
about how the light would react in the real world. In that way you can decide which lighting would
be the right choice. Let's jump to the second one, which is the sun. I'm just going to delete
this point light and I'm going to hide this big side. I'm going to Shift A, Sun. I'm just going to move it a bit. Here, I'm just going to
move it to the side. I believe the default power for the sun would be around 1,000. This is a bit too much, so
I'm just going to bring down the sun light a bit down. I think this is normal. If you ask me, why would
you use the sun lamp here? Basically, the sun
lamp, as it sound, acts like actual sun in 3D
space and it's quite powerful. You can actually move
it around depending on how and where the sun is coming. You can see the shadow
is pretty harsh as we talked about it
in the previous videos. I'm just going to do
it a bit this way. This is more like a
sunset situation. Usually, the sun
when it's setting, it's around this area, and that's why we have a
little bit softer light. But this basically
acts like a sun. You can also use it
to eliminate one side of the scene as we're
doing it right now. You can leave it like
this and play around. You can also change the color
to something like this. Maybe it's over-exaggerated, but I think that
the sun color would be around a bit whitish but between whitish and with
orange somewhere here. Our scene is not the best example to use the
sun, but you get the point. It's really powerful. It acts like a sun. The shadows are harsh. If your lighting scene
is based on daylight, this is a great choice. Let's delete that and let's
get back to our scene here. The third option
we have is spot. Here, as you might see, I might not explain
it very well, but basically the light is
emitted from this range. I'm going to just
explain the definition. As it look like, the spot lamp emits
light through a cone. This is a cone in a
specific direction. You can move the direction too. Let me just quickly
add some more power and then I'm just going to
make it a little bit down and maybe even move
it around like this. I'm just going to add more
and more power to make it available and show
the impact that it has. This cone can have between zero and 180
degrees of amplitude. Since this lamp only emits light in the direction
you specify, it's best to use on parts on the scene that where
you want to illuminate a small area or an object without affecting
other object nearby. This is a similar situation. For example, here, we don't want the background to be lit, we just want to
focus on the object. Here, it gives you
a proper result. You can even make it lower. You can even go further
by making it even closer. Yeah, I think it's
pretty understandable. It also has a very nice effect with the volumetric lighting. You guys, once you use it, I think it's pretty
self-explanatory. Now I'm going to delete and jump to the next
one, which is area. The area light basically
simulates light originating from a surface or we can say
surface look-alike emitter. Basically, if you see here, the light direction comes
out of this surface emitter. We have tons of example that we can use
this type of light. For example, we have a
TV screen or a window, and so much more. I personally use this light for my car scenes to
emit the inside, the indoor of the car. It works pretty well
because it gives you a very nice and realistic look just the way it
works in real life. In this scene, if you
just put it on top, you will have a very
nice soft light. If you add more sides, it will be even softer. I'm just going to add
more power to it and see how it's going
to affect our scene. I'm just going to tilt it by
pressing "R" on my keyboard. It's a pretty nice light that we have and it's also directional. It also work as a softbox light, I would say, softbox lighting. That's what we did with the
side area lighting here. So if we have side, this big sidelight gives you a very nice soft light
here on the side. Then I did the same with
the rim light on the back. I used area. It's pretty cool. The next thing we want to
talk about is object itself. Now that we are done with these four different
types of lighting, I have to say I might
not have explained all of these lighting properly because
there's a lot to it. There's a lot to discover once
you're starting to use it. I think the more you use it, the more you understand
how it works. I think personally for me, the objects are a huge deal when I can actually emit
one of these objects. For example, I want
to emit this statue. I want it to be the
source of light itself. You can simply do that by
going to the Shading tab here. If you have your
texture viewport on, you can see this is
the actual texture, but what we're
going to do, we're going to replace that, so let's delete all of this. This is the actual
texture that we have. It's already been done. What we're going to
do, we're going to delete all of that. Then we have no
texture whatsoever, it's just a black statue now. We're going to do Shift A
and search for emission. Basically, put
emission to surface, and you have
something like this. If you go to the viewport, you can actually make this
a light source itself. Now if you add
more string to it. This is not a perfect example. There's no details and
there's nothing whatsoever. But, for example, you can create artificial
sun using this technique. You can do a lot of stuff once you have the
control and the ability to add light and emit any
object in your scene. It's a great option. I just wanted to share that also because I personally
use that a lot. I use the exact technique to
add car lights in my scenes. You might have seen it before. The next things
that I want to do here is to talk about world. Here we have this
section called world. This is another way
to lit your objects just by adding the
world texture. I can actually add a ready
sky using Blender kit. I'm just going to choose
one of these and I'm going to try to go with
a higher resolution. Click "Okay" and we
should have it ready. What's great about this, you can easily
change the mood of the day just by changing
to different environment. This also gives you a very
realistic natural light. Here, I believe we
already have it by now. If I actually just
hide this plane behind and I'm just going to
turn off this light. I'm just going to move
the statue around this. I'm going to add more light. It's not the best example, but if I'm going to use
one of my skies here. Here, I have some
different options. For example, here, I'm going to use this one. It does gives you a
very natural light. This is if you're looking to add a natural light to your
objects, nothing artificial. You can also add more to it. Obviously, you can add different lighting
within your scenes, but just to know that this has a lot of effect
on your object. The sky can have
a lot of impact. Let's change to a more
vibrant and happier one. As you can see, this changed
the light completely. It's more of a backlight
right now and frontlight, so just everything is flat. Definitely experiment with
different environments so you can actually see the
lighting impact on your scene.
7. Artowrk #1: In this class, I'm
actually going to be showcasing my lighting workflow, and this is one of the examples, is actually one of the
artworks I made a while ago and it's probably one
of my personal favorites, and we will have this scene
without any lighting, and by the end of this class we should end up with
something like this, after we do all the lighting. Now here if we go to Blender here we have
the final project, this is how I rendered, this how it looked, not exactly. Let me actually
turn on the haze, so haze makes a
lot of difference, so this is the final
result on Blender, and then obviously I
did a lot of tonings, and then obviously if you've
seen my first series, you will understand that
after I render my artworks, I usually jump to
Lightroom and change up the tones and just make
them look more clean, and just better overall, so that what exactly
happened and that's how I ended up with
something like this. You probably notice
that I changed the orange color here
and I added more blue. But yet, this is my process. This is how I do it
but I think it's a pre-clear and I
also recommend you to definitely use Photoshop and Lightroom in your
advantage once you render because most
of the time you won't be able to perfectly, everything will then blender
or maybe that's just me. Let me disable the haze. Now before we get
into the actual, this is basically with all the external
light that we have, but we're going to
remove all the lights and we're going to start over. But before we do that, we need to ask a few question to understand the process of lighting better. Now, in this case,
in this scenario, you have to ask how many
light sources we need. Here we have a few
lighting sources. First of all, we have a light behind this thing
in the kitchen, let me actually draw, so here as you can see, one light source is coming, and that way we are
creating a beautiful, nice rim light in the back, and here we have another
source of light, which is the cigarette
lighting self, and then on the storage, we have another lighting
coming out here, that way it shows us some details of what's
happening there, and here I used sun lamp as a source of
heavy blue light coming in, and all of these, in a way it means something and I'll get to that in a bit. Here we have another source of light which is the open sign, here we have a little bit of
these backlight in the car, shows a bit of mystery
out there, and yeah, these are the pretty much
the main source of lights, and that way you create a
very interesting result. This is what it looks
like within Blender, and we're going to start
removing all of these light. Now I'm going to
get back to this and I'm going to explain why I went with this look and what I
was trying to go for. Now, if this is your first
time seeing my works, I like the combination
of these two colors, the blue and orange, and you can pretty much see
that in most of my artworks. Here in this case, what I was trying to do is, I wanted to emphasize
the feeling of being safe in the indoor, mini bar you can say, and this warmness empathize it. As you can see this,
here we have outside which is full of
blue and cold and that way is also
in a way empathize the darkness and the
mystery outdoors. It works pretty well together, and that was pretty
much the main idea when I started adding lights. All right, enough
talking, I'm going to get back to Blender right
now and I'm going to start deleting all
the lights that we have here and start from over,
start from scratch. Now here we have all the lights, the external lights, so I'm just going to
delete one by one, here we go, then we have point for the
cigarette light lighter, and then we have sun, which is the outdoor
lighting, and here, these two lighting from
outdoors comes usually from this lighting emissions that we have in the backlight, I'm just going to turn it off, and I'm going to show you
exactly how I did that, and also I'm going to be doing the same thing for this
opening sign here. As you can see, now the only available
lighting we have it's from the
environment texture, the actual environment which
is I'm going to show you, it's an actual sky, I'm just going to show you
here how it looks like. Obviously, I made the strength. The strength is not a lot, so just for the purpose of adding some
natural light to it. This is pretty much it, and that's the only
available lighting we have. The strength is 0.2
which is not a lot, it doesn't affect the overall
scene much, which I like. Now, let's get back
to what we have here. Just going to get back to our
scene, our viewport here. Just going to go with Blender. Now let's start by adding the first light source which
is going to be an area, and then I'm just
going to make it a little bit bigger obviously, and then I'm going to
go right away indoor, make it a little bit smaller. Now keep in mind, it's not going to be the same exact result, but this is just a way to show
you how I do my lighting. Where's the lighting? Here's it. I thought I just lost it. Now, what I'm going to do, I'm going to go to
the shading tab here, where you have all
these adjustments, and I'm going to
change the color to this oranges look
they usually go for, and I'm just going to
add more power to it, and I'm going to pretty
much go in all in here. It's a bit hard to find the right movement to it. Yeah, I think that's done well. Now let's see where is it. I'll make sure it's global
transform orientation. You know what? I should have turned
on the toggle x-ray, that way I can see better
through all these layers. Now that's much better. Go there, and then up here. That's what we needed. Now, this way it's an illusion, there is no actual lamp, but in a way you make the audience think that there
is an actual lamp there. Now what I'm going to do, I'm going to just duplicate this, I'm going to do the same thing on the back of storage here. I'm going to hold Shift D and then you basically
have another one, and then you can
do the same thing. Let's get back to it. Here we have our
storage, and frame back. Now that we have
two light source, I'm going to add another one, which is going to
be the cigarette lighter within her hand. Shift A, and this time I'm
going to add a point light, that way we have a better
illumination of the light, more realistic one, we can say. We can take it to
within her hand. I'm just going to get
closer to see where is it. Now we can see we already
have some light on her face. This is also a really good
trick to lit her face. You have to give
yourself a reason. You cannot just add
lights however you want, to give them a reason to do so. I'm just going to add
the same color here. By the way, the final result, as you can see here, I added the light actually
manually on Photoshop, and also the smoke
is also manual. That's why it's good to
know Photoshop because you can add all these small
details within your scene. I think it looks
pretty nice here. Now that we have
three light sources, I'm going to add our sun lamp, and I'm going to use it like an ambiance light
coming outdoor, that bluish dark color. So I'm just going to
add sun sun here, and I'm going to direct
it to the mini bar. I don't know if you even
call this mini bars, it's more like a train bar. What I'm going to do, I'm going to also bring down a
little bit the power. I'm going to change it
to this kind of blue. Once we have the haze here, I've turned it off right now. I'm also going to show
it to you how you do it. Now when you have the haze, you can see this bluish light is spreading over your scene, which is a really
cool way to add. Now it's good that the
haze is on so you can actually know what kind of
power you should go with. I think one would be good. I like the results so far. Just going to disable haze. Now that we have our blue
ambiance light outside, I'm going to add this
simple light source, the emitted one. This is one of the example
here, the neon sign. If you click on it here, I guess all of
them is connected. If you click on it, I'm
going to show you how you can actually add
this emission light, it's the same process
that I showed you in one of the
previous videos. Basically, you choose
your material, and you delete whatever
you have here. You keep the material
output and then Shift A. You look for emission, and then you change your color to whatever color you want
and then you add strength. That way if you can get
to the render view port, and if I start adding the
emission to this neon sign, you can see that we
now have lighting. The more you add,
the more it reflect to the surrounding objects. We're going to do the same thing with the back-light of the car. I'm just going to try my luck. Here at the back-light,
they're usually red, so I chose red. I'm going to add more strength, and that way we have a nice
reflection on the floor too. Pretty much that's it. That's what I did
for this artwork, and probably it took
longer than I expected. It's pretty
understandable what I do, I really tried to add depth to my scene by
adding different lights, but also not just
out of nowhere. It has to mean something. These are intentional lighting. If you turn on the haze now, you have a much better look
combining all these lights. I'm just going to turn off this. I basically render
something like this. Then I used Lightroom
and Photoshop in my advantage to
enhance it even further. But I'm also going to show
you how I created this haze. Basically, to create this haze, I'm going
to start over. I'm going to go Shift A, and then I'm going
to go to Cube. I'm going to create
a cube. Press S and scale it up,
somewhere like this. Hold the middle
click on your mouse, and then S again. Then just scale it this
way on the right side. Then middle click again, and then S, and then
scale it this way. Now we have a black box with all the indoor
lighting that we have. We blocked all the lighting
that comes from environment, but that's going to go away
once we add the shading. Now that we have our box, I'm going to go to shading, and then we will wait a little
bit to see the results. Then on shading we will
create new tab here. I'm just going to
call Volumetric. I'm just going to
go with volume. Here I'm just going to delete, this is the default
shading principle BSDF, I'm going to delete it, and then shift A and
look for volume, like principal principle volume, but also volume
scatter works too. I'm just going to go
with principle volume, and then link it with volume. Here the intensity
is way too much now. The whole scene is black, so I'm just going to put
around 0.02 something. As you can see now, you have haze, and haze is a great grade tool you can use in your
cinematic scenes. It really gives it a
really nice depth. Obviously, if you think
this is way too dark, you can also add more exposure here on
your color management, which I think it's a good idea. Yeah. Guys, this is it. In the next video, I'm going to play
with more examples. Again, guys, keep in mind
that this might not be the exact result as this. It's probably even better
now, the one I did. But yeah, I just wanted to show you how
I do my lighting workflow, and I think it's
a bit clear now. Hope it's clear. Anyway, I see you in the next video.
8. Artwork #2: Hi guys. In this class, we have another example
to play with here. This is the scene,
as you can see, and this is the
rendered viewport. If you go back to
the solid viewport, you can see it's not a very complicated scene I
basically added these cubes to add a bit of
texture and just like leading lines towards
our model here. What I did, I used this cube
at the end as you can see. I use this cube just as emitted. It's in a way, the metaphor, it's like a door
is a latent door. That way we create a
silhouette of this model. Now let's get back to
the main scene here. Now let's get back to
the render viewport. I'm going to start over. What I did basically, first of all, I'm not going
to recreate the whole scene. I'm just going to create
the light I made here. I'm going to delete this cube
over here by pressing X. This is how it looks like
without our main light. This blue light mainly is
coming from the background, which is flat blue. Basically, the reason I'm adding the blue light for
the environment is just to have the combination
of blue and orange. It just looks much
better when you have a combination of colors,
especially complimentary colors. What I'm going to
do when I get back to our cameras scene, I'm going to shift A and
I'm going to create a cube. We have the cube. What I will be doing,
basically I'm just going to press S and then middle click. I'm just going to pan out the cube a little
bit this much. Then press middle
click again and then just scale it up like this. Obviously, we might change
the size and a bit, but I'm going to press Z.
I'm going to delete this. Here we have our cube. Then slowly take it. Sometimes it's just
worky to move around. [LAUGHTER] Make sure you high the cube and keep
it just slightly out. It's like let it
out and then I'm just going to also
make it in the middle. Now that we have our cube there, now all we need to do is
go to the shading tab and create New and then let's
just call it light. Then I'm going to
delete this principle, BAZF I'm just going to add, I'm going to search
for emission. Before we do anything,
let me just turn on the render viewport and turn off these so we can
see what we're doing. Then I'm going to link it
on with surface, and boom, you have the light
coming out from wall, just like a dimensional portal, whatever you can call it. I usually change
the color towards a bit orange around
this area here. You can also add more
to have more reflection on the ground and on the
sides and that's it, guys. Obviously, you can play
around with the cube. You want to change the size, you want to change the position. You can do whatever you
like. That's it, guys. In the next video, I'm
just going to break down some of my works. I think is going to be fun to
see why I do certain things and what is the motivation
behind my decision. See see you in the next one.
9. Breakdown: This is more like a
bonus video where I'm going to review some of my works and
actually breakdowns, the reason, and the
choices I've made, and why I made those decisions
in terms of lighting. These are some of the photos
I wanted to diversify, but some of them look very
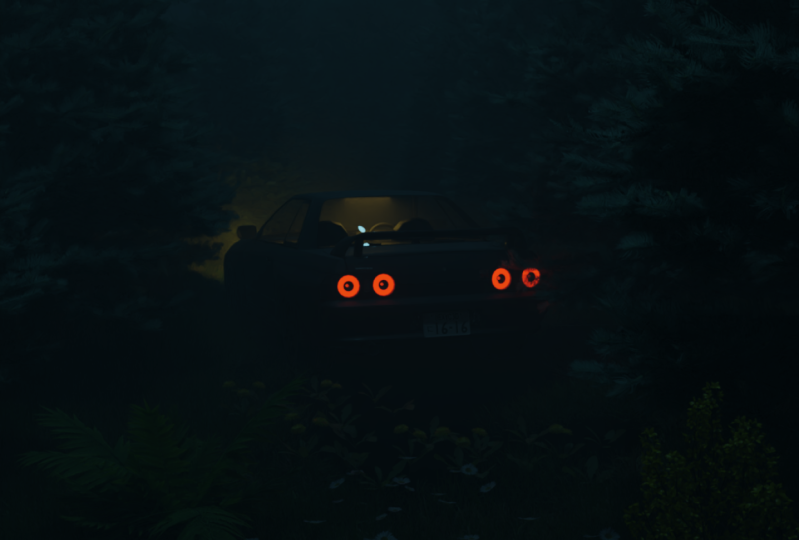
similar in terms of lighting, so I'm just going to start. The first photo that we have, probably actually
this is the one. Here, first, we have to
ask a few questions, how many light sources
we have in this artwork? You can probably tell there's
only one main light source. The bluish tones that we have here comes from
the environment texture, the sky itself and
that's the power of these natural colors you
get from environments. That's why it's really
important to choose the right environment
for your scenes. As you can see here, if I go here and draw, the look I was trying
to go for, obviously, maybe this is a bit
over-exaggerated, but I wanted to
have a strong light coming out from the car, the indoor, and I also tried to add some reflection here. In a way, it creates
some depth to the foregrounds and we have these nice reflections
over here. I also suggest you to do that if you are
using some lights, reflections definitely gives
a lot of aesthetic vibe and a really cool tone
to your images and you can probably see that
a lot in my other artworks. I obviously used
a huge cube with the volumetric haze to create
some depth in my scene. Obviously, this lighting
creates a very mysterious vibe, is only one lighting source. When you look at this
artwork for the first time, your eyes directly goes to this area which is
the light source. You might be wondering
what light tools I used. I actually used a point light. I know that probably area light lamp would be a
better choice for this, but I really wanted this
over-exaggerated light coming out to create
this nice reflection. Again, it depends
on what you want. The look you want to go for, so I use point light for this, but obviously, you can use area, I would say, to have a
more realistic light. We're done with this one. I'm going to go to the next one. Now you might notice,
again, pretty similar. We have reflection, a
nice water texture here, but we have a couple of light sources and let
me just point that out. We have draw tool here. First light source, we have
this gas station logo, which also creates this nice
reflection and then we have a couple light source in the gas station itself here
and then we have backlight. All of these lights
in a way create a very aesthetic vibe
to the whole scene. Again, this bluish tone, it comes from the
environment texture, so you have to notice these environment textures are really important
for your scenes. Pretty much, that's
it. What I did, I used the same technique for
the backlight to emit them, emit the backlight itself and I added these reddish colors. They might look orange a bit, but that's because when I
enhance it on Photoshop, I played with the colors to
match with the bluish here, but other than that, it looks pretty cool. Now, let's jump to the next one. I'm going to try to talk
briefly about each one. Pretty much here, I did the same thing
with the headlight. I used an orange
beautiful light. That way we can create
really nice reflection on the ground and also this
rim light to this bag. Also, if you can see even
his face is in a way, is lit and a little
bit of his side, which makes it more realistic. We have the shadow here, so really light has a huge role in my artworks
as you might see. Also, use this haze cube over here to create some depth, and then we have this mountain. Also, natural light again, which would give you
this nice reflection on the car and just the
surrounding area. Nothing that's special. [LAUGHTER] I'm just going
to go to the next one. Here, we have a very
interesting artwork. I personally really
like this one, mainly because of
these small details. Here, we have the crow, here we have a police officer, and this one source of
light, I would say yes, is one source of light and I
did that with the area lamp. I just directed it the way that the light would actually be directed and it
went really well. I was surprised by the
result when I rendered it. We have this really nice, an illumination of the light on this grass over here and also the reflection
on the water. You can tell that I love
these reflections here. Here, we have some
small reflection of the light on the car, which gives it even the extra depth that
we're looking for. I know this is not related
to the lighting part, but these blurry
foreground trees really create the really nice
step to the overall image. Here, we have the
grass also blurry, so the main attention, the main focus goes to the main elements that are
important in the scene, which is the police officer, the crow, and the lighting here. That's pretty much
it. Here, this one. Again, one source of
light and we have this natural bluish tone from the environment
texture, the HDRI. What I did, I just used the UV sphere and
I added some VDB, the Cloud simulation, and I just used this
as an emitted object, and boom, that's it. That's pretty much it. I'm just going to jump to the next one. Obviously, I mean, a composition is
important the way you position your model car. All of this you have to have some background knowledge
to be able to do this. This artwork
obviously is you can tell we have only
one source of light. We can say a couple
source of light here, but mainly it's this
huge blast out window that is filled with light. Maybe it's just
over-exaggerated version, but that's how I really like to use lighting in my scenes. The look I was trying to
go for is basically I wanted to showcase
that the safety, maybe it's just lame, but I wanted to
resemble the indoor as a safe place and outdoor
it shows this character, this mysterious character,
which is comfortable outdoors, which also this bluish
dark tones resemble to the darkness and a
scary, mysterious place. Now, I might repeat
mysterious a lot, but pretty much most of my artworks concept
are related somehow, like silhouettes and
mystery characters, so that's pretty much what I do. In terms of technicality, what I did basically, I used the cube and I
scaled it up to the size of this window and I lit it with
emission orange as usual. That way, we have this nice
glowy look and we have this nice reflection on the
body of the car, and so on. Let's jump to the next one. Here, obviously, we also have one source of light
and it's just a fire. I believe I used point
lamp for this one. I used the VDB, but the VDB didn't come
with an actual light, so I had to illuminate it in a way where it
actually looks realistic, so I just added a very
powerful point lamp here. That way, we see a
very nice rim light on his body and on his face too. I really like this artworks, probably one of my favorite and pretty much that's
what happened. The look I was trying to go for, obviously, this is
just my color theme. I really love combining
the blue with orange, and I wanted to
showcase the warmness of the fire and resemble
that within this color. Obviously here, as I mentioned, these foreground grass really
add some beautiful depth to the overall scene and I highly suggest you to add these blurry. Obviously, you can play with your camera and just bring down the aperture and you have these nice elements
in the foreground. What I would've done
differently in this artwork, probably I would have added
more trees in the background because it would just
be more realistic, but I did this artwork
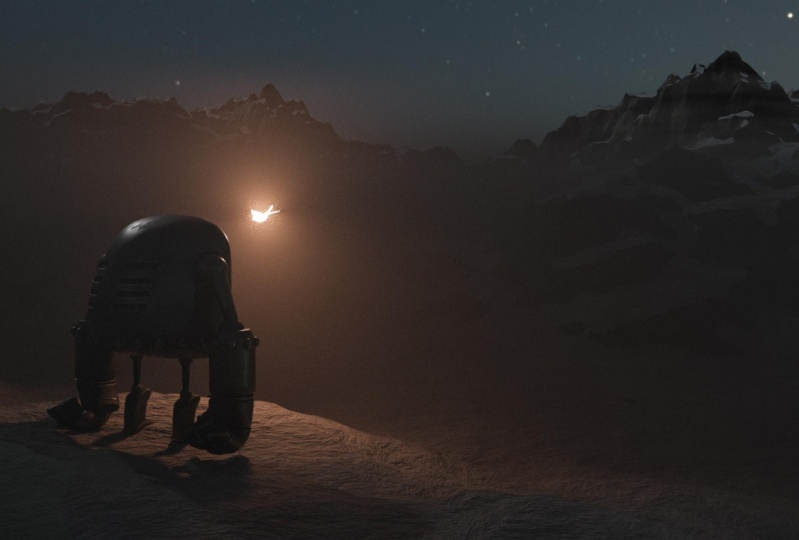
like 6-7 months ago, so I will pass on that. Here we have an interesting
artwork, obviously. There's one light source and is this sun that I believe
I downloaded it from BlenderKit and I just added a very powerful emission
to it and that's it. That's all I did and obviously, I created the scene too and that's the only
source of light. I wanted to have a very
realistic sunlight and that was the look I was trying to go for and that way, we have a very nice, I would say shadow of our model, very nice shadow form
of the car here, and also all these
details created very interesting scene overall. Here again, we have reflections. Obviously, you can
tell I'm obsessed. That's pretty much it. I also added this flare within
Photoshop, so actually, I do a lot of things
in Photoshop, like I add this noisy
texture on in Photoshop. I actually have a pack
if you are interested, you can take a look at
quinproduction.com. I have a pack of textures and I pretty much use
them all the time. I also have light overlays, this is the light
overlay volume 2, anyway, I'm just
going to stop there. Just going to jump
to the next one. So here we have an
interesting one, so basically what I did, I created this wall, about window but I created this studio look alike and I created a cube filled with
emission with this color, and then the color actually the light itself that didn't
come to the other side, so I had to add a area
line as a rim light behind this model and
that's why we have a really nice highlights
around her body. I highly suggest you do that to just add that extra depth. Otherwise the character would have been completely black, so that's just one trick
that you need to know. Anyway, let's jump
to the next one, you've follow me on Instagram, you've probably seen
a lot of these, I really like to add
light and the showcase the details inside the car and then also the
headlight obviously, the back-light I didn't use
it this time here, but yeah, the character is blurry again, very dis mysterious
looking scenes. The idea, the concept is like something probably
has happened here, the car is still on and the viewer can actually portray the way they
want to see it, but that's the mystery
that I'm talking about. Like I really like to leave the backstory to the audience. To talk about some
technicality basically, I use an area lamp here
in the middle in a way to create this realistic light
that coming from the roof, and then we have this
back-light that reflect the ground and we have this grass over here just
to add some realism. Let's jump to the next one. Yeah, this is probably
one of my favorite, there is, I think two light
source that we have here. First is the sun lamp obviously, this really powerful
light that comes here, and what I had to do, I had to block the whole scene, so from the back
everything I just opened this part and
this part and here, the light illumination
comes only from this side and that way we have a really interesting
light that creates a very nice highlight
here over the cars and a very sharp shadows
and I really like to go to this look. I'm highly inspired by
Blade Runner scenes, the oranges cinematography
by Roger Dickens, and I've been obsessed
with this color theme. You can probably tell by
now that this is more like a thing for my artwork,
this color theme. Yeah, I use this
interesting character, the position is really
nice in my opinion that's create a very mystery character, it's more like a silhouette, but we can still
see some details. Some technicality
would be basically I use the sun lamp as I mentioned, but I also use another area lamp just over this area just to add a bit of boost to
the whole scene, and that way we have more
light to the ground too, and that way we also have a really solid rim
light on the character. Yeah, that's pretty
much what I did, I also probably used
Hayes as a cube that way we have a nice soft sun
coming in to the indoor, let's jump to the next
one and similar load set. I really love this. look, let me just go to
the draw and we obviously have one light
source here which is this very long cube
that I created in a way that the
reason I wanted to go for this in a way it
shows like a portal, the artwork title is
final destination, final departure actually
and obviously we only have one light source
here so the look I was trying to go for was
basically to create like a portal here and
the artwork title is actually final departure and there's just one
light you can see that, that sometimes less is more. You can see the highlight here, the rim light over the
character and the car is very nice and I wanted to
make it clean as possible, not in terms of texture because it's pretty dirty
with textures and I love it, but in terms of adding elements. This is one light source, the technicality behind
this is basically adding one long cube and
emit that cube to the orange color and
also I added a haze and that way it creates a
very nice, smooth look. Actually, it's not only
one source of light, there's two source of light which is the backlight I forgot, it's a bit of reddish look here, and we have the reflection here. So it's a really nice extra
touch that we have here. Let's just go to the next one. This artwork is in
terms of lighting, I try to go a little bit the
extra mile so what I did, the technicality part
behind this haze, obviously I used Hayes as a cube of volumetric
and the shading tab, and I put a sun lamp behind this wall and I directed it through this way in the indoor. Then I added another
light source, indoor the car, we can see the details inside, and then I created
this emitted light, the headlight of the car, obviously the reflection,
water textures pretty nice here and I added this
character which creates, because of these headlight, we can see the shadows and
highlights really well-lit, and overall, we have a
very interesting scene. Maybe this is more like a
visually pleasing scene, but again all the lights have
been intentionally used. I just didn't add any
lights for whatever reason. As you can see, we've
seen scenes like these type of hates coming into the indoors and we
obviously have lights into the car and
also headlights. What matters the most when you use lighting in your advantage, try to be intentional. Sometimes it doesn't
have to be very super meaningful but if you're looking to create something
visually pleasing, try to know the motivation
behind your light. Speaking of motivation, I should have talked about this artwork. Same thing that we have a
very nice lit background, but if I didn't
add the area lamp, then it wouldn't make much of a nice scene and we wouldn't
have much depth here, we wouldn't have
highlights here. That way I added an area lamb, that way we have
this nice rim light, but the motivation itself, the light motivation comes
from the background, which is this orange lit
studio looking background. I just wanted to
mention that out. We obviously have
similar artwork, so I'm not going to
go in details again, but here we have a
couple light source, obviously these white windows, combination of red and white, I also really like this and then we have
Silhouette character standing near the car,
a reflection texture. What I did with this, I created a very
thin surfaces planes and I added a mission to it and the shading tab
and I try to add them it's nearly like slightly, a little bit over
the windows here, and that way we also
have a very realistic, nice-looking shapes
of the window, and I did the same thing, same process for the backlight, a little bit red, and we have a really
nice looking scene. Now, last but not least, we have this artwork. This probably also my top
10 favorite artworks. Back to the intentional light, I wanted to illuminate the light coming from the tram and
these light that comes out from this tram is
basically illuminating the reflection here
that we see on the car and also on the ground. We have this light, indoor light again in
the car and far away we have the small window
light which creates depth. It creates a very
nice-looking scenes as you zoom back and
see the overall scene. So obviously here we
have texture again, added in Photoshop, we have some wires just to
create more details and the environment texture
is the blue lit light. Pretty much same thing. Basically I use point
light inside the train, I used a couple point light, one here, one here, and one here and then I use the same technique as I did for this artwork,
for the Windows, but I just used them really far away and that way you probably
don't see much detail, but there are like buildings
next to each other, and also an area light, area lamp indoor the car and pretty much that's
set in terms of lighting. For the record, you
probably noticed that this motion has been added
manually in Photoshop, so just something
I want to mention, by the way guys, this is it, I thought would be fun
to just break down some of these artworks and
I hope they are helpful, I hope they give you some understanding of
my lighting workflow.
10. Outro: We have finally
come to the end of this series and I hope
you found something useful to add to your toolbox and hopefully inspired you to create your own unique artworks with the techniques
I showed you. Before I let you go, I want to leave you
with some advice to reiterate on what
we have gone over. First thing first, is that
you have to be intentional. You really cannot
break the rules unless if you have
understood them. In order to get creative
with your lighting scenes, you have to get a
solid understandings of how light works. The second tip I
want to give you is, analyze your favorite
artworks and scenes and pinpoint
what you really like about them and that's how
you will get a good idea of why these certain creative
decisions are made. Last but not least, don't be afraid to try new
things and get creative with. I really can't wait to
see what you guys are going to create with the
techniques I showed you, so make sure to tag me on Instagram if you ever
decided to post. Also follow me everywhere at its K1 to be updated for
the next upcoming series. Finally, I just
want to thank you so much for making
it all the way and I hope you enjoy this course and I will
see you in the next one.
 Kaiwan Shaban, Visual Artist