Transcripts
1. Master How to Create Animal Storytelling AI Videos Step-by-Step: Welcome to AI Video
creation Mastery Course. My name is George Steve, and I'll be instructor till
the end of this course. I'm a software
developer and have a very good interest
in creating AI videos. And today, I'll be
teaching you how to create your own animated AI
videos from scratch. So you learn how to
create the characters, how to animate the characters, and then how to
create a VoiceOver, and then add that to your characters and
make it come to life. Then we go ahead and
learn how to edit our video and how to publish
our video using Capcod. So it's a step by step guide
that is going to help you to create your own animal story
telling videos from scratch. Let me go ahead and show you a demo of the video we're going
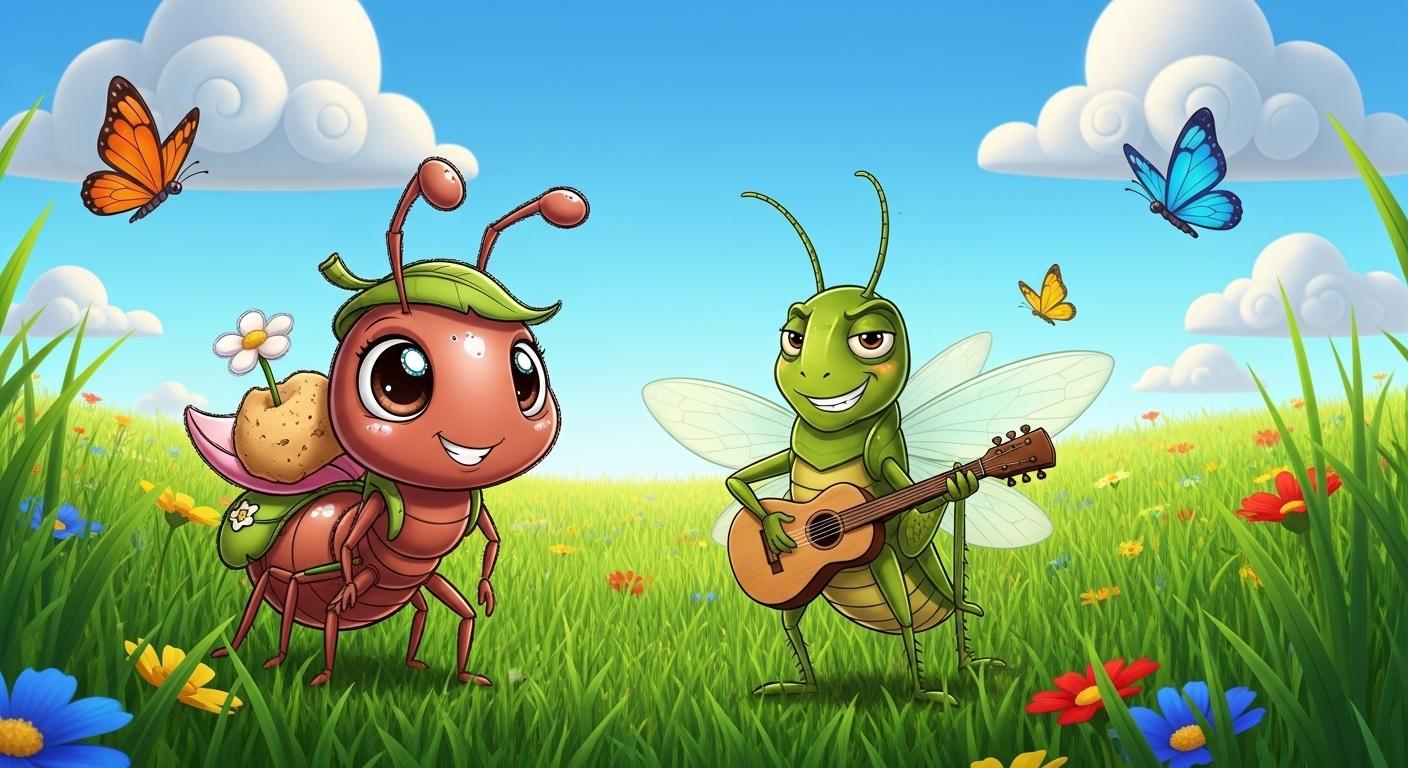
to create in this case. Once upon a time in a sunny meadow lived a little ant and a
cheerful grasshopper. All summer long,
Ant worked hard. He carried seeds, stored grains, and tucked away food in
his snug little home. Winter will come soon, Ant said, puffing as he lifted
a crumb twice his size. Grasshopper, however,
had other plans. He strummed his fiddle, sang happy songs, and danced
under the warm sunshine. Why worry about
tomorrow? He laughed. The days are too bright
to spend working. Ant smiled kindly but
kept on storing food. One day, dark clouds
rolled across the sky. The wind howled and
heavy rain poured down. Ant was safe inside
his warm home, shelves full of food. But poor grasshopper
had no shelter, no food, and his
fiddle was soaked. Shivering, he knocked
on Ant's door. Ant opened it and saw his
friend cold and hungry. Though he remembered
grasshoppers teasing, Ant invited him in. He shared his food and gave
him a blanket to rest. As Grasshopper sipped warm tea, Ant gently said, Playing
is wonderful, my friend. But preparing for
tomorrow keeps us safe. Work and play both
have their time. Grasshopper nodded,
his eyes wide. I understand now. Next summer, I'll sing and save. And so, in that little meadow, the Ant and grasshopper
learn together. Hard work makes
tomorrow brighter, and music makes today sweeter. That night, as the
storm rumbled on, they drifted to sleep, warm and full dreaming
of sunny days ahead. Alright. I am very excited you have seen the video which we are going to create, and it's time we
go ahead and start creating this amazing
video stow by stow. So if you are in Tristd
and start creating your own amazing AI videos
just like this one, let's go ahead and kickstart
this Johnny right now. Thank you so much. I
am still George Steve, and I'll see you in the
next video lecture.
2. Step 1. Generate Video, Voice and Image Prompts: I'll call you back
again. So in this video, we are going to be
creating an amazing video for a project. So we're going to start building this
project immediately. And what we need to do is
to head over to ChatGPT. So I believe you are
right on ChatGPT now, and we're going to
begin this right now. So what I need to do
is to first of all, write a prompt in order
to create a study line. And let's go ahead and write
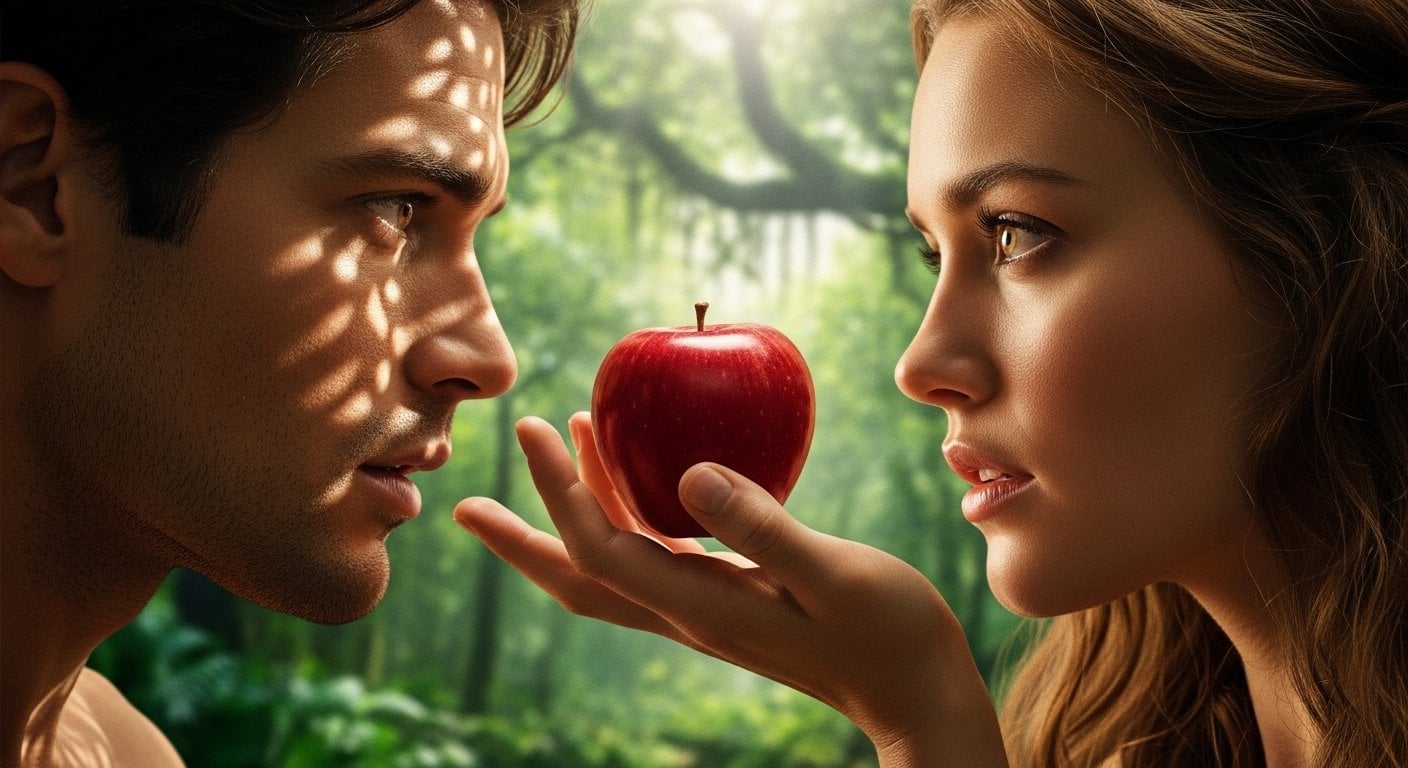
this prompts that says, write is children's bedtime
story of the Ant and the Grasshopper in about
two around 50 ways. Keep the tune simple, warm, and engaging
for young readers. The story should follow classic version where
the ant is hardworking, storing food for the fuho while the Grasshopper spend his time playing and dancing
instead of preparing. When a storm arrives, the Grasshopper finds himself
hungry and without Shota. The Ant helps him,
but also laying an important lesson to
share gently at the end. Alright, now, let's go ahead
and hit on this and we'll have our story get done for us. And from here, we move on. So we have that was potted
time in a sunny male dough. Alright. Alright, so this is
actually very interesting, and this story is
gonna make more sense. So we have not created this. The next thing we need
now is to go ahead and generate images
for a story line. Alright, now, so to create our
own images for this story, all we need now is a prompt
that help us to create this. And we're going to describe
the Grasshopper and the end. And for that, I have this prompt that
actually made for you. So it says, create
ten step by step. Three D pixatyimage prompts that illustrate each scene of the Ant and the
Grasshopper story. Each prompt should match
the narration sequence and include detailed description
of both main characters. So use the character design consistently through out all Ss. So I have this, I have
described this for the end. I want to actually specify this. I've described
this for the ends, and I also describe this
for the Grasshopper. So that is why you
need this prompt. So it's actually the go
ahead and copy that. And now go ahead and click on this and I'm
going to get date. So we now have this, and this is for the scene one, for scene two, three, four, five, six, seven,
eight, nine, and ten. So we now have the ten scenes. And these are what I are
going to use to walk, right? So I believe that
is actually okay. And I want this to actually be like
different scenes, okay? And if I want that, I can go ahead and say, this is another prompt I made. So if I want that to be into scenes again, I
can die in and say, create a the pixa dye and I'll
go ahead and check it out. I want this to actually
be into detailed scenes. So I want that to be scene
one and I have this, then scene two and talking hat. I have this. So
these two prompts, I'm going to leave
the two for you. So anyone that
works out for you, you go ahead and copy that
and follow up when I want the second prompts that actually
give me scene by scene. S one, this, then send two, this send three, this
and four to five. And I have all of them
showing that it is a pixel Si three D format. Okay? So that is
actually what I need. So ensure you always use a
three D format for this. So you can always
get this at the end. So if we actually need
the actual prompt I use, I also provide that for you. So you actually go ahead, I use the same fromt exactly like
what I use or what I have. So put this down, and if I
have a new question, go ahead, I use the question
answer section, and I'm going to get back
to you as soon as possible. Thank you so much,
and I'm going to see you in the next video lecture.
3. Step 2. Generate Images for Your Video: I welcome you back again. So we have ne to
create our study line. Then we have a video or we have our scenes actually
created for our images. Now, I'm going to introduce
you to something so cool, something you've
never had before. Or if you have had it or you have used it, fine, no problem. Now, in the punt I gave you, I describe the end, which is this, and now I
describe the Grasshopper. So if I want to actually create something
so adorable here, let's go ahead and
copy the first one for the ends and
we'll copy this. Then go ahead and say the Ant, and then I'm going to
give the description, move over to image effects, and we're not going
to use image effects. But let's go ahead and try Wisk. Wisk is going to
help us to create both images and videos, and to surprise you how
this can actually be done. Let's go ahead and check it out. So Enter to and
right inside here, I want to create
an image Go ahead, I hit on at image. So you're right inside weeks. You can actually create images. I can also create videos. Well, click on this, you
can actually create videos. Create and mix of videos, right? And that is something so cool. Now, let's go over and move over to At Image.
Click on At Image. So what Wik actually
does is that. You can create your images, and then you use
those images you create to create
different scenes. Very important. You can use that to create
different scenes. So if you want a particular
background, you can use this. You can add so many
different backgrounds, and then you can use that
to create your own video. And that is so much important. Let me go ahead and show you
how this actually works. Go right inside here
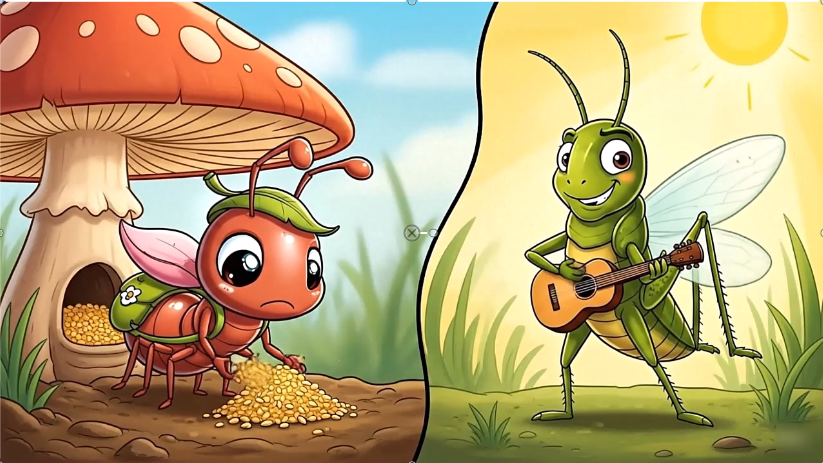
and click on Act text. Let's go ahead and
describe our end and generate image of an ant. And that is being
generated, right? So it gives you
this reference to assets using subjects,
scenes or style. So you can always use that. So this is kind of ant
with actually generated. And this is a Bxer style end. And let's go ahead and copy
the one for Grasshopper. Go ahead and copy that. I
go right this ide here. You can also add another one. So this are for your images and go ahead and generate
that for Grasshopper. Now, I'm going to
select a background, maybe where I want them to be. If you want to select a
background, there's no problem. So I have this and that's going
to be working so hard and this grasshopper that's
going to be playing guitar and dancing up and down. Okay? So if we are going to
actually start creating this, then we can go ahead
and give a background, maybe in a scenario where I
want this to actually happen. Okay. Well, it's
because I want this to actually not going to
happen in a particular place. I just want that to be maybe in a regular
or an environment. Let's go ahead and that creates a background and go ahead and say So let me say I have
to go back to this point, and I'm going to use
this background, create a vibrant three
D scene of white, sunny middle hued with a
tall glass and white flower. Then I'm going good
to add any character. Go ahead and place that. Then I'll go ahead
and copy this. I'm going to say
the Ant. With this, no, I don't want
to include the nt. I just want a scene. Then I can go ahead and
the grass oper green. No, I don't want the grass oper, and I'm going to copy this
as a background and wear and see bright sunny
garden peasants, bright blue sky, and so on. And then if for the character, I'm going to say, no character. But there's no I don't
know character because I don't just want this. Let's
go ahead and generate this. So this is just a scene
for the budground. So I don't want ahead and copy what I have
right this idea. So just go ahead
and copy that and let's have something
as a background that's going to present where this animal going to
be walking or playing. So now I have this. You can also open it up,
and this is what I have. And I think that is okay. Now, if I want to use the
background, I will select it. If I don't want to
use the background, I will not select it. Okay? So now, let me go
ahead and say for the scene, if I want to create
the very first scene, all I need to do is to
go ahead and copy this. Then move over here. Anywhere
the ant is mentioned, I'm going to select Ant. If ant is not mentioned,
I will not select it. Anywhere Grasshopper is
mentioned, I will select it. If it's not, I will
not select it. If I want to use this
background, I'll select it. If I don't want to use
it, I will not select it. For the purposes of this cas, I'm going to show us
how everything works. It can also add a tie. But I'm not going to d in a tie. Let's go ahead and
create an image. So go inside image. And past this, we are creating
the very first scene. And now I'm going to select this background to
show us that you can select you can
work with this and go ahead and
generate this image. So it's going to always generate two images
for you at a time. And then you go ahead
and select one you need, and then you can go
ahead and proceed. So it's been selected, I can see I have
this and I'm using this background I selected
because I selected that. I I don't want to select this, I go ahead and diselect
that's going to generate. This one ahead
unselect the scene, and I'm going to generate
this is going to create its own background for us.
And that is what I want. I want us to have a different
background created for us. And in this way, you can see that we are now using
this background again. But because it has
imitated this background, it looks similar
to what we have. And you see that this is
exactly this, you can see that. Now, let me go ahead
and delete this. I don't need this the beverage. Alright, so now we can go ahead and start creating
all your videos. Let's go ahead and uh I
put this and let's go over and past this and let's go ahead and create
the second image. And I did not select the
background. I just left it. I want this from
the starting point to have different backgrounds, and then we move on. So let's go ahead
and do that first, and I'm going to select
all of the images, the Ant and the Grasshopper. So, you see, I did not
selecting the background, and that's why I have
something different. But I have the same ant showing that it's
hang consistency. Okay, now let me go ahead
and I select the third one, and let's get over here
and let me go ahead on. Paste this and
let's check it out. So in that way, I can to create
as many images as I want, and I'll have something so cool. So this is whisk by Gogo and it's something
so cool, right? So you see now, I'm having something different and not
using Decembogran throughout. So let's go ahead
and, uh copy this. And now let's go
ahead and base that. So if you want to use
the same background, always select this background, and you're going to use the same background throughout this cows. Okay? So let's go
ahead and continue, and I'm going to do that f
to create all the images. Right. Now, I've know to
create ten of the scenes. Let's go ahead on stuff from
the beginning. We have one. We have two, three, four, five, six, seven, eight, nine and ten. So I've no to create
the American C. You can also see that the
videos look so good, right? So this kind of thing I
want you to actually do. So go ahead and put it down, and in the next video lecture, we go ahead and start off by learning how to create
the videos step by step. And then I hope that works fine. Alright, so in the
next video lecture, we go ahead and learn how to create the videos
step by step, put this down and see you then. Thank you. And in the
next video lecture.
4. Step 3. Generate Videos using Free Video Creator: So I will on your back again, and it's time we go ahead and create videos
for this project. So in this video, you can
go ahead and copy this. So we have this already. You can go ahead and copy this and show what each of
these actually do. So for that, I'll go
right inside whisk, and you'll be surprised we
actually using whisk again. So why are we using whisk? You can go ahead and
hit on this video, and right inside here, you can actually use this or any video you created
will actually be seeing. So back to your image. So for any video you want to create, you go ahead and animate that image using
Google V or three. So I'll go ahead and click on this, so choose
any one of this. So I want this that the ant
is carrying the food and why the the Grasshopper
is playing. I'll go ahead and
click on Animate, and now tell Wisk what actually want to do
and I'll go ahead and say, create a video of and moving forward. Why the grass opa is
playing and danset. So now let's go ahead and
create this and check it out. So you can see your
video Cretan is cooking it can exit
to create more magic. Now, when you exhaust this, you can also go
ahead and go over to Google AI studio and move
over to generate image. And right here, we
have V right here, and you have ten generations to actually be done right
here. You see that? So you can also use this. So we're going to
be using the two, and this is a way you can
actually create free videos. You're not paying
for this, right? So let's go ahead
and generate that remains 4 minutes and
very soon it'll be done, and then go ahead and generate all that videos step
by step, right? So now I have been able
to create this video, and the video actually
talks. I see that. It's actually talk, and you can actually use this to
create hyperistic videos. So I'm actually showing you
this so you can be able to know about this video
creation, right? So in that way, you can create as many videos as possible. Now, anytime you
hear about video, you can always the
video you've actually created right
inside here, right? So I can also go over
and choose the next one, and I'm going to say for this, I'll go ahead and copy this. Close up of the try miss Quirin, check that out. Yeah. So we head over to Whisk again, and let me go ahead
and animate this. So we can animate
any one of them, go ahead and animate this. So choose the best
videos that you like, then you go ahead
and animate that. And from there, you
can go ahead and generate your videos and
download all of them. So anytime you exhaust this, you guys have just four
generations remaining, you can head over to
Google AI studio, and I've shown you how to create that in our
previous projects. So head over to AI studio and move over to Generate
Media is absolutely free. You're not paying
for this. So we are using Google Video, right? So another thing you
need to actually know is about selecting either 16 by nine ratio
or nine by 16 ratio. So you're always going to put
that into practice on show, but you're actually selecting the right ratio
for your project. So let's go ahead
and wait for this. I'll go ahead and
do that immediately for every one of them
that's remaining. And I'll highlight also
show you how to use that right inside the EO if we qui ahead and
exhaust this, right? So let's go ahead and
wait for that, guys. So, currently, I've been
able to create one, two, three, four, five and six. And now I can no longer
continue because I've exhausted the free animation
that is being given. So I can also guide and
download all the videos. So all I need to do is to head
over to Google AI studio, which I also showing you
the previous lectures. So this is a URL. You can go ahead
and move on there, and I'll go ahead and get over to Gert Media and go to VEO. So I can always
continue with this, but this does actually
give the audio, and I don't need the audio
because we're going to generate our own audio
for this project. So go back right inside here
and I'm going to copy this. And now all I need to
do is to go ahead and uh upload the images one
by one by going over here, get back to images, we on this, and then I'll go ahead
and click on this, es go ahead and
download this image. And once I download the image, then I go ahead and upload it. So go back right inside here, and I'll go ahead
and upload my image. It says enable, go good Drive, so I'll go ahead and enable
GoGod drive or this. Alright, so now I have
Google Drive enabled. I cannot go ahead
and upload an image. So once you get your
image right this idea, and I've uplouaded my,
I can go ahead and passe this and then
I'll go ahead and run. So you just select
what a landscape my 16 by nine or nine by six ratio. So I'll go ahead and run this, and now I'm generating
this, right? So in that way, I can
generate my videos are free. Without pay, I guideline
continue to try this. So it always give you
the ara sometimes. It means that there are
so much queue on this. People are using
this at the moment, and without wasting time, you can go ahead and git
our videos one by one. So, so if you go ahead
and play this video, you can see that the card is now here and this is
now animated, right? So this kind of thing
you're always going to get, so you don't need to go ahead to start paying for videos
or video creation, you can always use
Google AI studio, and anytime you exhaust
that, you can go ahead and sign up with
another Google account. And anyone you do, you go
ahead and download the video. And see the video
is now downloaded. So in that way, I go ahead and upload every other video and then create them step by step and make sure
everything is done. Right. Now we have been able
to create all the videos, and this is the last
of this video, right? And that is what I have
here. So that is cool. Everything here has
been generated, and we have that
right inside whisk. So we got to
download everything, go ahead and download all this video that we just created, and all the videos
are being downloaded. Says, G ahead and allow this and the videos are being
downloaded one by one. So the next video, we go ahead and generate
a voiceover for this story and the
one we use free uh, voice Jaria for this. So jam me the next direct show. I'll go ahead and guess
stat it immediately. Thank you, and I'm
going to see you in the next video. Lecture.
5. Step 4. Generate Free Voice Over for Your Video: I welcome you back again
to another video lecture, and right here, let's go
ahead and create audio. That is the voiceover.
So head back to this. Let's go ahead and get
the video narration or the audio for this. So it says once upon a time, let's go ahead and copy this, and then we'll go ahead and
select that and copy it. Then head over to Go AI Studio. If you've never used
Google AI Studio before, all you need to do is head
over to Google and go ahead and type Google AI Studio
or go ahead and type. None, no. Banana. So
from Nano banana, you see AI studio, go
ahead and click on this, and this is where or how you get over to
this page, right? So from here, you head
over to generate Media, and here is Nano banana. I have always shown
us how to use this to create images and
everything we need. And now we want to create the story line for
the voice over, quire hit on Germans
piece generation, rise inside the air. Go ahead and select
single speaker audio. Remember this is
single speaker audio is what I selected right here. And now we can go ahead
and paste your speech. So this is a text that
want to convert to speech. Now, head over to voice, and you can go ahead
and select your sets. I always let that as it is. Go over to voice,
and the voice I always use for my
videos is Oge Ba. So Ojiba sounds so good. It can also use another
one that you want, and the will always look good, so you always go ahead and test that by clicking on
each of these bodies, and you can go ahead
and play that. Now, if you have done this, oh, you need to go ahead
and hit or run, and then your voice
will start to generate. So you can see that this
has started to run, and very soon it will generate. And once it generates audio, the audio will be shown here. We can play that and
then we go ahead and also then load it as well. So let's go ahead and wait
for that to generate audio. So we have successful
created that, and you can see we
have this audio, and that is two minis. And let's go ahead and
listen to that a little bit. Once upon a time,
in a sunny meadow lived a little ant and
a cheerful grasshopper. All summer long,
Ant worked hard. He carried seeds, stored grains, and tucked away food in
his snug little home. Winter will come soon, Ant said, puffing as he lifted a
crumb twice his size. Grasshopper, however,
had other plans. He strummed his fiddle, sang happy songs, and danced
under the warm sunshine. Alright, so that is what we have, and that is what the end. We need to go ahead and
hit on Download and get this audio downloaded now. So now we have our
audio downloaded, and the next direct show, we go ahead and put
everything together and have a sweet or sun video ready. So let's go ahead
and move over to the next direct show and
get started immediately. Thank you and see in
the next video lecture.
6. Step 5. Edit and Publish Your Video with Captions: So now we have
actually downloaded our videos and all our images. We can now go ahead and put them together to create
awesome videos. So use Capcod, you can
head over to Copcot right now and upload all your
images and your videos, and then you can get ahead and enter them wherever you
want them to be, right? So I just more main have
this video right here. And let's go ahead and
listen to this video. Once upon a time, in a sunny meadow lived a little ant and a
cheerful grasshopper. All summer long,
Ant worked hard. He carried seeds, stored grains, and tucked away food in
his snug little home. Winter will come soon, Ant said, puffing as he lifted a
crumb twice his size. Grasshopper, however,
had other plans. He strummed his fiddle, sang happy songs, and danced
under the warm sunshine. Why worry about
tomorrow? He laughed. The days are too bright
to spend working. Ant smiled kindly, but
kept on storing food. One day, dark clouds
rolled across the sky. The wind howled and
heavy rain poured down. Ant was safe inside his warm
home shelves full of food. But poor grasshopper
had no shelter, no food, and his
fiddle was soaked. Shivering, he knocked
on Ant's door. Ant opened it and saw his
friend cold and hungry. Though he remembered
grasshopper's teasing, Ant invited him in. He shared his food and gave
him a blanket to rest. As Grasshopper sipped warm tea, Ant gently said, Playing
is wonderful, my friend. But preparing for
tomorrow keeps us safe. Work and play both
have their time. Grasshopper nodded,
his eyes wide. I understand now. Next summer, I'll sing and save. And so, in that little meadow, the ant and grasshopper
learn together. Hard work makes
tomorrow brighter, and music makes today sweeter. That night, as the
storm rumbled on, they drifted to sleep, warm and full dreaming
of sunny days ahead. Alright, so you
can see that o is actually in, and that
makes sense, right? Now, let's go ahead and
add captions to this. Go ahead and hit on caption. And now we want to generate
caption for this video. All we need to do is to go
ahead and to generate that. Go ahead and hit on generate and start to generate
captions for you. So you can see jorty
captions and it's more use the voice over with uploaded to generate
it on captions. And then we go ahead and add sties to caption and
make that to be dlable. If you are using
free uh cap code, ensure you do not use the Pfsurs of cap code so that you can be able
to download your video. Well, if you have pro cap code, you go ahead and use
any one of them. Now you can go ahead and select.
Let me go ahead and say. Now, you can see. You
can see how this looks, but therefore is what you get. All you need to do is
to go ahead and select the type of u or how you want
your caption to look like. Or you go ahead and
select template. And from template,
you can go ahead and choose any one
of these sties, if that is what you need. So go ahead and choose
any onee of these ties, and it's going on Mize, right? So once you add that,
you can go ahead and download your video and your
video is going to look good. So we have actually come
to the end of this. But before then, I always want you to export
your video using four k or eight k or
above or anyone of these. But the show from
1080 pixel to two K, four K or eight K. Alright. So that is one thing
I want to stress. So sure you have
something to cool. Then at the end, you
have your video, and you can be able to
upload that to to YouTube, or you go ahead and upload
that to TikTok, right? So that is it for now.
Thank you so much, and I'm going to see you
in the next video lecture.
 George Steve, Senior Software Developer & AI Content Creator