Transcripts
1. Master How to Create Viral Cat Adventure AI Videos for TikTok & YouTube: I'm very excited
to welcome you to AI Video creation
mastery course. My name is Judge Steve, and I'm going to be instructor till the end of this course. So in this course, we go
ahead and learn how to create a viral cut adventure
video from scratch, and this would be a course
that will help you to start publishing AI videos for
TikTok and YouTube shots. So in this video, I'm gonna
show you how to create these Val cart Adventure videos that is chilling online today. I can be able to start
creating your own and start advertising that or publishing that on TikTok and
YouTube shots. So let me go ahead
and show a demo of what you're going to
accomplish in this case. So I pouring through
the win the white. Quiet moments where
the heart can hide. Soft steps moving through a gentle day Little joys
are never far away. Stir it so. Let the time unfold. Warm and love in every bowl peaceful songs where the heart feels
free calm and life. Alright, so the
download you just saw now or the video you just
saw now is the video, we're going to create step
by step in this class. And I'm going to
show you every tool that you need to get
this project done. So by the end of this lecture, and by the end of this course, you must have a complete project you can be able to
showcase to your friends, upload to YouTube, and
also upload to Tik Tok. So join me in this
cours as we go ahead and get
started immediately. Thank you so much,
and I'm good to see you in the next video lecture.
2. Step 1. Generate Video and Image Prompts: I welcome you to the very first
step in creating a video. So the video we just watch, it is time to go ahead
and start creating that, and the very first step is
to head over to Chat GPT. So I am kindly on Chat GPT, and I believe you
are right there, and the very first thing
you need to do is to go ahead and start
typing your prompt. So I have provided you with video prompt and image prompt. The reason why I provided these two different
prompts for each of our video creation is that
we're going to generate a video for each of these. But before we can be able
to generate this video, we have to generate the images. So that is why the image
is very important. But before I generate this
image using the chart GPT, I have to generate
this video so that the image can now
take the style of the video and then generate every image according to
the video description. Now, let's go ahead
and start with the video description or go
ahead and paste this prompt. Go ahead and copy this prompt
from the recess for that. Or if you don't see that, please let me know advent
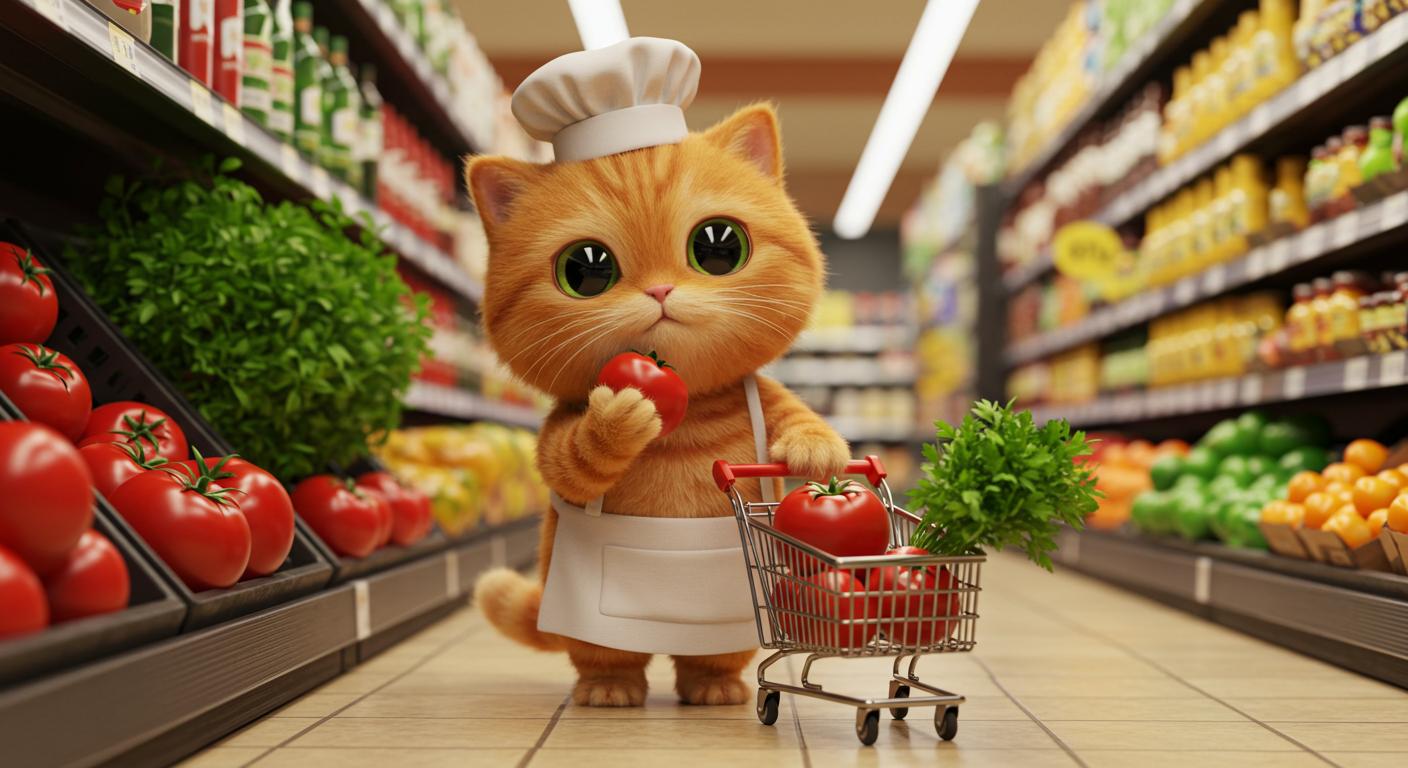
to provide you, but is actually there for you to go ahead and copy and paste. And this says, cut pumps for a series of scenes featuring
a pixa tie, three D, fluffy, orange colored
tappy cat with big green eyes and
soft rounded ears. Dressed in a white apron
and miniature chef's hat. As it embarks on
a cookie Johnny, start with the cat shopping for groceries
in a supermarket. The cat thoughtfully picked ingredients and
added them to a cat. Then progress through each
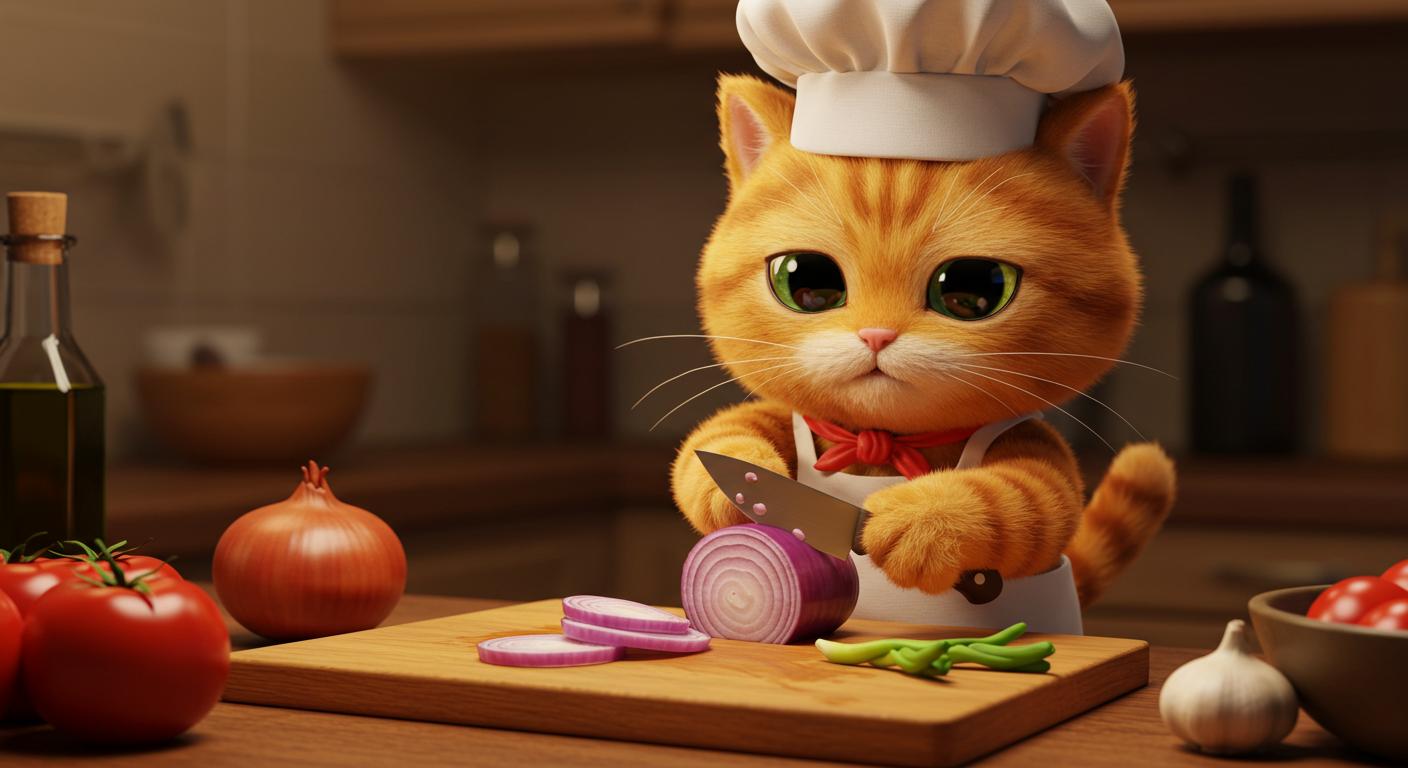
step of the meal preparation, showing the cat chopping
onions with a knife, mixing the ingredients,
and cooking the food. Conclude with the cat sitting
proudly on the dining she and enjoying its
carefully crafted dish. Each scene prompt should be detailed like a
beautiful v script. Use the cart detail or
use the card details, fluffy orange colored
tappy cat with big green eyes on each scene
to maintain consistency. Now, this instruction
I get to chat GPT is to ensure
that we maintain consistency throughout this
video so that the cat you see from the beginning
of the video would be the same cat you see at the
end of the video, right? Now, you can see, over here, I have what is called Pixa sty three D. Most of us don't
know what Pixar Ty means. Pixar StiOPixa is a
preparation production company that creates beautiful
images and videos. And we're going to imitate
that style of Pixa. That's why we use PixaTyT D, frothy, orange colored Tapi cat. Okay? So for every video you're going to be
creating in this course, you're going to always
use PixaTi D. Okay? Now, let's go ahead
and generated this video scenes for
this actual project. Right, so that is
actually starting and the very first scene says
the supermarket adventure. It's go ahead and give that, and choosing the
freshest ingredients, then preparing the kitchen, chopping the onions, mixing the ingredients,
cooking the dish. And the last one is
the grand fennel. And that is it. Now, I
have generated this video, and this is what I need. Now, I have to
generate the images. Like I told you, the
image is going to take everything from the video and give us the same thing, but I want to ensure consistency throughout
the image generation, and let's go ahead and pass
this prompt for image. And it says, create detail prompts for generating
images of each scene, ensuring consistent
description of the animal throughout cache props should include specific details
about the cats appearance, expressions, and the
surroundings to maintain visual continuity
across the series. Now let's go ahead and
generates this image. So every image that is
generated is really going to use to create the images
for the video, right? So from the images, we then go ahead
and get a videos. Now, if you watch this image, the very first scene
start with a pizza stye, then they give a description, and throughout this video or throughout this image
prompt, that is what I have. Okay? So this is very
important because we need to create the same animal from
the beginning to the end. So you can increase this
scene to be like $0.20, $0.30 or $0.40. No problem. But what I have here
is just seven scenes, right? So that is cool. Then in the next video, we go ahead and start off immediately by creating
each of these images. And that is very important. So thank you so much. And if you have
any question, use the question and
the answer section, and I'm going to see you
in the next video lecture. Thank you and see you then.
3. Step 2. Generate 3D Stylish AI Images: Welcome back to AI
video creation Mastery, and I welcome you back to another step involved
in creating a video, and that is the image
creating process. So over here, we
have these images. And remember, we created
a prompt for images. Now, go over to Google
and type image effects. So you can go ahead and hit on the very first one
or the second one, anyone can go ahead
and click on this. And what I need is the
Google Labs image effects. Why do I choose
this image efface? One, it is absolutely
free to start. You don't need to
pay anything. Okay. And the next one is that People introduce you
to things like Leonardo, Mat Journey, and so on. But one thing is that
they have limitations, and one of the limitation is that you cannot
be able to create something maybe you have like one and 50
credits to start, and after it's exhausted, then you have to
start buying credit. But for this course,
I'm introducing you to all the free
tools you can be able to use to create your own
videos from scratch to finish. And one thing is that
the image effects create amazing videos like Yona do AI. So you don't need to freak out. You don't need to waste money. All you need to do is
to go over to Chat GPT, and copy the very first
prompt for image. Remember, this is for image, ensure that you
copy the forms for image and head over
to this point. And now, I'll go
ahead and base that. And then I'm going to create or sit this
seed right in here. I'll go ahead and
close this seed. Save see this lock to create similar outputs is
very, very important. And then the one we're
creating is for best quality, and that is part by
image or imaging three. Now, the expect ratio
is for mobile devices, and that is what you are
creating this video for. Go ahead and choose
the portrait, and you can choose
for landscape for mobile portrait and
mobile landscape. They are all available here. So you can say that this has very nice feature that
is very important, and I'll go ahead and
choose this portrait. Alright, so I can now
go ahead and create and go ahead and hit on creates and it's going
to create this image. And one thing is that
anytime you get over to image effects and go over
to or your Google account, you can always see the same
image. And check this out. You can see that
that looks so good. You can always click on this to open or choose between anyone you see or
the one you want, and anyone I want, I'll go ahead and
they will click on that and I can go
ahead and download this. So let me go ahead and choose
this and love this that it has because it's
shopping for items, and I'll go ahead and
doload this, right? Now, I can go ahead and refresh this and check this
out it's gone, right? So, and all your images, if you go to your library, let's go over to a library
and check our images. That is what I want
to show you now. You can see that our images are going to appear
right in here. So you can see that, and that is why I want to show us this. So your images are not lost. So anytime you refresh, it goes on to open up a new page for you to
start immediately. Now, let's go back
and start off again. So go right inside here and I'm going to check the
second prompt, and I'll go back here and
I'll go ahead and press that, and let's go ahead
and ensure that you cross the seed and
always choose portrait. And I don't need to
refresh this again. I need to just keep it and
be creating my images, and we always
appear as the same. Let's go ahead and
click on this, and it's going to
appear as the same. So now it's coming, and very soon that will
be done for us. Alright, so now, and this is selecting of choosing
fresh grey Jays. And let's check it out. So I think any one
of them can be Okay, let's go choose
just one of them. And if you don't
like that, you can always come back to
check another one. So let's go ahead
and then load this. So remember it's your library, always come back
and then load that. Now, I'll go ahead
and move over and copy this and let's
get back to work. And if I go ahead and add this, it's going to overwrite
this, check it out. So I don't need to
always french this. So it will always overwrite the second or the
very first one day, but they are all saved
in your library, so you can always
check them out. So that is done and less
quiet and check them out. So you can see the
cart standing on the shear and is checking
out or preparing to cook, so I can go ahead and maybe, I think I love this I can go ahead and download
any one of them. But seeing some you can see that apron is
not actually the same. Unlike the very first one, let's go back to the very
first one we created. You see how the apron looks. And now the apron I'm seeing here is non looking the same. So I can go ahead
and refresh this. Let's go ahead and
recreate that. And, I got ahead. Okay. So I'll remove this standing on
a stool because I don't want it to stand
on a stool as well, and go ahead and correct that. Let's check it out.
So now you can see E, that I removed this stool, and it's now standing
in the kitchen, and that looks so
much better to me, unlike the very first one. So here, I can start I
think I love this that has a onions on the front because you're going to be
cutting the onions very soon. So let me go ahead
and choose this. I'll go ahead and look that. And for all your works, you can always go back
here and check them out. So whenever you click
on this button, they can always go back, and they can always go to your library and check
all your works out. Now, let me go back here
and shop in the onions. Let me go ahead and copy this. And then I'll go back and I'm going to remove
this and praise that, and let's go ahead and
check it out again. So now it come in.
Right now you can see that the cat is not chopping the onions and they can go ahead and choose the
best fit for you. And you can see the
cat is actually crying while
chopping the onions. And the reason is because it
should be right inside here. And it says, let's go back. He says, The cat holds a small knife
with surprising skills, his eyes nano the concentration, a single conic cat Ts. So I don't want the
Ts to be there. Don't go out and copy
this, and I'll go over and remove the ts. Then why not remove the TAs? And, you can go ahead and enhance these by
writing so manits you want. And let's go ahead and create these and don't want the
Ts to be there, right? Right now I've recreated that. And let's go ahead
and see how it looks. So now you can see
I have the cat, and I have a red
something on the neck. Let's go ahead and check
the very four hones. So I think you have
something ratios that is mentioned here. So we need to actually find
that I remove that, right? So it's very important we
check that and remove it. So let me go ahead
and recreate this. And one good thing about this is that if you're using
these on Leonardo and CO, your credit will actually be
going down, and with time, you can not be able to
do more on Leonardo. But on image effects, you can actually create as
many images as you want. And for the fact that I
have this always there, I can always go ahead and
let me go ahead and copy or download any one that best suits what I want
and I can go ahead and move on so that we don't
actually keep wasting time, but at least we
have the same cats actually in every one of them. So let me go ahead
and go back to this and let me check it out. Let me check the one
that suits these better, and I would download that. So get back to the
very first one. Okay, this has Ts and I don't
want the Ts to be there. I think let's check
any one of them. So I should go ahead
and download this. As that looks more
similar to what I want, then I'll go ahead and copy the mixing of the ingredients. So I need to speed
up this and get to the end so it can
be able to move ahead. So we now have the mixing
of the ingredients, and you can see the
cart is actually mixing the ingredients,
and that looks so good. So I can choose any one of them, maybe anyone that
looks so good to me. Okay, let me choose this
because it looks good. I think I love that.
And now I'll go ahead and choose cooking of the food. Then we go back and paste that, and that looks so good. Now we are at a
state of cooking, and I can see that
you have something so cool and that
looks so beautiful. So you can choose
any one of them. All of them look so good. So then go ahead and nload this. And now I'll go back here and I'm going to
choose the last one, and that is eating of the food, and I'll go ahead and
delete this and paste, and let's go ahead and
generate that, right? Now we are at the last
stage of this image. You can see that the cat
has now prepared a meal. So all you need to do is to go ahead and download any
one that best suits you. And I think this
actually looks good. Let's go ahead and
download that. And now we have all
our images ready. So in the next video,
we go ahead and start by turning these
images to videos. So hope to see you
in the next video. Thank you so much,
and I'm going to see you in the next video lecture.
4. Step 3. Create AI Videos using Free Video Generator: I will call you back again. And now we have images ready. One, two, three, four, five, six, and seven. I have downloaded all of them. It is time to turn
these images to videos. And to do that, we go
over and move over to Hello AI and go ahead
and click on SAS. So just to Google
and type Hello AI, and the very first one you
CA is what I'm going to use. Click on that and it's going
to take you to this website. Why do I introduce this website
to us is because I got to have 100 credits
every day, right? Or if you sign up,
you have 100 credit, and whenever it expires, you can go ahead and
create another account or another account
with another email, and then you've given
another hundred credits. And with that, you
can be able to create as many
videos as you want. And they don't take much
credit while creating videos. So you can go ahead and
let's go ahead and sign up. So I'm going to start with sign up with
your Google account, and I'll go ahead
and sign up with my own Google account
and kick start Johnny. So I have now sign up with
my own Google account, Tender, Go ahead and close this. Alright. Now, welcome, get exclusive points
and only the dots. So now have hundred
free trial credit. So all I need to do is go
over and click on videos, and anytime you click
on videos good to verify to ensure you're a human. And then you go ahead and import your videos from your
foldos one by one. So this takes just
a little time. And I want to show you
something important. On the videos, we have image
to video and text to video. So what I'm going to
choose is image to video, and you go ahead and
import your image. So these are my images. I'm going to import the
very first image here. I'll go ahead and
do a click on that and have this image
being loaded. Now one thing again is
that as a free user, this will actually run fast, is going to always waste time. But nevertheless,
you can go ahead and wait for that to
actually execute. Now, I have this, I
need to enter a prompt, and to enter a prompt, I go back to my chart GPT. And then I'll start taking
my video prompt one by one. So I go ahead and copy
this and I'm going to say move over to the points, and I'm going to pass that and let's go ahead
and generate that. So it's going to take
only 25 credits for this, and then that is it. So let's go ahead
and generate this. So hopes everything is okay and show that you don't
waste your credits by ensuring that everything
you have here is okay, right? So now let's go ahead and
click on Generate or create. And now you can see that
is actually creating. Okay? So in a way, you can also go ahead
and close this. You see, cancel generation or if you actually restart
this window, is not going to stop
this for grating. Okay? That is one good
thing about this, and I love it so much. So we can always
go ahead and close this and start
grating, another one. But I want to wait for this
very first one to finish, and then we'll go
ahead and start creating another one, right? So we have done or have this already done,
and you can see that. And that looks so cool. Now, all I need to do now
is to go back to this, and I want to copy
the second video. And then I will
move back to hello, and I can go ahead
and remove this. And then I'll go ahead and
check the second video, and that should be I have one. I have this, then this
should be the second video. And then Again I remove this prompt and went
to the this prompt. And let's go ahead
and start again. And you can see the second
video has started to generate. And then we can go ahead and do that to almost all the videos. So I'm going to speed up this, so don't waste much about time here because it's going to take more time to actually do
that from beginning to end. So let's go ahead and kick
start this immediately. One more thing is that you
can see that I've used 50 credits and is
running just 50. That means I have
two more to go. So when this is
done, I'm going to create a new account entirely and continue because I have
seven videos to generate. The reason why I'm doing this is just to show you that
you can be able to create this using or you can be able to use
free credit to actually do all this right
and have too many accounts. But if you really want to go
into video creation with AI. This doesn't actually
take much time, or it doesn't actually
take much credit. So you can go ahead
and subscribe for like a month or two months or
ten months and move on, but it's actually
worth it, right? So to compare with every
other one out there. But if you go ahead
and sign up with so many accounts using different Jimil accounts
or any other account, you can go ahead and get
100 credits every time. So try it out and
see how cool it is. So they'll actually go in, and very soon I'm going
to do every other one, and I'm going to show you
the end product and then go ahead and get started
immediately, right? So I've actually
generated all the videos. So remember, I used 100 credits because I
used a free version, and then the remaining
three videos, I went on and used
another account to fast track them and
generated all the videos. Now, all the videos
are right inside here. You can see I name them
according to the same one, two, three, four,
five, six, and seven. So you can go ahead and create as many accounts as possible
and create all your videos. But remember that
It so much time. So in the next video to come, I'm going to be using a paid
version to actually do that. Really is because the paid
version makes it fast, easier to work on because the free version
actually takes time like 3 minutes in order to
generate one video, but the paid version makes
it very, very fast for me. But remember that this
is actually free. You don't need to pay for that. But because of this lecture, I have to pay for that
in order to do that. But because I also have
account which I'm using to create my YouTube videos
and tiktop videos and co, so it's always there for me, and I will be using my
own paid account to actually fast track
this in order to make it more
easier for myself. So go ahead and put
everything down, and then we move to
the next lecture, where we're going to start with the next step
that is involved and put everything together for YouTube and TikTok videos. Thank you so much,
and I'm going to see you in the next video lecture.
5. Step 4. Use Nano Banana for Image and Veo for Video Creation: I will carry back again
to another video lecture in IVR creation mastery, and let me go ahead and
show you something I almost forgot about in this house. And that is for this
actual project, I fought to introduce
you to nano banana from the beginning and went ahead and doing most
every other thing. And now I remember I did not
actually use nano banana, and that is why I have to remake this video and put that
almost at the end of this. Now, let me go ahead
and say, I have these images that prompt for all the images
we've just created. All I need to do is to go
ahead and copy all of them. And with nano banana, I'm going to create consistent image. Go over to google.com and
click on nano banana, and the very first one that opens is where
you're going to use, and then go ahead and try nano
banana. I write this idea. I'll go ahead and I'm going
to say create images for the create consistent or create images for the following scenes. And you can go ahead
and tell you to use using consistent images. So create images
for a foreign scene using consistent images. I can go ahead and pass that. And now I'm going to
generate every video we actually generated
using image of fex, and that is going to
make it so easier. So this is one good
thing about nano banana. It can actually create
so many videos for you, and the video creation
is actually very, very, very much easier, right? And if you look, you can
go ahead and see we have something so identical and
consistent in character. And then you can go ahead and
thenload all your videos. So the videos actually
being generated, and Rama this is a quick guide in order
to know about this. So actually used image
effects in this project, and then we use a hello AI to
actually create our videos, which we actually did here. Now, I say, it's better also learn about nano banana right inside this project because
for other projects, I'm going to be
using nano banana. So I have to
introduce that here. So now we have actually see
how this actually works. You can go ahead and
download all your images. And let me say this image or the very first image can
go ahead and download that, and image is actually
being downloaded, right? Now, in order to create video, just like we did using Hello AI, in order to do that,
all you need to do is to head over to generate Media. And if you go over
to Generate Media, you can go ahead
and refresh this. I want to be fast about this, so I can go ahead and move to the next lecture and go ahead and generate media
and go over to VEO. And the VEO we're using is
not actually VEO three. It's actually VEO two, right? So we're not generating audio. So all we need is
just an animation, and I can move back to chat
GPT and go over to Chat GPT, and I'm going to copy this
for the very first video. I let's head over.
And right here, you can go ahead and
select landscape or go ahead and select
for mobile device. And let's go ahead
and import our image. So let me go ahead and
import this image. Right now, I've
inputted this image. I'll go ahead and
past the prompt. I just copied, let's go
ahead and run this prompt. And one thing again is
that this prompt is all about generating it generates
only ten videos at a time. After then, you can go
ahead and switch over to another Google account to get another ten tape free
video generation, and they can go ahead
and continue with that, or you go ahead
and continue with your Hero AI, and move on. So let's go ahead and run this, and we're going
to see the video, and the video will
start creating for us. Now, it always give this message failed
to generate video, quota exceeded due
to high demand, VO is currently
running at capacity. All you need to do is
wire a refresh this. I want you refresh that, you go ahead and import
this video again. It means that so many people are using this at a time
or at the same time, and then you go here and
continue with Mobile. So if you continue on this, you actually going to
generate your video, right? So you go ahead and continue
on to generate this video. So you see, my video
is not being directed, so I have to keep
trying until it reaches my tone because
it's always que, and that is why I
always use Hero AI to speed up this
faster than ever. So you can see how it's actually coming and
you can see the video, and the video looks
amazing, right? So now we have actually
giretd a video. And if you want to check it out, can go ahead and click
on the video right here, and you can see that the video
is now actually animated. Alright. So in that way, you can actually animate
all your videos, right? So you're not going to
get exactly the sente like what I did or what I got, or you can get
something so good. So this is a way you can
actually use Video three and nano Banala to generate
your own images and videos, and it's gonna look so cool.
Go ahead and check it out. I have to make this
video in order to get this added to this
lecture in order to have a way to start creating free AI videos for your projects and get
that start working. So thank you so much. And
if you have any question, go ahead and use the
question to answer section, and I'm going to see you in
the next video. Lecture. Thank you, and see you again.
6. Step 5. Create Background Music for Video: I will call you back again
to another video lecture in AI video creation Mastery. And now we have our video ready. What we need to do now is
to go ahead and start off immediately by creating a missed
background for the video. So get over and move to
Google and type Sno AI, and it can go ahead and get the very
first one right here, go ahead and click on
that and open up that, and that moves over to Sno AI. So you need to sign in to this account or create an account if you don't
have account with them. And once you create
your account, go over to create and you're going to get
right inside here. So right now at the moment, I'm having a clean
and new account, which I have not actually
created anything using that. Then what I need to do
now is to start creating a a song or to create a
song while this idea. So you can see that this
workspace have no song. So I need to get
over to Chat GPT, and over to Chat GPT, all I need to do is
to tell Char GTP to create a song for me in
order to map this video. So I'll go ahead and pass
this prompt that says, write a short lyrics to generate a calm and axing
song for this video. Alright, so let's
go ahead and write a short lyrics to generate a calm and rexing
song for this video. Let's go ahead and click
on that and it's going to get a song that is
beautiful for this. And now I have this and, I can also tell hagi
to be to put that into vases and chorus. So if I want to do that, I can
go ahead and pase this and going to say write short lyrics to generate a calm and axing
song for this video and make the song into vases and chorus. Right, so this
should be end right, so now I have write
that using Granmary. So we can add a please. What
I don't usually add please to I don't usually add
please to charge GPT, because it's always
do whatever you want. Go ahead and check it out, and it's going to
write another song for us. Now, have a vas. I have chorus, I have
vase, I have chorus. So in this way, can'm able
to create more music. But nowtheless we're going
to get more of that. Let's go ahead and copy this. And now I head over to Sona AI, and then because I have my song already generated
isn't charged GPT, I don't need to regenerate that by creating or
describing your song, or add to this to
go over to custom, and then I'm going to past that. So sure that the instrumental is actually closed.
You see that? So ensure that you don't
have this instrumental open, so it will always be closed. And now I have
this, created this, so you have to choose
the style of your song, maybe classical or
lodge or anywhere. So anyone, you can tag TP the
type or the style of this. I can chugtP what is
the style of this song. Now I ask GTP, what is the style of this song? And it's going to tell us tempo, instrumentation, vocal, mood. And now I have to get
over to this point, and I have to look for that. And if I don't see one, I can choose any one
of them that I need. Maybe I can choose
emotional, right? And I can choose
emotional and classical. Right. Now, I have to give
the name of the song, and I'm going to say
that is a cat cookie. And let's go ahead and
generate this song. And soon AI, we immediately
start to generate a song. And if you watch over here, you can see that the songs
are being generated. And then it's got to generate like up to four different songs. They go ahead and choose one of the song that
you need, right? So it doesn't wash mouch time. We go ahead and download that
and gets at it immediately. So right now, the songs
have been generated, and we can be able to listen to the song and then
start to work on them. So I just refresh that and have my song still
right inside here. You can see that. I'm
just refresh this. So I just refresh this
and you can see that. So I can go ahead and
play any of this song, or I go ahead and download that. So you see that I'm
playing the song, what the mic is not
crest to the song, let me go ahead and
keep that for now. So all you need to do is
now get over to this, click on this point, and
you can download this. You can download MP three. So I'm just going to
download any one of them. So from your own end check song that you lost so much
and download that, and it's going to always tell you that's no commercial writes. So if you're downloading this, there's no commercial
write that backed this up. So I'll go ahead and
download that immediately, and I'm going to use that. Okay? So my song is being downloaded, and in the next video lecture, we now have our song ready. We have our video ready, and all we need to do is to match the song and the video
using something so cool, which all of us have,
and that is cap code. So jump in the next
video lecture, we'll go ahead and
join these two together and see how cool
our video will look like. Thank you, and I want to see you in the next video lecture.
7. Step 6. Edit and Publish Your AI Video: So this is the last step involved in
publishing our video. And to do that, we have to
dig that using cap codes, and you can see that
I have this video. Now, having putted everything right inside the air,
you can see them. And this is the Odeo
we just created. I've added the OD
right inside the ear. So this is all about using
cap code to edit your video. So go ahead and, check that out. No, what you need to do
is input all your videos, select them, arrange
them the way you want. You can cut off everything
until you actually need, and then you can
go ahead and add transitions on your videos. You can add transitions
in between this, and that will look so cool based on any of the
transition you want to add inside here, right? So let's go ahead and wait for this transition to come up. So you can see so
many transitions available in cap cards, can drag any one of them and
put them right inside here, create duplicate frames.
Okay, the square ahead. And I can go ahead
and remove this. So one of the transition
that actually looks good, which I can always tell you to use is the mix.
So this is the mix. I love this. It's always good. So go ahead and add
that inside here, and I'll go ahead and
add mix inside here. And I'm going to add that. What mix actually does is that when the very
first one comes, it joins similarity
with the second one, and you won't actually
notice more changes, and it looks so good unlike fade that actually shows that
satin has gone out. And that is this makes it one of the best
you can actually use. Now on the next thing
is this watermark. I know you would actually
ask why are we going to or how can we cleft this watermark or how
can we remove it? Go ahead and select
all your videos. And once you select
all your videos, you can go ahead and
obscure that. You see that? I've now removed the
watermark. You see that. So with this, you can go ahead and remove
all the watermark. So for each of the
video, you can go ahead and select
any one of them, then obscur that. And see that. So for anyone I select, I'll go ahead and remove, draw that and the watermark is gone. So in that way, I
can hide each of this watermark on this video. Alright, so if you actually
use a paid version for this, you don't need to start
doing this manually. You can download the
videos without Watermac. But if you use a free version, you always go ahead
and hide the watermark so that viewers will
not actually see that. And that is what
I'm actually doing. So this is actually
good for TikTop video or is good for YouTube shot. They were also
going to learn how to create other
videos in this car. Now, I have my
video right inside so I pouring through the wind. Quiet moments where
the heart can hide Soft steps moving
through a gentle day. Little joys are never far away. Stir it slow. Let the time unfold. Warm f love. I ever peaceful songs
where the heart feels free calm and life
like a melody Alright, so you can see that the
video looks so good, right? So this is all credit. And the next thing is to explot your video and explot dot, go ahead and hit on pot, and then you can go ahead
and name this video maybe cut cooking video. And then go ahead and choose
where you want that to be. Then one of the things you
helped me to do is to select maybe four K resolution or eight KsRtion in to make sure that the
quality looks so good, and then you go ahead
and explot your video. Online. So I'm so glad we've
come to the end of this, and this is one of the that I love so much about
creating AI videos. It is actually very
fun, very interesting, and I hope you group got
something out of this. So jump in the next
video lecture, we'll go ahead and
create another AI video that is so amazing, and I'm so glad that we
actually at this point. So thank you so much,
and I'm going to see you in the next video lecture.
 George Steve, Senior Software Developer & AI Content Creator