Transcripts
1. Master How to Create Viral Ghost/Scary AI Videos for TikTok and YouTube Shots: I welcome you to
AI video creation. And in this course, we're going to be
learning how to create scary AI videos style by style. My name is George Steve. I'm a senior software
developer at E Manoir Global. I have very good
interest in creating amazing and trending AI videos. And today, I'll be
showing you how to create scary AI videos
style by style. So we are going to learn
how to create the images, how to create the voiceover, then how to add our images and voiceovers together and
create a unique video. And then we add a
caption to our video. And using cap codes, we go ahead and make
this video amazing, and then we go ahead
and export that video. Let's go ahead and
look at a demo of the video we're going to
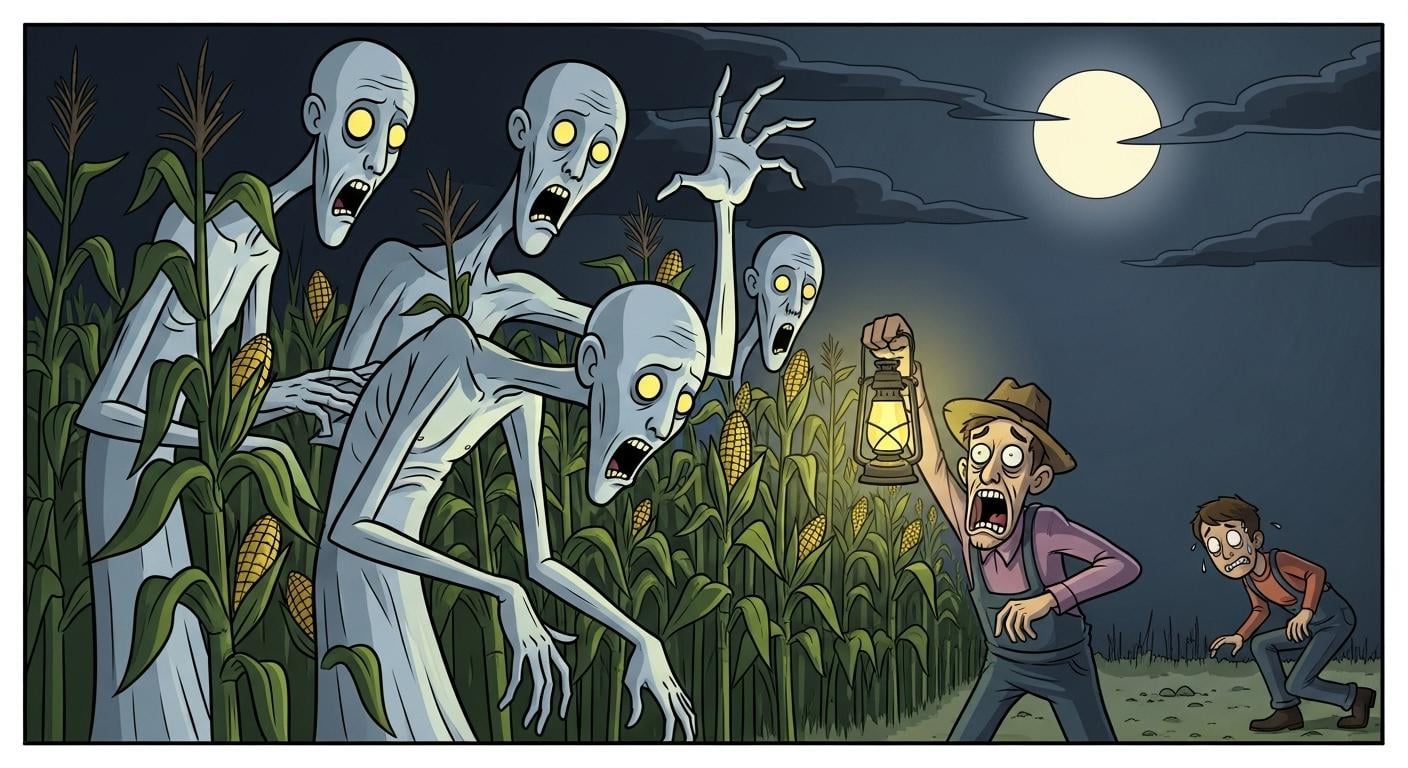
create right in this cards. Don't want you to know this, but something happened
in the desert. A streak of light
tore across the sky. Locals swore it wasn't a
meteor, the ground shook. Animals went silent. The military arrived
within the hour. They said it was just
a weather balloon. Classic excuse, but they
blocked off miles of land. No one was allowed near. Weeks later, farmers
reported tall, thin figures moving
in the cornfields. Some described their skin
as pale, almost glowing. Then people started
disappearing. Every missing person's file was sealed, families silenced. Journalists who asked too many questions,
lost their jobs. But the strangest part,
security footage leaked. It showed soldiers escorting
something onto a truck, not human, not animal, caged. And that truck was
never seen again. Alright, so the
video you just see now is what we're going to
create right in this cure. And if you want to start
creating your own trending, scary AI videos that
are helping people to get views and engagements,
this is the right time. Let's go ahead and get
started immediately. Thank you so much, and I hope
to see you in the class.
2. Step 1. Generate Audio and Image Prompts for Your Video: Welcome back again
to another lecture. And in this video lecture, we're going to be
learning how to create the scary AI video step by step. So if you've ever
seen the video, you just watch in the
previous lecture, and you can see how scary
that video looks right. Now let's go ahead and
guess at it and see how to create these scary vs. So go ahead and copy the prompt I just provided for you and you go over and paste
that right here. It says, write a
unique, suspenseful, scary story design for
text to speech narration. The story should last
approximately 120 to 160 ways. Now, all I need to do is I'll go ahead and generate the story. I've given you the
description of how the story we
go step by step, and then we go ahead
and get started. So the very first one is
the hook or introduction. They don't want
you to know this, but something happened
in the desert. Then a strike of light
toll across the sky. Local saw it wasn't a meteor. The grand shook
animal went silent. So you see how
suspenseful that is? And N says, and that shock
was never seen again. So, now you haven't
able to create this. This is a narration and is one event to use to
build a voice over. So to create image for this, this is where the
whole work start. Now, I'm going to copy this and then I'll go
ahead and paste that. I've provided you
with this prompt. So all you need to
do is from now on, we provide short sentences. Your task is to
expand each one into a detailed image prompt written in an illustrated
cartoon horror style. Featuring bold hotlines is a
directed facial expressions, and yet playful atmosphere. Go ahead and do that
and then chagTP waiting for you to get
all these this done. Say says do you want me to also keep
characters consistent across scenes like always driving the same or main character or should each prompt
be stand alone? So now says from now on, whenever you give me
a short sentence, I'll transform it into
a detailed cartoon, hollow style image prompt. And the prompts include
erosonar cartoon horror, style, bod Adline, is iterated
facial expression, and aerial yet
playful atmosphere. So what you need to do now is you can go ahead
and copy all this. The reason why I'm
going to copy this is because if you are doing
this right from B, you will know what you copy it last and where
you copy it first. So let's go ahead and
open up notepad or note. Let's go ahead and open
up notepad and use that. So this is my notepad. I'll go ahead and paste that, and over here, I can go
ahead and remove this. But there's no
problem. All I need is I'll be taking these
scenes one by one. And I'd say they don't know Oh, they don't want
you to know this, but something happened
in the desert. And I can go ahead
and copy this. I'll go ahead and pass that, let's go ahead and
generate an image prompt. So it's going to generate
an image prompt for this, and it's going to be
done step by step. So this is a prompt generated for me, and
you can see that. Now I'll go ahead and
create the next one. So here, I'll be taking
that one step at a time. It says a streak of
light across the sky. Then locas, we swore
it wasn't a meteor. Now, I want to take that
one step at a time, so I'm going to have so much
images generated for us. The reason is because we're
going to make sure that this has something that kept audience hooked to
the end of the video. Now we've generated
the next one, then I'm going to take this Loca swore it wasn't a meteor. And then I'll go ahead and
generate the next one. So this is the way we
can be able to generate different sections of this
video that we need, right? So in that way, we have
something amazing at the end. Now I warhead and
copy the next one, and then I guide and pays that. So just go ahead and
continue this way until you finish every
part of this story, okay? Then I warhead and
copy the next one. The military arrived
within an hour. The military arrived
within an hour. So Now, I'm going to move ahead and do every one of them step by step without wasting time again. Right now, I've gartd almost
every part of the story, and I have everything
ready right here. And in that way, I
can go ahead and start with image generation. So jump in the next video, we'll go ahead and start generating images step
by step for this video. Thank you, and I'm
going to see you in the next video lecture.
3. Step 2. Generate Images for Your Video: I'll call you back again. So end this video echo with more head start generating
images for this video. So the very first
thing you need to do is to head over to Wisk. You can go about Wisk, and get started with this or you head over
to Image effects. So anyone of them, if
you're using Wisk, simply go ahead and click on EntaTs that is labs dot Google, slash effec slash two slash
Wix then go to your project. And if you want to do this, go ahead and click on this, choose 19 by 16 aspect ratio, the portrait. Ratio for this. In that way, you can now create things for YouTube shorts, TikTop videos, and
Facebook reels. Now, if you're using
Image effects, you can head over to this,
select portraits 19 by 16, and you can go ahead and cruise
the sat in order to have something that is actually
similar and output. Now, I'll be using
image effects for this. Now, head over to all the
image prompts you've created, starting from the
very first one, and then I'll go
ahead and copy this. Then I'll head over
to Image effects. I'll go ahead and paste that
and now, if I create this, it's going to generate free video for me or free
image and not video. So from these images, we now download them
one by one, right? So let's go ahead and
generate images one by one. So this is the very first image that's actually
generated for me. Now can go ahead and
copy the next one. I'll go ahead and get this
head over to image effects. Let's go ahead and
delete this and paste, and let's generate
the next image. So in that way, we generate
old images one after another, and then after we go ahead
and continue with this. So this is the next one. Then we'll go ahead and
continue with this. And let's CV and
put this one here, and we move ahead. Alright, so watch all this. I've been able to generate all
the images very very fast. Now, how 710 images
generated in total. So you can see them. This is 16. The next one is 15. And then 14, 18, 12, 11, ten, nine, eight, seven, six, five, four, three, two, and one. So we're going to
start from here. All you need to do
is to go ahead and download any of the best of
the images that you like. And with images you
downloaded here, that is what you use to
generate video, right? So we have no way to
generate all these images, and all we need to to go
ahead and download them. So simply go ahead and click on these three dots and
you can see download. And in that way, you can go
ahead and download that. So I will go ahead
and download this. Then we head over
to the next one. Then we choose one that actually looks far better
than every one of them. So I think this
actually looks good. I can go ahead and
also download this. Then in that way, we go ahead
and check the number three. We can go ahead and download
may this this look good. Go ahead and download. And in that way,
you go ahead and download every one of them. So the next one should be this. Guide and download this. And then we go ahead
and download every one of these images
one at a time. So go ahead and get them,
and in the next lecture, go ahead and move over
to Garatin our audio. Thank you and see you in
the next video lecture.
4. Step 3. Generate a Voice Over for Your Video: I will call you back
again. Right now, we have able to
download all the images we need for all these, and you can say,
Well, images are ready and ready to download it. So all you need to do
now is to go over to the this stuff you have
that this my not part, I copied this or head
over to the script. Why I ask you to copy that is because it's
more easier for us. I'm going to remove
the introduction. I'm going to remove
the timestamp on the introductions and
I'm going to copy all the narration so that
the narration will be used to generate the voiceover. Now I've deleted that
this by I'm copy that. And now you
have copy this. All you need to
do now is to head over to Google AI studio. So you can go over to gogle.com and type Google Aye studio, I get to this page. On inside here, you can move over to Native
speech Generation, or you head over
to Generate Media and right inside the
Generates Media, that is where we're
going to generate the audio we need, right? So what you click on Generate
Media to get you to this. And this page, you see
Geminis Speech generation. Click on that and IDA, move ahead and select only
the single Speaker audio. Now pass the audio actually generated and move
over to voice. Right inside voice,
I always use chiba. It's more smooth for me to use and go ahead
and click on Run. So go ahead and wait for this, and in no distant time, it will start to run. So now you can see that
it has started running, and I wouldn't take care of an e. I'm going to have
my audio ready, and I'll go ahead and
download that, right? Right now, I have never
actually generated my audio, and let's go ahead and listen to the very first two lines. They don't want
you to know this, but something happened
in the desert. A streak of light
tore across the sky. Local swore it wasn't a meteor, the ground shook. Animals went silent. Right, so you can see that.
And now all you need to do is to click on Tread dot
and download Heo audio. And audio is now downloaded. So all we need to do now
is in the next direction, we go ahead and
put the audio and the video together and
get at it immediately. So thank you, and we'll see you in the next video lecture.
5. Step 4. Edit, Add Captions and Publish Your Video: I welcome you back again. So right now we have everything we need for
this video creation. We have a image,
and then we also have a audio which have
already downloaded. Now what is mining is to
head over to cap Code. And right as a Capcde, you go ahead and arrange your photos according
to the study line. So I have already added all the photos according
to the study line. And now, because this
is a scary video, you can go ahead and add
shaky background so that the but grounds will be shaking or the photos
can also be shaking. And to do that, all
you need to do is to head over to effects. And under effects, we
have this shaky effect. You can go ahead and
add that to your photo. And now you can see that
once you add that effect, I go ahead and play this
this. That is cool, right? Let's go ahead and remove that. You can add that anytime
say shake or something. And in that way,
it can be able to create a bad run
that is actually shaking in order to make the video to look
amazing, alright? Now, one thing that
you must not fill is the caption in order to get
people hooked to this video. So go ahead and move to captions and generate
your captions, and in all distant time, your captions will
be generated, right? So our caption is almost ready, and very soon we go ahead and
get that done and continue. So, we have a
caption right here, and I can drag this
it bits to see your caption and right
here, can see that. So we can also select
how you want it to be, I go about the template. And right now, I
can go ahead and select I want this to
be a white bad run. So we can select
something like this. Let's go ahead and make
sure that it looks good. So whatever you
select the caption, go ahead and download
your computer, and then we go ahead
and move on, right? So in this video, I usually use this
caption brown fox. So it is always far better. Now, let me go ahead
and stretch that. And I can take that
maybe to the center. It can be right here because I want it to
be on the middle. And let's go ahead and show
that everything looks good. Now, I'll head over to
where the ground check. As see that this
caption doesn't go out, so it show you have
something like this. I think that looks good. Right now, because
of this video, you can choose a caption
that we always look bold, you know, a caption
that will always be bold enough, okay? So in that way, you
have something that actually gets the
attition of the people. So let's go ahead and select
something like brown. This actually can look good. So I can guide, stretch that and it's okay. Now, let's go ahead and S,
you can change this color. Maybe you can choose
another color altogether. This guy don't choose this color or this color.
I think that is okay. Alright. As sad. So now I have this. I can go ahead and start on the beginning and
play this again. So show you select your Okay, we actually working with
template and the basic for this. So guide and select
the template. Show you select the brown fox, or you select something
that's actually look good. Now, let's go over to the beginning from the
beginning and watch this. Now, let's go ahead
and check it out. They don't want
you to know this, but something happened
in the desert. A streak of light
tore across the sky. Locals swore it wasn't a
meteor, the ground shook. Animals went silent. Military arrived
within the hour. They said it was just
a weather balloon. Classic excuse. But they blocked
off miles of land. No one was allowed near. Weeks later, farmers
reported tall, thin figures moving
in the cornfields. Some described their skin
as pale, almost glowing. Then people started
disappearing. Every missing person's file was sealed, families silenced. Journalists who asked too many questions,
lost their jobs. But the strangest part,
security footage leaked. It showed soldiers escorting
something onto a truck, not human, not animal, caged. And that truck was
never seen again. Right, so you can
see that I have no to make something so scary. And now you can go ahead
and start creating your own scary AI videos step by step. So I believe that is so
cool, right? So put it down. And if you have any question, go ahead and use the
QuestionaEA section, and I'm going to get back
to you as soon as possible. Thank you so much, and
I'm going to see you in the next video lecture.
 George Steve, Senior Software Developer & AI Content Creator