Transcripts
1. Intro : Hello, I'm pixel
Fred and welcome to my Skillshare course Fred. Cloth Simulation is one of
my favorite things that I like to do when it comes
to my Fred work that I do, like my day to day
freelance work, my teaching in this
skillshare course, I'm going to show
you guys the basics all the way to the more
advanced concepts so you can learn how to
do it yourself and then apply it in
your own fred work. If you do fred, even
if you don't do fred, this might just be something
you want to get into to visualize some
clothing concepts that you have or
something like that. So let me give you
guys a quick overview of what we're going to be doing. So the first thing
we're going to be doing is a basic scene set up. So this is where we're
going to be using Blunder, a free and open source software. And we're going to be
setting up a little scene. And this scene is going
to be what we used to demonstrate some
fundamental concepts. So one of the first things
we're going to look at is adding our
physics to that scene. And then we're going
to look at pin groups. This is going to
allow us to take certain parts of
a piece of cloth in a simulation and stop
that from simulating. Gives us more control. And then we're going to be looking
at hooked objects. These are little points or objects we can take
like dummies or knolls. We can parent them to these
groups that we've created. And that way we can animate our cloth through free D space. And then we're going to be
looking at force field. So how do you add
wind or turbulence in your freed space so your cloth can go along with that as well. That's going to be
handy when you want to imply that there's
wind or a breeze, something of that nature. And then we're going to look at a thing called cloth pressure. This is what's going
to allow us to blow cloth up in a simulation. So we're going to be
making an actual pillow. It's going to be really fun. I'll even throw in some particle simulation
where we can add some hairs around the rim just to make it look
even more cool. And then we'll be looking
at a flag simulation. Now the flag simulation is really cool because it's
going to take what we've already learned in the basic
set up in the beginning, like how to pin
certain groups to add enforced fields and
we're going to make a full flag animation. And I will be providing all of the resources for all of
these things as well. And then we're going to
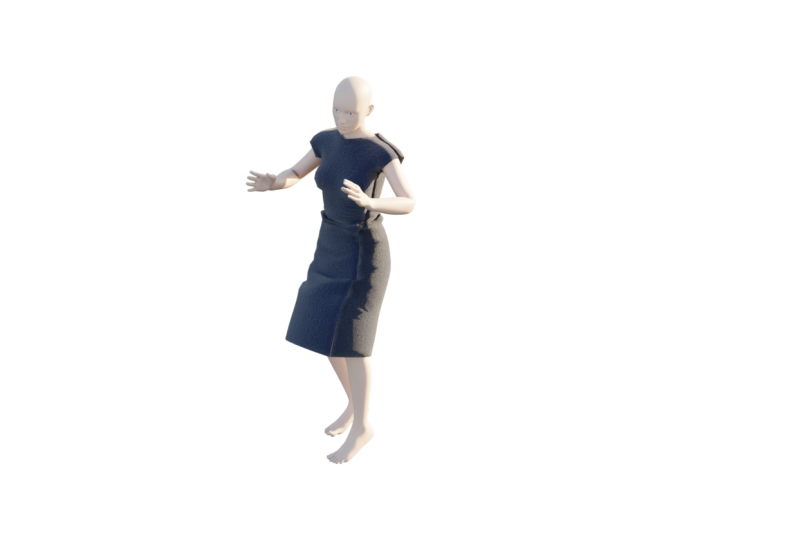
get into cloth sewing. I'll first do a little
basic set up just to show you guys the fundamental
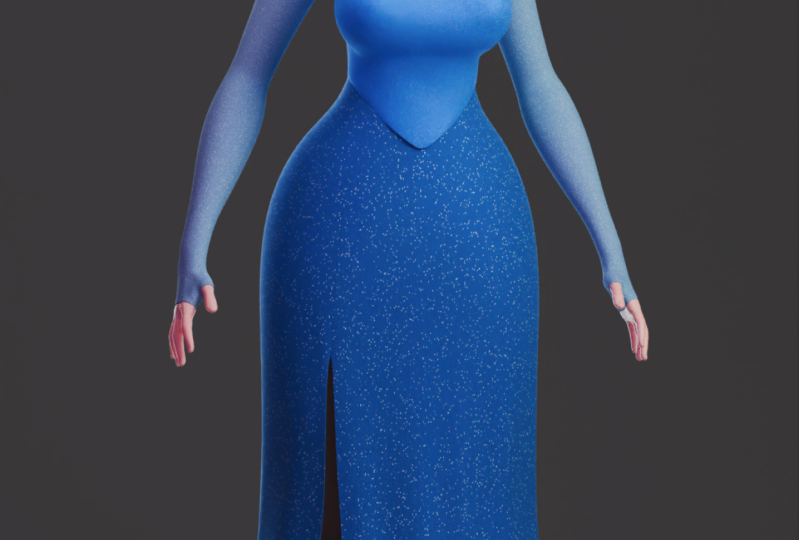
concepts of cloth sewing. And then we're going to make a full dress and like I said, I will be including
all of resources. So for example, there'll
be an example file for these things so you
don't have to go and get a character and
animated character. It'll all be one for you though. What I would recommend, once
you get better at this, that you challenge yourself
a little bit and you do your own projects where you try and use this on
your own character. So I'm assuming a lot
of people watching this already have a basic
understanding of blender. And this course is more aimed at people who already
know the basics. And if you don't know
the basics of blender, you can go watch my
absolute beginner skillshare courses
on my profile. And they'll get you up to scratch on all of these
things that you need to know. Cloth simulation is
absolutely fantastic. There's a lot of application. If you want to learn, keep watching all of the
resources are provided. To make sure to download that resources folder and let's get.
2. Scene Setup: We're going to get started by opening up a new
scene on Blender. I'm going to be using Blender 3.5 While I'm making
this tutorial, you might be using a
bit of a newer version by the time you
see this tutorial. Or a bit of an older version. But more or less a lot
of the same things should translate more or less. The thing here as well is I do expect that you know at least a little bit
about blender. If you don't, don't worry. It's a very simple program to learn the fundamental
basics with. You can watch some of my other blender courses
that I have on skill share, that approach this from an absolute beginners
perspective. And that's really going
to get you to scratch. So what we're going to do
once we have Blender opened, is in our main scene here, we're going to left
click and drag, select all of our
default objects. And we're just going
to press delete on our keyboard so we
have an empty scene. For your convenience,
I'm just going to turn on something
called Screencast keys. That way if I press different
keys on my keyboard, you guys can see
what I'm pressing. Now keep in mind I am
using a Windows computer, but a lot of the things are very similar
on a Mac keyboard. Instead of using
control on a Mac, you would use something
like command, for example. That's going to be
the main difference in a lot of shortcuts. But we're going to go
ahead and go shift A and we're going to go
to our mesh options. And here's where we have all
of our different meshes. We're going to want to
add in something that our cloth can interact
with for our demo. We're going to go with
the classic UV sphere. It's really nice objects. It's nice and round and you can see things fold around it,
so that's a good choice. You can see this thing has a
bit of, it's not subdivided. There's just a few faces
here that make this up and we can get it
a little bit denser, a little bit smoother. You can go here to
the add UV sphere. That's one way you can
adjust these settings. I prefer just to go
over to the modifiers, go to add modifier
and just simply give it a subdivision
surface modifier. And it's going to divide these faces and sub
divide it and make it a little bit more higher poly,
a little bit smoother. And then we can go
ahead right click, And just in our Viewpoard, we're going to
have shade smooth. It looks nice and smooth. Now what we have here is a nice round ball that our
cloth can interact with. We're now going to go shift a, We're going to add in a plane. With this plane we're
going to go and then we're going to press 22 to grow two times. And we're
going to press Enter. Now one thing we need to keep in mind is that whenever
we scale something, when we're going to deal
with cloth physics, it changes the scale of the
object in our object view. And blunder actually looks at the scale things when it's
doing our simulation. If we press the key
on our keyboard, the key and we go to item, we can see that we've
just changed it. The scale here is now 222, whereas before we scaled it, it would have been different if I go control z or
command Z to undo that. You can see that's what we have. Again, I'm going
to go ahead again, just make all of these two. What I'm going to do is I'm
going to go control A or command A and we need to go
ahead and apply that scale. Now you can see these
things over here, reset these scale transformers. And that's going to
be really important. The way you can
avoid this though is by going into your edit mode. So you can either press Tab, we can go up here where it's object mode and
change it to edit mode. And then you can
scale inside of here. When you scale inside of here, if I make this a bit
bigger tab back out, you can see that these
transforms didn't change. That's going to be something
that you have to keep in mind as we're going to
be working of cloth. Because a lot of the issues
people run into and are like, why is this not working
is because they're not considering the scaling
factor in Blender. So I'm just going to control z or command Z
just to undo that, just so we have
it as it is here. What we're going
to do now is we're going to go shift A and we're finally going to go to our mesh options and add in a plane. Then we're going to go
and move this guy up z. Move it up in a z axis. Still sitting on top of here of this one for the cloth
to actually to form. This is something a lot
of people might know. But if you don't
notice at the moment, it's just made up of
four vertices over here. If we try to run this
as a cloth simulation, it's not going to have
enough areas where it can fold and simulate
what we're going to do. We're going to press
eight, select Everything, and you're going to right click. And you're going to see an
option here called subdivide. Then we're going to
come over here to the Subdivide tab
and we're going to get to the number of cuts and
we're going to make it 28. And then we're going
to press Enter. Now we could go higher, but for demonstration purposes we're just going to stay here. This is a good round number
to give us enough areas. Now we've got a lot of little
places where this can all fold and we're going
to tab back out. Now what we have
here in front of us is a scene that
we can work with. Save this, I'll be putting this specific file
in a project folder. If you guys want to see
the exact same one, you can either save the one
you just created or you can just use one that
I've already provided. But I'm going to go
ahead and save it. You can go file save As, and then choose somewhere
on your computer. I'm just going to call it
beginner, cloth set up. I'm going to go
ahead and save As, now that we have
that out of the way. In the next bit, we're going to get into the fun stuff which is setting up some physics
and simulating our cloth.
3. Adding Physics: In the previous part,
we were able to set up a little demonstration
scene that we can use. Now what we're going to
do is we're going to add some of the basic physics. And this is we're going to
be making our cloth work. Let's come over here and
let's select our plane. We've already subdivided this
plane in the previous part. What we're going to do is
we're going to go over to this little properties here. This is the physics properties.
You can click on it. Over here you have
all sorts of physics. The one we're going to
be going with is cloth. Now, once you add a cloth in blender, you're going
to see this happen. All of these little
settings pop up here. You got the drop downs here. You've got physics properties, you've got stiffness
properties, dampening. Don't worry about all
those things just yet. What we're going to do is we're going to make sure
we go to frame one. You always have to make
sure you're on frame one. Because if I'm over
here somewhere, it's going to run
from this point. We need to go to the first
frame and then we need to run. You can either come here and hit the play button or just
hit the Space bar. I'm just going to
play the space bar. You can see here we actually
have the cloth falling. But the thing is, it's just
saying like one flat sheet, because we have no
forces acting on it. We have no force fields
or anything like that, no wind properties. The thing we need to do
now is the second part. In a cloth situation, we always need to have a cloth and an interaction surface. This is a fundamental
thing we're going to want to keep in mind as we're
doing cloth physics. Let's select the
sphere under here. Once again we're going to go
to our physical properties. Then we're going to go
this time above here. And that is called
the collision. Now Blender knows that this is a surface that the cloth
needs to interact with. If we go to frame one and
we now hit the space bar, we're going to see our
cloth now interacts. By the way, let's just select our cloth by left
clicking on it. Let's right click
and go shed smooth. Now we have some smooth shading. Now we have something
here that really well demonstrates what
a cloth simulation is. But if we drag to the beginning
here, we run it again. You can see there's something
weird going on over here. The sections are interacting or going right for each other. That is because we have actually told this cloth to
interact with the surface. But a cloth isn't
interacting with itself. This is where we're now
going to select our cloth and go back to our
physics properties. We're going to go down here, all the way to collisions. Now we have to tell it over
here under this little dropdown to enable this so it knows to
collide with itself, not just the surface
under it but itself. Now if we go back to frame
one and we hit the space bar, now we have self
collision and it isn't just penetrating
through itself. Now doing that has added a little bit more
extra processing. So it's a little bit slower, but you guys get the idea. Another thing we're going
to look at now is Quality. You can go to the very
top and you're going to see something here
called Quality Steps. Currently, it's set to five
for most things, that's okay. But sometimes you
can bump this up, so we can maybe put it
at something like nine, you can go back to
the first frame. And then we can
hit the space bar. And this time it's a
little bit slower, but it's done a
little bit better job at the calculations. What we're going to do
here is just going to go to frame one. And another important thing
I'm going to demonstrate, and I know there's a lot of settings here that I
didn't just cover, because we'll deal with
these things as we get more into different
projects in discourse. But for now we're just
focusing on the basics. But another thing that's
going to be really important, which I'll quickly touch on, is this thing over
here called the cache. Now I just demonstrated
how we can come here in our timeline and we
can play a simulation, but whenever we
make changes here, we have to run the
simulation again. What if we wanted to actually cache or bake this
into our blend file? That's where this
comes in. Now if we come over here and we can see our animation starts at
one frame one and ends 250. Let's just make it 100
frames long is come here to our cache and
let's make it 50 frames. Now from frame one to
frame 50, it's going to, if we go bake, it's going to
bake this in to our file. Now if you see over here, we go ahead and
hit the space bar. It doesn't matter if we
tap into edit mode and tab back out, nothing changes. This is actually baked
in, even if we came here. Now to our cloth, you can see it no longer allows us to change some of
the properties here. If we go down here
to the collision, a lot of these things
are grade out. You can't really do too much. And the reason is, is
because we've baked. If you want to delete the bake, you have to click
on Delete Bake. Then you can change the
settings here and you can go cache this again. This is something that is going to be something
that comes up a lot. Adding a cloth to something, adding a collision surface, and then caching it out. This is like, in a nutshell, the fundamentals of cloth. This is like the
foundation of everything we're going to be doing in
the rest of this course. I know this is a
little bit slow, a little bit on
the beginner side, but it's really about getting absolute beginners acquainted
with the concepts here. In the next bit, we're going
to be looking at pin groups. In other words, how we can grab certain parts of the
cloth and stop it from simulating so we can have more control in our simulation.
4. Pin Groups: In the previous
part, we were able to add our physics to our cloth. Now we're going to be
looking at the pinning. How do we take certain parts of the cloth and tell
blender that we want those bits to say inactive while the rest simulates.
Let's select our cloth. Just make sure if you go to your physics settings
that under the caching, that if there is a bake, that you just click
the leak bake. Because we want to
change things over here. I want to go over to frame one. We can see our cloth here unsimulated to be
able to do something. Let's go in it mode. You can see this consists of
a whole bunch of vertices. Now what we can actually do, we can go to this
little tab down here. This is called our
object data properties. Up here we have something
called vertex groups. Now essentially these
things you're seeing here, they're called vertices
and you can see each one of these is
a singular vertex. We can essentially take them, let's go for example, and grab a corner of vertex
here by left clicking on it. Then we can come here and
create a vertex group. We can call this anything, we don't even have to name it, but just out of habit,
let's give it a name. We're going to call it Pin
because it's our Pin group. Then we're going to go
ahead and assign that. Now if we at A, or double tap A just to
deselect everything, we can come to this
Pin group here. We can test it by going select. Now you can see
that is selected. Now we have a pin vertice here. In fact, let's go over
here, grab anota vertex. Let's go and assign
that one as well. Now if we go to select, you can see we have 12 of these orange selected
verts over here. Now you guys know
how we actually select verts and how we
add them to a group, but how do we actually
utilize this? Let's go back into
our object mode. Let's go over back to
our physics properties. Now we need to scroll
down here to the shape. This is what that has to do
with the shape of the cloth. Then you can see here is
something called Pin group. Now if it click
here, you should see that group we have created
and you can click on it. Now Blender knows that
these two points that we selected are off limits.
They can't simulate. If we now go to frame one
and we hit the space bar, we can see we have our cloth
being pinned on one side. Now that we have that set up, we can simply at any time
go back into edit mode. And we can select
any vertex we want. We can go back to our object data properties
and we can assign, we can tab back out and from frame one we can
run the simulation. You can even go back
and you can grab these guys over here and
you can remove them. It's that simple. This
gives you a lot of control. It gives you the
ability to pin things. It's just a ton of fun. It's going to help
you to try to do more advanced things in blunder. Yeah, that is cloth
pinning in a nutshell. In the next part
we're going to be looking at hooking objects. How do we actually take the pinned vertices here and how do we attach them to
an object so we can actually move the object
and move the cloth around. Because right now we
do have them pinned, but it is pinned
here in free space. Actually, we're not able to control these points
where they move around. That's what we're going
to be looking at next.
5. Hook Objects: In the previous
part, we looked at pinning certain points
on our simulations. They don't go along with
the rest of the cloth. Now we're going to be
looking at how to add some hooks, some control points. Let's tab into edit mode, or if you don't want
to use a shortcut tab, you could just go in
to edit mode here. Let's go over to our
object data properties. We have this group
we created earlier. Let's just go a to
select all of this. Let's just go and
remove anything, right? If we tab back out,
we got to frame one. We can, we just have this now. We can start from scratch, back in edit mode. Let's choose a point that
we want to control for me. You can choose any
point you want. It doesn't really matter. I'm going to go with
this point over here. I'm selecting a random point and I'm going to go ahead and I'm going to go and I'm
going to assign that point. Now while I still
have this point active, as you can see here, doesn't matter which
point you have selected, you're going to press
three on your keyboard. Three brings up all of
these different options. Then you can type in here
Hook. You can type and hook. Then you're going to
go hook to new object, should be one of the options. Now when you don't
do that, you can see we have this empty, this null object
that has been added. Now we can go back
in to object mode. Now we have this. We can select, and you can see that one
vertex wants to follow along. If we now actually go to frame one and we hit the space bar, you can see removing this,
but nothing's happening. All we have to do in that case
is just select the cloth, Go over to this little spanner here to go to your
modifier properties. We want to make sure that
we take the hook and drag this modifier
on top of the cloth. Because these things
are like modifiers, the cloth is a
physics modifiers. Physically, it's
modifying our cloth over time by running some
different algorithms. We want that to happen first
and then the cloth follows. Now if we go to frame one and we hit the space bar,
we grab our hook. We can move it, and we can
see our cloth moves along. Now obviously, in this case, it's only happening until frame 50 because
we grab our cloth. If you remember, if we go to our physics properties
and we go to our cache, we set the value here to 50. Let's make it 200. Nice and big value so
we don't run out of any cloth space too quickly. Let's come here to the
end frame value and make it 200 on our timeline. We can run our simulation
for 200 frames. Let's go to frame one
and hit the space bar. Let's grab our Mt. Let's go, let's move it now we
can have some fun. We're just gently moving
our cloth just like that. We have a way control our cloth. Now let's make this
a little bit more fun by animating this empty. But first of all, this
is personal preference. But you can go over
with your empty selected to do something here called object
outed properties. For the empty, it's a little green looking shape down here. You should be able to
go to the display As, and you can change the
shape. Let's make it cube. Let's bring the size down. Now we have something that's
a little bit easier to grab, a little bit easier to see. But anyway, let's
now go to frame one. On frame one, let's take our empty and let's go into
our front or graphic view. This is why I said
you already need to, not a basics of blender, but you can press one on your number pad or
you can just go to View and you can go to Viewport and go to your
front or graphic view. What you can do, it doesn't
matter where you're MTS. You can come over here
with it selected. You can press and we want
to make sure on frame one we're going to go and insert
a location key frame. Then we can come
over our timeline. Let's come to something
like Frame 70. Let's enable this thing
here called auto King. Now we have a position
key frame on frame one. Now on Frame 70, we can go and go and move this. I'm going move it over here. You can move yours
wherever you want. Now you can see it's automatically added
in that key frame. Now don't worry, our cloth
isn't going along yet, is because we haven't
cached it or anything. Let's come to something
like frame 140, and let's move it back
roughly over on this side. Then let's take it back
to where it started. In that case, I'm
just going to grab this first keyframe
by selecting it. And the I'm going to go
shift D to duplicate. And you're going to
drag this key frame all the way to 200. Now we have this animation. And don't worry if this
isn't moving along, you'd have to go back
to frame one anyway. Turn off Auto King.
Sometimes you just have to select your cloth and tab
in and out of edit mode. It's a little bit of a bug, but sometimes you
have to do that. Now if we go to frame one
and we hit the space bar, we can see we now have an animation using
the hook method. We now have a way of
animating our cloth. If we were doing an
animation where maybe you wanted a superhero
to have a cape, you might want to attach it
to the rig with this set up. And that's actually
what you would do. Now we have a nice little
way of controlling things. In fact, let's grab
this plane over here. Let's go over to our physics, and let's give that
a collision as well. It interacts with our floor because we only had the sphere, We have a collision
to begin with. No, it's a little bit
more of an interaction. Furthermore, let's actually grab our cloth and let's
go to our physics. Let's give it a subdivision,
surface modifier. Now we smooth it
out a little bit. Let's go ahead and
give it a solidify. Now we can take the solidify and give it a little
bit of thickness. Now we have some
thickness to our cloth. I'm going to go
something like this. Now that's looking really nice. Let's now go over to our physics properties
if you wanted to. Now, you could bake this, to bake it into the scene, but because we're going to be adding some force fields to this in the next section
where we have some forces affecting this. I'm not going to bake
this at the moment. Just make sure to
save all so you guys, In the next part where we add some force fields like wind.
6. Force Fields: Previous parts. We've
now learned how to set up a scene,
how to add physics, how to pin groups,
how to add hooks and ways of
controlling our cloth. Now what we're going
to do is add in some external forces like wind or something
that can effect. Let's go over to frame one. Remember, we haven't
baked this out yet. We are able to steal effect it. Let's go into our front view. I'm just pressing one
on my number pad. Then we're going to go shift A. You should be able to go down to this option here
called force field. Now one of the most common ones people tend to
work with is wind. Let's add in wind. By default it adds it in pointing up like so
in our front few, we're just going to
go, you can press G on your keyboard and move
it over to the side. Then you can press R. When you press R, you can rotate it. Let's rotate it. It's
facing our cloth. You can also press again to
move it up a little bit. Now we have it's
facing our cloth. If we were to go to frame
one and hit the space bar, it doesn't actually look
like it's doing anything because at the moment
it's really weak. We need to actually,
with our cloth or our wind object
here selected. We need to go over here to our physics properties because anything pertaining to physics, in this case we're dealing
with the wind physics. We can see here is the strength. Currently it's set to one. Let's go something like 500. If it's too much,
we can always turn it down. Let's go to frame one. Let's hit the space bar. Now we can see there is a
little bit of effect. I can see it's blowing
on it a little bit, but it's still not quite enough. Also, if we go to our top view by hitting seven
on a number pad, we can go and move this
over a little bit. It's hitting more
directly onto our cloth. Now if we go to frame one
and we hit the space bar, you can see it is affecting it. I can see it's blowing
it a little bit, but it's still not
strong enough. Let's grab our effector here. For some reason I still
have to auto keying on, so I'm just going
to turn it off. And I've moved
this thing around, it's added in key frame. I'm just going to grab both
of these keyframes or just press Delete. It's
just stationary. Let's go over and let's take
the strength and make it 3,000 Now let's go back to frame one and
hit the space bar. Now you can see it's
really blowing on it. You can see it's
flapping in the wind. You can at any point come and lower or
increase this value. But 3,000 seems to be
really good in this case. In fact, let's have
some fun and let's just go to something like
15,000 Why not? Let's go crazy and
let's go to frame one. Let's hit the space bar now. It is really flapping now. It's a really, really windy day. But I think we're going to be
a bit more reasonable here. And let's just go for
nothing like 5,000 I think it gives us quite a
bit of dynamic flapping, but nothing too crazy
like what we saw with a value of 15,000 Even 5,000
seems a little bit much, but you guys now have an
example of all of the basics. I feel like I've summed
it up really good here. I think we have now a
basic understanding. You should have a
basic understanding. You get the fundamental
things, how we cloth, how we control cloth, and how we have forces
in acting on cloth. Obviously, there's a lot
more that can be said, but this really
covers the basics. I hope I have achieved that. Now, this being done, we're now going to move on
to some fun little things. We're going to be now looking
at cloth pressure next, how to make a pillow. And then from there
we're going to head into some really fun projects. You guys can start
actually using these things for some
fun little projects. We're even going to learn
how to do some cloth sewing.
7. Make A Pillow: In this exercise, we're
just going to start with a brand new machine and blender. Forget about the previous
scenes we were working with. Just open up a new
signal blender to go ahead save it somewhere
in the computer I've just called
mine cloth pressure. We're just going to
go ahead and click and drag and select all of the default objects and just press delete on your keyboard. We're going to go shift A under our measure options
is Add in a plane. Let's tab into addit mode
so we don't affect scaling. Let's go scale this up a bit, like they're going
to tab back out. Now we have it, let's go shift A again, adding another plane. Let's go Z and move it up like it's just
sitting above here. With that done, we're going
to tap into edit mode with this one selected and we're going to right click
and go subdivide. We're going to go to
a subdivision tab. We're going to go with
35 and press Enter. Now we have 35 divisions. Let's close it over here. Then we're going to
go to Extrude and Z, we're extrude up on the Z
till we get about that much. Then what we're going
to do, we come in here hovering over this corner, we're going to go Control R, and you're going to see
a yellow line appearing Control or command R. When
you see the yellow line, just double click on your mouse. And there we've added it in. We're going to want
to use this later. Let's just go over to our
object data properties. Remember I've taught you guys
in the previous bits how to use the pen particle groups. Let's just go ahead and go. Plus let's just
go and assign it. We'll just leave
it named as group, but we're just going to
go and assign that now. We're going to tab back out now. We're going to grab
our floor here. We're going to go
over to our physics and we're going to
give this a collision, just so our pillow has
something to interact with. Then we're going to select
what's going to be our pillow, and we're going to go
ahead and give it a cloth. Now, we've already touched a
lot of these other things, but this time we're going
to go down and we're going to enable cloth pressure. Now if we go to frame one
and we hit the space bar, we can see nothing happens. That is because it's not just enough to add the pressure here, but you actually have
to give it an amount. Let's go with something like 12. Let's go back to frame one. And now let's hit the space
bar. Boom. Look at it. Bounce. You can go right click and go shade smooth to
give it some smooth shading. It's looking pretty good, but I think we can do a bit better. Give it some more forms. Let's go to frame one.
Let's tap into edit mode, and let's go to our top view. Let's go z and go
into wireframe. Let's select a
middle vertex here, like just two middle votes, one down the bottom
and one at the top. They're going to pre
z again and go solid. Let's go over to our
object data properties. Let's create another group. Let's double click
and call it Pin. You guys can see
where we're going with this because we've
done this before and we're going to go
ahead and assign those two selected
votes. Tap back out. Now let's go over
to our physics. And you guys should already
be able to do this now, but you're going to go down and you're going to
go to your shape. We're going to go to pin group, and let's select that pin. Now if we go to
frame one and we hit the Spacebar, look at now, it's looking a lot better, but the pillow is
going through itself. Let's go all the way
down to collisions. What do we need to
enable? We need to enable self collision. Now, if we go to frame one
and we hit the space bar, it's a little bit slower, but the pillow is at least
now interacting itself. And look at that,
how cool is that? We could probably do with a
little bit more pressure. Let's go up to the pressure, and let's take it
up to maybe 19. Go back to frame one. Let's hit the space bar now. It's
looking a bit better. We've got a nice puffy pillow, but what I'm going to
do now is give you guys something even cooler. We're going to make
this into like a Bohemian style pillow by adding some hair
particles on the side. This is like a bonus thing. It doesn't really have
anything to do with cloth. But let's go ahead. Remember earlier when we did our under object out of
properties, I created this group. If we go ahead and
select that group, you can see it was these guys running around here.
Why did I do that? That is because if we
go back to object mode, we're now going to go over to this thing here called
our particle properties. We're going to click plus and we're going to
give it some hair. Then we need to come
here to the source. We need to use modifier stack. It knows that it needs to take the other modifiers like
cloth into account. Then we're just going to go
down to the vertex groups, down here under the density. We're just going to
give it that group. Now it knows that
it only wants to add these hairs to this border. If we go all the way to the top, we can take this hair
length and take it down to make this dynamic. It interacts with the cloth. We need to go down to hair
dynamics and enable that. We also need to go to
our viewport display. Under the strand steps, we
need to bump it up so it has a little bit more bendy
bits to work with. Otherwise the hair will look too straight and too jaggedy. Now if we go to frame one
and we hit the space bar, look at we have hair particles. But the problem is, first of all, there's not
enough of them. Let's just quickly go down to this thing here called
children make it interpolated. Then in the display amount, I guess we can leave it at ten. And for the render amount,
let's set it to 20. Let's go to frame one now. It looks a little bit better, but it's just going
through to cloth. We just need to make sure
we select the cloth. Go back to our physics. Let's go to the top here. What do you think
we need to add? We need to add a
collision to the cloth. And yes, sometimes you can
even add a collision to cloth, even though this thing
here has a collision. You can even add a collision to the thing that is
the cloth itself. In this case, it's so it
can repel these particles. Let's go to frame one
now, let's hit space bar. Now. It is interacting
much better. How cool is that? We now have a
pillow. Really cool. What I'm going to do, I'm
going to go back to frame one. I'm going to grab this pillow and move it down a little bit. I'm going to go ahead and go to my modifiers and give it a
subdivision surface modifier. Now when we, it's going
to look a lot smoother because it's like subdividing and smoothing out the
mesh a little bit. But with that done, let's just go here
to end frame value. Let's make it 50 frames
with our pillow selected. Let's just actually go over to our physics properties
under our cloth. Let's just go down to our cache. Let's make that 50 as well. And now we're going
to click on Bake. Now it's going to bake
this into our blend file. There we have it guys. We now have a nice
Bohemian style pillow. You can select it
and then you can drag for here to get
a shot that you like. And then if you wanted to,
you could come over here, go to your cloth and
you can apply it. I'm not going to do
that in this case, but if you apply it, then it's going to stay
in that position and now you have a
model of a pillow. You don't have to
actually come here and sculpt or model in
these folds yourself. It is a lot more natural, a lot more dynamic. That is a fun little project, making a pillow with cloth
pressure in blender. I'd like to challenge
you guys and see what you can come
up with doing this. Maybe you can make a
couch or a bounty castle. The sky is the limit. I'll see you guys in
the next one where I think we'll be doing
a flag simulation. In that one, we'll be
adding some texture.
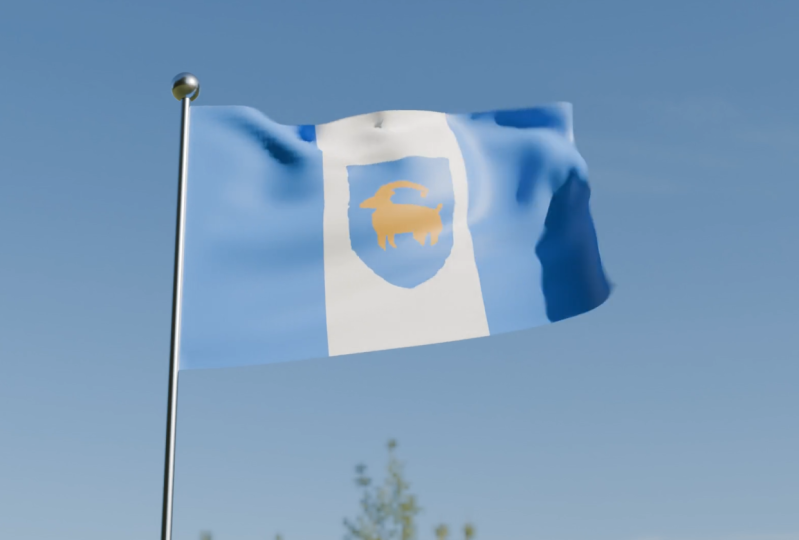
8. Flag Simulation: In the previous part we made a Bohemian style fluffy pillow. What we're going to do now is make a flag simulation
in blunder. By the way, you can make
whatever flag you want. I'm going to be doing the Australian flag
because I live in Australia with a new scene
opened up and blunder. Go ahead and save it
somewhere on your computer. Go ahead and drag over all of the default
objects and press the let, but then going to press one on a number pad to go into
the front or graphic view. If that doesn't work for you, just go to View Viewport and
go to the front graphic. We're then going to open
the resources folder. Now I have provided
a zip folder with discourse that you guys
should have downloaded. Inside of there is a
whole bunch of resources. We're going to go ahead
and open that up. One of the resources is going to be just an Australian flag, it's a PNG, and
you're going to click on it and drag it
into your scene. Then there's going to be
another one called the HRI. We're going to get
to that one later. But for now let's just focus on the flag that a flag has been
dragged in as a reference. Which can go Y and Y and move it back a
little bit in our front few, we're going to go shift
a, We're going to add in a plane with this plane, we're going to tap
into edit mode. We're going to go Rx90 and
we're going to present her then in edited motel in
a front for graphic view. We're just going to scale
it, then we're going to go X and scale it
to match the flag. Maybe just go a tiny bit smaller by scaling
the whole thing down. Doesn't have to be 100% just
more or less like this. You can see here that this
thing is rectangular. We want it to be made
out of two squares. We're going to go
hovering over this edge, Control R or Command R.
If you're using a Mac, you're going to see
the yellow line appear if you hover
in the right place. When you do control
R or command R, then just going to double
click by left clicking twice. Now you've added in
an edge running here. The reason for that is because
you're going to press A, just like everything,
they're going to right click and we're
going to go subdivide. Now it's subdividing in squares. We're now going to go
to the subdivide tab, and let's drag this value up. In fact, I think you
can drag past ten. Let's just type in 20. You could keep it at 20 if your
computer struggles bit, But I'm going to go,
I'm going to go to 35. For now, 35 is usually
a good number. Then what we're
going to do is going to go to our object
data properties. You guys probably already know where we're
going with this. We need to simulate this flax. Obviously, we need
certain parts to stay in place, like the edge. Let's select the
edge, and you can select whichever side you want. I'm going to go with
this side over here. I've got all of these
row of verts selected. And I'm going to create a group that will click and call it Pin. Let's go ahead and assign that. Now we have something
to work with. Now if we go over to
our physics properties, we can give it a cloth. Then we just need to
scroll down to our shape. Once again we're going to go to pin group and let's
select the pin. If we now go to frame one,
we hit the space bar. We can see we have a flag
simulation, by the way, right click with a flag, active negotiates move, but there are a few
things lacking. Let's first of all go
to our collisions. And as always, we want
to add a self collision, the flag interacts with itself. This time we're going to take the quality steps up to five, and we're going to go all
the way to the very top, to the main quality steps here. And let's take that to 12. Okay, That's going to make
it a little bit slower, but it's going to give
us a better quality. We're going to go
back to frame one, go to our front
orthographic view. We're now going to go shift A, we're going to add
in a cylinder. We're going to go
and we're going to go X and move it
over to the side. Then we're going to
go to scale it down. We're just making a simple
flag pole here like this. Then we're going to
tap into edit mode. With all of this active,
you can just press A if it's not active
to select it and you're going to go Z and scale
it up under Z if you want. You can make the
pole a bit skinnier and move it up
completely up to you. I'm going to go and enable
the x ray mode up here. And then I'm going to
click and drag to select these votes and go
and move them down. Your flagpole can be
however big you want. I'm going to go something
like this ball, we're in edit mode here. I'm going to go shift a, add in a UV sphere and go and
move it here to the top. And I'm going to go just to scale that and then move
it down a little bit. This is optional, but
I think it looks cool. Then I'm just going to move
that up a little bit like so now we have a cool
looking flagpole. I'm going to tab back out
and I'm going to switch off the x ray mode of this pole. I'm going to right click
and go shade auto smooth. Now we have a nice
looking flagpole. Now let's go to frame one. Hit the space bar, by the
way, I almost forgot. We also want to grab our pole, go to our physics, and we
want to give it a collision. Otherwise our flag will just go through to pole and that
won't be realistic. Now from frame one, let's
hit that space bar. That is looking really good. But obviously, what is a flag if it's not blowing
in the wind, right? That's the whole idea of a flag. To get your attention because
it's moving in the wind. By the way, let's just quickly
select this reference now. And just press the Lite, because we drag that
reference and we now actually have that image
in this blend file. Let's select our flag. Let's go to our render settings. Once again, I'm assuming you have a basic
understanding of blender, That's why I said
in the beginning of this course you should probably have a
basic understanding, but if you don't
just follow along, we're going to set the
render engine two cycles. If you have a GPU, you're
going to enable that. But if you don't
just chick the CPU, then you want to come
down to your samples and we don't want
to take forever, so we're just going to
go with 50 samples here. Now we're going to go over to our material properties
and we're going to go new. Now we've added materials,
this is called Flag. The're going to come
to the base color here and we're going to
give it an image texture. And then we should to come to the dropout and we should see our Australian flag here or
whichever flag you used. Now, we're going to
go to our UV editing. Now, we can go over here in this window and go Z and
go Material Preview. And it should match up
nicely, but if it doesn't, just press a select everything
and it'll select it. And then over here you
can select everything. And you can move it around by pressing and try and line it up. But in this case, it
matches up perfectly. So I'm not going
to worry too much. So I'm going to go
back to my layout. I want to go over here to the top where you see
our shading option. And let's come here and
change it to texture. We see our texture
the whole time. Now we're running
our simulation. This is what we're
saying. Pretty cool. Okay, now we have a
material for our flag. Let's go shift A. I know we could have
added our physics for the wind physics first, but I just think it's
just cooler to see the actual flag as it looks while we're doing
this simulation. That's why I did the texturing. First we're going to go shift A, we're going to go to
our force fields. You guys obviously can probably figure out
what we're going to do. We're going to add some
wind in our front view. We're going to go and move
the wind over to the side. And then we're going to go r to point it towards the flag. Now we can go over to our
object out properties. For that, let's just increase
the size of this thing. And then we're going
to go to our physics. Let's take our strength,
and let's at least take it to 4,500 as a start. Let's go to frame one
and hit the space bar. In this case, we can see it's
having some effect here. It's blowing our
flag. There we go. That's looking pretty cool. I'm pretty happy
with that, but I might actually just go and take this 5,500 like that, but it's completely up to you, whatever your
situation calls for. There we have that now. We have a nice flag simulation. Awesome. That is
really, really fun. I might just
duplicate this wind, bring it back and down a
little bit and point it up. And then you got a frame
one. Hit the space. For now, we've got a bit of
wind coming from under here. It just adds a
little bit more of a nicer dynamic and a flag
goes up a little bit, but I don't want
that to be too much, so you guys can mess
around of this. But I'm happy with this
result at the moment. I might just move a
little bit more back. There we go. Okay, that's
looking pretty good. What we're going to do now,
we're going to select a flag. We're going to go
over to our physics, and we're going to
go down to cache. Let's make this 120 frames. And I'm going to come here
to my end frame value and make it 120 frames as well. Let's go ahead and grab the flag and the
pole and the wind. Grab everything and go G, Z and just move it
up in our scene. Then select a flag and let's go ahead to Lkache.
Let's click Bake. Can see our simulation is baked. If you change any of
these parameters, you're going to have to go
and delete the bake again. One of the things you
can see here is the flag just stops because it
starts at the beginning. Again, one thing we can do, we can take the start value and take it up to maybe like 20. That's going to make
it look less apparent. The flag will always be, from our perspective,
in a state of flapping. The way you move
this around can make it look blend a
little bit better. But that's one of the things
with physics simulation, unless you're getting
into like geometry nodes or proceduralism, it's really hard to do a looping flag simulation
for that very reason. We won't be getting
into that. But this is still a really cool project. Yeah, that's what I'm
going to be leaving it at. Let's now go into
our front view. We're going to go shift
a, let's add in a camera. Then go to your right or
graphic view by pressing free on your number pad
and move your camera back. Then go into camera view
by pressing zero on your number pad with
your camera active. And you can see up
here it is active. You can press R twice, double R. That allows you
to rotate your camera. We're going to rotate it up
pointing at a flag like this. Now you're going to go over
to your World properties. You're going to go
to your Color here, click on the tab and then
go Environment Texture. Remember I told you guys in
the resources for there, it's going to be
something called a HRI. You're now going to go ahead
and you're going to go open. In this case, I have it
somewhere in my computer, but you know where
you downloaded it to. I'm going to go and
find mine here. I can see it's HRI four K, and it's going to
be an ER file and you're going to click on
it and you go Open Image. Now if you go Z and
you go Rendered, you should be able to see this. Now I'm going to go control or command B and drag over
my camera, make this box. And that's just going to
limit the rendering to the camera like so now I have this nice lighting
and what you can do is you can grab your camera and you can still
move it around. For me, I'm going to
move my camera down, but this is a
personal preference and I'm going to just rotate it up a little bit more like this. I see more of the sky like that, but this is completely up to
you how you want to do this. Then I'm also going
to select my pole. I'm going to go to my
materials tab and go New Material and I'm
going to go metal. All you have to do
is go down here to the metallic value and
drag it up to one. That means it's no metallic and you can bring your
roughness down to make it a bit more shiny like that's it. That is how you make a flag. Now there's a few more things we could do under our
render settings. Let's go down and
enable motion blower. When we do render, we get some motion blow
in the flapping, if your flag leads to a
little bit of thickness, you can select your modifiers. And let's give it a
solidify modifier just to give it a little
tiny bit of thickness. Don't go too crazy.
A very thick flag is not realistic,
it looks too heavy. And then let's just give it a subdivision surface modifier. Now let's see what
that looks like. Okay? Now that's already
looking really cool. Here we have a flag, and by the way, you can use
whatever flag you want. Doesn't even have to
be a flag of a nation. It could be just a flag that
means something to you. Could even just be a picture
or something that you like. Maybe a hot dog or a
Chihuahua or something. I don't know, but
there we have it. How do you render this out? Okay. The way you're going
to render this out is you're going to go over to
your output properties. Because you want to output
something from Blender. When you click on
this little file. Let's go to our desktop and go Accept. There are two
ways you can do it. You can actually render
this out as a bunch of PNGs and then compile them
together in another software, or even Blender, but
that's a bit involved. So for now I'm just going to
go and make this Mpeg video. I'm going to go to the encoding, and I'm going to change this
to an MP four, Mpeg four. Then I'm going to go ahead
and make sure to save. Now if you go to render
any render animation, this should render out
as an animation to your desktop or wherever you've selected in this destination. Now keep in mind this is going to take a bit
of time for me. I'm going to go ahead and end this now and then
I'll render that. Then I'll show you guys what the final result looked like.
9. Sewing Basics: Our previous little flag
simulation was quite a success. Now we're going to be delving
into making some clothing, or at least practicing
cloth sewing, before we get onto
some actual clothing with a new scene
opened up in blender. Go ahead, save it somewhere
in your computer. I've just called
mine sewing basics. You're going to select all
of the default objects. Press Let, we're really
going to keep this simple. Let's shift a, let's
just add in a cylinder. Let's tap into edit mode. And let's go 0.5 0.5 for verifying active
to make it half its size. Then we're going to go
z and scale it up in. Let's go shift to
duplicate and then go 90. In our front of graphic view, we should have
something like this and move it up and move it just like a rough
approximization of a human body. Maybe we can just grab this
and make it a little bit bigger, something like this. Have to be exactly the same.
And then tab back out. We're now back in object mode. We're going to right click
and go Shade auto, smooth. Now we just have a rough
person if you will. Then we're going to do,
we're going to go shift A, we're going to add in a
plane with this plane, we're going to tap
into edit mode. We're going to go
to scale it up. Then we're going to go
Rx90 and press Enter Rx90. Then we're going to
go, then we're going to go Y and move it
forward like so. Then what we're
going to do, we're going to grab these two votes in the front two top vertices
and go just to scale them. We're just like making what
looks like a basic shirt. Okay, this is the front pattern. We're not going to be
making any arms at the moment or anything,
just very simple. Then we want to be
able to subdivide this because it's not really
a square at the moment. Let's just come in
here, control R hovering over one
of these edges. Control. And then
we're going to roll the middle mouse button once
to add in two segments. And then double
click. Then control R hovering over the top edge or
one of these middle edges. And then double click
to add in one cut. Now we have the rough
looking squares. We can go A just
like everything. Then we're going to right
click and we can go subdivide. Let's come to our
subdivision tab. Let's drag this up. Let's go to as high as it'll
go, which is ten. Now we have one
part of our shirt, but we want another part. At the back. With
all of this active, we're going to go to extrude. And we're just going
to extrude it back. Extruding it back till
it's over here, right? But then we have all of this
stuff in the middle here. We're going to get
rid of some of that. Let's come to our face
Select option in our bottom. We're just going to
left click on one of these edges or one
of these faces. Then while you're holding
in shift and control, or shift and command,
you can left click over here and it'll select
everything in between. That's shift and control
or Shift and Alt, depending on what you're using. If all of these
bottom one selected, you can go X and you're
going to go faces. We want to delete the faces now. It's open at the bottom here, where the neck is going to be. In this case it's a
really wide neck. We're going to see over here we want to hold in
shift and control. Shift and command. And then the left
click over here. We want to select everything
where this opening is for the neck X. And we're going to
delete those faces. Now we want to go here
to where the arms are. Remember this is
just a proxy, right? We want to select this one up here and holding in
shift and control. We're going to come down
here and click on this one. Here's going to be an
opening. We're going to go X and delete those faces. Now you're noticing that I've left some of
these here open. In fact, let's just select these three over here holding shift. Just select them, X and
delete those faces. You can see what
I've done here is I've left these faces here.
Why have we done that? Because these faces here, we're going to delete
them in a special way. They become a point where our clothing knows it
needs to pull together. And if that doesn't make sense, just watch as we're going along
and it'll all make sense. We're going to select
these faces I'm holding and shift and just
selecting these four. Then I'm going to
go into, in fact, let's just go into our
right orthographic view by voicing free on a number pad. You can also just go to view and the viewport and go to
the right orthographic. Then you're going to go into
your X ray mode up here, and you're going
to click and drag and select everything
in the middle. Let's turn off x ray. Now
you're going to go x. This time you're
going to go on faces. Instead of faces, you're
going to go on faces. Now it leaves the edges behind. Now we have a basic
starting point. I've noticed that I've done something really
silly over here. I forgot to delete
the openings here. I'm just going to quickly
go and select my edge. Select here. I'm just simply
going to hold and shift. It's very simple. While
I'm holding in shift, just selecting these
edges here in the side. Very simple. When
these things come up, you can very easily
deal with them. We're coming down to about here. Now I have all of
those selected. I'm just going to
go x, and I'm just going to delete the edges. There we go. Now that little
mistake has been fixed. Now we have a nice
starting point. Let's go back in to
our object mode. Let's select our
body, so to speak. And let's go to our physics, just like we've done
many times now. We're going to add a collision because this is our
collision surface. Then we're going to
select our shirt. Once again, this is just
a very rough proxy. It doesn't look like
much of a shirt, but we're going to give
this a cloth as always. We're going to go down
to our collisions and add self collision so our
cloth can interactive itself. But one of the things that I
haven't taught you yet is if we go under to the shape
messed around with pinning. We've messed around with
cloth pressure up here, but I haven't taught you
how to use the sewing. Let's enable sewing. Now we
have to add a sewing force. You can see here it is,
this Max sewing force. Let's start with
something like 12. Now we're going to
come to our front, or our first frame and we're
going to hit the space bar. Now we can see our
clothing snapped on while you have it active, just right click,
negotiate smooth. You can see this is very
tight in some places because obviously we haven't done a proper pattern
or anything here. It's just to demonstrate
the point to you guys. In fact, to see this is a bit better with this cloth active. Let's go to our materials. Go new to create a material. Let's just go down to
the viewport display. Let's give it
something like a red, just so we can see it. Now you can see we
have our cloth here. If we go back to frame one and
we hit the spacebar again, you can see, there
we go, it snaps. You can come here to your
cloth settings and you can go to your sewing under the shape. You can come here and
change this factor. Let's maybe make it like
20. Let's go to frame one. Let's tab into edit mode, select everything and
go and just scale it up a bit, and tab back out. Now let's run the simulation. Now we can see we
have our t shirt. This has been a very basic
introduction to cloth sewing. In fact, this is quickly
go to our modifiers, this is add a solidify, just give us a little bit
of thickness as well. Let's just throw a subdivision
surface on that as well. There we go. Now that's
looking really nice. Okay, in the next
bit we'll get into some real clothing making. We're going to be making a full dress and I'm even going to be providing the
character that's pre animated so we can
make that happen. That's in the next bit.
10. Make A Dress: Okay, so I've got
a scene opened up here and if you guys
want to follow along, it's going to be in
the Resources folder. This blend file is called
Animated the female character. And I've already
gone ahead and set everything up for
us to get started. You're going to see here,
it starts at frame one, and you see I've
marked frame 13. And the reason for that is because the animation
actually loops 13-110 But I've just added this little bit here where the character
is in the pose, and that's going to be
important for starting off with our dress. Let's start at frame one. We're going to go shift A. We're going to go to
our measure options. Let's add a plane. This plane we're
going to go and Z. And let's move it about halfway. Then we're going to go
into our edit workspace. Inside of here, we're going to go X90, and we're
going to press Enter. Now we have our first plane, we're going to go Y
and move it forward. And then in our front
orthographic view, we're going to press one and
a number pad to get there. We're just going to go to
scale this down at this point, if you want to, you could
enable the x ray over here. Let's go z, and move it up. And we're going to
move it about here. We're going to scale it
so it's about this size. And make sure it's above
the shoulders here. This is just a cube
at the moment. Let's just right click
and go subdivide. Let's go to our
vertex select option. Before we move anything,
let's enable x mirror. Now if we grab a vertex here, it'll mirror on the other side. We're just going
to move this in, let's grab this vertex
and move it in here, grab this one. Move it up a bit. Then with this one, we're
just going to move it in this way and grab the
middle vertex here. And go to move it down these still roughly
look like squares. We're going to press
A to select them. All right, click
and go subdivide. Now we can refine this
a little bit more. Let's grab this one here. This one here. Let's move
this one up over here. We really want to make sure we maintain these squares
as much as possible. Something like
that. There we go. Looking about right here. Then we're going to press eight, like everything again, right
click and go subdivide. You guys, see where
we're going with this? Just making sure everything remains more or less a squares. Let's bring this one up here. Let's grab this vertex.
Move it up a little bit. Now we have the top part here. We're just going to go
ahead one more time. Eight, everything right
click and go subdivide. Now what we're going to
do is we're going to go to our edge
select option here. We're going to just left click
on this edge over here and holding and shift select
the next edge and so on. We're going to go
down till we get to this edge at the
bottom of the arm. Then we're going
to go to extrude, let's extrude it out to
about the middle of the arm, and we're going to
go R to rotate. Then come in here, control
R hovering over this. And enroll the
middle mouse button to add in three segments, like then double click. Let's come in turn off x mirror, since it's no longer relevant. Now let's just grab
this half over here, make sure it's only in fact, let's go to a face select
and select this half here. You can see the blue line
running in the middle. We're going to go x and lead faces under our modifiers tab. Let's go add modifier. Let's give it a mirror. Let's enable clipping.
Now we can go over here. Let's come in here, control R adding a loop, double click. If it's not enough
of a gap here, let's just go double
just to slide, just to make this
gap a bit smaller. You can see here, this
is the main segment here and then this is the
main bit of the dress. Let's go over here to
our face Select option. We now have to strip faces running here, holding and shift. Let's just select all
of these over here. Now we're going to over to our materials tab and this is going to make things a bit
easier for us for now. I'm just going to
turn off the x ray. We're going to go
new. Let's just come to the drop down
and give it to close. There's already a
clothing material that have added in
this blend file. Then we're going to go Plus, and then we're
going to go a sign. While we still have the active, we're going to click a
sign and then go new. Let's just call this away just to remind us that we're going to cut that section away. Let's go and make it just
something like bright blue. We're not actually
going to see that. Then what we're going
to do is we're going to select all of these faces
over here on this side, on the other side of
this blue section here, we're going to go and a sign. Let's just go, let's call
this clo or clo two, let's go and that a lighter
red, something like that. Or maybe even leave it
like a creamy white. The idea here is just so we can see the different segments. Before we go any
further with that, let's now continue making
the rest of the address. We're going to go
to our Edge Select Option in our front view here. We're going to go
Shift and Alt and left click to select this
bottom loop of edges. Let's go over to our
x ray to enable that. Again, now we're going
to go to extrude, and we're going to
extrude it down two, I was going to say about
just past the knees. Then we're going to go
to our vertex option. Let's just select this T
over here and just move it in just to even these
out a little bit like. Just to even out the spacing. When that's done, we're
going to go in here. Control R, double click to
add an edge to the middle. And let's just go select
this vertex and end, enable our proportional editing. And then go and then roll your middle mouse
button to control the falloff and which is going
to bring out a little bit, we're going to come
over here now. Control R over here. And then roll the middle
mouse button until we roughly have a bunch of
squares. Double click. And then come hovering
over this edge. Control R or command R
to the s yellow line. And then roll the middle
mouse button until you have a rough looking
squares. Double click. Now we have this we're going to do is we're going to
go to our face Select, Deselect everything,
and then go Shift Alt. And in the middle
here, let's just left click on this
edge to loop select. You can also just click
and drag to select them like let's go and give it a cut away
material and assign it. Now we know that
needs to be cut away. Now let's go and turn off x ray. If all of just done, we're going to press a to
select everything. Let's just maybe scale it
a little bit by pressing. And then just to
move it out a bit. Now we're going
to go to extrude. And extrude it to the back here, making sure that
nothing sticks out, just all the way to the back. Now we've got to get rid
of some of the opening. Let's come down here and
select this face here. Shift and control. Or
shift and command. And then left click on this face and it should
select everything. And then you're going to
go X and letose faces. Then going to go to
the opening over here. Select these four faces, X and Let faces. Then obviously the
neck over here. Let's select these faces
here where the neck are. Maybe just free, we'll do, let's go X and let those faces, okay, that's looking good. Now we just need to go shift
Lt and left click to loop, select all of these faces. And shift left click to
select all of these faces. Another thing you can just
do is going to wire frame and select everything by
clicking and dragging like that. One way or another,
just make sure you have all of those selected. And then you're going to
go X and you're going to go Only Faces, that's
really important. Then you're going to
go holding shift. Just select these
faces over here to the blue at the back here. Holding shift still,
you're going to select these guys, we're
still holding it in. Just select these
guys over here. And then at the back,
anything that is blue, make sure to select it. Then you're going to go X, and you're going
to go Only Faces. Now we have all of the
segments of the dress made. Let's tab back out. Make sure to save by
going control or command. Then you're going to go
over to your physics. You're going to
give this a cloth. Remember all of the things
we've learned so far? First of all, let's take
our quality steps up to 12. We want this to be able
to collide with itself. We're going to go down
to our collisions and enable self collision. Let's make the quality steps down here for the
collisions five. Then we need to go
under our shape, we need to go to
the sewing option. Let's start with a sewing
strength of 15 for now and then make sure to save, also select a character. Go over to your physics, and I've already
added a collision, but if you're ever doing this
with your own characters, make sure to add a
collision to the surface. We're now going to
come to frame one, and we're going
to hit Space Bar. Now we can see our dress
snaps onto the character. Let's just hit the space bar. Just pause for a
second. Let's select a dress and just go right
click and go shade smooth. Now you guys can see
we have a dress. The reason we do
these segments like this is that gives
us the ability to see where it makes seams and the clothing
folds around seams. In this case, the dress
is a little bit tight. Let's go to frame one. All we have to do now is
tap into edit mode and just a select everything just slightly scale it up by pressing to move it
out a little bit. And just move it
up a little bit. Now we can go back
into object mode and from frame one we can
hit the space bar again. Now we can see that
looks a lot better. Now I'm quickly pausing here
to show you guys something. If you see these gaps
are too big here, that can mean one
of a few things. You may have to go
back into edit mode, make sure you can frame one. That may involve you having to grab your proportional
editing and in wire frame, select some of these
vertices and just move them up just to create a little
bit more area here. Another thing I'm going
to do is just select these Verte over here
in the end and go X and delete as I feel like
that's a little bit too many. Tab back out. Let's also just go
down to our physics or our cloth and we're
just going to go to our self collision. Under the self collision,
let's just make the distance here 0.005 instead and
make sure to save. Now if you go from frame one, we hit the space bar, those gaps should be a little bit smaller. You can see if they're
still not closing fully. You can also try taking
under the shape, go to the sewing and increase
it to 22 instead of 15. Go back to frame one, and
then hit the space bar. Now we can see it all snaps
together quite nicely. I think we're almost at the point where we
can case this out. But there are few
things I'm going to do. You can leave the
colors if you want. I'm just showing you guys how to do them, but
for me personally, I'm just going to select them
and I'm just going to go ahead X and I'm just going to press X and
delete diverts it. Just so I'm going to
have it more open like this but that's just
personal preference. Then what I'm going to
do is I'm just going to select a row of faces here. And then I'm going to match
it exactly on the back like, and I'm going to go
X and only faces. And then I can select
these middle faces, like I can go ahead and assign
the cloves to material. And now we have like a
little middle section here. Now we can see what
that looks like. Okay, that's looking pretty
cool. One more thing. The collision distance between the character and the
clothing is a bit big. If you select our character, we can go over to our
physics under the collision, we can come here to the
soft body and cloth. Let's make the outer
0.001 Let's take the inner and make it 0.1 Now we're going to
have less of a gap. So if you've got a frame one
and we hit the space bar, you can see now that this
gap is a lot smaller. There we have a dress, we can add a few extra
details at the bottom. One thing you could do that's
really fun is you can come here and select every
second edge, like so. Do the same thing at the back, then go to extrude. And extrude it down on the Z and then go shift R to
repeat the action. Then you can go over here
to individual origins, and then just press and scale each one of
these down to a point. Now we have a
little bit of extra detail here at the bottom. It looks cool optional, but I think it really adds
a bit of extra flavor to the dress now that we have
a dress on our character. To show you guys how
to cache this out, let's go over to our cloth. Let's go over down to our cache. And let's set the
end frame to 110. Let's have it starting
at one, Going to save. And go ahead and click Bake. The cloth simulation
has now been baked. Now if you play it, we
can see it in real time. How cool is that? The reason I marked
frame 13 is we can now come to the start
value and make it 13. Now we don't have that pose, we just have a looping
animation that runs 13-110 Now what are a few extra things we can do to make this dress look cool? For a start, we can
select a dress. We can go to our properties. Let's go ahead and give a
subdivision surface modifier. Let's go ahead and give it a
solidify to give it a bit. Now we only have to come here to the thickness and bring it in a little bit and have a
look at that, how cool. Now we have a completed
dress simulation that we've made in blender. I really hope you guys have enjoyed this course
just like that. You now have made your own
dress simulation in blender. This was just a basic dress, you could definitely add a
lot more details to this. You can make it based on
an actual dress pattern. I was just showing you a
very simple way of making a dress and where we have these different pieces
sewing together. You could use that method to add in seams anywhere you want. Delete them, and that way you can make these segments
using this way, I really hope you
guys have actually been able to follow along,
make some cool stuff. If you got stuck on any of this, you can go ahead and look
at the provided files. I will be including this one. That is the completed
dress simulation, so you guys can actually
look at it as well. In the next video,
I'm just going to talk about some final thoughts, some challenges for you guys, some things you can try out with this new knowledge
you now have of cloth simulation in blunder.
11. Final thoughts : This is the final video
and we've now concluded this little skill show course
on Fred Cloth simulation. Now at this point you
guys are going to take what you've learned and
do some fun challenges. First of all, you're going to go ahead and take what
you've learned with the basic example
and see how you can incorporate that into your
own fun little project. There's a lot of
things you can do. You can vary the animation. You can make a
different type of flag. Maybe you can make
a cover on a table. Maybe you can make some
laundry on a washing line. The sky is the limit to
what you can do with some of the basic cloth
features in blender. Then if you want
to take things a step further,
you're going to now make your own
article of clothing. You're free to use the provider file that
I've given you guys, But what would be
even cooler is if you have your own character
that you've animated or your own project file and you can incorporate
the cloth that way. This is really not just about getting you guys to
copy exactly what I do. This is about learning something new and then incorporating it into a useful skill in
your own Fred workflow. I really hope you guys have
enjoyed as anything I can do to improve this in the future or some more things I can cover. Feel free to mention all of that in the discussions.
Thank you for watching.
 PIXXO 3D, 3D Character Artist, MoGraph Teacher