Transcripts
1. Intro: Would you like to learn how to take a 2D photo and turn it into a simple free DIY animation using only free and open source software. Welcome, I'm John Andre from Pixar Friday. And in this class, I'm going to be teaching you a rapid acid production workflow that I've used as a freelance animator. This class will teach you how to turn a single image asset into a full 3D animation. We will start with a picture of a baby and then we're going to model texture, rig, animate, render out a final product with a few outer steps in-between. This technique is not intended for a polished high-end production, but it's an excellent way to quickly bash out some assets for scene building and testing basic concepts. This class will be kept simple and we won't be using conventional workflows as the whole objective is a quick results with minimal effort and basic afraid who told you could almost call it a quick and dirty workflow. But there are going to be toms when knocking out them fast animations and cotton tips are going to be a central besides having blender which is frayed, bought away, the only thing you're really going to need, it's a good photo or two. In this case, I'm going to be providing a baby photo, which we're going to be using in the class. And it's a really simple way to demonstrate that this work for this class is more intermediate level and a basic understanding of Blender is highly recommended. However, if you're completely new to Friday or blunder, I will put some links in the projects and resources section, including a previous course that I did that explains blender for absolute beginners. And we'll even teach you how to make a character and a complete turntable animation. The sides, all that, all of the blend files are going to be included. We have this into projects folder and you can check that out. There's also going to be some other resources and they're like hotkeys for Mac and Windows. Sorry if that's something that's going to be helped you make sure to check it out. And I really hope you guys enjoyed my course and let's get started.
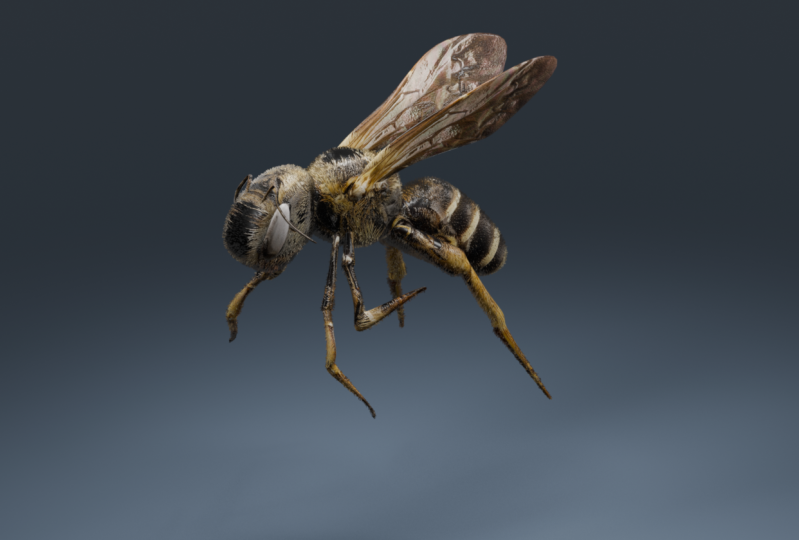
2. Preperation: So this is the first part of the class. And before we get into the actual modelling, we're just going to be preparing a few things in our file, just setting a few things up and, and we'll get right into the rest of the course. So just follow along with me and I'll show you some really helpful things. So for this class, we're going to be using this specific image which you can find in the Resources folder just provided with this course. Now you can see here this one is actually from Pexels, which is a free image site. There will CCS, and you're allowed to use every image that you download on hair completely free, even for commercial and non-commercial purposes, you can go ahead and find your own image of an insect or anything like that and do the same thing. So this is a pretty cool place we can go look for free images. So I'm just going to mention that. So you don't have to download this one if you don't want to, since it's provided already in the resources folder. But feel free to come up here and type in B and maybe find another one. The important thing though, is that it's a nice straight on one, as you can see here right? Now, if we're going to be more advanced with this, we'd get multiple pictures of the same B from different angles and kind of texture paint in. But that's going to be a little bit more advanced and that's not what this tutorial is about and trying to keep it really simple with just one image preferably. And this immature I found works really good for the purposes of this tutorial. So this is where we're going to be using. But if you do find another one, if you came in here and typed in B and he did a search, you could try and find one that is similar. So a big thank you to textiles for providing that image for free. So what we're gonna do now is we're going to go in to blunder. So just open up a fresh seen in Blender. I'm using Blender free 0.8 at the point of recording this tutorial. But you could use probably in the future watching just a newer version and it should be fine. I don't thinks things are going to change too much within the next few years, maybe a few little features, but not a major user interface change. Also, just keep in mind that I do have my screencast keys and able, so you guys can actually see the keys I'm pressing. That should be super helpful, especially if you're a beginner and you still kind of learning those things. So in the default scene, this is not an absolute beginner tutorials. So what we're going to be doing is we're going to be using the default cube. So I'm already expecting that, you know, a thing or two about modelling and just the very basics of Blender. If you don't, you can go check out some of my other courses to deal with it from an absolute beginners perspective. But this one is nevertheless easy enough that if you really need to blend Are you should be able to follow along. So we are going to be doing it box modelling, which means we are going to be using the default cape here, which is a primitive object. It's very low geometry, which means it doesn't have a lot of points, vertices, edges, and faces to work with. But we are going to be relying on a modifier of two. On top of it is primarily mirror modifier and a subdivision surface modifier. And that's going to be doing a lot of smoothing app for us and giving it a little bit more organic shape rather than a boxy shapes to do box modeling method is really good for this sort of thing. It's ideal because there's very little geometry that we have to move around when we're trying to model it to our reference image. So to default, cube is going to be a choice. And what we're gonna do here is we're just going to now get out image. So I'm just going to get that image that I downloaded it already. I'm just gonna put it on my desktop. So once again, it is in the resources folder assist this one here. And all you have to simply do is make sure you are in your front orthographic view by hitting one on your number pad. And once again, I'll just quickly touch on this. If you don't have a number pad, maybe you have a laptop, you can just go into the preferences, go into input, and it can enable the emulator numpad, and you're just normal one to f3 keys. We'll do the same thing. So we're going to front or for graphic field because we hit one on the number pad and I'm just going to take that image from my desktop or whatever folder you are keeping it and just drag it in here and just maybe drag above the cube like that. And you can see it's added in, but at the moment it's just randomly placed. So what should you do? You can hit G to move it, or you can use the move tool here, what I like to do is we have this plane active. I just like to hit Shift S. I'm just gonna go selection to cursor. It's going places image perfectly in the middle of our scene where that cursor is located. And then we're just gonna go, gee, why I'm going to move this image back doesn't really matter how far you move it back, because we're going to be working in orthographic. That means there's no perspective and it's not going to look closer or further away. Just make sure this image is not embedded into the actual tube there. So what we're gonna do now as well, we're going to scale this background image up by a factor of phrase. We're going to hit S and then free. And I'm gonna hit Enter and we can always scale it down later. Don't worry too much about it. Once we've done that, we're just gonna make sure to hit Control S or Command S just to make sure we save our file as we're working. Very good practice. And now that we have seen prepared in the next part, we're actually going to get into our modeling. So if you're following along with your own image or an insect, set it up like this and we can get into next part which is going to be the modelling. And then we can do things nice and efficiently because we have it all nicely set up and ready to go. Remember, make sure to save your files as you go.
3. Modelling Part 1: This is going to be the first part of modelling Albi. So you can see this is it here we're going to make the body and then just to legs. And then the next part, we will tackle somebody out a little features, but we're keeping it really simple, mainly with a box modeling method and with the legs here we're actually going to be reusing some of the geometry to save us a little bit of time. So this is going to be Part 1. And if you have any thing that is confusing, make sure to check out the resources folder where I have the individual blend files. And those can be a really big help to you because you guys can actually open them and you can evaluate how I've set things up. And that's just really simplifies the process, especially if you're a beginner and things may be a little bit confusing. So I'll try and going nice and slow. Let's get into it. In a previous video, we looked at how to set things up to get it ready for modelling, and now we can actually get started. So we're gonna select our default key, which is going to be our main item. We're going to be modeling and make sure you're in the front door for graphically on. I've already mentioned that, but just just hitting one on your number pad. And we're going to go into my editing workspace by hitting Tab on my keyboard. Or you can just come up here and do it this way manually by clicking on it if you're still getting used to the shortcuts, but just go ahead and make sure you're in edit mode. Now by default, everything's selected. You can hit Alt a just to de-select everything. And if you're going to want to select everything by clicking and dragging, if you want to get the verts behind it or to faces and stuff like that. You're going to have to make sure you hit Z and then go into wireframe. So hit Z on the keyboard and make sure your wireframe mode here. And let's click and drag and just select these verts here, okay? So you can see they're all active. And these, these ones here, we're going to go, gee, that's to move and we're going to move him to backward and neck is, and we're gonna go Our to write tag. Don't worry too much about the details. I can't emphasize that enough details are going to get in the way at the moment. So we just need to get the rough form establishes the same with any other art. Where do your drawing, you're sculpting real life digitally. It doesn't matter, it's just one of the fundamental principles. You block things out before you get too hasty of details. We're going to click and drag here to select all of these efforts, as you can see it are active. Then when it go G and we're going to move him to about the middle of the body here. We're just going to click and drag and select these bottom. You can see those ones there. Go back into front or for, you guess I'd have to go back and forth like that. I'm just doing that to demonstrate what is selected. And then I'm going to click and drag here again in front view and select these top ones. We're gonna hit G and we're going to move him there. And then you can see here, a lot of these spaces here are not filled. You're going to be tempted to maybe add in an extra cut here at the moment and just move it up. Just avoid doing that at the moment that we really don't want to go too crazy with details right up front, like I said. So we're going to now select these guys here again. And we're going to hit a to extrude, move it to about back here. I'm gonna go R to rotate and an S to scale G to move it right about here and make it a little bit smaller. You can see we have this big section turning down into here. We have a big curve going up here. And, and it's kind of like a small area where this is actually connecting. So he's a pretty large parts were very small connection, so make sure to make it small enough. Then with those still active, we're gonna go to Extrude. And this one is a little bit more tricky, but we're just going to select these verts here. Now, I'm going to go G and just move them. Do dare select these ones and move him there. And then make sure to not continue before you scale this out a bit because you can see because there's just been randomly scaling that it's gotten narrower here at the back and the abdomen thing. Or to for x, whatever you call that there is going to not be as narrow and relaxed. So we're gonna go to our face select and which can select that face. And we're going to go S, y, and we're just going to flatten that out a little bit. Just like that, not quite square, but just about there. So this is kind of the dimensions we should be having from the top. Okay? Now you can go back into your front view and let's go to vertex select option again, make sure that these are still active and we're gonna get e to extrude. And let's extrude it all the way to the back here. And let's grab these verts down here and hit G to move them. Click and drag up here, select those verts, J to move them closer together. And now you can see we have to fill that in up here. Now there is a way you can do this. You can kind of extend these out further. Then go Control R and add some more luke cuts in here. But then we're going to have to kinda just really skewed geometry here you can see here we're losing a lot of this face is getting really stretched out and that's kind of bad modelling practice even for something this basic and quick and dirty if you will. So what we're gonna do is we're going to actually select these verts here holding Shift click and drag here to select these parts. So we have to top face active and then we're gonna go eat to extrude it and extrude out another face. This way they want to come up here, click and drag select, that was verts and Sergey movement there. And then come down here, click and drag these verts and then G, and just move them in a bit like that. And now we have that situation a little bit better there. We're now going to just quickly got if I select, select this top face, we're gonna go, gee, why? And just scale them in on the y just a bit, just to round things out. And now we're going to come over here hovering over this edge. Just have your cursor floating around here. If you go Control R or Command R, you're going to see the loop tool appearing. So we're just going to roll our middle mouse button and once we see the yellow line, and let's just add in free segments and then gotten your front orthographic view again, hit C going through wireframe. Cartier vertex select option. And let's just click and drag here to select these faces here, G and just move them up there. Click and drag and move these ones. Click, drag, select these ones G to move them. And you can see where we've just John were just really quickly filled in that space and it wasn't that hard at all. You can now come down here once again in wireframe in front of you select these ones, changed to move them. And then these ones, you can already kind of get an idea. Even if you're not following step-by-step, you kind of figure out how to do this yourself. It's very self-explanatory once you know how to move diverse and extrude faces. So that's looking pretty cool at the moment. And later on we'll add some more geometry. But let's just leave this back part here. That it's really embarrassing, actually forgotten anatomy because I actually practice this and I knew the names of these different parts. I think apologies for anybody out there. That's actually Norris biology. So let's come over here to the head. And let's just select these verts here. So the front face, and we're just gonna go E to extrude S, to scale it up and eat to extrude it forward. And let's now click here and drag here for this, verts cheat to move down and we're just roughly establishing the shape of the head like that. And if you go to a top view, you can see that the head is white too high. So in your top few hits, seven bought away on your number pad. To do that, we're just going to click and drag to select these SY and just scale them in a bit. But what we wanna do is select all of this next geometry here. And we want to go SY and flatten out in a while a little bit. And that's going to be a little bit better. Okay? So it's a little bit narrower. So you can see we kind of have the base shape happening here and we kind of have to extract blight in our own mind. How does it actually look like in the other dimensions as well? But you only have a two-dimensional front on image like this. But this is kind of roughly what makes sense. Just have a look at it. If anything seems too much out of place. Like the width of the head, for example, still seems a bit to want. Make sure to select tool that hit S, Y and flatten it a little bit on the y-axis day. So nothing too complicated. We're now going to come hover over this edge here, Control R to bring in a loop tool, we're going to click, right click and let go. And now we're going to go S, Y, and we're going to give this a little bit of curve. So SY, with all of that geometry active. And now B has a little bit of girth. You can see we're still not getting too over the top with geometry, but keeping it very low poly. We're going to come over this corner here, control our yellow line, click Go, and then S to scale that up. So that's still looking really good. And let's do the same thing here. Control R, click on it, right-click, and let's just bring holding Shift. I'm going to select these two verts here, G and then z to restrain it to the z-axis, which can bring that up. And you can go to your front view just to confirm that that all looks right. So feel free to move some of these points around till things look a little bit better. You can add in more loops if you feel like it. But we're going to be, like I said, we're doing box more length. We're going to be relying on modifier. So if you've got overtime Modifiers, add in a modifier. Let's click on Add Modifier list. We're adding a subdivision surface modifiers, subdividing the mesh. You want to know more about that. Make sure to check out my absolute beginners course on my Skillshare page, a link to that in the description somewhere that really goes over this from a very basic fundamental level for absolute beginners. But essentially it's just subdividing this, averaging things out and adding more geometry, but it is a modifier, so it's not actually editable geometry until we apply this at them I went, you can see we can turn it on and off, but already can see we have much more over and organic form and still relatively little geometry to actually work with. Let's hit Z going to wireframe. Let's come back in here and it's just manipulate the cage a little bit more. And you can see the cage now is actually extending further. Then the actual subdivision surface modifier itself. If you wanted to really grasp how different this as you could actually come here to the subdivision surface modifier and click the cage on option and you can see what it actually looks like. And this is what it looks like once we applied it. So if you want to work like that, you can for me, I'm just going to disable that. Is that's a little bit unnecessary to moment, but what we're gonna do now just in a front view and in wireframe, we're just going to move things around till it fills out that shape a little bit more naturally. If you feel like it's getting not enough definition and these seams here, or you can do is you'd go Shift Alt and just click the Shift ultimately click on an edge, it'll loop, select it. And then you can go Shift a and you can just pull your mass away and you get this little tightening happening here. Recall that a crease that's just sharpening got up for us. And that looks a little bit more defined. You can do the same thing over here. Shift Alt and click on this edge inside of their shift and just tighten that up. Okay, so that's looking a lot better. So today we have Albi so far, we can always work on it a little bit more later, but what we're gonna do now is work on the legs. So let's reuse some of our geometry. So we're going to select the actual BY mesh. And let's tab into edit mode. And I'm just gonna go and select if I select option here. And let's just select any one of these quads. And the quote is simply just a face that has four edges, right? So we've got this quote here. And let's just go Shift D to duplicate your shift D will duplicate it and let's just move it down here and then S to scale it down. And while we still have an active, we're going to go S square root out of it, right? So we just have this face here and that's going to be extruded as a leg now. Now let's hit free on a number pad to come to her right orthographic view. And you can see here where that face is located. So if we now go to G and we just move it in, we can see where it is. So we want it to be kind of embedded into the mesh a little bit here. So the arm actually looks or to limb looks like it's attached, right? And we don't want a floating out here somewhere. So once you have it roughly in place there, what you can do is come over here in your front view again. So we're in front of graphic view again. And we're in Mar frame, we're gonna go G and we're going to roughly place it's where we feel that limb is starting. So in this case you can see this was one limb here, and that's not a one here. So let's now go E to extrude, and let's extrude this face down and then hit G, well, selective inhibitor extruding it to about there where the first section starts. And you can see it's way out over here. Let's go, gee, why? And just move it in a bit. So just kind of is where you have to use your own judgment because we don't have a side image. We kind of have to use our own depth perception, which is a good exercise as a 3D artist. So now that we have that done, we're gonna go R and just rotate that phase. And let us also go up here and select that face at the top. We first extruded. And let's just go R to rotate that, right? And what we get that face up there selected, we're going to go E to extrude it a little bit, and then x and we're going to delete that face. Now let's select this face down here again, gun to your front or for graphic view. And let's scale that went up a bit R to rotate it, just line that up to that joint there. And then E to extrude our TVD Tate, Jay to move, S to scale. And all we're trying to do is follow the shape of this like roughly e to extrude again as to scale, bring down one here. And an E to extrude that again are to apartheid S to scale and we're just following the contour, right? And though it looks really rough department. But what we're gonna do is we're going to go Control R and use our loop tool. So in a front view Control R and just move your mouse cursor over an edge Control R, click twice and then double G, slide it down. And then a front view, we're going to just move this one here, S to scale it a bit. And that's just to tighten up that seem as well and give it some more definition. And if you go to wireframe that could help come over here, Control R, click, move your mouse. Let's move this one up here, S to scale, and just roughly try and build the form here. Now, don't overthink it because like I said, it's very rough. We're only doing this as something that's going to be seen from a distance and not up close. So being completely accurate without actually it looks isn't too much of the point. So let's come over here over an edge Control R. Okay, so just so you can see over this edge Control R, click, Move to slide as to scale. Over here, Control R, click, Move it as to scale. Okay, for now, let's just leave it at that. Well, it kind of looks okay as a leg. And one way we can really speed up and work close by reusing an asset. So in edit mode, we can just select, click and drag to select any of the geometry here and then go Control L. And it will only select this because it's not connected to the rest of the geometry in edit mode, we can now go Shift D to duplicate this one and we're going to move it till this knee here. It's kinda where this one is there. You can see just like here. And what we're gonna do is we're going to have vertex select option and just click and drag and select these bottom parts here. Then if we go to Control plus or Command plus, we can grow to selection till we have it all the way up to just before that segment there. Now we're gonna go R to rotate it. Now front view G to move it. And we're just going to try and roughly line it up and S to scale. And we're just gonna move it, provides it to where just lemmas. And I know it's looking super messy, so we're just gonna select the verts right over here. So make sure you select the right vertices and you fund for your just moved them. And then we can select these ones here. Just move them closer to the knee just to sharpen that up. And let's just select these ones here. We've daimon and select all of these ones here, just moved them and scale them a bit. And you can see how we've re-used at, right? So this is just a matter. Let's just go to edge select option actually and just select these edges. That should be a bit easier. So we're just trying to remake a leg over here, reusing what we already have. Say graph that one. Maybe move it forward a bit and then we can come over here, Control R, click, drag and just move in another point here and an S to scale it a bit, just to sharpen that up. Now we've reused this one here. You can enable proportional editing if you want, and just select verts and use data as well. That could make things a little bit easier with proportional editing if you need to. But I'm not gonna spend too much more time and I'd like, but from our side view, what we can do is we can actually hit click on a vertex on any one of that second leg and go Control L or Command L. So NF side view. To do that, I'm going to hit Control or Command freight to the left or for graphic view. And I'm just going to rotate this one a little bit like this and G to move it out just so it's not exactly on top of that other one. Now we can always adjust that later, but now we roughly have that leg in place. And now to make this back leg here, That's also something we can simply do by reusing one of these legs and edit Mars. Let's just select any verte on this leg at the front here, control Outlook I gave before you go any further, I made a mistake while I was recording this and I had to come back in editing and just remake this little video. So what I did is I just said Control L to select this leg and then move it over to the back, make sure you go Shift D. So when you select it by selecting vertigo and Control L, go shift date, and then move it back because we still want the original like they're right. Because what I did in while I was recording this, I just moves his whole leg of the bacteria and reused it and then I had to remake it into frontier because I didn't go shift day. So don't make that mistake like I'm about to make and that'll save you guys a lot of time. Sorry about that. I just had to quickly correct that issue and move it back here. So placing it roughly here. And what we're going to do is let's just, while we have this active, if we hit Control I or Command I to inverse the selection and we can just go into edit mode to hit H hi debt. And now we have the leg here. So let's go into wireframe and let's just select these top verts and let's move them up here, rotate them, and this can be pretty dirty. I wouldn't worry too much about being too precise. I'm going to scale these. And then I'm going to click and drag. It's like these ones. I'm just moving these two where there is a joint. Like that. Control are over an edge. Click S to scale. If you need to add in a little bit more geometry. And just try and get roughly looking like the shape here. I'm gonna come over here, Control R. Click double G, slide it up a bit, S to scale it a bit. And you can see kind of what we're doing here, stats the back leg there. And I'm just going to come in here as well. Control our advocates scale it up. Control are over here, double-click double G, S to scale that and tighten that up a bit. So now we have a Bakelite, but don't worry too much about the details yet. We're going to go Alt H to unhide everything else. And now we have that leg down, right? So later on when we start UV projecting all of this, we can edit this a little bit more, but for now, just keeping it super simple. So if you've made it this far, you're doing pretty good. Okay, cool stuff quickly place that leg in there to say that was a really dumb mistake. I don't know why I did that, but I hopefully you guys didn't do the same thing. So now we have three legs here. Now you might be looking at this reference over here and you think this B has four legs and a solid, but it's actually bees only have six legs. Okay. So this just looks like it because you're actually seeing the leg from the other side, but trust me, you can look it up. B's only have six legs, so don't worry about these other legs you're seeing here. So now we have the legs done. What we're gonna do next in the next part is we're going to do the antenna, the eyes, and the wings. Okay, and that should be most of our modelling out of the way and we can proceed to move to the next parts.
4. Modelling Part 2: In the previous part, we did do this modelling with the subdivision surface modifier, but we haven't as of yet added a mirror modifier, which means that eventually we will split it in half like this, and we will be mirroring everything on the y axis. But for now, like I said, we just have a few more features to model. Relatively simple, so not much more harder than what we've already done. So let's go into a front or for graphic view by hitting one On our number pad. And then we're going to go into edit mode with OWL, be selected and make sure proportional editing is not enabled. And what I think we're going to do just to give us a little bit more to work with here. Let's just come over here to head and go Control R or Command R. So you can see the loop count option just click. You can move to slide. If you've already clicked, you can double G, hit G twice just to slide it. And this is just to scale it. So that just gives us a bit more geometry there. And the same here, control our ad in a loop here, go into wire-frame, click and drag, and you select those verts, and let's just move them back like that. Grab these ones. Sorry, let's just see what that looks like. Okay, so now we've just defined that head a little bit more. So now what we're gonna do is add in something for our I. And now you could actually just project the eye on it eventually has a texture, but just having that adds a little something extra. So you can do it two ways. You can either make the eye, we have the existing geometry and here, or we can make it as a separate object outside of edit mode. So let's just actually make it, we have the geometry, so make sure to hit Z and then go into wireframe. And let's just select a face. I can actually just going to solve this. Let's just select this face here. So device closest to die, right? So you can see here there's DI. So let's go Shift D to duplicate this face and let's move it over here roughly where the eye is. And let's now S to scale it up a bit, our toolbar to edit and E to extrude it and an S to scale. And while we still have to face active, we're gonna go Control L, control I just to inverse the selection and I'm going to hit H. And that's going to hide the outer geometry. And let's just select the back face there. Let's hit X and delete faces. Now we can go all touched to unhide it. And now we have our rough II here. So once again, just select the eye control L, z wireframe and then just try and move it over to either and then scale it up and you can see it there. But if we go and hit Control, free on no number pants I control and free on the number pad. It's going to take us into a left over graphic. So we're gonna go, gee, why and move that in a bit to edit if you have two. And then we're gonna go to edge select option, de-select everything, and they go Shift Alt and click on an edge. And let's go to Extrude, extrude that edge in a bit and S to scale it. So now we just have that closed in like that. And that looks a little bit better. Control are come over here, add in a loop, click plot it down a bit and an S to scale. And we can enable a proportional editing. Make sure connected only as ticked and then select the top here and angle G and just drag that down. So it looks like an absolute mess. But if we go to our modifiers and we hit decay John here, we can see what it actually looks like. So you can see that B, I may still be a little bit too out. So just select the whole thing and as G, move it in a little bit more until it just kind of makes sense. Okay, So just stuff like that looks pretty cool. And you can see here we have an antenna, I think coming here. So that one's gonna be a little bit tricky because we don't have a front on image. But let's just in edit mode, Let's just untick. Let's just uncheck the cage on option here. And let's just come over the middle edge here and go Control R, add in a loop, click it in, and now we're going to Face Select and just select this face here, make the proportional editing inactive. And if this face active or can go Shift D to duplicate it, right-click to let go, S to scale. And I'm going to go into our front or for graphic view again by hitting one, hits the guy who wireframe. And if this face active, Let's just move it roughly where we feel Dan tunnels going to start. It's going to be down here for me and I'm going to go eat to extrude it, G to move it, S to scale. And I'm going to go eat to extrude R to rotate, J to move negative go into my left off of graphic view again by hitting Control F3. And once again, we'd have to make a guess here. So I'm gonna go, gee, why with that face active R to rotate it and we're just rotating it out this way. Back into the front view, ie to extrude it out, to dare back into to left or for graphic G to move it out, or to rotate it. E to extrude and back into the front orthographic view. So roughly, trying to match it up, we have this thing here, back into the left or for graphic E2 extrude G, move it down a bit, R to rotate and then go into your front orthographic view again by hitting one and then g, just move it and line it up with the antenna here, E to extrude it due to move our tripartite and all we're doing is going in between the left or for graphic and right or for graphic and just trying to make it look a little bit more normal. Sorry, it doesn't look like this is going too far out or to And so you kinda have to use your own judgment on that. But importantly, in your frontal for graphic view, we wanted this to match up as much as possible. To this antenna here, but don't overthink it because we can fix that later. R to rotate again, a to extrude, G to move, has to scale. Okay? So just trying to get that shape into left quickly again. Okay, That looks cool. I'm happy with that. So now that we have that antenna made there, what we're gonna do is we're going to add a mirror, so in our left or for Graphic. Okay, we're just going to go into wire-frame, go to a vertex, select option, click and drag to select half of these verts. Hit X and delete verts. So now only have half of our B here add modifier. And let's make this a mirror. Let's go to y and disabled dx. Now importantly, we want clipping enabled. If you don't have clipping and we move the geometry, it'll goes apart. Both clipping enabled, it'll sticks together, which is really important. So now our base or looking really cool because we have it mirrored. But now we just have to simply model to wing, which is not that hard. So we're going to use very simple techniques. Let's go over to our face like option. Let's select the face over here and keep in mind it's now being mirrored. So if we now go Shift D to duplicate and we move it over a bit, you can see it's being mirrored. So again to a front view, hits the ground to wireframe. And while we have that face active control I or Command I to inverse the selection, hey H to hide it. And now we can grab this face and we can go G to move it. And let's move it here too. It a wing starts R to rotate, G to move. And let's go to vertex select option. This is scale the whole thing down. So you can see it starts at this node here. Let's click and drag, select these two verts over here, e to extrude. And let's hit S to scale. E to extrude, S to scale. And all I'm trying to do is make it follow the shape here, E to extrude. Let's grab this vertex, move it up here, this one over here, and we're just following that pattern. Just like that. Select these two E2 extraordinary amount. We have just one hair, this one over here. Then we're going to go over here. Control are you can see the yellow line, click it, then select this new vertex and end and move that out. So we're just trying to make the shape conform. But don't be too fussy about getting it exact. Because a subdivision surface modifier is doing a lot of this for us. And besides, it doesn't really matter because we're not trying to be dead accurate. It'll look believable from a distance. Like I said, this is more of what we would call a quick dirty model. Something that's only going to be seen briefly from a little bit of a distance. Or maybe even just as a demonstration, this is not going to be selfing debt is going to be a high-quality, high detail acids. So this is just to kind of work floor that we're going forward to something that is quick but a relatively believable. So one issue we're having now, as that from the front it looks okay, but we need to go to that top view, select everything, and then we're gonna go R to rotate it, g, y and move it a bit like this. And now I've got to have fun for you. And if it's not looking quite right, just grab the proportional editing select avert, roll your middle mouse button to control a fall off. And just bring these out a little bit more to now that's looking a lot better. But what we need to do is when you just like the whole thing by going a to select everything. Just de-select that quickly. The proportional editing eat to extrude and let go by right-clicking. And that's still active. You're gonna go Alt S. And he's going to scale it out like this and give it a little bit of thickness. And then you're going to go to your face select option by clicking on it. And then you're going to just select these two faces here by holding Shift to select them both. And it wouldn't go to Extrude, extrude that out a bit S to scale it. And now we have that little bit of dimension there. Let's just select these two faces here. E2 extrude them S to scale. And let's just move them there. Okay, so just have that little note at the bottom there that connects to the wings. And you can come over here, control R or just loop. Click Alt S while he got active and scale out along with normals. And now that's a little bit more defined along the edge. Now we're going to go Alt H to unhide everything and to bring it back. And let's just select any edge on the wing. Control L to select hold, loose geometry, g, y and move it out a bit. So just Hill is looking right. So let's quickly go and enable our cage on, on the subdivision surface modifier. And let's drag our mirror above the subdivision where it should be. And now I can see what this looks like. So let's quickly tap out into object mode. Go to Object and enable shade smooth, or you can just right-click and also go Shade Smooth. So that's just a viewport shading. So here we have it. That is our b is looking really cool. So what you can do now is you can come in here and you can't just using your proportional editing tool and edit mode select edges. And you can slowly start moving things a little bit more accurately tell us doesn't looking and filling in the spaces that we see here in the reference. Now there are some limitations as some things here are overlapping on image. But we can kind of get away with that, especially when we do some tricks later. We have our animation and camera angle. So I'm going to go Shift Alt. Just click on this edge here. It's loops selected. I'm going to go Alt S, role my middle mouse button down because I have proportional editing and abled. And I'm just going to scale that out along the Knowles a bit to make it a bit thicker. So just go have a look at your reference and select edges and loops, give more definition and volume where it's needed. Disable proportional editing if it's easier. But just, it's just a matter of adding and loops and geometry. So Control R is super useful for that. And you can scale, you can move by hitting G. We're essentially just want to copy this form that we see here. Slide that went up, maybe scale it down. So it's going to be a little bit different for you depending on how you've done things, but more or less, you should have something that looks like this. And like I said, all of these blend files are included so you can just check out how offset it up if you get stuck anywhere. So let's just quickly also come in here. Control are at in the loop there, double jus, just a slide that, to tighten that up. And over here a control our double G, Control R here, double G. And that's looking pretty cool. So yeah, that's our B so far. So I'm going to just tap out into object mode and make sure to save as you go. So now that we have the modelling out of the way, pretty much in the next part we're going to be doing UV projection. That's where we take our geometry and we're going to go into our UV Editing Workspace. And we're just essentially just going to project all of this geometry onto our image and we're going to use it as a texture. So I one-dimensional texture. But if we do things right, we can kind of really make it look 2D and all kind of work. We what's going on here, even though we're just using one simple image, which really is the beauty of this technique. You can use limited resources to make a really quick asset. So that's going to be in the next part. And I really hope you guys are able to keep falling along. And if you really enjoy it and make sure to check out the blend files, like I said, I can't emphasize that enough. All the resources are there for you guys if you want to use them. So I'll see you guys there and have fun.
5. UV Projection: So in the previous parts we modeled out B. And what we're gonna do now in this part where we're doing our UV unwrapping is we're actually going to select the B. And we're going to go over to this workspace here called a UV Editing Workspace. So go ahead and click on it once you've selected the B. And by default on this side here, you should be in edit mode. If you're not, just make sure to go into edit mode. And over here you can see this window which you may or may not be familiar with sensory. That's where you're gonna see your projection. And what we're gonna do would come to this little drop-down window up here. And we're gonna select that Pexels be image. So if you're following along with this class and using the exact same image, once again, it's in the resources folder. If you don't already have it on your desktop or wherever and you haven't dragged it into here yet, you probably won't get it in the drop down. But if you've already dragged the image in, in the beginning of this class, you should have it in this blend file by default, keep in mind that Blender will not automatically Pack Resources or images or assets into your blend file unless you tell it to. So if you go over here to File and you go external data and you got automatically Pack Resources. It'll pack them into the blend file. Because if you actually move the file once you save it and you move it to another location to file path is going to be destroyed and you'll lose this and we open it up, you're just going to see a pink image here and it's all going to be gone. So just make sure keep that in mind. If you're a beginner, that might be something that stumps, he might not be understanding of what's going on. So just keep that in mind. I hope that hasn't happened to anybody. But now that we have done here, you should be okay to go. So let's now go to my materials. And by default you can see this B already has material because we haven't active. And over here it says material, this is a default material because we started off with the default cube, which comes with a default material. So if there isn't already a material there, just make sure to add one. Okay, so if there already is, so let's just click here and call it. Hit OK. And we're going to come here to this base color option and let's click on it. So that's under the surface presets. Let's go to base color, and let's click and come over here to Image Texture, come to the drop down and give it the Pexels image. So now if we hit Z and we go into material preview, We're gonna see we have the texture, but it's all over the place because it's still trying to use the default unwrapping or projection or whatever UV coordinates from the original cube. And since we've modeled it, it's just gone completely alive at a place. A data is just everywhere. So what we're going to do is we need to reproject. Let's now go to a front view, hit a to select everything. So all the geometry is active and you have front orthographic view. You're going to hit to you. And you're gonna go to this option called Project from view. And now you're going to see over here, we have a basal click and drag and select all of the geometry G to move it, S to scale it, and just line that up roughly with the image over here. And over here in your preview because we hit Z and we went material preview should be able to see what it looks like. You're getting some stretching and stuff like that, then worry too much about it. We're just trying to get things roughly into place. If you get a lot of really bad stretching like that, what you can do is you can just go into your modifiers quickly, just able to proportional editing. And what we're going to do is we're just going to go to edge select here and make sure to select this edge here, holding and shifts like these ones here. And then double G and just slide down. So select these ones doubled j, just slide them down and just round the body out. So I'm gonna select this one here. Double G flat at double G slide down or just trying to round things out. Sorry. I can select all of these. And W, G, G to move them. So I'll just round out the shape of your be a little bit. And that should help with that horrible stretching. Select these ones here, double G. And you can see here we're rounding it out. You could use the Smooth tool here by selecting or air, by selecting everything, and then going to use the smooth tool. However, that's going to make us lose a little bit of detail. So if you do use that for whatever reason, just make sure to use it very carefully. But something with this low kind of geometry, just using your vertex like option, proportional editing or whatever. And just selecting verts and edges, moving them around and just manually rounding out the shape is more than adequate size, just slightly lifting the chin there, rounding it out. So now we can try again a to select everything in a front view, you and project from view. And now let's try it. Scale things up over here, G to move it. Just try and line it up as best you can. And now it's the material preview. And let's have a look at that. So now you can see that stretching is a lot better, but was never our goal anyway to not have any artifacts like that. Like I said, this is a quick and dirty technique. The idea is just to get a crate acid from a photo or two and best-case scenario we have here, we're just trying to do it with one photo. So let's go and turn our subduct back on by clicking on this little panel. And we can see it again. And now what we can do is we can actually select individual objects in edit mode. So in edit mode over here, I can just select a vertex and a leg control l. Now I can come over here and I can just select the vertex here. And I can just move them till I'm not seeing any of that black on my B. So just moving these in anywhere where it's kind of sticking out. You can just move it back in. So maybe you like that. Use these ones. And now you can see that's already looking a lot better. You can grab this one here. I move that in and it'll probably be a little bit different for you. But like I said, check out my blend files. They are provided with the resources. If anything is confusing, you guys can just go there for help and you'll see exactly how I've done things in the blend file setup. So there we have that. I'm going to now select the next leg, select divert control L. And let's do the exact same thing. I'm just going to come here. And let's see, this one should actually be coming from about here. Select that doesn't have to be precise, just get something roughly in place there. We've got one up there, select this one n. So anywhere where it's sticking out, just bring it in a little bit there. But definitely don't over do it to just keep it simple. Don't need to get to perfectionist with this workflow. Okay, and let's select the back leg now, Control L. Once we've selected a vertex, and let's just come over here. And this one. Select DES AES to scale, cheat to move. And we're just trying to line that up as best we can with the reference scale, those ones in, select the scale them in a bit, select days scale and we're just trying to match it up to the segments here. And then this one goes there. So now we can see over here. That's all looking really cool. Let's select a wing hair Control L analysts is come over here. The wing seems pretty cool. Just write out the box. Once you select these ones, rotate them, scale them, and move this one in here a bit. These ones are sticking out a little bit, and so on. So just these ones here. So I'm not going to be too fussy. You guys to spend as long as you want. But I am making a tutorial, so I probably want spent more than just a few minutes doing this part, but I would definitely recommend you guys. The longer you take to do this, the more time you put into it. Obviously didn't nicer, it's going to look. So this is just me teaching you to workflow. But you guys can always build upon it, which is totally what I recommend. And it's just a good way for you to learn as well as students. Our case, let's just quickly grab the eye here. I'm just going to select any effect on the eye control L. And let's just grab the geometry here. Scale it a bit for our credit, and just try and line that up to the eye. A little bit better. Once again, are not being too particular. Chest nice and simple. So you can see, I've got a little bit of an artifact there. And you can see one issue is it's double projecting. So we have this antenna here and it's projected there. Now, there are ways you could get rid of that. Eventually you could make a master texture. And you can have different UV coordinates in your under UV data stuff here. And you can go into your texture painting and you can set it all up in a way we can project from different angles and paint onto your master texture. And you can kinda paint all that stuff out. You can take your texture exported into Photoshop or GIMP with a UV layout overwrites so you can see where it is. And then you can kinda painted this out with a clone brush or something of that nature. And there's all sorts of ways you can fix it. Like I said, this is not what this tutorial is about, but that's definitely something you can do completely up to. You. Just take as much time as you want. But for now, I'm just going to keep it like this. I think we have a texture pretty much sorted out. If we need to improve on this later on, if we notice a little accident later on when we're rigging or animating this, we can just quickly fix it up. But this has been the part where we do the UV projection. I hope you guys have been able to follow along and please if anything has confused you and you're really new to this, just check out to provide it blend files in the resources folder. They're there for you guys, they're there for you to check it out. So you can actually open that up, see what I've done. And it's just going to make things easier for you. So I will catch you guys in the next part where we do the rigging and the particles and the rigorous actually what's going to help us also animate this, and I'll explain that in later parts as well. But if you've made it this far, congratulations, and you're doing really good.
6. Rigging & Particles: In a previous video, we projected our mesh onto our image. And here you can see here we have a pretty rough texture on it and we can now go onto our rigging. So rigging is pretty simple from a fundamental point of view. For example, just understanding the idea of a bone being inside of something and the movement of that bone affecting the things around it via something that we call weight painting. So they fall off amount will determine how much an individual bone actually affects geometry. So from that point of view, rigging is pretty simple now when you get into other things like constraints and how the different bones work with each other and adding things like controllers. That's when things start getting a little bit more advanced. That's not what I'm going to be covering here, so I'm keeping it really simple. So we're going to be avoiding anything alike. Controllers and I case F K's all that sort of stuff. We're just going to be working with this as a simple armature, almost like you would in the old days when you had a clay model with just a simple wire inside of it. So we're just going to be doing forward kinematics when we animate, we were just select each individual bone up to hierarchy or up to chain. Sorry if you're at all familiar with the IK method of rigging, you can definitely go ahead and do that. It should be a breeze if you kind of understand that. If not, let's just keep it real simple for people who are really new to this. After all, this really is an, I can't emphasize this enough. I have said it a few times. I really want to emphasize the importance of simplicity with this workflow to whole point of this workflow is not an overly polished modal. Her rather something that you could use and make quickly if you need it. The asset, maybe even just as a rough draft and you don't want to expend too much on a high-end model. This really has its place in the industry. I've personally used this as well in my industry workflow. So let's hit 12 Gunter front orthographic view. And for now let's just select our reference image here and let's just hit M. And if you hit the M key can go new collection. Let's just call it the href and hit Okay, or enter. And then we have a new collection here. Look at it almost like a layer in Photoshop and just on tickets now it's gone and we can just select the B here. Actually, we probably don't need to select a b. Let's just go Shift a. And that allows us to add in these things here. So when we hit Shift a, we're gonna go to the armature. Now at the moment, the B is quite large, so I'm going to select a b and I'm going to hit S to scale it. And I'm going to scale it be till it's about that big. And I'm going to go G and a move to be up to hair. I can maybe even higher. I'm gonna move to meet be to about here. And then I'm going to go Control a and I'm gonna apply to scale. Now the reason we plot a scale, and I'm not going to touch too much on this, but if we hit M to bring up your Properties panel and you go to the items blender, like any other 3D software, it relies on these things called vectors. And these here are our vector transforms. So in 3D space, if I scale, this is affecting these scaled vectors and blender oftentimes uses in fact, it fundamentally looks at the scale and rotation a location when it is determining how it's going to do certain things, especially when it comes to animation. And it need to figure out how it's going to extrapolate things. It really needs to know what the scale is. So whenever we scale, something is really, really important that we apply it. So we're gonna go Control a and we're going to apply it at scale. So now to scale transform is applied. I wouldn't worry about the rotation. Location for now is fine. We don't have to worry about that. So let's go back into our front orthographic view by hitting one. And let's select our armature. And just like anything we want to edit, we can hit Tab to go into edit mode or just come up here in the edit mode. And this is going to be outranked by, and that's going to be the main bone that everything is parented too. So we're going to now select it. I'm going to go Shift D and we're going to move this parent bone up here. And if you want to see for it without having to go into wire-frame which you could get. You could go z and care wireframe. You could also come here to this little tab, go to Viewport Display and go in front. And then the barn will always be X-rayed for the B. It doesn't really matter either way. More just personal preference. So you can do that if you want. So what we're gonna do now is we're gonna select this knob over here. And in fact, I'm just going to hit Z and go to wireframe anyway, so I can see the geometry underneath. I'm then going to go G and move that nub. And I'm going to move it to written neck is, and I'm going to do one simple extrusion. I'm going to hit E and I'm just going to extrude it out like that. Then I'm gonna select this back nuptial atoms can move it right into the middle there and an e to extrude it out, like so. And then I'm just gonna select this bone right here, holding Shift. I'm going to select the bottom barn and I'm going to go Control P, keep offset. Now we have a parent relationship from this bone being a child and this one thing, their control. But at the moment, if we were to go into pose mode and we selected this bone here when, when G to move it, this one is no longer connected. So we also need to go into edit mode again. Makes sure to select this backbone. Now holding Shift, select this barn here and go Control P, and then keep offset. Sonata relationship is child to this parent. And this is the child to this parent. And this one is not affected yet. So that is still just a connection to this one here in the hierarchy. This one has dominance or ever diss one here, which is to head. If you want to name these, you can go over here to the barns. So select this one at the front. We'll just call that headband. I'm going to go ahead and let's just go body. And I know what the name of this thing is. Like I said, I really suck at B biology. I'm just going to call it that, but for now, whatever. Okay, and this one here I'm going to select, and I'm just going to call it the root. So that's just our main barn. Now, what we're gonna do is we're going to hit Z to go back at the solid. And now we have our rig. So what we can do now is we can actually white paint this jump, the geometry of the B. So we can now actually parent the armature to L mesh or our b. And we can play around with the weights in white paint. But one thing we don't want to do here is make this bone here at deformation. So in other words, these buttons here should be able to have some sort of influence on the mesh when we do a parent, but we don't want it this bond here because it's just a control bone that helps us move everything else around. So with this bone here active, just go over to your bones and just make sure to untick to form. So if you click on any of the other ones, you can see it there. Steel to form, to form the form and AS1 know deformed. Now we can go into object mode and let's now select out B and holding Shift, select the armature. And then we can go Control P. And then we can go with automatic whites. So make sure to not pick any of the other ones. So automatic whites. And what that's essentially done, blender has done its best attempt to automatically weight w0 and all of its different parts to the bone. So if we now select the armature and we go to our post mode, select any one of these bones. So let's rotate this one, R to rotate and you can see up boot B moves along. So if you do move something and you move anything or scale, it, just hit a to select everything and then go Alt G, ALT are Alt S and that just resets these transforms. Okay? So now we can see we can rotate this one. We can rotate that, and we can rotate this. Now, here's the issue we're having is by default it's done an okay job, but not everything is really perfect. So for example, if we were to actually rotate this one here and then rotate this, you can see that these legs here are following along. But if you rotate this one here, for example, you can see that enough example from the front. If I write that here, It's only really affecting these two here, but this one is kind of just floating around inside of the body. Now in this case, it's not too bad. But if you were just to select everything and just reset them, we can go back into object mode with the armature act of holding Shift and select the mesh. And we can now go into our white paint. And then we can go control and left-click on any bone. And you can actually see these colors are sort of blue or something is or order cooler in value, the less influenced at bone has on it. So you can see here on this heatmap centrally that the head is really being influenced by these legs are Bailey. So let's just go over and make this a brush type here. Let's just make that draw. And let's just, with death one active, Let's just paint these legs a little bit more. Okay, so now we can kind of control to influence it. That's a lot better. Now I'm going to hold control and select this one. And now I'm going to just slightly paint body here. And I'm just going to paint here so that one's pretty good. That's kinda fall we want so run out of the box, it's done a pretty good job. And in holding control, and you can click on this one here. And like I said, we want these values here. The warmer they are, the more influenced that bone has on that geometry. So maybe painted in here. Just keep in mind, we can only paint on one side because this is actually still mirrored. So you can see here when I paint on this side and nothing happens, but I want to paint there. That's actually what's being affected. It's just being mirrored onto the other side essentially. So just like that. And now we're just really fixing that all up. So that's actually pretty good. It's not too much, it has to be done. But if you get anything weird, you know, you can just write painted until it looks right. And by the way, if you go control and you just click on these bones, normally clean white paint, but you can actually move them and test them out as your right to painting. So you can see there's something weird going on there which I don't want. So for example, can now come in here and I can white paint that out. So I can come here and make this a subtract. And now I can subtract that away because I don't want that headband to be affecting the leg over here. So I'm just painting that all the way. So it doesn't have influence on that. Sorry to cooler, it is less influence. So now if I go R to rotate it, you can see, okay, that's a little bit better. I might just go and go to the Add brush again and just paint. Like I, let's bring that strength way down. Okay, Let's just slightly paint that. There's just a tiny bit of influence. Like that. Just a tiny bit of influence. Okay. That's pretty cool. So I'm happy with that. I'm just gonna hit a to select everything older, g, old are Alt S that just resets, transforms, analysts go into object mode. So now we have a B. Rick, now select your b, and this is important. Don't skip this. So select your b value modifiers. And we wanna make sure that we have a specific order here. So we want the mirror first, then we want the armature, and then we want the subdivision surface modifier, okay? Because if you have to sub-divide on top of the armature, what's going to happen? It's going to be, the armature is going to be looking at all of the geometry here and it's going to slow it down. It works a lot better for whatever reason you put it underneath. And not only that, if you come here to your subdivision, you can also make sure to view port level is down. So the render here's what's actually going to be in a render. So that doesn't matter. You can turn that up even to free or for, but make sure that the level in the viewport as this lowest possible. Or even if you're really having performance issues when you animate, especially, you can just click on this little screen here and that's just going to hide it in the viewport. And that's going to make things work a lot faster, completely up to you guys, but there we have it. So we now have our B. So let's just quickly go z, going to material preview. So we now have one rig to be, right, and we can go into pose mode with that armature active and we can play around. So that's pretty fun. Now you're probably wondering, this is a B animation and you have flapping wings yet over here, you didn't even add a bone to the wings. Now, that's where we're going to be getting into shape Keys. And we're going to be animating their shape keys. But we're gonna get to that part when we get in 2D animation. But it's much simpler than you think, but this is it. If you've gotten this far and you've been able to bring it to be and you understand kinda some of the basic concepts here. Congratulations. So we're not going to add in our particle system, which is also quite simple. So let's just select a rig here and let's just hit M. And let's go new collection which is called rig. And let's go. Okay. And just out of good practice, now we have a bit more organization, so we're just gonna untick direct glare here or collection if you will. And now that's out of the way. So now we just have our b here and just hit Z and go into solid view. And now we can get into the rest. Let's go over here to our particles, and let's go and click on the plus side the moment it's adding particles like this. But what we wanna do is we want to make the particles hairs. So we have these hairs here and don't worry if they go all over the place. We're simply now going to come here and click on the Advanced because we're going to need that. But let's come to some basic things here. So the first thing we're going to look at is just the emission. And that's simply tells us the number. So the number here, all we need is about 700 for something like this. And they're also going to go to the hair length. And let's just make that point 0, 2. So it's really short, as you can see. In fact, let's just make it 0.05. It really just depends on the scale of your scene. We can always adjust that a little bit later. And this is also come here to what's called a children and make it interpolated. So for every one of these parent particles here, in which case we have 700 over here into children. It's simply just saying generate ten more additional hairs and that's in the viewport display and then a final render, it's currently set to a 100. The reason that is is so we didn't have to actually edit every individual hair. Could you imagine if you made a model and you had to like, individually move and direct every hair to having this child to parent relationship when it comes to particles, is a very important part of a particle workflow and it makes things a lot more manageable. But what you might notice costly as that things are being applied to everything. We might not even want hairs. In certain places like the eyes, like bees don't have hairs right under eyeballs. So what we're gonna do, actually, they didn't have eyeballs, but you guys get what I mean, what we're going to do is we've got to make a group to let the particles to know where we want that distribution. So that lives over here. So if we go over to our object, data properties, click on it, and let's give this some data. So you can see here these vertex groups that exist on a body, head and about those other bones that we previously parented to this and this data here is being used by our armature modifier. So we're just going to come here and click create a new one so we can click Plus and just double-click on it. Let's just call it this for distribution. And now if we go over to our particle system, we can code down here under this thing called the vertex groups. And one we want here is the density. So if we click on density and we select body, you can see this happens now we haven't actually currently assigned anything. So if we just tab into edit mode and we go back to our object data properties, we can now actually select everything by hitting a. And let's go over, click on this distribution one and let's just go assigned, now, assigned at all to that group. So if we tap out into object mode, we can see it's applied everywhere. But what we can do now if you want to limit that distribution, we can now go in here and we can select those parts. So I can select the eye control L. Once I've selected a vertex. And then I can go over here and I can just go and remove. So now if I de-select everything and I just click on that, this distribution I can go Select. And I should say it's only selecting the ones that I've assigned to it. So anything we remove, sci-fi, select this antenna and I go remove, and now I de-select everything and I select, you can see it's nothing selected because I've removed it from that. Same goes for the wings. If you just go Shift Alt, click on this edge, Control Plus to grow selection to about there. And then you'd go remove from that group there. And now we click Select and you can see only where it is. Active is where we're going to have to particles distributed. Let's tap back into object mode. So currently something isn't looking quite right over here. So what we're gonna do is just quickly select a, b and under the particles so the mixture just click on the particles. Let's just quickly go through it. I'm sure it is just a simple solution. This is quickly go back to our vertex groups. And you can see here under the density dumb mistake is I accidentally selected the body groups. So let's just make sure that we actually get the one we created for that. And that's the distribution one here, sorry, and that was an accident. So sorry about that. But we've now selected the density here. And you can see that's now all exactly the way we want it to work and it's working beautifully. That is just fantastic. And it's really nice to see it working like this. And also just make sure that if you go over to your modifiers here, that you look at this here we want to make sure that the particles is never above the armature or the mirror. So we don't want it above the armature because if we were to actually use the armature and we've made the mesh to form, the particles would kind of just float in space because it's not taking into account the armature, the hierarchy here kind of really matter. So make sure that the particles is always underneath, usually people put to subdue if afterwards. But for me, because this is such a low poly mesh, I really am gonna take the particle system, put it after the subdivision. So it gives us a bit of a smoother result. But you're gonna see here, if we untick the subject here in the view port, it looks quite scraggly, but at least the hairs update with that as well and they're not just floating around. So it used to in the old days when I used to very early versions of Blender doing this sort of thing really mess with the particle. So it's actually really nice that it's working nicely like that. So now we have our little particles. Now, it doesn't look that much more spectacular. And now because it's just a viewport display here, but eventually later on we do add the materials and we can edit these particles settings just a little bit. It's just going to add a little bit extra reels them having that, there's particles there, so it doesn't just feel like a flat texture. So that's the reason for doing this. So now we've done, our reg was done at particles. And next part we're just going to get into our shape keys here for the wing. And that's going to give it the little flaps that we can eventually animate when we get into the animation part of this tutorial. So go ahead and make sure to save and once again, all of the blend files or provided in those resources folder. If you get stuck on anything, make sure to check it out. And that'll be a really big help to you guys. I'll see you in the next part where we can do to shape keys.
7. Shapekeys: In our previous video, we finished off our rigging and adding little hair particles. Now in this part we're gonna do something that's relatively easy and quick, so it's not gonna take too long. And that is setting up shaped case. And then we're going to quickly go over here to my object data properties. So we have to be active and see this option here called shape keys. So essentially what a Shape Keys, and I'm gonna explain this as basic as I can, is that you create different versions of the mesh. So this is kind of like data. It's going to remember the position of your geometry in 3D space. So what does, isn't, is once we start editing shape keys here and creating them, the thing we're not going to do is add in any new geometry. Sure what that means is can move geometry around like points and edges. But what we can't do is modify it by adding an extra geometry. That'll really confuse it and break things up. So you have to make sure at this point that any sort of modeling the steel has to be done is done. So you can still later on and you shape Keys, move things around, but you cannot extrude, add an edges or anything like that. This geometry that exist here has to stay here. So now what's going to happen is we're going to create different versions of this. And as we're animating between those different shape keys, it'll change between the different shapes. And that'll give us the illusion of movement or an animation on how it doesn't make much sense at the moment. But let's just start by creating our first shape key. Now the first shape He's going to be called basis. So that's our master shape, shape, that's the original shape. And while we have that active or we have it selected and we have a V active, we can go into edit mode. And at this point you can spend one last time just quickly making sure everything is right. So in this case I'm just gonna quickly change something here at the front. So I'm enabling my proportional editing and I'm just going to select the eye. So I'm gonna select the vertex and I'm gonna go to Control L and animals. We're going to just select holding and shifts, help them select some farts here at the front. And I'm gonna go to my top view by hitting seven on the number pad. And with proportional editing enabled, I'm going to make sure connected only is there. And I'm going to go G. And I'm going to roll my middle mouse button. I'm just going to move that in. So if it's not working, we may have to do is also hit Z and go into wireframe and just click and drag and just select those verts like that. Okay, now I've got to your top view and now try it out. Okay, So just, just hit C and then middle mouse button and just de-select those verts. And let's just select this one. So C middle mouse button and just use c tool there. And with just a selection tool and just go to a top view. And j, Let's just move that in. So just rounding that out a little bit. If you're not too fussy with it, you don't have to do what I just did, but I just feel that's kind of neat it. So now I feel like that's looking a little bit better and I'm also just going to take the I here, and I'm going to select the top part here. And I'm gonna go G and just roll my middle mouse button to increase the fall off. And I'm just gonna drag that up a little bit higher. Also going to bring this one down here just to fill in that space a little bit more case what I might do, I might actually just, while I've got this active, so I'm just gonna select the vertex Control L. Just select the whole thing, then go right-click and just go subdivide to give it some more geometry. And it's just good to our smooth tool here. And let's just smooth it all out. So that looks a little bit better, I guess now we have that out of the way. We can now go and continue. So now you have to make sure it's just what you want. We're not changing anything to the basis past this point. So now we can go and click plus, and now we can create our first shape case. So let's just call that shape key flaps. So I'm gonna get flaps. Alright, and we need to think about how we want it to look. So when it gets started, the default position is going to look like this. And we can select the basis. And as long as we don't edit any of the geometry as far as like extruding are adding and loops. We can still, if we need to come in here with the basis selected, so we're in edit mode and we've got the base selected. We can just select a wing and just angle it in a way that looks a bit better. So I'm just going to go Shift Alt and click on this edge here. Still have proportional editing enabled and make sure connected only is there. And we're just going to rotate it and we're going to roll and middle mouse button to increase the fall off. So we just need it to more look like that. So from the top, it should look like that. And maybe just bring this edge and just a bit. So that's going to be our default starting position. And maybe here from the front of a gun to our front. Or for graphic view, we should probably wrap these here and just bring them up a little bit as well. So just like that. Or maybe even a little bit higher. So the more you have a difference between the two shape you some more exaggerated defects going to look. So I'm just gonna select a whole wing actually and just rotate it and then G to move it up there. Okay, So that's our basis. So now if we click on our flaps and we get to the value here, you can see. It's not really doing anything because we haven't actually met a shape killers is actually quickly get rid of it and she's hit the Plus again just to make sure we haven't missed anything up. And now if that shape key one just called flaps, and now it's just quickly go into edit mode. Make sure to stop. You don't have to basically select it. So we already have the basis might make sure you click on the flaps. And then what we're gonna do is we're going to bring the wing down. So let's just start by selecting the whole thing. And let's just rotate it like this to start off with an NG tube, bring it down. And then we're going to de-select. We're gonna go Shift Alt and just click on this edge here to loop selected. And we're going to go G and we're going to roll down middle mouse button to increase the proportional fall off. What you're going to bring that down like this. And then we're going to go over here and we're gonna go R to rotate it and we're going to flatten it out like that so it folds in. So we're going to have that sort of thing going on. And then we can just select a vertex here, G. I'm rolling my middle mouse button to decrease the full off. So I'm just bringing down there and I'm just bringing in a bit. Okay, I like that. So that's the downwards flap. So from the top it should be in closer to the body as well. So maybe bring that in just a bit. So now we can tap out into object mode. And now we have this flap here. So the flap is currently set to a value of 0. But if we now grab it and we drag it, it's going to enact that shape key. So you can see here like it at pretty cool, but at the moment it doesn't look too good there. So all we have to do is just going to edit mode and just keep working on it. So make sure to flaps is selected. I'm just going to select any verte on there. So have proportional editing. I'm just going to bring it in more. And I'm going to click on the basis and I'm just gonna go in-between and see where it makes sense and look at that as a flap. So in the flaps, it's up too much. I'm going to bring it down. Bring it down like that. And let's see what a difference is now. K. So we want it to look as organic and natural as possible. So just seeing how the differences, let's bring that down a bit and let's try it now. So click on bases. I guess that's the difference there. So I see that it should look like a flap. Okay, pretty cool. So now what we're gonna do essentially, I hope this makes sense. We're going to now take this flaps value. And it's going to say at 0 it's going to be using 100% of the bases. And then anything in between here at a value of one, it's going to be leaning more towards the flaps. So at 0.5, it's kind of halfway between devices and halfway between a flaps. And by simply Keyframing this later in our animation, we can create the look of a flapping wing on the bee. And even after we've key frame of the animation, the nice thing about this workflow, we can still come in here and we can still edit these two shape keys. But once again, we don't want to edit the original too much, but there we have it, so that is it. And what we're gonna do now in the next part is we can finally get in to actually making our animation. Because remember we've already made outbreak. You remember in the earlier parts, so make sure you enable that layer again and you don't have to bring to reference back. We could just leave that for now. But now we have our shape ready to go. And we have our rig, we have a b, we have a particle system. So we're gonna get into the animation and I'm really looking forward to that. So make sure to check out the provided blend file. So they're going to be in a Resources folder that comes with this class. And if anything is tricky, just check out what I've done and you can follow my blend fall exactly like I said, is more of a intermediate thing. But if you're an absolute beginner, you should be able to follow along. If you watch some of my other courses may be and just do a little bit of practice, kind of getting a feel for the user interface. So I'll see you guys in the next part and I'm looking really forward to it.
8. Animation: In a previous video, we finished off our Shape Keys and we already have our re-established, and we're pretty much now ready to start doing the fun part that I really enjoy, and that's the animation. Now, we're going to be keeping the animation so basic data, it's not even funny, like it's probably not even a proper animation tutorial. I'm just going to be cheating and really just avoiding getting into any of the technicalities of like squash and stretch and all of that sort of stuff. We're just really going to be keeping it simple, but that's the whole point of this. It's just about making a quick asset and getting quick results or the specific workflow. So let's go and make sure to select our armature. That's the thing we're actually going to be animating, That's our rig. So once again, if you haven't already enabled that RED glare or collection, recreate it, makes sure to enable it. And what we're gonna do is we're going to come over here to our timeline. The timeline is really important here, but default Blender comes with 250 frames, so that is 24 frames a second. You can see that by going up here to your output. If you wanted to work in a higher frame rate, go ahead and do that. Just keep in mind, obviously, if you're working at 60 frames a second, something like a 120 frames, which would be okay for 24 frames a second will only last you two seconds. It'd just be a blink of an animation. So the higher you increased at proportionally going to have to do the math and increased the keyframes to match up what I'm undoing. So 24 frames per second, let's just say close to 25. It can go almost 10 seconds into 250 frames. So if you want it like an eight to 10 second animation, you'd have to go 60 times 10 to eight, whatever that is, the maths you can figure it out and then make this end value that same amount. So you can still get 60 frames a second, but you're not actually ending up with a super short animation. And also keep in mind that once you animate at 24 frames a second, you're going to have to adjust things afterwards. You can't just all of a sudden change it to 60 frames per second, because the keyframes on not just going to automatically update to accommodate that, it'll just be like a really quick animation, so just something to keep in mind. So I'm going to be working with 24 frames a second. And I'm just going to leave these default values. One simply means it starts to frame 1250. The end just means that ends up to a 150 frames. So I'm gonna drag this little slider to frame 1 because obviously that's where we want our first keyframe. And a thing we would need to active here is the armature. So click on it. You can see up here at the armature is active and when you go into pose mode, now, just make sure just in case you guys have done it, just hit a to select all the armature and go Alt J, Alt R or S, that'll reset any transform vectors. So if you see here and I, for example there, I did a rotation, I can go Alt R and reset that. So now let's get started on frame 1, we're going to select this bone here. And on frame 1, the root button we're going to go, I am going to insert a location keyframe. We're then going to move to frame 50, right? If I am 50, and then frame 50, we are going to go G. So we're going to hit G and we're going to move it up a little bit. And we're gonna go, I am going to insert our location keyframe. So now if we go to frame one and we hit the space bar, you can see it goes up like that. And if it's going to be slow and laggy and the view port just hit Z and going to solid view. And just for now let's just tap quickly into object mode again, or you can just go up here to object, select a baby and she's got two out the port. And let's just disable our particle system because that's a really slowing things down and under subdivision, let's just come here and click on this little window just to speed things up. So now we're not seeing that in our view port, that's going to make things a lot faster, especially if you're working on a laptop or a lower-end device. So now let's just select our armature again, back into pose mode. And you can see now we have it going up like that. So nice and slow. And let's go to frame one hundred and fifty a hundred, we're gonna go G, z. I'm going to bring it down a little bit larger as time we're going to hit I, insert a location. So all it's saying now is at frame one, this is a dislocation. And then frame 58 goes up a bit. And at frame 100 comes down a bit. So you could just animate this with two keyframes and then use a noise generator in your animation curves to make it go up and down on the Z or whatever. But for me I just prefer to keep it simple because it is supposed to be simple, so we're not going to be getting into any of that stuff, but I am aware of that workflow. So now we're going to pull this up to about, this has go 150. And at 150 we're going to go G and move it up, move it back just a little bit and we're gonna go i and into the location and then went to go over to frame. Let's just go to S1, 192 or something like that. I'm going to go to G and move it down a little bit. But Ford, and we're gonna go i and insert a location. And because we want this to be livable, we're going to click and drag here and select that first keyframe. And we can go Shift D to duplicate it and drag it all the way to frame 250 over here. So now we're going to see if we go to frame one and we hit the spacebar, we're going to have to pay the Bs, kinda of like hovering up and down. And that's looking pretty cool, right? So now we're going to add some more things for, for now to make things simpler. While we have this bone active, we're gonna hit H to hide it. And now we're going to work with these ones here. So you can see we no longer see our keyframes because we don't have that barn active. So what we're gonna do is we're gonna hit 72, got a tuple for graphic view. And let's drag F frame to go to frame one. And what we're gonna do is we're going to select this bone here, the body bone. I'm going to go R to rotate it a little bit and then select the head, rotate that in, and then select this here. And we're going to rotate it out like that a little bit. Select all of them, then hit I and insert a location and a rotation key frame. And then we're going to come up to frame 25 and 25. We're going to just give that head a little bit of a tilt. And we're gonna go, and we're going to insert a location and rotation keyframe. And then we're going to come up to frame 50. And at frame 50, we're going to grab the body here. And we're just going to rotate it slightly like that. Select the back here, rotate it down a little bit and then select ahead and just rotate it up just a tiny bit, just little movements will do a to select everything or just click and drag. And we're gonna go i and insert our location and rotation keyframe on frame 50. Now we're gonna come up to frame 69, maybe 70, just about here. And as there's a little bit of a change in movement as it goes up and down. We're going to select the head and this time just tilted out, just that's the way a little bit. In fact selected back here and rotate it in. Select the body and just straighten that out just a little bit and which need that little bit of movement there. Select them, hit I and insert the location and partition key. And let's just see what we have so far. Yes, So if you're gonna go to frame 10, hit the spacebar, you're gonna see we kind of have that look there. And at the moment it doesn't look that good yet because we're going to have to wings flapping, but you can see where we're going. We have this kind of like just see suspended in air. And he's has a little bit of a lively looked him. So now let's go up to 110110. As he's coming up again, Let's just rotate his body like this. Grab the back where it's headed in, grab the head. I'm going to rotate that even more down. And now I'm going to hit a to select everything. I'm going to right-click. I'm going to hit I and I'm going to go a location and rotation. So now between dairies going to have a little bit of a look down with his head. And we're just trying to get this kind of like nice up and down flow. So look at that heads who'd ahead. It's not just going up and down, but it's a nice organic movement into head. And it's pretty rough at the moment that we could refine it later religious try again. So now he's going to go up again and it looks a bit stiff. Let's come to about, let's just say one, 40 and 140. Let's just tilt the head back this way a little bit. Straighten that body. So select it back and jiggle it. That's why a little bit and maybe even a little bit up. Okay. So as he's going up, select all of these bones and hit I and NGA location rotation. And let's see what that looks like. So as you're going up, kind of folds back a little bit. See that just adds that little bit of realism to the animation seed before it just looked so stiff, it just looked like it was floating up like a statute, but now, just that little bit of movement in their head as he's going up really makes him look more alive. So now we're gonna go to 185. Let's go about 185, roughly about there, I think should do. And let's now write them out like this again. Select the head, move them down a bit, then select the back here, and let's just end it down. Select all of days and then hit I and insert a location and rotation. And let's have a look at. Awesome. And now let's just go up to about 240. And let's just come over here while we have all of these active at 240, when a click here and drag over this keyframe mass second keyframe, Shift D to duplicate. And let's just drag that to 220. I guess what's going to happen is gonna kinda go back to that position. And then what we still have these free points active, Let's click and drag and select the first keyframe, Shift D to duplicate, and that goes to 250. And why do we have it a 250? Because we want the last frame position to be the same as the first. So when we run this as an animation, it's lupus means you can keep it running. Okay, So if you want to also avoid the stepping that kinda gets was the sort of things we could also later just drop it by one frame. So you don't have a repeat frame, but we'll get into that in a little bit later when we get to the point where we export our video for now, just to make it simple, let's just keep it at 250. Okay, so now let's just go back out. So I'm going to just tap back into object mode. I'll just go here object mode and make sure to save as you go. Okay, so we're saving. So now what we're gonna do is we're going to animate our shaped you. So let's just select the mesh itself. So we're in object mode. I'm selecting the beam mesh. And let's go over here to our object data properties. And we're going to be animating this flaps here. So at the moment is at a value of 0. So at frame one, Let's make sure to come here. And with a value of 0, we're going to click on this little dot here and that's going to insert a keyframe. You can also hover over it and hit I, and it'll do the same thing. We're then going to come to 250. And once again, we're going to come here to this value of 0. And with the flaps, we're going to click on this. And that's going to add a keyframe. Now you can see we have a hold a whole. You simply means. It's holding that because it's the same here and the same here. There is no interpolation that's happening in between because we don't have any shape keys giving a different position or anything like that or a different value. So it's not transitioning between anything. It's just the same value here of ZR and the same value here of 0. So it's just a hole that's called a hold, an animation. So obviously that's not going to work. So let's just come over here. And what we're gonna do on frame 1, which is going to hit out right arrow button. And I'm going to move up two frames. So let's frame free. Now, I will tell you if I was going to be animating this, I usually wouldn't go and use this method where I make a whole bunch of little keyframes and duplicate them like this. But because I'm trying to keep this more at a quick and dirty method and just quick results. And it's just something you're going to use for rapid acid development and making a quick animation. There's no point in really getting to more advanced stuff where we use generators and maybe even like drive a shape key or a turbulent forces, something like that to create an effect that's just way too advanced and that's something I might do one day in a more advanced tutorial. But to keep this simple, we're just gonna do it just kind of like really super basic way where we're just making two Shape Keys and just duplicating them a whole bunch of time. So just keeping that in mind, this is not usually the way I do this, just as a little bit of a disclaimer. So over here at frame 1, we're now going to come to this value and we're gonna make it all the way up to one. So here at frame free, free we're going to come to this shape key value which is currently at 0. And that's the flaps. We're going to make it now one. And we're going to click on this little shape here, and that's gonna give us a keyframe. Now we no longer have a hold because you now have this extra bit of information in between these two hold frames that were originally hold frames. And now it's doing interpolation between dose too. So you can see from 1 to free it goes down. So what we have to do now is simply click here and drag and select both of these first little keyframes. Shift D to duplicate them and move them up just like that. And then once you've moved them up Just by two frames or so, Shift R and it's going to repeat that action. So we're going to go shift our hold it in if you want. And you can see it's just repeating that action. And we're gonna repeat that all the way to the end. And that's it. So now if we come here to frame 1 and hit the space bar, you can see we have these wings flapping. How cool is that? So if we hit Z, going to material preview, a slice things down a little bit, but you can kind of see how it's looking like. Now. If by any means, this doesn't look too good, like your shape keys themselves, something just doesn't feel right. You can simply just go anytime you want. Click on these basis or flaps. So let's just click on a basis. Hit Tab to go into edit mode. For me personally at the moment, I'm just going to disable proportional editing. I'm just gonna select the whole wing here. And I'm just going to Vegas leaf proportional editing an abled. And let's just go Shift Alt, click on this edge to loop, select it, Control Plus and just grow to selection till we get to these efforts here. And in G. And let's just move that up a bit higher. Again. Now let's tap back out into object mode. And now that different should look a lot more pronounced. And in real life, this sort of thing that goes on with obese wings flapping is a lot more complicated. There's kind of like a much more dynamic transition happening between two up and a down position of two flaps. But like I said, we're trying to keep this super simple. So just those two values like, kind of like that on, off, on, off 1010. You'd have just as basic as you can get just two different values. And this is switching between them. That's about as easy as you can get. And that is what we're looking for for this kind of workflow. So now we have our beater. And if we come here to our modifiers and we enable a subdivision surface modifier, obviously, that's going to slow things down a bit, but eventually and I, when we render this out, it won't look that bad. So for now let's just go to our rig and let's just on ticket because we don't need to see it anymore. And we're just interested in TBI, so we're happy to be here. And also you can also come here to your particles and just enable them again. You can see them. And obviously that's going to slow things down. But that's how B. So congratulations, you've now finished making the B from a 2D image. You've put the texture on it, you've added particles, you've wrecked it. If my Shape Keys and you've even gone and animated it. And if anything has been tricky, makes sure to look in the resources folder. We will find the individual blend files folder, different processes. You guys can look at them and they should make things a lot easier. And hopefully we can all go together into the next part. And that's where we're going to be setting up our materials. We're also going to be adding in a floor, a camera, and just getting this thing looking really nice as a render. And once we've done that, we can go to the part where I really love and that's where we're going to set it up as an exportable thing that we can maybe select our desktop. We can select a file format and we'll be exporting this as either some image sequences, which I'll explain, or we'll be exporting it as a video format, which I'll be personally doing and which is going to be an MP4. And it's really easy, but we'll get, we'll get to that. So that's going to be in the next part. I'll see you guys there and thank you for watching my class.
9. Materials & Final Rendering : Because if things are getting really awesome in the previous parts, we finished off the modelling, the rigging, the projection of the textural. That's what the stuff we're now finally ready to get into defining thing where we make the materials and we add in the little floral cameras are super fun. Let's now go Shift a and let's just go and add in a plane. So that's just gonna be like our floor. But you can add anything you can important environment if you're already an experienced blender person. Another thing, you could obviously import this B into another scene you have or whatever, but it's me. I'm just going to keep it simple with a nice floor and I'm just going to scale it up. So I'm hitting S and I'm just scaling it up nice and big. Now you know, something like that. This font is going to have to do anything specific because later on, if it's too small, just scale it up and what we're going to be doing now. So we're gonna select out camera. So we've got our camera here and we're gonna hit 0 to go into a camera for you. So if he hits here and you can actually see up here that in our collection to camera is active. So what's a camera active? In camera view double-tap are twice. So if you hit R twice, you can control the rotation and pointed towards the B and then want to come here to our camera settings. And let's make the focal length 95. So that's a nice long focal length, is we're going to come over here to our Output Settings. And this is where you can check what you want. So by default it comes with 1920 by 1080. And I think that's gonna give you a nine to 16 aspect ratio and we're gonna be leaving it at a 100 percent as well. Now all of these things here to one to 250, that's already been established in a previous video. So that's all good. So just check those things. And then once again with the cameras still activity had GI middle mouse button and just pull back and just adjusting our camera till we get something like that. Now at the moment, I don't really like the way it's pointing into B. So what we're gonna do, So when it come over here to out transforms and we're going to make it free to cursor. And you can see here that this finger in the middle, That's cool. F 3D cursor up here. If it's not in the middle, just go Shift S and go cursor to world origin. And if you still can't see it, just go up here to your viewport overlays and makes sure that free the cursor up here is enabled. So once that's done and you have the camera active and you're on camera view. You can hit R and then z, and it'll rotate around that cursor and we can just rotate it till we have UP be somewhere that we like. So I'm going to graph that. And I'm going to set that back to median point. I'm going to hit G to move it. G middle mouse button to zoom back out. And that's looking super cool. Now let's go to our render engine. By default, it's set to EV, which we're actually going to use because it's gonna be a lot faster, but a cycles will give you a little bit better results. So let's just stick with EV. And I'm going to go to Ambient Occlusion. That's really important. And we're also going to come here and enable screen space reflections. That's actually the most important. And under the screen space reflections, if you are working with refractive materials, which means you're working with glass or something like that, something that is refracts light, you have to enable refraction, but we're not going to be working with for factions. So don't worry about that. Just ambient occlusion, screen space reflections and ready to go. So we obviously need some lights because right now if we hit Z and we go into our rendered mode, which is pretty cool. We only have this default garbage light up here. So let's just delete that when I select it, hit X and delete. Then we're gonna go Shift a and let's just add in an area light. And when it go G, z and move it up here to your light settings. And let's just give that free 100 and the power. And let's just make the shape to meters or maybe in free meter. So we're gonna go to free meters. And at this point you've probably realized we're not working with real-life proportions, but that's fine. Yeah, So the larger you'll seen as Anyway, the more power you have to put in. So if the scale of your scene is larger, you're going to have to bump that up quite a bit. If you've got a smaller seen, something like 300 might just be blowing everything out into the white. So let's just in our adjusted accordingly for me it works at 300. I want to go Zhe Xie. I'm just going to be that up a little bit till I'm about there. And then I'm going to go Shift Dave, deadline active. I'm going to move it forward. And then I'm going to hit R to rotate it in towards the B. So now I've got my lights like that. For now, That's simple enough, but let's add a little bit of rim lighting to make the beat pop out. So let's go Shift a and we're going to add in a point light. And a point light is just going to be behind a b from the cameras, the cameras here. So from the camera's perspective, the point light should be just behind the beat there. And what this is gonna do, it's gonna give it this nice reflections that catch around the edges. And it's gonna make it really pop from the background. It gives you your subject, whatever you're lighting, a lot of depth. Very simple technique, very popular. So let's now if that's pointless, active, Let's just increase the radius and the power, but don't go overboard with it. This, you don't want that to be too strong, so I'm gonna move it back. Just make sure it catches that edge and we'd go shifty. Move on here, Shift D, Maybe one right there, and then Shift D to duplicate it, put one right behind her. And let's just put it there. At the moment, you didn't notice that too much. But if what we're gonna do now is we're gonna go over to our shading workspace and we are going to hit 0, it You're going to camera view. Make sure to hit Z and go rendered. And let's just select our floor to. Floor is now active and we're just gonna come over here and click New and call it a floor. Alice has come to the base color and let's just make it darker. And I'm going to make one slightly bluish. Like that. And I'm gonna make the metallic value a little bit higher. I'm going to bring down the roughness down just to make it a bit more reflective. So something like that to me looks really cool. That's as simple as I'm going to keep it. You guys can add whatever you want at textures, add an environment for all you want. But for me, I just think that contrast this kind of yellow color really well. We're now going to select the B and you could technically leave it like this if you want those to be. We're just working with an image texture. And one of the limitations like I've mentioned with this workflow is it's not that you're going into a sculpting program like ZBrush and you're sculpting details and then you can also export that later. Once you've done that week topology, you can export that and make a normal map so you can really controlled and details with your different maps like a bump map amine inclusion map. We didn't really have that because we're working with an image to image textures. We have to do a little bit of cheating and it's not going to give you the same results. So just keep that in mind. So what we're gonna do is we're gonna go shift a, we're gonna go search and which can type in color. I'm going to take this color ramp note, I'm going to place it here. Now, what we're gonna do is take the color output from this image texture, and we're going to plug it into the factor here. And by the way, this image texture is in here by default because when we did the earlier part of this tutorial and we came to this material. Remember, we went and we click there, and we went to image texture and we selected our image texture. That's why this note set up It's like that by default. So it's just plugged into the base here. But for now, we want to make this have a bump effects. What we're gonna do, We're now going to take this color ramp. I'm going to go Shift A Search. And let's just kind of bump. I'm going to take this bump night now if we take this black and white or grayscale info from the color and we plug it into the height. We can take the normal and plug it into the normal above our shader here, a principal chatter. And now it's going to give us this bumpy surface, but it's quite too much. Let's take the strength and make it a point to, okay, so just 0.2 should be fine. And also, you can mess around with the contrast of debt by messing around with these sliders. And that's about the best you can do with this workflow. But it's fun because that's the whole point. We're keeping things super simple. So slide these around and see what you get. We're also going to come here to our roughness under the principled BST F. And we're going to bring that down to a little bit more reflective. The reflection going on, on a b. Okay, That's looking pretty cool to me. Spend as much time as you want, but I'm keeping the material super-simple now to these little hairs. They don't really looked at believable. So we're just going to quickly go to our particle system and make sure to save as you're going. And under our hair particle system, Let's just quickly go down to the children. And we're gonna make the render display amount. We're going to make that 20. And we're gonna make the render amount 35. And let's just come out over here under the emission and let's make the hair length 0.002. And if that's still too small, we can make it 0.02 and see what that looks like. So just try different values. It really also depends on the scale of the b, but just having these little hairs helps. Then we can go over to our Render. Make sure that under the path B spline as an abled. And by default the material here, she's going to be our beam material, which is fine. And what we're gonna do is we're going to come onto here to children as well. And we just want to add a little bit of randomness to those hair. So we're gonna just come here to what's called the roughness. And let's just go over here to the random and which can increase that a little bit. And that's already going to help a lot. There's little hairs. And we're just gonna take the size and make it 0.7 as well. Now we can take to an uniform amount and the more you turn it up, the more uniform the hairs are going to be. But makes sure to be careful of that. And we'll just slice here. Let's just make that 0.7. And let's try that out. So just mess around if at all we're trying to do is create a little bit of roughness in the hair so it didn't all look perfectly straight, and that's about it for now. Let's just also go up here to the display amount. Let's just make it 35 and see what that would look like in a render. So that's still a little bit too, too long. So let's just go up to our hair length. Let's just make it 0.01. And if that's still too much, just make it 0 or nine or 0. So just, this is just one of those things. You just have to try it out til you get that sweet spot sire. Nothing wrong with that. So I'm going to go with 0-zero or five maybe. But, yeah, just experiment, see what works. Now the density of the hairs here might be a little bit too much. Let's just go over to the display amount, make it 25 and maybe 45. So just really, it's up to you how Ferrari you want the baby to look. Ideally, you'd create a special kind of map, like a black and white value map that you would use in your setup here to control the density. So it's not only applying it and not applying it on the surface, but it's also applying it in different densities based on like a black and white or grayscale value. But that's like that's something I've never really going to get into this as we're trying to keep it really simple. But for now, let's just give this a test render. So in a camera view, let's just also make these lights here. Just put them back just a little bit. To Bryant there. And let's also select this top light, move it back a little bit and rotate it in. And I think I'm just going to go Shift D and duplicate that one and rotate it like that. So just till we get some nice light, pink eye that light there, I'm just going to bring the strength down to 120. And maybe I'm just gonna grab this one up here. And I'm just going to bring the strength down to 150. And at this point, there's really nothing set in stone. It's just a matter of personal preference and seeing what you like. So moving lights around, maybe that one's a bit too intense. And that's a really nice there. Select this light up here, maybe bring the value of that down to 250 and see how that works. K, That's looking pretty cool. Sorry. Now that we have that established, Let's do one more thing is really going to help this. Just select the camera and let's go to camera settings. Let's enable depth of field and get a drop-down. And now if we click on this and we select our B. So now B is to focus object. We can bring the f-stop value down. And you can see now we have a camera out of focus. Now, this is a little bit limited. So what you could do as well as you go Shift a, you can add a dummy object like an empty. And it can move that dummy object right in front of to be like that, where you want it to be focused. And then you can select a camera, go back over there and under the depth of field, just click on the little eyedropper again and then select that empty. And now you can actually use that empty and even animate it to control the focus of your camera. So let's just select a camera again, and let's just make the f-stop 0.8. Let's see what else works. Cats pretty good. And I'm just gonna select this empty, maybe move it a little bit more forward. So what we want here is this nice sharpness towards the front of the B. But as it's going towards the back, it's starting to get nice and soft autofocus. There's kind of makes it look like you're dealing with some more realistic macro photography. It's just a little something, but it will increase the render time a little bit. But, you know, I think it's pretty cold or we can do that. So now let's just select the B again. And I'm just gonna increase the strength of that bump a little bit, but don't over do it. And also just experiment with the contrast here. And let's just see what the roughness is doing here. Down. Totally mess around with it. But that's what I have so far. You can also see here with the structure on the wings That's more noticeable when you mess around with these sliders. You really just want to do a to really get this nice details, kinda just showing up today. You can see that's really, really helped there if those details there. But yeah, it's just one of those things. This is like this is like finding a balance without actually painting in the maps yourself or having debt traditional workflow, if you will, It's really hard to get it looking absolutely perfect. But like I said, that's not the point here. So let's just quickly give that a test renders. We're going to save this go render and then go render image. And let's just see what it looks like. And there we have it that is our render death literally took just like seven seconds or something to render us pretty quick. So that is it. That's LB. And you guys can spend as much time as you want working on it. The head here isn't looking good, It's a little bit blown out. So what I might do is you select a b, hits the year into rendered. And let's just come up here to this node and discuss shift a search. Let's just type in RGB and it says get an RGB curve and place it on here. And now what we can do is we can take this color here. And we can use this kind of like we would in Photoshop or something where we can adjust the contrast we're making, kind of like the classic S-curve here. And you can also go to your red, green, and blue channels. And you can adjust those as well. But use them sparingly. So a lot of you might already be familiar with how colors and stuff work and how curves work. But like I said, this isn't a really just a toy, but just by bringing that contrast up a little bit and bringing somebody values down, it's not looking overly white or blown out on the face there. I still feel like it's really hard to find a balance bump here. If you bring it down to lie, you start losing some of the details up here, but it starts looking a little bit nicer on the head. Now, like I said, this is already limited just because of how we're doing it, but I'm pretty happy. So I'm just gonna select a few more of these lights. I'm gonna go shifty. And I'm going to maybe bring this one just in here and just having a little bit of a rim lighting in between the legs. To me, I think that really helps. Okay. It's looking pretty cool and you can select the floor again. And I'm just going to take that material, make it a little bit less saturated in the blue, make it a little bit more metallic. And maybe bring the roughness up a bit. Yeah, just completely up to you guys. Try it, try different colors, maybe. Try something that's a little bit more brownish, a little bit more red. But for me just having that little bit of blue there and a color bit of a darker value just really helps compliment this, is it. So let's just do one more adjustment with a camera. And by the way, if you wanted to animate your camera, just simply go to Lance. And we can just go over here to frame one. And let's just quickly on frame one with the camera active, hit I and insert a location and rotation. Click to select it and duplicate it by hitting shift D, drag it to 250. And as it goes up, Let's just go G and it shouldn't have a camera just a little bit. I to insert a location rotation. Then come to about here due to move it down a bit, hit, I, insert the location rotation. Hand. What we're doing here is just essentially making it look like somebody's holding the camera. So we're just adding in random key frames and just, just try different things, see how it goes. If you want to, you can go into your animation curves, add some generators today's. So it can use kinda like a noise to automatically give some camera shake. But there's a ton of tutorials on that on the internet so you guys can check that out. But this is pretty much while we haven't at the moment, it's really hard to watch it in real time because there's so much going on. So just select the B and you can just hide the sub div and a particle system and you can see what it looks like. It's going to material preview. That's what we have. Pretty cool. So let's render this out as a final animation, right? So what we're gonna do is we're gonna come over here to our Output Settings, and let's click on this folder. Now you can select anywhere on a computer I'm going to select my desktop and I'm gonna go except and make sure to save. So that's going to be the destination where your video gets saved out to. Now, I was talking earlier about file formats I by default, Blender gives you the PNG format, which means you can export this as sequences. All right, and then you can compile them in Adobe After Effects or whatever. And that's the way I would normally do it, especially for us doing like a client project. And they wanted to have like different composites and stuff that they can use and maybe like an amine inclusion pass at a death. That's where we really like to work with that sort of thing. And it's probably the proper way to go because it is a short little animation and we're rendering and EV, I'm just gonna change this to FFmpeg. Video is going to be either wrecked video exports. So the nice thing about it, you have a finished video. Only downside is if your computer was to crash or to power went out or whatever, you'd have to start again. So that's kinda the advantage with the PNG sequences as you can just continue, but I'm not gonna be covering the PNG, how to do it, how to completely do it today, because already a lot of tutorials on our end, It's pretty self-explanatory. I mean, just select PNG and when you render it out, it'll render all those sequences to your desktop or a selected folder of your choice. So now you have your video there. This has got to do encoding and go to the container and you can select whichever ones. So it's a whole bunch, but I'm just gonna go with the MP4 format, which is really good. I really like that. And then there's some video codecs here and obviously some audio codecs, but we're not going to be touching that today. Just the default here with the MP4 works really good. So let's make sure to save. And what we're gonna do now is we're gonna go to Render, and we're gonna go to Render Animation. And it's going to render it to our desktop. And when that's done, I'm going to show you guys what we have. And once again, if anything is confused you before you click Render, just check out my example blend files that are provided and scrutinized and pull them apart. And that should be a big help to you guys. And here we have it, guys, that is the final result. Now feel free to spend as much time as you want using this technique. And like I said, the whole point of this and I know I've emphasized it like 50 times, is having a very quick workflow using limited resources, in this case, one photo and quickly making an asset, even animating it. Now this is not the way on what condense conventionally do things. There are definitely, there are definitely a lot of different ways you would approach just as an, at an industry level if you're gonna make like a polished final product. But just to get a quick asset bashed out, this technique is invaluable and it's been used by a lot of really professional artists. Now I'm going to be encouraging you guys to not only do this class if you haven't already, but to go and find your own image or images and see what you can make using this technique. I'm really excited. And if you make something really cool, Make sure to post it on here. And Sharpie 45 done, share some of your projects and it's really good stuff. So thank you so much. And I really appreciate it. It's just a really fun experience making these little tutorials on Skillshare.
10. Outro: I'd like to thank you guys so much for taking the time to fall in my course. If it's been enjoyable, feel free to follow me if you want to check out some of my water content, you're on Skillshare. And I really look forward to seeing what you guys can make this as a very creative application blender. It's free and it's definitely fun to use. And if you're an absolute beginner and somebody just seem too over the top, I will have some stuff you can check out, especially one of my other classes where I covered blender for absolute beginners. In fact, in that class, you're going to learn how to make a complete character and animate a turntable animation. And it's got a whole bunch of stuff starting from absolute scratch, which includes things like the user interface, the basics of modeling, how to navigate all that sort of stuff. So I really hope that this has been fun and happy, fun creating for all of you.
 PIXXO 3D, 3D Character Artist, MoGraph Teacher