Transcripts
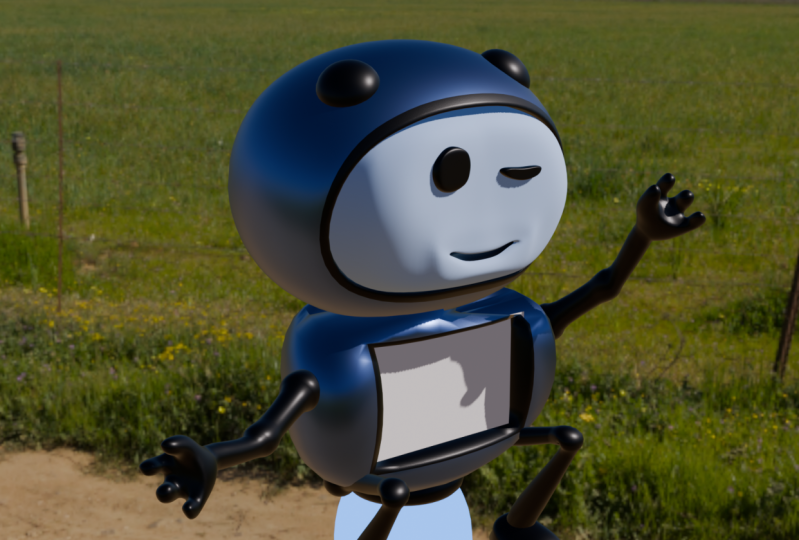
1. Intro: If you want to learn how to make a cute little dynamic character
and animated in Blender. I'm gonna be showing you how
to do that in this course. My name is John Gray
and I'm looking really forward to take you guys
through the whole process here. We're gonna be starting with
just some rough concepting. Then we're gonna be
working our way through some basic modelling,
making some features. And then I'm gonna
be showing you guys how we can make a rig animated a little character
and a dynamic part of this course is going to be using a little bit of
cloth simulation to make some sort of
dangling thing under a character for lack
of a better word. And overall it's just a
fun little learning thing here did you guys can do? And I want to see what you
guys can come up with. I want to really encourage customizing this
concept and this idea. And really making it your own animation that you can be proud of and show to your friends, family, and whoever you want to. So let's get into it and I
really hope you guys enjoy.
2. Initial Concepts: In this part of the
class, I'm gonna be showing you guys how I make my characters with just
some really simple methods. I'm going to be using GIMP, which is a free program. But this is not so much
about how to use GIMP. It's more about just my process. It doesn't matter if
you use some paper, if you use crayons, it really isn't the point. We're just going to bash out some concepts is a ton of fun. I want to show you how
I do it and I will be providing this GIMP file if
anybody's interested in it. But it's not essential that you do this part of the class. To follow along, I will provide all the resources and concepts that you need
as we continue here. If you've decided to
go along with Gimp, I'm going to quickly show
you how I approach this. Once again, this is not a
lesson on how to use GIMP. You can definitely use
any medium you want, but I'll quickly give
you an overview. So once I have opened up, I like to go to file
and I click on U, comes up with a create
a new image box. And you can just leave the
default settings as they are. I usually leave it at 1920
by 1080 and I press Okay, and it'll create on the layer section here a
layer called background. Now if you want to create an additional layer
with transparency, you can come down here
and click on this little create a new layer tab. It comes up with
this new layer box and you can go to
the field width, makes sure that it is
set to transparency, which should be by default
and then press Okay, and then on top of
your background now you have a layer
that you can draw on. So I'm gonna go to my paintbrush tool up here
in the tools section. You can just hover over
it and you can see it says paintbrush tool,
just left-click on it. And underneath here
you're gonna see all the different
properties that relate to the tool
that you're using. In this case, if you have a
graphics tablet, which I do, you can come here to the
dynamics and click on it and change it to whatever you want to work
with at the moment, I'm just going to use a mouse anyway because I know
a lot of people don't have a graphics tablet
and I'm going to just demonstrate how easy it is. So with that paintbrush
tool selected, come here to the size of your brush and just
bring it down. But at about five pixels
with that layer selected, I'm just going to quickly
draw out a few basic shapes. So I'm gonna go over about four. And these will be
like the foundation of our different
character designs. Just a shape to start with that we can build on top of it. We're essentially
just experimenting. So I'm gonna quickly
speed that up as well. You can see here I
really quickly just drew out for basic shapes here that are going
to be the character is essentially
over the concepts. So what I will select to do is create an additional layer. So I'm going to press the
button down here again, make sure it's
transparency. Press Okay. And on this new layer
of that selected a, you can draw out
some simple eyes. You can also increase
the brush size if it makes it a bit simpler. And then just draw out
some cute little I. And so I'm going to speed
this process up as well. Here you can see
I've just place them where I think they
would look good. And then you can just go over
here to your fill color. I will select it, just change
it to something that I think would be like
a mouth color. So maybe a little
bit of a pinkish, reddish color, maybe a little
bit darker on the value. And with that, I'm just going to draw out some little mouth shapes trying to make
them all a little bit different, a little
bit more unique. Then another cool thing you
can do, It's really simple. Just create another layer and make sure to drag that new layer underneath the attitudes. So just left-click
and drag it down above the background and
make sure it's selected. And then you can move
your brush here, just increase the
size a little bit. And then this is
completely up to you. You can choose different colors and then just paint
over each one of them, adding in a color just
to kind of get an idea of what they might look like
with a little bit of color. Here you can see I've
just painted out more different colors for
these different shapes here. And you can already see
just by doing this kind of random shapes and adding little facial features,
adding some color. You're already just quickly
in just a matter of minutes, just building a quick idea of some cute little
character concepts. You can even take it
further than that. You can create
another layer on top of the one that you
added the color to. Make sure that
layer is on top of the color layer
and move that one, you can go for a darker color on the fill and then just
add some shadowy areas. We think there
might be a shadow. So I'm going to just paint
them all roughly where I think it'll look good on these
characters like this, maybe on this guy as well. And then with that
layer selected, you can go to Filter
blur and then give it a Gaussian blur and then just blurred a little bit
like that press Okay, and then you can select
your color layer here. So select Color layer, didn't go to your fuzzy
select tool up here, and then just click into
space here and it'll select everything around
this color shapes. Then select the shading layer we created here if the
little dark spots, and then just press delete and it'll get rid of
all of that extra. Then with that layer selected, you can just drag the
opacity down a little bit. And that just gives you some
quick dirty shading as well, which is kind of fun, just
brings them out a little bit, makes them look a little
bit more three-dimensional. And you can play around
with that opacity as well to change the amount there. Now that we've added these
quick dirty shadows here, you can also just make sure
you have that layer selected. Click onto new layers
button here again, create a new layer of transparency and
it's just new layer. You can also just, with
your brush selected, just go to your colors and
change it to something like a bright yellow and
increase your brush size. And then you can just paint some areas to make
some highlights. I noticed isn't quite
accurate to how you do it with real 2D illustration. But this is just about getting some quick results and knocking
out some quick concepts. So maybe it's a little bit of reflection coming
from the top here. And then you can go with that
layer selected to filter also blurred out with
the Gaussian blur like we did with the shadows. So maybe that much, and then you can select
your color blob. So we've painted here
to select that layer, once again to fuzzy select, and then just click
somewhere into space. Select those highlights
that we just created so that layer and then
just press Delete. And now we've deleted the excess around it and
trimmed it a little bit. And with that layer selected, you can actually just drag the opacity down a bit as well. You can also go to
the layer where we did some of our sketching and select that and then bring that opacity down a
little bit as well. So that's how I make some really quick
concepts of characters. I do this all the time with just random shapes that
I put together. I do some really
rough, dirty shading and I really just
want to get across the concept more than the actual tool
application that you use. It doesn't matter if
you do this with paper, you can just do
doodles and sketches, but just get some concept going, do as many of these as you want. I can already see
some ideas here to really pop out to
me and I really liked what we're gonna do
now is just create another layer and just
draw some little ideas, some little body
parts that we could dynamically animate
later in Blender. After we've done our animation, just took a little break before recording
the rest of this. And you might notice some things look a little bit different
with the shading. Well, I did is I selected that shadow and highlight layer. I just went to filter again
and Blur and just gave it some more Gaussian blur and it just looks a little
bit better now. And I've just made
the sketch layer a little bit lighter
and less noticeable, but very small change there. Like I said, we're going
to create a new layer. So select the top layer and press the button down here
for adding a new layer. Once again, transparency,
that's okay. And by the way,
feel free to keep naming these layers as you go. I usually I name the layers, but I'm being a bit lazy today, but with the top layer selected, what you can do is make sure
you have your pen tool, use whatever color you want, whatever size you prefer,
and then just sit back, have a look at your
characters and think about the colored concept to shape what sort of details might work. So maybe for this
character here, I'm gonna go with maybe even
a smaller brush quickly. Let's maybe paint some
flames like this. I'm just using my mouse here. Maybe like a skirt of fire. That looks pretty
cool as a concept. And maybe just a
little guy here. I think some cute
little wavy tentacles might look cute, wrapping
around like that. And then maybe distort
very person here in some sort of detail there. Once again, I'm really
just using my mouse here, doing some really
simple concept. And maybe for this one here, I won't put anything
in the bottom, but maybe something at
the top, wavy like this. Just like that, it's easy to concept some little
additional details. You can always hide the layer, create another layer and
draw on top of that. And you have layers you can toggle on and off for
different concepts. But you guys understand my thinking here, how
I approached this. Just add different
things to get a randomly and just see what
sticks, see what works. This is one approach
you can take. So at this point I'm
going to select one of these characters that I
think it looks kind of cool. And I'm going to flush
it out a little bit more in a separate GIMP
file working on it. Now I'm going to
just do that behind the scenes and looking
at record that if you guys eventually
finish watching this class and you want to
design your own character, I'm going to encourage
you to kind of flush out the design yourself
a little bit more. And I will be providing in the upcoming parts any sort of references or
resources that I use, a wheel provided to you guys. So you'll always
be able to follow along San worry too
much about that, but yeah, have a ton of fun. We have the concepting.
It honestly is a part of it that is really
fun because it's easy, it's not too technical
and you can do it with whatever medium you prefer. I'll look forward to seeing you guys in the
next part where we can start making
this guy or girl, whatever you want in 3D is
going to be a ton of fun.
3. Model The Body: Okay, So if a new scene
open up and blender, I'm using Blender free
point O at the point of recording this tutorial
when you're watching this, it might be that there's a
newer version available, but more or less thinks
should be the same. So in the default
scene of Blender, there is a default cube, a camera, and a line. Now, once again, I
am expecting that you already know some of
the basics of blunder. This is not an absolute
beginners course. Feel free to check out some
of them are outer stuff on Skillshare that goes through
that in more detail. But what you're gonna
do is you're going to select the light here and just delete it by
pressing Delete on the keyboard and also
the camera here. Just so you know, I do have my screencast
keys enabled down here, so you can actually see
the keys I've pressed, and that should make things
a little bit easier. I'm using a Windows computer, but also in the resources
folder there will be a list or a Word document showing the different hotkeys for
both Mac and Windows, which should help
you out as well if you're still kind of
learning all of this, is that a thing we're going
to be starting off with? Our modelling is
just a default cube. That's our mesh object that
we're going to start with. And for a bit of reference, I've gone and
sketched out one of our character designs from the previous part in a
little bit more detail, I will be providing
disk GIMP file in the resources,
so check it out. And inside of Derrida's
also just a PNG image that I export it out of GIMP. Now we're not going
to be dragging this image into Blender, anything like some of my
other classes on Skillshare. Or you could just have
it opened up somewhere, maybe even on a
different monitor. And when you need to see it, you're in Blender and you're
working, we need to see it. You can just go back
and check it out, wants this class and
then just go back. Yeah, You get the idea
here, very simple shape. So we're going to start
with the head here, the head part of this guy. And we're going to model that.
And we might even modeled a little dangling thing here at the bottom before moving onto the next parts, I
pretty simple to do. The work you're gonna do
is you're gonna select your default cube by
left clicking on it. And if you hit one on your
number pad on your keyboard, you're gonna go into your
front orthography v. Now once again,
you should already understand the
basics of Blender, but let's do a quick overview. The number pad. If you don't have a number
pad on your keyboard, you just have to
conventional number line. You can just go up to Edit Preferences and in the input
section and just go to the keyboard section and just
go emulate number pad and then just your
conventional numbers will be like a number pad. But once again, you guys
should already understand this as you go on
with this tutorial. So we've dad cube selected, we're going to press Tab to
go into our edit workspace. And we're also going to
go to our modifiers. We're gonna be doing a
box modeling method here, which means we are going to
be relying on the modifier, in particular the
subdivision surface modifier to round things
out an average Frank's out. So let's go to the Add Modifier here and just give that
a subdivision surface. Now you can see here we can
see what it all looks like. We can still edit and manipulate the points
here in 3D space. But the modifier is not something that's
actual mesh geometry yet we haven't applied it. So if we went back into
object mode by pressing Tab and we came here to drop
down and we applied it, didn't have back into edit mode, that's now actual geometry, and we no longer have
that as a modifier. So I'm just going to
quickly undo that, go back into edit mode,
which add modifier. But what we're gonna do is just scale things a little bit. So we're going to press a to select everything in edit mode. We're going to go S, x and this skeleton,
the X a little bit. And if we actually look
at our character here, it's just a circle that's
a little bit squished out almost like a bowl of dough that's sank a little
bit and that's kind of, that's squishy, cute
look we're going for, so just scaling the whole thing on the x little bits of Sx. And then what we're gonna do
is when it comes to modify, this is bumped the levels up
here in the viewport to two. Now we have a little
bit more geometry and that's looking at K. Let's go to our
right orthographic view by hitting three
on a number pad. And what we're gonna
do here is we can select all of these
birds at the back, but let's just go over and click on the
X-ray toggle up here. That way, if we
left-click and drag to select these vertices over
here, it selects everything. Whereas if we didn't
have an outright or for graphic viewed at x-ray mode on and we just
clicked and dragged, it would only select
these ones here, makes sure that you enable
that x-ray when necessary, right, orthographic
view selecting all of these for to the back. I'm going to go and just
flatten them just a little bit. Again, that's the
main shapes are far less tab back
into object mode, pressing tab under
the modifiers. Let's just come to the drop-down and applied at the modifier. Now press Tab to go
back into edit mode. And I'm just going to disable the x-ray over here at the top. Now go and press one to go into your front
orthographic view. And while this is a perfectly
symmetrical object, Let's come up here
and just click on Enable mesh symmetry. And we're going to
click on the X. So if we were to
grab a vertex on either side and I found orthographic view and
press G to move it. You can see it happens on
the other side as well. We're also going to
enable our proportional editing up here by
clicking on it. That'll give us a
little bit of falloff. So if we select a
vertex and move it over a certain range, depending on how much we roll
our middle mouse button, it will control how
many verts go with it. And that can give us a little bit more organic manipulation of the mesh there one
thing we're gonna do is select this bottom part
here we're going to go G, z and move it up
on a little bit. We're going to select
a top verte here. I'm gonna go G is
z and move that up a little bit ruling to
middle mouse button to control the falloff. And you can see what
we're doing here. We're just making
that shape there. There's no need to drag this into your scene,
but if you wanted to, you could also just
split your screen I completely up to you, but you see what
we're doing here. Just trying to make that shape. It's pretty easy. I mean, that's about it. Maybe bring just Some efforts down here, just a little bit at the
bottom just to squish it out. But there's really not
much to this shape. It's not that complex,
but a thing we have to focus on is to write
off or graphically. So if you hit free to go into the right orthographic view, you can have a look
at this guy here. We want to kind of make
that elongated shapes. Let's select some versa, clicking and dragging
some further to the back, we're gonna go, gee, why? And we're going to move it
out and we're going to roll our middle mouse button and just move it out a little
bit like that. If you just come up here and you roll your middle mouse button, you can scroll over
to your toggle x-ray. So just click on X-ray and
then just click and drag to select somebody's verts and
the right orthographic view. And you can go S,
flattened it and I'm rolling my
middle mouse button to control that fall-off. We're just flattening that face. That's going to be
important when it comes to putting features
on our face later on. But you get the idea here. But let's just toggle
that x-ray off again. And I'm just going to make
it fullscreen for myself. While we still have
proportional editing enabled, what we're gonna do is just
select a bottom vertex here. You can hold and shift if you need to, and actually select to, maybe just select vertices down here and go to your
front orthographic view. Just for now, just press Z
and then go into wireframe. Wireframe. But what we're gonna do
is with those two verts, we're going to go G, Z and we're just
going to lift them up and we're gonna roll the
proportional editing so middle mouse button to make that full up a
little bit smaller. I'm going to go about
that much for now. And then what we're gonna
do is we're gonna go Control plus or Command Plus on a Mac just
to grow to selection. And we don't want this
part here selected. So if you go Shift Alt and you just left-click
on this edge, it'll de-select all longer edge. We just want this
middle part active. They wouldn't get
e to extrude and then S to scale. So E and an S. And we're going to extrude that. And then we're gonna go 12, go into a front
orthographic view, hit Z, go back into wireframe. We're gonna go to Extrude and extrude it up a
little bit and an S to scale but roll your
proportional editing or your middle mouse button just to shrink that fall
off a little bit. Well that's also active. You can go Control
plus or Command plus about three
times just to get a selection over here in your tools panel and decide if you don't see
that, just press T. That'll toggle it on and off. But what you're gonna do is
we're going to come here to this tool which is
called the smooth tool. Click on it and it's drag
this little gizmo here just to smooth things
out ever so slightly. And that's pretty much what we need here for
that little indents. Or you can just select maybe
a vert here on the side. We still have that x
mirror enabled and just bring these down
just a little bit. But that little detail there, that little cavity in there,
it's kind of important. That's where our
little dangling bit is going to come out of. I was just quickly
guardian modifier as well. You'll modifiers
and just give it a subdivision surface modifier just so we can see what
it's gonna look like later. We've got modifier on it, but that's pretty much that. Let's just model the next part. We're going to just tap
back out into object mode. To do that, let's just add
in a new object shift a, and we can get a mesh options. We're going to add
in a UV sphere, and we're gonna come here to
our add UV sphere settings. Let's just make the
segments 12 at the top, and let's just make
the rings like so. And we're going to
drop that down. So now I have a low
poly sphere here, but we're gonna go G is Z and just bring it down
to about here. Once again, this
is hit Z going to wireframe and an
S to scale that. And let's just place it starts right up in
there like that. Kind of not halfway but almost less than
halfway down like that. Don't worry that it
has low geometry, it doesn't really matter. Now, move, it's still active. You're just going to tab into edit mode and you're going to go with all of that
geometry active. Press a to select
everything you can go s, z and just flattened
onto z a little bit. And then you're going to click
and drag and just select these bottom verts, disable
proportional editing. You're going to go to
Extrude and then S to scale e to extrude and it
should extrude on the z. But if it doesn't, let's
say it goes to the side, just press Z to
constrain it to dizzy. And we're going to bring it
down just a little bit S to scale and to extrude, S to scale, e to extrude, and then S to scale it up a bit. All we're trying to do is just
make a little Bowlby part of the bottom like that. I'm scaling it and I noticed this and this better
ways you could do this, but this can be as rough
as you need it to be. Just all gonna be kind of
like flapping around anyway, so it doesn't have to
be absolutely perfect. Just trying to make
like a little poll. So I'm going to
eat to extrude Z, to restrict to the Z and an S to scale and engines
moving that up. So you kind of get the
idea, then you can go Control plus with
that seal active, just grab a selection and
move that smooth tool steel, just smooth things
out a little bit. But you can perfect that
as much as you want. Grab this geometry and
proportional editing, you can go S to scale control your fall off by rolling
and middle mouse button. And we're just making this
little dangling part here. Once you're happy with the
white it looks you can just select the top bits. So at the top here, we'd
not gonna see them. So we can just go x and
just delete those faces. All we have is this
little thing down here, and we can give that a
subdivision surface modifier. And then we're gonna
go into a write-off or graphically by hitting
three on a number pad. And in a wireframe we're just going to select
this once again, you can also just go into your x-ray mode as
well if that helps. So clicking up here
while in solid, whichever way you prefer
board just going to select some verts and using
proportional editing, which is going to pull
them back a little bit. And same over here. Just make it look
however you want. It doesn't have to be
exactly like I've done it. It's just a cool little
dangling feature that we're going to dynamically
animate later on anyway. But you get the idea. That's it. I'm going to just toggle
back into solid and yeah, maybe in front view, I'll just select these and I'm filling a
little bit, but yeah, but this is where I
encourage you guys to spend as much time as you
want and really make it your own. But
you get the idea. We're just making this
little dangling thing here, back into object mode. Just select everything and then right-click and then
just go Shade Smooth. Now we see some nice smooth
shading into view port, but I hope this part
hasn't been too confusing. This is where we're
gonna be ending at right now before we go
onto the next part. But if anything is
confusing and you don't really understand why I did
that or how I did that, then you probably see only to learn a little bit
more about Blender. So you can go to my
page on Skillshare, just look at some of
my other tutorials. I've got one there
that's for absolute beginners and it'll take you for every little detail that you need to know to
follow this course. And a lot of the stuff will make a lot more sense to you as well. So make sure to check that
out if this was tricky. And I'm also supplying the blend files for all of
these different stages. If anything has been confusing, just check that out
in the resources, open up the blend file and
see how I set things up. I'll look forward to
seeing you guys in the next part. It's going
to be a lot of fun.
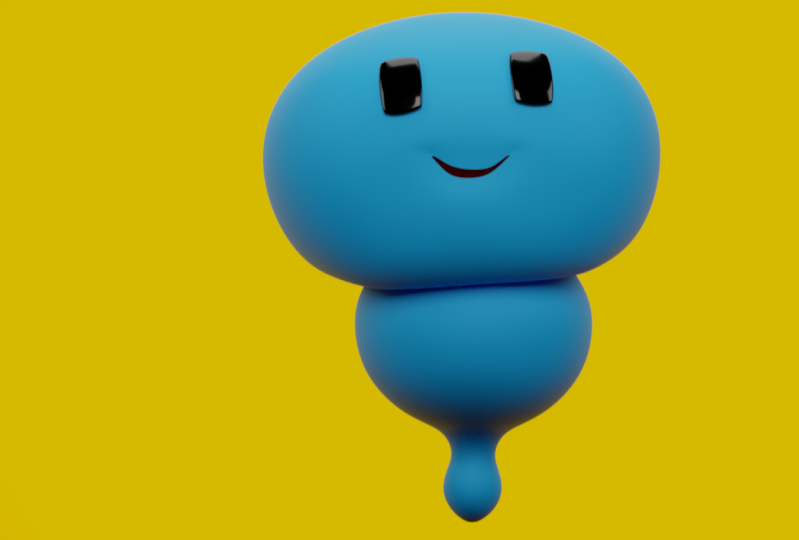
4. Facial Features: In the previous part,
we were able to make the head and the body. So what we're gonna
do now is make the mouth and just two eyes. So the thing we're going
to be selecting to start off with is our heads. So select the head, make
sure you're in edit mode. So pressing Tab to edit mode. Once again, just keep in mind, I do have my
screencast keys down here so you can see
the keys I'm pressing. But what you're going
to want to do is make sure that proportional
editing is disabled. And the selection mode we want
to have is the face Alexa. Currently it's set to vertex. Let's change it to face luck. And we're gonna select this face here and holding and shift. We can select the
face over here. So this, these two
faces and you can see that's roughly where
our mouth is gonna be. But one of the things
we want to do at the moment is we want to
turn off the X mirror. It, turn it off up here, and then we're gonna
go to extrude. So pressing a and then S right after scaling it
down to about there. Then we're gonna go s, z with those two seal selected and
skeleton on the z like that, you're then going
to go Control R or Command R while you hover
over this edge over here. And you can see a
yellow line up here. That's just a loop tool. You're just going to
left-click once and then you can move the
mouse to slide it, but I'm just going to
leave it in the middle. So I'm going to
left-click one more time. And now it's set over there. Now one of the issues is
because we turned off x mirror. If we now select one
side and move it, it's not updating
on the other side. So what we're gonna do to get
around that is we're gonna go to our vertex left
option it real quick. And we're going to
press Z and go into wire-frame and then click and drag on this side and just drag and select
all of these parts, hit X and deletes. Now we only have half of it. When you go to a modifiers and give that a mirror modifier, you're going to drag the
mirror modifier above the subdivision modifier
and enable clipping. If you don't enable clipping, the whole thing will just come apart when you're trying
to move the mesh. So that's really important
to clipping is enabled. So now we have a mirrored side and we'll continue working
with our mouth over here, I guess before we go any
further with the mouth, we're gonna have to add in
some additional topology. What are you gonna do? You're gonna go
control are hovering over this edge and
then click left twice and then come over
to this edge control our CDL line and click
twice by left clicking. And now we have some more
topology here for the mouth. But we also have these two additional loops going
all the way around, which is a bit more topology. Now we'll even just
out in a little bit, but for now let's just continue working on the mouth here. So what we're gonna do
is we're going to select this vertex in a corner
of the mouth here. And the vertex select
option is active. But what you can do is you can
go G and move it in a bit. And let's just for now so we
can see what we're doing. Let's just disabled the
subdivision surface and then grab this
vertex down here. And what we're
trying to do is just even them out a little bit. So it dragging these verts out like that, bringing these ones. And so you get the
whole idea here, what we're doing if to mouth, just dragging them
in, rounding it out, grabbing this one
here, running it out. And it's pretty
self-explanatory. Just evening out the
topology for the mouth. And then we're
gonna do is you're gonna select this vertex here and holding Shift,
select this vertex, these two innermost
vertices that you see in the inside of this loop. And you can go x and Leighton always should have
now is this opening here, and if you go Shift Alt
and you click on an edge, it'll loop, select that edge. And then what you can
do, you can go into right orthographic
view by hitting free on your number pad, press Z and go into wire-frame. And then we can do is go S, Y and flatten this
onto why a little bit. Then you're gonna
go E to extrude an extruded in about this much and didn't get to go SY and flatten it
completely under y. And then you're going to go
E to extrude to pad here. I know it doesn't make
any sense at the moment, but if you go to a mirror
and you disabled a mirror for a second and you press
Z and go into solid. You're gonna see we
have this inner part. Go to your face like now, and then select
this face in here. Holding. Shift, select this face and then go E to extrude
a little bit. To create some volume upwards. You're going to select
these two faces. So select them both and go
to Extrude, extrude it up, and then select this
face holding Shift, select this face and then E
to extrude it down a bit. Now we've created
some double faces, so we're going to select
this face here and go x and delete face. And also want to grab
this face here and press X and then delete face. Now if we enable
our mirror again, you can see there
is a bit of a gap. All we have to do is go to our edge select option up here, Shift Alt, and then click on
an edge here in the middle. And then we can just go
S, z and press enter. And then we can just
press G and an x and just move it down to x and make sure it's
all clipped together. Because remember we have
clipping enabled for our mirror. So if we now go, gee, nothing should be able to move away, should all be clipped
together nicely. Now we have some volume to
the inside of our mouth. It's just disabled
the mirror again. And this is good back
here and inside. And let's just select this
edge and holding Shift, select this edge and
press F to fill it. And then you can deselect and then go Shift Alt and then just click on this edge and it'll loops like this
whole edge in here. And you can go F and that's going to
fill the whole thing. You can come in here,
Control R to add in a loop in the middle
of the mouth and an S, Z and scale it up only
on the z-axis like that. And then Control R at
another loop here. And control are adding
a lot of loop here. You can see what we've
done there and that's enable L mirror again, if you want to smooth out
the inside of the mouth, just go to your face, select, select this back
part of the math, a face and then go Control
plus or Command plus. And keep doing that till the whole inside of
the mouth is selected. So up to about there. If you've gone to
March, you can go Control minus to
shrink the selection. Once you have that,
you can just go down here to the smooth tool, click on it, and then just drag this little gizmo to
smooth it all out. Like so now you have a nice
inward cavity to the mouth. And let's work on the shape
of the lips a little bit. We're going to go over here
to vertex select option. Make sure proportional
editing is enabled. Then we're going to select this vertex up here holding Shift, select the vertex behind it. Then in our front
orthographic view, we're gonna go G, z and
we're going to move it down. Now if it's moving, diverts below it, you can just go over here to
proportional editing. And you should come
to the drop-down and change the type to
connect it only. Now you'll still
have to influence, but it won't be influencing
these ones at the bottom. So we're gonna go, gee, if those still
active and we're going to move them down a bit and it would have grabbed
the bottom one. We've set up a bit and we'll just going to keep
working around like that. There's electing
the virtual want to shape and we're gonna go G and bring them down. You can see
what we're doing here. We're just trying to bring
the inside of the mouth in a little bit or to
upper side of the lips, creating a little bit more
of a natural shape to it. So it's pretty simple. You can style yours
however you want. It doesn't have to be exactly
the same way on doing it. At this point, you can select different verts in
the outside as well, and you can just even
them out a little bit. So I'm just grabbing them
and just drag them out. So they're all a little bit
more even so just making sure that the squares are
roughly the same size. And you can see it's
looking a lot neater. To make a little bit
of a cute look here. You can just like these
verts down here and just go G and move them back in a little bit just to
create a bit of a divot. And the same here. If the cheek, you can select a vertex
here and just move it in a little bit, like so. Now at this point, you can
also go to these verts here. Here. You can see this a bit of a uneven thighs
here for the faces. This one is two
rectangular wood. This one is a nice square. So what are we gonna
do is we're going to hold down Shift and just go around all the
way to the back, selecting all of these to there. This can go double G
and that's gonna slide. So double G allows you to slide. I'm going to do the
same thing over here, just going around. I'm holding shift in double G. I'm just going to slide
those down and just trying to even things
out a little bit. Same with this
over here anywhere where it needs to be slided
around a little bit, just make sure to do so. While we don't
want is faces that are really like long or skewed, for example, like this. We're trying to keep everything nice squares that are more
or less the same size. Now around the mouth here
you can notice that d squares here are quite a lot
smaller than these ones. But that's something that's to be expected because we have a little bit more detail here and things are looped
a little bit more, but you get where
we're going with this. We've just made a really
simple mouth here. We have an inward cavity
and this was probably the hardest part of this course. She's modelling the mouth. The rest is a lot easier. So let's just enabled our subdivision surface
modifier again. Let's just tap out
and keep in mind that all of these
blends stages are available as we're
continuing so you can check out mine and see
how I set things up. But in object mode again, we're going to select
the body, right-click and then go Shade Smooth. You can see that's
what we have so far. Now am noticing that I could probably changed the shape
here just a little bit. So I'm gonna go back
into edit mode and just select averts in the
corner of the mouth here. And I'm going to go into
the right graphic view. And I'm just gonna go G
and just move it back. So we want a little bit of a indent there around the mouth, which is going to look
a little bit cuter, a little bit more natural, so that looks a lot better. So what we're gonna
do now is we're just going to make
some simple eyes. It's gonna be a lot
easier than the mouth. So make sure you're inside of optic mode and you're
gonna go shift a, you're going to add
in a mesh object. So you're gonna go
to plain tab into edit mode and make sure
all of that geometry is active and
you're gonna go are IX and in 90 and press Enter. So we've rotated all of this
90 degrees on this x-axis, which is this red line here. And you can disable proportional
editing at the moment. What do you going
to do is you're going to right-click with that also active and
click sub-divide. And then what you're gonna
do is you're gonna go to the sub-divide tab here and just bump it up to free for now. And if you press Z
and you go wireframe, you can see that a bit better. Now, what you can do as
well is make sure you have to smooth tool
enabled down here, and then just click on the gizmo and just drag
it to smooth things out. Then select the bottom
vertex by itself, enabled proportional editing
again and then go S to scale and roll the
middle mouse button up if you have to
increase the falloff. We're just trying
to round this out. You get the idea here. If it's easier to work in
wireframe, didn't do it. But we're gonna go s z and flattened it a
little bit as well. So just like that. And then
once we have this sort of like almost square but
rounded out oval shape, we're going to go
right-click and sub-divide one more time. And then once more smooth tool, we're just going to go smooth. Now probably doesn't make
much sense why this is an AI at the moment,
but it will later on. So we're going to
tab out that we have this object and we're
going to go, gee, why? And we're going to
move it forward. And to make things easier, we're gonna mirror disguised. We would have got
to add modifier under our Modifiers tab. And we're just going
to mirror this time. We don't have to enable clipping and we're just gonna go G and move it over to the side
S to scale it down. What you're gonna do is
I'm going to click on this little mirror object and click on the eyedropper and then select the body
as a reference. Now the eye is mirrored and
the body is at targets. We're gonna go G, move
them in and an S to scale them down a little bit and just place them somewhere. Now at this point
you can look at your original image and you can see it's a
little bit different, but it is long that idea I decided to go a little
bit more squared eyes, you can always change that later when we add shaped keys to them. But you guys get the idea here. So at this point you can move
these wherever you want to. Whatever it helps
your character feel a little bit more the
way you want it. But you can also make sure you get to the top view
by pressing Seven on the number pad and move
them in a little bit closer and then rotate them. So we're gonna go r, z, z, and just move
them in close. Now you don't have
to be touching, just get them
roughly into place. They're gonna be. And
roughly the scale that you think work. What I might do is rotate this
a little bit differently. So I'm just gonna
go our double y. So press Y twice
after you've press R, and then just write it
on his local y-axis. So let's rotate it like that. And I think having
them up like that a little bit stretched
up is a lot cuter. So you can see here, this is
what we've made and this is where I'd like to
see you guys come in and be a little
bit more creative. You can select the body. You can change the shape
of the face a little bit. If you want to make
different facial features, Everything is customizable
and nothing is set in stone. This is completely your
character at this point. Come up with some cool styles of cool ideas for your eyes. Work on the shape of
your mouth a little bit, I'm going to make mine and
maybe a little bit smaller. But you guys overall get the idea of what
we're going for here. A very cute little character
with some basic features. Now, eventually it'll
look a lot cooler ones. We rig it up and we're gonna do more things
with the eyes later. But this is more or less modeling done for
this character. I hope you guys have
enjoyed this part. It's getting a
little bit long now, but if anything has been
confusing and make sure to check out the blend files
that I have provided.
5. Rigging: What we're gonna be doing
now is making our rig. So with this scene here opened up and we're in object
mode, that's important. When we created this character, we created it right in
the center of the world. So we have our origin
point here in the middle, or actually a 3D cursor. And that's where it plays
the origin point of our object that we started
with, which was a cube. If you recall back to
the earlier parts now, if that didn't make
any sense to you, probably completely new
to blend or stolen. You don't know the fundamental. So definitely check out some of my other videos
on Skillshare. But as you guys
probably already know, if we're gonna be adding
a rig or an arbitrary to a character and that
character is symmetrical. We want to make sure
too, that rig or armatures perfectly in
the middle as well, so it's nicely symmetrical. So in this case, we can see to that 3D cursor is still in
the center of our world here, right in the middle
of a character. If whatever reason
you clicked here accidentally and you
place it somewhere else, just go Shift S and then go cursor too large and make sure that's in the center there, just as a character is. Once you have that sorted,
Makes sure you do. You can go Shift a, you can go down to your armature options. Just click on armature and
it's going to add in a barn. Now, if you press Z
and you can wireframe, you can see that bone again, you can go into solid
and rather just come up here and click on an X-ray. If you want to do that
completely up to you, what you want to do,
whatever works for you. You can also dead bone selected and I'll
quickly just show you. I'm not gonna spend
too much time on this, but you could also have
said bone selected. Just go over here to
your barn settings and then go to the
viewport display. And you can go down to in front. And that means you'll always
see this at the front. It'll always be
projected to fund of any object and it'll be
like extra, essentially. What you're also going to
do is come here and change the display as also to be bone, and that's gonna be important. So make sure you do that. It's not just a display
thing visually, it's going to matter because
we're gonna be setting up something called a bendy bones, I guess now we have that placed, make sure that bone is
active and you're gonna go Control I or command lie, that just flips the selection
I us now everything else is selected and
you're gonna go g, z, g, z, and just move your
little character up till it's sitting
on the floor here, at the bottom of the character's
head is sitting right here on your floor and you can see that the red
axis line there. And then select the
armature again. With that armature selected, if you want to do
any sort of editing, you can press tab
with it selected, you're going to go into
edit mode for the bone. And you can also just disable portional editing
if it's enabled. And what are you going to
do is select that top knob. So just little knob
here at the top. You're gonna select
it and you can go G, Z and bring it to the top
of the head like that, then you're gonna
go to Extrude in z, to restrain it to the Z and
extrude up a little knob. That's gonna be our
control handle. And then you can click on this bone over here,
the first one, and you can go Control Alt S or Command Alt S if
you're a Mac user. And that's just going to
scale the thickness of the bone so you can kind
of tell the difference. It's just a visual thing,
but I like to do that. So Control Alt S. And then this knob here, we want to separate that. So we're gonna go Alt P and
we're gonna go clear parents, and we're also going to go Alt P and wouldn't go
disconnect button. Now if we go G to move his bone, you can see it. Nothing goes along with it. And that's really important. Let's keep naming
things as we go as well because it's
gonna be important later. It's going to help us a
lot to go down here to this little bone, It's
called bone properties. Make sure not to click
on any of these others. That has to be to
bind properties and then come here and
named the bonds. So the top one here,
this is called at Khan Control underscore head. They went to click on
the bone underneath it, the first original bone.
Let's click on that. Let's just call that body
and that his press Enter. So what we're gonna do,
clicking on this Kanban here, we're gonna come over still
another barn properties. We're just going to untick
deform because this bone isn't actually going to be deforming any of this geometry
on a character. It's just a control
button to tell us the deforming barn underneath
it what it has to do. So you need to go
up here to where it says Edit mode and just
change that the pose mode, instead of postmodern can
actually move anything. He can go a to
select it and just go Alt G to undo a movie. Once again, that's basic
blender stuff and you should already know it
watching this course. But what you're
gonna do is click on the Control button
first holding Shift, select a body bone, then you can go Control shift C, or Control shift C or Command Shift C to bring
up these commands. And you're going to make
this a stretch to right. Now if you click on this
bone here and you press G, you can see that stretches
along, which is pretty cool. But another thing we
want to do is click on the body to forming bone. Go over here to the
bone properties, come to the bendy by
an options and then increase the segment
count here a few times. And now I can click on
the headphone and then go G. And you can see we
have more segments, but it's not really meaning anything or doing anything
that is telling us what we actually want
to happen here as well as when we rotate this, we actually want it to
influence this as well, not just with the Move, select the body bone, and then go to your settings. Here are buying properties
and just scroll down and you're going to see
under here these handles. And the one we want to
affect is the n handle. Set that to absolute, and then come to
the custom here and just select that Khan head. Now if you select it and
you go G to move it, you can see it as an influence
on the band as well. And if you can
move it somewhere, you can go R to rotate it. And that's going to be really important with what we're gonna be doing later
with the animation. If you've moved anything, just select everything, all G, Alt, R and ALT tests just to make sure we set any of
the transforms, Let's go back into edit mode and just do a few more things. Inside of edit mode,
we're going to go Shift a to add an another bone. By default, death knob here at the top
should be selected. You're gonna go G, Z and just bring it down
to about here. And then what you're
gonna do is you can select both of these bones at a top holding and shift, select the first one
and then this one. Then lastly you're gonna click
on the very bottom barn. Shift, click, click, click. And then you're going
to go Control P. And you're going to make it
apparent and go keep offsets. Now, if we could go
back into pose mode, we can select this bone
and everything goes along. But we can still
select this bone and rotate it separately
and move it around. Really cool. So that is about the hardest
part of the rigging. Let's go back into edit mode. And let's add in
a few more bonds. We're going to go Shift
a, added another bond and click on it bone G to
move it over to the side. Press F3 to go into
right orthographic view. And then you're going to rotate, press R to rotate and you're
going to rotate it this way. So move your mouse up your right side like that and then just roughly get a
flat and then you can go s, z and they'll
flatten it on the Z. It didn't go S to scale
it a little bit and then Control Alt S
to make it skinnier. It doesn't have to be
any specific size. Then go G and just move it
to where the eye is here. Then press one to go to your front orthographic view and just roughly from the front,
move it with your eyes. It doesn't have to
be perfect at all. Make sure to come to
your bone properties for that bone will still active. Name it I dot capital L. Now, I can't stress this if you do
not use the extension here, dot capital L, not
coma dot capital L, It has to be capital L
with no spaces in-between. This will not work later on what we're
going to try and do. So it's extremely
important that you make it a dot capital
L towards the end. And then what we're
gonna do if that bone is still selected in front view, we're gonna go Shift
D to duplicate it and move it here to the
top of the mouth. And we're gonna call
this one upper mouth. And we're gonna
go dot capital L, very important, Shift
D to duplicate it, move it to the
corner of the mouth. We're gonna call it corner
mouth dot capital L. Very important that a name of it isn't that important
as the extension, but this name is something that will remind you what it does. We're going to go Shift D to
duplicate it one more time. Bring it down to
the bottom here, and we're gonna go bottom, mouth, adopt capital L. Now these bones here are all named and we're
going to select them. So these four bonds, and because they have had
dot capital L extension, we can go to armature and
then we can go to symmetries. And now it's
automatically symmetrized these bones on the outer
side, as you can see. And that's also given them their own naming convention with a capital R automatically,
which is really good. What you can do is go to
your right orthographic view and select all of these
bones here on the side. And you can go, gee, why? And just move these ones
back a little bit like that. You said are embedded in there. It doesn't have to be perfect
but just roundabout there. Andy eyes should be sitting just right
about there as well. You can move them maybe
a little bit back, but make sure you select
both at the same time. Instead of both selected, you can go G and just
move them back a bit. It's very important that
you don't just move one and then not move the other
one there has to be mirrored. You can always turn on X mirror. And because they had
at naming convention, it'll all update
on the other side, but I'm not going to
do that right now. So just make sure now to select these bones
here at the front, all of them holding Shift, select the body bone. That's very important. Then go Control P and
then go keep offset. Now we can go over
to our post mode. And now if we select this
main bone down here, by the way, which we
should steal name. So just like the
bottom bone and then come up here onto your bones
tab and just call it base. I guess that's a base bone, so that'll control everything. The Head Con, the Kanban
will control our body. And then this will
be how we can move our eye if we needed
to or scale it. And these ones here
will control the mouth. We can do like a little
smile or open up your mouth. And this is an extremely
simple rig, really, if I was doing this professionally or
doing it for a client, I would really make this a lot more complicated, add
a lot more controls. But this is about making
something simple for people who want to just get started and
trying to have a bit of fun. This is as simple
as we can make it, and there's not
much more to that. This is the reading part
of this tutorial done. And if you've gotten
so far with this, congratulations, I will be
providing this blend fall. You guys can check
it out and I look forward to seeing you in the
next part where we're now going to combine this rig with our character so we can
eventually animate it.
6. Parenting: In the previous video, we were
looking at making our rig. What we're gonna do now
is we're gonna take our rig and sort of attach
it to our character. And this is called
parenting AND rule is going to be addressing a
white painting a little bit. So what we're gonna do is we're gonna actually
quickly select a rig. And we're just going
to quickly press Tab to go into the Edit mode. You can see up here,
and I recall that in the previous part I just
missed one little steps. So all you're going to do
is quickly just select the eye bones and just under your bone
settings just go down and untick deform
because these bones are not going to be
deforming any geometry. They're just going to have a direct parent
relationship with the eyes. And I'll explain that
a little bit later and then select the other one
as well and just make sure to form this turned off for that as well,
and that is it. So you can now go
back to object mode. And what we're gonna
do is we can select the head of a character
holding in shift. We're gonna select
the rig itself, body first, holding and
shifts like the head. I know I'm repeating
things but I just want to be sure
you understand. And then once you have that
selection arrangement, you can go Control P or
Command P if you're a Mac user and you're gonna go
down to this option here called with
automatic whites. And what that's done, your blender is given
that it's best shot to automatically
white paint this way. And I'll quickly show
you what I mean. If you go up here with debt rig selected and you go
to your pose mode, it can now select the
top head controller, and this is press G and move it. You can see, see how that's
all going along there. And now you guys kind of get an idea of what I meant by that. You can now control things. Let's just quickly select
somebody's mouth controls here. Give that a shot. Did see it's a little bit messy. It's still a little bit jaggedy and fall off isn't quite
exactly where it needs to be, but it's this roughly
put things in place and we can definitely
refine it then we will. But you get the idea in any
eyes, if we select your eyes, nothing moves along because we're actually going to directly parent the eyes to those bones. But we'll be addressing that in another video where we
tackled the shape case. It's not really that
important right now. So let's just go back
into object mode. And what we need to
do is we need to select the head itself. Go over to your Modifiers tab. And it's important that we
change the arrangement here. Let's make sure that
the mirrors at the top, I'm just pressing
these little tabs to fold them down so it's
a little bit more compact, but we need to take this
armature and drag it above the subdivision
surface modifier. It's very important that
the mirror is at the top, then the armature, and then a subdivision surface modifier. Whatever you do, do not make the armature
be at the very top. That'll be a really big problem. So keep it underneath the mirror as long as you
have it in that arrangement, things are gonna
be a lot better. There. Select the armature
and in holding and shift, click on the body. And then you can go to
object and you're gonna go into the white paint mode. Now what you can do
is you can hold down Control or Command and
then click on a bone. So let's click on a body bone. And now you can see what
that bone is affecting. Anything that has a
warmer color has a lot of influence and anything that has a cooler color has
less influence. At the moment, the
default way that it did this fall off
is a little bit messy. So we're just gonna go
over here to our tools, make sure it's set to
draw and then bring this strength down
to about halfway. And if you press F, you can increase the
size of your brush. So press F and make
it a bit bigger. Then go to your right
orthographic view and you're just gonna
start painting. You're just going
to make the top have a lot more influence. The body here like that. So you can see what I'm doing,
just painting, like say, you can come here and enable
the X-ray mode as well, and then just paint. Again. It doesn't seem to be doing
anything in this case, but if you press Z
and you go wireframe, uh, you may be able to have a little bit more control there. So just painting over
making sure that has full influence on these areas like the mouth over
there as well. Just coming in here and you only have to do it on one side, it'll be mirrored because we
have that mirror modifier. But what we're doing here, maybe increase the
strength for a bit. It's just warming up. All of the places are adding
more value where we want this body bone to have influence it towards
the bottom parts, we don't have to
have quite as much influence as you think. So Something like
that should be fine. And then we can click on
the corner of math here. So holding and control click on the corner mouth bone here. And let's now go
to a brush and go subtract and it's having
too much influence. We don't want that bone
to affect the head, so we're just going to paint areas where we don't want
it to have influence. So we want it to be completely dark blue on the areas
where we don't want to influence and we're
just painting down to about here and we just want that
corner of the mouth. Do we have influenced while
you still have to bone selected if he could go
G and you just move it, you can see what I mean
by influence, right? So just right-click to let go, set it back in place. But wherever there
is one more values, that bone is going
to have influence. If you hold down Control and
click on the other bone, you can see it's mirrored that white value exactly
on the other side. And that's what's also
important to have a really good mirroring. So the bones are
perfectly symmetrical and to have that naming convention that I mentioned in
the previous video. So that's why it's
really important to you. So you guys understand that. Let's keep cleaning up. We're gonna holding
Control and click on this bone up here
and the upper mouth. And the same thing,
we're just going to decrease the falloff. We don't want us
anywhere in the body. Just like that. Not
too much to do here. It's done a pretty okay job. And in holding a control-click
and the other one, you can see it's
mirrored perfectly. And you can also just
test that click on it bone while holding a
Control G to move it. And you can see the
falloff looks quite nice. And now the last
one, control click on this bottom
bind here and just paint away with the
Subtract brush areas that don't need influence. And this is pretty common sense. I mean, you guys know what
part of a math should move and shoot and just try
it out a little bit. Press G to move it, and then right-click just to
set it back into its place. And then just paint accordingly. If you've taken a little
bit too much way, just click on Add brush
and add a little bit back. It's really not a big deal and it's a lot easier
than it looks. But essentially you
can now try it out. I'm gonna hold down Control and clicking the top bond here. And you can see if we
select the top control, but everything is pink
because remember we turned off the form for that bone because it
doesn't need to deform. It's only a control
bone for the body. So if we click on
that and we go G, you can see that
all moves around. We can also hold
Control and click on this bottom body bone and we can go G and everything
else should move around. You can also, you know,
I've already shown you, but you can select these
different parts on the body, on the mouth and
move them around. And that just gives
you character. You can add emotions and
things like that too, when you're animating.
That's pretty much it. So let's just press
Z, go back to solid. And I think that's all the white painting
we need to do for now. If you need to refine anything, go ahead and do that. But I'm going to go
back into object mode. And at this point we
can also just select this little jiggly
thing at the bottom. And holding in shift, we're going to
select our armature. And then what we're gonna
do is we're going to go Control P and we're
just going to go set parent to object. In this case, we
don't want to do automatic weights
just to object. Now if we select the armature by itself when we go G to move it, you can see that bottom part goes along with it. Now
don't worry about the eye. So you can see the eyes are
kind of being left behind and everything else
goes with the armature. But we're gonna be addressing
that in the upcoming parts. So that has been
how to white paint al simple little rig
to our character. And honestly we're
really getting past a lot of
complicated things. I mean, if you're
following along so far, the animation should be
even easier than this. So I will be providing
the blend files. Keep an eye out
for them and I'll see you guys in the next part.
7. Shapekeys: Okay, so what we're gonna
be doing now is turning our eyes and just something
we can animate later on, we're gonna be using shape case to do that so you
can actually select the eyes and before we can actually get into
adding shape keys, which I'll explain in a minute. We need to currently go over to our Modifiers tab here you can see we have
a mirror modifier. So currently, I mean, if you just press Tab to go
into edit mode of design, you can see we only
technically have one I hear the other
one is just being mirrored at the moment
and we can't really access it or do anything to it. It's just existing as a modifier or an
operation, if you will. In object mode of
that I selected, you actually had to
come to the drop-down here and apply that. Now if you tab into edit mode, you can see these are individual pieces of a mesh
or we have one over here, and we have one over here, and they can all be
individually edited. Once you have that done, make sure you are an
object mode and you can go and press F ray does
is actually important. We need to change
this origin point which is currently on this. I hear that he
press R to rotate. You can see where it's rotating. So we wanted to write in the
middle of this geometry, and it's actually something
we can use in Blender to automatically do it
as if you press F free while you have
those eyes selects it, you're going to come up
with the search bar here. And what you can do is type
inside of their origin. And it didn't go down
to origin to geometry. Now let's place
that origin point right in the middle
there for us, which is exactly what we want. Now that you have that done, you can go over to your
object out of properties and you're going to see something
here called Shape Keys. And it's a shape keys
that we really want to be using for doing little
blinks and things like that. So when you click on this plus
it's going to add a basis. Basis is going to be essentially the original state
of your geometry. So that's the one that I'm
once you no longer using your shape key safe
exempt you set the values of U-shaped
keystone to 0. It will revert back
to your basis. So your basis is the one
you don't want to edit. So make sure that any sort
of topology that has been added has already been added
before you go on with this. And then you can
add your basis and then you press Plus again. And now that's when
you get your case. So essentially, if
you select a key, in this case we have key one, select that and you
go into edit mode, any changes you make now to the geometry so you don't
have to follow this. I'm just explaining
this stuff example. I just move a point and I tap out and now I have to shape key. I can actually
increase the value. And now it's going to
look at a difference between the bases and a key. So it's automatically
doing that all for us. Now the thing is instead, but we don't want to
do is add in topology. So if we can move topology, but we don't want
to extrude or we don't want to add
in new loops or edges only existing
to poll j can be moved around
in the edit mode. So I'm going to quickly just get rid of that key
and add it again. So what we're gonna
do if our first shape key is we're just
going to be adding a blink to the I over here on our right or the
left side of the character. So just always
keep that in mind, the actual side of
the character and the view that we're seeing on our screens are not the same. So if I say our right side, what I mean is to the left
side of the character. So we're gonna be working
on the left eye here. We're in edit mode. We have that key one selected, and let's create a
cute little blink. So we're going to just
select all of this, make sure it's not
the other side. And we're gonna
go s, z and we're going to shrink it
on the Z, like so. And then we're gonna
go NSX because that volume doesn't
just disappear. It has to be
displaced somewhere. So that's gonna be
to the side so we can create a little
bit of stretch. And then we're going to enable
our proportional editing. And we're just going to select somebody's verts
here in the middle. And we're gonna go G, Z and just bring them down
a little bit like that. And there we have it. So you can select all of it if you want, you can go to the smooth tool and just smooth things
out a little bit. Scale a little bit if you want. But this is where you can make a shape or blink
shape that you like. Look at some
cartoony references, whatever inspiration
you can find online. There's a lot of cool
stuff out there. But essentially
this is gonna be to shape that our eye is going to morph into when we're
doing a poll link. So clean that up as much as she went from now. I'm just going to
leave it at that. If you now tab back
into object mode, you can now get this key one and you can
take this value here, and you can slide it
and look at that. Now we have away. Later on we can animate this blink and it looks pretty cool. So you got to just
make sure that it will look for
it at the moment. Maybe that ion looks just
a little bit too big. So what I might do is
just go into edit mode, select the whole
thing and just go S and scale it down just a bit. So now I'm gonna try
it at an object mode. A cat looks cool,
so make sure that value is set back to 0 there. Once you're happy,
you have to blink. How do you get it exactly
on the other side? And that's what I'm gonna
be showing you before we can do anything with the mirroring while we're in our object mode and we
have the eyes selected, we need to press N
on your keyboard. It'll bring up the
properties panel. This thing here is
a Properties panel and you've got to click on item, make sure the eyes are selected. And you should see
over here under the rotation vectors that
there are some values here. And this will
absolutely not work at all if we don't
set those back to 0. Because remember in one of
the earlier part through rotated the eye in
object mode TO in fact, if I just quickly rotate it, you can see these
vectors move here. Well, we need to do
is we need to go Control a or Command a. And it's going to bring
up these apply options. We're going to
apply to rotation. And all of these
rotation vectors have to be set back to 0 once
you have that done. Now we have a clean
reference point for this to mirror over onto
the other side. Make sure that's
done very important. So now what we're gonna do is we're gonna make
sure we have that blink ones selected when I
increase the value to one. When simply come to this
little drop-down error, we want to go new
shape from mix. And if that key to now selected come to the
drop down arrow again. And go mirror shaped key. And now if we take that K2
and you drag that value up, you can see we have it on the other side and
you can double-click on that one and let's
call it Blinkx dot star. We've got linked dot
L, which we can take back to 0 or take back to a
value of one or in-between. And we can get exact same
thing to the right one. That's all pretty cool. I really liked that, but we
want to individually take these two eyes and
also parent them to these I bones that we
added to our rig earlier. But at the moment
it's just one object. So how are we going
to get around that? So let's quickly come
and click on this little x down here not
to minus this little x. It'll just reset all of
these values back to 0. The Blinkx dot L
and the Blinkx dot are not at any sort
of value except 0. And we're going to separate them into two
measures in a second. But let's just quickly
go to and modifiers. And what we're gonna
do is we're going to add a modifier now, and that's gonna be the
shrink wrap modifier. Click on the shrink
wrap modifier. And the reason we
want to use delta P1, this geometry to stick to the surface of the character because that's going
to be deforming a lot. And we don't want this clipping in and out of the mesh
of our character. So when you click on
this little eyedropper and you select a character mesh, now you can see it's
stuck right on there. And if we even move the eyes, you can see it's continually
on that surface. But what we need to do is
come here to the offset and just bring it
out a little bit. Or some value that
works for you. Then what do we need to do
is give it some thickness. So we're gonna go to the
solidify at a solidify. And let's give that a
little bit of thickness. So I'm gonna go
maybe out like that. You can still mess
around with that offset. Like I said, That looks okay. And then let's also
give that a smooth. So we're gonna go and
give that a smooth. This is going to help smooth
things out a little bit. You can increase that
factor but don't overdo it. Then you can add a subdivision surface
modifier on top of that. But for now, just come to the levels here and
drop it all the way down to 0 because
we don't want it to be slowed down when
we do animating. But eventually
when it renders it will have a subdivision
level of two, so it'll be nice and smooth. So also just minimize that
with these I selected, you can also go right-click
and go shade smooth. Now, they look pretty cool. Let's go back to our shape keys. You can see it all still works. We can still do it
a little blinks. But now we want to separate these into two separate objects. So we're gonna tab into
edit mode and make sure you have the basis
selected and you're just going to select the eye. It doesn't matter which one. Just select all the
geometry of either one of them and then go pee, and then you can go
separate by election here. And you're going to tap
back out into object mode. And now both of these, this one is its own
object and this one here. Now the origin point is still in the middle for both of them
and we don't want that. So we're gonna hold down shift
and select both 50s eyes. Make sure it's only two
eyes that are selected. And then you're going to
press F3 and you're going to come here and you're
going to go origin. So type in origin. And then you're gonna
go origin, who? Geometry over here. And now let's place
the origin points for each one of these in the middle. So what we're going
to quickly do is just add these two outrigger. Select either via,
doesn't matter, holding and shift
select the rig, den go over into pose mode. In this case we have left, I select it so we're gonna
click on the left thigh bone. You can see it's blue
and then you're gonna go Control P or Command P. And you're going to parent
it directly to that bone. Now you can go back into object
mode and select the other I holding and shift
select the rig again, and then go back into pose mode. And now click on the right, I hear Control P and then
go set parent to bone. Now, not only can
we use a shape, Qi Bu can also move these
bones around here and even scale and rotate
for each individual ion. So now if you actually select
the top head bone as well, the controller and you
press G to move it, you can see those eyes
go along as well. So death is a very
simple way to add these little eyes Did you can do all sorts of cool things
we've bought away. If you go back into object
mode, you select either eye. This option here is there. So you can actually
select the left eye first and then just get
rid of that right blinks. I'm going to just click on a little minus to get rid of it. And then you can
select the right eye, which is the right
side of the character, and you can get rid of
the left blank like that. So now both of these have their little blink that
we can use later on. That is how we do shaped keys. And by the way, you can add a lot more
different shape keys. I only made a blink. You can easily exact same method and technique to
make different eyes. And that's what I
challenge you guys to do. I always want you
guys to not just copy the tutorial or lecture. I want you to learn
something from it. Use two techniques, incorporate them into your
character in a unique way. I would really like to
see what you guys do. I'm going to be including
this blend file, if anything, was a
little bit tricky, which would maybe
for some people, just look at it provided stages and you can see
how I set things up. But in the next part,
we'll be getting into actually what are we
doing in the next part. Let me quickly look.
In the next part we're gonna be doing
D animation that looks like what's on my list. So I'm looking forward to that. That's gonna be a lot of fun. I'll see you guys then.
8. Animation: We're now ready to get
started with our animation. What we need to do first of all, is select our
armature over here. And that's what we're
going to be animating. A character is already
parented to our rig. We already did that
in the previous part, but the thing we also want to consider is our frame, right? So the amount of frames
we have, I should say, you can say that n value here on our timeline is 250 frames. Now our animation by default and blender runs at 24
frames a second, so 250 frames, it's gonna
give you the battle 11 seconds or so of animation,
which is a bit too much. We wanted us to be
a short little loop and it's also going to take longer to render if
we had a bigger one and it's going to be
more simulations, let's double-click here
or just click on it and you're going to
make this 75 frames. Now note that seems like
quite a short animation, especially at 24
frames per second. It's not that long, it's
like free seconds long. But the thing is because
it's lovable, you can, it'll almost look
like it's just going endlessly and it will also take less time to
render luck I mentioned. So let's come over to frame
one and make sure you have this rig selected and
you're going to go over here to object. And then you can go to
pose mode instead of pose mode where we can move these bones and add keyframes. Now to simplify things, we're going to select
only two bones we need to get started with bodies. The main thing we're
going to be animating. So let's just come over here, select the head control bond and holding and Shifts
selected by span, and then go Control I or Command I to inverse
the selection. So now everything else is selected and then just
press H to hide it. So we only have these
two bones in the pose. My palette, I don't
want to not delete it. They're just hidden. If we go old age,
they come right back. So everyone went Alt H,
they come right back. Okay, So don't worry about that. And if we were to actually
move this base bone here, you can see that the body
down here doesn't go along. And let's, I'm just gonna
quickly show you guys this. Let us quickly go back
into object mode. Now if we select a rig
itself in object mode, you can see it goes along
because we've directly parented this bottom part of the
body to the armature. One thing we should actually do, we'd probably be a
better way to work is to select this bottom part
holding and shift, select the armature,
and then go into pose mode and then just
select this bottom baseline. So make sure you click on
it and then go Control P. And then just go direct
parenthood a bone. So it's just a bone option here. Now, in our postmodern
we move this, we'll see that bottom body
part go along as well. And that's gonna be
a lot more accurate in what we're actually
trying to do. So, so just stay in postmodern. In fact, I'm just gonna quickly
go back into object mode. Just click somewhere to
de-select that bottom part, select the rig again, and
then describe pose mode. So these two bones
are going to be all we need to get started
with the body, but don't have to
worry about the facial expressions yet in the eyes. But when it come to frame one, which is quite obvious
because that's where it starts and we're just going
to use this default position. So make sure to both
selected and then press I. And that's going to bring up a whole bunch of
key frame options. But the one we want to go with
is location and rotation. And essentially that
just means on frame one, these two bones are set to be at a certain rotation and a certain location
in our 3D space. And if it comes to the part where our animation is
running on a timeline, when it comes to a friend one, That's where those bones
will be positioned. Essentially, we're going to layer up a whole bunch of these. And over time, it will
interpolate between these different keyframes
and that will give us the appearance of
motion or an animation. Now if that all
sounded a little bit confusing, don't worry about it. You'll understand
as we get into it. Let's come up here to
about frame seven. Let's just save
from frame seven. There we go. This is safe from frame
0 to frame seven. We want this guy to kind
of jump up a little bit. While we're going to
do on frame seven, we're going to just grab this
bottom base bone and we're gonna go G and we're just gonna move it up a little
bit like that. But then what we're gonna
do is we're going to rotate it as well,
just slightly. And then select the top
Control button for the head and then bring it down because
as he's accelerating up, it's going to squish
them down a little bit because there's
forces acting on it. If we didn't give it
that little squish, then it'll just look
too stiff and robotic. Once you squish it down a bit, R to rotate it just slightly and then G just move it
over to the side. So it's kind of just squishing up and to the side
a little bit more. Just select both of dishes, bring it up just a bit more. Then once you've done that, press I and then insert a location and
rotation frame again. But on frame seven this time, frame seven, it's going
to be in that position. And frame one is going
to be in deposition in Blender automatically
for a process called interpolation
will automatically fill in all the
in-betweens for us, this is what makes
it different to 2D animation where
we have to go in and draw all of the information
frame by frame. We've Friday. The advantage we have is that through like vector
maps and stuff, it can fill that all in for
us, which is pretty cool. Now if we press the space bar, we can see that set,
but you can see it just still a lot of
information to add here. So let's give it a little
bit more movement. We're gonna come up
too bad, frame 11. And we want to think
about soft bodies when something that is soft
and squishy suddenly accelerates and it gets
squished down and then suddenly stops that
mass of squishing. It doesn't just stay squash, it has to stretch out. It's almost like
taking a bottle of water and really
quickly moving it. It's not just going to
stand still immediately. You'll still see the water sloshing back and
forth and down. You can actually feel it moving if you've ever done
something like that and it's going to be the exact
same thing with a squishy character like this. That's very jellyfish and that's what we're
trying to achieve. So on frame 11, we're gonna grab the top control bone and
we're gonna go G, and we're just going to
stretch it out a little bit. Almost at a bit of
an angle to before. We're going to select both of these bones and we're gonna go, I insert a location and
rotation on frame 11. Okay? We might also just want to grab this bottom bone here on the
base and on frame 11 again, I forgot to do it is
just go G and just maybe move it up a
little bit as well. Then once again, just
select them both go and insert a location
and rotation on 11. Now if we go to frame 0
and I press the space-bar, you can see there's a little
bit of a stretch like that. Now it might be a little bit
too extreme just like that. So let's just back in frame 11, just bring it down,
maybe just a bit. And I insert location
and rotation again. And sometimes this is just
one of those things where you have to just tweak
it a little bit. It's not always going to
be just right up front. Okay, so at the moment, That's looking a
little bit better, but it also needs to
come back to its place. So what we're gonna do is select both of these
bones and we're going to actually click and drag over to one on frame seven here. So you can see it's now yellow. And if you go Shift D, you can drag and duplicate
that keyframe. And this time you're
going to drag it to frame 18, which is about here. Up to frame 18. And now what you should see if
you've got a frame on it, hit the space bar or
something like that. It's just this little jolt
going up in a suspicious back. Now you may have
to come in here, make sure you always have
to bone selected and just slide these keyframes
around just a little bit. So you're going to get this nice organic looking squishy motion. That's looking better. We can always fine
tune it later, but for now we have them going up to the side and
squishing down again. Then we want to kind of
bring them back into the default position
a little bit. While we're gonna do
is we're going to come to about frame 27, so come up to 2027. And we're gonna select
both of these bones. We're going to go Alt G and Alt R to reset the transforms, but we're just gonna go G, Z and just move them both up
a little bit like that. And we're gonna go i and insert
a location and rotation. Now if we go to frame 0
and we hit the space bar, we can see it kind of
goes back like that. And it's from this point
here in the middle, we kind of returns to
its original position. We don't want them just
immediately launching off. We went a little bit
of anticipation. So what I mean by that, we're gonna make
them squished down a little bit and then
kind of spring out. So let's come to about
frame 35 and we're gonna go bring both of
these bones down just a little bit and we're
gonna grab the top bone, rotated a little bit and in
g to squish it down like so. Select both of these
bones and then go i and insert a location
and rotation on 35, what you should see some kind
of squishing down again, giving a little bit
of anticipation. It's just a little
thing like that. Adds a little bit
of extra detail and then you can quickly
shoot up to the left. So what we're gonna
do on frame in 40 to come to about frame 42, we're going to select both of
these bones and we're gonna just go R to rotate it a bit and then G and move it over here to the side so
it's shooting off. And once again, he has forces acting on a
menace very jelly-like. So it's going to be
squished in quite a bit. We want to think
about the physics here, so something like that. And then we're going to
select both of these. We're going to go I and
insert a location and rotation for that
squish over on 42. So let's go to 27 and played
out. And he shoots off. It might not look the best yet. We still have to add
in more information. So let's come to about 47. And once again,
we're going to bring them up even more like so. And now stretch out the top bone a little
bit more like so. Select both of these
bones and then go, I insert a location orientation. And what we're trying
to do is just get that kind of stretch
up like that. So ducks down quickly and stretches up and you
see that little bit of displacement there is shooting
up, it squishes down. That's just something we
really want to emphasize. You can always come
back to frame 42, squishy down even more
for that bone and then go I inserted location
and rotation. Let's see that. Okay, That's looking
a lot more natural. Then he's gonna yank
back a little bit. So let's come to
about 52, frame 52. What we're gonna do is we're
gonna grab this head here, the Head Control button and
bring it down this way, a little bit rotated this way, and bring the body in and
down a little bit like so. And we're going to
select both of these bones on unframed 52, we're going to go I and insert
a location and rotation. So let's look at that. Because up looked at, kind
of talks back a little bit. Now that might be a little
bit too aggressive, but we can always
slide that frame 52 over to the side
a little bit later. But for now, let's just go up to frame 59 or 60 about here. And then what we're gonna do is with both of these
bones selected, we're going to come
to the frame one over here and just select
the keyframe and then go Shift D and duplicate it and drag it all
the way to frame 60. And now we're using that post. So what we should see
is I'm kind of going back to where it
originally was like that. And you can see
how even though it doesn't look that good at first, you can see how
they're also into add to get a little bit. Now one of the things that's
making just look really dead is the lack of the
jiggle on the body here. But later we're
going to fix that. We have a simulation. It's going to make
this look 1000 times better and more natural. And we're also going to add some little things to
the eyes and things, but you can see how
we're getting here. And what I mean by
these little stretches, stretches and squashes. Animation is just a
matter of patients working away through and
making little adjustments. But what we could also
do here in frame field, what we need to do is just bring the body up maybe
just a little bit and just tilt the head
over here because what's happening is
coming from the side. Rushing over back to
your original position, but he's going to tilt over a little bit
because he has a lot of mass moving to the
right side again, which is not just going to stop. So he needs a little bit of
a tilt over seven frames 60, moving that bond here
we're going to go, I insert the location
of rotation. So let's have a look at that site for a
little bit better. But we're now going
to come to frame 68. And then with both of
these bones active, we're going to go Alt G and Alt R to reset the
transforms and we're gonna go i and insert a
location and rotation keyframe. What you're gonna notice is that the very first frame and the
very last frame here for the body animations are
exactly the same and it needs to be that way
so that it's lovable. And if you just
press the space bar, it should look loopy, like you shouldn't
see a little glitch. It should just look
like one seamless animation that's
looping over and over again while we're still
in pose mode of our bones. Remember earlier we press H to hide some of our bonds
who are not going to go Alt H or Alt H to
unhide the bones. And now let's get rid of
somebody's ADA Brian, so we can get rid
of the body bonds. We're going to select
them and then we're just going to press H to hide them. And now we only have the eye
bones and the facial bones, and they're the ones we're
gonna be working with. So let's come over to frame one, and this is going
to be quite easy. So on frame one, with all of these
bones selected, we're just going to press
I and we're going to insert IT location and
rotation keyframe. And then what we're gonna
do is when it come over to frame 12 or 14, either one. And we're just going to
slightly open the mouth here a little bit and give
them a little bit of a smile like that. Now you can bring maybe
this one in here. And this is where
you can have a ton of fun and really
make it your own. But I'm going to go
just a little kid, little smile, select
all of these bones. I'm going to go, I want
to insert a location, location and rotation
on frame 14. I'm going to go up
to about frame 2828. I'm going to drop this bone
down here a little bit. Select it and press G, and
maybe bring this one up here and bring to smile
down a little bit. Bringing just went out. So just making the math a
little bit more hose. That is a little
thing like that. Select them all and then
go I insert a location and rotation and
then up to frame 40. And in frame 40 we're going to bring the mouth even
down a little bit more or maybe up a little bit
fat and open it just a bit. So we want to open
their mouth and bring the smile over here
off a little bit more, whatever you want to just making a little expressions like
that, something like that. Maybe I got that looks
smart kid that every guy. And then once you're
happy with it, you can just select
everything and then go, I insert a location and
rotations that it's in frame 40. And let's keep a
few extra finances. We don't want it to be
too like consistent. Let's give it a little
bit more of a gap. Let's come to about 60
or so and frame 60, Let's just select
somebody's mouth bones. Let's just go Alt, G, ALT are just to reset
the transforms. Let's go i and insert a location and
rotation on frame 16. And then towards the end here, while we still have all
of these bones selected, Let's just go to the
first frame here and select it by dragging over it. And they go Shift D to
duplicate and just drag it all the way to the end like that. And maybe here on frame six acres currently
we have a hold. These two frames are exactly
the same subframe 60, you can just customize
it just a little bit, maybe a bit more
of a smile here, like that for the mouth. Select it all and then go, I insert location and rotation, as long as the
beginning and the end. Barn poses are exactly the same, it should all be
nice and capable so you can see what we're having here. Try whatever you want. Maybe what I'm gonna do is I'm gonna come here to frame 40. And I'm just going to
for me personally, I'm just going to
reset those transforms there and close them off
just for a better thing, that's a bit too much, but you guys can do
whatever you want, okay, so completely up to you how
you want to approach this, but just experiment, try out some different smiles
or whatever frowns. As long as the beginning and the end frame are
the same for this, it should be fine
with the eyes here. You can also dude,
exact same thing. You can move them
around a little bit. What work could actually do, and this is what I'd
recommend you go into object mode and then just select whichever
I want to select. And didn't remember earlier
we created the shape case. I go to Object Data Properties and let's just start
with the left eye. So we're gonna
select the left eye when it go to frame one. Frame one with the left eye
of a character selected. We're going to go over
to our Shape Keys under the Object
Data Properties. And it'll just blink
here with a value of 0. We're just going to click
on this little button here to add in a shape key. And we're gonna select
the other one and do the exact same
things that Blinkx dot R with a value of 0. Here we are going to
give it a shape key. Now let's come up to about
frame for attain in frame 14. With both of them,
we're going to still keep the value at 0, give it a key frame
for the blink. So click on the other eye
and give that value there, a value of 0, and also
give it a keyframe. But then what we're
gonna do is gonna move up maybe to about frame 16. And then what we're gonna do is increase that value to one. Click on this little button next to it to give
it a keyframe. Select Exact same
other one on frame 16, give it a value of one and
click on the little key frame. And then we can move
up to about frame 20 and then bring for both of
them that value down to 0. And click on the little
keyframe button here on frame 20 And exact same 40 out of
one, bring that value to 0. Click on the little keyframe. And what should now
have if you've got a frame one and you
hit the spacebar, is a little blink like
that, which is really cute. So let's create a whole. So between 20 and about
50, we're going to, with both of those eyes
with a value of 0, we're going to click
on the little keyframe again to make sure it's
0 and that's in fact 50. And then instead of having
to go for all of that again, if you hold down shift and
select both of these eyes, you can just come over
here on the timeline, drag over these keyframes
here, disease-free. They should all be
yellow and then go Shift D to duplicate
them and just drag them all the way till the very end one is sitting
right in front of 50. That way you should
have duplicated those blinks like that. And what you can do
is as long as you have both of those
eyes selected now, you can come in here
with the keyframes and you can slide them around, adjust the timing a little bit, and see what you like. It's completely up
to you. And this is where it really is the
way you want it to be. But you can see we can
just cute little blinks. You can offset the
timing is a little bit. See what works, but
you can see how simple it is only having those two little blinks already adding a lot of life
to a character here. And just a little smile that happens here into
math is really cute. So that is our animation and you guys can fine tune
that as much as you want. But in the next part,
we're gonna just add a quick little
simulation to this, hanging apart at the bottom. So it's gonna be dynamically animated with the simulation. And then from there
we're getting really close to just
doing our materials, lighting, and rendering
out a final animation. So if anything has been tricky, I will be providing
the blend file as I do revolve two
different stages.
9. Simulation: In the previous part, we were
able to do our animation. Now, we did hide
some of the bones. So if you still
have the armature selected and you're
in pose mode, you can just go Alt
H to bring back the other bones were pretty much now done
with the animation, but you can go into
object mode and in object mode to make things a
little bit more organized, what we're gonna do
is select that rig, make sure it's active. And then you going to
press M and then go new collection and then call that new collection and rake. And then press. Okay. Now you have collection
here which you can click on the little tick and that'll
bring it in or bring it out. So at the moment we don't need to see our
armature anymore, so just hide it
and we can come to the main collection here and just click the
little drop down. And now things are just a
little bit more organized. Come to a little
drop-down here as well. Now we just have
these two layers, if you will, or collections. So think of them kind of
like layers in Photoshop. We can just take
them on and off, which is really handy, but we don't need to be seeing our rig. But we're gonna take this
bottom part now here. And we're going to be adding
a cloth simulation to. The simplest way to do
that is just a selected, the actual backfiring
that hangs there, whatever you want to call
it, and go over here to the physics properties. Then just click on this
one here, fold cloth. Now obviously it's just
going to disappear because thinks it's in the
middle of a simulation. But if you go to frame one and you press the spacebar, you're gonna see it falling. And the reason it's fooling
is because it's acting like a real cloth is actually
gravity and the same. And because it's not
technically attached to anything as far as the
simulation is concerned, it's just fooling
for empty space. Now, we're going to
solve that by pinning the cloths and come back to
frame one while you're at it. And you're gonna
come over here to your object data properties. Now above the shape keys, which we've already
dealt with, is something called
the vertex groups. And these vertex
groups are essentially just values that are
assigned to the mesh, just like when we were
in the previous parts, white painting, our mesh to our rig is the same
kind of thing here. So what we're gonna do is
we're going to come here and click on the little Plus
to create a new group. And we have this part,
active dangling part. We're going to come over here to an object and change
it to white paint. What are you going to do
is I'm gonna come here to your brushes and you can
make sure it's ad because we want to be adding a value and essentially anything that
has a warmer value here. So if you recall earlier we were doing our white
painting where we had our rig and we were
parenting it to the body. We were using the
sort of whites. What you're gonna do
is you're going to come here and make sure
you have to add brush. And anything that has a warmer value is going
to have more influence. So we want these things at a top topology at the top
to be more influenced. Let's paint it. We're just going to
come in here and give it a bit of a warmer value. Like say, in anything
that has this kind of lesser warm values to lighter blue and stuff
and the dark blue, it's going to have
less influence. So we're going to use this
group essentially to tell a cloth simulation to kind of pin onto these warmer
values a little bit more, but have less influence
on these bluer values. Essentially more
cloth simulation. So just with that brush, just painting a little bit of the top here to give it some warmer colors
and that's all we have to do. Let's go back up here
into an object mode. We now have that vertex
group information and work we're gonna do is we're gonna go back to
your physics tab. We already added a cloth, but all you need to
do now is scroll down all the way to the
shape down here. There's gonna be
something called Pin group and you're
going to click on it. And then just select that
group that we've now created. Now if you go to frame one
and you press the spacebar, you're gonna see
that it's dangling. So it's now actually
following along because those values
at the top there are telling that topology
that sits there to stay pinned to the character. And the rest of it that is the lighter value
would have bluer value is going to be less influenced. Now we only have to
do is just fix up the simulation values a little bit and then we
can cache it out. Dangling parts selected and in a Physics tab
under our cloth, or you're gonna do is go down to the stiffness here under
the physics properties. And currently the
bending is set to 0.5. What you're gonna do is click
on that and set it to five. That means it's going
to essentially been less if we now go to frame one
and we press the spacebar, you're going to notice
it's a little bit more, little bit more stiff. It has a little bit
more stiffness. But On top of that, if you go to your modifiers and it's very important
that you actually drag the cloth above the subdivision surface
modifier for that. Then go to frame one. Now, press the space
bar and you can see it has a lot less like cloth, coffee, coffee is to it if
you want to call it at. So we wanted to be more
like jelly in a sense, a little bit almost
like a soft body. Sometimes these things are
really weird to describe them, really sorry, but you guys
see now what it looks like. That's pretty much all
we had to set now, there are a lot of settings
here under the cloth, physics and stuff, and I'm definitely not going
to be covering it. The only thing you need
to know about now it's just a bending and adding the cloth and the arrangement
of the modifier here. This is not a clef or
physics tutorial, but all, but this simple little technique here of just using cloth
with a bit of stiffness. I use it all the time for all sorts of characters
in a really works well. And it's super simple to do even for people who are
absolute beginners. And like I said, I'll quickly
just mentioned caching. Now what caching is
essentially when we bake our cloth simulation
of the data behind that into a file somewhere
like a blend file. The thing we can do
is just make sure obviously that
engulfing is selected. And under your cloth settings
you just going to scroll down to your cash over here.
So just go to the drop-down. Currently it's set to 250 frames because that was the
default number of frames, but we changed hours to 75. So let's just change
it to 75 here as well. So it means over 75 frames, it's gonna cation
that information and make sure you file
is saved somewhere. I know that's obvious, but just make sure it is. And then once you
have that done, you can just press bake. And that happened really quick. It just took a few seconds there because it's such a short thing. But essentially it's now
baked into our blend file, which means if you were to go now and look at your settings
here for your cloth, a lot of them are grayed out. You won't be able
to change anything. You would have to
actually come here and delete the bake In, changed something and
then bake it in again. Now it's really
important that you bake when you're all done. So eventually when
we render this out, it'll render because
if you don't bake it out when you render it, you won't see the
cloth simulation. So just make sure to do that whenever you're
dealing with physics. But yeah, that's it. I will be providing
the blend file and I keep mentioning that, but all of the different
stages are provided for you guys to look at just
in case you're stuck. I look forward to seeing you in the next few parts
where we wrap this up.
10. Materials & Lights: Now we finally have our modelling animation,
physics simulations. All that stuff's out of
the way and we're going to add in some lighting
and materials now, generally, I tend to make my materials before
I add the lighting. That's a bit unconventional, makes more sense to add the lining first so
you could actually see the results of your materials as
you're working on them. So we'll do that first. But obviously we also need to think about our
render engines. So if we go over here, if you go to the top,
as you can see, a little camera, camera
properties or render properties. Actually, the engine
that's rendering, this is the EV engine, but it'll still give us
a pretty good results. We're gonna make sure
we set that to EV. But the thing is if
EV, you need to enable a few things here like ambient
occlusion, number one. And also you need
to come down here and enable screen
space reflections. So that's just going to make it look realistic, a
bit more realistic. Because if you don't do that, what's going to
happen when you add the lighting and the materials? It's just going to look
really flattened dead. So make sure to enable
these things here. If you don't know a lot
about the materials, definitely watch some of my
other tutorials or courses on Skillshare to go and introduce things from a more
beginner's perspective. But that's all you have
to worry about for now. And then you're
going to go Shift a and you're seeing here, and you're going to
go to your lights. And a very simple way to add
in is just an area light. If that area light
added in and just go G and move it above
your character, then go do a little
lights have here. So to see a live properties. And just to take the
power up the 30, increase the size a little bit. Now bigger you make the size, the more software
that's gonna be in, the smaller you
make that science to sharper light
you're going to get. So if we press Z, so press C and then go rendered and
you'll see what I mean. Let's make that smolder
and you can see sharp the bigger the
softer that light is. So that's really handy and you guys can just set
however you want. But I'm going to
make mine about 1.4 meters and I'm gonna move
it up a little bit more. And then I'm going to go Shift D to duplicate it and move
it over to the side. And then R to rotate it in. And then again Shift
D to duplicate it, move it over to this
side R to rotate it in. And this is just
giving my character a little bit of a rim
lighting like that, which looks pretty cool. So just free lights
like this for now we'll do for
the rim lighting. And then I'm going to go Shift D from the top legato, top view, and then Shift D to duplicate the lights and then
rotate it into words, the character a little bit. But at this one,
we're gonna give it a power of 50 instead. And we're going to go once
again to top Shift D, to duplicate it again and write it in towards the
character like that. And there you can see we have some lighting on a character. Now obviously it looks
really wide it out because we haven't
added any materials. But even before we do that, let's just add a camera as well. So in your front view, we're just going to go
Shift a and just add in a camera and then go, Gee, y, and move it back
onto why we have that camera activity
can just press 0 on your keyboard
or the number pad. And that's gonna take you
into the camera view. And then you're gonna go G,
z and move it up like so. So the cameras now moved
up and you can come here to your camera settings
and change the focal length. Now I like to personally work
with a focal length of 95. So I've typed in 95. Now if I go into my camera view and you guys
can do that too, you can see it's got a lot more of a focal length
happening there. So you can just go G and then press the middle
mouse button on your mouse and move back just to move it back a
little bit like that, which looks a lot
better in my opinion. And it's just going to help with when we add the
objects to the background. So it fills in more of
the background space. It's just the focal length
I prefer to work with. So move it back a
little bit like this. And you can also just go G
and move the camera as well. You don't have to go, gee, middle mouse button like I'm doing inside of the camera view. But as long as you
have that camera setup pointing towards a character, if something like this looks pretty good as far
as framing goes. But on top of the
lighting we have here, I will select it, just
go to my world settings, go to the Color tab
here, click on it, and then just change
that to a Sky texture. And then you can come here. And if we want to
change the method it's using here to brief them, That's one of the
supported for EV. And then you're
gonna come down here to the strength and just make it 0.3 like side. Now we've got some nice
lighting there as well, that complements our
area lights here, but we also want to
add a background. So we're going to go Shift a go to Mesh options, add an a plane, and if that plane added in, we're gonna go our X9 0 and
we're going to hit Enter. And then we're gonna
go S to scale it up. And then S, x and skeleton
dx like psychosis, almost like the
cameras dimension. Then go, gee, why and move it back and then got
your camera view again. Move that still selected. You can just go G and
move it in an S to scale in the background till that just kind of
fills in that space. It doesn't have to be perfect, but just something like that. And then once you've
done that, go Control a and just
apply to scale foot up. Later on, we're going
to add a material to that as well for our background. In fact, make it even
bigger because we're going to be animating
the camera a little bit. So we want some margin
there to half movement. So something like
that should be fine. And now we're still
inside of our render, rendered view here we can
go into shading workspace, go to camera view by pressing 0. Once again, just make
sure you're on rendered, so z and then go rendered. And now we can add
some materials. So let's just start with
the background for now. I know it's kind of weird, but I just want that
out of the way. We're going to click on
the background plane here. It go and use to
create a new material. Let's just call it
BG for background. And we want this to be emissive so we don't want to
principled shader here. So we're gonna click
on a principled shader and press X to delete it. Then over here we're
going to go Shift a and we're going to click on Search and we're
going to type an e, m n is going to come up
with the emission here. So click on emission, plug it into the surface here. Now it's glowing, but
the thing here is, it's not that bright, so we can change
the value to fray. And on top of that, it's just a white color,
which isn't that cool. So let's add something to
it like a gradient texture. So we're going to go Shift a and we are search and type in G, R. And then click on
gradient texture, plug it in to the color here. And at the moment you can
see it's making a gradient. But we want it to be like, kind of like a
circular gradient. So we're going to come
here and change it from linear to spherical, and we need to change
its position as well. So let's add in some coordinates
and a mapping night. So we're gonna go shift
a, we're going to go search and type in MAP. So we're going to go and
click on the mapping here, plug the vector into the
vector of the gradient, and let's tell it how we
wanted to distribute. So it needs to be an object. So we're gonna go shift
a click on Search and let's get a texture
coordinates so we can type in texture space and then CEO texture coordinate. Put it over here and let's take that object and plugged it in to the vector
where I'm mapping. So at the very top there, now you can see its place,
it in the middle here. And all we have to do is come to our scale here and just
mess around with it. So this is take the x
and this could be a little bit different for you depending on how you
have things set up. But all we're trying
to do is just use to x and a y here to
increase or decrease the scale on those two axes
or dimensions or whatever. So to x and a y. And then to soften
that out a little bit, what we can do is we
can go shift a search and get a color ramp
now to type in color, get a color ramp and
then place it next to the texture, the
gradient texture. It put it on that cable
so it's now connected. And to make it softer,
Let's just change it from linear to B-spline, and let's add some colors. I'm going to drag this
value in here a little bit and then grab this
end lighter value, drag it in and I'm
gonna make that a nice yellowish orange color. And then I'm going
to click on the little plus here to add in another controller or
little color slider. And with that one, I'm
going to click on it. I'm just going to
change it to a bit of an orangey color like that and move it
more in the middle. And I'm just going to
adjust these accordingly. Just trying it out, seeing what works
and what doesn't. This color here is too dark,
so I'm gonna select it. And I'm going to increase the value a little bit
to make it lighter. And then kind of make
like an orangey, dark orangey brown
color like that. Now we've got something that
looks pretty cool here. You can make those colors
whatever you want. So if I hit 0 to
kind of camera view, you can see that's what it
looks like in the background. Pretty cool. That makes a character
really pop out as well. Some very basic notes here. Once again, if you don't
understand nodes very well, definitely check out some of my outer courses on Skillshare, like my beginner courses. Go into that in a
lot more detail. But now let's click on the little character and
let's just select the head. And by default
that's going to have a material already cold material because we made it out
of the default cube, which comes with a
default materials. Let's just click
on it and call it skin and the base color here, let's just make that
a bluish color, but you can make whatever you
want and you can come down here to the roughness
and just increase it. So it's not as reflective. And that's pretty much all you
have to do with your skin. You can now select the bottom
dangling part and then come to the Color drop-down
here and give it that skin. And then you can click
on the eyes and go new. Let's just call that eyes. And all you have to do is come
here to the base color and make that black bring
down the value. And if the eyes
you can bring down two roughness to make
them more reflective. So once you have that done, just click on the auto, I come to the drop-down and
give it that I'm material. That's pretty much it,
That's how simple it is. But one more thing that's
gonna make this look cool to add a material to the
inside of the mouth. So select the head again, it's a press Tab to
go into edit mode. And all we have to
do here, in fact, let's just go to a modifier
so it'll make it more simple. Come to the mirror here and
just disable it for a second. And then what you're gonna
do is you're going to just select a vertex or two at the back here and go
Control plus or Command plus. And just keep doing that
till the selection grows. We're just going to
select the inside of the mouth like that. So everything is selected. If it goes a little bit out, you can just press
C and then click the middle mouse button and just paint away that selection. Only want to inside of
the mouth, select it. And then we're gonna come over
here to the materials tab. And you can see
there's the skin. We're just going to click
on the Plus again, go new. This is cool, this
mouth, space enter. This is assign. So
we're assigning it. And currently by default
it's set to white. So let's just change
that to a mouth color, something like a pinkish color. And that's it. Now we can go back
to our modifier and just enable it again
over here to mirror. And this is tab back out. And we can see we've added that mouth and inside the
mouth material now I can see here it's not quite right. I missed the face here. So if you do
something like that, just come back in here. If it's easier, just got to face left and just click
on that face. And then just go
to Material tab, click on the material and
just go assign any parts you want to assign
that math material two, That's how you can do it. Very simple stuff. And DEXA our materials. So let's go into our
camera view again, and now let's go back
into our layout. We have our materials,
we have a lighting, and let's just hit the space bar and see
what it looks like. Pretty cool now, we don't have any movement in the camera, which we'll do in the next part when we're
rendering this out. But you can see how
this will look like. It's pretty cool. Another
cool thing you can do is select the character and
go to your materials tab. And currently these are things we're going to
see in your renders. If you're going to render
it, we see the materials. But if you wanted to say
something in a viewport, you can just click
on the material, scroll down to the bottom, and you're gonna see something
cool to Viewport Display. And here you can
change the color so you just see it in
the viewport as well. So just in case you wanted that, it's really optional, but
it's something I like to do. Just roughly emulate the
color in the viewport, just so you can see it when
it's not being rendered, which is yeah, just
something I personally prefer Signet exact same
thing to the eye material, but definitely not optional. It's not going to change
anything in the render. It's purely just for the
display in the view port. It's really just an
aesthetic thing. But yeah, that is how to add
the materials and lighting. And we're really
going to make things look a lot cooler
in the next part. But there's also another
thing you can do is see how the character
is moving like that. If we were to render this out, it would be perfectly crisp and we want a little
bit of motion blur. So all you have to
do is go over to your render settings and just go over here and
enable motion blur. But let's just drag
from here till this apart with a character
moves really quickly. In this case here like 47, he's really moved up
really quick bath there. And let's just go
back into solid view. And let's just test
that motion for us. They're going to go to
render and go render image. And you can see we have a little bit of
motion blur there. And that looks really cool. So in the next part, we're going to add
a little bit of animation to the camera. And we're going to render this
out as a final animation. And that'll be it getting really close
to finishing this off. Once again, the blend files
are provided if you get stuck on anything and they
should help you out a lot.
11. Final rendering: Finally, we're able
to start doing the very final steps to
get to our final product. So what we're gonna do is
we're going to quickly add a little bit of
animation to the camera. So make sure you
select your camera. Cameras now selected and you're going to come
here to your timeline. And just like we added shape
keys to our bones earlier, what are you going to
do is come to frame one with the camera active, you can press I and
insert a location key. You're going to go
to the end frame, frame 75 and you get a press I. Once again insert
a location key. So the last frame and the
first frame we need to be identical so that we don't
have a clipping issue. So we wanted to
look seamless when the animation plays because it's a really short little
looping animation. Frames in-between. You can
make whatever you want. What do I like to do
is I'd like to move my camera up a
little bit to where the character is
moved out of frame. And then if a camera active, I wouldn't go G and move
it up a little bit. And then press I and insert
allocation keyframe. The other gonna keep going. And over here I can see
he's gone down a bit. I'm gonna go G and move it down. I insert a location
keyframe and so on. Here he shoots up a little bit. I'm going to go up. Instead of location. He comes down here and
move it down just a bit. So the idea here is
just adding a bit of random camera
movements that looks like he's being followed now, you could also add
a little bit of noise to this in the
animation curves. So if those of you
who are familiar with animation curves and
how to add generators, that is an option you can
do because this is more for people who are a little
bit more new to Blender, less experience. Maybe
we have characters. I don't want to keep this
a little bit more simple. This will do just fine. So today we have a little bit of camera animation and
it looks pretty cool. Now how do we render this out? What you have to
do is go over to this option here called
output properties. Didn't want to go down
to this output folder. It's got a little destination. Click on it. You can select anywhere in your computer if you're
gonna be doing sequences, makes sure to select a folder. I'm just going to
select my desktop. Now here are a few things
you need to consider. If you are somebody who
wants to compile all of the image sequences in something like Adobe
After Effects. So Adobe Premiere,
maybe you want to do some ambient occlusion passes or reflection passes, whatever. You can go and leave
this as a PNG format. So it'll render out
a whole bunch of sequences and you just
compile them together. Now because there is such a
short animation or using EV, I'm gonna directly render
this out as a video format. So I'm gonna go to
this over here, click on it and change
it to FFmpeg video. And then all you
have to do is go to your encoding and change the container to mp4 or any
other format that you prefer. But I definitely recommend
MP4. So I click on that. And now did you have a
video format selected and you have your
destination selected. You can now go to render
and go Render Animation. Remember earlier we
did a render image. Now you can do Render Animation,
which works pretty good. It'll render it out to
that selected destination. Now, I'm gonna go ahead
and do that and I'm going to show you guys
what it looks like an O. And just before we render, I'll just quickly
mention that we've already done the lighting
and the materials, but you can always adjust
them a little bit. If you're in your
rendered workspace, you can just select a lot. You can try different
powers and strengths. Maybe add in some
environmental lighting is really up to you how
you want to do this. You can try out different
color palettes. By no means do you have to follow this exactly
to why I did this. A lot of fury, a lot
of ideas out there. And I really encourage
creativity and customization. I want to see what you
guys can do with this, but that said, let's go
render and render animation. Here we have the
finished result. This is what it looks like. I really hope you
guys have enjoyed this course and
we've had a lot of fun what I'm gonna do
in the next video. So I'm just going
to quickly explain a few things I'd like to see you guys improve
on or customize. I'm just doing an
introduction here, but I want to teach a method, an idea, and I look
forward to seeing what you guys can do with
your own creativity. So the whole idea of this class, It's not just to get
you to make something. Did I showed you how
to make where to learn something and build upon
it, make it your own. And I really loved saying
that from the community. I've already seen a lot of
really cool stuff out there from some of my other courses that people have been doing. So that's really awesome.
And I'll see you guys then.
12. Thank You: This is the official outro for this little character
course we've been doing. I really hope you guys have enjoyed it and
learned something. Once again, makes
sure to look at those provided references
and the folders that I've put into resources showing all the different stages and the different
blend files, all that. And I've also put
in some hotkeys in there like I've
mentioned now, I really hope you guys, like I said, I have enjoyed it, customize it and
make it your own and shared with the community,
shared with friends. Some of the things that you can focus on customizing could be things like the actual
character itself. So I start with a concept
that's unique to your, your flavor, your ideas, and then you can flush
it out and model it a little bit and make a
rig that suits that. And then try doing your own
unique little animation. You own little moves, ideas. Try experimenting with the eyes. Add a few more shape keys. Just so much stuff that could
be said, a color palette, the material's reflectivity, what sort of lighting you
use, how you set it up. That's all stuff. I encourage you guys to make it your own. And once again, thank you
so much for watching.
 PIXXO 3D, 3D Character Artist, MoGraph Teacher