Transcripts
1. Welcome to the class: Hello and welcome to the class. My name is David and I'm very happy to have you here in this class. Will you learn how to create a slim handmade leather wallet like the one you see in the video. These types of wallets are extremely comfortable to use and can be worn both in the back pocket or from bucket. They can also be used as cardholders are IID wallets. In this class, you'll learn how to cut and glue your letter, make your stitching holes and polish the edges of your wallet. Knowledge on so I will stitching is suggested for this class, but you haven't hand stitched before, don't worry. We'll also go to class on how to make a minimalist leather wallet were subtle stitching is covered in detail in another class and how to make your own template that you might find useful as a compliment for this course. You can also download a template out of loaded for this class, which is a one I've used for this example. So without any further ado, let's begin to make our wallet.
2. Cutting the leather: To begin our xlim wallet, you first want to mark your letter in accordance to your template as you'll see in the video. Because the leather I'm using is very easy to scratch. I mark the pieces of the wall would just crush all trying to leave as much as possible. Because of this, the pieces were marked very close to one another. Use your cutting ruler and exacto knife to cut your leather pieces. A much cleaner and straight content scissors. Only use your scissors for lining or paper. Also, make sure you're using an IV, you feel comfortable working with it. You'll feel your knife is to ball or thick. Try using a thinner similar to the one I'm using in the class. To cut the leather firmly place you're cutting ruler and begin making slow and straight cutting lines with your exacto knife. If you haven't seen my previous classes, you'll see that I tend to use my ruler upside down. Since WIOA, they are indirect contact with a letter and a ruler. If you use your ruler facing the poor to the leather, just be aware that this generates a shadow and you might not see clearly where you're cutting. Some people like to use it that way and always like to use it upside down. Whichever way you choose. Remember to be careful what I recommend. You first got the individual parts to extract them from the large piece and then go to the edges in a precise manner. Okay. Here's your scratch yourself or the ruler should be placed before cutting. So you know, you're cutting the peas in a straight line in accordance to your template. Make sure that there's like cotton cleaned your workspace of any leftovers once you finish. Okay. In the next lesson, we'll see how to finish the edges before moving forward to us and we'll do all that.
3. Finishing the edges: To begin preparing the edges of the loss of the wallet, we must identify which sides are the ones that need to be finished before assembling, and which ones can only be finished once they're assembled to the lower parts. This is easy to do since first we need to focus in those slots that are free from any stitching or union with all their parts that will make them thicker. Use some water to them. With your finger. Put some water in a plastic cap or bottle you have near to you while you're working. When this is done, you'll say it wouldn't match burnisher to create friction with the other edge and the edge burnisher. These will partially seal and polish the edge. Well you'll feel the edges mode. You some burnishing government, a small piece of canvas topology. It even more applied the varnishing gone with your fingers and rub the piece of canvas until you hear a cracking sound. That sound is a good indicator that your leather edge is well-polished. Now, repeat the process with all the edges that need to be polished.
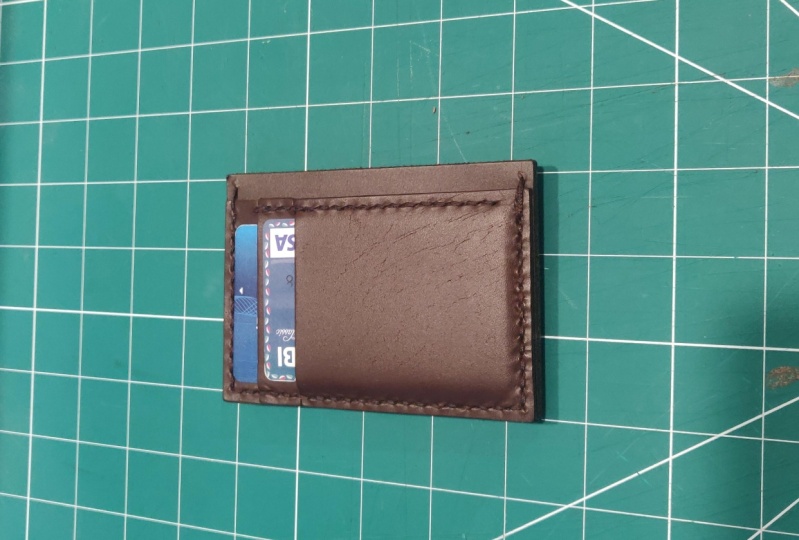
4. Assembling the wallet: Assembling the weather is a simple yet delicate process when making handmade leather goods, you need to be very precise with the distances when gluing and stitching your other pieces. Before you begin, make sure you don't miss any edges to burnish and polish. Since once the pieces are stage IV, you forgot to finish one side, it will be very hard to do so without damaging or marking the other pieces. The first thing to do is to assemble the large middle cars lots. To do this, I suggest you align the edges of the slot and it would your scratch our lines of where the middles log will sit. Then called the excess of leather lacing the middle slot. This excess hustle release serve its purpose on a lightning bolt cars lots. The next thing to do is to stitch both pieces in the template you've created or downloaded from the project section, you'll find an indicator of the stitching line in the middle slot. Marcus straight line, dotted line indicates where you first need to stitch. Plays a piece over your blog and your diamond CISO employee mullet. Make sure to periphery the holes for the stitching in that single piece first, as you see in the class video, you can check the back part of the piece to see you. Well punched. Now apply glue in both the large and the middle slots, or they will join and let them see it for a few minutes. Plays both pieces then blog and we do Diamond, she's so once again periphery the letter in the same, place it in before with a mini slot. The holes you might previously, it will serve you as a guide. When you're finished, proceed to vote visas. Because I'm using natural show quarter long for this wallet, I decided to use a brown line and thread. There are symbols that color better than the white polyester thread. Now we need to assemble those moles log to the subassembly we just did. Or we can set the distance or the stitching calls will go. In this case, I'm using a distance of four millimeters from the edge, list that gene lines. When you're satisfied with the lines you just marked. Use your diamond results of performing the holes. Before doing so, however, I suggest you mark them slightly weird. She's so just to make sure you're heading the right direction and it has a night aesthetic look. One stitch tried to leave one hall after the middle slot, so it is wild-type into the large lobe when assembled. The first law you wanted to punch is the one that will join the upper bottle unless lots together, bunch this line and then continues a punch to the rest of the piece starting from the lower edge of the slot. This will be a little lower edge of the water at the end. Do the same with the horizontal line of the lower part of the wallet. Now before assembling, if you want to add the logo stamp or hot stem to another, this is a time to do so. When I do a 127 grid paper Sunday edge of the large slots. So when you glue them together, the pieces will have the error much better. Okay. Once before a deal br Barlow, this loss and subtle stitch those pieces together in the line. This will ensure that GPSs are no firmly assembled together. Finished the edge of the assembly stage to the other parts in the same way as you did with them to be little pieces in the previous lesson. When you're finished, the loop very shiny since this is now thicker and more light is reflected in the surface, proceeds it. But for the rest of the pieces of the edges where the wallow will assemble with a large slot for folded bills. When you're done, your assembly should look like the one in the video. Now proceed to assemble the large slow to those reassembled pieces. Make a mark with a pieces will join the largest load and Sunday. Just before gluing. Also make sure to mark the four millimeters at the top end piece. When you join the pieces, you can use. So the glue better before punching holes. When you finish the whole scene, one side, repeat that process for the opposite side of the wallet. That is the assembly of the small, medium, large lots and upon jingle the stitching holes. Now I'm bunching the holes of the edge of the world, make sure both sides have their holes are lined with each other. Glue both sides of the wallet and make sure this touching holes are well line between them. You can check this by using your scratch all NCBI, the metal passes all the way through the other side of the wallet. You can use some middle-class to hold both sides together while the blue sits. Now in the next lesson, we will finish our wallet and see what will be our final project.
5. Finishing the wallet and final project: By now, the welders should be completely stitch. In many cases, the edge of the world can result in a small excess of leather. You can get rid of the excess with a sandpaper or a molecule such as Dremel. Doing so, however, sometimes leave sharp edges. So to eliminate them, use an edge. Premolars, take out all the access. Those tools normally live in your wallet, as you can see in the video. Beveling the edges will leave us mode field to the user. Okay? Once you're done, precedes the damper, burnish and CLD, which is the same way you did it with all the other pieces. Okay. Hello. The final step is to use a bone folder to make sure there's lots are free of excess glue and open them allele. Since brand new walls usually become extremely fit, 100 stitched. We have now finished our wallet. So for the final project of this class, you will design your own slim one and if possible, constructed using the methods and techniques. Learn this glass. When you're finished, take some pictures of your work or template you the sign and post them in the project section. So we're certainly scan also see your work. Hey, I want to learn more on how to build your own template. We cable paper and use it over leather as well, hands stitching. Make sure to check my other classes on how to build your own template and how to build a minimalist leather wallet. Thank you so much for watching. I hope you have enjoyed the class and I'll see you in the next one.
 David Gonzalez, Industrial Designer