Transcripts
1. Welcome to the class: Welcome to the class. I'm really happy to have you in this class. I'll show you how you can make a very simple handmade
leather keychain. Key chains are among the easiest leather working
projects you can make. They're also great
because of many reasons. They don't require a lot
of materials and tools. You can build them really fast. They move really well
amongst consumers. And you can even make them from leftovers from large
leather projects. There's nothing wrong when using leather leftovers
for small projects. Leather is a fine material. It comes in different prices, but as raw material, it is
usually of good quality. Also, leftovers don't spoil. They're simply smaller pieces that are no longer needed for the main project or that came out from
cutting larger ones. In this case,
however, we are not considering leftovers for
these small projects, since we are using
shell Cordovan. Considered as one of the
finest layers in the world, leaving a large amount
of leftovers from shell Cordovan is simply a
luxury we cannot afford. So without any further ado, let's begin to build
our key chain.
2. Cutting the leather: As you can see from
the Cordovanym using, I selected a small part on one of the edges
of the leather, since this is all the
amount of material we're going to need for the exterior
part of the key chain. Because of this, the
first thing to do is to cut out a portion of the
leather you're going to use. Make this to have a more
manageable piece at hand. Since working with a
larger piece will only make it harder to
move and awards. Use a cutting ruler to cut your piece with an exact knife. You can also use some scissors if the leather is soft enough. However, this leather
is quite firm and that makes it harder to cut
with a pair of scissors. Besides cutting with
some scissors can damage your leather and
bend it when cutting it. I like to use the ruler upside down because
as you can see here, the cord is glued
behind the ruler leaves a space between the
metal and the leather. This space generates a shadow in the leather and
that shadow can misguide you if you don't have enough lighting to see
exactly where you're cutting. When I place a
ruler upside down, the metal is in contact with the leather and no
shadow is generated. Remember to always cut safely. Whether you're using your
ruler upside down or straight, always be patient when cutting. Even if you have
years of experience working with these tools,
always be careful. Another reason to go slowly is because you want a clean cut. You don't want to
have a curved or irregular side and your leather. Make this process with patients. It will be worth it in the end. Now that you have a smaller manageable piece to work with, user preferred exacto knife
to cut out the leather. Look how I'm using another exacto knife as in
the previous one. This is because the blades
of this new one are sharp and its width makes it more economic to handle all the way. So you don't have to invest a lot of money in your tools as long as they're in
good condition and you feel comfortable
working with them. Again, with these cuts, go slow, patient and always keep your fingers behind the blade when you're cutting the leather. Once you've got a letter, let's see how to line
it in the next lesson.
3. Lining the leather: To start lending the key chain, I suggest you use a very
thin type of leather. What I'll be using
now is white co skin. The thickness of this
particular piece is approximately 0.8
to 1 millimeter. Because this leather
is so thin and soft, you can easily cut it
with some scissors. Unlike the outer part, this leather won't
get damaged that way. Place your outer side on top of the lining leather
and with a leather pen, draw the entire
perimeter of the side. Make sure both leathers are facing their inner
side while doing this. Next glue bot inner sides of the leathers and carefully
join them together. Let the glue sit for
at least 10 minutes. You can apply some
pressure by adding some weight to both pieces
while they're gluing. When the pies are set, would your scissors or an exact knife gently cut the
excess of lining and try to leave the edge
as even as possible?
4. Preparing the keychain: The first thing to do
with the leather once it's ready is to mark
the stitching lines. To begin with, place the
metal ring in its position to see how the kitchen will
behave once it's fully closed. This way, you can see where it's convenient to
start stitching. If the stitches are too
close to the metal ring, the kitchen will
feel very tight and you won't be able to
turn the ring freely. Okay. Set your windy vial to 3 millimeters and
use your template to draw an offset line inside
the margin of the template. Then from the middle of the
template to the offset mark, draw a perpendicular
line at half an inch. Make sure this line is
as straight as possible. If you have a grit mat, you can use it as a guide to do this as you can
see in the video. Now, we just scratch I'll make the two points where the line intersects with the offset line. The idea is to then pass the
same marks to the keychain, so you know exactly
where to start stitching and where to
stop and close the stitch. Mark those points and
use your wing divider to draw an offset line of 3
millimeters in the leather. This will be your
guideline for stitching. Because this is a
very small project, we want the stitches to
be as fine as possible. Also, 3 millimeters
from the edge of the leather is a good
distance to use thin thread, such as 0.6 millimeters or less. For this project, I use
a two pronged perking. You can get this at
many different sizes and light diamonds. These irons only mark where you have to place each
stitch in the project. To use them, you place the
prekini on top of the leather and use your polymal to
slightly mark your keychain. Then with a diamond scratch all perforate each stitch by hand. With this done, we can now
move to the next lesson, where we'll see how to make the heart of the
key chain. Okay.
5. Making the heart of the keychain: The heart of a key chain
is the inner leather piece that will give structure
and volume to your product. It can be made from leather
or softer materials such as foam to obtain the
form of the heart, use a template and
wing divider to offset a contra line 3 millimeters for the stitching line to the
center of the template. Understand Once you've done this, tics drew with your scissors. You can remark them with
your pencil if you wish. Place a template in a
scrap piece of leather. We'll use some
vegetable ten leather since it's a more
rigid material. Draw the template over
the leather and with your exact a knife carefully
and slowly cut the piece. If you have any circles
in your design, you can cut them by doing
small cuts as you see here. Straight lines can be cut
with your ruler and knife. A The piece is totally straight from
the edges once cut. So I suggest you use an edge peveler to
round those edges. This makes a huge
difference to the product, since once inside, you can feel the edge with your fingers
if it's not rounded. Use your wing
divider once more to offset 6 millimeters
from the outside of your keychain to the center to locate where you will place the heart and draw the offset so you don't get lost
if it's not so visible.
6. Painting the small sides: Before stitching the key chain is important to paint
the small sides. This is because once
the metal ring is set, it becomes much harder to do so, and you could easily stain parts of the key chain
you don't want to, and it becomes more
difficult to polish as well. To paint them, use
your edge applicator and carefully add the coats
of your preferred color. In this case, I'm using a white hel paint and have found that for
this type of paint, it is necessary to add
at least two coats. However, the result
is beautiful. It gives a made finish
to the edges and this makes the leather
product look quite elegant. Okay. Once the paint is applied, let the letter piece
sit vertically for at least ten to 15 minutes or until the paint
is completely dry.
7. Glueing and preparing the stitching holes: Before starting to
glue the leather, if you have any logo or hot stump you want to
put on your keychain, this is the time to do it. Since the leather is still flat and it's easily manageable. For this project, I have put my brand logo in
the front part of the keychain using a custom
made brass logo stamp. The next thing to do is to
prepare the inner part of the keychain in order to
glue everything together. Well. Use a s paper to send the inner part that will glue the heart of the
keychain at the sides. I'm using a 320 s grid paper. Then add glue inside
the back part of the key chain and the heart
and stick them together. Okay. Bend the front part just enough to let
the metal rings in the inner part of
the leather and on add more glue to the sides and the inner front part of the key chain and
place them together. Okay. With your fingers, try to push the sides harder so that the glue can sit
well everywhere. Oh. Finally, we need to
make the holes of the stitching throughout
the entire keychain. You can use a polyploc
to place a key chain and with your diamond stitch
all perforate each hole. Be careful of the condition
of your polyploc. As I'll show you here,
if you put the keychain directly to the polyploc
and it's a rough condition, it can damage your surface. B. Notice the small dots that are now present
in the leather. To avoid this, place a piece of cardboard on your template and begin perforating
the keychain. This way, the backside
of the product will be protected
from my damage. In the next lesson, we'll
see our key chain stitched and we will continue to paint the edges and so
finish our project.
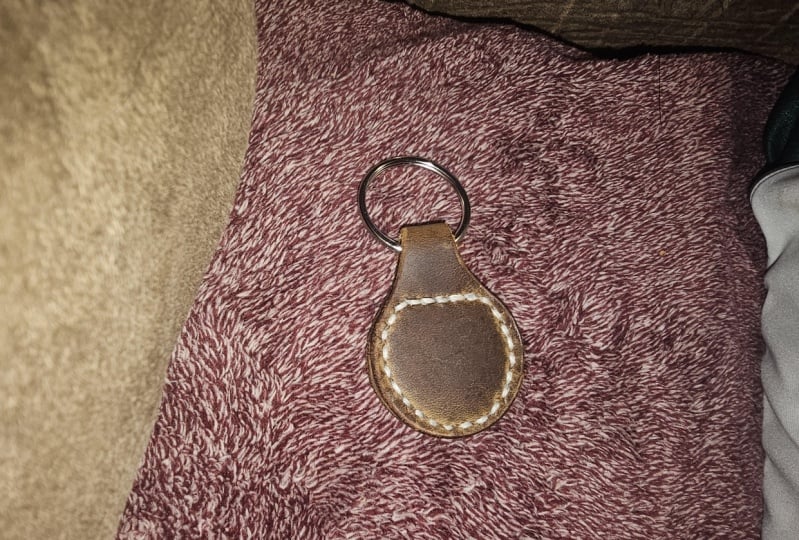
8. Finishing the keychain: As you can see, the keychain
is now stitched and the only thing left to do is
to take care of the sides. After stitching the keychain, try to leave the edges
as even as possible. You can do this with a
sandpaper as you saw previously or use a
motor tool to go faster. I like using my dermal to do this because
it's much faster. If you're going to do so,
remember to always use a mask. Once the entire edge is
even with your edge bevel, carefully remove the sharp edges to make the entire
keychain rounded. Next, you can paint the edge
with you prefer edge paint using the same
process with the with the small sites in
the previous lesson. You can also leave the
edges in natural color by not applying any paint and
burnishing the led directly. When you finish
applying the paint, let it sit until it
totly dry and polish it with a clean cloth of canvas
and some burnishing gum. Was it the final result
in the next lesson?
9. Final result and final project: A We've now finished
our keychain. As you can see the project,
is quite easy to make. It really doesn't take a lot of time and you can become
very creative by choosing different
kinds of finishes on the edges and on the
color of the thread. For this class project, begin by designing your own template. I suggest you do this by using some cable paper or cardboard, so when you have to
pass it to a letter, the paper is strong enough
and won't bend easily. Also, if you haven't
seen my class on how to make your
own water template, I suggest you watch it so you could have another
reference on the subject. Thank you so much for
watching this class. I hope you have enjoyed it, and I'll see you
in the next one.
 David Gonzalez, Industrial Designer