Transcripts
1. Intro: Hi friends. Then here I'm
from coaching CT in Malaysia. Coaching means cat
in our language. So here I'm with my
cat named cookie. I'm a self-taught artist, meaning I do not have any
professional art training. I learned from watching lots of art tutorial videos at books, and also took a few online
classes to further my skills. I practice in my own
little space called watercolor Studio and create
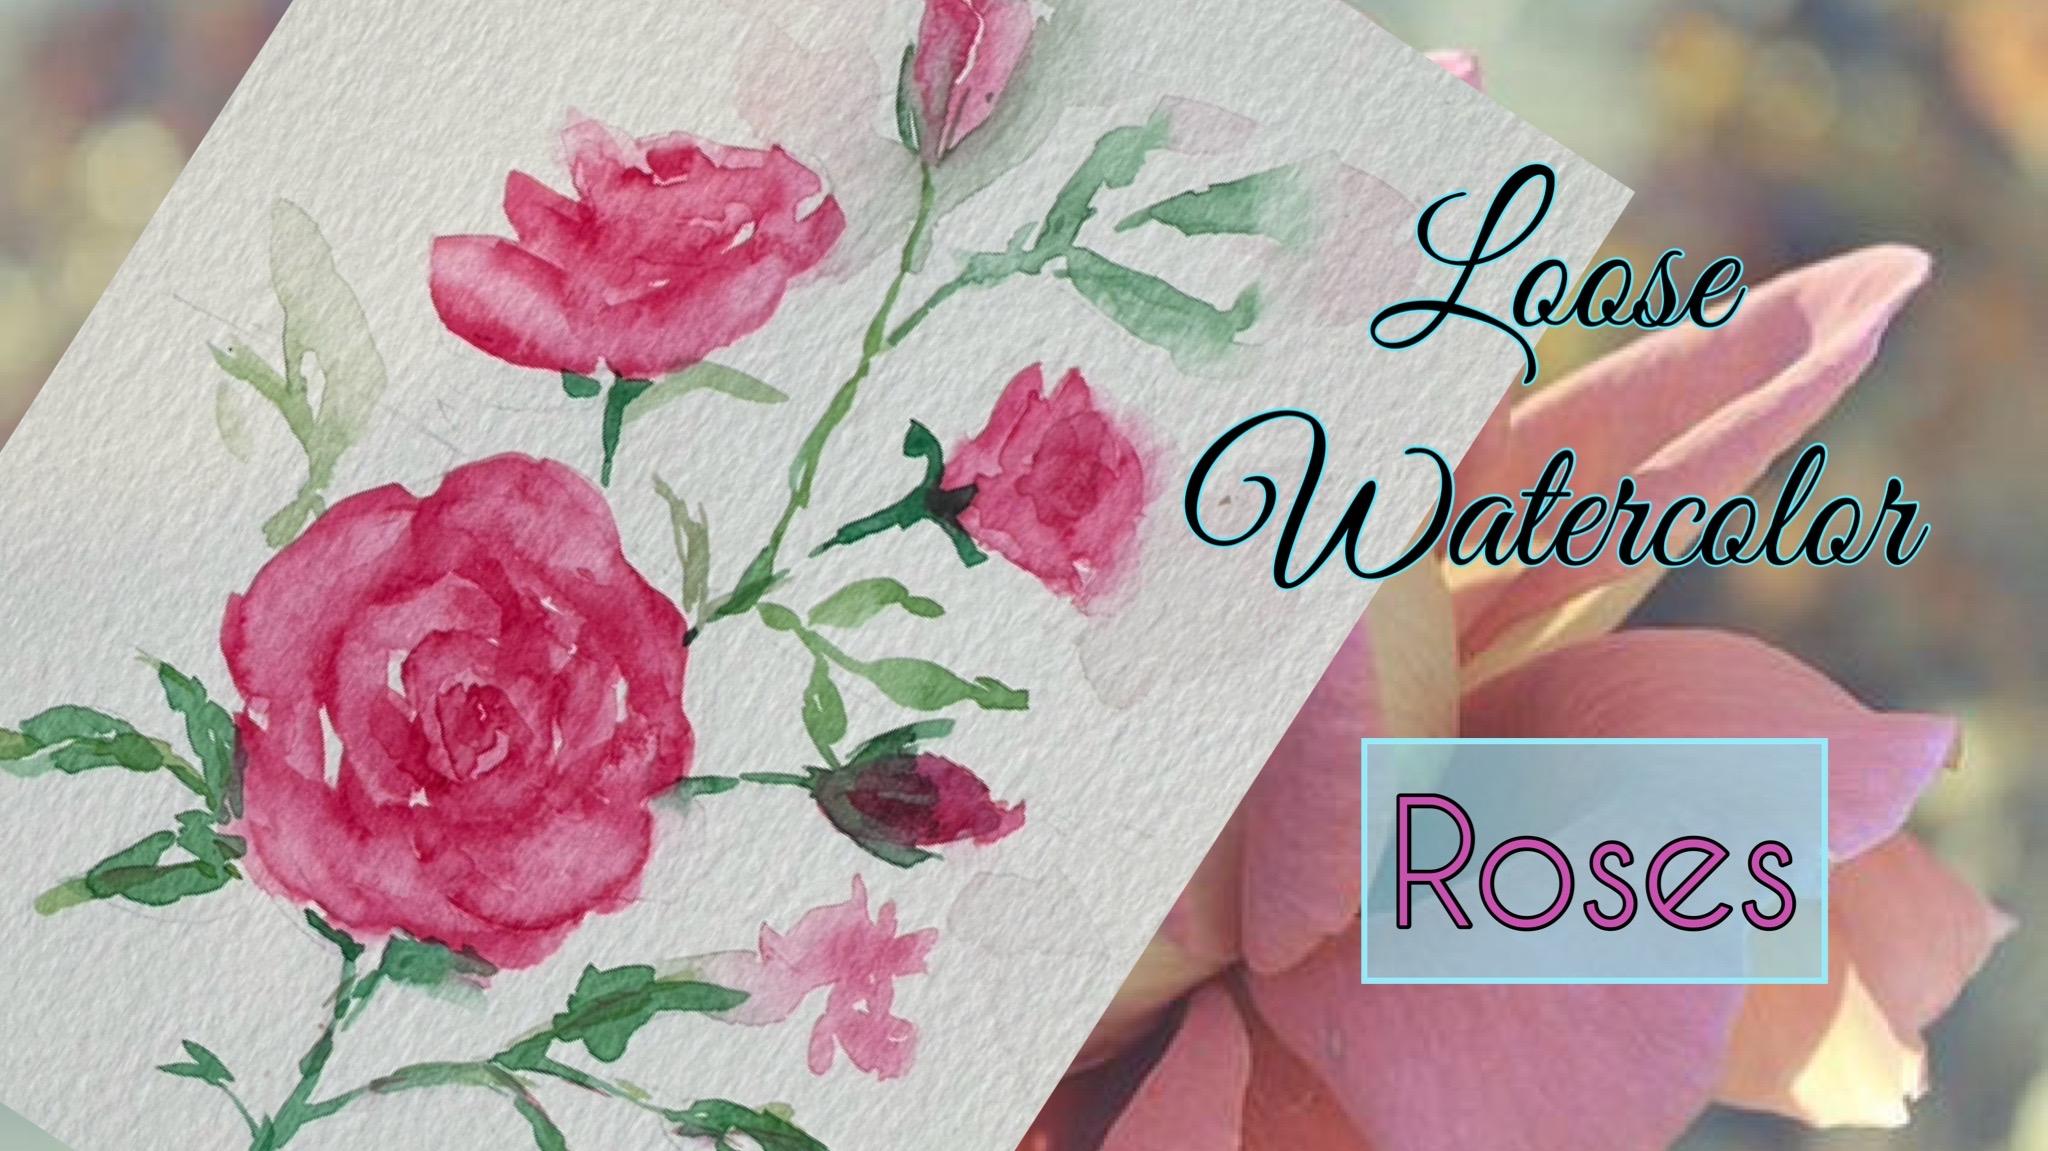
this cute logo for my brand. In this class, you
will learn to paint loose watercolor roses
with an atmospheric low. And here are some examples. We are not looking
for perfection. In this class. We want to have our
painting telling only half the story or the
other half of mystery. This class is for all levels. Not to worry if
you're a beginner, as I have an easy
step-by-step technique video for you to follow. You will also learn
how to paint roses in the foreground and
also in the background. I will also get you to plan your final painting for
your project by planning thumbnail sketches
and a whole video on the final piece of art. Besides, roses are flowers, a lot can be achieved
through these techniques. And here are some samples
I have done before. I'm so glad that I can share my self-love skills with you. So I will see you
in class real soon.
2. Project: A class project always sound
a little intimidating, but don't be discouraged
by the word itself. As it can be fun if we know exactly what we are going
to do for the project. So let me walk you through the steps from start to finish. Once you have watched and learned the
techniques of lifting and softening of colors
throughout the lessons. Then plan your project by doing
a few thumbnail sketches. Choose the one that you
are most comfortable with or one that is
workable for you. It can be a couple of roses
are a bunch of roses. But be sure to
include techniques that you have learned
from the lessons. And not to forget to one or two background roses and leaves that are out-of-focus. Be proud of your project no matter how it turns out to be, as we are not going
for perfection. This is a loose watercolor
painting and not a realistic painting that
replicates the photo. Once your project is done, to upload it in the
project gallery, to share it with
fellow students. There you can also comment
on each other's work. And to me that's how we can
improve our work further.
3. Tools and Materials: Tools and materials.
Before we begin, let's look at what we
need to use in the class. Watercolor paper. Paper must be at least 300 GSM, hundred and 40 pounds, as we are going to pen
with quite a lot of water. Preferrable, a cold press
paper with textured surface, also try to get a bright white color
instead of natural white, which is most of the time
a bit creamy in color. Doesn't matter if
your paper is made of cotton or cellulose fibers. I will be using this pepper
for the technique videos. And I will use this
sketch book for the full Ross painting
towards the end of the class. The pepper in this sketchbook is watercolor paper of 300
years or 140 pounds. Cellulose fibers with
texture and white color. I quite like the size of this sketch book
and to my opinion, is quite a good size
for this class. If you have a bigger
paper like this one, you can always cut it into half. Next is brushes. We're going to use three round brushes
of different sizes. The smallest one is
size to medium size. And the last one is size ten. Sizes of the two
bigger brushes used will depend on how big
your rows is going to be. The smallest brush
is for details. Besides a round brush, you can also use regal
brush like this one. Or even a small Chinese
calligraphy brush is also excellent for the job. Next is pellet. Advisable to use white pellet so it's easier to
see the colors, especially if you are mixing
two or more colors together. It can be plastic or ceramic. Difference is that plastic
will get, then over time. Next water, you can use
one or two jars of water. One for washing your brush
and another for using clean water or kitchen towel for wiping your brush. Watercolors. I have a set of Winsor
and Newton here with colors that I
most frequently used. I will show you
what colors we are going to use in the class. Here's the color chart
for the whole set. Out of this set, we are only
going to use a few colors, like the Permanent Rose, Winsor, green set green, ultramarine blue, or violet. He's okay if you want
to pin your rows in a different color instead
of permanent rose, choose your own color
like yellow, peach. After all, we are going to
learn techniques later. I will show you a
small color swatch, which I have done
earlier to show you the colors that I will be
using in the entire class. The first color at the
top is permanent rose, which are used for the rows. Next is cadmium orange, which I didn't end up using, but I use it in my other class over in my YouTube channel. It's a deep and bright
orange and it's beautiful for
sunflowers and sunsets. Here's the roster
I have painted in. My other class is still painter, was permanent rose
for the main color. And then I applied some
orange for the sunshine. Next is green and sap green
for the leaves and stems. See the line dividing
the swatches on the left is showing
saturated colors. In the right is diluted colors. I will show you some
techniques used in this class in
the next lesson.
4. Techniques: Here are some simple
watercolor techniques that we're going to
use in our class. First technique is lifting. Lifting is basically
removing or erasing of pen. It can be used for
highlighting or simply wanting a certain
area to be lighter. It can be done with a brush, tissue, or a sponge. Let's begin painting a
shape onto the paper. Make sure is even
n with no puddles. To check, lift up your
paper at an angle. And you can see if
your pen is even. And without any puddles. Let it dry for a bit, making sure it's not too dry or else it would be quite
difficult to live. Now wash your brush clean and
wipe off the excess water. We want the brush
to be just them. Place your ****
brush on one area, press it down and lift it up, then wipe the paint off
your brush with your rent. Repeat this process
until you are satisfied with the results. If there's too much
paint on your brush, you can always watch it clean and repeat the process again. It's all up to what you are
looking for in your painting. You can leave a dot, a line, or any shape you like is quite easy to do and it gets easier
with more practice. So I advice you to practice
on scrap paper if you are applying this technique
in any of your paintings. Next is glazing or layering. What the color is quite
a transparent medium. It moves so when it is
dry after your painting. So sometimes to get more
depth in your painting, glazing is done in
layers after each layer is dry in order to
achieve what you aim for. It can be layers of same
color or different colors. Let's spend two
sections as evenly as possible and let
them dry completely. While waiting for them to dry. Let's move to the next
technique, softening ages. Sometimes we do not want to have hot lines or edges in
our watercolor painting. But of course at times
hotlines are useful, especially if we are painting branches or edges of objects. Using a small size brush, pen, a line, and the curve. Wash your brush clean and
use clean water so soft and these lines before
they are completely dry. Sometimes, if it gets too dry, just use your brush
to rub it in. Notice I'm brushing the water
on the line on both sides. Sometimes you need to
brush on one side. Let me show you another example. Now I will draw another line
to show another example. A clean brush with
water and blend on one site only to
blow out the edges. Let's try another one. Draw a wider line this time
and soften it with water. Try to bring the
color and blend into the water as much as possible. You can apply this
technique to so much more in anything other
than just flowers, example of full moon animal
eyes and much, much more. Now let's get back
to the glazing. This two colors are
completely dry. Now, Let's paint a second layer of the same color
on the top part. Only this way you can see the difference between the
top and the bottom path. Since the top path
has two layers, the value is much inductor
compared to the bottom one, which is lighter as it has
only one layer of color. As for the second example here, I'm going to pin two different colors
onto the origin color. I'm going to pen
ultra marine blue on the top part and Indian
yellow down below, leaving just a small gap in the middle showing
the original color. And Indian yellow is something
like an orangey yellow, which is beautiful for
sunset and autumn leaves. Here I'm showing you the color of Indian
yellow on its own, and also the original color, non rows on its own. Next technique is
color movement. I'm showing you two ways that we are going to use
in our painting. First one is movement of
one color with water. And second one is movement of two or more colors together. Moving off of color into what is to create an
atmospheric loop. Or just creating a lighter
value for highlights, or maybe for some
background color. All four neighboring
objects that are nearby. Pick one color and Penn
any ship onto the paper. Then with a wet brush, draw the color out with the water from your
brush as Sean. Then tilt the paper to let the water flows and brings the color along
with its movement. You can always use your brush to encourage the flow to the
direction that you want. And you can always add
more water to have a lighter effect and flows more. If too much water is added. Don't worry, you can
just blend it out with tissue or sponge. This is how it looks. But you can still add
more water if you want. Since I have space down here. So I add another drop of
water and see how it goes. You can continue putting water
and see how the results. Sometimes it can surprise you of how beautiful
it can turn out. Now let's do the second example. This is the movement between
two or more colors together. Start by painting one
color on the paper. Then drop a second color, just barely touching
the first color. And let it spread. Lift up your paper at an
angle and let the color flows down a stream of water and let the color
flows into the water. You can see down here is a
mixture of red and blue. Some purplish tone. Now turn your paper
around and let the blue flows into the red color. See how the color
mixed together. You can move your
paper around and let the colors blend together. You can add another color
and see how it goes. With all these techniques. Now you are ready
to plan your roses. So I'll see you in class
later to pen some roses.
5. Facing Front Rose: Before we begin, let's look
at the photo of a rose here. I have drawn markings
on their roles with yellow and blue colors. Yellow shows the lighter value which indicates highlights, while the blue shows
darker values, which indicates shadows, and also gradation of the colors. Get writing your paper
color and brush. I'm using a size ten brush as I'm going to paint
a bigger area. Wet your brush and wipe
off the excess water. Then sock your brush with
paint as much as possible. Since we are painting
a front-facing roles. First, we need to pan the whole size in some
sort of a circular shape. And try to paint the outer
part in an irregular pattern. As what I'm doing here. Doesn't matter if some part is darker or lighter at this stage. It's also okay if you have some white spots here and there, you can opt to cover them up or just leave them as highlights. Wash your brush clean and
wipe off excess water to have a DEM brush for
doing lifting next. Now press your brush
down firmly and as if to make a curve which
will look more like a petal. Now, do another lifting
next to the first one. Repeat one more time
for more lifting. Continue lifting and creating
more petals for your rows. Remember to wash your
brush if it has collected too much pen or you wouldn't get the lifting done properly. Also, if your pen
is getting dry, wet your brush and lethal. And when you press your
brush down to lift the color with your brush and lethal in the pen
will be lifted up. Once you are done
in satisfied with the numbers of petals
you have created, let it dry completely before we proceed
to the next stage. Is completely dry now, and we are ready
for the next stage. Get ready on number eight or
medium brush and the tool, your smallest brush, mix the same color as you
use before with less water. This time, because we want the color to be more
darker in saturated. Now wet your smallest brush with water and wipe off
the excess water. Now pick up some color
with your brush. Pen, the center of the rose
with a small spot of color. Then touch the edge a little
with your bigger wet brush. With your small brush, draw a small curve, and that will be your
very first petal. Then use your bigger
brush to blow out the insight of what
you have just drawn. Look for petals that you have lifted up and continue
the process of painting darker ships with small brush and blurring
with your bigger wet brush. I'm just showing you
the idea of how to pan around the lifted areas
to form visible petals. Not that you're lifted areas will not be the same as mine, but the idea is the same. So I advise you to watch how and what I'm doing throughout
the whole process. First, before painting
along with me. Once you've got the idea, you can start
painting along while you repeat the video as a guide. Notice that even though I
have a photo reference, I do not copy exactly how many or how the petals
look like in the photo. I refer to the
reference photo only as a guide for things
like the shadow, the value, or the
light of the flower. Since this is a flower
with many petals, I don't have to know how
many I need to Penn. But if I'm painting an orchid flower that has
specific number of petals, then I will have to stick to the idea of how the
reference photo is. I will let you watch the
process to the end at three times speed with a
little background music. It's all done now, and let's move to
the next stage. We can now try to soften some of the outer edges by using a wet brush in
ascribing movement. Also try to draw the color
out into the wet area. You can also do this
before you paint the petals where the outer
edges are still damp. So it's much easier to soften the edges and also
bringing the color out. If your roles is to
try like mine here, you can always drop a little pen into the wet area and blend. This gives your roles are
more at most four loop. It's done. And next we're
going to do a rose in profile and also a rose, but in the next video.
6. Profile Rose and Rosebud: In this lesson, we are going to paint a rose in profile
and also arose. In the last video. Prepare all the things
you need before you start with your biggest brush, a number ten, roughly pen
a few strokes like Saul. Remember that you don't
have to copy exactly as a reference photo is just
the us the guidance. Don't worry if it doesn't look
like a rose at the moment, as this is just the
initial stage of shaping. What's your brush clean? When you are done, you can opt to use the same number ten, or you can change it
to a smaller number. It it all depends on how large or how small
is your roles. Like before wet your brush with clean water and start
lifting to create petals. If the pen is too dry, just use a little water. If it's too wet, you will
create blooms are shown, but it's okay as we can always go back and
remove it later. Some consider blooms or
mistake in the painting. But for me sometimes
it can look beautiful, especially for
backgrounds, all feathers, for birds and so on. Continue creating more petals. I have to do a little
rubbing here with my brush as my pen is
a bit too dry now. You can always do
the same if your pen dries up to, but be gentle. Or sometimes if
you're up to heart, you might live up the
fibers of the pepper. Continue till you
have enough petals, and once you are done,
it dries completely. Get your number eight
and number two brush ready with them and wipe
off the excess water. Then your small brush
with Penn and Penn, a small half circle
facing down as shown. Blow out with water using
your bigger width brush. My brush is too wet here, so it forms a paddle
in the center. So to solve the problem, I'm using a smaller, clean and damp brush to
pick up that puddle. Now let's paint our first
petal with a small drop of color at the center and
a small curve below. Then so often with water
and let it dry first. While waiting for it to dry less pen a different site first. You can always draw a
couple of petal lines. First to estimate the
placement of the petals. Then blur them out with water. Don't draw too many or else
they get dry and will form a duck hot lines which are
difficult to remove letter. The process is basically
same as what we have done for the front facing
roles in the last lesson. Draw with a pen and
soften with water. I'm painting the petals out of my own imagination rather than following the
reference photo. This way, I can pan more freely without
thinking too much of how the petals should look
like or where they are facing. While painting, I forgot that this area is
still quite wet. See how the color spreads
into the wet area. So I need to sop up the powder again and let it dry once more. Let's pan the upper petal first. Above this petal
is the background. So I try not to paint
outside of the petal. This brush will always
be clean and wet with water only if there's
too much paint on it. Watch it first before using. As you can see, that the
petals shown in the profile Ross is almost like
showing it an angle. So it's more likely to be a horizontal position as compared to a
front-facing roles, which is more curvy
and roundish. Continue painting and
creating more petals. Following my guidance. At this point, the process is repeating. So I'm speeding up
the video a lethal and let you watch with a
little background music. Most of the petals are done. So let's get back to the
center part which is dry now. Painless small spot right at the center and
the curve below it spreading the color out more
as this area is under shift. Then so often with water
using your bigger brush. I'm lifting an area
here for this vector as I want this part of the
petal to be in the light. Now using a wet, clean brush, try to soften some outer edges and add the lighter
color like before. So it will seem to be colored
sipping outwards from the petals and add more water. And now it's done. And lastly, let's paint a rose. But using your bigger brush, either an eight or ten pen, a vertical oval shape, which resembles a rose bud. Adjust the size to your liking. Since a rose bud is
quite always darker than a full bloom roles or edit
a little blue on top. Try to blend the two
colors together, especially for the upper part. Once the colors are blended, back the Ross or
direct color that you are using to get
that darker shade. While the raw spot is still. Then start painting the sepal of the row spot with sap green with your brush
slightly touching the butt. A sentence set to let it
dry a bit and move greens. Then use a clean, damp brush, lift some pens off
from both sides of the rows, but it's done. In the next lesson. We are going to paint a branch
of roses in one painting.
7. Leaves and Background Roses: In the last two videos, we have learned
through Penn roses in the foreground,
which often focus. Now we're going to paint roses that are in the background, which are blurry
and out-of-focus. Here is one that I
have painted earlier, just to show you how it
looks like in watercolor, we are going to use the small and medium-sized
brush for this exercise. Your small brush with
your rose color. We will start with the
front-facing rows first. So just make a few
random strokes for the center of the rose. The strokes don't have to
be in a certain position as we are going to blur them
out later with water. Get your medium brush ready
and wet it with water. Then blow the strokes from
outside into the center. You can opt to leave a lethal
of the center and touch it all depends on how other focus you want your roast to be. Here you can see the comparison of the first and the second row, one with less calendar center and the other more
color in the center. As for the rows in profile pen, the brush strokes as what I'm doing here in sort
of a slanting way. Also at a center too. Once you are done
with all the strokes, then soft and wastewater.
Same like before. You can leave a bit of the center color or you
can partially blow it out. If you want it to
be more blurry, you can move water
around the rows. As four leaves. I'm mixing green and
sap green together. Or you can have your
own mix of grains, depending on your
reference photo. Not your size eight brush
with the greens and pen, a leaf shape as what I did here. Don't pan, You're live in a perfect leaf shape as this
is not a realistic painting, is supposed to be loose and
having an atmospheric look. I'll do a couple more
ships for you to see. Don't be too concerned of how the shapes are at this time. I promised you that
they will look stunning when they are
added to your roses. With the tip of your brush, you can add a little detail at the edge of the
leaf if you prefer. Some leaves of roses do have some dark color on them,
especially red roses. So to do that, I just painted some strokes with the rose color while
my leaves are still dimmed and below them
out with some water. That's it for this lesson. And I will see you in
the next lesson where we'll plan how to paint
the whole picture.
8. Thumbnail Planning: Thumbnail sketches are small
and simplified drawings, which helps a lot in
planning your painting. They will give you
a rough idea to plasmon of the Roses and leaves. On the whole. You can
also see the balance in your picture and
that's conversation. Now let's look at
the first thumbnail. I'm sketching tool
facing front row says one profile roles
in one rose bud. Once you have your roses, then you can add in the stem, the branches, and the leaves. The main focus of your
painting, other roses. So once you have the number
of roses that you wanted, then the others are just add ons to create a
balanced picture. No matter how simple or complex your picture
is going to be, it's important to
create balance. Now for the second one, the second thumbnail here, I have one facing front rows, one profile roles
in one row span is easier to sketch the flowers
first, then the leafs. Thumbnail sketch number three. You can also make it more
interesting like this one, the branch growing downwards with older roses facing down. Here. I have one
facing front rows to profile roses and a rose bud. Sometimes you don't even have
to sketch in older leaves. You can add in the leaves after you have painted
all your roses. Who share what you choose, try a few options. Sometimes you might even pen in more leaves than what
you have sketch. But nevertheless
remember to keep in mind the composition
of your picture. Thumbnail sketch number for this sketch is the simplest
if you want to start simple, just one facing
front, rows and rows. But perhaps after you
have painted the rows, you can add in one or
two out of focus roses. Now that you have all your
sketches in front of you, chose any one or you
can create your own. And I will see you in
the next lesson where we will append the
whole picture.
9. Transferring Sketch: I'm going to show you two
easy ways to transfer your thumbnail sketch to
your paper or sketchbook. The first way is rule of thirds. In rule of thirds, we normally draw two vertical
and horizontal lines to divide the sketch into nine boxes are shown in
the picture number one. But since our sketch or
painting is quite small, it's enough just to draw one line on each
side instead of two. Hence, dividing our sketch
into four boxes, only. Draw two lines crossing each other as shown here
on your sketch. Then do the same
onto your paper. So now we have the center where the lines cross each other. You can start sketching with
the guidance of the lines. As for me, I like to start from the center and sketch
out what's wrong day. Once it's done, sit back
and check on your sketch. If your pencil sketches
to dark like mine here, you can always erase lightly using a soft or
kneadable eraser. Don't over Erase tool. You can see your sketch. Another way is by tracing. You can use a carbon paper under the sketch to trace it over
to your sketch book directly. But I don't usually do this. Or sometimes carbon
paper can be very messy and will leave black
traces onto your paper. So a better way is to cut out the main subject of your sketch, which are the roses here. You don't have to
cut out the others, like the leaves and the stems. This is what it looks like. After the roses are cut out. I will put a color backing
so you can see how it looks. All the dark blue colors here are the positions of neurosis. Now place this cut
out sketch onto your watercolor
paper or sketchbook. Then sketch out the outline of the cut-out shapes
with a pencil. Once you remove the
cut-out sketch, you can see the roses shapes on your watercolor
paper or sketchbook. Then it's time to
roughly sketch in all the stems and leaves
according to your cutout sketch. And there you have
your sketch and ready to be painted
in the next lesson.
10. Roses : Complete Painting: Before we start painting, prepare the color of your roles. We're going to need
a saturated color for the first layer. Do a pen test on
a piece of paper first to check the
consistency of your color. Once you have the
consistency that u1, you can now start your painting. Start painting your
first rose from what you have learned from
the technique video. We begin with the shape
of a facing front rows, leaving some white spaces
we've seen for highlights. Wash your brush clean
and we're going to do lifting of colors. Remember to live with COVID movements so your petals
will look more natural. Continue creating your
petals and do remember to wash your brush when it's
too saturated with pain. Us what the profile roles? Remember the pen, the petals in a slanting horizontal way. Then immediately pen the half
opened roles besides eight, pen in a triangular shape. Back to the profile roles. And lift some colors
off with a damp, clean brush and soften the top with water. Leave off some colors
from the half open roles to soften the top edges. Pin two strokes curving
inward each other. The blue or violet to darken it. Prepare a mix of green
and sap green together. Start drawing stems
using the green mixes. I'm still using size brush here, but you can always change to your size two brush if you feel the bigger brush is
a bit too clumsy for a delicate
subject lines, stems. Since the rows but
is still damp. I painted the sepal saw the greens will blend
into the rose color. It looks nice when the greens
seeped into the rose color. Penn sepals for the other
two roses above the rows, but there are no samples
for the facing front rows. Stay behind the roles. So continue with the stems. Start drawing branches
for the leaves. Following the guide of
the technique video, pen the leaves in sort
of a jagged motion. Also try to leave some
white spaces as highlights. Made it dry before we
go to the next step. Now, it's dry and it's time to paint some details
for the petals. Remember that your petals are most probably
different from mine, but those techniques
always stay the same. So I will fast-forward
a lethal and let you wash with some
background music. I added some more
saturated rose color to the Rossbach as it
dries a little too light. As normally, rose buds
are usually darker in color compared to
an open two rows. Now I'm painting an out-of-focus
rose bud above here, starting with a saturated color, then blurring it out with
a very wet brush and carefully still leaving a
bit of center and touch. Not to worry if your center
is smeared as you can, always come back after it's dried and in the center again. Now load your brush with
rose color and draw thin strokes on the
leaves and branches. Then soft done with
water before it dries. If your stems and
leaves look a little like mine here at a
little more greens, or you can add only sap
green to brighten them up. Since the rose bud on top
is an out-of-focus one, I'm adding an out-of-focus
branch of leaves on its stem. Now, adding a blurry sepal to this out-of-focus rose bud here. Now I'm adding a very, very diluted rose
color over here in the background to suggest
a distance roles. In another out-of-focus
rows down here. It's almost impossible to stop when adding
out-of-focus flowers. So be watchful not to overdo it or else you will overcrowd
the whole painting. One way to know when to stop
is to stand back and look at your painting from a distance
like an arms length away. This gives you a better
view of the whole painting. At the same time, you can
also have a better view in seeing which part needs a
little bit more attention. Lastly, to endure painting, sign your name and thus it. I hope you enjoy the
whole process as much as I enjoy
painting it for you.
11. Recap: If you have this last
video of the lessons, it means that you have
finished watching my class. So congratulations. I hope from the lessons
you have learned a short, simple and easy watercolor
techniques to paint roses. I also hope you will continue to practice these simple exercises. As I do believe, that practice makes
progress not perfect. So don't look for perfection
in your painting. With a thumbnail sketch
in your head is always easier to plan your final
painting for your project. Have a few thumbnails
to choose from. Please do post your project in the project section
below this video. May it be only a rose or
whole bouquet of roses? If you post it on Instagram, do tag me at all. You what the color.
Thank you very much. It's been a pleasure for
me to be able to compile this class for you hope to see you in future
classes to come.
 Zainab Mohamad Ali, Artist and animal lover