Transcripts
1. Intro cosmo watercolor tutorial: Hello and welcome to my class on painting cosmos
with watercolor. I recently was in my garden and my Cosmos are
just going crazy. They're blooming like
crazy right now. And I thought it
would be so fun to do a tutorial watercolor painting. We are going to do
a more loose style. And it's going to look
like we kinda just through all these flowers down on the ground and
then painted them. I think it's gonna be really fun if you love to paint
with watercolor. This class is
definitely for you. This is a beginner level. I will walk you
through everything. But if you've never picked up
a watercolor brush before, I definitely recommend
checking out my beginner watercolor course. It will really be helpful. It's available on Skillshare and I'll link it in the
description of this class.
2. Class Project: Our class project
is going to be you painting along with me and
painting your own kosmos. You can choose to use
any colors you'd like. But I'm going to show
you which colors I'm using today and the supplies
section of this class. Please play along with me. I cannot wait to see what
you create and please post your project in the
class project section. It makes it easier for other
people to find this class and also just really love
seeing what you guys create. Alright, let's get started.
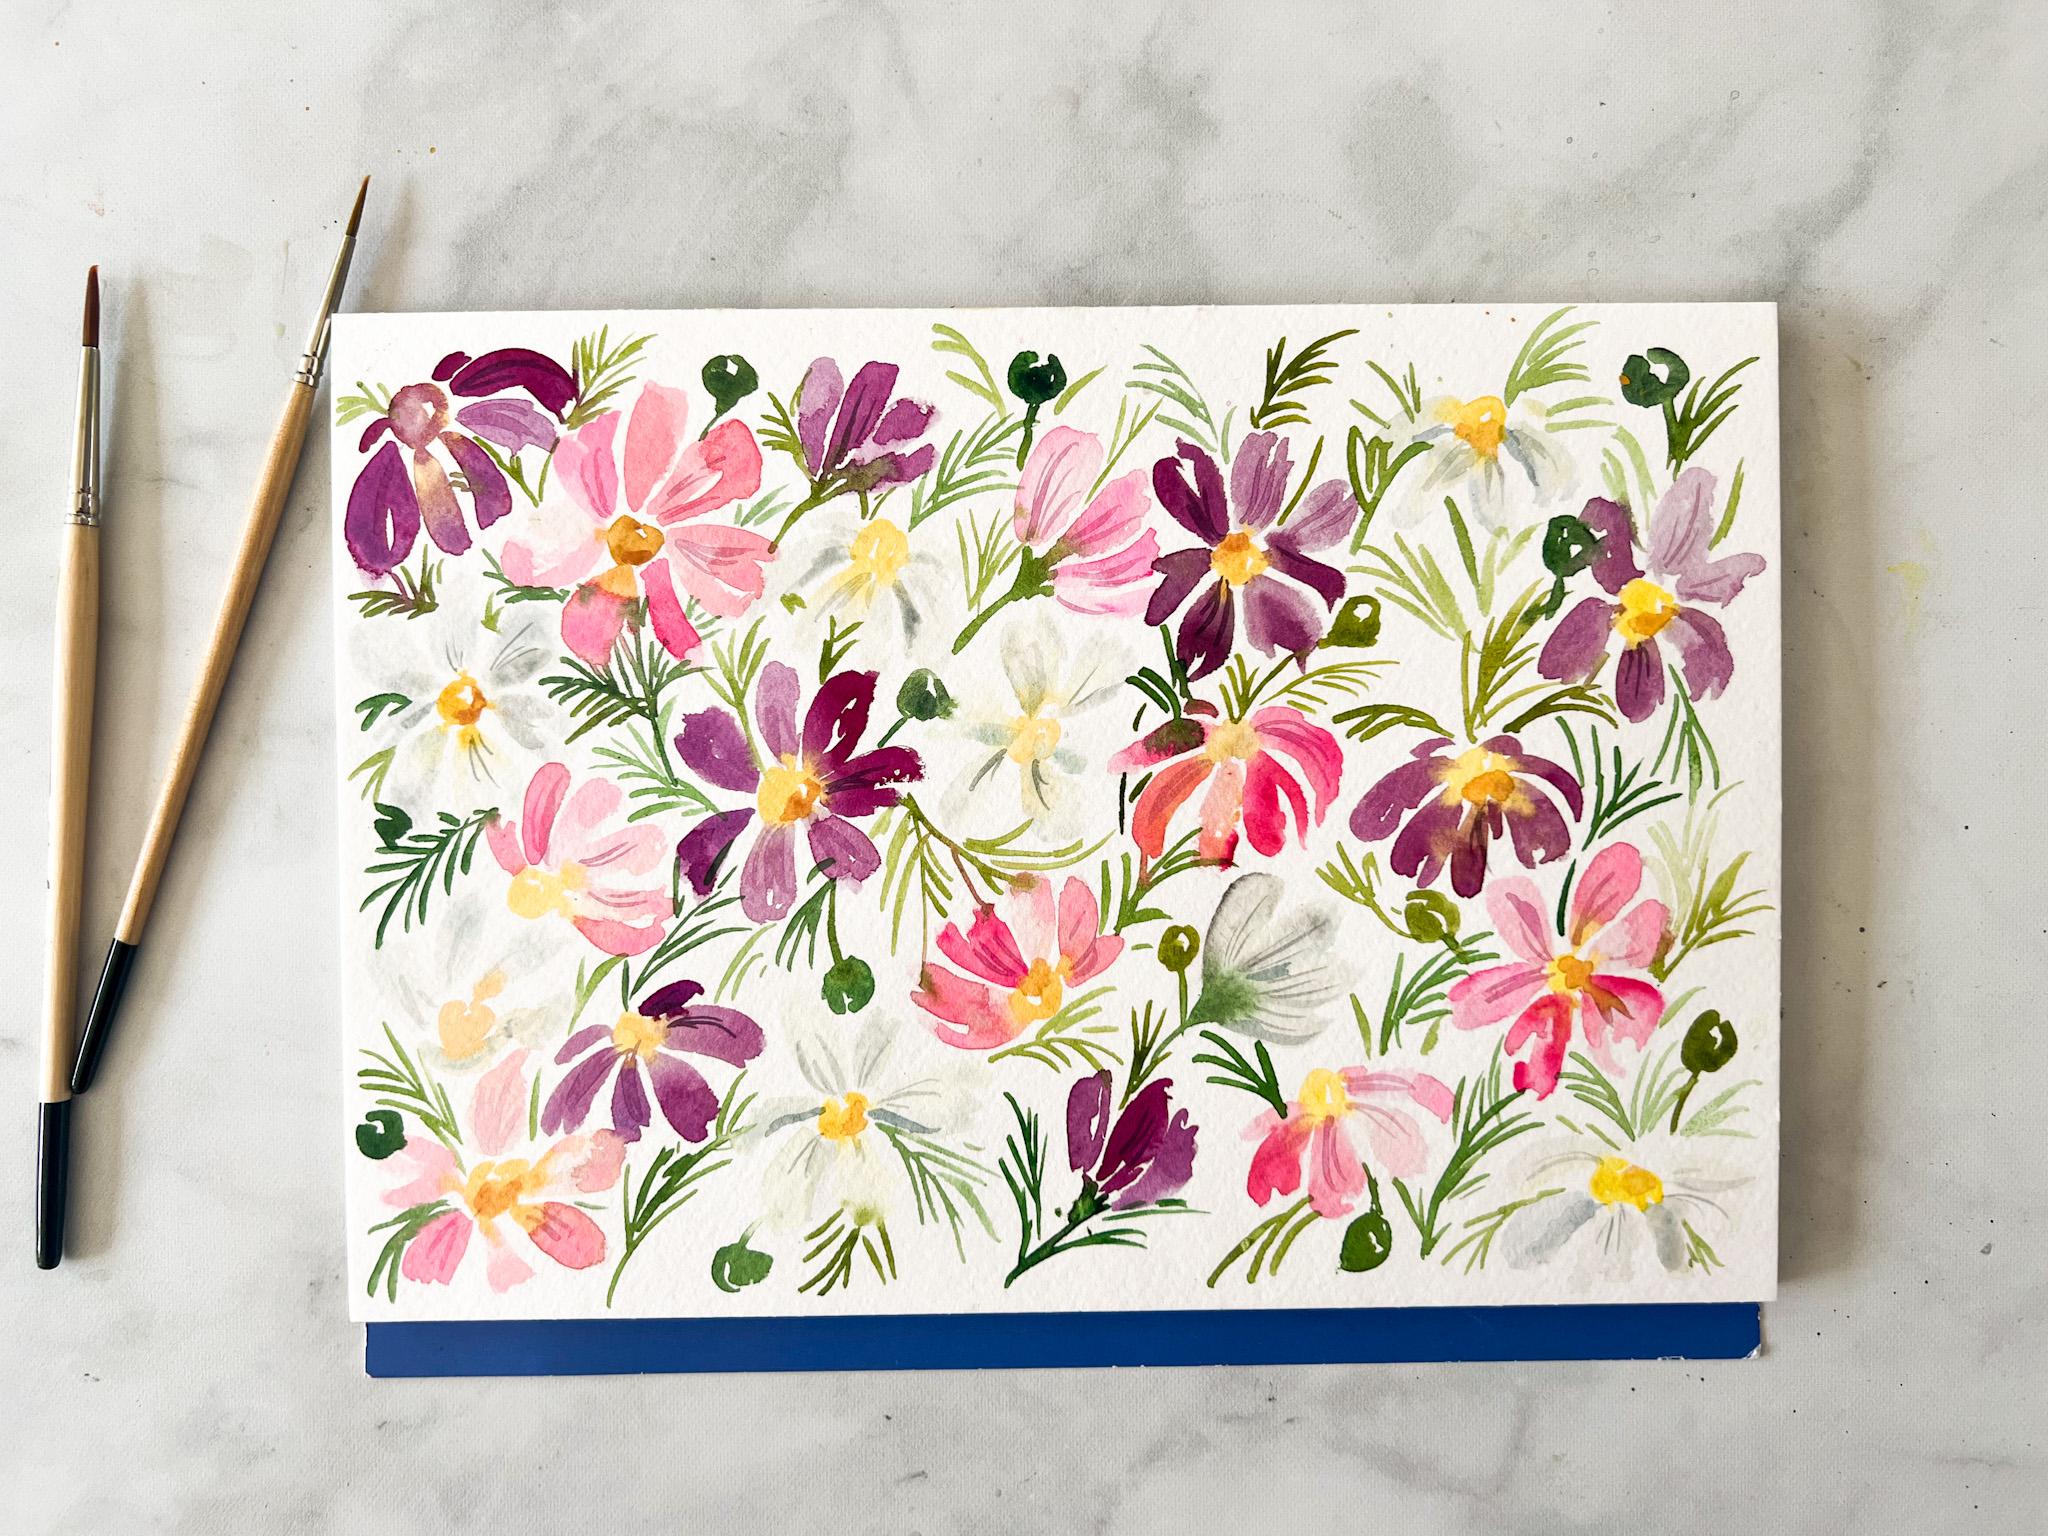
3. Supplies: Before we get started
with painting, I wanted to show you what
supplies we'll be using today. If you've done one of
my classes before, you know that I love
to use to water cups. And the reason I like to use two is because I like to keep one for cool toned colors
like blues and greens, and one for warm tone colors
like yellows and reds. What that does is
it makes sure that our colors stay
really vibrant and we don't end up with really murky water and
then murky colors. And I am using a smaller
watercolor block today. I'm using the Stonehenge
Aqua cold press. I love this paper,
it's fantastic. I also love arches. If you don't know what
kind of paper to use, I suggest a watercolor block. It really helps you to get
a better quality painting. However, if you, whatever watercolor you
have will work just fine. But if you are working
on an individual sheet, make sure you tape it down
because we're gonna be using a lot of water
on the paper today. And if you don't tape it down, It's going to buckle and
warp and we don't want that. So I'm working on this. And then I'm also going to use a few
different brushes today. You don't have to go this big, but I like my size
eight brush because it has a really nice
pointed tip on it. I love these brushes
by the pigeon letters, but any watercolor
brushes will do. I also have a size
six and a size two. And most likely
we won't be using this small sizes of
three over 0 today. But if you do have whatever
sizes you have are great. A six would be probably the best size if
you only have one brush. And now we're going to
set up our palette. Now you can do, like I
said in the beginning, you can use any colors
that you want by, I'm going to show
you what I'm using just in case you want
to use them as well. So in the beginning
of this class, I showed you the different
colored flowers. So we have in my garden
kind of a light pink one, we have a purple one
and then a white one. I'm going to start with
ultramarine violet. I love Winsor and Newton. Those are the paints
that I like to go with. But if you have different
kinds of paint, I'm totally use that one. I'm just going to put a
little bit right here. We can always add more. The cool thing about
watercolor paint is you never really waste it because you can just
add water to it after it dries, it'll
come right back. I actually already have a
little bit of this on here. This is permanent magenta. So I'm going to leave that. Then. I am going to add some pink. So I love opera rose, one of my favorite colors. But I also want to make the pink a little bit
more blush in tone. So then I'm going
to have a place for this is yellow ocher, kind of a brownish
yellow, bronze ketone. Then regular yellow because we're going to make the
center of our flowers. This is lemon yellow. Let's see. We have our green. I already have green
on my palette here. This is rich green, gold. Daniel Smith also makes really
good watercolor colors. So we have that color
which is pretty bright. And then hookers green. What a name? I wouldn't really like to know. It must mean something different
than I think it means. That I also have undersea green, which is a little
more mild and Mellow. We're going to play with different variations of green to make it look interesting. Then just a little
bit of Mars Black because we might never know when you'll need
a little bit of black. And lastly, because we
have those white flowers, we need some kind
of shade that's not white because
it's not going to show up well if we don't. So I have cerulean blue, I'm probably saying
that incorrectly, but we're going to use that
with a little bit of black to kinda get a gray color
for those white flowers.
4. Watercolor cosmos painting tutorial lavender and sea SS: Alright, we're gonna get
started painting here. And like I said, we're just going to
pretend that we picked a bunch of flowers
and threw them down. And they're just going to be
all over the place on here. There'll be a method
to our madness, but I am actually going to start with my
size eight brush, but feel free to start with
something a bit smaller, like a six or even a four. I just really like, I'm loving this brush right now. So that's what I'm going to use. I'll show, don't worry, I'm going to show you
how to do everything. So we're going to
mix up our, oops, the yellow and the
yellow ocher to get kind of like
a darker yellow, yellow color that we're
going to put around the center of the cosmos L. So just with the
tip of my brush, I'm going to make that
little half circle. Now you never want your brush
to be dripping with paint. That means you have way too
much water on your brush. And if that ever happens, just lightly tap it
on your paper towel. As you can see, I always keep a paper towel under my
water cups because I like to do that if I have too much pigment or too
much water on my brush. So we have this on
this left corner. And a Cosmo has lots of
petals and they fall. They go up and then
some of them fall down. So we're going to
make these ones fall down and we're going to get that dark magenta
purple color. And I'm taking the
tip of my brush and just pointing and
then pulling down. So my brushes fanning out. Then I'm gonna do
that one more time. I'm making a little pedal. I'm gonna do it again, but this time maybe leaving
it just one little shapes. And don't worry if it touches, we're doing a more loose style and it's okay if
it's bleeding some. I'm just going around and making these petals grab a little
more saturated color. Then you can even do some
little ones back here. And don't worry if it touches, it kinda looks cool
and it does that. We have our first purple cosmo. Now we want to do
one that's open. So an open face flower, again grabbing that
yellow because there's yellow in the center
of all the flowers. And just making a little circle, I'm actually going to grab
a slightly smaller brush. This is a little too big for
what I'm trying to do here. I am grabbing a size four brush. And now I want to
do a pink flowers. So I'm mixing up a
little bit of that opera rose and a little bit
of the yellow ocher. And I'm making sure that there's not the paint isn't
dripping off of my brush. I'm gonna move this
down just a little bit. And then I'm just
coming back and I'm pointing, kinda pulling around. I'm just going to
curve it back in. And then I'm just paint like
pointing and then pulling. Pointing and pulling. And we're alternating. You know, how much pigment
we have on the brush. Maybe one of these petals, you can't see it quite as well. It's okay if it's kinda
jaggedy on the edge. You want to have some variation. If I just went in here
and use the same shade of color or the same saturation. It's going to look really boring and we don't want
it to look boring. It's also okay if it's
slightly touches. Maybe this petal is
really, really light. And now for that white flour, for the white flower,
what I'm gonna do is I'm going to
use a lot of water. So I'm just taking a
little bit of this blue and a little bit
about Mars Black. That's almost too much. And come in here. And again, I'm going to start
with that yellow center. And it can be really saturated
or not so saturated. And maybe like leave a
little circle in the middle. There. It's interesting, they're
not all just the same. As you can see, this one
turned completely purple. That's okay. That's the style
we're going for. So back to that really
diluted blue gray. And we're doing the same thing. You're just pulling. The cool thing about this is the yellow kinda bleeds into it. And I, I really liked that look. These are really light,
but don't worry, we're gonna go in and add
a little more detail. And you can make some of
them a little bit darker. Again, you're just pointing
and then kinda fanning out. Then the other move is
just kind of painting strokes in a pedal shape
and touching a little bit. If I want that
yellow to bleed in, then maybe grabbing just a
little more saturated color, making sure we don't
have too much water. And you can just touch on
the edge of some of these. So it looks a little darker. Cool. So now what we wanna do is we're going to fill up this
whole thing with flowers. Like I said, we're just
kinda dumping flowers here. But we want to add
in some green. And I'm going back
to my big brush only because the tip on here
works really well for this. And I'm going to mix up some
kind of yellowy green color. So make sure you have a color
that looks yellowy green. Then you're going to want
some irregular green, which that's this
one right here. Pretty bright, but less yellow. And then a green that's a little darker or a little more muted. Because we don't want to just use the same shade of green. That's going to
be really boring. Okay, I'm actually not going
to use this big brush. I'm gonna come down
to my size two. If you've ever seen
Cosmo leaves before, they're really like a bunch
of really skinny leaves. So we're coming in here
and just make sure again, your paintbrush is not
dripping with water. But we're gonna make the stem. And then we're
going to come out. And I'm just using
the tip of my brush. It's these really light
strokes to make these leaves. Then maybe I'm going to grab a little darker color
and do the same thing. It's okay if it touches, you don't want it to touch
too much because then you'll end up just having
it be a blobby mess. But it's okay if it
touches a little. And maybe up here
I'm gonna do a bud. So the bud would
be just a circle, maybe leaving a little
section of white. And then where it connects, have it come down like that. Same thing over here. This is really wet, so if we touch it, it's
going to bleed a lot. I'll show you right now. Oh, actually, it's almost dry. That's good. Okay. So you have all these pretty
little leaves and we're just alternating some different colors,
different shades of green. I mean, you can even alternate
within the same branch. Now, we're just going to paint more flowers and maybe changed the way that
our flowers are facing. So this one was a side angle. So maybe now we do one that's
the petals are facing up. So you can't really even
see the yellow part. But you always want to make sure you all the petals are
meeting in, at one place. So if we were doing the
petals facing up but a side angle, I'm pointing, pulling All here where
they would all start. Then maybe grabbing my green because I want it
to bleed a little bit. Then maybe we have
a white flower over here that is a side view. So grabbing that yellow then that bluish gray, I'm just making sure I
don't have too much water. I'm pulling some of
that yellow into it. So now I'm going to do another purple flower. The whole point of an
exercise like this is to really get
into the flow state. So once you know the basic
shapes of your flowers, because the basic
way we're painting them were painting wet on dry. So we're bringing wet
paint onto dry paper, but we do have some areas
that are wet on wet. Great. Now it's touching and
bleeding a little bit. Then we're just varying. The saturation of our paint were also varying
the shape slightly. It's going to be
interesting to look at. Like I said, we're trying
to get into that flow state where you're not thinking
about it too much. You're just painting. I like to paint from
my left side and over, but paint any way
that works for you. I like to do it this way
because then I'm making sure that it really flows. There's no holes in my painting. You'll get used to
that over time. Just kind of knowing when something needs a
little bit more and things are balanced. I like to squint
my eyes sometimes to see what it looks like
when my eyes are squinted. Because sometimes
you can see things that you don't see normally. I'm just adding in
these little branches, sorry, these little leaves. And I can even add some darker shade in here
if I feel like it needs going to do pink, they'll just alternating
the pink flowers with the white flowers and
the purple flowers. You could even throw in another
color if you wanted to. I liked this color combo from my garden in the green. And every once in awhile
doing a little bud. I think that's a nice touch. I think that the cosmos I've bought them
from, I bought seeds. And they were called seashells, so they're supposed to be
like seashell color ones. So hopefully you are just
painting along with me. As you can see, it's going
to take us a little bit to fill up this paper,
but that's okay. This is, this is a
relaxing tutorial. Sometimes I just wanna do a fun tutorial on the weekends and I don't know why I have such a hard
time finding one. That's just simple. Like I just want to
follow somebody painting because sometimes I don't feel like painting my own thing. That's what I hope this
tutorial is for you. Don't be afraid of your paints touching
if they're still wet. Also, if you feel like there's too much paint it
say you wanted to lighten up this
petal right here. What you would do is dry
off your brush or sorry, wash off your brush, then dry it off on
your paper towel and press down and you
can pull up pigment. It's pretty cool. It's one of the techniques
that I learned a long time ago and it's super-helpful. Let them touch a little bit. Maybe do another white one. I hope at this point
that you guys are in the flow of the painting. And you feel like you can make your own decisions when it comes to what flower
you wanna do next. I'm just going to
stay here paintings. So you were painting together. I wish you could ask
me questions live. That would be really cool. I guess that's what
in-person workshops are for. And don't be afraid
to switch the angle. So I'm going to make a pink one, but the pollen center is
going to be facing down. You can do two things. If you feel comfortable
painting this way, you can, or you could also flip your paper around
if that gives you, if you feel more
comfortable that way, but just be careful
that you don't put your hand in your wet paint. I'm just making
petals coming down. Adding in some dark shades. Little bud. Pull up some paint, put in some leaves, touch. So adding in maybe
just a little more, maybe blue over here. And if that seems
too much for you, do that little
technique where you can just pull up the pain. I'm gonna go ahead and
speed this up just in case you want to turn this off and just continue
your painting by herself. And then I'll meet you
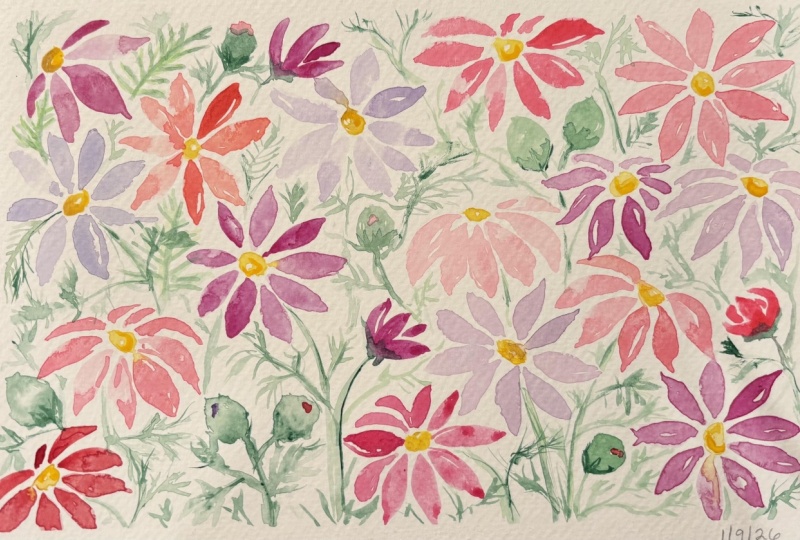
on the other side. Okay, so we have completed our beautiful
causal and flowers. Like I said, basically just a bunch of flowers that got
thrown on the ground. You can totally keep it
like this if you want. But if you want to add
in a little more detail, we are going to do that now. So I'm going to add
a little more detail to the centers of the
flowers, the yellow part. I'm going to grab my yellow
and add just a little orange. So it's a little more
golden in color. I'm not gonna do
this to all of them, but I'm going to just
add a little bit. I need something a
little darker for that. Just a little drop of a
different color in here. And not all of
them, just some of them makes it a little more interesting
because it looks harsh. Just grab a little
water and blend it in. Something else that
you can do if you want to add a little bit
to this painting, is you can add in
veins and the flowers. So maybe the flower that
maybe the white flower to you doesn't look like
it has enough detail. So you can come in and add, describe a little
bit of blue and a little bit of that mars black. Make sure it's really light. This is a good time to use a brush that's
smaller for details. Similar are similar
to a three over 0. You could do a size
one or a size 0 brush. And I'm just coming in here and adding the tiniest little lines. Again, this is totally optional. I do recommend that you don't do the lines the same all over. It's going to look boring. Maybe add just a couple lines
on a couple of the petals. If you do want to add more, I suggest lightening
your paint a lot. So it looks at least
a little different. You can also blend it in. And then just go
ahead and do that. That was really dark. This one definitely could
use some definition. It's little things like this
that make your painting pop. But again, it goes
back to what you want. This is your painting. If you're happy with it being
really loose and simple, That's awesome to make sure if the petals are curved, that you're also curving the lines of the
veins and the flower. That'll keep it looking
a little more realistic. Alright, this one
needs a little help. And you could also go in and do the same thing for
the other petals. I'm going to add some pink. For the pink, I want the
veins to be a little darker. Grabbing a little bit of that purple and mixing
it with my pink. And just a little tiny touch of black to mellow it
out a little bit. And just coming in. Making sure that I'm curving my lines with the
curve of the petal, not adding them everywhere. A couple of spots. This needs a little more definition to me. Cosmos or the prettiest flowers. And they're so easy to grow, at least I'm in Southern California and
they're easy to grow. But on this seed packet, it literally says, these
flowers loved to be neglected. Like, Oh perfect. I'm
getting better at gardening, but I'm not quite a master yet, so I liked that. It said that. Now we're going to go
in and if you want to, we can add those same
lines to the purple. I'm going to take
that magenta color, I'm going to add a
little black to it. Another way that you can
darken a color or make it more neutral and tone is
to add it's opposing color. So the opposing color on the color wheel to
purple would be yellow. You can do that if you'd like. I'm just adding a little black, keeping it simple today. That's probably too dark. I would keep the dark ones
on the darker petals. I'm going to lighten it
for the lighter petals. And I'm just doing
it in a couple of spots because I don't want to overwhelm this darker. Okay. Now I'm going to
lighten it a bit. For some of these
lighter petals. I really like the little
veins in the essay. I think it looks really good. Feel free to get
crazy with this. If you guys want to add an,
a ton more detail, do it. But makes sure to post
your what you create in the class project
section because I love to see it
because it's amazing how different all of
our paintings can be. And that's what makes art
so neat is because it's so individual to each
person and their style. It's it's really neat
and I love to see it. So do me a favor and
posterior. Your projects. I think I may come in here and just these white flowers to me are getting
a little bit lost. I have just a darkened
grayish blue tone. And I'm going to add just a little teeny lines
around some of the petals. Almost what a shadow
would look like. Doesn't have to be crazy. Also, if you don't like it, you can do that
technique I showed you earlier of wet cleaning your brush and then
drying it off and coming back and
pulling up the color. If it looks too harsh, just grab a little bit of
water and blend it in. Okay. I could get lost in this and keep working
on this forever. You guys will learn. If you haven't, if you just
kinda started watercolor, you'll learn that less
is more sometimes. But that's part of the
learning process you learn. Okay, I went too far
on that painting and then next time you
just don't go as far. Or another good
technique is just too. Or a practice that I do is to step away from my painting
and then come back to it later if I feel that I want to add a
ton of stuff to it. All right, here is
our causal painting. I hope you guys
loved this tutorial, please let me know. Please review this course
if you did enjoy it, or sorry, please
review this class. If you did enjoy it, it helps other people
find the class. And I always love to know if you enjoyed
this class or not, so I know what to do next time. Thank you so much for watching and I can't wait to
see what you create. If you are on social
media, please tag me. If you post on social
media lavender and C so I can see what you created. Have an awesome day.
 Nikki Hess, Artist & Corgi Mama