Transcripts
1. Introduction and Class Project: Hello and welcome to my class
on how to paint watercolor, Christmas or holiday motifs. I really wanted to bring
something fun like this to you guys because it's
the holiday season. And I know personally I'm always looking for a fun
watercolor tutorial. So I hope that this
is that for you. This is a beginner level. I'm going to walk you
through all of the steps. Of course, you will need
some tools for the class. You will need watercolor paper. If you're not using
a watercolor block, makes sure you tape your paper down just
because we're gonna be using a lot of water
today, a paintbrush, I used various sizes, but if you have a size
six brush or a size four, then something for details
like a size one or zero. Watercolor paint, of course, I like to use to water
cups to make sure I don't make my watercolor
paint too muddy. And then a paper towel, a pencil and eraser, and either a white gel
pen or white gouache, because we're going to be doing frosting on these little
gingerbread cookies. We'll be painting
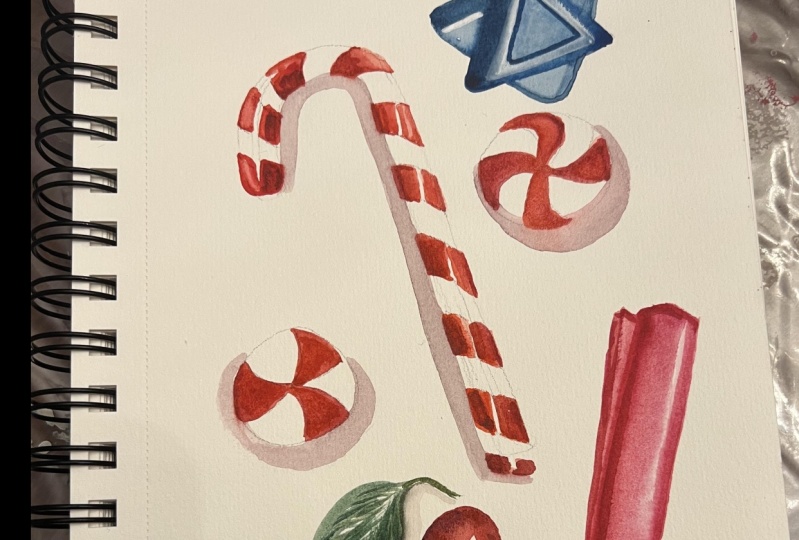
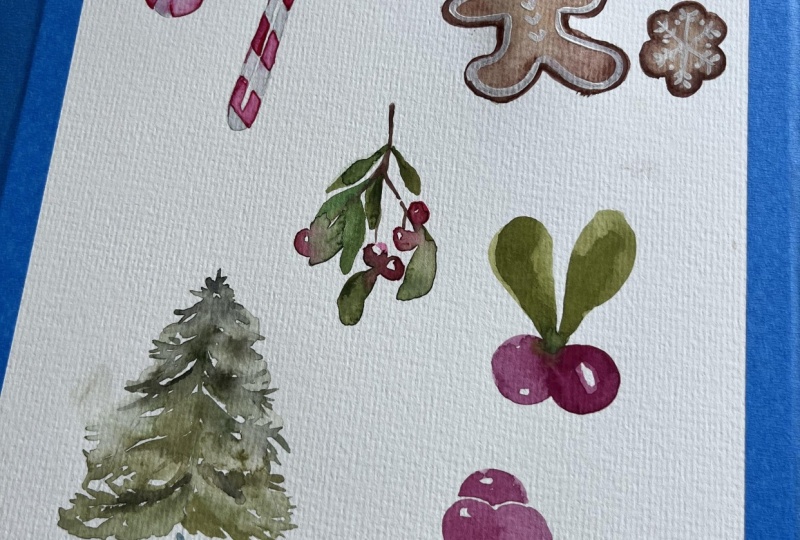
gingerbread cookies, a snowy Christmas tree. Some candy canes and
peppermint candies, as well as some holly berries. So your class project is to
just paint along with me. Whatever you want to paint. You don't have to do
all of the classes. I split, these are
all of the sections. I split these into four sections so that if you
want to do the candy canes, you can just do the candy canes and you
don't have to worry about fast-forwarding through
the tree or whatever. So everything is split up and I would just love
to see what you paint because everybody paints things just slightly different. And it's really cool to see how everybody interprets,
interpret the prompt. I hope you guys
enjoyed this class. As always, if you
have any questions, feel free to reach out to me. I also love your feedback
and let's get started.
2. Paint A Snowy Pine Tree: We are going to be
painting a quick and easy like snowy pine tree. And to do that, I am going
to have a size six brush. We're going to start by
mixing up some green. So we want a pretty dark
shade like a pine shade. Then we want to have some
lighter variation as well. So maybe adding a
little sap green. I'm not sure what my
really dark one is here. I'm sorry. But if you
don't have a dark green, just add a little black to it. And you can also
add a little bit of indigo if you want to
make it slightly blue. Okay, That should be good. Now we're painting in
more of a loose style. So if you need a guideline, just grab a pencil and
make a straight line. If you feel like you
really need a guideline, you can also make a triangle. So it'll just give
you a rough outline. Now how we're going to
make sure that there is snow on this tree is we're
going to skip some parts. So grab your paintbrush and we're going to
start at the top. And I'm about at a 45-degree angle and I'm
just making a little wine. If you're familiar with, like, I think it's a Douglas fir, just like some little
lines up here. Then I'm going to
make it come out. And I'm just using the
point of my brush to make these little branches when
to leave a spot right there. Now I'm going to
skip down and grab, grab a little bit
of a lighter color. And I'm making, leaving
a pretty big gap, but I'm always coming out
from the center here. Same thing. Just these little swishes. Maybe I grabbed a little dark again that I'm going to rinse off my brush
and grab just water. I'm going to lightly tap this. I'm just pulling down a little
water and a little color, but I'm making sure
to leave parts of the paper completely dry. Just grabbing that
water again and pulling down some of that color. And right here you can
connect it because it's not going to be a
perfect line of snow. And then just pull out that diluted color
out to the edges. And then maybe you want
to do the same thing up here as well. Then we move down to
our second branches. Now we want this to
look interesting, not like the same thing
over and over again. So maybe we touch in some of that darker color and then
pull down these branches. And we're going in a cone shape. So it's going to get bigger
as we get to the bottom. Grab a little more
saturated color. You can also poke in
some different colors. And then maybe you make some of the branches
go down a little bit. Maybe this one comes
in a little bit more. Then I'm going to
rinse off my brush, grab just water, and just
lightly tap some of this. An almost making
it look like the snow's coming off the edge by just bringing that
watery green color down. And you're just going to do this all the way down the tree. Make sure you're
alternating between colors. Otherwise, it'll
get kinda boring. And maybe this part, there's a lot more
green showing. You can also do like barely
any snow coming on this side. And then just grabbing
that water and lightly touching
that top branch. So it bleeds but not so much that you're covering up
the white of the paper. And I am going to make
more of a whitespace here to show that maybe there's a big pile
of snow right here. And then the same thing, it's important to make sure
that this is still wet when you come in there with just water to make
it look like snow. Basically what's happening
is you're wanting to make it look like the snow is reflecting the branches and it's going to change
a little bit. But when we get to the bottom, we're going to add
in some new colors. So stick with me here. I'm just, again, I'm just using the tip of my
brush at an angle. And everyone's thrombin at grab maybe that sap green color. So it's not too much of the
same over and over and over. And sometimes your
branches can go up, sometimes they can go down. This is nature. So it's not going to be perfect. I'm grabbing just water again. I'm just putting in some of make sure if you start to get too much paint on your brush to
rinse it off again. So you're getting just water. And we're starting to
get to the bottom. So I'm going to show
more of the center leaves coming out or branches. Maybe it's just a little
more thick down here. You can use more of the
belly of your brush by pressing down to make
it a little thicker. But something I really
like to do here is I like to come
in with a blue, not like super dark blue, but something like that. Then I do the same thing. It looks like I'm
drawing branches, but essentially what
I'm doing is showing that there's snow down here. Then I'm going to grab just water and
lightly blend it in. So to me what this looks like is the branches hit the ground because they are
flooded with snow. And then I like to
grab a darker color, blue, indigo and just
lightly tap it in. You really get that shadowy
close to the ground. Look. You can grab just plain water and pull it down even more if you want to. So we need to grab water
and come up here to some of these areas to give
that snowy shadow feel. You have to work pretty
quick because it's drawing as we go and it's really dry
where I live right now. So one other way I want to
add some interests to this, as I'm going back to my
really dark green color, you can add black if you
want to make yours dark. And I'm just going to poke in where I think there'll
be more shadows. So maybe down the center, there's a little more shadows. Just to make it here and there. You can also use the
tip of your brush to just show more dimension. I guess. You don't want to
add it everywhere, but here in there
we'll add a lot to your painting because
it draws your eye in. So it's looking like
deeper and deeper up here. And I would say that
this is just about done. There you are a snowy tree, super easy and fast.
3. Paint A Candy Cane and Candy: We are going to paint a candy cane and some
Peppermint Christmas candy. First thing we're
gonna do is we want to sketch out our candy cane. So if you guys have one on
hand or you can grab a photo, we're just going to make
that classic candy cane that's like a hook. And make sure you do the edges rounded because
it's a candy canes, so it should be rounded. And feel free to use a ruler if you have a hard time
drawing a straight line. I'm actually going to make this little
hook come in just a little bit more because
a little far out. There we go. Okay. I'm drawing a little bit
darker so you guys can see, but feel free to draw
as light as you want. The lighter you draw the better. Because you don't want
it to show up since there is white on
the candy cane. And then something
that I like to do, you know how candy candy
canes have that sheen? It kinda looks like shiny. The way I get that is I draw
a line down the middle. So one line and then two lions. So it's just really thin area that I'm going to keep
completely white. And this is going to give the appearance that there's
like a shine to this. You can also cut it off so it doesn't go all the way
down the candy cane. And we're going to leave
that white right here. Another way you can do this, if you have masking fluid, you can paint this with
masking fluid and that way you can just peel off that masking fluid and you have the
white paper underneath. But today, I'm just
going to paint really delicately and make sure that
I don't paint over that. Then we want to come in
and paint our stripes. So just paint those, are sorry, draw those
candy canes stripes. This will just help
to be a guideline and I kinda like to do
them at an angle. So that's our candy cane. And then we're going to do
our little mic candies. And we're going to
paint two of them. So draw a circle and then
draw a little.in the middle. And it's like a pinwheel. And there's four sections. So just draw that
pinwheel like that. Wait, is it 4123455? Wait, that's not right there. The circle than a.in the middle. And it's actually going to be, there should be four sections. Right? Why am I having such a
hard time with this? Sorry, three sections. So red, white, red, white, red, white. Draw another circle over here. Feel free to grab something in that circular if you're having a hard time grabbing
a drawing a circle. And then this one, I want to
have eight sections total, so I'm gonna make them
a little bit smaller. 12341234. There you go. It's okay if some of them
are skinnier than others. Okay? Now that we have, are our pencil down, what we wanna do is if
you drew a really dark, just lightly erase it
because we don't there is white on here and
we don't want it to be we don't want the pencil
marks to show through. Now I'm going to grab my size two brush and make sure you have a brush with a
pretty good point on it. Makes up some red. I have scarlet lake here. But whatever red
you have is fine. I actually wanna make
this red a little deeper. So I will add just
a touch of blue. Sometimes if it's
too like poppy red, it doesn't it's not really
like a Christmas red. I have a good amount
of paint on my brush. It's pretty thick, kinda. The texture of
butter I would say. And what I'm going to do is just come over
here and I'm going to outline that first stripe. But I'm going to make
sure that I do not touch remember our
white shine line. I'm not going to touch that. I'm going to paint around it. So I'm outlining it. I'm going to rinse off my
brush, grabbed just water. Sure. Not too much water. And then I'm just
going to kind of pull that paint around. I'm gonna do that all the
way up this candy cane. Again, making sure to not get that white
line in the middle. And don't worry too much about the white stripe in
the candy cane right now. You don't have to
worry about that. If you feel like you put
too much pigment down, just grab a dry brush
and lift it up. Going all the way down
and now we're back to having that white line down the middle that we
do not want to touch. Because that's our
little highlight. It seems like
something so simple, but you guys are
going to see it come together and you're
going to know, oh yeah, that's
why you did that. I think that is one
of the things about watercolor is figuring out how to make something
look if you want to paint in that style
more realistic. It's really about the lighting, like how the light
is hitting things. Because it would look really flat if we didn't
just have this. Highlight them at all. Okay, one more. And we're going to graph
just a little bit darker. I want to pop in a
couple of areas. So grabbing that
darker red and just lightly touching the underneath. So this is where it's like the underside
of the candy cane. And why I'm doing this is I want to make it look like a
shadow a little bit. Then I'm going to just lightly dab off my brush so there's
not a ton of water. But I'm just going to make
this little teeny line here. And not too much. You don't want to
do the whole thing, but just a little bit. It's going to guide our eye
along the edge of this. And I'm going to mix this is just add a
little more water over here. We're gonna give
this a second and we're going to come back to it. But for the most part, it should be darker
on the inside here. And then on the outside
it can be lighter. Now right here, I'm going
to add just a little line. Oops, I add too much
water on my paintbrush. Soak that up. I just wanted to add
a little shadow over there because that was
looking a little too dark. So I'm going to do
the same thing here. Just with the tip of my brush. It's really important
you have a brush that has a good tip. This is a Princeton heritage tip on these brushes is amazing. Okay. So as you can see, it's
already starting to come together because we played a little bit with those shadows. We're going to let it dry
and we're gonna move on to our little candy cane
candies, pinwheel candies. For these, we're grabbing that same red color and
we're doing the same thing. We're just outlining
where the red would go, rinsing off our brush. Just moving it around. And I can tell that I have a little too much water
on my brush right now. There we go. And if it's looking just kinda block like
this looks really flat. Rinse off your brush, dry
it off on the paper towel, and just pick up some of
that paint because you want it to have that
watercolor and look. I'm just pulling a
little highlight there. Same thing over here. He really got to
watch your brush. Sometimes water builds
up around here, and then it goes down your
brush and onto your artwork. And that's not what you want. I'm going to dab in just
a little darker color and let it bleed. We're gonna do the same
thing to this guy. This one had kind of
uneven pinwheels. That's okay. These are great. If you wanted to make a
little gift tags or a card. Oh, there we go again. Dropping away too
much water on here. Another thing you
can do to make this look a little more
interesting is, okay, I'm going to outline it. Then I'm going to make
a little triangle here and I'm not going
to paint inside of that. So it looks like another
little highlight in the candy. Actually should have done
that for all of them because that actually
looks a lot better. Okay, we're coming back to our candy cane and
we're going to grab a like frosty grayish blue. We don't want black because
that's just too dark. So I want to lighten it up by this is like a
lavender color. And then I have a
little bit of Payne's gray and I might just
do a touch of black. So like a grayish blue. I'm going to make sure
that I definitely do not. This is really watered
down and I don't but I don't have too
much water on my brush. Then I'm going to
come in and I'm just this with the
tip of the brush outlining where the white part of the candy cane would be. And I'm making sure that I am not painting that
center piece right? Because that's our
little highlight. And it's okay if it
bleeds a little bit. And I know you might
be thinking, oh, that looks really, it looks
like the candy cane is dark. It won't look like
it because we're going to come back in
and do one darker shade. It seems weird, but
it'll look okay. Plus something else that I do. When you digitize your artwork, appear in Photoshop, you can
bring the white out more. So sometimes I'll paint dark. And then when I get in Photoshop
because I'm digitizing it for like art prints
or cards or whatever. I am able to basically
make it white again, but keep all those
shadowing details. We do have a little bit
of bleeding because the red is not totally dry, but I'm okay with that. Actually kinda like that look. Okay. So we're going to let this dry and then we're gonna come in with a second layer to just get these details
a little stronger. But do you guys see already it's already
creating the shine. Back to our pinwheels. We're gonna do the same thing
with the white sections. Think I'm going to
darken my color. Just a tad. Going to outline
it along the edge. Just bring in a little water that's actually not dark at all. So outlining it. But making sure that
I'm leaving white. Because if you
don't leave white, it's just going to
look like dirty candy. So make sure you're leaving
some of that white. Same thing over here. A little wet still. So I'm getting a little
bit of the red in it, but it's okay
because it's kind of giving it a creamy look, like a cream color, not
like a creamy candy. But again, makes sure
leaving that white. And you can see it's kind
of looking more freely now because we're adding in these layers were adding
in the shadowing. So this looks good. I want to add another layer
if you're happy with it, as is, you can totally
be done with it. But I want to add just
a little more layering. But we need to wait until
this completely dry. So I'm going to let it dry and then we'll come
back and add the details. Now that we're dry, we're going to come in here
and just add some details. I can see that this one
got a little washed out, so I'm going to definitely add a little more red over there. I have a pretty saturated red. And I'm just going to add a little line here
and a line here, but make sure they don't
touch because we don't want them to bleed
into each other again. That I'm just grabbing water and letting that kind of bleed. Same thing over here. Like I said before, we're just adding depth by
adding a shadow, basically. Good. And I should have painted
this one first because I'm right handed and I tell my
hand is going to go in there. We're gonna do is
we're going to come in here for the red one, and we're just going to add a little line on the
left-hand side of that white. And I'm just doing this to
add another dimension to it. You could even do like a slight line on the
top if you want. Just a real thin because we don't want to make it look
like there's too many shadows. I'm actually going to blend
this with some water. And I'm going to grab
that gray color, senior lots at that lab and
nourish gray that we had. And just on the tip of
my brush, on the inside, I'm going to make a
really light line here where that white is. Rinse off my brush because
I actually got too dark. So I'm just going to blend
it in with some water. Again over here, I can tell my brush has a
ton of water on it, so I just dab it off
on a paper towel. Maybe just a little
line over here. And I think that about does
it for the candy cane. I don't wanna get too. There's definitely,
you can go too far when you're painting
with watercolors. So there's a happy
balance there. You did want to add a
little more red over here. A touch over here. Help over here. Because, okay. Alright, I think I
candy cane looks good. Now, last but not least, another little peppermint candy. We're gonna do the same thing. It's kinda outlined with the red blended in a little
bit with just water. And I am going to grab black
gray again, greenish blue. Just on the tip of
my size two brush. I'm going to make a slight line just to outline it a little bit. Same thing over here. All right. And if you feel like
you want to make this highlights
tick out even more, you can grab an
even darker shade. It's kind of an endless
process like you could always tinker with
it for a really long time. Just adding in. Like just every few,
just really small. This is a darker shade. Do that but not gonna
touch it anymore. I think we look, they
look really good. All right. Those are our candy canes and
our peppermint candy.
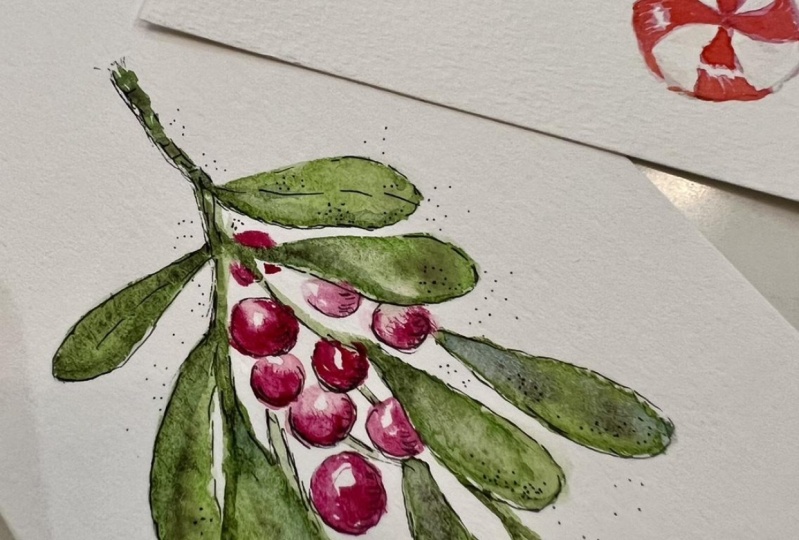
4. Paint Holly Berries and Leaves: We're going to paint
a more loose style of cranberries and kind
of like Christmas, like mistletoe and
stuff like that. I wanted to paint a more
loose style because I know I often do the layered style, which takes a little more time, but now we're going
to do a loose style. So I have a size six brush. Make sure your brush has
a pretty good tip on it. It really does help. When the tips dole, it makes
it a little more difficult. I mixed up some red paint and
add a touch of blue to it to give it just a
little more like depth. Because I'm using scarlet
lake and it's really bright. My paint is kind of like a
butter melted butter texture. Hopefully that's helpful. And what I'm going to do
is I am pointing my brush. It's like at a 45-degree angle. And I'm just going to
make, I'm pressing down, making a circle, but I'm leaving a little white space
in-between it. Basically, I want that
little white space to be like a little highlight. I'm going to rinse off my brush and describe a
little bit of paint, but with more water. I just spelled it. Then I'm going to come in and
just make a circle again. Again, I'm going to
leave a tiny whitespace making that circle. And then I'm going
to let it touch and it's going to
bleed a little bit. And I'm cool with
that because we're using a more wet
on wet technique. Then I want to add some
fun little leaves. So I'm going to grab some green. You want a green that is
pretty bright and vibrant. Not Neon of course, but something not too muted, this color that I just
grabbed his really muted. So I'm going to try
to brighten that up with some of my other
greens that are bright. And I do want it to
be pretty strong. The pigment, I don't want
it to be too watered down. Maybe grab a little sap green. And you don't want your
brush dripping with paint. So if it if it feels
like it's about to drip, just lightly tap it
on a paper towel. Then what I'm going
to do is I'm going to point and I am going
to touch that red. I'm going to bring it
around all the way back. And now I'm going to grab that same pigment but maybe
just slightly darker. Same thing. I'm lightly touching little berry and then
bringing it around. And that's our first little one. As you can see, it's going to bleed, but we're okay with that. We'd like that
texture right now. Now let's do some berries again. Let's do three berries. Grabbing the tip and
then I'm pressing down, kinda make this little circle. I like to leave a little white so it looks like a highlight. Rinse off my brush, grab maybe just water
and paint a circle. I like to paint the
outside and then come up close and then
I'll start to bleed. And then for this other one, if I went and touched it, it would just look
like a big blob. I'm actually going to leave this little
whitespace between it and make it look like it's not touching. Just
paint it like that. And instead of having this kind of like
mistletoe style leaf, I'm gonna do more
of a pointed leaf. And let's change the color
of the leaves just slightly, maybe a little darker. And a lot of pigment. I am going to point it. I'm going to press down. And then I'm gonna do that
same thing, point, press down. And then as I'm pulling, pull up, so I get a
little point here. And now I'm going to grab a
green that's just slightly lighter because I want to see
it does a little variation. Same thing. Make sure your brush is
not dripping with water. And I did touch it a little bit. But that's okay. Pointing, pressing
down and pulling up. Beautiful. I like to just, sometimes it's really kind of relaxing to do stuff like this. I'm gonna do some
yellow berries now, just paint along with me. Sometimes I do a loose style. It's nice to just play
and not have it be so. Syria is I have to make this
perfect and look realistic. It's just fun to play. So now we're gonna do
some yellow berries. So the same technique. And I'm going to think of
a way that we can make, make this a little different. So now I have that more watered-down paint and I can lightly tap
it and they can touch. Another thing you can do
is rinse off your brush, dry it off on your paper towel, and then you can
come in and just soak up some of that paint too. If you want it to look
a little less bright. Another thing I
like to do is maybe grabbing more of a golden tone. Just poking it in here. Like so. Then maybe we have one down
here that's more golden. And leaving that little
white highlight. This one got to be quite big. And maybe for this
one I want it to be on a branch with
leaves coming out. I'm going to grab
some brown, darken. I'm using a red brown, so I'm going to
darken it just a bit. And I'm going to
go just the tip of my brush and I'm going
to touch the berries. So you're going to see where
the branch heads into there. That I want to have
some green leaves grabs slightly darker. And it's not our same technique that we're using over here. So I'm going to
point, press down, pull up to a point, and then I'm gonna do the
other side of the leaf. Same way. Hello, rinse off my brush and get something that's maybe a
little more yellow. And I have a dog
hair on my brush. I'm going to press down, lift up to a point. And I'm actually going to do something a little
dangerous here. But it's our wet
on wet technique. But don't touch the yellow
Barry and see what happens. I'm not gonna go all
the way over it because I don't want it to go
completely over it. But I'm going to touch
it and then I'm going to pull over here like so. And I think that looks cool. Then maybe I'll just
stick one more out here, just a little leaf and have it come down in here
a little bit. Okay. Now the last one I wanna do
is kind of a hanging mist. Technically, it
wouldn't be mistletoe because mistletoe berries
are actually white. So we're going to
do something that kinda looks like
hanging mistletoe, but it's actually going
to be holly berries. And I am going to start off
by grabbing that brown. And it's going to
be hanging down. So take the, just the tip of your brush and make a
branch coming down. And then going, oops,
that's kinda thick. Going in a couple different
directions because your leaves are going
to hang off of this. Then I'm going to
grab that green. We're gonna do leaves
that look like this. So I'm going to start up
in this brown the point, and then I'm just
going to sweep around. You can also move your
paper if you want. I don't want to move
it because I want it. I didn't want it to be
easy for you guys to see, but you can move
your paper around. That helps to. Then maybe I'm gonna
do another one up here that comes and
touches this one. I want to put my berries
them because they're very important. Grabbing red. And I'm just making little circle and leaving
a little white highlight. Now you don't have to
do them all like that, but you do want to
vary the shade. So right now I'm adding
a little bit of blue. I'm gonna come over here and
this is super saturated. I want to reduce, I mean, I don't want all
of them to be like that. I'm grabbing just water with a tiny bit of red
that's more diluted. And I'm just making
a circle again. They're all touching
and that's fine. Same thing. Maybe do one just poking
out over here a little bit. Now, I'm going to
get a green that has a little more bright because that's
a really dark there. And I'm going to
just lightly come in here to show that there's
a lease back here. And that's looking really
dark and really muted. We add in some sap green
and just lightly touching. And then that's swooping to
make it rounded leaf shape. Maybe just putting
like a line back here. So it looks like there's
some green back there. Same thing over here. And don't be afraid to leave a little
whitespace like that. If you don't want it
to bleed like crazy. There's really, I mean, there are methods to watercolor, but you don't have to do exactly what somebody
else tells you to do. Experiments with it. That's why it's so fun. Maybe just add a little
red berry up here. This berry is looking
way too dark for me, so I just rinse off my
brush and dry it off. And I'm going to pull
up some of this color. And if this isn't
completely dry, I'm going to pull up a
highlight on that leaf too, because it's way too
dark, in my opinion. Perfect. So it's not too dry. So I just again
rinse off my brush, dry it off on a paper
towel and I'm just pulling up some of that. I'm gonna do that
to a lot of these. And this branch, because this branch turned
completely green. That's so cool thing
about watercolor is it can be pretty forgiving. For the most part. Then maybe bringing in some of these little tiny branches. I think we need one
more leaf down here. I'm going to touch it but not touch on this
other side here. Maybe another leaf over here. Alright. You have your cute
little holly berry branch. And these are just some
loose style cranberries, holly berries and whatever we're going to call those guys.
5. Paint Gingerbread Cookies: We are going to get started
with our gingerbread cookies. Now for our gingerbread cookies, we are going to do a couple
of different shapes. I am going to be painting them and then adding white
on top of them. I want it to feel like we're decorating
cookies essentially, but we're doing it with paint. Another way that
you could do this is you could draw all of your details and then just paint with a brown
paint around the white. But I want this tutorial
to be any level. And sometimes when you do that, That's a lot of detail work. So I want to take that
extreme detail work out and we're going to just paint the base of the cookies. And then we're going
to come in with white gouache in the frosting. It's the first shape
I'm going to draw is just your typical star. And I'm going to be keeping
all of my artwork on one side of the
page just because I'm trying to be better
about saving paper. So I'm drawing just a
regular five tips star. And I'm realizing that I'm actually drawing
this pretty big. I'm going to draw a
pretty dark so that you guys can see
what I'm drawing. But feel free to draw
as light as possible. Because the lighter you draw, the less likely
you're going to see your pencil marks,
your watercolor paint. Now we're going to draw your
typical gingerbread man. And for that, I'm going
to do a round head. And feel free to bring up pictures of gingerbread cookies. If you guys need
them for reference, then it's five points, right? We have a circle here, circle, circle, circle, circle. And then you connect them to
make the legs and the arms. If you feel better doing this, you could draw those
circles like this. Just really lightly. It's kinda like half
circles for the feet. Then you can come in
and just kinda them. My dog is walking around and I can hear her
little pit or pattern. I'm drawing these
pretty big today. This is a large sheet
of watercolor paper. This is 12 " by 16, but you can draw these
as small as you want. I typically do them a little larger just so you guys can see the details a little
more, a little better. Then I'm going to
make a Christmas tree So that triangle shape, but I'm going to make it. So it has like a
couple indentations. So just that triangle on top. And then coming in
triangle, triangle. And don't worry about
these being perfect, I'm going to put a little
trunk at the bottom, so just make like a
little rectangle. These don't need to be perfect because when
you make cookies, as we all know,
they're never perfect. We could also do a candy
cane shaped cookie. So just that hook and
then thicken it up. Like so. Don't worry about the details. We're gonna get into
all the details later. A snowflake. For a snowflake, I'm going to do something that has six points. So I'm actually going to draw an ax and then one with
a line through it. Just so I have more of a
guideline when I do this. Then what I'm going
to do is just make a little circle
around this part. It's going to make more
sense when we decorate it. It kinda looks like
a flower right now, but when we decorate it,
it's gonna make more sense. Okay? So these are our
gingerbread shapes. Like I said, I drew a lot darker because I wanted you guys to be able to see what I'm drawing, but I'm going to
come in and just lightly erase some of this with a gummy eraser so
that we don't have too strong of pencil marks. Then we're going
to start painting. Now I've gotten most of
my pencil marks taken up, and now we're going to
mix up a color that is a light, light
gingerbread color. We are going to be
working with layers today for the
gingerbread cookies. Since we're working with layers, we want to start with
the lightest layer. When you're working with color, you need to start with
the lightest first. There is actually
a technique where you can start with
the darkest first, but that's not how I paint. Mixed up something with
some yellow in it. Maybe a little bit
of reddish brown. Should it be a light tan color? You're just going to come in. I have a pretty good amount
of water on my brush. My brush is not dripping though. You never want your brush
to be dripping with water. And C, dot that up real quick. Okay, so grab your paints and I'm going to
just make a basic. I'm just painting this bottom
layer, so nothing fancy. You don't have to worry about it like a bleeding technique
or anything like that. You're just putting down
that first layer of paint. And I'm going to
paint along with you because I personally
don't like it when I'm following
a tutorial and they speed it up because I want to I don't want to
feel like I'm behind. And it makes you feel like
that when they do that. So we're just coming in and
painting this first layer. Something that you
can do to make this a little more interesting is grabbing a slightly
darker color or maybe a color that has a
little more red into it. And you can just.in
some color if you want. But you don't have to do this
because we're essentially going to be adding in
shading on our second layer. But this is more of that wet on wet technique that I like
to do that in my layering. But if you feel like your
base layers super flat, feel free to add in
something like that. Painting in that base layer. And we're going to be doing three layers today
for these cookies. Now, I will fast-forward
the drawing part because nobody wants
to watch paint dry. But if you want to, maybe you want to speed
that up and you don't have the time to let your
painting dry naturally, grab a hairdryer or depending
on what time of year it is, where you live and
how your weather is. You can also put it
outside in the sun. I'm in Southern
California so I can put, I mean, it's sunny right now, there's some clouds,
but it's sunny. And this will dry
in like 10 min. So feel free to grab it, dryer or place your
artwork outside. And we're just painting the really light wash
that bottom layer. Okay, our first layer is done. We're going to let this
dry and then we can come back and put on
our second layer. Now that we have our
base layer down, you can see it dried
a lot lighter. So we want to mix up
a darker colors so we can get a more vibrant color. So we're going back
into our well, in grabbing this is yellow
ocher that I have here. I'm going to grab a
good amount of that. You want your paint
to be thicker. One time. I want to say the texture
of like melted butter. I know that sounds weird. But then a little bit
of that red brown, a little bit of, I think
this is Van **** brown here. So a nice toasted brown color. Then we are going to come in. And what I'm gonna do is I'm
going to ask, okay guys, I accidentally set off the
emergency notification. I don't know what it was. It's like when you're
trying to dial emergency number on my
phone because the thing that's recording this was pressing the two buttons
that if you press them, sets off an emergency thing. So that is why this happens. So let me get back to this. We're grabbing that
paint that's thick like that, butter texture. And I'm just outlining
the edge of this cookie. You want this to stay wet. You don't want it to be dry at all because you're going to need to
add water to this so you don't want it so light that you're not
getting any pigment, but you also don't want it so dry that it's not
making a smooth line. So you see how my line is very smooth and shiny because
it's white, it like that. Then you're going to
rinse off your brush and grab just water and coming here and just touch
that edge with the water. So this is this is a wet on wet technique and it's
going to help it bullied. We're going to have
to help it along to get to the middle. But you could use like
a circular motion. And basically what we
want is it looks like our cookie has crispy edges and the inside is nice and tan, but the outside edges
are a little crispier. If you feel like you
want more color, you can also.in more
color like this. You can just leave it
and see what it does. Usually will bleed quite
nicely and blend in. But if you feel like
it's too harsh, you can always move it around. We are going to be
doing one more layer. So if this isn't
dark enough for you, don't worry, we
have another layer. So just go ahead and do
that for all of these. Now, something to be aware of is where if you're
left or right handed, you don't want to be
putting your hand in wet paint, so paint accordingly. So e.g. I'm right handed. So I'm not going to
paint this one. Wait. I'm not going to paint this one. And then this one, I'm going
to paint this one first and then this one so I don't
drag my hand across it. So that same technique
that I used on the star, I'm just lightly
outlining the edge. I'm using a size six brush. But depending on what, how big you painted
things or small, you might want a smaller brush. You might want a bigger brush. Rinsing off my brush. Usually I have to water cups, but today I'm just using one because I have all
the same color. Just grabbing some
of that water. It's okay that it's
tinted a little bit like orange because that's
the color will be working in. And then I'm
literally just adding that water along the edge. Kinda helped me move. You can already see that they
are really starting to look like you might have to
mix up some more color. I know that I'm having
to that got really dark. I don't want it that
you can always pop in little bits of color and see what happens
when it dries. Okay. Going on to my next, I'm gonna do this guy down. I do like this. I like, I love this part where you add the water
and it just bleeds. It looks so we're
going to do our labs and just getting water touching that edge
so it bleeds in. If at any point you think like, Oh, I have too much
pigment right there, what you can do is rinse off your brush and then dry
it off on the paper towel and come in with a clean
dry brush and press down. And it's going to
pull up that color. So Pulls like a nice highlight. We have to let this layer dry and then we're
gonna come back. We're gonna do one more
layer just because I want these cookies
to really pop. But you could really just leave it at
this if you want to. But I want to make
them just a little bit darker because
we're gonna be adding white and I want the
white to really stand out. Let your painting dry,
and then meet me back. And we will add
that third layer. Are lovely cookies are
ready for their last layer. So go ahead and if you don't already have enough
of that same color, you might want to
darken it just a tad. Just so you get a
little variation. And again, you're working with a consistency that's
pretty saturated. That's going to be
like a burnt cookie. I don't want that. You want it to be
pretty saturated because you want there to
be a good amount of color, but you also don't want
it to look burn burnt. I can't talk today. Okay. I think that's good.
So I'm coming in with a lot of pigment and I'm just drawing,
painting this edge. Remember you want to make
sure that your paint stays wet because you don't want it to be dry because you need
it to stay wet until we add that water to it so you get a nice bleed around the edge. Rinsing off your brush, getting just that water. And then just lightly
touching the edge and letting the paper and
the watercolor do magic. If you are finding
that your paper looks like it's not doing very
well with this water. You might not have high enough
quality watercolor paper. So make sure that you
have something that is 140 pounds or hire 140 pounds and standard
That's what I use. But anything less
than that is not enough to soak up all the water. And if you feel like you want your cookie just to be
a little bit darker, feel free to poke in some
color here and there. If you want to do some
cool little things, I loved the wet on wet technique because
you can get some, some cool texture
to your painting. Feel free on some of these. If you want to add more yellow, if you want them to look
slightly different, you can totally do that. Same thing. I also
broke my rule. I should've painted
this one first, but I'll just have to be
really careful that I don't put my hand in this. Make sure this outer
edge is staying wet. I've got a really good tip
on this size six brush. So I'm able to do some pretty
easy like painting with it. But if you feel like your brush is not that good, a smaller one. But you do need the larger
one when you come in with the water because you need it to cover a good amount of space. So as you can see, this one has a little
more yellow in it. Again, if you need
that technique, if you were like, oh,
that's way too dark. Rinse off your
brush, dry it off on the paper towel and then
just pull up the paint. If you feel like you need that. These cookies are looking more as if they have
molasses in them, like a traditional
gingerbread cookie. You guys like
gingerbread cookies. I personally thought
I hated them. And then I made my husband and I made
gingerbread houses last year, and I made the
gingerbread from scratch. And it was actually delicious. Who would have known? I love all the ****** in them. One's really good. So I used to hate
on Gingerbread, but the truth is, in my
opinion, it's delicious. I might add a little
more yellow again. Hi. This is a really great way. I'm actually going to pop
in a little extra color here just to make it more
interesting to look at. So since this is all wet, I can just lightly dab in color and it's just going
to bleed nicely for me. Then I'll just go back over
here and continue this one. But these layers are a
nice way to add a lot of depth to your, something simple. Like the cookie
is pretty simple. But I would say that these
look pretty good and a lot, even if you're a beginner, you can really get it
to look pretty neat by using I'm just this
layering technique. Then our last little
guy down here. Once we finished these, we need to let them
dry completely. And then we're gonna come
in with white gouache. I'm actually going to
be using something called Ph Martin's or Dr. Ph. Martin's bleed proof white and is essentially gouache
because it is not waterproof, but It's a white paint. I used to use a lot
when I did calligraphy, but it's definitely
not permanent. So if you get it wet again, it's just like watercolor. Like if you get it wet again, it can bleed and stuff, but it's perfect for this. And I use it on a lot of my
paintings that I digitize. Because once it's digitized, you can put it on
anything and you don't have to worry about
it being waterproof. You just need it to be white. It's for the scanner. Okay. I'm pretty happy with this. I might add the candy canes
looking a little bland to me. So I am going to just
poke in a little color. I can see that the shape
right here, I went out. The line, there's two options. One, I'll just leave it like
this because it's a cookie. And if you've ever seen any cookies that I've made it When definitely
a little bit this. But also I could fix
this in Photoshop if I digitize this because I can just cut that off really easily. But if you feel like there's any areas that you
want to darken up a bit. Feel free to do that. Just make sure if
it is almost dry. I can see up here this is
not going to bleed very well because this
is starting to dry. Just grab a little
bit of water and lightly help it along its way. But be careful because once you enter and you
guys will learn, if you're new to watercolor, it's really, you learn as
you go with watercolor. The more practice you get, the more you start to
understand how things dry and like how long
they take to dry. But since this is on
its way to being dry, what's happening is I have to add in a little water to
move the paint around. But I have to be very
careful because I can also start pulling up the paint
that's already there. So there's definitely
this sweet spot with watercolor where you want to
work when the paper is wet. But once it starts entering
into that drying period, you have to be really careful because you can pull up some of the paint and then
you can start to get these really harsh lines
that you don't want. Okay. That's my soapbox moment. Let this dry. We're going to come
back and add those frosting details with
the white paint. Now we're ready
for the fun part. Not that the other
stuff wasn't fun, but this is like the
decorating part. I am using, like I
was saying before, the bleed, proof white. But if you have a gouache or you could even use
white acrylic paint. You can also use a gel pen
or a paint pen like a mall. A towel, white paint
pen can work as well. Okay, So I'm going to start off, I have a size two brush, but if you guys made your
cookies really small, you might want
something smaller, like a size one or a zero. I'm just grabbing
that white paint. I'm going to start with my star and I'm going to
outline my star. So if you guys are familiar
with cookie decorating, they usually outline the edge. And of course, don't worry
about it being perfect. You want whatever white you're
using to be pretty opaque. Opec, okay. And you might have to
do a couple of layers. I'm only going to do one
layer for this tutorial, but I might go in and add more later if I choose
to digitize that. You have that outline and
then you could totally add something to it if you want to or you can leave
it just as it is. I think I might add a line. I'm gonna do a circle
in the middle. Then align. Maybe, maybe it will
be kind of like, uh, actually make it a
little bit of a snowflake. So I'm going to put a couple of lines going
up that middle line. Feel free to make these cookies look however
you want them to look. Sometimes it just comes to you when you're painting like you might not know exactly
how you want it to look and then you'll get
started and you find it. For the gingerbread man, I am going, I think I want
to give him a bow tie. A bow tie right here on him. And I think I want to, or actually I want to
outline him all the way. So same thing, I'm
going around the edges. I'm eating more of this white. I recommend not drinking too
much coffee before this. A little bit tighter line work. So just outlining him like
you would outline with frosting and then two eyes. You could also make
it a girl and put little eyelashes and
put a Smiley face. Maybe I'll do some eyebrows, like going off the edge and
some buttons down the middle. Moving on to our tree. Going to outline the tree. Again, I like to
outline all the edges. If you look on Pinterest
at gingerbread cookies, they usually have
the white frosting go all along the edge. So it kinda reiterate
what the shape is. You don't have to
do it that way, but that's what I saw. And so I wanted to make this feel as realistic
as possible. Then I want to do basically it looks like kinda strings of lights
all the way down. I'm just going back-and-forth. You could even add color here
if you want to add color, add it on top of the
white after it dries, but I'm just going to put
some little Christmas. You could even do
Christmas ornaments on the tree if you wanted to. Now to our candy cane. I think with a candy cane, I might not do
that outside line. I might just do, Yeah. I'm just going to do stripes. Just as thick stripes. You can always leave
a little bit of the cookie showing
through if you want to. It's really amazing
how they can, people can decorate cookies. It's totally an art form. I have seen some because I worked in the wedding
industry for a long time. And I've seen
incredible cookies. Some of them they have
printed out, but other, other people like actually do the artwork and it's amazing. Okay, So that's like
candy cane, mean cookie. And lastly, this guy down here, I want it to look like a
snowflake and I don't, I'm not going to outline it. So what I'm gonna do is I'm going to make a
circle in the middle. Then kinda similar to this. From this circle, I'm
going to make a line down each of these
little petals. But I'm not going to
let it touch the top because we don't want
it to go all the way to the top line, line, line. And then I'm going to do like a almost like a long
teardrop shape. I'm going to do two of those. Then I'm going to do a circle in the middle of
all of the petals. So you should have as
many as there are points, so there should be six. So for this, you just want to make everything symmetrical. If you guys use an iPad and Procreate and you're used
to this symmetrical tool. It's basically that, but
you have to do it by hand. I find myself sometimes because sometimes
I'll work on my iPad. I don't like it as
much as analog, like working on stuff like this. But I'll find that I tried
to zoom into my art work. Like it's a computer. It's definitely not. It doesn't work. You can turn this
if you need to. If you're not taped down, then maybe I'll do some
little ones down here. I didn't say this
when we started, but make sure that the
cookie layer is dry. If it's not dry, you're definitely
not going to get the opacity you want and
it's going to bleed. So these are cookies,
they're all decorated. Feel free to add another layer of white
if you feel like you're white is not opaque enough. So we're all done
with this painting. Please share your artwork. I love to see what
you guys create. You can tag me on Instagram
at lavender and see.
 Nikki Hess, Artist & Corgi Mama