Transcripts
1. Introduction and Class Project: Hi, Welcome to my
class on painting, a Nordic or Scandinavian style wreath with
watercolor paints. In this class, I'm super
excited to bring it to you. It's holiday themed. I don't know if you
guys are familiar with the Scandinavian
style declarations for the Christmas season, but I love them. They're simple, they're
really nature-inspired. So that's what we're
gonna be creating today. This is a beginner level course. I'm going to walk you
through everything. We're going to start by
sketching our wreath, and then we're going to
paint it with watercolor. Like I said, this
is beginner level. I'm going to walk you
through everything. We are painting in a
more layered style. If you've ever painted
with me before, this is typically style
that I like to paint in. Don't worry, it's not gonna be hours upon hours of painting. I kept it to just a few layers. So you can still get
that layered look, more realistic look, but it's not going to take us what my normal paintings tag, which is like 10 h. So this
class is only an hour. Also if you don't
feel like sketching in the projects and resources
section of this class, you can just trace the wreath that I've
already drawn out for you. So you have that option as well. For the class project, you are going to be painting along with me and
painting a wreath. Please post it to
the class projects. Just snap a photo of it because I really love seeing
what you guys create. And even though we're all
painting the same reef, though really looked different. And I love that. That's why being an artist is so unique because you
can do the same thing, but you put your spin on it. So grab your watercolor
paints and a coffee and tea, and let's get started.
2. Supplies: Before we get started, let's talk about the
supplies that I'll be using. That first thing is, of course, of watercolor paper. I am working on an Arches block. But you don't have
to work on a block. You can work on any
watercolor paper, just make sure it's
140 pound or above. Otherwise, equality is not
going to be good enough for all the water that we'll
be putting on the paper. Another thing if you are doing just a sheet
of watercolor paper, make sure you tape it down. Something like a masking tape or painter's tape, even washi tape. Sometimes I find that washy tape isn't quite strong enough, so make sure it's strong
enough and you tape it down. The reason we tape it down
is because we don't want the paper to warp when we
add a bunch of water to it. Second thing is brushes. I'm using a variety
of sizes because we will get pretty
detailed here. I have a size six, a size four, a two, and I believe this
is like a 2/0. This one is really small. You might not need
to go this small, but have a range of medium large size brush
in a small brush. Next. Hi my watercolor palette. You can use a plate. Just make sure you're
using watercolor paint. And I am going to be using
a pencil and a gum eraser. The gum eraser is just optional, but I like to use gum erasers because when you press down, it picks up a lot of the lead. Without tearing up your paper. We won't really need to do a
lot of erasing today since our subject is pretty highly contrast
against the white paper. Probably be good there. Then I have two cups of
water I like to do. One for cool tones, one for warm tones, and a bowl. Anything you have that
as round because we want to make our wreath
perfectly round. And lastly, I don't
have up here, I'm going to grab
one real quick, but grab a paper towel
so you can dab off any excess ink or any, sorry, Any excess
watercolor paper. Alright, we're ready
to get started. We're going to start
with sketching.
3. Sketch Your Wreath: We're gonna get started
with sketching our wreath. Now the sketching is going
to be really important because we really want to make sure that we
get the details in. This isn't a loose style wreath. This is a more realistic ones. So we want to make sure that we know exactly where
we're painting app. But I grabbed my bowl, grab one. You can do any size you want. This is probably, I want
to say like 8 " by 8 ". But of course do
whatever size you want. And then just lightly
outline it with your pencil. I like to use an HB pencil. The lead is little
softer I find, but you can use whatever
pencil you have on hand. Now, we have our perfect circle and we're going to start
sketching out our wreath. Now, if you guys
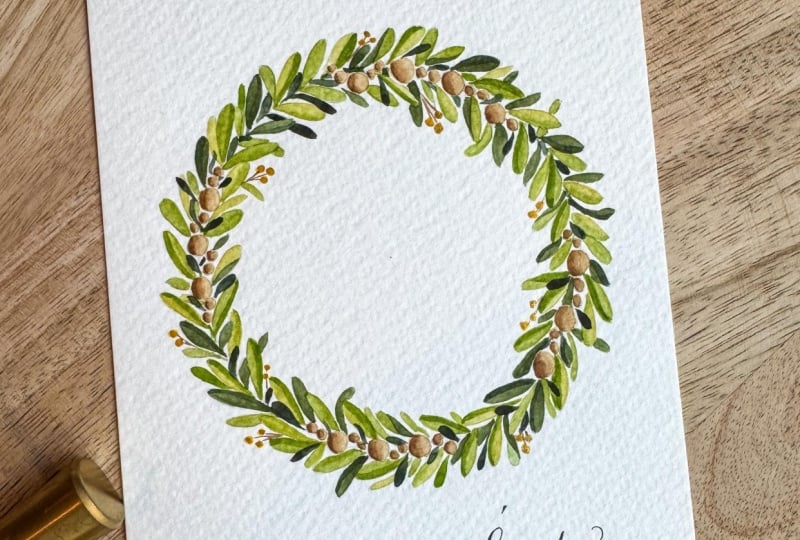
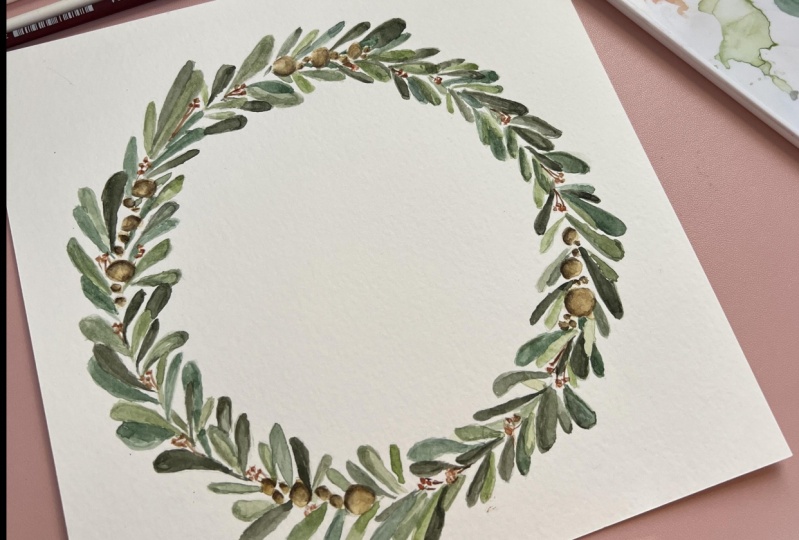
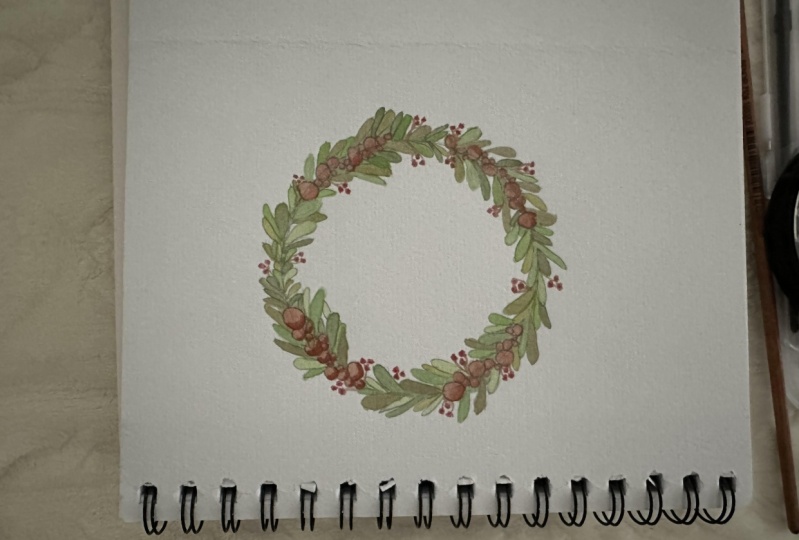
are familiar with the Scandinavian or Nordic
style Christmas wreath, they're usually very
natural looking, almost looks like there's
olive leaves and then there's usually these wooden
beads that go throughout it. Or those are just
the things that people decorate when they're
going with that style. It's pretty popular.
It was really, really popular About
three years ago. I remember we did a photo shoot
and I think it's hygiene. I might be saying that wrong, but it means cozy and so that's what people
are really into. So these are pretty popular. The first thing I'm
gonna do is actually that beaded piece around. That way I can put all
my leaves around it. What I'm going to do is I'm
going to start with a big, not that big, but a
pretty big circle. Then I'm going to
make two little ones. And I'm going to do two
little ones down here. Now, you don't
want it to exactly follow this because
that's gonna be really boring to look at. Make it go a little curved. So my next bead, I'm going to make
that big one again. So it's gonna be a big, big to little beads, big bead. I'm going to make it
off-center from my circle. And then I'm going to
make it come back up. And maybe do one more. Now. We're going to do the leaves so they're covering up
some of these spots, but we want to make it
look pretty well balanced. So I'm going to do
four of the same, maybe like a couple
more or less, but in four corners of this, so it looks balanced. You do not have to follow
exactly how I'm doing it. Feel free to add
your own spin on it. But just go ahead and
sketch those out. I'm sketching pretty dark
so that you guys can see. But you don't have
to sketch that dark. You want it to be
light enough that you can paint over it. And the pencil lines aren't going to show through but not so dark that the pencil lines
are going to show through. And just remember you
want to keep it similar. I know right now they
just look like bubbles, but we're gonna make them
look like wood with paint. Then you could even make one side come down a
lot more if you want. You don't want to do. That's the thing when you're drawing and when
you're painting, you don't want everything
to be so symmetrical because then your
eye loses interests. So you want there to be some things that are
a little different. But then you also want
to make it make sense. Okay? I'm going to do just
a little more here. Maybe just one more. Okay. I'm happy with the
way that that looks. I might add just one little one up here and then maybe
a little down there. Oh, I just realized
these are all the same. So I'm going to add one extra because I don't want
it to be too much the same. And I'm going to
move that one down. I just totally did something
I'm not supposed to do. But when you are erasing from watercolor paper, don't scrub. Use a gummy eraser and press down and pull up to pull
up your pencil marks. Otherwise you remove
some of that texture and you really don't want
to remove your texture. That's the key to
watercolor paper. Alright, we have our
beautiful little wood beads, and now we're gonna go
in and add those leaves. Now the leaves are
going to be a little more time-consuming and I might speed this up just because I know you guys
are drawing your own. Of course you can
follow along with me, but we just want to
go in and the leaves are similar to olive
leaf, leaf shapes. So that long slender leaf, leaf. Then you want to of course
make variations. Also. Make it, if you want to
make it kinda flap over. So I do a curve and then I come in and meet
the center again. Then almost just like a
little triangle up here. You could do like a side view, so the sides a little thinner. And then something else
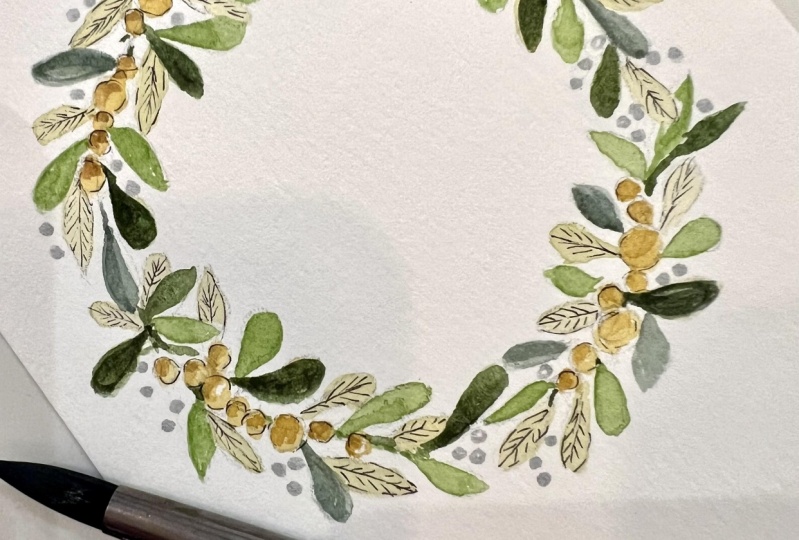
that we're gonna be adding in is these little berries. And you can do those
wherever you want. But we're just coming in
and we're adding a lot, a lot, a lot of leaves. And you want them to cross over, you want them to go under. You want it to look very fall. Some of them will
be straight along our circle and some of
them will come out more. You want variation,
because you want this to be interesting
to look at. Like I said in the
intro to this class. This is going to be a lot. Something that takes a little
bit longer to paint because we are doing a more
realistic style. There's a lot more details here. I think that this
is a great way to expand your skill level to
do something like this, because it's challenging and it also pushes you to
spend time on a piece. And especially in our world, we're just so used to like
busting stuff out so fast. I mean, as an artist you
feel so much pressure because of social media,
TikTok and Instagram. And it seems like
everybody is just pushing out content at a
ridiculous speed. But it takes awhile to paint
something really cool. And it's important
to remember that while you're going along
and making your leaves, make sure that
you're really paying attention to filling
out this whole thing, but not having it be so
stagnant and the same. So maybe some leaves go more straightforward
and some come out more. Maybe some are more pointed and some have more of a curved edge. If you guys are just maybe
hating drawing this. I mean, I hope you're not. But if you are in the
little class project, are in the I always get
the class description. There is a line drawing that you can just trace if you
want to, that I drew. So feel free to do that. Don't forget to add in your
berries every now and then. I'm gonna go ahead
and speed this up. You guys, of course, take your time spent as long
as you want drawing it. But I'm going to speed this
up on the video just in case maybe yours is a
lot smaller than mine, so it's taking you less
time to draw these leaves. So I don't want you
to just sitting here watching me draw forever. You can watch me draw
lightning speed. Alright, here we go. One thing I do want to mention, if you are coming in
here and you're like, wait a second, I really
want to add more beads. You totally can. This is about you and how
you want to design this. I'm just guiding you along. The one that I'm creating, but feel free to add
whatever you want. You could even add
flowers if you want to. I am focusing more
on the Nordic, Scandinavian style of a wreath. And typically you don't see
too many flowers in them, but if you want to
add bars, I flowers. Back to going fast. Okay, now that you haven't drawn something that
I like to do to make sure it looks even
and this is not gonna be possible if you
tape your paper down. So you could actually walk around your drawing
if you want to. But I turn it and see how
it looks like if there's any places that are
missing some thickness. And I can see over here that this is missing
a little thickness. So I'm just going to add a
leaf coming out a little bit and maybe one
coming out here. Now, I can already tell this
is gonna be a lot to paint. So you can also do a little
bit thinner if you want, but this is a fun tutorial
and we're cool with painting. That's why you came here, right? So now that we have are
it's already sketched out. Everything's looking
pretty even. I definitely need like berries down here because I
don't have any here, so I'll put those there. I think we're ready
to start painting. I painted this pretty dark and I'm going to just lightly erase, but we are a wreath is
gonna be greens and browns. So I'm not overly concerned. I M a little bit concerned
about these berries because I was going
to make them yellow. And yellow is a lighter color. So maybe just if it's
not light pencil mark, just make it a
little bit lighter. Okay? Alright, I think we are going to do a couple
of lighter leaves. So I'm gonna just get some of this pencil mark off because I don't want it to show through. Okay. There we go.
4. Painting The First Layer: Now we're ready to
start painting and we're going to be
painting in layers. Just removing a little extra. We are going to be
painting in layers. So I'm grabbing
my size six brush and I'm going to mix up a color. So grabbing green, I have a couple of
different greens here. I have sap green. I use Winsor and Newton paints. And then I have whatever
is already on here. Then I am grabbing
some undersea green. Basically what you're looking for is you don't want a super bright green because
these are all lovely use. And if you've ever
seen all these before, They are very kind
of a muted color. There's almost a
little bit of blue, so I'm going to add
a little blue to it. Or blue undertones.
Maybe this blue. And if you feel like you're
green is still too bright, you can grab a little bit of red and just lightly
mute it down, but we don't want
it to be too muted. So that's one color and we want to make a
variation of colors. I'm going to set this down. Over here. I'm going
to do a darker green. I have this super dark green and I don't know the name of it. That's my toxic trait, is I put paints on my palette
and I don't know the color. But hopefully you guys have a
dark green or you can make, if you want to
darken your green, you can add a
little black to it. So we have this darker green. I'm going to add a little bit of sap to it just so it comes up a little deeper or a
little richer in color, not so dark green. Have this one. Add a little more. Kinda, have like a blue or a
more bright vibrant green. Add that in. If you guys have
something good to do, a good practice is to have a little scrap of paper where
you test out your colors. That's always helpful to make sure your
colors are similar. And then over here
I'm going to mix up a more yellow greens. So these would be leaves that
are brand new coming in. But we want to have a
variation in color. But we don't want it to, right? So I'm going to add
a touch of red. Okay? Now we're going
through and we're painting our first layer. And our first layer is going
to be more water down. And we're going to
build on top of that. So the important thing to
make sure you're doing is not painting over your
beads or the berries. So make sure that
you paint around. And I realized that I made
this wreath way too vague. This is going to
take me a long time. But just come in and you're
going to alternate colors. So just poke in some
of the lighter greens. What I like to do
is go through and make all my light
green leaves and then go through and
make all my mid tones and then go through and
make all my darker ones. Because if you're
switching through colors, it's going to take a long time. But this is also, since this wreath is so big
and there's so many leaves, the good thing is that we
won't really need to get out our blow dryers or wait for it to dry because
it'll be drawing by the time we get back
around or be dry. So this is just my light layer. I'm literally just I'm not
doing any special technique. I just have a pretty
watered down paint on my brush and I'm just coming
in and painting each leaf. So I'm not doing like a special wet on wet
or what on I mean, technically this is wet on dry, but I'm just very
basic painting. And sometimes it might
be a little bit darker. And don't worry,
we're not going to do like seven layers on this. We're just going to do honestly
probably only two layers. But I like layering
because you can get a more realistic look, but it also is just
more interesting to look at because there's
so many variations. Come back and just add a little more of these
green ones here. I will if they're not already launched by the
time you're watching this, have some loose watercolor
wreaths available as well. If that's more of your style. But like I was saying earlier, I think it's really
good to do stuff that just takes a little
bit longer sometimes, because it really
teaches you patients and what it takes to work on
a project for a long time. I realized in my
own practice that I started getting used to
things being really fast. And the quality of my artwork
was starting to go down. Or also I was becoming
increasingly frustrated. I had a I do sometimes
I worked for other stationary and I do
watercolor artwork for their wedding
invitation suites for them. If they don't do it themselves. And I were just going along when painting you guys and I'm just
telling you stories. So there was this hotel
and it was so intricate. It was the adult Adolphus
hotel in Houston, Texas. And I just was like, I was driving myself nuts because I thought it was
going to go so much faster, but it took I want to
say like fifth team, like 12 to 15 h for me to paint
that thing in watercolor. We only did a section of it, but it was so detailed. And I realized that I had really gotten used to
things being really fast. I was painting in a loose style or there's nothing wrong with
painting in a loose style. It's awesome. I'm just saying that I like
to paint realistically, but I was finding that I was
becoming really impatient. But, or I was doing, which is another style I
really love is doing kind of loose watercolor and then adding a sketch with
ink on top of it. So that was just making my
attention span really short. And there's a course, like it's good for
me to get into those different styles
and have fun with them. But at the end of the day that I like to work in a
more layered style. It looks more realistic and I was just getting so inpatient. Art takes time. Okay. There's a little
I'm going to add, just saw another one down here. Now we can move on
to our second layer, which is this mid tone green. And we're just gonna
do the same thing. If you guys are
painting along with me, which I hope you are. Somebody told me that
they just watched these videos because they just like to watch people paint. Which is really funny. But if you are painting along, feel free to grab
a cup of coffee or wine or tea or
whatever your thing is. I'm a big fan of t and
put on some music. You can just turn me away down. We're not getting into
the technical stuff yet. We're just adding in all of
our leaves the bottom layer. Make sure though,
that you're mindful of where those beads are. You want to paint around them. So there was one right there. And your lightest leaves
should be dry by now. If yours aren't, say you have
a smaller wreath than me, makes sure that you don't
touch that because we don't want that bleeding look today and that's not the
look we're going for. And I am choosing not to
speed this up because I have heard from a lot of
you guys that you like to watch it in real time because
when people speed it up, you feel like you're behind. And I totally get that
feeling because I've had it before when I'm
doing a tutorial, I'm like, I don't speed it up
because now I have to pause it and I feel like
I'm behind and I'm rushing. And also, if you're behind, I don't even want to say that word because
it's not really true. But if you feel like
you're behind right now, don't worry about that either. That's totally fine
and you can pause it. And when you've completed
your first layer, you can come back to it. There's no pressure. I'm just painting, just filling. It's like that I
paint the numbers. Just filling in the colors. Now, now that we're
on our second layer, we really want to pay attention to how many leaves
are left, right? Because we don't want like
three dark leaves altogether. Because like like if I did
all of these ones dark, it doesn't look
very interesting. So make sure that you're
paying attention to that. I think that you're definitely
having a separation. And if you make a mistake, like say you're like, Oh, I didn't do enough
of the mid tone. You can always come back later. You can also always darken. We can never go lighter
though with watercolor. So that's something to remember. Let's see here,
let's do this one. And you might like the look of just the first layer done and you could
totally do that. And then you can
skip ahead to when I do the beads on here, that's totally up to you. I like a layered look, but not everybody does definitely need some
variation over here. It's looking really similar. And sometimes your brush
might pick up a little more like that color is definitely different from anything
I've put on here. So because of that, I'm
gonna come over here and make one of these other
leaves that color and then one probably down here because you don't want just
one sore thumb sticking out. Our eyes naturally will
go to what's different. So I think it's like an
evolutionary thing where we look for something
that's different because it's
signified danger when we were hunters and gatherers. But the same thing
happens with art. So because that's different, we want to make
sure to just add in a couple of those
here and there so that everybody's eye isn't
immediately drawn over there. Okay. Let's move on to these guys. Alright, I think we're
ready for our next color, which is our darkest color. We are going to keep this water down though
our darkest color, so don't get it like
super saturated. And then you can always tap
your brush off if you're finding that it has way
too much water on it. So coming back to
that darkest color, making sure to paint
around our little beads. Another thing you
can do if you really don't like painting
around things, is you could use masking fluid. I will not be showing you how
to use masking fluid today, but if you go to, I have a beginner watercolor
course on Skillshare. And I show you how to
use masking fluid. But sometimes I find that masking fluid tears up my paper. I don't know why. The Arches paper
is pretty strong, but if I use I think
it's called Aqua, aqua Trello, that
one at terrorism, it tears up legions
papers so bad. So I really don't
use it for that, but I love legion paper. But you could use masking fluid if you if you're
not familiar with it. Sorry, one thing
about this, You guys, you want to make sure with
all of these beads that they're feeling like they're
tucked into the greenery. So makes sure you are having leaves come
right up to them. Because otherwise they're
going to look funky. Back to masking fluid. If you've never used
masking fluid before, it's like it sounds
it's a mask that you put over your paper and it protects whatever
is underneath it. So protects your white
paper so you can come back and add whatever
you need to add. I like to use it if I'm doing a house painting
and there's like a picket fence or there's a lot of
details on the windows. But I've seen people just come
in with white gouache too. So totally a
personal preference. We're going to come
back for that one. But I am going to add in a little bit of
dark around here. It doesn't have to be
like a perfect leaf, but I just want to outline
where those beads are. So it looks like they're
pushed up over the greenery. Just painting our next one. This is pretty dark. I'm okay with it. I like it. But if it's too dark for you
feel free to lighten it up. I'm just going to poke in some
little like green spaces. And you want to be careful
because we're using the dark colors so you
don't want it everywhere. But just to show that these
beads are on top of it. See, it's already starting
to come together. Again. I'm just painting like I'm not doing any
special techniques. I have my size six brush and
it has a pretty sharp edge, so I'm able to really make
those lines that I need. You never want your
watercolor brush to be dripping paint. That would mean that we're
using way too much water. And if that is happening, just tap it lightly
on a paper towel. I'm just filling in some of
these spots with greenery, maybe adding an extra
leaf here and there. If any of the leaves
are folded over, you want to make
sure that you're not painting them
the darkest color. Because you want
there to be like what it folds over the bottom
is going to be the darkest and the top is
going to be lighter. So you want to have the dark color left that you can put on the
bottom of the leaf. If that makes sense, it'll make more sense when we paint it. If you're working in a
different size, like I said, my my wreath is pretty big. I'm going to add a dark leaf over here because it looks like it's kinda missing
dark color over here. If you're working
in a smaller size, you might want a
smaller size brush. So just be aware of the control that you
have over the brush. If you feel like you're losing control because it's too big, then get a smaller brush. Okay, we have another
folded one over here. I'm gonna grab my mid-level green because we want to
make sure we have an option. Then just poking in
some color here. Got a skinny leaf on its side. I'm going to grab another
color because I don't want to dark leaves
by each other. Actually, I'm fine with that. That's fine. Okay. Alright. And I can see that there's a lot more dark
color on this side. So I'm going to
come back and grab a little darker color and
just add it over here. This is only our first layer, so you don't have to be
overly concerned about it, but I do want to make sure that we are consistent and
your eye travels across. Okay, that looks good. So we have our green layer down and now we're gonna
move on to the beads.
5. Painting The Beads: Moving on to the beads, we want to mix up a brown color, but kind of a light beige brown. So I have yellow
orchid right here. Ocher, sorry, not orchid. And I'm going to add
it into this brown, whatever I was using. I think I was painting
cookies here earlier, so that's what this color is, but just a real light color. And we're gonna go ahead
and put our first layer down and it's going to
be pretty watered down. Remember, we never want paint
dripping off our brush. Then I'm just lightly
filling it in. Now, if your grains aren't dry, it's going to start bleeding. So make sure that
your greens are dry. I just saw that mine wasn't
completely dry over here, so it did start
bleeding a little bit. Oh, a tip for you guys. This just made me think of it because if you put lotion on your hands and then you start painting on your paper and
you're putting your hand down, you are going to make your watercolor paper
essentially oily. And it's going to not soak up the water or the water
and the paint so well, this is what I'm going to
leave that for a second. I realized that I was doing. And I'm like, oh my gosh. And I hear people,
sometimes they think their paper is faulty
and sometimes granted, they're not using
very good paper. But a lot of times it's if you put lotion on your hand or if there's any oil, like if you just got done eating french fries and you're
touching your paper, you're going to
create an oil barrier and it's going to mess up. You're not gonna be able
to get the depth that you want because the water is
not going to soak into it. It's like a otters for a
can't can't penetrate. So I'm just going in
and I'm painting, I'm doing the lightest layer, makes sure that your
greens not wet. And I'm just adding this light beige brown
to all of my beads. You might want to
grab a smaller brush. I'm thinking that I
probably could have used a smaller brush here. Because if you, water or
watercolor can be reactivated. So if I'm painting, I start touching the
green with the water. I can reactivate it and start to move it around and
I don't want that. So you really want to try
to get just the bead. I am touching the green
a little bit here. It's okay. It's not like the worst
thing in the world, but if you really
want that crisp, clean look, you want to make sure that you're
staying in your circle, stay in your lane. Got these guys up here. These are wet so I can see that the greens
bleeding a little bit. Yep, there it goes. That's
okay. It's not horrible. I am probably going to let
this dry though before we keep going because I don't
want it to bleed. Okay. Alright, we have our
base layer there. I can see over here that
this is a little bear. I'm going to grab that
mid green and kinda just fill it in a little bit. But be careful you don't touch your beads or they're
going to bleed. We can actually do that later. Now we're gonna do the berries. I'm going to definitely
grab a smaller brush. I have a size two. I'm going to mix
up a yellow light. We want it to be pretty light
yellow or watered down. My yellow is a mess. I'm going to add some of
this orangey yellow to it. And then just really watery. And then make sure you tap your brush down so it
doesn't get too wet. And then I'm just filling in these little berries,
yellow berries. You can make them white. If you want. You can make them red, 0 red would've been killed. I didn't do read because
you don't see a lot of red with the Scandinavian,
Nordic style Christmas. You see a lot of beiges and
greens and earthy tones. Now that red is not
an earthy tone up, I see we're missing
a leaf right there. So how to fix that? If you see missing leaves
that you didn't paint, feel free to just
fill them back in. Hope I see you went up there
to fill these leaves in. And I also have to
go back and paint that little wooden bead. Then something else is, there's going to be
these little twigs basically mix up a brown
that's darker than r would be IDS and just
make lines coming down. You can make them a little
jag it if you want. But they're just
connecting these into the wreath because they wouldn't
really just be floating. I mean, they could
be if you want, this is our cell. Do whatever you want. Okay. I'm going to grab this one
last bead with some brown. And let's see. I'm going to let
this dry because we have some areas that are a little dangerous if we're going to be painting
around them, I don't want them
to start bleeding. So let your artwork dry completely and
then we're going to come back and we're going
to start our second layer. The second layer for the light, the mid tone and the dark green. And then the second
layer for the beads.
6. Adding Additional Layers and Details: Now that we're dry, we can come back and add in all of our color
variations to our leaves. So that lightest tone, I'm going to darken it just a little bit and maybe add a
little bit of yellow ocher. And then I'm going
to come in and i'm, I moved down to a
size four brush because I wanted a little
more finer detail. And I'm just painting
along the edge of it. And if you want, you can
rinse your brush off. Grabbed just water and
then kinda blend it in. I'm okay with that. Having a little bit
of a harsher edge. And basically what I'm
trying to show here is that there's like a
shadow on the leaf. You can alternate
between colors too. For, even with this
one variation, maybe you want to add a little more green to some of them? Totally. Okay. I'm just I'm just paint I have just paint on my
brush. Not just paint. It's obviously paying water, but it's pretty saturated. And I'm making a line that
I'm rinsing off my brush, adding just water and then
just letting it move, kinda helping it along. So now we're just going to
go through and do that. This was like if I
want to be super particular or you want
to be super particular, the shadow would be on
the side that's covered. So e.g. like right here, it would be more shadowed because there's a
leaf right here, but I don t think we don't have to
get that crazy with this. You can put the shadow
on any side you want. It also doesn't have to
necessarily be a shadow. It can be the other
side of the leaf. You know how? If you look at an olive leaf, one side is quite dark and
the other side is lighter. It could represent that as well. And feel free to make
this one just darker. Pop in some darker colors, like not super dark but within that same shade
or change it up a little bit and add
a little green, or sorry, a little more yellow, or you can even add red if you want to mute it
down a little bit. But what we're looking
for here is just to add more interests
to the leaf. So we still want to see the
lightest tone popping out. Then just adding in
water to move it around. Since it's wet, you
can always just tap and bring in
this is the wet on wet technique and bring in a little darker
color if you want. Okay, so now we're just
going around and we're doing that to all of
those light leaves. Sometimes what I'll do to
save time or it makes me feel like I'm saving time is
I'll do three leaves. I'll rinse off my brush, get just regular water, and then do them all
at the same time. But you don't have
to do it that way. Do what's best for you. I can see I've got more
green on this one. Another thing you could do is you could just leave
it like that too. If you don't want to blend it, I want it a little softer
look so I'm blending it. But if you don't care
and you like it, more of a harsh look, not harsh but bold.
That's a better word. You can totally do that. And some of them,
I like to leave a little more bold
and then maybe you just poke in some darker
color here and there. That's the fun part
once you get so we have our base layer down is just adding in like the
fun little details. So I want to add in just
like a pop down here that's darker and it'll bleed up because it's, it's wet stone. And I like to say this
in all of my classes, but this is the
way that I paint. It's not the end-all, be-all. This is my style. This is the way I like to paint. And not everybody is gonna
like to paint like this. So feel free to explore my
style and if it's not for you, then do whatever you want. Some basic, obviously
rules and with watercolor. But there's a lot of different techniques
that you can do. And some people like to work how I painted all the light color and then
all of the medium color. They don't like to do that. They like to do like
one section and get super detailed and then move
on to the next section. For me, I don't like to do that because it makes it hard for
me to see the whole picture. And when I do the
layer upon layer, I can really see the whole
picture coming together. So that's why I like
to do it that way. But again, that is my choice. You can choose something
different if you want. We're just outlining every
once in awhile I'm adding a little yellow
ocher to make it a little more yellow and tone. And I do always
leave a little part. So you can see that
base layer poking through because that's
giving us the depth. And realizing this is getting
real green over here, or sorry, really yellow. So I'm coming over here and just adding some of that
over here as well. So it's nice and balanced. When we took our little break
and waited for this to dry, I realized that it's not
perfectly filled out. And I'm gonna be okay with it because I'm working on
not being a perfectionist. But you do want them to be
pretty filled out if you can, like evenly filled out. But it's not the
end of the world. I just did or I didn't just
do, I did it last year, but I sold wreath Clip Art and they were
really popular in my Etsy. And I realized one of them is really not filled out and
it really bothers me, but nobody's complained
knock on wood. So hopefully it's fine. I think sometimes you just
really getting our heads about perfection and
we don't need to be that crazy about it. Sometimes, like other people, especially if they're not in, not like a watercolor artists, they don't even notice
a lot of the time. They're like, I just
think it looks good. And that's the best. Feel free to add in some little
darker spots if you want. Realize I didn't paint this guy coming around starting to
run out of this color. So when you come back in to blend this, you really want to make sure
you have a clean brush. Because if I just took the paint like this and
then just kept blending, it's going to be
all the same color. So you need to rinse off your brush and pick
up clean water. That's another reason
I use two cups. Especially when I'm working in a similar color
palette like this, where there's a lot of
variation in colors. I'm not worried about my
water getting really muted. So I keep one for dirty
water and one to just pull water out of so everything stays real crisp and clean. Yeah, I'm just barely gonna do that one because
I wanted it to look a little bolder. If you ever need
to pull up color, just rinse off your
brush and then tap it on the paper towel and get as much water
off as possible. Then you can press down and pull up and you'll pull
that color right up. That is one of my favorite
techniques that I learned. I can't believe I like
just something so simple, can really help you out so
much if you make a mistake. Instead of being like, oh, I guess I, watercolor
painting is ruined. Right? Now we can move
on to our mid tone. Just may take one, peruse over your artwork
and make sure that for the most part it looks balanced
with that new greenish. Greenish. Why do I keep saying that new yellow tone
that you added in? And it looks good to me. So now we're moving
on to our mid tone and we're gonna do
the same thing. So we're going to make
it just slightly more saturated than the original
layer that we put down. We do have to be careful because it might
touch some areas. That are wet, so just
be mindful of that. And I think for this one, I'm not even going to
blend it unless I think it looks really crazy. Also, you guys, you can see I have watercolor
splatters all over here. I don't recommend keeping
your watercolor above. The reason I'm doing that
is because the way I have this setup to film, I can't put my watercolors
to the right of me, or sorry, my water cups. So you want to keep
them somewhere that's not going to splash
onto your paper. Of course, this can all
be fixed in Photoshop, but if you wanted to
sell an original, you don't want watercolor
spotter is all over it. I recommend. I'm not keeping
it right by your paper. I'm just doing like I'm not using the water to
blend these N I really like the look of
just having it as like it looks similar
to an olive leaf. So feel free to follow
that method if you'd like. I might see, this
kinda looks funky, so I am going to blend it there. Just so it looks a little smoother because
we have that bead. It's already coming together
quite nicely, I think, because just when you start to add those different colors, it really makes it pop. And make sure you're not getting too much of the same color. So if you're noticing, oh, these look really similar. Just go ahead and add in
maybe a lighter tone or a darker tone or water down that color
that you're using more. That can also be a good method. And add a little
more brown in there. Now I'm getting confused
which leaves are which? I think that's the darkest one. It doesn't really matter. I mean, once you start
painting all these leaves, like nobody is gonna be looking
at each individual leaf. They're gonna be looking
at the whole painting. I might blend some of
these in just a touch. Just to touch. That's looking a little
too harsh for me. And I see that I missed a
couple of these lighter ones, so we'll have to come
back in for those. Now, here's one
that's folded over. So this is the top. It's going to stay darker. Sorry, it's going
to stay lighter. So I'm just outlining the
bottom here and filling it in. So you can tell that this
is the top and we'll add a leaf vein at the end. So you can tell that it's
a leaf that's folded over. I missed. Actually. That's another folded over
all n. So do that dark. A little brown. Eyes off my brush and add. Just make it blend
a little bit more. And I think I'm going to blend that
because that turned out really kinda bright green. Looking good. I'm going to come back and
fix this with our original, like the lightest color,
its second shade. I'm makes sure there's not
any other ones that I missed. I might add a little yellow
to these folded over ones. That yellow, green color. Okay. Alright, Now,
there's two up here. It's like a scavenger hunt. You realize that, oh, I forgot to put it on that one. There's one more here. Now we are moving on
to our darkest one. And we are going to just, I don't know, Like I said, I don't know what color this
is, but it's pretty dark. You can add black to
one of your grains if you really want to darken it up. I'm getting my darkest
tone on the darkest leaf. And I am just making that line. And again, I'm not
really going to blend it unless I feel like it needs it, like it's standing out too much. But I love that. Look, I think it
looks really cool. Sometimes you start a
painting and you have a specific vision in your head. And then along the way, it kinda turns into
something else. And I will say a little bit that this kinda
turned out that way. So we're just adding, I'm just adding a line
in, but it's darker. So it's creating dimension. Dimension is a lot more interesting to look at than something
that's totally flat. I can't believe that the
Christmas season is here. Got here so fast. But I'm so happy to be offering
this tutorial this year because last year I really
wanted to do more tutorials, but just gotta wait for me. This is another folded leaf, so we're making the
bottom part darker. And if at any point
you realize, hey, I don't really have a lot
of dark leaves over here. You can just add it in, right? Like just paint that second layer over
whatever color is there. I got one right here. Now our leaves are
basically done. Take a bird's eye view. Sometimes I like to
do is hold my paper up to the mirror to,
and that can help. But see if you need to add
in any colors somewhere. I'm noticing that
there's a lot less dark over here, the
darkest leaves. So I'm adding in a
little bit of that. Or if you have any spots, I feel really open. Okay, that looks good. Now we're gonna move
on to our beads. If you, if this isn't dry, most likely it won't be completely dry because
we just painted it. Just be really careful
or pause this, come back when it's
dry because we don't want to stick our
hand in wet paint. Now we're going back to the brown and we're making a
second layer of brown. And for the beads were probably
going to do three layers just to make sure we're
giving it enough depth. Honestly, I could make 700
layers on this painting, but I want this to be
quicker than Paul hours. Don't worry, it's not gonna
be anywhere near that long. Mix up a darker
shade of that brown. And then we are
doing same thing. Now for these, I'm
gonna be a little more particular on where the
shadow is coming from. I'm going to say that we have light coming from
the right-hand side. So all of these
shadows will be on the left-hand side of the bead. I'm with the paint just
following that circular line. I'm going to rinse off my
brush, grab clean water. This water has a little
yellow on it but that's fine. And then I'm just going to
scrub it like a toothbrush. And it's going to blend nicely and look
like it has a shadow. Now, we can't paint the bead right next to it because
this is what we want, that crisper cleaner look. So you're going to need to
skip and go to the next one. And do that. If they're right next to
each other and they're not touching, you're totally fine. But if they are touching, then you need to
wait until it dries. But we'll be able to come
back and do that. No problem. Again, I'm just adding
the paint to one side, rinsing off my brush, grabbing just water and
then blending it in. Now if for some reason, all of a sudden, this whole
thing is the darker brown. Rinse off your brush and then dry it off on
your paper towel, and then just do that
technique I taught you. Pressed on your
brush and pull up and you'll be able
to pull a highlight. And if you want to do
that little method where you're kind
of saving time, you can do a couple at once
and then just blend it. Just make sure you're
not getting sloppy. Wear. Your brush isn't clean. This is really key. I see I got sloppy there. We don't want that. You can always tap in
some darker tones. Actually really like that. Okay, you guys come in with a darker shade and just lightly
tap it on that left edge. It's gonna give us a
really good shadow. And we might not need that third layer because
that's looking pretty good. Painting painting. If they're touching
makes sure you skip. Then we're just
painting on one side, grabbing that clean
water and blending. Blending, then grabbing
that little darker tone and just lightly tapping it in. Boop. Boop. These are touching,
but I'm going to try to be really good with my water. So as long as you don't get it wet right next to
the other bead, you'll be totally fine. Got to wait for that one. Just be mindful of where
you are adding the paint. So we're originally
adding it more like up here and now I'm adding
it closer to the edge. Because the location is changing of where the beats that and
our sun is coming this way. You can make the sun or the light source wherever
you want it to be. That's totally arbitrary, but whatever you do,
just be consistent. Now this one, we
would just paint the bottom right because the
light's coming from here. Consistency with
light source matters. Especially if you're
trying to paint in a realistic fashion. There's just something
about our eye that knows to look for
that inconsistency. And then we're like, Wait,
that doesn't make sense. It's appears that my
original Good idea of just lightly popping in
that color actually wasn't that good of an
idea because it's all wet, so it's just blending
all the way in. So we are going to have
to do a third layer. So you can stop doing
that if you're doing it. If it's working out for
you though, keep doing it. It was not working out for me. Oh my gosh, I'm making a
disaster of my watercolor paper. My husband always
jokes that I'm so messy and I am just
a messy person. I can't help it. But I think
I'm a pretty good artist, so I'm not too upset about it. Again, make sure you're
not going directly to the bead that's
touching the wetland. Or it will just all bleed into itself and we
don't really want that. If you guys ever have any
requests for tutorials, I love to hear requests. I I try my best to
publish classes on them. Was really helpful for me is if several people request the
same thing that I know, okay, this is really going
to be popular, but I always love to hear
what you guys want to paint. Now we can come back
up here to these guys. Yeah, we're gonna do
one more layer because it'll really make these pop. If you need to wait for
this to dry, please do so. Don't don't rush these
or they're not going to look as detailed. They're going to just look flat. And you can grab a smaller
brush to if you need to. My brushes a little
big for this. I paint this one
already. I think I did. It just really bled into itself. Yeah. That wasn't a good idea that I sometimes it works,
sometimes it doesn't it. Okay. So that is our await. Sorry, we got to finish
these ones up here. Our second layer on
our little would-be, it's now we need to make these dry completely before we
add on our other layer. But something we can do to make Those little yellow pieces, more interesting is to
add some texture to them. I'm going to show
you guys actually how I could clean
this up right now. Grabbed clean water and
just start scrubbing. And make sure you have
a clean paper towel and you'll be able to
pick up some of it. I mean, this is
pretty dried on here. When it was wet. If I would have done this,
it would have picked up. But just in case that happens
to you, that's a good way. It makes sure you get to
it as soon as possible. It's like a stain
on your clothes. The sooner you get to it, the easier it's going
to be to remove it. For these little yellow berries, we are going to grab a
darker, darker yellow tone. I'm grabbing this
kinda golden tone. And I'm actually going to
get my really small brush, my 2/0. And I'm just going
to come in and add just the
littlest, like swish. It's like a little half
circle on the edge. And it's just going to make it look a little more interesting. Move it around. So it's
not all in the same place. Just to give it a
little more depth. Something really important
if you're going to be working in a more
realistic style, is to focus on shadows. Because that really tells the I were to look and if
something looks realistic, we're not doing a whole I mean, we are doing shadows here, but we're not going to make
shadows behind the leaves. Grab a brown that's
slightly darker. I think this was CBR R3 here. You're going to need a darker
brown for the beads anyway. But we're using
our smallest brush because we're going to come in to these little
branches for the berries. Don't have too much color, then I'm just going to make a line on the underside of it. This line is going
to be its shadow. So light is coming from above. And just make some that much
more realistic looking. Who are getting so close, you guys are almost done. I can't wait. Please post your wreath
in the class projects. I love seeing what
you guys create and sometimes people don't
post them that much. And I'm sad because I love
to see what you guys create. For the final thing, we are going to be making
these with one more shadow. I'm going to grab my size two, brush, that darker brown, but I'm going to mix it into that golden brown
because we don't want, all of a sudden
we're using a brown that does not look like
the original color. We want to keep some
consistency there. I just coming in and adding
it to that left side, rinsing off our brush, grabbing just water
and blending it. The key here is
you don't want it to spread across the
entire bead because you want to see the
color variation from the darkest to lightest. So I'm just tapping with water on that edge so that
it's softens up a bit, but I'm still seeing
all the layers. Let's just go ahead and do
this all the way through. Feel free at some of them. Maybe you want to add a little
black so it's a little bit darker than the other one is, or something that's
totally cool. Also, if you have any
connections in here, adding just a dot shows that there's like
a little shadow here. I love when it gets to
this point because to me, this is the fun part because you see everything really
come together. I mean, it's all fun, but this is the most
rewarding part, I guess, is what I'm
trying to say in my mind. But you know what art is
rewarding all the way through because it teaches you so much. And I'm gonna get
on my soapbox about art and how important
it is for us. Because it teaches
you a lot of things like perseverance,
keeping going, or keep going when
things are really hard and they might
not look that good, but you keep going
in faith that it will work out and it will turn into a beautiful masterpiece. I can't tell you how
many times I are. First of all, I've painted
so many pet portraits. But I swear to you, every time I get in
my head and I'm like, freaking out that it's
not going to look good. They always work out. But it's just like it's really teaches you a
lot of things in my mind. To me, in my opinion. It's also relaxing. It's a good way to just
totally kind of zone out, but just care about what's in
front of you on your paper. It's metadata. There we go. That's the word I
was looking for. It. It's meditative. That's why you think it's so important that we
keep art in schools. It was my saving grace as a kid. So I'm really thankful
for it and I'm thankful for my parents because they really encouraged me. And I want to do that
encouragement for you guys to just keep
going on your art journey. And it doesn't have
to be your career. It doesn't have to be
like a moneymaker. It can just be a way
for you to really relax and to connect
with yourself. It can be a form of self-care. If you guys are
like, Okay, Shut up, just show me what you're doing. So remember we are just
painting the bottom edge. Our light source would now be turning and pointing down here. So the shadow is going to be
on the bottom of this bead. I'm going to rinse off my brush. I'm getting clean water. And I'm kinda swirling
in this lower third because I
don't want to get rid of that second layer
of color that we have. Took a little shortcut there. Something else that you can
do if you'd like to work with gouache or
like a gel pen is, you could add in some
white highlights here. You can get that effect by
keeping the paper clean, but that's kinda
like a pain in the, but for some people. So you could also grab
a gel pen or grab white gouache and add in
little highlights if you want. I'm going to make
some darker areas here just because
I feel like it. And because this is wet, I'm just lightly
tapping the edge. Right. Because it
kinda turned into a disaster when I
did it earlier. But the paint that I had is
really thick on my brush. If I'm just lightly
tapping the edge, it's not going to
bleed too much. Plus the stuff up
here is pretty dry. You might like that,
you might not, you don't have to do it. I might blend it, just touch. See, this is my problem
is that once I get going, I'll just I could do this first. So feel free to tinker as long as you
want with your painting. There's no time limit. Unless you have kids, then they're probably trying
to get to you right now. I have a dog. She is my
whole world and love her. But she's sleeping right now. So that's why I'm able
to record this tutorial because she's a puppy and
she has so much energy. All right, you guys, take a step back, look at your masterpiece. It looks beautiful. Feel free if you want, you can come in here
and you can add another layer if you want to. You could keep
going for so long. You could also add
a quote in here. You could digitize
this and turn it into gift tags or Christmas
cards or tote bags. There's so much that
you can do with it, but I really hope that you
enjoyed this tutorial. Please post your projects in
the class project section. If you guys are on Instagram, tag me at lavender and see, like I always say, I love to see what you create a mean so much to me that you took this tutorial and or class. And I'm really
thankful that you did. If you could leave me a review
that also is wonderful. I love seeing your reviews. It makes me so happy, but it also shows me that
I'm doing something right. And it also helps my
class gets seen by other people so that they're able to take this class as well. So I hope you have the most
beautiful holiday season and a wonderful day.
 Nikki Hess, Artist & Corgi Mama