Transcripts
1. Introduction: Hi, Welcome to a beginner's
guide to watercolor painting. My name's Nikki. I'm a watercolor artist. I do a lot of work in
the wedding industry, so I do custom
wedding invitations. I also sell art prints and
I do custom commissions, such as pet portraits
and house paintings. I love painting with watercolor, but it was not always that way. I actually hated
it when I learned, when I was in high
school because nobody ever taught me how to do it. I just thought it was o you add water to paint and then
you just have at it. Well, no, there's a lot of different techniques and a lot of tools that I
wasn't told about. My goal for this course
was to really help, you know, all the tools and all the techniques
to get started with water, watercolor painting. I find watercolor painting
to be really meditative. You might be taking this
course because you want to add an offering in your business
or you might be taking this course just to learn
painting as a hobby. Anybody is welcome here. This is all about just learning
how to watercolor paint. If you are brand new, you've never picked
up a brush before. You're in the right place. If you're somebody who's maybe dabbled a little bit in
watercolor painting, but you're still
struggling a bit. This is also a great course for you because I'm gonna walk
you through everything. I really dive into the materials section
here because it's so, so important and not a lot of people take the time to figure out what
supplies are best to use. So we're going to
go through that. I'm gonna show you some
different techniques for watercolor painting. There's gonna be a
portion where we paint a couple of
items together, but feel free to pick
up your paint brush. Anytime I pick up my paintbrush, I'm the kind of
person that learns as I like to do things
and I learned as I go, I know everybody's different. So if you are that
same type of person, feel free to paint with me. If you'd rather just watch, you can totally do that too. I wanted to mention
that you will need some supplies to get started. Of course, we're gonna
talk more in depth about supplies, but
just so you know, straight off the bat,
you're going to need watercolor, paper,
watercolor paint. Please make sure it's
watercolor paint. The paint is very different from other kinds of paint
like oil and acrylic. You do need watercolor
paint brushes. I recommend a size six and also a details brush
if you have it, which is like a size two or
o size 12 cups for water. If you're not using
a watercolor block masking tape so you can tape
down your watercolor paper. We'll talk more about why
you need to do that later. And a paper towel. I'm so excited you're
here and I cannot wait to paint with you and teach you all about
watercolor painting.
2. Paper: Your watercolor paper
matters so much. I have used probably about six
or seven different brands. And I finally landed on my
favorite one which is Arches. But I'm gonna go
through a couple of different papers for you today. It has really changed the way I paint because you need
a high-quality paper, something with a little bit of tooth because it needs to soak in the water when you're
using a lesser quality paper, it's not soaking in
the water enough. What happens is when you use
layer upon layer upon layer, the paper is just so saturated
that you're not getting the brilliance that you need from the paint
and the paper. Explaining watercolor
paper a little bit. I'm not going to go super
in-depth with this. I'm just gonna give
you the knowledge that you need as a beginner. So the first thing you always want to look for when
you're purchasing watercolor paper is you
want it to be a 140 pounds. Now this is standard
in the US that this is how we talk
about watercolor paper. I have worked on watercolor
paper that was 300 pounds. That is very, very toothy and can be a little bit
difficult to work with. But 140 is the sweet spot. You do not want
anything less than this and the quality
will be really bad. And then I heard that the
UK and other countries, they referred to it as 300 GSM. These mean the same thing, but whichever
however your country and talks about it,
just go by that. We always make sure that
it's a 140 pound paper. And there is a difference
between there's, there's cold press
watercolor paper. There's hot press
watercolor paper. This is cold press. And as you can see, hopefully you can see that there's some texture
to those paper. The texture allows the
paint to really soak in. Essentially what happens when
they make watercolor paper. I believe watercolor paper
is made out of cotton. They take all the fibers
together and they smash it down with
these rollers. And for the cold press paper, It's literally done cold. And that's why you get
this texture to it. Whereas the hot press paper, this is a piece of
hot press paper. It's super smooth. It's done the same way with the different
fibers press down, but it's heated up so
it gets super smooth. And I'll explain
a little bit more about hot press on a second. We're making sure we have a, a 140 pound paper. And I want to go
through a couple of different paper brands that
I have used in the past and I'll talk to you
about their level of how expensive they are. Probably your most
expensive paper or at least in my experience, it is the arches. I think I paid
about $40 for this. This is a watercolor block. As you can see. It has this black on the
outside is essentially just glue that is taping down
a bunch of pieces of it. I believe there's about
there was originally about 12 to 15 pieces
and it's on here. So I love to use watercolor box because
when I'm painting, I don't have to worry
about the paper warping because it's glued
down to this block. And then when I'm done, I just stick a little
knife in here and go around and peel
off the top paper. It is, this is how
I like to work. It took me a long
time to get here, but at the same time I am a watercolor artist
and I sell my artwork. So I'm able to kind
of offset the cost of this expensive water color block by pushing that costs
onto my clients. Now if you're just
starting as a hobby, you might not want to
spend a ton of money, but if you can get one
of these, I highly, highly suggest it even if asked for it for your
birthday or just splurge a little bit for yourself
because it does make a world of difference
to have amazing paper. Now if you don't buy
a watercolor block, what you need to do is
tape your paper down. I'll go into that in a little
more depth in a little bit. But because watercolor paper
has water all over it, it gets really saturated. And when it starts
getting saturated, it can start to bend. And you don't want that
warp and you don't want it to have all
these little dips in it because in your water, in your paint will
just sit in there and make things that
are not so pretty. That is why we like
the watercolor block, but to get around that
you can save your paper down and I'll explain
that alone later. This is my top paper. And then from here, I like the Stonehenge
lesion paper. This is a great paper as well. It has really good texture. I believe it's a little less
expensive than the arches. Again, this is a
watercolor block, so I do the same thing, I paint on it and then I stick a little
knife in this side, go around and pull
off the top sheet. There's also, I have found that this paper when I use
the masking fluid, which I'll explain masking
fluid in just a few minutes. It does tend to tear up
a little of the texture. I don't know why. For some reason I feel
like arches is just a slightly a slight bit more
durable than the Stonehenge. Still both are amazing papers. These are high-quality
watercolor papers. So now we're gonna go down, down the quality
a little bit and talk about papers that
are more affordable. Something that you'll find
maybe at your local Michael's, That's the craft
store in the US. Both of these papers are
relatively inexpensive. They both do say that
they are a 140 pounds, but I will say I see a huge difference between this paper and the ones
that I just showed you. This is a paper that I started learning on when I just started. I was a little bit frustrated. But if you are
just starting out, it's okay to use these papers. I do recommend. If I'm recommending
one over the other, I believe they're very
similar in price. I recommend the Strathmore
over the Canson. The Canson is really
in my opinion, the lowest quality
watercolor paper. You can use it, but it's
not going to allow you to use lots of layers in your painting and we'll
talk about layering later. But layering is what makes your paintings
look more realistic, give them more interest, and you're just
really not able to do that too much
with this paper. I'll show you guys
examples when we get into that part
of the course. The Strathmore paper is
a little bit better. It has a little
more texture to it. Honestly, it feels a
little more thicker to me. And I think you can get
away with using this one. I know a couple of
artists that do, but once you get to
a certain point, please try out the other
watercolor papers if you can, because it really makes
a huge difference. Here's a quick
demonstration for you. The two watercolor papers. This is the Canson
cold press here, and this is the
Arches cold press. This is a much more
high-quality paper. And this was the lower end
that I described to you. But as you can see, the water really soaked
in and the pigments soaked in really
well here in evenly, but not so over here, I used the exact same
technique for both of them. So just a great example of how much and how important
watercolor paper is.
3. Water: A huge part of watercolor
painting is using water. And it's really about
how you control the water and utilizing it
in the best way possible. But just the most, in the most simplest terms. What you really need to do
is have two water cuts. I used to use one
water cup and I noticed that my pigments
were really murky. And that's because
essentially you're mixing all the colors at once. And when you mix warm and
cool tones, you get browns. So that's what happens
to your water. To avoid that, I use two
different water cups. You can go about this
one of two ways. The first way is to do what
both are filled with water. And one is where you rinse off your brush and the other one is where you pull water from. Then the second option, which is the option that I use, is having two cups. And one of them is for warm tones and one of
them is for cool tones. So when I'm using yellows, reds, and oranges, I only pull
from the warm tone cup. When I'm using blues
and greens and purples, I only pull from
the cool tone cup. It ensures that I'm not
getting murky water, which makes your
paint murky as well.
4. Brushes: The next thing I'm
going to talk to you about is paint brushes. Paint brushes are also another important part
of watercolor painting. I suggest if you're
just starting out a size six is a
fantastic size brush. You can do a lot of stuff
with it if you are wanting to expand a little outside
of just a size six, I suggest doing a size to a
size four and a size six. That's a great starting
point and we are going to be using those today when
we do start to paint. I love the Princeton heritage brushes there, a
synthetic fiber. There are some watercolor
brushes that use animal for, I am a big proponent of no
cruelty towards animals, so I choose not to use the
ones that are real animal fur. It's pretty easy to find
the synthetic ones and they work just as
well, if not better. This is the Princeton
heritage and then also the pigeon letters. So Peggy Dean has her own
line of paint brushes. She's a really talented artist and I love her paint
brushes and she's super no cruelty towards animals and wants everything to be
environmentally friendly. So these are also great brushes all linked these all in the, the notes for the course. So it is good to have
a variety of brushes. This filbert brush
is great for washes. You don't want to have
all round brushes. You want to have
some square ones for washes and then having larger brushes as well will
be super-helpful for you. Just a variety of them. But like I said, if you are just starting out a size six brush works great. Now some rules about taking
care of your brushes. The first big, it
is never, ever, ever leave your brushes
in the water face down. What's going to happen if you do that is you're going to bend these tips and they're basically just going
to be bent forever. And you don't want that
because you're not gonna be able to paint
while if you do that. Instead, what I do is I just
rinse my brushes and then I grab a paper towel and I lay them on the paper
towel until they dry out. Once they're dry. This is a little ghetto
how I keep them. But I keep them just in
a plastic bag like this. There are some really cool
fabric little brush cases that people have and
they roll them up. I need to get one of
those for myself. But I like to keep
my brushes flat. You can store them like this, but I don't recommend storing
them up until they've dried because if they're still wet and you
store them like this, the water is going to
seep in here and create this expansion of the
fabric or the fibers. And it's going to make your brushes kind of
warped a little bit. So take good care
of your brushes. There's no need to ever use soap on these watercolor paint is water-soluble and
will obviously we'd, all we need is water to
wash off the pigment. Then just let them dry flat.
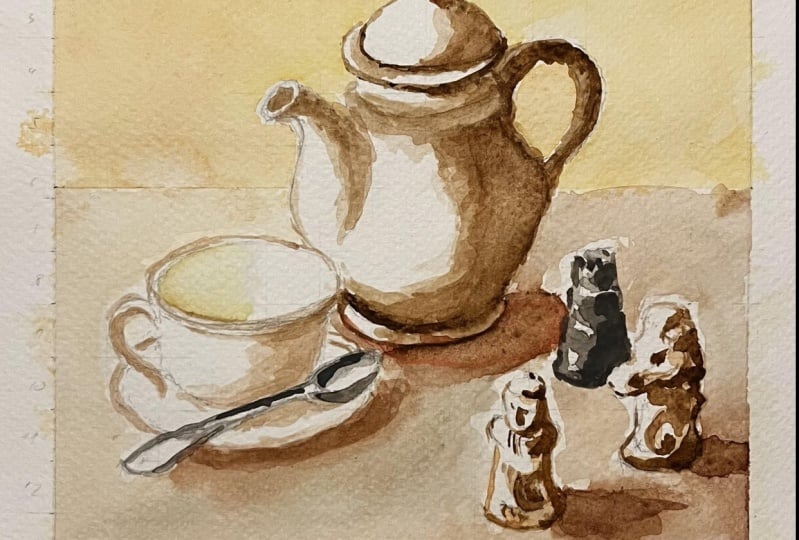
5. Paints: Okay, Let's talk
about something very exciting and that is paint. This is my paint palette. It's very robust. This watercolor, being a
watercolor artist is my career, so I need something that
has a lot of colors in it. Honestly, I suggest
having this even if it's your hobby because it's
really nice to have all this. But if you are wanting something smaller, I completely
understand. And this is a version
of smaller one. I got this at Michaels. When you first get your palate, you want to scuff
it up a little bit. So if you have like maybe
something you scrub the dishes with just to give it a little texture so the paint
really sticks on there. Another option is there. These are all liquid paints, so I buy the tubes and
then I pour them in. I like to do that
because I get to set up my palette exactly
how I want it. I don't have to buy
a pre-made set, but there are, you can
buy the little trays. So this is my little
travel watercolor set. And who can buy
these little trays? Because they're all
labeled on here. But I bought this together. It was a set and I bring
it with me when I travel. I can watercolor paint. But you can, some people do like to work with
the TRE paints. To me once you get
I'm missing one. Once you get this started, this is almost the exact
same thing because these pigments are going to dry and then you just
wake them up with water. And that's essentially
what's happening here. These just come
dry and these are going to be wet when you
put them into the palette. Totally up to you. Some people think that these
tray ones are more vibrant. That really hasn't been
my experience with it. Again, I like to do the tube paint because I like
to make my own palettes. Some questions that I get often are Do you ever
washed your palate? No. I don't really wash it. The only instance when
I do wash it is if, say I just worked on this
huge bright floral piece, I would have a lot
of bright colors which I have right now. But I need to transition
into painting. A pet portrait, and pet
portraits are typically more neutral colors like
browns and blacks and grays. Sometimes in that case, I would rinse out these areas so I have
a clean place to work. But typically I'm
able to kind of blend in some of these
other colors and it doesn't make too much of a difference with the
color of my paint. Your palate is a big deal. And the way I like
to set mine up is I do blues and greens and yellows. So I like to keep cool colors
by each other and then my, my more warm tones
by each other. It's kind of a mess in here, but it's, it's chaos, but it's organized chaos for my, the way I like to work. Another thing about
watercolor paints, which is amazing and so
different from acrylic paints is watercolor paints can dry and then you can wake
them back up with water. So you're never going to have
to throw away these paints. Whereas I don't know if anybody watching this has used
acrylic paints before. I used to do acrylic painting. If I poured out too much, it would dry and it was like plastic and you could
not wake it back up. I really enjoy about water. What I really enjoy
about watercolor is that I can just wake up
the paint again with water and I never have
to worry about wasting paint. So that's a really
cool added bonus to watercolor painting.
6. Additional Tools and Supplies: Now let's talk about a couple more tools
that you'll need. You don't necessarily
need all of these, but they are helpful to have. The first one is
going to be tape. I like to use masking tape, That's this ivory color. You can use the
blue painters tape. But to me, the blue
painters tape can be really distracting because it's so bright compared to
the white paper. And for some reason it
just makes me not see my colors as well as I want to. I like to use this one
because it's a little more neutral and get masking tape. This is Blick masking tape
and I find it to be awesome. Some people like to use the
actual watercolor, a tape. I find that it's not as
strong as I'd like it to be. There's also washi tape. Washi tape works but it's in my opinion is not as
good as the masking tape. Now, I mentioned this before, but you will need to, if you're not working
on a watercolor block, you need to tape down all of
your edges of your paper. If you don't tape
down your paper, what's going to
happen is it's going to fill with water and
it's going to warp. And that sucks because then your paint is going to pull and it's just gonna
be a big mess. So what you're gonna do
is tape down all sides. And I'm gonna do that
right now is to show you, I'm going to speed up the video. All right, our paper is
completely taped down and this will make sure
that when we paint on it, it won't buckle or warp
or anything like that. So we had our masking tape. Another thing that's
super helpful to have is a sand eraser. Sand erasers are fantastic. They have almost a
sandpaper texture to them. And if you have a mark or say you cannot get
a mistake off, usually you can use a sand
eraser to get it off, but just be careful because this does start to pull some of the
texture off of your paper. So if you sand it
really, really deep, you could poke a
hole in the paper. So just be really
gentle with this. But this saves me from a
lot of paintings that would be ruined if I wasn't able to erase it and
fix it with this. Another tool is masking fluid. Masking fluid is
really amazing if you need to protect a part of the
paper when you're painting. This is the way to do it. Now I have to mention, do not use your regular
brushes with this. You will be so sad because
it will destroy the brushes. So make sure you
purchase either use a crappy brush that
you don't care about because it's gonna go
in the trash afterwards. Or you can buy these
silicone brushes. This is what I use. Hopefully you can see that it comes in different tip sizes, but this is silicone. It's really easy for me
to just clean this off. After I'm done, I'm going
to demonstrate really quick what it looks like to
use masking fluid. I want to shake your masking
fluid up really well. I don't know why, but
they make these like the most difficult
tops to get off. So I might be speeding this up. Now that we finally
got this out, what I would
typically do is pour a little bit of this
and a little cup. But just because this is
a simple demonstration, I'm just going to
grab some of it. And I'm going to obviously, you would use this
in a situation where we're trying to
protect something. For example, if I'm painting a landscape
painting and it has a lot of layers and say there's some flowers
right here in the front, but then there's tons of
buildings in the back. I might want to just
protect those flowers with this masking fluid. Because once it dries, I'll be able to pull
it up and what's underneath will
just be the paper. We're going to let this
dry and then I'll show you what it does once
I've put paint over it. Now that it's dry, it doesn't take
that long to dry. It's about, I would say
like five or ten minutes, going to pick up some
paint just so I can show you what's going to happen. You don't have to
worry. You can use your regular brush over
this because it's dry. And I'm just going
to paint over it. As you can see. It's protecting the paper
that's underneath it. We're just going to let it dry. And then I'll pull up the
masking fluids so you can see a couple of other tools while we
wait for this to dry. A high-quality pencil is super great to have
this as an HB. I like it because
it's pretty light and the graphite is really soft. You really want to
make sure you're drawing lightly when
you watercolor paint, because once you
paint over that, you're not going
to be able to take away the pencil marks. Another great tool is
a kneaded gum eraser. This is the best eraser to have. Say, you just drew what
you wanted to paint, but the lines are too dark. What you're going to do
is just press this down. Here, I'll show
you. Here's a lion. You're going to
just press it down, like in this motion
to pick it up, to pick up some
of that graphite. Otherwise, when you're, if you draw and then you're trying to erase it and
you're scrubbing, scrubbing, scrubbing,
what's happening is you are tearing up the texture
of your watercolor paper. And you don't want to do that
because the texture is what helps your painting look so nice and helps the
water soak in. A gum eraser is fantastic to make sure you keep
your paper protected. Alright, now that the
watercolor paint is dry, I will show you, you just lightly pull
up with your finger. And you can either use
tweezers to grab it. Just pulls right off. But again, be careful that
you're not scrubbing too hard because you don't want
to take up your paper. But as you can see, it protected the
paper underneath. Now I can paint that whatever color I want
and I don't have to worry about the blue
getting into it. That's how you use
a masking fluid. Sorry, there's a
little bit more. It's a really great
tool if you're doing a house with a lot of windows or there's a fence
or something like that. You can block them out with
masking fluid to keep them from getting messed up by all the other paints
on your painting. So those are some extra
tools that I recommend. You don't have to have them, but they do come in handy. The one thing that you
do need to have though, is if you are not working
on a watercolor block, you must tape down your paper. So you will need tape.
7. Wet On Wet: The first technique
we're going to start with is wet on wet painting. And essentially wet on wet
painting is you're going to have wet paper and then
obviously the paint is wet. Really simple. I'm going to mix up, just
get a little paint here. There's a little glow
coming in from the sun. I hope that doesn't
bother you guys. I'm just mixing up some paint. And then what I'm gonna do
is I am going to grab water. I'm going to make a
circle with water only. Now I'm going to grab my paint. I've paint on my brush. You never want your brush
to be dripping with paint. You just want it to be
saturated but not dripping. If it is dripping just lightly tapped down on your paper towel. As you can see, I'm just
poking in the color here. I can move it around. The paint isn't going to go anywhere outside of
where this paper is wet. Which is really cool. If you wanted to. If you want to make
a cool effect here. Oh, I'm sorry. If you guys want to pick
up your paint brushes and paint with me, that is totally fine. I like to. You can choose your
own adventure. If you learn by doing, then pick up your paint brush. But if you rather just watch, that's totally fine too. I'm going to grab
some water again. I just have water
on my brush and I'm making this little circle. I am going to lightly add in, let's just do like really pink. And then I'm just going
to make it touch. Usually. I don't know if it's
going to work here because the colors
are too similar, but they'll start to
bleed into each other. And you can also assist
them in bleeding. And together. Let's do another, we'll do another color. We'll do some green. Remember what I said
about the water cuts? I like to keep one with cool tones and one with the
warmer tones because it keeps your pigment
pretty bold and vibrant. Instead of mucking it up. Again, a firm doing wet-on-wet. I'm working with
wet paper already. And then I'm adding
in my pigment. How this might work if you're painting because I
know you're like, Okay, this is cool, but
how do I apply this? How you would apply it? Or one way I really apply a lot is when I
do pet portraits. For example, I might
be working on for, and I really want to get this, see how smoothly it blends into itself and you want the
fur to look really smooth. So what I'll do is
I'll put water down. I'm like, Okay, well, this is the side of its cheek. Just bear with me for a circuit. And I want this to
look really blended. So obviously I would
have a drawing of a dog, but then I would add the water to the painting
and then I'd come over here and get whatever
color the dog is. Say, pick up this brown. Then I can just kind of lightly added in and it becomes really, really smooth and blended. Then say there's a little
shadow right here. I could take something
a little bit of darker brown and
just add that in. Then you can come in
with a clean brush, kind of move some stuff around. I really suggest just
practice moving, practice controlling the water. That's one of the biggest
things with watercolor. And I think it's the reason
I hated it when I started. Because you really need to just get a feel for the
water on the brush. And there's no like I can give you the
techniques for watercolor, but nothing is going
to be as great for you to learn as
just doing it yourself. Obviously, you need
these techniques and you need to know what to do. But you'll get used
to using the brush. And you'll get used to how the water feels on the brush and whether it's
like too much or too little, it just comes with
time and practice. This is the wet
on wet technique. Next, I'm gonna show
you wet on dry.
8. Wet On Dry: Alright, now for wet-on-dry, and it's probably exactly
what you think it is. I am going to be painting
with wet paint on dry paper. This is, I use both
techniques when I'm painting. And you really need to use both. But one, when you're
doing wet on wet, it's really good for washes are like I showed you if
you're doing first, something that needs
to be really blended. Wet on dry is good for
just about anything. I'm gonna show you if
I was making a leaf, I'm just painting
on here dry paper. But you see how different it is. It's really dry. If I don't put
water on this area, it's going to dry like that, but I want to make it a little
smoother so I just have a clean brush and I'm
just gently touching it. You could also use a wet on wet technique
here if you wanted to say I wanted the center
to be a little more yellow, I'm going to grab some yellow. This is wet paper and
this is what paint. And I could just tap it in here. When it dries, it's going to
look really cool in blended. So really when your
watercolor painting, you're always going to be using both the wet-on-wet and
wet-on-dry techniques. There's I mean, I don't think I know anybody who just does one
over the other. Here's another example. Make a circle. Just add some water. You could just
leave it like this. That would just be wet-on-dry.
9. Loose vs Layered Painting: Let's talk about loose style versus layering. Loose style. You guys might see it a lot, but a lot of floral combinations or sometimes even patterns
that you see that our watercolor are
a loose style and more detailed work such as pet paintings or
house paintings. Anything that looks more
realistic is usually heavily layered and it doesn't necessarily have to
look more realistic, it just has a different depth. We're going to go over
those two styles. Don't feel like you ever
have to do only one style. That was my problem for awhile and you don't have
to do one style. You can use both
styles if you want to. Practicing a loose style here. I'm gonna show you, we're just gonna
do some flowers. Just making. If you guys want
to paint with me, you can really loose. I am using wet-on-dry technique, but I'm not making multiple
layers because this is the, this is how it's
gonna look by itself. I'm not going to
go back over it, but I could come in here
and use that wet on wet technique right now and
add in a little yellow. Just lightly touch it. There we go. And then
maybe I want to do a leaf. A little thing I want to teach you guys is pulling a highlight. I'm gonna do that by
rinsing off my brush. Make sure my brush
is totally clean. Then I dry off my brush on the paper or sorry,
the paper towel. Now my brush is pretty dry and I'm gonna come over
here and press it down. And when I do that, I'm pulling up some
of the pigment. I'm getting this nice
little highlight here. This is a great way if
you accidentally put too much pigment or you just want to make it look a
little more interesting. You can just pull up pigment
by using a clean dry brush. It doesn't have to
be completely dry. Just make sure you pat it
off on the paper towel. This is a example
of loose painting. So it would be, I would be done with this
right now because I'm not going to go in and
do a bunch of layers. But an example of more layered, we can use a leaf as an example. Just making a line and then pressing down with my
brush and pulling up. Pressing down, pulling up. So when you press down and
you're going to fan out your brush and it's gonna
make the lines thicker. And if you don't fan it out, you're gonna get thinner lines. So just a little
technique there. Then I'm just using clean
water to come in here and move around my pigment so that this whole
leaf will be green. Now, the thing with
layering is I now have to wait for this to completely
dry before I come back to it. If I start painting
on it right now, I'm going to get that loose. Look. I'll also give
you an example. Say I'm wanting to come in here with a little bit darker green. Well, if I do that, oops, it's going to start
blending all over the place. That might be the
look that you want. But if it's not
the look you want, what we need to do is we need
to wait for this to dry. So obviously I'm not gonna make you sit here and
wait for 20 minutes. Drive, speed it up for you guys. And then we can put on our
next layer and our next layer. Now we're ready for
our second layer. This has dried completely and you can test it by
lightly touching it, but be careful because
of it's really wet. You're going to pull up pigment and you do not want to do that. See, basically what I
just did there is I reactivated the paint
because water touched it, so be careful about that. Now what I'm gonna do
this is completely dry. Grab some pigment, some
green, a little darker. I'm layering so that
was too much pain. Politely top. I'm just going to make
a line kind of like a thick line right
here, going up here. And then I'm going
to get rinse off my brush and just get water. I'm going to tap
it just a little bit so it's not dripping water. And I'm just lightly
moving it around. Maybe I want to add
a little yellow. That is our second layer. As you can already see, you're getting more
depth here than this because this is very loose
and it's only one note. There's a time and a place
for the style of artwork. And also if that's what you love to do, you can do that too. But as you can see, this one is starting to
really draw your eye in because there's
different depths in different colors here. So we're going to
let this dry and we're gonna do one more layer. This is all dry
and are ready for our last and final layer. Of course, when you paint, sometimes there'll be
projects where you use a ton of layers. For a leaf, I probably use
about four or five layers, but we're just going
to use three here. I have a lot of pigment on my brush and you're
going to want to make that pigment slightly
darker than what you already have so you
get some depth. And essentially
what I'm trying to create is that the sun is
hitting the leaf up here, so it's gonna be lighter. But down here it's
going to be darker because that's how
the sun works. Rinsing off my brush and
then I have a wet brush with water and just lightly tapping this side so it kind of blends. In. There. You have it, you let it dry and
it's all done. But look how much. Look at the depth of
this compared to this. It's pretty incredible. I loved layering. It's what I use for almost
all of my paintings. Of course, I do love the loose style every once in awhile, but this is my jam.
10. Mixing Colors: In this section we are
going to talk about mixing paint colors
and also about values. Something really important to understand about
watercolor paint is the more water you add, the more light the
color is going to get. We'll get into mixing
colors in a second. But first I want to
just work with values. And when you're painting, you need to use various values. If you just use one color, if you use green and use it with the same amount of
water every time you're painting is going
to be pretty boring. It's important to use a pink that's really light
and a pink that's dark. And I'm gonna show
you how you can get different values of
color in your paint. This is a great time if
you guys want to pick up your paint brushes and
paint along with me, I have a roller right
here and I'm just going to make four little squares. If you want to just
paint your squares, you don't need this
structured about this, but if you want to, you can. I want to use it to look
really good for you guys. So I'm just going to make these little squares
that are an inch wide. So I'm going to do one inch align and then I'm going to make a half an inch of the space. And then another
line that's an inch. You just want four
little squares. This is kind of extra, but I like the way it looks. Just make your little squares go across the top. Now, you're going
to grab a color. You can grab any color you want. I am grabbing opera rose here. You're going to grab
it at a 100% opacity, or basically the truest
version of what that color is. The paint should be pretty
thick on your paintbrush. You don't want too much water, but you also like, it shouldn't look like that. That's way too much, but it should be
pretty thick on there. Once you have that, come over to your
square and you're just going to paint in that square. So this is your a 100%, basically like a 100% of value. It's the darkest, most
saturated version. I'm going to put
100% right here. Now we're going to
go down a little bit and we're going
to add water. So if you added
just 25% of water, you should be getting it to
be a little lighter here. Still pretty vibrant and
saturated, but lighter. Going to add a little bit more because that looks
like more like 50%. This is 50, 75%. I'm just going to write
50% and then 25% here, since we're gonna be
doing that anyways, now I'm gonna go back to
that same color and I'm going to add about 50% water. So half water, half paint. I should be getting it
to be even lighter. Now I'm going to add a seventy-five percent water and twenty-five percent
pigments or paint? I use pigment and paint interchangeably if you
guys haven't noticed, but they're the same thing. This one, I'm actually going to pull a highlight
a little bit. So just my very
lightest version. As you can see, the
more water we add, the different variations
we get, the hue. The hue doesn't
change, I'm sorry, the saturation changes. You could paint a flower with
just all these different, very different saturations and get a lot of depth
in your artwork. So definitely
something to practice. If you guys want to
practice with more colors, I really encourage it. It's a great way
to kind of explore with your paints
and see what kind of colors you can make and
what kind of value variations. The next thing I want to do is a small study of
just mixing paints. And I'm going to
do the same thing. I'm going to make the little
squares with my ruler. I'm going to speed it up though, because it is a little
bit time-consuming. So feel free to pause this video and make the
squares if you want, but you can also just make little swashes with
your paintbrush too. All right, now are the
R-squares are all set. We're going to do is we are
going to take two colors. You can take any, you can
use any colors you want. I'm going to be
using opera rose, which is one of my very
favorite pink colors. It's really bright and fun. And then I'm going
to be using yellow, yellow, lemon, deep. Whatever two colors you choose. You're going to make
the first one up here at 100% saturation. And then you're going to
make the second one down here at 100% saturated
illustration, and then we're going
to slowly mix them. Now. You know what, I'm sorry, I need one more square. That way. The middle is perfect.
One more square. So you should have 123467. That way the one in the middle is going to be a perfect mix. You could do this with a lot more squares if
you really wanted to take your time getting down to the perfect mix
in the middle. But for time purposes, we're going to do
it this way, right? What your color is up here. This is a great way
to study colors, just like the last lesson about the different saturations. This is a great way to see how different
colors blend together, especially if you're
working on a painting. I really recommend doing this. I just recently
painted a black dog. It was her dog was Pitbull and golden retriever
mix which doesn't eat. I don't know how it
got such black fur. But I never use black
in the whole painting. I made my own color
palette with Sienna, brown and indigo and
a little bit of red. This is a great way to explore that when you're
starting and painting. This one right here is
going to be opera rose. I'm just going to
write opera rose here. And it's gonna be at 100%. You don't have to write a
100%, but you can if you want, then this is yellow
lemon, Deep lemon. The first thing we're
gonna do is we're going to put in the opera rose. Here. We're at full saturation. I'm going to rinse off my brush, make sure it's nice and clean. Get my clean water and
grab my yellow because we don't want it to
be tinted at all. I'm going to paint
that one down here. We're going to start mixing. We're just going to
add the tiniest bit of yellow to this opera rose. Mix it up on your palette. Just make sure you're not
getting your yellow dirty. I'm just adding the
tiny tiniest bit. We're going to see maybe
a slight variation. Don't be too worried
about, I mean, try to keep the same
saturation all the way down but don't be overly
concerned about it. We just added the tiniest bit of yellow and you can already see that it is changing it. Then we just keep going. So now I'm going to add
a little more yellow. The pink. Pray a little too
much. Needed more. And you can tell if you
need more because if it doesn't look different
than what it was above, Yeah, I need more yellow, orange under this palette, so I think that's
what's happening. It's coming through. Now this is our 5050 color here. So if you can, I know it's hard
to get it perfect. 5050, but just do
the best you can. We're going to get a
much more orangey color. Now we're going to add
even more yellow to that. Really almost like
a tangerine color. I really like this palette. Now we're literally having just the tiniest
bit of pink in it. It's really close,
so that yellow, but there's still a difference. This is a little bit golden or this is more sunshine yellow. There you have it. You can people make huge
diagrams with these. You could do a giant version
of this and like I said, is a great way to explore color and see how certain
colors mixed together. I didn't want to
chat a little bit about when you're mixing colors. If you say they're really, really vibrant and you want to bring it down a little bit. I'll show you how to do that. So let's take this
crazy pink color. So it's super, super bright. But maybe I don't want it that I want it to look more
like a dusty rose. I'm going to take the opposite of that color on
the color wheel. So let's say there's pink isn't really
on the color wheel. Or if you're doing
just the main colors. So red, the opposite
of red is green. So if I just add a
touch of green to this, it's going to mute it down. See how much more muted at is. Another way that you can
do it is adding black. But personally, I
don't like to add the block because
I always feel like it kind of gets it kind of muddy and I don't
like that. I don't know. I just think that it
looks so much better when you use the opposite
of the color wheel. So I'll give you
another example. Yellow. If we're using yellow, the opposite of yellow, It's opposing color
or contrasting color, I think you would say is blue. If I just add a
little blue there. I mean, essentially you're
going to get green. You have to be careful how
much you put in there. But at neutral. Okay. That was a
terrible example. Oh, you know why? Okay. I used the wrong color. The opposing color to
yellow is actually purple. That's why I have this yellow. I'm adding just a little
tiny bit of purple. Now. I feel a lot better
because I knew this was a rule that was true. Now you can see it's more muted. If you wanted to do orange. Well, that one's kind
of already muted. Let me get it a little brighter. If you wanted to do orange, you would add just a
little bit of blue. There it goes, It's
getting muted. Use the opposing color. If you are the
contrasting color, if you want to mute it down, you can use black, but I think that meeting it down with the
contrast color really makes it still bright and doesn't take away
the actual color.
11. Time to Practice!: Now that you know all
of your supplies and tools to use and you've gone through some
different techniques. I thought it would be nice
to just paint together. And of course I will be getting some instruction along the way. If you don't want to do this, There's no pressure
to do this part. You do have the
supplies you need. You have listened
to how to paint, so you are good to
go if you want to, but if you want to stay with me, we're gonna do a couple of
small paintings just to apply the things that we
just learned to artwork. So we're going to
paint two items and avocado and a Cosmo flower. And I picked these items because they both
require layering. And that is, that is a style of painting that
I typically paint in. I am going to focus
on that here. We will not be focusing
on a loose style, but more of that
layered, realistic look. The first thing
we're gonna do is we want to sketch it
out with our pencil. I am going to draw a little darker so that you guys
are able to see it, but try to make your pencil
lines as light as possible. For an avocado. Kind of has that not
hourglass shape, but there's a big
circle down here. And you might want to just
start by drawing that circle, then little circle up here. Then we're just going to
kind of come down like this. We're doing a half
of an avocado. It's going to be open. Feel
free to pull up a photo of an avocado on your phone or your computer if you need
to see what one looks like. I would normally erase this, but I'm just sketching
it for you guys. So you can see. I put a
little teeny stem up here. Here's a tip about avocados. If you guys don't know,
always buy them when there's a little
stem or people call a hat because it makes no bacteria can
get into the avocado. My grandfather was
an avocado grower. So lots and lots of years
of learning or avocados, then you're gonna make the seed. And the seed is
pretty big in here. Again, I'm drawing dark because I want you guys
to be able to see, but please draw as
light as possible. Then just draw a little
outline so there's just this thin layer
along the edge or border. That's the skin of the
avocado like that. So that's pretty dark,
but that's okay. Then the further cosmo, you can draw a flower
however you want a Cosmo almost like a daisy, but the petals are
a little thicker. I love cosmos and
butterflies loved cosmos. Their OEMs and my garden. I'm going to start by drawing
the almost like a C-shape. This is that center area
where all the pollen is. Then I want this petal
to be cut into the side. So I'm doing another
long C-shape. And then just kind of a
ragged edge to connect it. Drawing a straight line here, a ragged edge and
feel free to pull up an image of a Cosmo
far if you want. I think they normally
have five or six leaves, but we're going to do five here. And maybe the little stem down here does not have
to be perfect. We're just using our new
skills that we learned. We have our basic drawings here. And now we're going to do
is start the first layer. The first layer is
going to be just green, almost like a really
light green wash that we're going to put
all over the avocado. I got a little bit
of water here. Don't, don't paint
over the seed. You could, but we don't
need to paint over it. So I'm just painting
all of this green, even this little stem, it's going to be more
brown, but that's okay. Your pencil line should
be nice and light. We have a really light
wash down and this is just our base and we're
going to build up on this, something that you can do. This. We just did the
wet-on-dry technique, but something that you
can do is you could grab a little bit of yellow and poke, poke in some yellow. So now we're using
wet-on-wet technique. That'll just help to give even more variation in it
when you go in and paint it. When you go in and
paint the next layer, you could even add a little more darker green
if you wanted to. There will be a shadow here. Because we're gonna say
that the light is coming from this side on both items. You could make it a
little darker too. While we wait for that to dry, we are going to paint the Cosmo. Cosmo. I'm gonna make it
almost a bright red, orangey poppy color. But the first layer that we're
going to start off with is going to be a really light wash. And we're just going to come
in and paint all of these, all of these petals. When you're painting in this style where
it's more layered, you'd really need to think about where the light is coming from in your painting and
where shadows would be. Because we're definitely
going to be utilizing shadows to give it a
more realistic look. The more you paint
with watercolor, the more you're going to
discover what style you like. Maybe you don't like more
realistic and like more abstract or you want to
do a more loose style. That is all totally fine. You can still apply
the basic principles that I taught it here today. But feel free to
find your own style. Don't feel like you have to be adhering to somebody else's
style or what they prefer. That's the cool thing about art, is that it's really open
to what you want to do. Now we have to let this dry. A couple of things
you can do here. You can grab a hairdryer and blow dry it and it
will dry faster. I'm actually going to
let this dry naturally, but of course I'm going
to edit the video so you don't have to
watch it dry naturally. You don't have to
watch paint dry. Then we're gonna
come back once it's dry and do another layer. You can also, if you're
working on a watercolor block, you can put it
outside in the sun. One thing I want to say
about the Sun though, is that it can fade your watercolor paints
because they are light fast, meaning that they can
be changed by the sun. But for this project is
not that big of a deal, so you can do that as well. We're going to wait
for this layer to dry and then we'll start
painting the second layer. Now there are first
layer has dried. We're going to come in here
with our second layer. And we're going to leave
the seat alone for now. We're just going to focus on
the flesh of the avocado. I have a green here that's been, it's called sap green, but you can mix up any green
that you think looks good. I'm going to add a
little yellow to it. Again, our light is
coming from this side, so I'm going to load up
my brush with pigment, then come over here
and just put a line. My brush, I'm using the
side of it. Then the tip. When I'm getting
closer down here, I'm going to rinse off my
brush, grabbing only water, coming back in with
that water and just touching the edge of the paint that I
just put on there, you get this soft kind of bleed. You can move it around. That's definitely
a part of learning how to paint with watercolor is moving your water around and learning how to
control the water. I'm going to leave this edge. I'm happy with it being this light because the light's
coming in from that side. So I'm actually not going to put another layer of
paint over there. Over here. I might just add a little, something that's a little
darker and just tap it in and down. Now we're going to
wait for this to dry. So as you can see, watercolor painting can be a long process because you're waiting for
your layers to dry. Which I never used to let my layers dry and just
keep painting on top of it. But I was really
frustrated because I wasn't getting the
result that I wanted. So now that I know that
things have to dry, it just, it makes
a huge difference. We're gonna come
over to this flower. We need to think about how would the saturation
of the colors be closer to the pollen area. And Cameron wrote the name
of that as right now. It's almost like a
cup that's closed so there'll be some
shadowing down here. This would probably
be darker petal. This petal is definitely hitting the light
and so is this one. So there'll be a little
lighter and on the top of this one is probably
hitting the light as well. So going back to that pinkish
red color, I'm going to Let's paint in here. I have a lot of
water on my brush, so I just tapped
on my paper towel to get rid of some of that. When you feel like
you're not able to control the paint on your brush, it's most likely due to
there being too much water. So just tap your brush off and then I'm just grabbing
water and moving it around. We're working on two
small things right now. But if you're working on, for example, I do
house paintings a lot. And when things have
to dry between layers, it's not that big of
a deal because say, I did this side of the house. Well, now I can work on
this side of the household. That side dries. So don't feel like you're going to be having to stop and wait 20 minutes on every
single piece when you're doing something that's larger and it has a lot more going on. You're working on something else while something else dries. I am going to pull
a highlight here, so I'm going to
rinse off my brush. I'm going to dry off my brush. Doesn't have to be
completely dry, just the excess water. And then I just press
my brush down and lift. I'm able to pull up some of that pigment so that it
looks a little brighter. Now with this technique, since I just painted this petal, I can now paint this
petal or what's going to happen is the paint is
going to bleed into there. And then I'm going to
lose that nice line that divides the two petals. So again, I have to wait until those are dry and then I can come
back and paint it. But during that time
we can paint the stem because the stems aren't
touching anything that's wet. Again, I'm just putting some
pigment on my brush and just painting with the tip of my brush because it's
a little smaller. For the avocado, I'm gonna grab a little bit of brown
and do the stem here. I'm okay if it
bleeds a little bit in here because an avocado actually naturally has
that little area there. Now this is still pretty wet, so I am not able to
paint the avocado Sega, otherwise it's all going
to blink together. So again, we're going to
wait for our layers to dry. Now that these layers are dry, we can go in and do
some more layers. Now we're going to
paint the avocado seed. I'm going to grab a
little bit of brown. I also want to mention that today we're only doing
a couple of layers, but a lot of my artwork
that is more detailed has maybe 1520,
sometimes 25 layers. I'll explain it a
little bit more. But first I wanted
to just tell you, so grab brown paint and
just you're putting just that color all
over the seat at this point because we need
to put several layers on. But like I was saying,
some of my paintings have almost 25 layers or more. Those are paintings
like pet portraits. I want to make sure to get
a lot of depth into those. I am doing a lot of layers. So as you can imagine,
it's time-consuming. But I love it because I
love watercolor painting. I'm going to grab a slightly
darker brown and just tap it in on the side here. Because again, we have
that shadow coming in. And since this seed is round, There's definitely probably an extra light source
hitting the top of it. Another thing that
we can do here, so we're not really going to add anything else to the flash, but around the edge we want
to put the skin of avocado. And the Skinner avocados
is usually quite darker. So grab a green months That's a lot darker
than what you have. And for this, we don't
have to worry about layering because
we are just going to be basically making a
little border around the edge. Depending on your style. If you wanted to, you could grab water and kind of bleed
it in if you want to. It's kind of a cool look. Just going along the edge. Now. This vitamin and makes
slightly thinner. Just because of my mind, I imagine that
there's a little bit more of the skin on this side. Just you could even skip some little parts in there to make sure that this
side is nice and dark. And it is bleeding a little bit because I have that wet paint, but I'm okay with that because
I think it looks good. I'm just going to
put a tiny shadow on this stem just to give it
a little more interest. Make it look a little bit
more interesting to look at. I'm just putting a
line on the left side. And then maybe
there's a couple of little lines like that. All right, moving on to our
beautiful little cosmo here. I'm going to paint the
middle with some yellow. Just have some
yellow on my brush and painting it in there. Nope, Nothing fancy. Are going to have to work on
some of these other petals. This one, I'm going to grab. Another thing is you don't
want to do the exact, remember when we learned
about values and saturation, you don't want to do the
exact same saturation on all of the petals or
it's gonna be boring. I grabbed a little
more red in this one. I'm just tapping in that paint along the edge and then I'm going to
wash off my brush. Just move it around. This might be a little
too different than that, so I'm going to add in a little yellow because it looks just
a little too deep breath. Pull that color up a little bit. I'm gonna do the same
thing over here. So that same dark red, darker red, it's not
really dark, dark red. Touch the yellow. Some water and just
move it around. I can't really do anything
else right now because everything is going
to touch that lives. I wanted that to bleed
and if I was okay with having not believe
that I could paint. But these are this one's white and this one is
white and they're touching. So that would be
another problem. Let's work on this stem, just grabbing a green that's slightly darker than
what you have there. Just making an outline. Then coming in with only
water and moving it around. I can see that this is
drawing a little bit harsh, this line right here. That maybe for a
couple of reasons. One, I might have put
too much water down. Another thing is
that I've taped down this paper and it's not
on a watercolor block, so there's nothing underneath
to soak up the water. There's only the sheet
available for that and that might be why this
is happening as well. So again, just use a
little too much water. So what I'm gonna do is I'm going to grab water
on my brush but then slightly tap it off
because I don't want too much and just see if I'm
able to blend this in. So I'm using a scrubbing motion like brushing your teeth kind of circular and it looks like I am able to lightly
move that line, this one as well. But something to mention, if it's almost dry and
you start to do that, it might not be possible
to take it off, or it might do something
really funky to your paper. So make sure that that line is still wet before
you try to do that. Or you can just try it and
learn that's another thing, but I don't want you to ruin a painting that you've
been working on forever. We're going to wait
for this layer to dry. And then we'll paint, or it's player painting our
next layer on the seed. We're done with the green. Going to grab, we're actually going to get my size four brush. Then grab a darker brown, maybe a brown with a
little black in it. You could even add a little blue should darken it as well. Then just come in here. And I'm making that thick line, but the paint is nice and wet so that I'm able
to move it around. Rinsing off my brush, getting only water on it. I'm going to tap off
some of the excess, then come in here
and just move it around until it goes in a direction that I
think it looks good. I actually really like it like this because I feel
like there would be this top area that would have a lot
of light coming in, going to add a little
shadow over here. Just because a seed comes
up and out of the avocado. So there would be this
kind of shadow down here. The more you paint. Promise you, you'll
start noticing shadows in nature in real life, which is really cool
because then it means you're really applying
what you've learned. But now I see things like that so much and it's
really interesting. The avocado is essentially done with how our painting today. As you can see, it's a
lot more interesting than the way we first started
when it was really flat. There's a lot of depth. There's also shadows. And I think it
looks really good. I hope you guys
enjoyed Dr. drying pillar painting, the avocado. But now we're going
to move on to our flower and finish it up. I'm going to grab that color and come in here to the bottom, is actually a little too
much water on my brush. But we're going to work with it. I just draw this, this is gonna be the
darkest shadowed area, the cup of that petal. And then I'm just going
to add in the water. And again, who you guys
are gonna drive you nuts. We can't paint these two petals
because I just put water right here and the paint
is wet, it will bleed. We have to wait again and
we really can't paint anything else because of
the layers needing to dry. We're gonna let them
dry and come back. It's nice and dry. And now I'm going to
grab a green that's slightly darker and just put in one last little
shadow here under the petal. Just like a little like to say to you guys from going crazy because I'm sure you don't want to go through another
round of this being dried. We are just going to
finish this up here. Let's add these petals
need needle pink. Another little shadow here, because they would be
shadowed with the center. Then just grabbing
a brush without paint on it and
moving it around. We might want to grab
that same color. Just think, well, this would probably make sure you
don't have too much paint, would have a slight shadow. With this. There's also veins
in the flower. We can do just a
couple of those. Actually don't like this. I'm just going to blend them in. If it's still wet,
you can just grab water and blend it right in. That's an amazing part
about watercolor. I love it. Maybe make this a little darker. Shadow there. More shadow here. That's about as far as we're
going to go with that today, just so I can save you guys
from all of the waiting. I'm going to put some
little dots in here just to make it more interesting
because it's not very, there's a lot going on in there. We didn't do a lot of layerings, so just some light
little brown dots. If you feel like
they're too harsh, just grab some water and
that was way too much water. I'm gonna pick some up. You can just mix it around
with some water a little bit. Alright, so those are two examples of working
in layered painting. I hope you guys enjoyed
painting those ugly.
12. Bonus Section: Digitizing Your Watercolor Artwork: Alright, I'm gonna
show you how to digitize your
watercolor artwork. Being able to digitize
your artwork is key to bringing your
designs to life. Whether you are creating wedding invitations or you
want to make art prints, or you want to make a
pattern, pattern design. There's lots of options and it's really cool to be able
to digitize your artwork. So I'm going to show
you how to do that. Again, this is a bonus. So if you don't
want to learn this, you totally don't have to
do this part of the lesson, but it's a great way to be able to bring your artwork
to life in other mediums. The first thing we're
gonna do is we're going to scan in our artwork. And I use an Epson
Perfection V600E. It's a fantastic
scanner, I love it. I put a link in the notes if you guys want to purchase it. You can also take a
picture with your phone. That's another option. If you have a good phone, most smartphones take
fantastic pictures now. But I love using a scanner. It's what I always
use for my artwork. So a couple of things to
note when you're scanning. I'm not going to bring up my little scanner software just because you might be
using a different scanner. But I am going to tell
you about a couple of key things to remember
when you are scanning. The first thing is you want to be scanning and
exporting as a tiff. They are compatible. A tiff is compatible across all editing softwares and these files can be
saved uncompressed, which helps retain a lot of
the details with a JPEG, which I use to scan as a JPEG, but I found that to
be a lot better. Every time you save a JPEG, it loses some of its quality because JPEGs are compressed and the tests are
not compressed, I highly recommend
scanning it as a TIF. The second thing is your DPI
is super, super important. If you, you cannot do less than 300 DPI if you
want it to be high-quality. I usually do about 300 or 600 if you are making something that's going
to be blown up, I mean, you're not gonna be able
to do like a billboard, but say it's going to be
a pattern for bed sheets or you're gonna be making it a little bit
larger than you painted it. You might want to
go up even to 1200. At the minimum, you're doing at least 300 DPI
means dots per inch. It's just how many dots
there are per inch. You're going to
get higher-quality the higher DPI you have. But 300 is our minimum. And then if you have this
option on your scanner, I actually couldn't
find it on mine, but I know some some scanners do never have color
restoration on that's going to mess up your
colors and you want to keep your colors really true
to how you painted them. So those are the key things when we're scanning
in our artwork. And now we're going to bring
our artwork into Photoshop. I am only going to
show you you can digitize your artwork on
other software programs, but I'm only going to be
showing you Photoshop today. I loved the Adobe
Creative Suite. I use it for my business. I've linked it in the notes if you guys
want to purchase it. It's fantastic. I think it is one of the best software
programs that you can have when you're
doing this type of thing. So that's what we're gonna
be working in today. Sorry if you have
something else, but you will need
Photoshop for this lesson. Now that I'm in Photoshop, I'm going to go up
to File and Open and I've pre-screened in my work
so you guys can see it. So I'm going to grab, I have two pieces. The first is this
old fashion and then the second one are come quartz. And the reason I am choosing knees is because the contrast between the white paper and
the composite is really high. When you have high contrast, it's a little easier to scan in, sorry to remove
the background of your artwork and digitize it. But when the contrast
is not so strong, so this is pretty light here. It's gonna be a little
more challenging. So I wanted to show
you both of those. We're going to start
with a squats. I'm just zooming in here. What I like to do is I don't
need this other stuff, I just need the conquest. So I'm gonna come up
here on the left and I'm going to grab my lasso tool, just your regular lasso. And when you use Lasso, you click hold down your mouse. I'm on a Mac too, so things might look a little different if you're on a PC, I'm holding down
my mouse and I'm just drawing around this. So don't unclick
because if you unclick, it's going to snap
command Z to undo that. And basically what I'm doing
is I'm just cutting this out from the paper because I
don't need the other stuff. Going around. And then I'm going to
right-click and layer via cut. So essentially this is cutting this artwork out
from this paper. If I unclick it, you can see I'm going to delete this bottom layer
because I don't need it. I'm going to name this
layer, come squats, whoops. I'm going to
duplicate this layer. And the reason I duplicate it, I'm going to say original on this one is for
some reason if we mess up this when
we're digitizing it and we don't have any way of going back to the original. We don't have to worry because
we have the original here. You don't need to
see the original, so just unclick the icon. And we are going to
specifically work on this one, but we have the original just in case something goes wrong, which I don't think
something's gonna go wrong, but I always like
to have it just in case I'm going to
straighten this out a little bit because
it would be like that. Now we want to get rid of this paper background because
if we were digitizing it, say we're putting out
on a wedding invitation or a t-shirt. We don't want this
yucky paper around it because if we had this and
it was on a white shirt, it would look so bad. We're gonna go over
to the left-hand side and I'm gonna grab
my magic eraser. And the magic eraser
is very magical. I love it. You're gonna go up here
to your tolerance. I like to have my
tolerance pretty high because the
contrast is so high. I don't have to worry
about this really. The higher the tolerance, the cleaner lines
that you're gonna get when you erase
the paper background. But if the contrast
isn't really high, you're going to have issues. So for this specific
instance, we're fine. A high tolerance of 75. And all I'm going to do, it makes sure your
layer is selected. This is something that mess
me up when I first started, is I wasn't on the right layer. So make sure you're
on the correct layer. And then you're
just going to click that white paper and
it's like magic, it just gets rid of it. So easy. How I like to check to
make sure it got rid of all the little pieces is I come over here and I
make a new layer. I put that layer underneath
my artwork layer. Then I grab my paint bucket. I make sure that I'm
on a black paint. And I click and I can see
that there's no paper left. Something I want to
mention is water. The nature of watercolor artwork is that you're going to have some kind of jagged edges
because the paper is textured. So if these jagged
edges bother you, what you can do
to clean it up is just scrub your
regular eraser tool. You can make it
smaller or bigger. Just hold down your brackets. Again, I'm on a Mac,
so this thing would be different if you're on a PC. I'm just coming here
and smooth it out. If it bothers you. To be honest, this would not bother me for us for artwork. I would probably leave it as is, I would clean this
up because this was a mistake that I made
when I was painting. But if it does bother you, you can come in and smooth all of this with your eraser tool. And with your eraser tool, if you come up here, click this down arrow. There's lots of
different brushes. So you could do a soft brush. It's going to give
it a softer edge. The hard brush, which is
what we were just using, is going to make it a
lot harder and cleaner. But since it's
watercolor artwork, I recommend using the soft brush because you still
want your artwork to look soft unless you
have a different style. And that's cool too. Okay, so that was super easy. That was because we had
a very high contrast between the watercolor
artwork and the paper. Now we're going to go
to something that's a little more complicated. Just so you know, when
you want to export this, just make sure you turn
off this black layer because you don't want to
export that layer as well. And then just export, export as. And I like to export as a PNG
because the background is transparent and then just export and save it
wherever you want it. Keep in mind watercolor
artwork files are large, especially when you
are scanning them in at 300 or 600 DPI. They they need to be large. You want them to
be high-quality, but just know that
they'll take up some room on your computer. Mine is so stuffed. I'm over here and
do the same thing. But this one's gonna be a
little more challenging because the contrast is not as high. We're going to grab
our Lasso tool. I'm sorry, let's label our
layer first old-fashioned. If you label your layers, you will be a lot better off. I learned that
lesson way too late, so just name them. Stay organized. We have our Lasso tool and we are
just going around here. Oops. Going around, cutting this out. Remember when you're
using your loss of total, you're just holding down. The click on your
mouse that entire time until you come back
to where you started. Then you get the marching ants. You're gonna right-click
and layer via cut because I don't want
this paper on the back. I'm going to delete this. Oops. That was the wrong layer of it. Delete that I accidentally
did a new layer. Now I'm going to name
this old fashioned, and I'm going to
duplicate this layer just in case anything happens. We don't want anything
to happen to the original in case we
need to reference it. Put that underneath, turn it off and we're on our
old-fashioned layer. As you can see, there is going to be some, it's pretty like
almost white here. So if we went and did the
same method as we used for the conquest watts 75 tolerance with the magic
eraser watch what happens? It's taken away a lot of our artwork and we don't
want that command Z, we're going to undo that. I'm going to straighten
this out a little bit because it's
driving me nuts. A couple of things
we can do here. One, we can play
with the tolerance. So the lower we go, the more it's going to not get rid of
the lighter section. So let's go down to 15. If I go down to 15
tolerance, it's pretty good. I mean, it doesn't
It's kept most of it, but it did get rid of
this section right here. So I'm going to undo. I could go down to
five tolerance. But when I go down to five, it's having a hard time deciding what is the artwork
and what is the paper, because they're
similar in colors. And what a magic
eraser does is it just recognizes pixels that are different and it
gets rid of those. So it's recognizing
all the pixels that are this color
and getting rid of it. But then at the same time, it might also get rid
of some of the artwork. You can do it this way. And it looks like it's
doing a pretty good job. But I have a feeling that it probably when we put
in that black layer, it probably didn't get rid of
everything that we needed. So let's add in
that black layer. It's kind of our tests to see, we're going to paint it. This is a hot mess. You don't want to do this. If you took this and printed it, it would look kind of
funky on your printed item and we want artwork that's
really nice and clean. A few options here. You can come in
with that eraser. You can just go in
and erase it by hand. Sometimes I do this method. I am actually going to do the hard round eraser because I want it to
be a little tighter. So you can do this method, come in and clean
up all of this. That's one method. The other thing you could do, I'm gonna go all the way
back to the original. Is use your Magnetic Lasso Tool. Taken a bit, sorry. My Magnetic Lasso Tool. Basically I'm gonna zoom in. What it's gonna do is it's
going to hug the pixels. So it's kind of funky. When you start using this,
you're going to click. I'm not holding down the click like the
original lasso tool. I just clicked once. And as you can see, I'm just dragging my
mouse over this section. And it's basically just
following along this line, which is great if it can see it. But for example, right here, it can't tell that
it needs to stay up because this is kind of
like a little highlight. What I would do is click and I'm basically making anchor
points to keep it going over this
section until it can find the colors again
and make its own line. Now, say I went too far and
I want to get rid of these. Just hit Delete. And you'll delete the
little anchor points until you get back to
where you want it to be. Then what I what I am going to do is I
want to get rid of this. So I'm just following
background. I have to go just like
the other lasso tool, all the way back to
where I started, click, you're going to get
the marching ants hit. You can see that the little magnetic
tool it has that minus. You want that minus to be on, it should just
automatically be on. Then hit Delete. This is a good way if you wanted to go all the way
around with this, you can delete these
sections and that usually leaves it pretty clean. If you want to stop
the marching ants, you select Command D
and I'll get rid of it. If I put on that
black layer again, you can see that
it's pretty smooth. But for the way I like to
work, I would come in here. Oops. Make sure you're on your layer where you're correct,
old-fashioned layer. I would come in here
and just delete this with an eraser tool
and smooth it over. That's what you do.
And then I just go around and do that
for this whole thing. So those are a couple of methods for digitizing
your artwork. Keep in mind that
it's going to be more challenging to digitize something that has
less contrast as compared to something
that's higher contrast.
13. Final Words and Class Project: Congratulations, you've
finished this course. You should be very
proud of yourself, and I hope that you found a new love for
watercolor painting. I do want to say that
it's so important to just be okay with where
you're at right now. I'm a total perfectionist. And so whenever I try something and I'm
not perfect audit, I get really frustrated. And maybe that's you. If it's not you, that's
really good that you can just let yourself
ease into things. But if you are a perfectionist, know that the more you practice, the better you'll get. This is a painting I did
about four years ago of these two core keys that are
used to fall on Instagram. And this is the painting
that I did last year. Hugely different. And during that time I taught myself watercolor,
but I learned different, different techniques that
helped me to be able to get the layers that I wanted to
produce the artwork I wanted. So be patient with
practice comes skill. And before you know it, you'll be painting
exactly how you want. For our class project. It's really simple. Just paint whatever you want, anything you want at all. Please post it in the class projects because I love to see what
you guys create. Also, you can tag
me on Instagram. I love to see what you guys create and
I just want to say, thank you so much for
watching this course. And if you liked this
course and it helped you, I would love it if
you could share it with your friends
and families so that they can take
the course as well. I hope that you have the most amazing day and
thanks again for watching.
 Nikki Hess, Artist & Corgi Mama