Transcripts
1. Introduction: Have you ever wanted to achieve that dynamic, fun, expressive, and effortless looking urban
sketch technique? You see? If so this might be
the class for you. I'm an ink and
watercolor artist, and I specialize
in bringing fun, quirky techniques into
my urban sketches. Experimenting with
different techniques with my pens and my watercolors
to make my sketches alive, fun, full of life and vigor. I want my seems to be accurate or recognizable for
where they are. But also I want to be creative
and bring my character, the feeling of the day, the feeling of the
place onto the page. Not just slavishly copying out details which
sit in front of me. I use a variety of
methods to achieve this. And in this in-depth class, I wanted to give you the
benefit of my experimentation, showing you guiding
you through a series of classes to build confidence and give you a bag of tricks to use next time you're out
and about sketching. I'm going to start off with
a fairly in-depth overview of the different pens I use, why I use them and what
their strengths are. And we'll move on to looking at my watercolor palette and examining the different
colors I use. And again, why I use them. Next, we'll go
through a series of different fun techniques,
things to use. Pens, different kind of inks, different watercolor
techniques like how to achieve granulations
and cauliflower ears. And then finally,
we'll move on to some demonstrations
for our final project. I'm going to take you through three separate
demonstrations from start to finish
step-by-step, using different fun techniques, which I use every day to
bring life to my sketches. Thank you very much
for joining in. I'll look forward to having you long for the rest of
the journey as well.
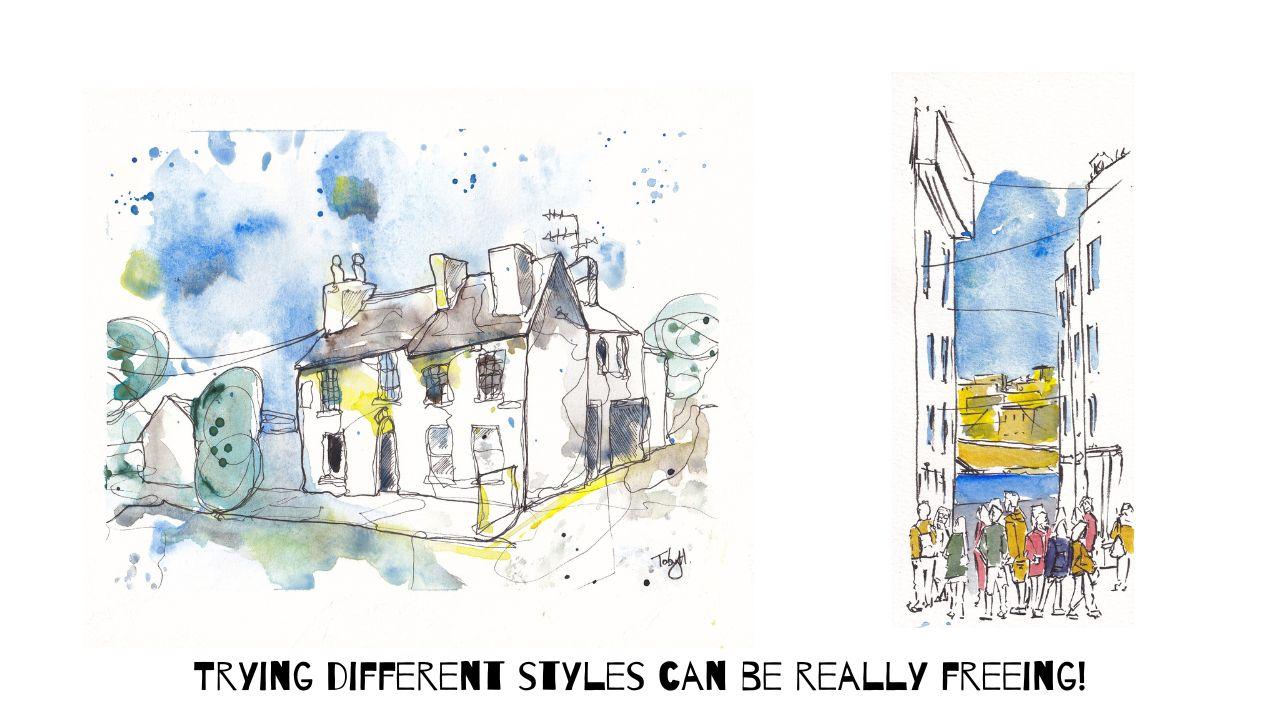
2. The Class Project: So what I'm gonna do is three
separate demonstrations. The reference photos are all in the class files and you
can download those. And I'm just going to be using different experimental
techniques. Be that little bit
of time pressure, using funny colors or
using some household, household ingredients,
believe it or not, to produce some fun textures. I'd love you to try
something different for you. Perhaps normally you love being really exact and
precise with your colors, keeping them all
within neat lines. Maybe this time you could
splashy colors around and use a bit of extra water or let the colors
roll into each other. On the other hand,
perhaps normally use like sketching with neat lines, making everything exact and really representative of
what's in front of you. Perhaps this time you
could experiment with a continuous line sketch
or with over sketching a little bit doing gestural
lines and bringing a bit of quirkiness to
that line, drawing. Whatever you decide to
do, I'd love to see it. Feel free to use the
references I provide or sketch something close to
you, close to your heart. Or even do something like a still life theme
tucked in front of you. Anything you do,
I'd love to see. And if you're
willing to share it, I love to have the
opportunity to comment and give some feedback.
Thank you very much.
3. Pens and Ink: I wanted to give you now an
overview about pens and ink. And we've got lots of
different pens here. A few fine liners, a few fountain pens, and a couple of
chisel or feud pen. And I do use unbelievably, I do use all of these things. And I like experimenting
with them, like having fun, seeing what different effects
we can get. Within this. We've also got some
different inks, so we've got a lot of
permanent black ink, but we've also got some
permanent fountain pen ink, some water soluble
fountain pen ink. And we've also got that in a couple of different
colors to try. I want to show you in this lesson all the different
effects we can get from these different pens
and give you ideas for your line work which you might want to start
experimenting with. So let's just clear this all
the way and get started. So let's start by having, think about the most
common kind of pen, which is typically a fine liner. I think. One of the most
common brands is uni PIN. And there isn't a common is because the reasonably priced, they're very good
quality and they come in all sorts of sizes. I've got here a very
thin naught point, naught three millimeter
up to 0.4 millimeter. And obviously, these produce very different thicknesses
of lines. I'm, I'm 11. Thing to be aware of is that these thicknesses
of lines can be actually quite different
between different brands. So that's the first
reason you might want to understand the brand you're
using to just understand how, how these different pens
and won't interrupt. Just because a pigment pen my there's a fine line
has a alleged width. Important to recognize
that we can still be flexible and have a bit
of freedom within that. So if we take our point for pen, you can see I drew a line here. But what if I press harder? Suddenly we've got a much
bolder, much thicker line. If I go thinner, we've got a thin line
which is almost, I can make it thinner. The myths 0.3 middle line. So I guess what I'm
trying to say is, the first thing to
think about with your patents spot
from Brandon sizes. How many do you really
need? Pretty obvious. I didn't really need to always carry around all
these different pens. Another word on European
pens is that pretty well, sort of hardwiring, let's
say you can abuse them, you can use them on
watercolor paper, which is quite rough. And you'll still get a
good use out of them. So they're a little bit
expensive to start with. They are they're not overpriced. I wouldn't say they do last. I just wanted to
quickly show you another couple of
brands as well. So I got rupturing, which are another good brand, bit less common, little
bit harder to find. Now these I find a bit thicker and they're
almost a little grayer. You can see, so this
is 0.3 and 0.1. So you can see if I
put the 0.3 next to my original point for this was
supposed to be nought 0.4, this was supposed
to be nought 0.3. You can see that
pretty much the same. You'll find rupturing pens very similar to the independent, but perhaps a little
grayer in tone and a little bit thicker than
what you might expect. On the other hand,
Winsor and Newton, which is probably my favorite. So this is another
0.3 millimeter pen. I find these to be a
little bit thinner. You can see if this
is a 0.30, 0.4, 0.3, 0.3 is obviously a
lot thinner, isn't it? But again, we can press hard, we can press lightly. We can produce a huge
range of effects. So we don't need
to be beholden to a single brand just for
that. There's other brands. I've got another one. I won't bore you
with all of these, but this is stateless. We got similar with very thick. But the reason I've
got these out is because you can also get
these really thick pen. So this is a point, this is
actually a one to 1 mm pen. This is nought 0.8
millimeter pen. And the difference then
does become dramatic. If you look at that
thickness of that line. Now we're talking really bold. So let's do a little
sketch just using these and see how we might
use different widths, different thicknesses
of lines and pen. So if I use my point for Western folk standard
point for unit one, which fits in this 0.3,
0.4 millimeter selection. Let's just draw a little house. And I like doing these
wobbly wiggly lines. Just something quick
from the imagination. And maybe we draw
a little tree and we can get a couple of windows, a little door, another window. I've drawn that
all quite quickly, but you can see by varying the speed, by
varying the pressure. I've got within this
a lot of variation in the line quality and
the line thickness. And it's a useful thing
to just practice doing, to experiment with
not just producing a single uniform line like this, which I could have done,
could have just done really controlled single line. I could have done. They're
all looking the same. But then it's very flat. So I would argue the shapes
are the same pretty much. But this is a lot more flat, a lot, lot less interesting. Then when you've done this,
you don't have to be stuck with just this one
initial drawing. You could, let's say we
wanted some details. Let's get our really thin pen. We can start drawing in the little window details
with these little scratchy, tiny lines which are much not impossible to achieve
with a thick pen, but much easier
even at people in front perhaps and
more distant houses and things which are
sort of fading in the background when we're
using these thin pens. Maybe that'll lamppost
is you get the idea. We can build up a
lot of detail and texture by changing the
thickness of our lines. Be that by changing
the thickness while pen or just by using
our pen differently. Similarly, when you use
a really thick line, it tends to bring
things forward. What goes at the end of
a painting or a sketch, you might think, you know what? I want to make this a bit
bolder but more illustrative. Coming with our 0.8
millimeter pen, we can pop in a hard outline. And you may or may not
like the look of this. Sometimes it looks great. Sometimes it's a
bit heavy handed. But it produces a really
interesting effect again. So there's lots of
ways just using simple fine liners
which you can get in big sets that you can
start experimenting with, how you're using them and how you're producing
quality of line.
4. Fountain Pens - Which pen? Which ink?: Let's move over to
our fountain pens. I'm going to start with
the ones which I've got some black ink and this one, and it is this one. So these are my two favorite
brands of fountain pen. One is platinum preppy. And you can see on this
I've got an ink cartridge. It says carbon ink on it. And what the ink is, It's actually called
Platinum Carbon Inc. So platinum carved ink
is water resistant. So all these fine liners
are water resistant. So if we pop to brush over them, which we will do shortly, you'll see that they
won't move at all. And that's exactly what
this Platinum Carbon Inc. Does for you. Now,
platinum preppy is there sort of
budget fountain pen? And this one's got a fine nib. And if we just use that, we can compare to us sort
of line quality here. And it's very similar
to a fine nib is very similar to
this kind of 0.3, 0.4 millimeter range
of fine liners. Now the advantage, fountain
pen is a lot more flexible. Nib literally bends. So we can push really hard
and will get very bold lines. We can flip it over, we can use the back and
we get very thin lines. And actually you can see, look, that's pretty much
the same as R. This is R naught
point, naught three. This is pretty much the same. So suddenly with one pen, we've got this huge, huge range and flexibility. And because of that,
you can produce really interesting
qualities of lines. If we do another little house, let's say perhaps this one's
a little block of flats. But because it's so flexible, suddenly you can
bring it to life with all this variation. We can with the same pen flip over and start adding in
these little details. Maybe they'll break
lines can come in. But then we can also add a really bold touches
straight away. Maybe there's a little
banner under here, e.g. and we want to get lots
of shade and we can just use all one pen,
nice and flexibly. There's a couple of more
windows and you get the idea. So suddenly you've
got this sort of storefront block of houses,
popular, refund it. And all of that just
with a one pen. That's the sort of the
power of the fountain pen. Now, what are the brand? Do I like? My other brand that I have a couple of
pens in is at Lemmy. The classic one to use is the Lamy Safari.
Really lovely pan. Both of these allow me safaris, easy to hold their bit more chunky than the platinum preppy. And I've got to say the
ink flow is much nicer. This is actually
a medium nib and you'll immediately
see difference. So this is way
thicker, isn't it? It's way down here. This is probably a
better 0.6 or something, maybe even a point 0.7
thicknesses of pen. You can still get
some nice variation, but it is really
hard if you look really hard to get aligned
quite as fine as this line, you are going to be doing what bolder things with
this kind of medium nib. And it does mean you can get really lovely pooling of things. It's really easy
just to make some absolute locked in dark areas. So there are some swings and roundabouts to the thick pens. I probably prefer the thin nibs. Little bit more flexible and
a little bit less intense. Now the next two, fun depends. I've got, I've got colored ink and this is another platinum preppy and this
has got absolute brown. It's called by Waterman. And this is alarmist, fiery, and it's actually got a Lamy
Safari purple ink in it. And both of these inks, along with This black
ink or water-soluble. And so I wanted to show you quickly the advantage
of water-soluble. Then what we'll do, we'll do a little comparison
with all four of these pens. Just doing a quick sketch. And then we'll pop, pop some water on
it and see what happens when we use this kind of water-soluble ink to produce a lovely effect and
lovely bit of tone. So I'm just gonna
be really simple. House. And then maybe next to it we can have sort of
pink house, purple house. I'll make them all look
slightly different. And I can talk to
you again about just how I use these differently too. Very ink flow and
quality and when, when I might washing
down and I might add lots of bold
areas that I've got little residues or reservoirs of ink that I can actually
wash with water. The black ink itself, this, this dark one, this is just normal
fountain pen ink, so just, it's the bog standard Lemmy
cartridge that I've got in. But again, you can use it as sketching and produce
some lovely effects, lovely tones from it. Then the last one
we're going to do is this lovely brown ink. You see how it's got this
sort of nutty brown. It's quiet. It's sepia. Look, isn't it? It's
quite dark there. But this one is really, in fact, both of these inks
are really amazing. The, the purple and the brown. Really amazing when you
come to add some water. So what I'm gonna do now, my little brush is show you what happens when we
activate this ink. This is our water-soluble
waterproofing spray. C, doesn't do anything. Let's go to the black ink next. You can see how immediately if I just
drop the brush a bit, even with a tiny bit of water, immediately activates it
becomes an interesting Tony. You can then bring it down, create shadows, can
pop it up on the roof, and create little
textures as well in a really lovely technique to
use just with normal link. If we go to the purple ink, you see how this becomes
this bright pink. So the ink when you add water tends to have
quite a different tone. And again, we can activate,
it makes shadows. We can, even if we add
a little bit of water, we can pick up a bit of ink, start doing some
splashes around. Loser effects you can do. Then this brown ink
is my favorite. Because when you activate it, it takes on this really
warm, slightly red issue. And if you use this, which we will in
some later lessons, if we use this on top of
some sort of watercolors, you can get both
for deep richness and a lovely warm
ink sketch on top. Now the last thing
which I wanted to talk to you about was just very, very quickly these
different shapes or pen. So this is a pigment
liner by Staedtler. It's a chisel. Can see the
shape of it sort of angled. And you can get a lot of
variety with this from very thin to angling it
to be very fit. I have used this a
bit. I must say. It's not the thing I'm
most comfortable with. But there are people who produce incredible drawings
with this kind of pen. Then the next one is a feud pen. So this is again, it's just
got some permanent ink in it. A black ink. And you see the nib is bent. Nib is traditionally
used for calligraphy. But again, it can produce
the same effects from incredibly thick
down to very thin. I think it just takes
a lot of control and a better practice to
be able to use these pens. Which isn't something
that I have nailed down. Anyway. That's an overview
of all of my pens, all of my different inks. Hope that's been interesting,
a little bit helpful. And let's get on and see how we can use this. Practically.
5. Watercolour Palette - Which Colours and Why?: So this lesson is about
experimental watercolors. And I want to show
you three techniques. And then I'll do a little
bit of a bonus at the end. I'll just show you a few other
ways of playing as well. But I'd suggest
just starting with these three techniques for experimenting with
your watercolors. So we're going to
start off with a, some alkyl technique, one
which is a pigment in water. And what do I mean by
that is if we just take little square of our
page and make it wet, and I'm just using a size
ten travel brush here, just around travel brush. And what I've got
square of my page now, which you can just about
see on with cut on the camera, which is what? We can play with a different
amount of water there, how wet it is, how dry
have soaked paper is. But there's a puddle of water. And all we're gonna
do is picker, pick a color and
I'm going to choose my phthalo blue because I know that's a really
bright vivid color. And we touch it in. And you see how
that expands out. And that's what people
often call a cauliflower. So all that happens if you
put something concentrated, concentrated pigment
in the middle of something that's
concentrated, it will expand out,
produces lovely shape. And you can control
it to some extent. But to some extent it's
gonna do its own thing. If we put it in a coordinate,
we'll just expand one way. If we sort of
splatter it around, we get lots of these
star patterns as well. So this is technique number one. Encourage you just have a
little play around with that. Try different colors, see
what different colors do. I mentioned them.
Secondary. We talked a little bit about granulation. And this is a great way of demonstrating bit of
granulation as well. So if I take one of my
heavily granulating colors, in this case, I'll
take my lunate. And I do just the same thing. And I drop even more. And you can see as this
one separates out, it forms lots of
particles everywhere. So it becomes very bitty. That's what granulation as it's the granules of pigment
within the watercolor, literally just settling down. And instead of staying
suspended in the water and forming a clear sheet of color, they sit down and
all the crevices of the paper and they form
a speckled pattern. If we keep dropping heavier
and heavier pigment and we can end up creating these funds would have
circled of color. And we can split it around, but not as well. That there. That is what we're going
to call technique one. Pigment in water with a technique one showing us
the power of granulation. Going on over this side. What is technique to?
Well, you can probably guess it is of course,
water and pigment. So if we take the same color, make quite dense wash
of this fallow blue. This one is very easy
to see on the camera. A nice big square of blue and it's quite
watery, quite wet. And I said if you've dropped
something concentrated, concentrated pigment into
water, it spreads out. But the reverse is also true. So if we take our brush and
we spec down some water, we just get it nice and
wet in that middle. You'll see that it spreads
out in a different way. We start getting this this space where the water is
pushing the pigment out. The way that the paper is
lying might affect that. How much water you
have might affect it. You can splatter and you get the same thing going on stars, but this time they're
white stars pushing out, making these cauliflower
light patterns. We can do the same again if
we just choose another color. Let's do it. This time at
a slightly wetter wash. Still lots of pigment but a
bit more water this time. We do the same thing. You can
see immediately it works, works with all the
different colors. Anything you care to have
will cause this same effect. You can be a bit more
controlled about it as well. So if I draw with my brush, I could purposely
wash out. A patch. Might take a couple of goes just to wash out a patch of light. Then I can add some
water in there. And then that will
create a cauliflower. And I hope you can see that edge as it moves
and moves and moves. And that edge is
just pushing away. If we want to stop it, we can come back in
with a dry brush. We can just lift up some of
that extra water and we're left with that natural
branching pattern. But it won't expand
too much further. We've got technique
one technique to what is Technique three? Well, it is a course,
pigment and pigment. So if we take our
same colors again, so this time I'm going to put
my fallow blue square here, a relatively smooth
wash of that. Then if we take
something contrasting, why not just use this, this same color again and drop it in? And
look what happens. We get exactly the
same effect as this. But this time it's a one color
pushing another color out. And again, the amount of
pigment you use affects the size and how
quickly it moves on. I could even put some
blue in the middle of these red squares. You starting to build up these really
fascinating textures. It's worth having a
little play around. Let's, let's do another
little red square here. And we'll use another
granulating color this time. Let's try the lunar black and see what happens
if we play with that. We'll call that n, just
needs enough pigment to, pigment has to be
more concentrated. So that's the trick. Sp, more concentrated than
the wash behind. But there you can see we're
getting this sort of spiky, spiculated little
pattern coming up. It's moving, it's producing granular surface within
this otherwise flat wash. So these are my three
techniques I suggest you try pigment and water. Water and pigment. And
pigment in pigment. And play with how much pigment
you use, how much water, and see what happens
with your colors and how they interact
with each other. And as a little bonus, Heather, a quick speedup sketch of me playing with some
of my other colors. So these are lunar rough, lunar black and cobalt
blue in the middle. And then some moon glow and
fallow blue at the bottom. And these are all
part of the phyla. They're all granulating colors. It's really interesting to see
when you say it's sped up, how much these colors
really Cornelia, and how these
qualifiers developed so quickly and so fascinatingly
over the page. So have a little play, see what your colors to do not feel the need to go out and buy a load of fantasy colors. Just enjoy what you've got and have a bit of fun
playing with those.
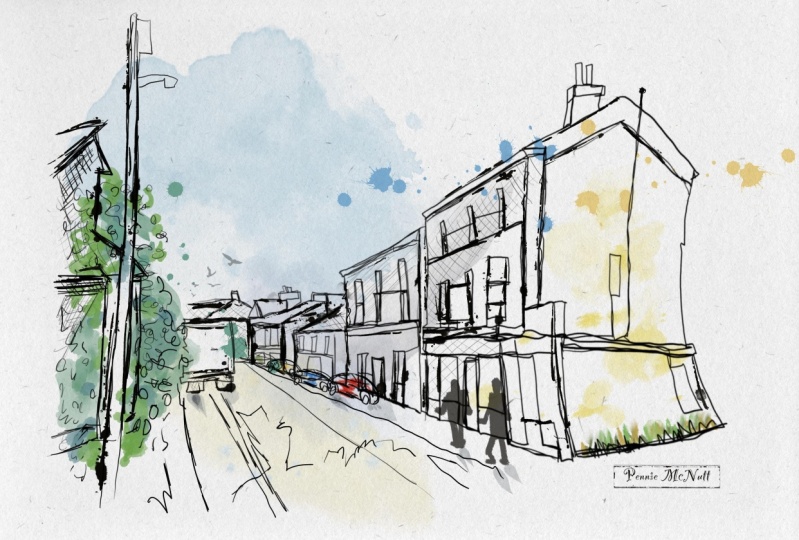
6. Sketching with Soluble Ink : What we're going to do now
is an ink only sketch. So it's just gonna be
using our fountain pens. And we're gonna be
using soluble ink. And having a look
at how we can use soluble ink in our ink sketches and a little bit
of water to create some interesting effects and something to experiment with. This. A little reference
photo just up here, popped up for you now, um, that is a street in my
hometown in the UK. We're just going to have
a look at this first and have a think about where are the shadows
whereas the light. So what are we
trying to achieve? We can see in the
middle of the street, this is where the light
isn't it sort of flowing up. Then in this middle building, That's where we got
a lot of light. Also got this big tree or bush S phase and a lot
of light at the top. But then in the middle
got lot more shade. And then all of this half these buildings
definitely in shade. Now, normally with a, with a pen to get shade, you might have to do
something like some hatching. If we draw a little cube
often to get the shady side, you might have
driven double hatch. And I must say I
do love hatching. I think it's a
fantastic technique. But with soluble pen, with water-soluble
pens, we can cheat. We don't have to do that. So let's have a
think as we sketch about how we might
plan our sketch out so we can use
a little bit of water along with normal inks. This is just normal
black fountain pen ink. And maybe a couple of
our colorful links, I have to create
a lovely sketch. I'm just going to
do a really loose gestural scepter,
gestural drawings, just sweet, sweet quickly, you don't think too hard, he produce something
nice and loose. So we just capture these
big shapes on the page. And then the next one starts
the building on the left. Then we've got the
next building along. And then we've got
this little building which is relatively enlight. And then we can just talk popping in a
couple of these details. And as I get towards
finer details, I'm being a bit more
gentle with my pen. Then perhaps I flip it
over and I use the back as well to get those
even finer details. And we got a little bit of a tree coverage at the back
and I got a lump paste. We've got this, this tree here. But we have having a think
about how we can get this in given how light it is. So how about we don't
draw the whole outline, we just touch on a few bits
where leaves might be. But then as we get
towards the base, we start to really capture much more of the sort of shape. And we're thinking
about pacing or ink. This point we're placing our ink where we think the shadows are going to be doing
this or with loose, loose leaf shapes on there. This all natural
squiggly shapes. So the idea is we're catching
something leaf-like, which we can use and you
can see even become very, very light amount
of ink isn't there. Then here, much heavier ink. And we can continue that down. And then we can capture this, this top of this wall. Then again as a sort of
shadowed at Tesla's, prepare for our shadows
with some darker ink. And then again, just a few more of these shapes to
get in, isn't there? Let's start thinking
about the details again. I'm going to flip the
pen over and just get this arch and a door. Another thing we can do with waterproof ink is
just suggest shapes. Because we can come and
move the ink around a bit. We don't have to draw the
whole shape and we can just pop in these touches and, and, and leave it too late to really finalized
what's going on. Do the same over here. So these are much more definite. They want they there
in the foreground. So perhaps we, we resolve these details
a little bit more. We don't have to fully
resolve everything. Again, just flipping
the pan up and down depending on how I think the level of detail or the boldness
of the image is needed. We're not got enough
windows here, but that is absolutely fine. Let's get this roof structure
in and then just go back in a couple of places where we
think there's going to be more shadow, much darker things. We can add a few elements
of extra pen work. Just extra ink that
we can activate. Good little bush in
the background again. So let's just dotted outline. And we've got things
like this car, we've got this pavement here. We don't have to pop
in every detail. So actually, I'm going to choose to swap over and then think
about adding little thing. So let's add in this
car now that we swapped to all our brown pen. Because just a series
of shapes as well. So you don't need to get
too stuck into getting accurate Specially for
this very quick sketch. And then where else
we're going to want some different tone,
different colors. Well, I think in these
natural objects. So now that we've got two colors going on with
thinking about this warm brown versus this relatively cool
black gold neutral. So where do you want these
warm colors coming out? And we can just
decide, you know, what? Everything is natural. And the car, of course, because it's bright red, can just have a little
bit of warmth in it. So we've got this warm brown
ink that we've popped in, nano trees here on there. And then another tree here. Now we go. So we've
got our sketch. Now again, a lot
of shape on this. Like I said, normally you might need to come back and do
some of this hatching. See, you might want to
hatch all the shadows. But what we've got
is soluble ink. And there's lots of ways to
experiment with all the wink. And one of them is just with a normal little wash of water. I didn't have much
water on my pen, on my brush even can even
dry it off a little bit. And you see if we just
practice on our cube up here, how that immediately activates. We can just practice on little simple things
like this are on little doodles so that we can get used to
what's going to happen. Now we can literally just
come onto our actual image. We can apply a wash and we
can go with the shadows. Where do we want
to move this ink? Where do we want to create this extra sort of
tone and texture? Remember, just like
with watercolors, we want to leave
some areas blank. We don't want the
whole thing toned. So maybe in the windows we
leave some little reflections. And then just to
create some contrasts, we leave areas where we haven't pressed all
the ink around. But we can also use ink to make these shadows
specifically on the roof. And the shadows just
under the roof line here. Perhaps, whilst leaving
the rest of that house. Nice and bright. We can bring
the shadows down as well. This is where we've got these
other ink tones coming in. So if we come into a bush here, we've got this lovely warming. And in the background you
see how we've suddenly got this lovely warm
tone coming through. Not just got a single
monotone image. Can do the same back here. Then we've got our
lovely tree to have a think about this big brush. And again, we're activating the ink where we've
got the shadows. And then where we've
not got shadows, we can just pull
up a little bit, just a little bit of
gentle moving of the ink. That gives us a sort
of light and dark. And then let's just give our car a little bit of
tone and shadow. And we're done a
lovely little sketch. We can come in, we
can pick up ink, we can splash it
around if we want. Similar to watercolors. It's worth having a little
play around with what might happen if you go in
and while it's wet, touching and you see how it, it becomes fairly bold. So ink, especially soluble ink on webpage,
becomes very bold. And if it's very wet, you'll see it sort of color
flowers out, balloons up. That might be in effect, you want to play around with creates a lovely
little shadows, doesn't it? Maybe we want to
do the same with our brown ink as well to create
varying tones of shadow. So there's lots and lots of ways that you might just
want to experiment. Have a little play with
different kinds of inks. You don't need to go out and buy all these expensive inks. You can just get standard normal
watercolor ink cartridges and have a little fun. Do
something a bit different. So there you go. There is my little sketch, this reference image
in the project files. If you want to have
a go yourself, or even just take
some still lives or have a little play with
something sat in front of you.
7. Continuous Line Sketching - Simply Magic: I wanted to talk to
you about one line or continuous line sketching as an experimental urban
sketching technique. And for the sake of argument, I'm just going to use
a standard fine liner, but it's equally valid using other pens like
a fountain pens, or even those few patterns we talked about in
the first lesson. Now, continuous line drawing is often fraught about something. You see these
beautiful prints, e.g. where you get a simple
wine, wine glass, maybe someone might
have just really simplified a wine glass
into an elegant shape. Or dogs or cats or
even human faces. You can do lovely little scene. So you can have a
little park scene. We've got to have a tree
and then along the bench. And then a man perhaps
walking his dog. And you can get
all these details and often people might think of it as just
a way of doodling. But if you take one
of my sketch books, it's also a way of creating
really interesting art. These are all one-line
drawings for people. And a couple of
one line drawings. What I'm trying to,
different levels of detail, different ways,
splashes of color, or on holiday often take away just a tiny
little sketch book. So here's a one-line
drawing of a person. It's a really simple one. There's another one in such a one-line drawing taken
from, I believe, a painting, a painting in a
museum which I copied out. So what I'm trying to say is you get these lovely
graphic illustrations, but you can also
move it beyond that. You can experiment with it. So why don't we have a go
at this scene up here, which is a photo taken of
a street in Cambridge, which is Cambridge in the UK. And let's have a think
just a quick play with how we can do this kind of
continuous line sketch. I'm going to have a little
think about the advantages of doing it as we sketch. So I like starting
often in the middle at the focal point with my continuous line drawings all going sort of left to right. I think given how this seems sort of fixes and down
and it goes back out. Perhaps left to right is
a good way of doing this, but just experiment to
see what you prefer. That as first-line, very wobbly. I didn't necessarily mean
to make it that will vary, but it's fine. We're doing something which
is going to definitely be abstracting and
simplifying as we sketch. What I like to do is
capture these big shapes. First, tackle that one
big building on the left. And then we go up and
down and we start picking out things like the sign. Then we can add tone into these. I always shop fronts. We can come in and we can add these windows and it doesn't matter that
they're all linked up, it just adds interest and it
forces us to simplify it. We can't draw every
little brick like this. It would, maybe you can, but it would certainly look, look different or be full of ink by the
time you've finished. But you just get to play and experiment and
do different things. And it forces you to
make decisions as well. Like where, how do I
move, how do I link? How do I, how do I do this? And it can't be perfect because we're joining
everything up. It's never going to look
exactly like the reference, but it can look really
interesting and artistic. Again, just capturing
these big shapes and then we can just come back
in and suggest Windows. And it can be tempting sometimes in art to set rules like, Oh no, It failed because my parents come off,
doesn't matter. We can pop in a couple of
windows which aren't joined up. That just adds a little
bit of contrast. It's interesting why those
windows suddenly poking out. Well, we could come
in and we could just start again from a place
where we have turned up. That means we can
always come back. We can add little bits if
we feel a need it later, so we don't need to be rigid. What we're doing a
continuous line drawing for is to experiment, to have fun, to try
something different. And for me, because
I really love, really, really love
the effect it gives. It has quite a few people
out there doing this kind of sketching to really
wonderful effect. Now we're doing just,
it's all these big shapes when we get things that
you're really complicated. So in the back here,
in this part of the references directly
up from my pen. There's an awful lot going on. You'd want to continuous
line drawing is we can just suggest that if we just move our
pen around a lot. Suddenly, it looks like I've drawn something really
busy going on there. But all I've done is create
a little bit of chaos. But that chaos is
what our eye sees. And I immediately recognizes. Then come in and we've got this side in shadow, haven't we? So how can we get shadow and tone with continuous
line drawing? Well, we can do it by sort
of version of hatching. So we go up and down. Well, we can do it by varying
the intensity of our lines. Really like making
this or bold intense. We can, we can do it by just adding some color
or some tone after. We'll see don't need
to be scared of adding people were
continuous line drawing. We've got this scene
and it's kinda, it's already taking shape. You can imagine splashing
on a bit of color even leaving it as it is
and it looks cramped. But we can have people on top. Now continues to enduring
with any sketching is find a details on
top of other things. We could say we could
have drawn this out and we capture this building
and then we come around, we get our people in front and we make sure that our people are definitely front
of the building. So that's one way
we could have done. But I haven't I've
I've drawn out the whole scene and then I want to add some people in front. That's fine. So we can just simplify
them into sort of carrot people and look as we just draw them and link them and try and get this sort
of fake proportions, right? But not worried too much
about exactly where they are. Just imagine your
sketch, you miss an outside people are
walking past you. If you're trying to fix them
quickly onto your page, you see how just popping them on top of other lines is fine. It's absolutely fine. Just fills that image with dizziness with things are
happening here, right? So I'd encourage you
to just play with that with all sorts of things. So maybe a lamppost goes on top. Maybe we pop a little
letterbox or something. I have a hit. It doesn't
matter if you add a detail on top of other
lines or if you want, you can be careful and add
your lines around people. So there you go. This is my continuous line
sketching technique. One of my absolute favorite, slightly niche but really fun
ways to sketch and to use my fine liners on my
fountain pens and produce really interesting
different creative images.
8. Watercolour Textures - Granulation and Cauliflower: Hello, It is now time to just do a little rundown of my
colors, watching my palette. And to be specific, what's in my urban
sketching palette. So this is the palate itself may ice fully subscribe
to the idea that a messy palette is
a happy planet and often sketch without even
cleaning out these areas. You can see I've got 14 colors
and it's just a small x, y and just a small
palette, metal unbranded. All you need to be
carrying around. The thumb leap is really useful. You can literally pop
your phone minute. Now suddenly I can
hold it, I can paint. I can use my other hand to
be scooping up my colors. And then it's got
several mixing areas. I normally have it like this. So I've got these four areas and then to bigger areas here. And I said 14 colors
and these are the colors and this is how they're organized
in my tray as well, left to right, top to bottom. Just to run you through them. In the top, I've got
all my bright colors, my primary colors,
cobalt turquoise, cobalt blue, fallow blue. All lovely colors for skies, for sees, for reflections done. I got alizarin
crimson transplant, transparent pyrrole, orange, which are great for
adding a little bit of a punch to different colors, to road signs, two red cards. And then I've got two yellows or Hansa yellow and a
connector and gold, both from a relatively
mellow yellows, I guess they're not, they're
not bright and cheerful, but they warm and they
create for sunlight. So these are my sort of bog
standard, happy flat colors. I say flat because apart
from the cobalt colors, they don't, they
don't granulate much. They produce a nice clear, transparent wash. And we'll talk about granulation in
one of the next lessons, which is all about
watercolor textures. And that becomes
important, of course, when we get onto
the Boston rank. So these are my fun colors. I've got phthalo green, which is a really vibrant, punchy green, little bit
synthetic and how it looks, but it's amazing for mixing. And I'll show you that
in a short while. I've then got magenta, which is just a more sort
of mellowed out red. Nice for adding a bit of mood to shadows and things like that. This is where things get
really special listed my lunar and I've always got
lunar black over here. Both of these are
really heavily, heavily granulating before
incredible textures. They take a little bit
of getting used to, but they're amazing, fun. I think, dumped friend
blue and Van **** brown. Now they're next to each
other because mostly I'm mixed ease into a
really dark dark. And then lastly, we've
got moon glow and moon goes another lovely
granulating color, which actually splits
into different colors. So if you produce a
nice big wash of it, you'll get greens,
reds and blues. And you can learn to
play with moon glow and to manipulate how much blue and green and different
things emerge from it. The brush I've got here is
just a size ten travel brush, so it is by Skoda unless they're versatile rangers are
sort of not quite budget, but certainly not premium. Plenty good enough for urban sketching where
we're splashing colors, adding a little bit of
loose wash the things. I just want to show you a
couple of my favorite mixes. So I'll start with
my green down here. So this is the fallow green. And it's quite
bright and punchy. There's a little bit of brown already mixed in
there in my palette. And like I said, I often mix, we're sort of messy
palette like that. And you can see with that brown, it becomes really earthy,
really interesting. If we take out a little
bit more of the green, we can see that
it's a really sort of hybrid and punchy green. Then if we go the other way, we add some yellow to it. So this is just my
hands, a yellow. Suddenly we get a
kind of mellow, more summary, golden
type of green. And then we can even
mix bit of blue. If I get a bit of my
phthalo blue in there. Suddenly we've got another
even more synthetic perhaps, but Brighton like the sunlight streaming for a
tree kind of color. You can play with
all sorts of colors, you can mix in with that. Another good mix with green
is a little bit of red. And that neutralizes and look suddenly just
green and red. And we've got a gray. And by playing with
different amounts, you can make it more purple
or more gray or more creep. So these are some lovely
colors to play with. My other favorite mixes I
talked about in dunk, phonon, Van ****, Van ****
brown, dark brown. So if I just mix those
together in my palette here, this is one of my absolute favorite darks and you can see, produces a very clear,
lovely, crisp dark. And you can then you're
moving around with shadows. You can add a bit more brown. We can change it out
a bit more blue. You can reduce these
interesting bearish shadows where you're just manipulating the browns and the blues and, and with that kind of thing. So that my, my favorite
couple of washes, I'll just show you the
moon glow quickly as well, because it's an
absolutely lovely color. So if we take quite
a big washer, this pop it down. You can see when
it's just down on a page is just sort of neutral. Neutral dark color,
really, isn't it? But if we start adding a
little bit of water in there, and hopefully you can see this. It's separates out. And you end up with little
bits of hazy green of neutral. The blue tends to settle and the red tends to come
out to the edges. So if I just add
a bit more water, you can encourage some of
the separation to happen. Now not sure how clear
that is over the camera, but hopefully you can
tell that it's produced a wonderfully textured and
varied wash. Or within this. That is my palette, my
one of my travel brushes, and a couple of my
favorite mixes. And one of the other
lessons we'll be talking about fun ways I
use this product. And y are selected so many colors which are
heavily granulating as well.
9. Using Wax - Mixed Media: So the next effect that
I wanted to show you, and I'd encourage you to
experiment with having a bit of fun with is this one. So look at my blank page. And if we just get a
little bit of lovely blue, maybe mixing a bit of red, and then maybe a
little bit of magenta. That's right. Suddenly
my page is saying, hello, how do we achieve this? I imagine many of you know, and perhaps some of you don't. And it's using the
humble candles, using a little bit
of wax by drawing on the page and wax
before adding water. The water and the
color repelled. And you end up with
this image left behind. We can do some interesting and fascinating and fun
things with that. I'm going to suggest a couple of scenes that we
could try it again. Just really quick,
almost doodles where we get to just practice
these fun techniques. So the first we're gonna go with another skyscraper because
skies keeps just incredible for practicing
interesting colors and letting your colors
mingle and blend move. We've got a couple of houses
on a skyscraper this time, quite big, chunky houses. And how could we use the wax? Well, we could use, you could break off a
bit of this candle. This happens to
be a new candles. I'm just using this sharp edge. Just rub that sharp edge
and a couple of places, we can create some windows. We can create some light
reflecting off the roof, off the side of the house. We could even create in the sky some
textures, some clouds. Hand if we make this
a nice bright day. So we'll take some
cobalt blue and fallow blue creates a really
beautiful sky. Suddenly, we've got
these clouds pre, emerging on like that. Do you see how they're
already there? I can't add water. Clouds are just there already
from the adding of the wax. So using this technique, we can cheater way to painting
some delicate clouds. We can advance on the clouds, providing them with
shadow underneath. Perhaps you really
bring them out. We can leave them
be and we can just have them as if they are. Then we've added some code
to the house and we said, why don't we make
these really nice and orange, bright orange roofs. On a bright day, I look, the sunlight is reflecting off those rooms where
we've added that wax. Then we can just give some nice, Let's give you some
Reddy brown wolves. And look, those windows
emerging straight away. Already pre painted on. So it's a really
interesting way of just creating the shapes
and colors and things. Especially effective for skies, for reflections, for like, even for things like
feathers on birds. That's technique one, I'd
encourage you to try and just use any camera
can be colored candle, because candle wax, even if it's got a little
bit of coloring, probably won't
stay in your page. And if it does faster
somebody else to play with. Now, the next version
that we can try, if I just draw another
little landscape. Instead of doing a pen
sketch and using candle wax, you can use something
simple, like crayons. I've got here, the Green Crayon. We can decide,
we're going to have a little tree here coming along, maybe on both sides, guest speaker tree
coming up there. Then I'll go to a blue crayon. Think about crayons
is that they are, of course, their work. So they are going
to repel water. We can have a little bit of yellow just reflecting off here. And then maybe we have a
little yellow sun as well. We can use a bit
of unnormal works. We can come in and
gets more reflections and get some light
surrounding that sun, light in the trees. What's left to do is just
add our watercolors and see what that
experimentation has got us. What you'll end up with is
this fascinating texts. Did you see how in some places
the watercolor setting? In other places watercolor
is just flowing off. And suddenly, without
trying really any effort, we've got these really
interesting textures. There are people all
over Instagram and like doing this exact kind
of thing to amazing effect. Unlike in the sea,
Suddenly by having these textures in the
sea or the river, whatever we decide this is you really separating
out from the sky. I hope you liked
this little doodle. I think it's quite
charming and its own way. And it just illustrates how they kind of mixed
media effects using wax can provide a number
of fun way to experiment. To take shortcuts with
your urban sketching, and to just bring it to life with new and
fascinating techniques.
10. Salt Application - More Textures!: Hello everyone. I want to now show you
interesting technique. So integrate
incredible textures. And that is using this stuff. This is salt. We've actually got two
types of salt with me, two different ways. One is just standard
table salt, really fine. Governor, a little pot here. And the other is
Himalayan rock salt, really chunky grains of salt. And I'm gonna persuade you in the next few minutes
how much fun it is to play around with this, create some really
interesting techniques. I thought I'd do this. We have just a couple of
little doodle scenes. So we'll do one for
the rock salt perhaps, and one for the table salt. And we'll see what
the differences are. Now on the left. Let's do a
sort of murky sky, night sky. We can just make this fun little silhouetted townscape
to put the sky above. That's all we need to do
with our append work. We could even leave it
blank and we could just do a sky sort of escape of that. And then the other, Let's do
something a bit different. So let's make it
more of a landscape. We'll do a meadow with
a little windmill, and so we can use some salt to create some interesting textures
along this meadow. Maybe just sketch above the
meadow a few little features. Maybe little Karen and
background there as well. Okay. So that's what we're sketching we're
going to be doing because this is all about having a lot of fun
with our watercolors. I'm just going to very loosely apply a little wash in
the background here. And he used a couple of my interesting
granulating colors. And if you want to know
more about the granulating, in a couple of the
videos earlier. We're talking about
making cauliflower and also where it talked through the colors I put in my pants. In my palette. Can see I've been playing
around already with it. I'm gonna be using
some moon glow, one of the lovely
granulating colors. And we'll just touch that in, in a few places and just
let that move around. Do you see how it
expands out on its own? So it already, without salt, even we're getting some
fascinating things going on. Mixing and do is just add
a little bit of warmth, a little bit of our
transparent pyrrole orange to give the idea of a glow. Now when we're using salt, it can be quite nice to have
quite a lot of water there. The salt does. It sucks up the water. And by doing that, remove
some of the pigment and remove some of the tone. And then it can also,
as it dissolves, it can spread out and create
sort of crystallized shapes. We've got our lovely sky.
Know what I'm gonna do? My little pot. Find a few bits and pieces and just
sprinkle them. And you'll find with rock salt, defects are a little
less dramatic because the surface area of
the salt is less. It doesn't immediately
absorb so much. But that said you can see How around different bits
of the rock salt here. You're getting
different effects. You're getting this water is
being pulled towards places. You're getting white
areas expanding. Well, we could do just as a
little direct comparison. I'll pop a little bit
abnormal salt in there. And you can hopefully
see immediately muscles here and all around that. Suddenly the pigment has
been sucked up and moved. Anyway. What we now need to do is let that thoroughly dry. And that's how we can then see what the real
effect has been. And what we're doing
that let's move on to our little mediascape. So again, nice bit of water. And we're gonna go
for sort of very summary or tunnel
meadow, lots of yellow. So we do tastes or two lines
of yellow with our brush. Then I can just pick
up some of this green. This is just some
of the fallow green up and mixing earlier today. We can read that in-between. And I'm actually, I'm
thinking I wonder a bit more intense so I wouldn't need
affects be more obvious, so we'll just make them
a bit more intense. Whilst we here, why not
add in a couple of sort of background trees are just
other little fun touches in the background there. Another couple of trees, or a cow is no
green, Never mind. I'm sure he'll be okay. And we can add some just intense bits of
yellow in as well. Then we'll take our table
salt and let's sprinkle that. Let's go mad with it this time. So low to sprinkling. Do you see how there's
a sudden change, really sudden change in, in how this escape is looking. Now what I'm going to do, I'll just add a few
little fun touches. But essentially, we're
waiting for this to dry. Best to let it dry naturally, but you can use a
hairdryer if you like it. If you let it dry naturally, you get more of the
dissolving effect from that salt as well as
the absorption of fat. As if by magic, we're now got all sort of try see a seat, sky
and landscapes. And what do we have to do now? Well, we have to just
remove the salt gently. You could do this
with a dry brush. I've got to live a dry
brush here that we can just use to gently push things away. Or you can do with
this statistic. Just to be fairly gentle, there may still be
a little bit of water trapped by the salt. You don't want to spread
your paint too much. You want to be just a little
cautious as you're doing it. You can see this
is nice and dry, so you can see the
salt to the edge here. Do you see how the salt
is no green because it's picked up with yellows and
greens from our escapes. And then over here, I
can pop this off to one side as well. There we go. So let me just tip away this salt and I will show
you what it looks like. You can see how this lambda is just covered in these
beautiful speckled patterns. These are quite fine and
where there was a clump of, so there's a really big clump of pigment change in where it's just speckled is just speckled. And you can see it's got
both a lack of pigment, but also this kinda speculating
pattern coming out. On the other side
we've got big lumps, trunks where things have
been removed by the salt, as well as some
more fine patterns. But it's, it's, it's more perhaps than applying a nice
thin film of table salt. But there you go. There are two really interesting techniques
you can use with salt. I'd recommend using
it for skies, seas, anything natural or creating
textures and old walls, or just having fun doing
something abstract. So have a play,
get some salt out.
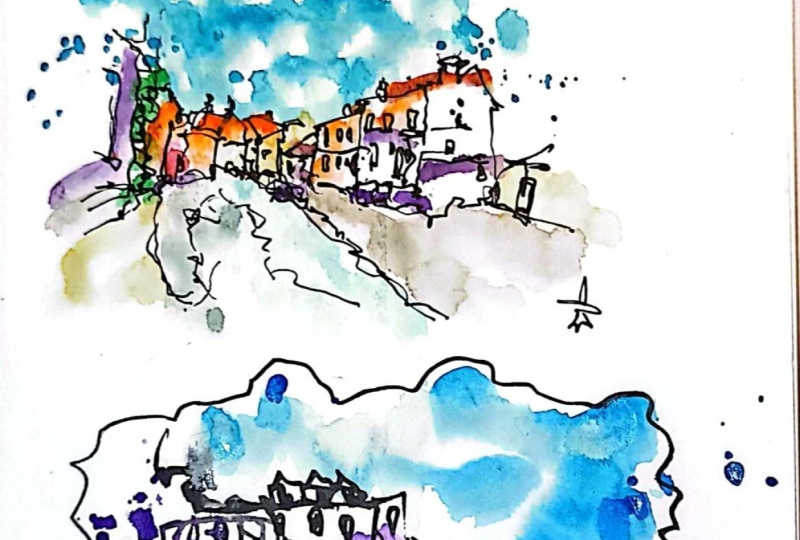
11. Urban Scene 1 - Continuous Line Sketch, Loose Colour and Salt: Hello, this is now time for our final project, example one. So I'm gonna do a
little demo here. I'm going to be using this
lovely reference photo in the top, which has got lots of light
and shadows, a few details. But if shape and perspective, just the perfect photo, I love sketching from the scene. I love sketching in
real life as well. I'm gonna be using a fountain
pen with carbon Incan, which I talked about in
the pen lessons earlier. And I think for this, we'll be doing a
continuous line door and having a little
think about how we simplify things and get
it really fascinating, getting this kind of
perspective in detail in before adding on some
really loose colors. And perhaps playing
with textures, with our color flowers
and our salt as well. Well, joining up our colors. So let's, without further
ado, get started. So I'm going to start. I
think with this sketch. I'm feeling like
starting in the middle. And what we'll do,
we'll work out and then we'll work
back the other way. And in the middle
we've got a couple of little houses just peeking out. Be careful when we
start in the middle to just sort of set the scale appropriately so that
we don't end up with something to that doesn't fit on a page or that's
too small and I paid. It's okay to make adjustments. We can if we have started
with two small, that's fine. We can just change the scale
of things in a bit later, but it's nice to keep it fairly representative
sometimes, isn't it? I'm just moving, I'm capturing. I found this silhouette often the easiest thing
to capture first. So just kept going along, capturing all these roof
lines and then pulling, pulling down the vertical. See you then to take, take the vertical lines down from the tops
of these rooves. That suddenly creates for you this lovely
image of a house. And you didn't even need
to draw the bottom. We've already got the
house often enough. If you've done this.
Just the silhouettes. Because our eyes are so good
at picking out silhouettes. Basically, it's one
of our visual tricks, one of the tricks
our brain uses, because you have going
up and down lines, lots and lots of that's fine. It creates texture and interest. Partly I'm doing it because
I'm waffling a bit. And partly I'm doing it
because it's a sort of natural habit because I
enjoy the way it looks. As we move out. I'm going to just gradually
increase the height, trying to keep things in proportion and get the
perspective about right. But most exaggerating the
perspective a little bit. So you can see here that I'm gradually exaggerating
the angle of these roofs. And that again, is just a
little trick of drawing and making things seem perhaps even more magical than
they are in real life. Well, no more quirky. You can also get to
go the opposite way. You can flatten the
perspective and have a play with what effect
that has on your image. You can see we've
managed to keep the scale about right,
which is great. Partly that's probably a
little bit experience for me in partly I've probably stretch these buildings
a little bit. It doesn't matter. I'm
just a piece of art. So we were being
flexible about how we, how we create our image. It doesn't have to be
absolutely perfect, it doesn't have to be anything. But I'd suggest that we
aim for having fun in the first instance and just gradually exploring
and improving as we go. I'm going to just introduce just the edge of
this building here. I need to go too far, too much detail into it. Now what we can do, we can use the bottom of these buildings
to sort of come back along, keep our continuous line going whilst adding in
details like windows. So we've got Windows,
just simple rectangles. Little signs can be good. Now, have a check at the sign. Do you see how the
angle is different? Because this is
on this sinusoid, on this plane here
pointing at us. And the windows
on the flat plane of the, of the building. That means that the
horizontal lines of the window needs to be in line with the horizontal
lines and building, whilst the horizontal lines and the sine are going to
be perpendicular to it. That makes sense, often quite difficult to explain
these concepts. But hopefully you
can see as I do it, if I draw another sign, how the lines are going
in different directions. Because the signs and windows, they're going in
different directions. And we just keep going. I talked about this in the
continuous line lesson. You don't need to be to hit up to strenuously keeping
the pen on the page. It's more the idea, the concept of trying a
continuous line drawing, rather than actually having to 100% never take the pen off for where you've failed
or anything like that. We could introduce the cars will have a look at that later. For now, I'm just introducing. Below the ground floor, since you have all
these buildings, it's just quite dark and
difficult to see anything. And we can just show
that quite simply by creating little bit of chaos with these
vertical lines. And there's lots
of windows here. So again, just doing
some vertical lines like that suddenly suggests
lot of detail. You could be more specific. So I could go in and have
drawn slip-ups here. I go in and I do pick
out individual windows, e.g. that's also fine. But there's lots of ways
of doing it quickly, easily and having a
bit of fun with it. Let's move over
now to this side, we've got just a
little bit of contrast in building to capture this
lovely greenery as well. So let's get that greenery
on and let's just be really careful about where
does this end, how loaded actually going. And we could do some comparative
measuring here and see it goes well below the
edge of this building. If we look at our reference, the bottom of our white
buildings about here, bottom of our greenery here. So I've got that about right, about right For me,
it's good enough. Will then come up. And again, how high does this go? Just below. Just below this chimney. So just with the simple
little measuring, visual measuring tricks, we
can easily get things right. You can incorporate this lump place things
quite fun little touch which is just
linking things together and also providing
a little bit of a frame. I don't think we need much
more on this building. It's doing its job just being a, a looming contrasting presence. We just fill out this greenery or the few
wiggly random lines. But I think we need
to do anymore with it in terms of the building. So what else have
we got going on? Well, we haven't got any
context to this street yet. So what we want to
try and do is find a line of our
pavement, sidewalk. Then we can just show the
texture of the road as well. But coming back
to them forwards. And do you see how
I'm trying to keep this sort of perspective though? The lines are gradually getting wider and wider as
we come forward, then we can link that up
with the other pavement. And that can disappear
off into the distance. And I said we could
think about carbs and I don't really feel
this image needs cars, but why don't we
add them in just to show you how I often do them. I'll just noticed
as well as the top, I've neglected to finish
off a building here, so I'll just do that as well. Causing this style can be, I guess it can be
hard if you're trying to get really sheep
are accurate. Read detail can cause a
really simple shapes. So what we need to just
grab the base of the car, which can be just
inside the pavement. And then the front of the
cars, basically a rectangle. Then on top of it it's got an ellipse, which is the bonnet. Then it's got another
circle. Now the circle. It's really simple shapes, so we just separate
our car into shapes. Now that we've got
one car behind it, your eyes can tell
there's lots of cars, but all you're seeing
is the sort of overlapping rectangles
and shapes. And do you see how
just by drawing essentially series of circles
overlapping each other, we suddenly got a street filled with cars going all
the way along like that. So I just encourage you to have a play with
that kind of thing as well. And just make your
cars really simple, make things really easy. See how simply you can get. Course. It is time
for the colors. So I'm going to stick with a brush or when using
for all the lessons, which is this size
ten travel brush. And we're going to have
fun play with loose, loose colors on this scene. I find with a continuous
line drawing, either doing minimal colors or just really loose
joined up colors. I'm going to say joined up. So do you see how now
introducing what I like to call it a
water-rich down here. Some of this ink
is still a little bit wet, which is fine, fine for me because
I'm going to create some murky shadows
in here anyway. You can see perhaps at
some of the things is just shifting as
I had that water. So I get this water
bridge linking things together and we get
a nice bold sky, a little bit of cobalt,
little bit of fallow blue, hot that in. I like to sort of, if I'm
doing these kind of loose, loose glazed colors,
I like to well, I said it. I like to glaze them. I like to have a
transparent layer of color really coming
through the whole image. Picked up the wrong
color. What I wanted was a bit of a moon glow. So this is where you start
to introduce some of these shadows and the shadows
all the way along here. All the way up there. We're taking cues
very much from our, from what we see, but not being sort of labor actually
stuck to those cues. We can change things
a bit. So e.g. the road isn't yellow, but it is glaring with sun. So I'm going to use a
bit of quinacridone, lovely golden sun color. When they just suggest that
bright sunshine with that, then we can move across. Now I do want my green. And I talked about how I like
to mix my green so I don't like to take it often as
the pure green color. What I'm gonna do this
time is mixed with a little leaner earth,
very granulating. It will dull that green down, becomes much more
of a natural color. Then also, it will help introduce some really
interesting textures as that green sort of the green and the brown mellow
out in all this water. Then that all mingled. Let it just go and flow
around and see what happens. I may do a tiny bit more
shadow to join up the image. So we sort of got this
moon glow on both sides. Just on this building. I'm not going to
take it too far. And we can deepen some of
these shadows as well. Now, just in a few places. This is where we start thinking
about where do we want on our interesting cauliflower
like techniques. So perhaps that's just a
little bit in the sky. We can just drop in a few bits. And then on the road, what can often be really nice is actually dropping in water. So you get the inverse. You get this kind of
speckled appearance which suggests the tarmac you feel you can see that coming
to life already there. Then we talked a bit
about using salt as well, didn't win so often, good for natural things, could use it for the tarmac. But it could also sprinkle a little with a soul
into this greenery. Then let's see what that does. And if that brings a
nice and natural field. And perhaps to create a
bit of a rough Tom McPhee. Or we can use our rock salt just speckled around
in a few places. To contrast or
complement what we've done with our specimen of water. Can do a little bit more
water in the middle of that. Still got some green
on my brush there, which isn't really a problem. Little bit more water in there. Then we can keep
having a look around. Are there any final touches
we want to introduce? Well, you can see some of our color flowers have been
lost up here, so let's, Let's reintroduce them,
or let's even take some really dark moon
glow and just drop it in. And then, then we know
that cauliflower, that definitely an estate. We can just introduce a few
bits in the window here. Under here I get some shadow. Maybe we want a little punch of color to pull out
our little cars. And I love using red or orange, these bright colors
I talked about again in the watercolor lesson. I've got these
colors at the top. They're all punchy,
bright colors. And a great Vic just
creating these highlights. If I just flip between
a bit of alizarin, a bit of orange, and then just bring it
out a little bit as well so that these colors
are going to continue to fit this merging, blending aesthetic
were going for. Then we go, that is my
little sketch done. So I'm going to let that dry. We'll remove the
salt and then we'll see what we've done with our
loose sketching techniques, experimental textures.
So here we go. Pretty much dry. Must say this, It's taken a farewell to dry. It's been about 20:20, 5 min. But we can see that it is
pretty much dry and it's safe, I think now, start
removing our salt. I'm gonna go again, we
just brushing gently away. Now you can see actually
under some of this salt, it's still a bit of water which is perhaps give me effects. I wasn't expecting.
But that's okay. And under the smallest salt, it dries a bit quicker because it's not traveling pools of water. There we go. We just got a
couple of bits here knowing that these ones
smudged a little bit, which I don't think
is a bad thing. But knowing that they
have smashed a little bit and this can be a
bit more gentle with how I lift these up. So I'm going to,
instead of brushing, I'm just going to pick
them up with my tissue to avoid the smudging lines. Just put that to one side, tap the rest of the salt off. And we can have a look at all these textures
we've introduced. So we've got these
kind of pebble stone like textures from
the rock salt. And then all through
here look at all this wonderful texture
that's been introduced by the, by this table salt, kinda speckled natural
feeling leaves. And then in the sky we've got these wonderful cauliflower
which we introduced. This will be the water
being added pigment. And then the moon glows, dissolved and separate
it out as it does. And you can really
see the hints of red, as well as the neutral
colors which you get from the lovely moon
glow. So there you go. That is my final
product demonstration. This I must say is one of my absolute favorite
ways of sketching. And I really encourage
you to just have a play around with continuous
line sketching and really loose colors and seeing if you enjoy it or if it
helps you develop your, your preferred form of
sketching in some other way.
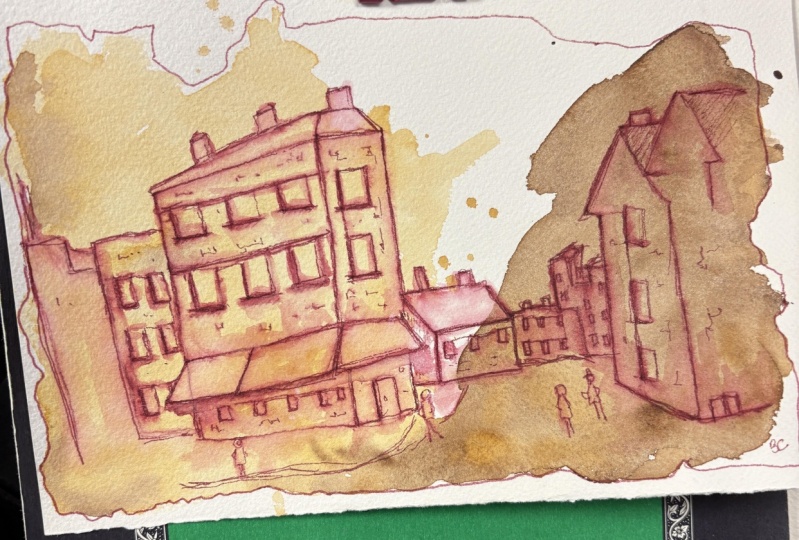
12. Urban Scene 2 - Sketch from a Splash: So this is the final projects through demonstration to
another different idea for ways that we can
use our watercolors sketching to create really
interesting and fun sketches. I guess. What I'm gonna do this time it's going to be
sketching from a splash. Now, what do I mean by that? Well, I mean literally
creating a splash on the page. And then from that, we will sketch off saying
we'll use that splashing and use them this time using a fountain pen with
normal Lincoln. This is my brown ink. Will then wash the ink to
create more tone and shape. Now, you could do the
splash several ways. You could just totally randomly. And I often do enjoy doing that. Going out with a
sketch book where I've pre-made some splashes and you just sketch
things over there. You could also, using e.g. this reference, we
could just go for it, add some colors in vague shapes. So we've got a big
rectangular building, we've got a dark living
building over here. We could just get that kind
of shape and flow of colors. That's probably
what I usually do. Wanted to do today, is the second of those options. But just so that you can see where I'm
guiding the colors, I'm going to do a brief sketch with a blue watercolor pencil. And this isn't what
I would normally do. But in the name of
experimentation, Let's just try something
a bit different. Just said it's a bit easier
for you guys to follow the ideas I'm
undoing and also so I can try something a bit
different for me as well. So this can be super, super loose sketch
and all I'm trying to do is get these
really big shapes. And we've got this looming
building on the right. We've got this building
here which is go to Layers. And then it's got a series of other buildings going
off to the side. And then we've got
this dark tunnel of other buildings that we
can see in the background. I'm not going to sketch
initially this chapter. We'll see if we do
decide Actually we want the chap when we add our pen. So hopefully you
can just about see that pencil sketch line. What I've done is I've got
this kind of shape here, here and here to give me some broad working guidelines to start adding some
fun colors from this. So when we're thinking about what color we should
use for this splash, we've got this brown ink
that we're going to use. If you remember from
the ink sketching lessons and the
fountain pen lessons, this becomes quite a lovely warm color when you activate it. So let's contrast it
with some cool colors. So I'm thinking
things like bit of cobalt blue on
everyone's favorite, a bit of moon glow
and perhaps even will get something done for in blue in or
something like that. Let's just start when I say sketch or a slash.
That's what I mean. So let's start with a whole
heap of just splashes. And we're trying to sort of
bear in mind our shapes. We're not sticking
rigidly to them. So I'm just going to come
in and move that color around using this outline, kind of kinda
filling the outline. Not we are bearing in mind
a bit where the shadow is. So there's more shadow
in this background. So we can put more
moon glow that there's definitely more shadow on
these buildings up here. So we can put more moon
glow there as well. But then let's come back
in with a bit of fallow, bit of cobalt and
again, splashing. And we want our
little splash to be really full of interesting
texture is full of things going on that we can take a little bit of inspiration from as
we're sketching away. I said in downtrend. So let's just try,
Let's see what happens. There we go. Lovely little bit of extra depth of tone and color
and now isn't there. And let's just get some more
splashes moving around. We've got all these
things going on in the, in the vicinity. So we can just kinda join
some of our colors after we can come in and remove pigment. We can create cauliflower
is dropping things in. We can create cauliflower
within where we remove pigment. Just interesting things like
this going on everywhere. And that is probably enough. Quite a lot going on there. Remember when you
do stuff like this, that it will dry a little bit, walk a lot less intense
and it looks now. To help it dry,
you might want to just absorbed with the tissue. So we just got a
non-graded tissue here. You can just go round
and absorb some of that excess water
because otherwise, you might well be sitting
around for an hour or so waiting for
everything to absorb. Remember when you put
the tissue on the page, you are going to pick up some
of that pigment as well. You're going to
create more textures. You can use that
to your advantage. You can actually come in
and smudge things and. Maybe you want to pull
out clouds and things. You can do that to your
advantage or you can just be really careful
if you're trying to avoid doing that. There we go, That's our splash. So let's let that dry. Probably about 10
min, I would guess. And then we'll see what we
can do with our pattern. And here we are, we
are pretty much dry. There's a couple of
slightly wet edges, but that is fine by me to just start sketching on what
are we going to do now? Well, we're going to start trying to use a reference image along with a little bit of the outline that
perhaps we can see, but mostly taking cues from our splash to start creating
something interesting. I've got my fountain pen with my brown ink and
let's just go for it. So I'm gonna go for quite a loose gestural
silo sketching here. So that gesture is
where you're making these big sweeping movements. And it kind of results often in accidental or perhaps on
purpose over sketching. So you create this
architectural look. You, you can almost see
the working lines TDC, how the lines of sketched outside where they might be
fought to end like here, e.g. if I exaggerate, it will
do a couple of windows. We can exaggerate it and
you get these windows where you can kinda see the, the working lines
that you might have drawn if you don't have
pencils, get trust. I think it creates a
lovely, lovely Look. It's an interesting
way of sketching and gives it a
very precise feel. Whilst also being very least it looks like you've been
working at it quite hard, despite it being very
least technique. We'll just keep
finding windows and adding these things
here and there. We talked about it
in the panelists and about how you
can just where, you know, there's
going to be shadows. You can add a bit more ink. We can do a few
more vertical lines appear to suggest the shadows. We know. We know
we're going to want a bit more ink 2M
to show that off. And just move around and it's been too long
in any one place, you can always come
back and add more. But both were
watercolor and ink. You can't take away, so you just keep moving around. Finding new things
to touch on two, gives you a little bit of ink has leaked out my pen there. And that is the fun
of fountain pens. You don't necessarily have full control of what's
going to happen. Adding in here, coming all
the way down the side, adding in this
lamppost, this side. I'm just going to leave
it off to one side and we'll see what we make
of that in a little bit. My after blot up
some of that ink, it's probably going to be
too wet to do anything with. But we'll leave it for now
and see what happens if we just play around
either side of it. Bringing this pavement,
which kind of loops around, is joining everything
up really nicely. And then we can start working on some of these shapes
in the background. And that's all we're
aiming for is this shapes. So I don't need to
be super detail. We don't need to spend forever sketching details
if we don't want or you, perhaps you do want
to, you want to be focused on the details. That's also obviously
absolutely fine. Go lots of the
busy-ness going on here and signs and things that
were just get those ideas. And you can see with
my little sketches become evident now
this gaps widen it supposed to have
been, but that's fine. So we'll just start
building away from this splash, splash bit more. Apparently my pen is
deciding today is a day. While I'm filming such
an important thing. It's going to create some very interesting
textures for me. But no worries, we
will continue to experiment and find
out what's going on with our Pen and how we can use these random splotches of
ink to our best effect. So no worries about things
go wrong all the time. But they only go
wrong in your mind, they really, no one will
know apart from yourself. I could claim I intended these and they're all
part of the look, part of the aesthetic. No one would know. If
I get upset by it, that it's going to ruin things. Okay. And there we go. So
the question comes through, you want the people and I don't
think we need this chart, this really big jump
in the front end. But I can't see the harm in just adding in some
suggestions of people, especially in these busy places. So just really simple sketching
of a circle, triangle. Suggestion of a leg
in just a few places, adds to the busy-ness,
adds to the field. Especially in a busy street. Might this, there we go. I think that I would say is or at least our initial
pen sketch down. I'm going to now, like I said, blocked up some of these
impressive arrays of ink, which my pen is
generated for us. There you go. No harm done. Just adding to the field is
sketchy nature of the image. And it's time to activate our ink with a
little bit of water. So you don't need a
huge amount of water. So just a very slightly
wet brush is fine. If you see this,
this is very well. I would say, if I use this
somewhere, Let's use up here. It can be a little
bit hard to control. Bit too much water
flowing around. If it just slightly damp. Suddenly we can pull things
around much more delicately. We can control, say we just
want the shadow in this roof. We can control that,
we can achieve that. So let's just keep moving
around and having a look. Where's the shadows. So this side is
definitely liked it and this side will get a bit of
our ink just moving around. On this side of the image. We can use some of this ink blot here we can use to move around and really get deep and interesting
shadows going elsewhere. Perhaps down here we do want a bit more water because we want to really spread this
shadow around it. We, we decided underneath, there's definitely
more shadow going on. Underneath these warnings. We've grabbed that will move it, will make it our own.
Back here as well. We decided that was
a bit more shallow. And we're also getting a nice
contrast because this is, this is why there's no blue. Suddenly we can make
these pinky tones sing. And we can join it into
our looming shadows, which are coming from this side, which we've already
suggested really nicely with our moon glow. But also with sort of
vigorous application of ink. You can see it so quick to
do something like this. So, so quit because
already we just got tone. We've got movement and interest. And all we've done
is it a splash, some accidental blots,
and a little bit of ink? Now what can happen when you do this kind of sketching is
you can lose a little bit of your suggestions of detail because we've watched the
income purpose, we've moved up. And that's why I said
perhaps we'll be going back and redrawing
some of these lines. I think that's exactly
what we'll do, is I'm going to let this dry and they'll have one
more go with the pen. And we'll finish. There we go is time just to add
this last bits of ink. Now this time we can be a
little bit more careful. And we can just pick out
this time the shapes, the lines that we had
before that we really like, we can add new shapes as well. If he places perhaps
just invented chimney here and there is a chimney
here that we can pop in. So we can add these lines which
perhaps we didn't want to add before because we didn't want to lose them
when we watched. We can come to these windows. We can even add
more depth by now. We know we're not
going to wash it. We can really lock in a few bits of dark with
our, with our ink. We can leave some
of these lines at the bottom is suggestions, because it's really difficult sometimes to tell where
does the shadow begin. If we do some little horizontal
lines with suggesting shadow meeting a,
meeting a building, but we can just leave them as suggestions rather than trying to fully render
every little detail. Going here with
these window frames Canvas by adding a bit
of darkness on one side, tend to add a nice bit of shape. Do you see how even though we sketched this was all white. But actually because
you've watched so much, this white and Reddy brown
of all merge together. We no longer have that void
and the image that it looked like we might have
at the beginning before we wash that encounter. We'll just get our little
people here again, these ones in the background
still looking good. You see just working super quickly and you don't have
to work this quickly. But this is what
I enjoy the most, just flying around the image and making really quick decisions and living with the results. Claiming I meant
everything as well, like the slot you get. These blockages are really absorbed into the
image, I haven't. They? They, they definitely
look like they could easily have been
intentional and purposeful. And this is where I say again, you can start adding
in some extra details. Now, why did we add in a
couple of ideas of bricks? Can I do in this
little sign things which we were a bit worried
if we added earlier, would just end up smudging and
blending and getting lost. There we go. I would say
that that is a sketch done. Now, one more thing
though, let's go. A little bonus is how can we
end the sketch like this? Well, we can leave it like this, and many people would
choose to do that. But what can be quite a
fun technique is to take your pen and just bring it around and create a
little frame and outline. And I know I get,
I'm going to say mixed responses from this mixer. Responsive often means
not very good responses. But actually some people, many people absolutely love it. Many people think it's rubbish and think that you should let the arts we're seeing for
itself and not introduce. These are fake frames, but for me, I think sometimes
it's really fun way, especially in a sketchbook
or for loose sketch or just framing it and making it feel a bit more like
a completed work. There we go. What do you think of the frame? Do you want to try
the frame yourself? I suggest having an
experiment at the very least. For me, it looks like
we're now looking in on the portal of this
sort of slightly mad, but definitely interesting
world. So there you go. That is final project,
demo number two, using a splash, some
Reddy brown ink, which we then wash
all over the page.
13. Urban Scene 3 - Negative Space and Time Pressure: Hello everyone. We
are now going to do final product demonstration
number three. What are we going to try
and achieve with this? Well, we've got this interesting
moody picture up here. Um, what we're gonna do is put a sort of artificial would at time pressure
on ourselves. We're going to try and
do this in 10 min. Try using two different pens. So we're gonna be using
something really bold, a 0.8 millimeter pen and something more standard
appoint two millimeter pen. Along with some loose colors
and a bit of negative space. Negative space being sort of choosing not to
paint essentially, but by doing that, you can guide people
around an image. So let's start our timer and have a think about how
we can sketch this quickly, but also having a bit of fun. So start with this
obvious focal point are big church poking out. If we're thinking about
a ten-minute sketch, thinking about being fairly
quick on when I'm really simplifying things and reason a 10-minute sketches is good. Well, we don't want
to cause stress, so there's no point in getting
too stuck on the 10 min. And it may be that
I ended up going a couple of minutes over
or under or whatever. But often you're outside and what you want
to sketch is very light dependent or that you're trying to sketch
people and they keep moving. So you do need to be able to just quickly get ideas
down onto the page. The other thing is it
forces you to simplify. Simplification is one of
the hardest things I think, to learn, to let yourself do. But if you look at
any of them like great artists out there, they're all simplifying things. Obviously there's some very photo-realistic art out there. That simplification
is a key to save. So pretty much all
sketching at least say, we're just trying
to grab shapes. What we got with basic
made some big cubes, but boxes with another cube on top with a rectangle
to the side here. And then underneath we've
got another rectangle. I'm just separating out all
these little shop fronts were taking cues from
what's that we're not leaving to be so rigidly
stuck to what we see. But getting the idea of the shop fronts is good
enough for me, at least. Perhaps you want to do
this quick sketch and then you can use that
quick sketch to inform a longer piece or even to
inform when you're doing something in a different
medium like oils or acrylics. You can see I've definitely made this building to,
to narrow that. No problem, we just extend it. These incorrect lines is
wrong lines will disappear. They won't affect
our final image. And then just looked
like something intentional by the
time we finished. Really, no need to worry. What I'm saying about
when you're pushing yourself to be a quick
no need to worry about making mistakes because it's all part of
the process and it all adds to something
in the end. Now we can grab some of this
background scenery as well. This is where we're
really starting to go. How simple can we make it? We can make it
really simple just by getting the idea
of this silhouette. This silhouette which
assigns you run the image, shows that there's a hill, shows that there's these
looming buildings. And perhaps we can add in just some exaggerated vertical
lines exaggerating the, the degree to which
they're bending over. Then we've got this
wonderful dark frame. You might have
noticed, I love having these looming frames coming
over in my sketches. I really think they add a lot to the framing, but
also to the field. It looks like you're,
you're pairing through into something
a bit magical. So that is our sketch
done with our, with our 0.2 millimeter pattern. Let's just go and add just a few little extra details because we're on
making good time here. We can even do things like all these tram was
coming around. We could just grab
those and they can, they're lovely way of linking up the scene. Will these y's. And suddenly everything's a bit more busy and interesting. We can imply some of these
details in the church. We can add a little
bit of texture for recent hatching
and that will start to bring out some
of these shadows as well. Hatching can be really simple, just really simple
vertical lines like this. That's plenty for me to create
this interesting kind of fail and already tones
and tones it down, which is what we're
aiming to do. And then we go all these
windows which we can just loop in a little bit. Okay, and that is our
sketch done and we've probably been going
around five-minutes. You've got five-minutes, add some more ink and some colors. I'm gonna do it in
the other order. So we're gonna go colors first using the same brush I've
been using this whole time. Travel brush size ten. And we're gonna
be thinking about where do we want to add color? Where do we want to leave? Sort of vivid, vividly want I'm going to add some
of a punchy colors first. And don't worry about
how the colors are just going to try and vaguely
keep them within the lines. But when we add our extra ink, we wouldn't be worrying
about that anymore. I want it to blend a
little bit as well. So let them let this
red run into a dark. In the dark I'm using here. It's been a moon glow. Then
I'm going to switch over. I'm going to add a bit
of fun **** brown and just give this shadow,
some variation. And then back to some
more moon glow and maybe a little bit of
Indian thrown as well. Then suddenly we've got this
interesting very shadow. We can pull that down
just with some water on our brush During the page angle. And certainly not that shadow will pull down onto the street. I'm going to just really
gently provide some tone into this background before adding some dark tones on a
looming building here. Using the same effect, a little bit of Van ****, little bit of moon glow, a little bit in done throne. And before you now, another
interesting and varied wash, which we can just
pull down a little bit as well just to link
these things together. Then what else can we add? So we've got these kind of warm building over
here, haven't we? So why don't we take
some lunar were another warm brown like burnt sienna or burnt umber or even an ocher, just to a slightly
warm brown anyway. And then it's also
definitely in shadow. So once you've got that on, we can mix on the page. Really quick way of getting our colors down is
to mix on the page. And we certainly think wears
on negative space can be. So we've got all these
lovely colors going on around. And we have choices. We can make this negative space. I'm actually
inclined as I sketch to make this more sort
of punching colorful. Just with some Chen to cobalt, cobalt turquoise, this is just any old blue
would work really. And to extend some of
this red up here as well. Then on negative space, because suddenly
be the whole sky, the whole sky can be, can be on negative space. And that I think will also work. Well. How long have we got to go?
A couple of minutes left. So I'm going to just get
a few textures then. I must confess, I'm gonna do
a little bit of cheating. So I'm going to use my hairdryer to make sure that we can get this dry and finished within just about
within maybe 10 min. Just using a tissue to pull
back some of that texture. Then bear with me while
I quickly dry this off. Okay, so now we have
a really bold and this is where I said we
don't need to worry too much about how neat way of
being with our colors, because we can use a bold
pen to pick out outlines. So suddenly I bold pen can just come down the
line of color. And to neaten it up. And what you'll find by doing this really bold liner or bold could use a bold
fountain pen as well. So if medium or large
nib fountain pen, you get a really graphic
illustrative image. So a lot of, so pushing
forward with those details, we can just use it
on those key lines. And suddenly I loose
colors on our leaf shapes become something
a little bit more, a little bit more certain. But don't make it, they
make it too rigid. So we can still make it sort of this kind of
loosened squiggly line. But we can make it
just more certain. Okay. And how are
we doing for time? So probably, probably just
about done, aren't we? Let's just do some
last little details. Getting some real that proton
and some of these windows. And that better be me for
my ten-minute sketch. And you can see a lot
of negative space. Very simple to look at compared to some of the
other sketches we've done. But much more illustrative,
much more graphic. And the graphic quality comes from
experimenting with the, both the negative space. So all of this whitespace
just pointing in, as well as using these really
bold lines to lift shapes forward and simplify things into these really bold shapes. So again, I'd encourage
you just have a play around with falsely giving yourself a little bit of a time pressure to see
what you can achieve. Also with working on what
you don't need to paint. I'm playing with line quality in line weight and seeing what a strong versus a light line might give you in
your sketching.
14. Round Up and Thanks!: So that is the end
of this class and here are my little
projects I produce. Now if you want to share your class project, that'll
be absolutely amazing. Just upload it into the
class project folder. And I will make sure
to leave a response. It will comment on it and
give you some feedback. If you want to follow me on Skillshare, that'd be amazing. If you want to find me
on Instagram or YouTube, or I'll say produce lots
of different contents. That would be amazing. Known as Toby urban sketch on
all of the above platforms. And it's been a pleasure having you along for
the journey today, or maybe over several days and have a good
rest of your day, week or whatever it is.
 Toby Haseler, Urban Sketcher, Continuous Lines