Transcripts
1. Introduction: Hello everyone. My name is Jessica and I
want to welcome you to a class which will
teach you to draw. Even if every other
class you've taken in every book you've read on the
subject could not do that. The trick to success is in
building the foundation. I was in college learning
to be an art teacher. Someone told me to
teach as if I were helping my students
make a stack of things, like boxes for example. But it can't be any old stack. Everyone knows that a stack
like this will topple. These kinds of stacks
are made by little kids, are folks who are in a hurry. They have no foundation. They cannot stand. But if you build
the stack carefully and thoughtfully
one step at a time, you build something
solid that will last. And not only that, you can stack things
on top of that stack, and it will still stand because
it has a good foundation. This class is for you if you are an absolute beginner and it's for you if you do have
a drawing practice, but don't really understand
what you are doing. Or maybe don't get the
results you would like. Our class project after having fun with some
practice drawings, will be to complete this
graduation drawing, which combines
everything we have learned and looks complicated. But you will find it
easy and fun to do because you will understand
what you are doing and why. Our graduation drawing
is also the cover of my 100 page creative
drawing playbook, a PDF which you
can download from the resources section
for this class. This book contains all the
information from the class and lots of extra step-by-step
practice drawings. Let's grab that book
and a couple of supplies and finally,
learn to draw.
2. Supplies: Let's take a minute to
talk about are very, very short supply list. We're starting at the beginning. And you don't need a lot of art supplies have started
at the beginning. You just need some
enthusiasm and a pencil and anything that will take the
mark of the pencil. And so not a cocktail
napkin, not so much. But anyway, we want
paper that we can draw on with the pencil and
that will easily erase. You could use any paper, copy paper, anything
that's lying around. However, I promise you
that you will be drawing some things in this class that you will like and you
will want to keep. I'm going to recommend
that you use a sketchbook. It can be any sketchbook. But what will happen? It will turn into your primer
to refer to for this class. It won't be scary because the first pages we do
will be really terrible. And we already know we're not
gonna get bothered by that. In the end, you will
have your collection of wonderfulness and proof
that you really can't draw. I don't particularly care
of myself for a spiral bound because my hand
eyes gets on it. But in this case, spiral bond is fine too. Because if you really, truly only want to keep your good pages at
the end of class, well, you could just tear out the bad pages and
they'd be gone forever. A sketchbook is just
a really good idea, is not necessary, but
it's a really good idea. And a pencil, and pencils come in all kinds
of hardness and softness. The yellow one you
use in schools, very soft and very smearing. The only thing wrong with smearing is that
it's hard to erase. And we're going to erase
all that we want to, we're gonna talk about
that in a second. But I generally use a three
H pencil or two H pencil. And the H stands for hardness. And the higher the number, the higher the pencil they make. This is not one which is why
I'm not demonstrating it. And the reason it's
not one is because it's a light line that doesn't show up very well on video. I am going to use a, three b. The b for some reason
stands for softness. And so I'm actually
using a smear, a pencil. But you don't need to do that. You can find drawing pencils anywhere that are all numbered. And for long-term
drawing practice, a three H or to H, or even an HB which is dead
center, is a good idea. So this is just a
regular pencil. And the third thing,
sketchbook pencil, eraser. I call an eraser, best friend, and a
permission stick. Permission stick. Why? Because this gives you the permission to make any
mark on a page was no fair? It's an undo button. If his son a computer. There are, there's a lot out
there these days because people making art seemed
to be in a big hurry. And so there's a
lot of talk about erasing being a really bad thing and go directly to your ink line and then live with it and all
this kind of stuff. That's fine if that's
what you want to do, but it's not a race. The pencil erasers
situation where you draw something and if you
don't feel it's right, you erase it and
you draw it again. That's a good thing. That's the creative process
when you're making a drawing, you're sketching and you're correcting and you're creating as you go so far from
being a waste of time, It's a really good thing
to be able to work with a pencil and eraser because there's
no fear involved. Can undo any mark that you want. You can correct, you can move things in your composition
and that's why you like to have a lighter lead in the pencil so that
you don't end up with a really dirty page. You'd like it to erase completely after you
put in your good line. Sometimes that's done with ink. A lot of times that's
done with ink, but we're not gonna do that in this class because the ink is scary and ink is difficult. Early. We won't get there someday
in our little journey. But what I prefer to do
with beginners is to make our final line with a
black colored pencil, not a watercolor pencil, regular black colored pencil, nice sharp tip on it. We will use this to
define our good line. Once we find our good line. That's really all
we need for now. A little later, when your
drawings are looking really great and you feel
like filling in color. You might add any kind of color, colored pencils or markers or whatever to the supply list. But this is all we
need to get started. Let's do that. Let's get started.
3. Drawing Straight Lines: Let's start our journey
by talking about lines. Line is due most important
thing that there is in drawing because with
outlines there is no drawing. You could argue, well,
a stroke of paint was aligned to just the
fat one, colored one. Anyway, lines come in all
kinds of shapes and curves, zigzags and so on. When, when someone
says they can't draw, they usually say they can't draw a straight line with a
mean by that is that they can't just make a perfect line without a
ruler just using a pencil. It isn't true in the first
place that you can't draw a straight line if
you can print your name. Because the alphabet,
when we print it, to write our name or
anything else we learned in first grade or wherever we learned that those are
all straight lines. So of course, you can
draw a straight line. But we all know where people are talking about,
when they're talking about. I can't even draw
a straight line. Now see, erasing is very cool and you're wondering
where these are going. I'm in a greenhouse freely. It really doesn't matter. I'm not putting a
month my floor. I am not getting a
really clean erase line here and it's because I'm using a heavier pencil so
that you can see it. Now if you set out to
draw a straight line, one easy way to draw
a straight line, and nobody said it's
against the law ever is to use a ruler. Straight line, perfect line. Now when you try to do a straight perfect
line without a ruler, that's a different thing. So you've drawn, I can draw pretty good straight
line because I've been drawing them for 50 years, but it isn't always easy. They walk and they do things. People go see, I can't
even draw a straight line. There are a couple of
clues I'm gonna give you about drawing a straight line. And one of those
is related to if you've ever played softball or baseball when you
were a little kid, what did they say to you? They said keep your
eye on the ball. Don't look at your mid don't
look at anything else. Keep your eye on the ball. Why? Because then our hand
wants to follow our I. So if I wanted to start here and I wanted to draw a pretty
straight line up to here. It'd be a good idea to
put a target dot there. Then when I'm drawing
my straight line, I'm looking at that dot, not at the line. I'm trying. That's not too bad. You can get there from here. The truth about straight
lines is that if they are a part of man-made
structures and so on, they need to be true vertical
or a true horizontal. And obviously true
vertical means standing straight up and down. You're drawing
buildings and things. It's fun and sketchy
to do wonky buildings. But it doesn't always
work because that isn't the way that the structure
would actually stand up. So you're sacrificing
some reality if you can't manage a straight true vertical. Likewise, a horizontal line
should be a true horizon. And if it isn't something in our little gut response thinks that we're
gonna fall down. This is why when you go
into those imax theaters and you're watching
these surround films, they give you re links to hang onto because when
we tip our horizon, we tip our equilibrium. Believe it or not, our brain
is running all of this and we have to behave
according to our brains rules. And so our brains rules
say that a building, a telephone pole, whatever, supposed to be a straight-up
thing in a horizon is supposed to be a straight across thing and then we feel good, we feel nice and stable
here on little planet. Now another tip about drawing straight lines is
that for most people, drawing away from their
body is a steadier thing. I don't know why. We
think we're gonna stab ourselves in the
heart with our pencil. And every class that
I've ever told that too, I said somebody who's
raised their hand, I feel better drawing
it toward me. Well, if you do
awesome, you pick. But try it and see, try drawing a straight
line away from yourself. Try drawing it toward yourself. See which feels better to you whereas your hand
more comfortable. Now a third thing. Is that never should
you think that a sketchbook or a
piece of paper as glue down to the tabletop. It isn't, it moves and
it moves easily and it's worth moving rather than getting
your hand uncomfortable. This will come in really important when we do
circles in the next lesson. But, um, anytime that
you're drawing anything, turning this so that you are
always making your line. The comfort zone
of your hand and yourself is a great idea. Just turn it in,
turn, turn it works. The next thing is that when you began to
draw straight lines, it's a really good
thing to draw them in his sketchy fashion rather
than a swoop like that. When you draw a line
and a sketchy way, instead of a swoopy way, you are correcting as you go
along your brain in hand, just do this. No,
you're not to think. But if you do these
short strokes, you get a really nice line. Little bit fuzzy, but I would
just clean it off, right? Nudes cleaning up. You see inside of you guide. I'm gonna call it a
guide, not a critic, a guide who's really
your brain actually, but who knows where things
are supposed to look like? Think about this for a minute. Everybody talks about
the inner critic. But if you didn't know what something is
supposed to look like, how would you know
that it's wrong? It's a good thing that you
allow your inner guide to correct your line as you go along and drying
is perfect setup. It's not like, oh, I'm never gonna be
able to draw because that line looks like
it's not right. That makes absolutely no sense. If you're telling yourself
the lines not right, then you know that where
the line should be. If it is gonna be right, you just hunt for it. And that's what I call that a hunting for the line
when we're drawing. It's a really good thought. It's a really
empowering thought. Now, most man-made
start and women made structures in our world are
made up of parallel lines. Most of nature's
made up of curves, but buildings and houses
and sidewalks and streets. Telephone poles, It's all
parallel lines, boxes. What's the parallel
set of parallel lines? It means that there
are two lines. That's a really crappy line. They are the same
distance from each other all the way
along their length. Obviously, that's not a
really easy thing to just do. There is a good plan and
it's related to the keep your eye on the ball for
making parallel lines. But if you're going
to create a drawing and things are all going
to work out, okay? You got to make sure
that you start with a line that's a true vertical or a true horizontal or true slant wherever it is you're
trying to draw. Your first line is going to
be the really important one. I have a little vacuum
for these and I don't want to make all that
noise on the video. However it is, you have to establish that first
really good line. If you have to use a
ruler, greed, do that. I'm going to do that using the edge of
my page as a guide. And you can use that
edge or this edge depending on if you're going
vertical or horizontal. But what I do is I
measure two spots, ruler straight
against the chair. I'm going to just put my
first line at one inch. You can use anything to do this just so that they're
the same distance. Now, I have two dots on my page, right here and right here. They both Denmark and
one inch from the edge. And so then I do use a ruler
very often for guidelines. Because who's watching
and who cares? Idea is to get it
right in the end. When you draw your line
through those two dots, if you end up with a pretty
darn good starting line. Now we have a pretty
darn good starting line. We're going to draw a line
that's parallel to it. If you want to beef it up so you can see it a little better. That's cool too. You
see what I did here? I picked up my three h, which is why you can't
see it very well. But I like it better
because it'll erase any way while drawing online
parallel to another line. The thing to do is to watch the line that
you're following. And so it's like
keep your eye on the ball and it's Don't watch your pencil point doing
this because then you can watch it and it will go all over the place and do whatever once. Watch this line and watch the distance between this
line and your pencil point, and draw a sketchy
so you can correct. But draw along. Watching this right
here, this space. Sometimes our brains are
a lot happier looking at the negative space than the positive mark
that we're making. I don't know why that is
either were just weird. This is pretty fuzzy with
this soft lead pencil, but we're getting
the job done here. That's not terrible. And I want you to
try it and I bet you that yours isn't
terrible either. You can always check if you
have this ruler around, you can always check how
far apart are they hear? Far apart are they here? If that's vastly different? You keep drawing parallel lines, which is usually what
you're doing when you're drawing a house or a
wall or fence or whatever, you're putting several of
them, a door or a gate, putting several of them
Based on each other. And so it's like if you've
ever done any kind of needlework like knitting
or crocheting or someone who's be a
tiny little mistake. But because it keeps
being built on, it gets worse and
worse and worse. If you skipped a little stitch, then it's going to, your piece in the end
is going to be coming way in well with
a parallel line. If this one isn't really
parallel to this and you're a 3.5th one is to be parallel
to your second one. You're in trouble because you've got a slant going on that you're going to accentuate,
going all the way. So it's just a thought,
just a thought. And I will share with you
one of my favorite things, which I got for, I don't know, $2 on Amazon. You can get a little
pack of them. Westcott ruler and it's, it's done with squares. And it is awesome because this
is kind of hard sometimes you know how many eighths
is add to 816, 32nd. Little difficult for the
artistic brain anyway. This is easy. I just take a main line
there and count the squares. 1234, how far they
are apart here. Let us go down and see how
close I was down here. 1234. It's a little high on the four. I'm not going to say I'm
not perfect, I'm not, nothing is, but I
always try anyway. So four here, four here. I know I have parallel
line to this. Right now is an
exercise that's just important to do and that's
all there is to it. And if you skip it, then you're not going
to have comfort moving forward and it's gonna take you
about five minutes. I want you to take your
page in your sketchbook. I want you to do
what I just did. Get yourself a good true
line to start from. And then I want you to draw, got your way and drawn away from yourself and turn in the book whatever it takes for comfort. And try to make these
spaces the same. And see how you do. You know, it's not going to be great as first-time
you're doing some. So it's not gonna be great, but I bet you, it's not
gonna be terrible either. I want you to go all
the way down the page. When you have
finished doing that, we're going to turn our
page and we're gonna make a really cool drawing with what you already know how to do. You'll like it and it'll be fun. I'll see you in a minute.
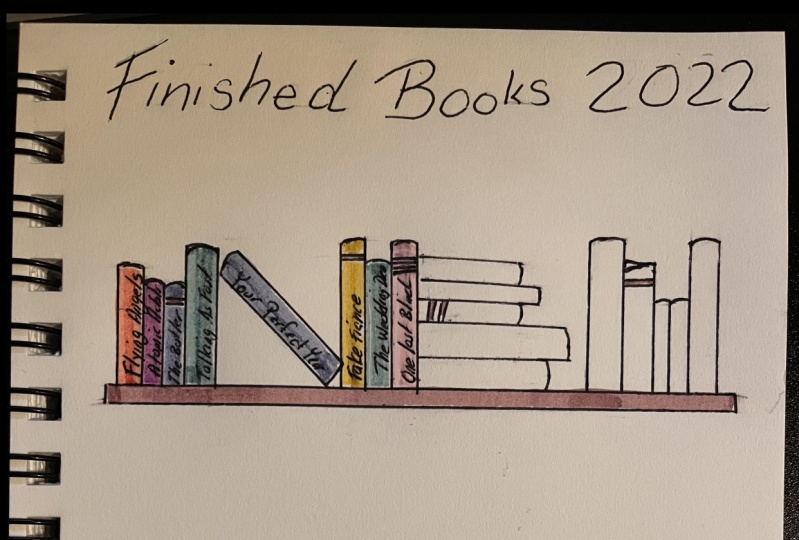
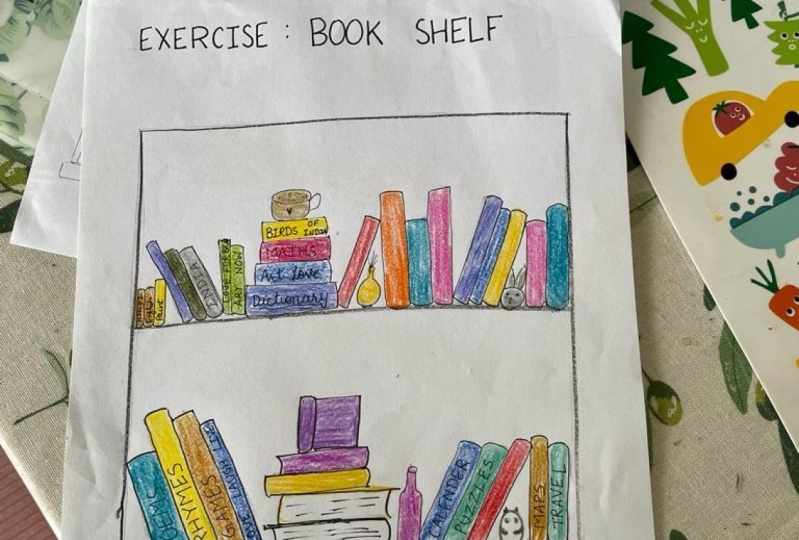
4. Create a Cool Bookshelf: I am a firm believer in the fact that you learn better
when you have any fun. And so you did, hopefully you did your page of parallel lines and
that's a practice. And it wasn't that fun. Probably it might've been
challenging at first to see if you could do it and then you got boring and then
you are going on. So I think that we
learn better when we take what we're learning and
we apply it to something. And so we're going to do a drawing and it's
going to be fun. And you're going
to succeed at it. And it's going to have
a real creative element till we're going to
make a bookshelf and we're going to fill it
with books and wanted to do it high enough on the page so
that if you have so much fun, you can put another shelf below
it and do the same thing. And it's all going to be nothing more than what
we already just learned. I'm going to locate my bookshelf about maybe a third of
the way down the page. So I have room on the top
to put books of any height. My line that is going to be my true line for paralleling is going to
be right about here. Right about here, is
about three inches. I think. I'm gonna go with three
and a quarter inches. Then I'm going to
move over here. Three and a quarter inches. I am going to put my
ruler and get your eyes, get your sketch book
pages lined up. Because when you're looking
at the edge of a page as a guide to something. Good if it's Kirkwood
to start with. And so I'm just going to put
a light line across there. And that is the top
of my bookshelf. The bookshelf has to have some strength in order to
hold any books on top of it. And so I'm going to
draw a parallel line, do it in a sketchy way. And I noticed that a slanted my board to make it easy on myself. Just a lot more fun
when it's easy. There is a bookshelf
already, just one. But some people have
these new node. They're hooked on their wall and they're just a single shelf. So we're gonna start there
because we can always add no, no point over amping
in the beginning. And if you look, I am not parallel, they're, my inner guide is telling me that isn't even good. I'm gonna get rid of
that good old eraser. And I'm gonna get my little red ruler and
I'm going to check it. What I have here is I have to these little squares down here, look how bad that is. I'm halfway through another squared by the time
we got down here. But by shocking, I
know that I'm going to line my line down here with
that little dot I just made. My line should look a
little better and I'm gonna use the ruler to make sure the lines are still fuzzy and we're going
to fix it in a little bit. How to draw a book, just like this, only shorter. So your books are gonna stand on the shelf
or they're not. And later on you can add
a what do you call that, those things on bushels
of old books up. Okay, I'm lost. I can't even think of it, but you can add one. And so your height
and thickness of your books is going to be
wherever you want it to be. You can take a look at your
own bookshelf if you want to. But try to make a true vertical book is
standing up on a tent. Then make a sketchy
line right next to it. This would be a
straight line to, but you can curve it a
little bit if it's just, we're looking up a little
bit at the bookshelf. Next book is going to
be shorter and fatter. Like this. Just a tiniest curve on your straight line
at the top of that. Then I'm going to make the one next to that are about that tall, about that thick. I'm drawing my parallel line. Cool. Now right next to that, I'm going to have some
works that are lying down. And now I'm watching this, I'm referencing this
horizontal line to make a parallel line to it to get
a book just laying down. There's one line down
on top of it too. But it's a smaller book. So now we're seeing the spine as it were laid
down on the bookshelf. I'm just getting rid of some
extra fuzzies here so that my eyes can reference
the real lines. Then I'm going to put
another couple of here bookends that's called takes a long time to dredge up from the bottom of the
sea of my brain. But there it is. I think I'll make the next
one little taller. And then I'm going to make one slant because we just
don't want it to be boring. So in that case, I'm gonna make a book that is
leaning against that book. Your reference line now is not a true horizontal
or a true vertical. It is now slanted, but you are still going to make your parallel line
parallel to it. Now it's sitting on its corner because that's
what they do if they lean. I'm going to put even
another book Leaning. You're getting the
picture here. I think. Of course your choices are
just absolutely arbitrary. You can look at your own
bookshelf and go from there. Because of fun part is going
to be when you finish this, you're going to go back
and get titles from your favorite books and write
those titles on the spine. And then you can get colors out. And that's the creative part. We can go back here to
little shorter, fatter guy. And so on. When you fill this shelf, you have a lot of
choices here and they all have the same skillset. You can put a bookend here, which is something like this, and then it usually has a stand or it could be
more fancy than that. Would hold those books there. You can make uprights at
the end of your bookshelf. You could do it over here. You could have a whole
the whole page be a bookshelf with two shelves. You don't have to finish
this in one setting. In fact, my finished
sample that I'll show you, I don't know if it'll
ever be finished because I'm still adding titles as they come
to me as I think of favorite books that I wanted
to be represented in it. But for this, you just keep going as long as
you want to keep going. And if you want to
do a second shelf, just space it just like you would at home
in your bookshelf with enough room for toddler
books and smaller books. Kick your farm and go take
a picture of a section of your bookshelf so that you have colors and titles
you can work from. But anyway, what's
going on here? What's going on is
you're making a drawing already and you only know
one lesson worth of stuff. A lot of you I know I know her getting basics and you're
already draw a lot of things. But if you never have
tried it before, you're already
creating a drawing that's gonna be creative
and colorful and fun. And it's gonna be a real keeper. This is all sketchy
line and I want to take a second here
to show you what I mean about putting in your
proper line that you found. Because in all these sketching, Let's say on these two books, I found that I have the
straight line is right there. The straight line is right here. Instead of taking an
ink pen to do this, because it can be
messy and scary. I am doing this with a black colored pencil because colored pencil
does not erase. Yet. It goes on with a softness. That's like a real
pencil and not scary like ink and
it won't blob again. You can always
move to ink later. But for now this is how
we can clean up our work. So when I take an
eraser back here, even my smear a pencil, I'm getting rid of
all my sketchy lines. Yes, there's a
black pencil line. Get lighter. It does, but it doesn't erase. Therefore, you can come
back and you can strengthen it before you do
color or lettering, or this would be good for
doing the lettering too. After you put your color
on or before you put your collar on because
you'll be able to see it through your color. That's it. So this part
of your project is to do as little or as much of a
bookshelf as you feel like. And take it as far as you
feel like put in some titles and colors and it can turn
out to be really cool thing. A keeper already. Here you are. You just started. I wanted to show you
what I would call it a finish of a bookshop
drawing that I did. I'll show you the difference in using an ink lines thinner. But otherwise she was just going to have the
same kind of look. By all means if you know how
to use a fine liner and ink pen and you have no
problem with it and do it, you know, But those who
are a little afraid of it, you can do the pencil instead. So this is the same way
that you started out. I have blocked this because
it's a different page on a different subject and I don't want to confuse the issue. I got carried away with mine. I got carried away
in a different way. I didn't do it by having
more shells or, or bookends, but I did add some dust bunnies because here in Santa Fe this is always, especially out in the country. Always true in your bookshelves that everything is always dusty. I own a duster down here. These are some of those giant
books that don't fit in a bookshelf and never were
never know where to put them. So I just like let them
lean on the wall here, stacked some more
books on a shelf. And you can do that too. In your laying down books. You can have them for the
spine shows and you'll put the title or you can
have one end or the other, or the back or the side of it. And all you have to
do is put a couple of kind of wiggly straight
lines into represented. Those are pages. Here's a bookmark. It's also two parallel lines and I just put a kind
of a JTAG you on their same toolset table. Two parallel lines. The cat, forget it,
that's curved lines. This table leg also
two parallel lines. This is more of a
circular thing, but it doesn't have to be. It could just as well be
same shape as a book. And it was still looked like
a table and it was still a great by the time
you finish this, even the drawing of it, you're gonna be really proud
of yourself and you're going to be pretty darn good
at making lines parallel. And that is the first huge basic of knowing how to draw
if you can do that. And a couple of things
we're going to learn. You have a world opening up in front of you if
things you can draw. The third step in that
is going to be able to see what shape things are made of and then
apply these skills. But so far we see that books
are made of parallel lines. There are rectangles,
rectangles, and squares are two
sets of parallel lines. And most man-made things are either rectangles or squares. So you're in business.
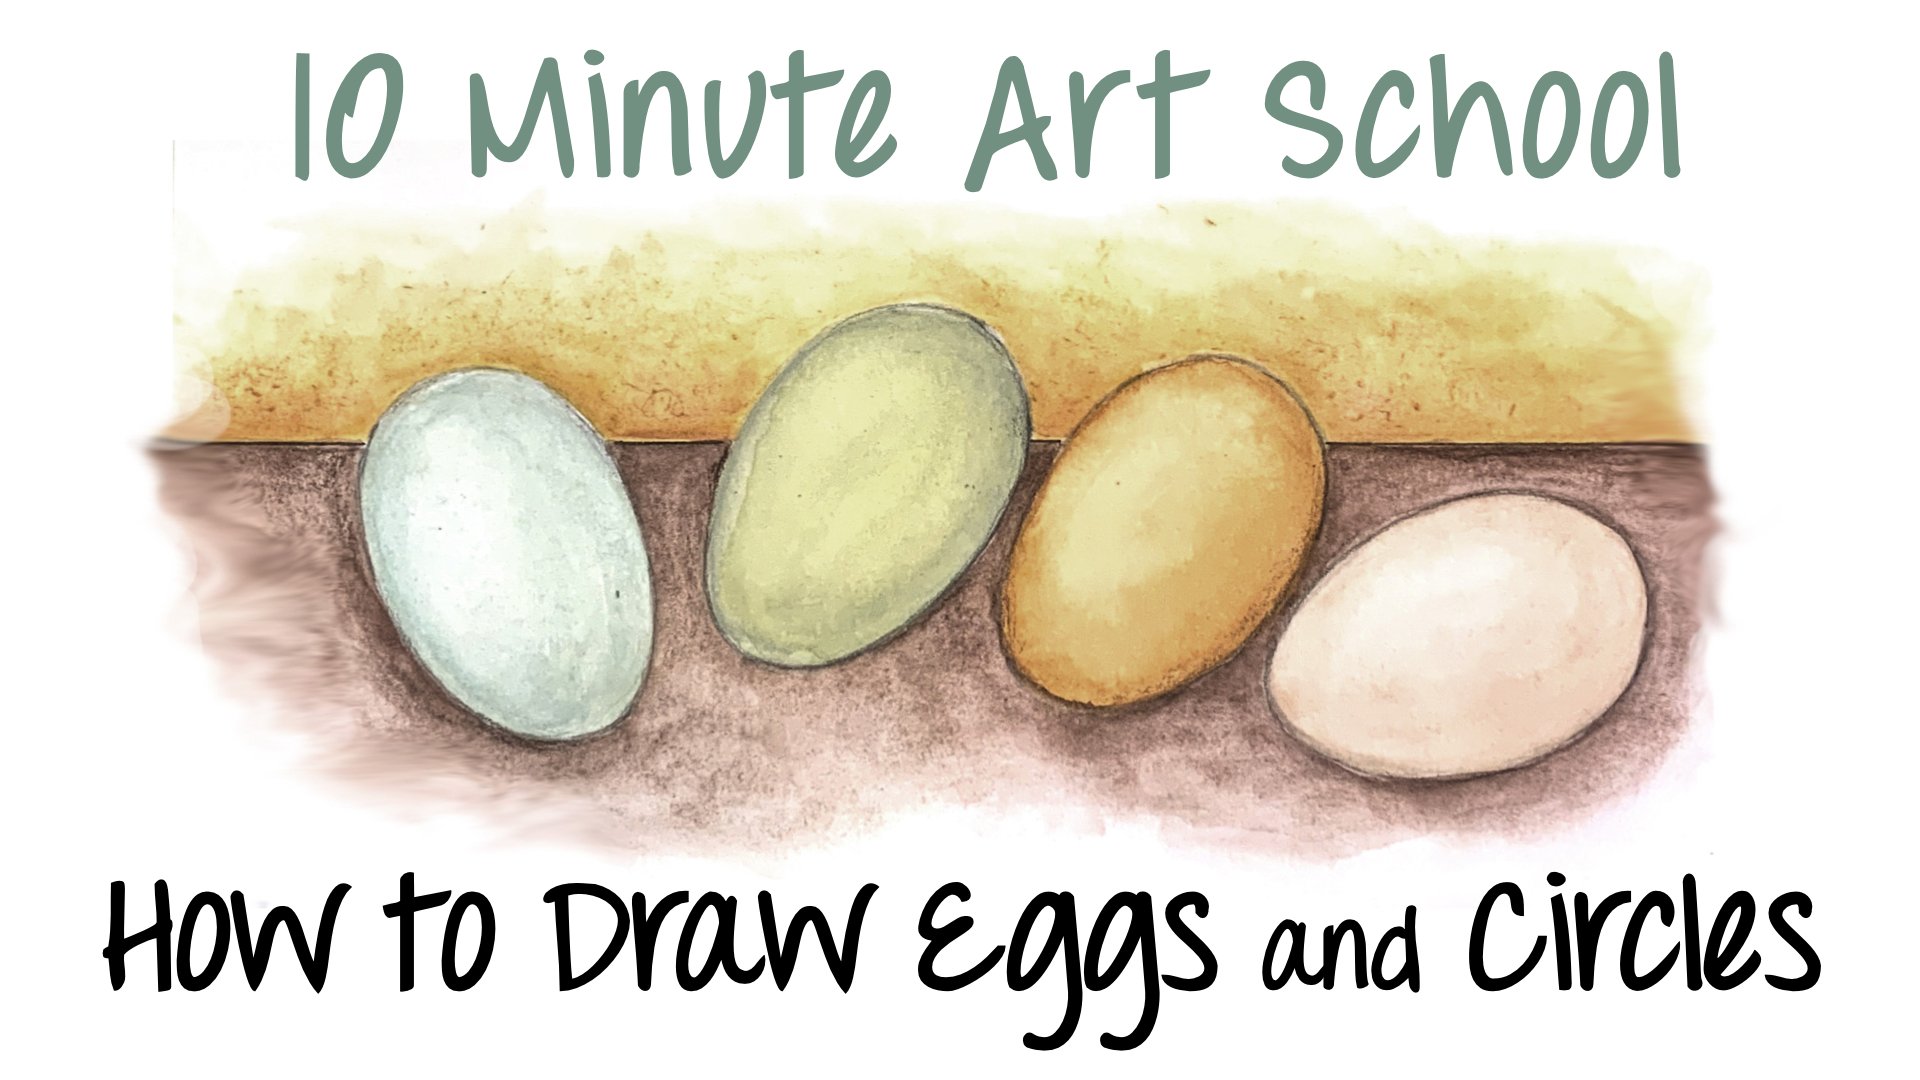
5. Circles Go Round and Round: As we all know from the
title of this class, it is about basics of drawing. Basics started the
real beginning. And basically it means
2D or flatly drawing. So what is that? That means that we are looking
straight on at something when you see a flat lay
photograph or whatever, something is usually laid out so that you're looking
straight on at it. Now. Granted, straight on is not the way that we
usually see anything. I mean, we almost have to make an effort in order to do that. And otherwise we have a
point of view that's not straight on and that
changes the basic shapes. However, if we don't understand the basic shapes that something is made out of, we are not going
to understand how that shape will change
in perspective. So without that being more complicated
than it needs to be, I'm just letting you
know that 2D drawing is the best place to start
because it is the way to understand what things
are truly made of. We're gonna talk about in
this lesson about circles. And we will in just a minute, but I have a can
of cat food here. I'm going to use as an example of what I
was just talking about. This can of cat food
is made of flat. In order to know what it is
made of basic shapes wise, we have to look
directly down on it, directly at it, from the side, directly up at it. See what the shapes really are. So right now we're looking
directly down at this Can, the camera is as much as I can make that happen right now. We see that the top
of a can is a circle. Plug a perfect circle. Let's turn the kn
over and we see that the bottom of the can
is a perfect circle. Now this just seems like
obvious kindergarten nonsense, but it truly isn't because
if you get this into your brain about what a
thing is actually made of, you will know how to treat it
when you get a little more advanced in your drawing
it from a different angle. From this side. What is this round can with the circle at the top
of the circle at the bottom. It's rectangle. That here's the two
parallel lines. Here's the two parallel lines. Knowing this is going to
keep you from mistakes like when you're looking
at a can, at an angle, not understanding that
this line has to be the same curve as this line because they're
parallel to each other. Because, why? Because they're a rectangle. In this class, we
are going to go after understanding
those basic shapes that make things up and making
it part of our DNA almost. So that when we are looking
at something in perspective, we know what it really is. I'm going to grab
something else here as an example and it's gonna
be a little more unusual. But if you look down, I'm trying to move this so
it's street now as it can be. You look down at
this spray bottle. It has a circle here. It has a circle here. It has a circle
here. From the side. It's a rectangle. The bottom is a circle. If you look at it straight
from the side here, you have rectangle, rectangle,
rectangle, rectangle. What this really
is is a series of these big and small sitting
on top of each other. So with that in mind, we're going to spend some
very simplistic time drawing and for recognizing
perfect circles. They're all over the place. We just don't ever look
at them from that angle. Usually. We want it
to be able to draw a perfect circle that is
not easy out of the box. But our inner guide knows what it perfect
circle looks like. If you reach out with a
pencil in your draws circle, more than likely, you're not going to
have a perfect circle. Because we just, we know
what a perfect circle is, but our hand doesn't know
exactly where to go, especially in one movement. To make a perfect circle. Circles are imperfect in
just a couple of ways. Here is a tool that
is just invaluable in any size and they're not expensive and you can pick
them up almost anywhere. But it's a circle template. Why they're so useful is
they can tell us right away where the problem
is with a circle. This one is kind of the size of this right here.
Maybe this one. What do we see? We see that we were
doing pretty well. We came around here but
didn't really lost it. So circles can be
wrong in two ways. It can be too flat or
they can be too fat. This one is too flat. It's got this flat side gonad. And so we wanted, and we need to do is come out like that. If you draw a circle
and it's walked out and a different direction, what is this one? This one isn't too
flat anywhere, but it is too fat in two places. And take this down
to what size it ought to BC this right here. That's all just too fat. Down here is too fat. I'm going to just trace this
to show you the difference. You're not always going to be running around with
a circle template, but if you had one
around while you're learning to perfect
your circles, It's a great tool because
you can do what I just did. Your best approach to drawing a really good circle
is the sketchy line, again, because you can
correct as you go. And the idea of turning
the book very important. And so I'm going to show you
how that goes right now. I'm going to draw a
circle right here, but I'm not going
just with one line. I'm gonna draw my circle
with the same kind of little sketchy
lines that I drew. My straight lines with an, I am going to turn my book
so that my hand is always comfortable as it's making
these halfway around. Now. I keep going. I'm feeling it out. I'm feeling that curve
that I'm making, making sure it's nice and round. And we're gonna
come back this way now that I can see that and never going to keep that up, I'm going to get all over here. Now, it doesn't look too bad. However, my inner
guide is telling me, I think I have a flat
side right here. I don't think I
have any fat sides, but I think I have a flat side. I'm going to test that and
find out if it's true. That's almost a match here
for this size of circle. And it's not very flat. But it's a little. If I do this, am I getting
any you want this one? It's a little bit off
round on this side. Just need to add little
more round to decide. And they've got nearly
a perfect circle. And it's all the
hunting of the line, the turning of the
book so that the hand is always comfortable
drawing that hunting line. Correcting for too
flat, too fat. I want you to do another
boring exercise. And then we'll draw some exciting things that
are just made of circles. Once you can draw a good
circle and parallel lines, you have the tools to draw most of the stuff in the world. Because most things
are made of boxes and circles in some kind of a combination very similar to what we were
talking about here. Circles, boxes, depending
if you're looking at the side where you're looking at the top
or the bottom. The first part of your
assignment, if you will, for this lesson, is to
fill a page with circles. Whether you have a
circle template or not. You can do, go by the feeling of your inner guide telling
you that's a bad circle. Okay, Then listen, why
is it a bad circle? What's wrong with it? And look at it and
you're going to see like it's really flat there are, oh, it's really fat there. I'm going to bring it back into balance in
what makes sense. This is the boring part, but this is the
learning brain hand, muscle memory part, if you will, about a good way
to draw a circle. Sometimes you have to
do them by hand because you can't be carrying a
template around all the time. Now the second part of your assignment for
this lesson is to take your phone and go around your house and look
for perfect circles. Now that is not going to pop
up obviously all the time. You're going to take the
head to take something. I think there's a
circle on that. Take some things and look at
it from different angles and see if indeed it is the circle
that you're looking for. And take pictures and
take them as straight on as you can of these circular
things in your life. Then we're going to meet back
here and we're gonna look at them and think
about drawing things.
6. Drawing Circle Based Things: We are back from our circle haunt and I have no
idea what you've found. And so I'm going to go through what I found in order
to point things out. As I went into the house
for my circle hunt, I ran right into a tomato. Tomato is looked at straight on. Actually, a tomato is a ball. No matter where you look
at it from a stool, looks like a perfect circle, so it's a good place to start. I'm using Procreate here to show you my photos because
I've been able to draw, help you to see the circles in some less obvious
cases than this. This is pretty obvious. It had snowed here and I
went outside and I have a stand outside the greenhouse and the top of the
stand as a circle. So when the snow piled up, it piled up in a really
nice snow circle. Again, just like the tomato, but not something that was
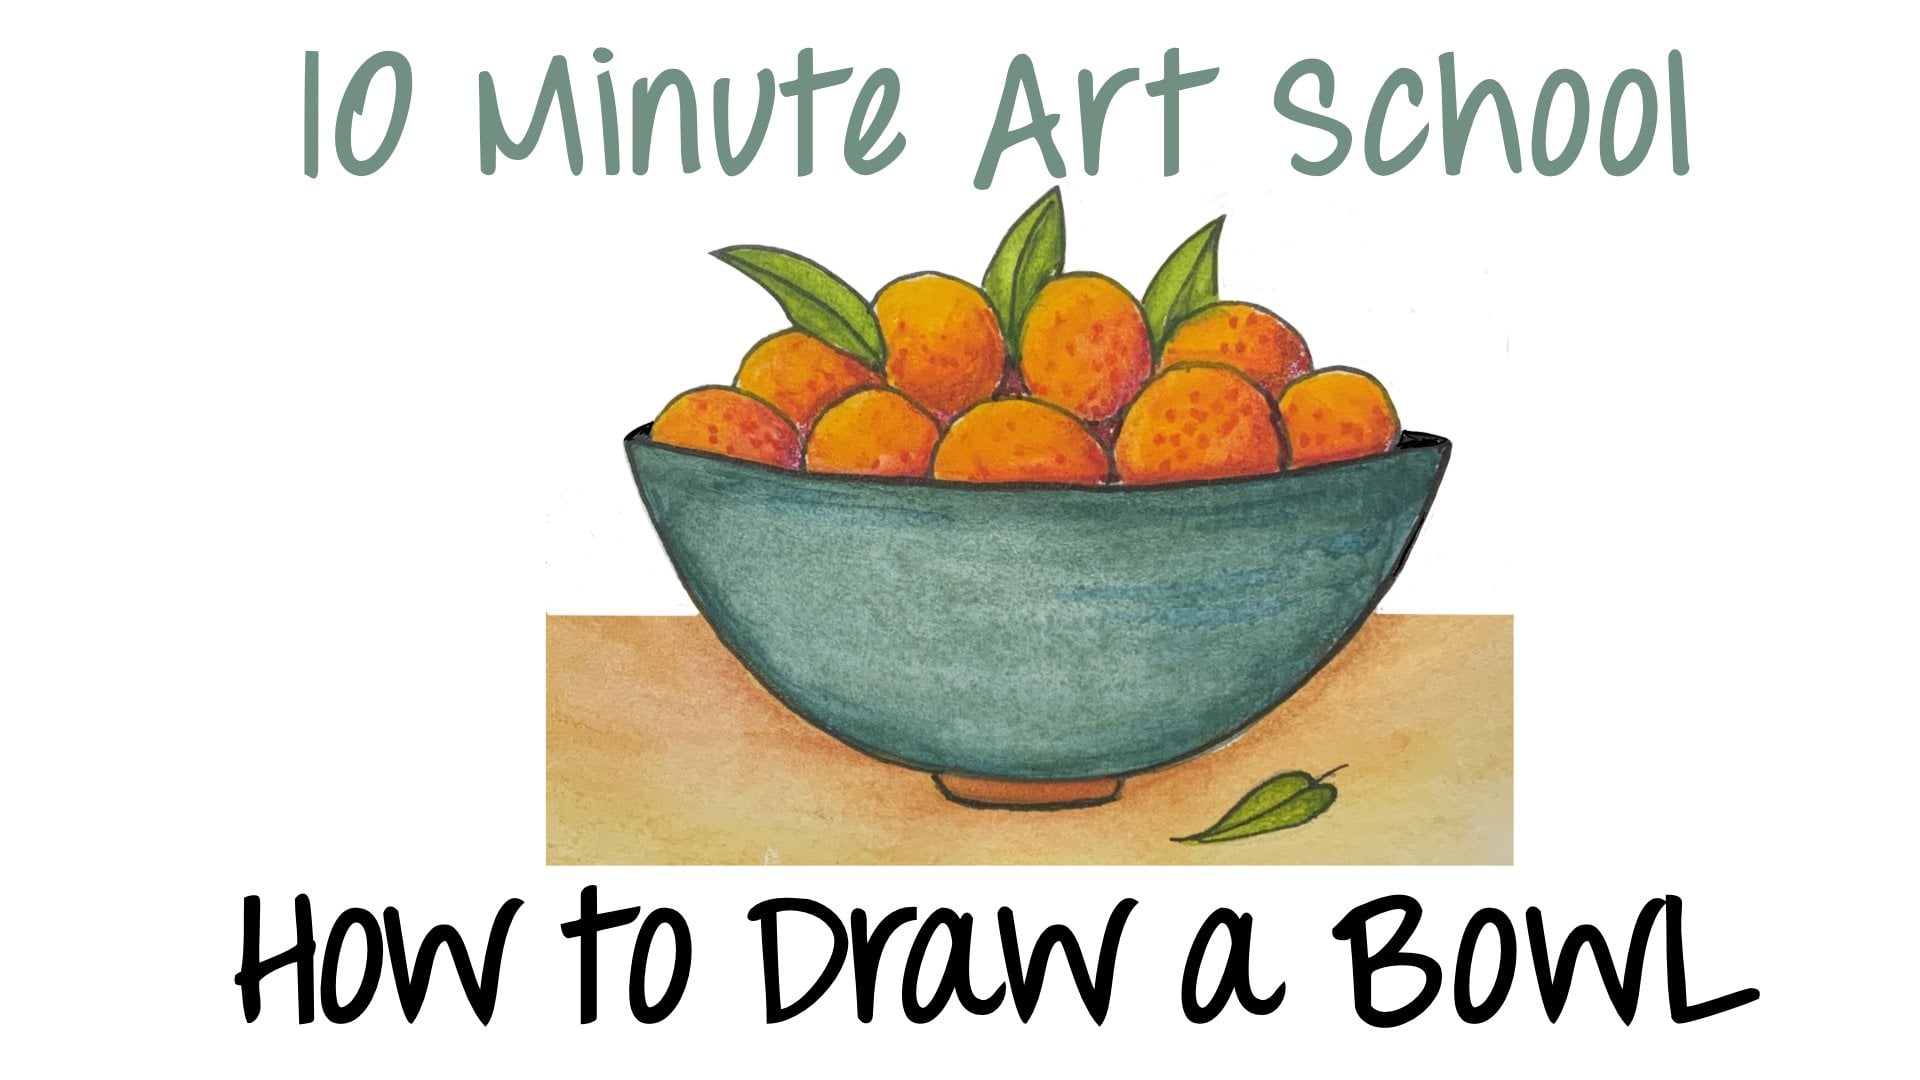
always there in this case, this was a magic phoned circle. This is just a little Japanese
ceramic real shallow bowl that I happen to like very much. It obviously is a circle when you look straight
at it like this. The other thing that's
incorporated here were you to want to
sketch this bowl. The other element of it is
really your parallel lines. Parallel lines. I don't have to be like
machine-like about it. These are the idea of parallel lines which
help you to draw this, but you wouldn't want to draw real straight perfect lines
did respond to get the idea. This was done with a brush because it's thick,
thin, thick thin. But when you notice
that, you know, how about how you
could put the decor on this this bowl if you were
doing a drawing of it. Never take a picture of a roll of tape that
you're going to look closely at because
the adhesive nature of tape picks up stuff, we'll pet hairs and
pieces of dust. This is not true
to the flat lay. Today are today the flat
lay 2D effect that we're working with because of the thickness of
the rule of tape, we're seeing down the
side inside here, which is what this
orange thing is. For the moment, we're
going to ignore that because it isn't
helping anything. But what we have here is
more than one circle. To work this out. We have the one around
the outside of the tape. Then we have the one that's
the the edge of the core, cardboard core that
the tape is Wanda. And then we're gonna have the
other side of that as well. We really have three
circles in here. In this particular picture. I want you to observe that all of the circles
have the same center. The lines of the circles are parallel to each other
all the way around. If I take the tape
out of there totally, we can see that we have
those three circles, two smaller ones
within a larger one. Parallel circles because they're not offset in any kind of way. My drawing probably
is a little bit, but this is parallel to this. This is parallel to that drives
me nuts when I hit that. Another name for this
as concentric circles. To draw a concentric
circle or parallel circle, you do exactly the same
thing that you did when you drew parallel lines. So you get the first circle, whether you start with the
smallest and go out where you start with the largest
and go in drawing. It is the same thing. You keep your eye on the
one you're trying to follow on the space between that and the one
that you're drawing. It's really important
when doing this with circles that
you turn the book. I just turned the
whole thing here. I didn't I but anyway, you turn and turn and turn as you're drawing
a parallel circle. I want you to stop right now and stop the video
for just a minute. If you're working along, if you're watching through
and then you're going to work along well, keep
watching through, but it would be
really good right now if you stopped and you try to draw a few
concentric circles and see how well you do. The first ones are not
gonna be very good. They won't be really parallel
and you've got to make sure they're round circles
to says they're a big job. But in practice is what
makes perfect in this. But the success, like I said, comes from turning and turning and turning
the book as you do sketchy lines and you go along watching
that other circle. First, you've got to
draw the good circle you're following, right? So, but practice does make perfect the skills of this
are really simplistic. It's the doing it
over and getting used to it that
makes you improve. Watch this line as
you draw this line. This is my coffee mug, little errant line
of Kremer in it. I don't know how that
happened. Anyway. Again, we have a
circle out here. Circle at the
inside of the room. When we look straight
down on a coffee mug, that one, that one. Now, in this case, if we were drawing this, we have something attached
to the item as well. It's the handle. When drawing things
that are circular, always draw the circle first. Whatever it's going
to be attached to, it is going to be a lot easier
to draw, attached to it. Much easier than
drawing this handle. And I'm thinking you're
going to get this circle. All perfect. Draw the circles. And then you'll know
exactly where to put this point and this
point of the handle to join them about two
o'clock and four o'clock. Because you can always use
a clock for a reference. And then you just have to make your little lines and that, and you'd have the
handle. There it is. This is actually one
end of a flashlight. Again, we have a circle. Another circle, another circle. We have. This is actually a strap
hanging off of this here. I don't know if I
would ever even put that in the picture. But one more thing I
wanted to point out, if you were drawing the
end of this flashlight, is that the pattern on the center circle
is made up of what? It's made up of parallel lines. There's a method
to this madness, even though it seems so simple and it seems like
why would you ever want to draw the
end of a flashlight simply for the power
of observation. When you look at something and you're able to see
that it's made up of three circles and a
bunch of parallel lines. You understand that thing now, you know how to go
about drawing it. Like in this case, the outer circle first. This is what I would do. Then a parallel circle
inside of that one, and then a smaller parallel
circle that I'd be watching this distance and keeping it at the right
distance from there. And then a bunch of parallel
lines in one direction, parallel lines and
another direction. And you would have
a perfect drawing of the end of this flashlight, then you can figure
it out what one does with a perfect drawing of
the end of a flashlight, but that's just a
different issue. Here is a watering can in
front of a very dirty window, I think greenhouse part
of it isn't dirty, part of it is a screen. But I got to get outside at the end of winter
and do these windows. Let's look at this for a minute. Now we're in that mode
where we are looking at a thing and trying to
figure out its structure. What we have here, although it's not
perfect, is a circle. Again. That's where you would start the drawing because you
know that for sure. Here's the circle. And then I corrected
where I needed to. This particular circle had to be flattened a little bit because otherwise it would
never sit up, right? So I just made a new line there and I
already erase that one. But I started by
drawing a circle. If you look at the handle
of this watering can, you will see that there you have another circle when you're
first beginning to draw. And to notice these things, make your complete shape come back and erase the
parts that you don't need. There's a very good reason
for that because it makes you understand that you have
those shapes there. If you were to start over
others as a hand on it, you start drawn it, see if you can get it right. That could be hard. This is not heard. Oh, that's a circle. Let me draw that whole circle. Then I'll see what
I can get rid of. An inside of that
circle is another one. Now, we've actually
drawn the body of the watering can and the handle. And all we have to
do is get rid of those lines that we would
not see because they're not, they're really
hidden by anything, they're just not there. But I added a spout
first because this is a circle I knew
right where to join that almost nine o'clock
and almost eight o'clock. And then I could make my
lines out for the spout. Then I erase what I didn't
need and look at that. I have a drawing of a watering can sort it looks like one. You can always put
details in later. But when you see
this basic structure of a thing and you draw the basic structure and then get into see how
the parts relate, then you get rid of
what you don't need. This is the way that we start to observe our world differently and to be able to draw
things because we're able to understand
what they're made of. Here we have pencil
sharpener. Again. This part is a circle. If I were going to draw this, I would start by
drawing that circle. But then what's interesting here is that how
would I go about drawing these circles and little triangle shape that are all different
sizes and everything, I could make a real mess
here if I just arbitrarily started drawn different
kinds of circles. But really these circles are
placed it concentric circle. If you were to draw the
concentric circle in there, you then have a reference
for all these little guys, how big this should be
and where they should be. Then of course, you'd
be erasing where that circle went through things. But that would be
your total guide for being able to
construct this. This is a simple
version of that. Here's a complicated
version of that. I'll know that this is how many, how many circles do you see? Think about that for a second. There are two for the outer rim. But looking at all these other
ones are three more here. Two of them are establishing where other
little circles go. You would draw. Start with your outside, you draw the inner rim of that, then you draw the
inner realm of the of the I don't know
what to call it, the descent, where it goes down. Then there are holes in, in order to draw in space those holes you would
put in a guide circle, which is another
concentric circle. Finally, this
little handle here. But this would allow you to place all of
these guys were they go there are all the circles that are actually concentric
circles in that drain thing, drain plug, stopper,
bringing a drink stopper. I don't know what these
things are called. I don't pay attention. This is actually a lotion
dispenser and it's on a handle. This is the handle right here. And this is in here
because again, there are circles
within the circle, but they're not really there. They're just guides. The only one that's really
there is a center one. The rest are guides to tell
you exactly where to place. The other circles that you would be drawing if
you were drawing. It's always good again
to use the clock idea. And you would have
when at 12 o'clock and when it's six o'clock. You'd start like that. I want it 31 at nine. Then it becomes easy
for your brain to know that it's
about one o'clock. Some courts don't even have all the numbers in
place because we're so smart that we can just surmise what time it is by
the position of the hands. And so you could easily
think that that one goes at 1245 and you'd have your placement for
all your circles that you would be
drawing in there. Your assignment for this lesson is to go to your own photos of the circular things that you've found and choose a
couple of them to draw. Start by whatever the
most obvious circle is in the drawing and go from there the way
that we did here. Now another great
tip for learning to draw is to choose the things
you think you can draw. As we sit right now, you know how to draw a circle and you know how to
draw parallel lines and you know how to draw
concentric circles. As you look at your photographs
of the things you found in your house that are circular. Look at them and say, Can I
draw all the parts of that? If you can then go for it. Now if you look at it
and you go way too hard, I don't understand that
little design on that bowl. Blah, blah. Don't choose that one. Your progress in becoming a
person who draws Raul is so, so dependent on your feeling of accomplishment when you draw something well,
really dependent. And so therefore, don't choose to draw things
that you can't drive. If your drawing is as simple as that tomato, then do that. You've color it red with
some markers and you've made a tomato if that
Japanese dish type of item is something you think, I could do that because
I can draw a circle and I can draw some pretty
rough parallel lines. If you want to draw the end of that flashlight that like I had, if you have a flashlight, but choose something that is
going to bring you success, it's really important
in the second one you choose to draw might
be a little harder, but again, choose something you think you can do and then do it. There'll be happy. And I'll see you in
the next lesson.
7. Drawing Triangles: Well, we've come to the
part of our class, right? Introduce you to the
gift that I gave you, which is the creative
drawing playbook, and it is a PDF. You can open it and any app
just about your devices. And you can open it
on your computer and you can print you all know, PDF, sorry, you
can print out all of it or pages of it
as you need them. So it's pretty convenient. I wrote this book
a long time ago, and it has taught
a lot of people to draw all by itself without
me even being there. Because it takes
the same kind of simple approach that we're
taking in this class. It also is going to backup everything that you've
learned in the class. You don't need to take notes. It's a perfect
companion to the class. So anyway, the welcome,
this supplies, this page here can be printed on a transparency if you have
the capability of doing that. And then that becomes just like that circle template that
we used to check for, for flat and fat on our circles because you'd
be able to see through it. That's why that is in here. We talked about the pencil and eraser and how special they are. All about circles
as we've gone over, but sketchy circles about concentric circles about parallel lines and
parallel circles. We got this far in the book is, you can try practicing your concentric circles
on a, a target. For whatever your goal is in
the middle of the target. This one says I can draw and was shot in here
already at that. Here's a little turn of the thought process
on circle drawing. What we did so far, we went around and we
looked for objects in which we could see a circle
and work from there. These exercises turn that
around a little bit and ask your brain to think
of things that are made of circles out
of your imagination. Then start with a circle and
draw like what can it be? String of beads is obvious or balls of any kind or circles. The decorations on these
are all straight lines. There's no concentric
circles here except for that guiding when there
that would show where those whole
show up or not holes, they're not holds this
time they're polka dots. O'clock is a couple of concentric circles
and you can make the outside as
fancy as you want. And then it's just
hash marks that 12639 and then the marks
between easy to figure out, you can put numbers were not. But those are some
things to draw. Circles and lollipops
or circles as well. Plain ones like this. Or you can do the ones that are whole spiral
inside the circle. We talked about the
parallel lines, adding that to our arsenal of
tools and about squares and rectangles being just made
of pairs of parallel lines. That brings us to the next shape that we're going
to take a look at. And that is the triangle. Triangles show up much less often then circles and
squares and rectangles. There are mostly part
of man-made things. Mostly show up as
the roof on a house, as a steeple, church, spire, things that happen
don't see him a lot. Sometimes they're in nature, but they're in the
shape of a leaf, but it's much more of a
rounded out adjusted triangle. We don't see them very often, and sometimes we can
be funky with them. But when we need to draw a
triangle that has even sides, I don't mean an
equilateral triangle where all the sides
are the same length, but I just mean a triangle
that's not wonky. If you're going to put a roof
on a house or a steep on a church to be walking unless the whole
building is wonky. And that's a style thing. But how do we get a triangle
even if we want it that way? Well, we start with
the baseline of our triangle and however
long we want that to be. And that's an arbitrary
decision of course, because it depends on what
drawing you're making. But hopefully a true
vertical Baseline. And then you decide how high
do I want my triangle to be? And you measure the baseline
to find the center. And I did that by I and I have no idea if that's
the center now, but we're going to find out because that is a two-inch line. Well, I was pretty close. We've divided our baseline
in half and then I, I'm going to shoot a
point up from there, the height that I
choose for my triangle. So if there's only this
much room for the steeple, then we'll make a
dot at the height. And we will try to make that dot directly above the
one on the BSW. You can measure that
if you want to or you can eyeball it
if you want to. And I can tell them a little
left of center there. Once you have that dot, then you can just shoot for it from each corner with
a straight line. So keep your eye on the
dot like we talked about. Then just bring your, your straight line up
to the dot and you'll have a pretty solid triangle. Triangles are supposed
to be solid because they have this base and skinnier top. They're considered a
real, a solid shape. And visually looking at them
in drawings and paintings, there's a feeling of solid, steady base that is not
going to fall down. Less of course is sitting in
a log or something anyway. So we're gonna go back to our playbook to take a look
at what we might draw. I'm starting with triangles. And just to get some
practice, here, we have the review of what we just did and we drew
our perfect triangle. And then there's a section here, I'm going to skip for a
minute, two sections. We're going to go here. We're going to
walk through doing a drawing made of triangles, made of nothing but triangles. And it is a drawing of
a man-made dwelling, but it's not a house or church. And you can recognize right away what it is as
soon as we draw our triangle and allow our lines to go past the
dot and cross up here. And then I just put another
little one in the middle. We have a shape that looks
a lot like a teepee. And so we're going to continue
and draw a little village. Tepees were really
great dwellings because they would,
they would collapse. But these sticks right here, and they would be a true voice. I think that's how you say that. Maybe not. But anyway, you'd put
all of your goods on it, you drag it behind the horse, and you move to your new home. These were used on the
planes by Native Americans. And so it was a very
clever, amazing design. But anyway, we're going
to just learn a couple of simple things here
by drawing our TPS. One of those is that
even when you are doing flat lay 2D drawing, there is a way to
show some perspective to introduce a little bit of 3D without getting your
drawing off challenged. And there are two very
simple rules to this. One is that if something
is further away from you, it is smaller than the
thing that's closer to you. And the other thing is, it is higher on the page. We're going to draw
three triangles and make one a little smaller
than the first and the third, smaller than the second one. And go ahead and overlap them. Because we always draw our
whole shapes if we can, so we know what we're
doing and we come back and erase what
we don't need. Then cake another set of triangles and put a doorway
into each of the dwellings. Flat. Smaller triangle. Now this one, this doesn't
look like it would cover that doorway and it
shouldn't because if it did, it would be sticking out. And it's not It's got
a little curve to it. But if it were folded over, it would fit the doorway. Then we can add more
triangles as decor. Because we know how to draw
some parallel lines on there. We know how to draw
parallel lines here we know how to put triangles
on the parallel lines. This lightning bolt is
also parallel lines. They're oddly shaped in a little different to make parallel, but we have to come back and erase the corner of HTTP
that I'm just noticing, I hadn't done that yet. And so our village
is getting done. We want to put some ground, they aren't floating in the air. Then some colors. So if you have some watercolor or colored pencils or something, you can make this
very pretty thing. And I did throw a
circle in there for a sun because the
sun was a big deal. The planes while still is, I put another little son, I put another lightning bolt. Whatever you would
like to do is fun. You can hang some
feathers from up here. Feather. You're going to learn to
draw an arc in a minute. In a feather is just like two arcs and a
line down the middle. So you're gonna be able
to come back if you like, and add that kind of decoration. We're going to leave our
triangles for just a bit. I'm going to backup to give you another exercise in drawing
what you know already. And then we're going
to move on to the, to an arc and see what
magic there is there. But anyway, I'm going to backup
to where we were up here. There's a project practice
drawing project here, drawing group of gifts. And I know that's
pretty simplistic and useful mostly on birthday
cards and at Christmas. But what it does here, and you'll see
through these steps, it has your drawing, the
rectangles you know how to draw. It has your drawing parallel
lines which will make the ribbons on these boxes
it looked like this. Now, to draw a bow, we draw a little circle on
the top and then triangles. And you don't have to
leave these as triangles. You can round them off
and make them more fun. But the basic shape, those parts of a
bow, our triangles. This project is to do a shelf. We already did a bookshelf
with our rectangles. This shelf is for
a ball collection. It can be any kind of balls, but they're round ones. I made the whole
shelf this time, put a bunch of balls
of different sizes, hung some from here. These balls, of course, family walks through
the room and wiggles anything,
they all fall off. But that's kind of
the dynamic fun of a silly little
drawing like that. That's two more practice
drawings that you can go and do in-between video lessons and just get real
accomplished all of this. Now we are going to
move on to the arc.
8. Drawing with Arcs: What is an arc? An arc is a part of a circle. We have our circle that we
draw this nice and round. If we cut off a piece of it. It looks like this. The curve of an arc
is going to totally depend on the curve of
the circle it came from. So in other words, with an infinite
number of circles, there are an infinite
number of looks, amounts of curve for arcs. They can be very, very curved like so. Or they can be very, very not curved like so. If you think about parentheses that we use every day in, well, maybe not every day, but often in our writing and printing and
communication in general. Thought containers. There are also
arcs and there are pretty good average amount of curve that we can use for
drawing a lot of things. So I want you to stop the video if you weren't
in for a moment. Draw a lot of arcs. Your page in both directions. Little fig. Real curvy, almost like a
half circle, almost straight. Get your hand used
to drawing sketchy. Once you can do that, you can just draw amazing
things in nature, in botanicals and all kinds of fun stuff that can be done. Now that we have a
little practice in drawing are so we're going to
create ourselves a little, a little flower patch,
a wildflower patch. And it's just gonna
be so quick and so easy that you're
not gonna believe it. It's also backed up
in your playbook. So work along with me and don't worry about taking
notes about anything else. The first thing I'm gonna do
is cross this page with arcs of different heights sizes, not a million, but quite a few. And then I am going
to turn around and do the same thing any
other direction. They can crossover. And these are gonna be
basically leaves of grass. When we go back and
finish this off, we're going to do
not a parallel line, but we are going to start
a little wider and go in until we meet the tip of our first arc
with another arc, just like I just did here. There's the first one, and here's this one. Okay. You can also start
from the tip and get wider as you come down whatever is comfortable drawing for you. But we're going to make each of these arcs into a
tall blade of grass. Part of our beginning of our
little wildflower patch. This can be sketchy
because you've strengthened with your
colored pencil later, I'll get rid of all the scratchy
from the bottom and meet the point down from the permanent and
get wider as you go. I'm going to stare on these. This is a little more even
than I would normally. I'd be more random. Normally. They can be everywhere
and they can be every height and
every direction. I'm gonna leave it like
this for right now though, because it's just
fine the way it is. Now out of this, I'm gonna bring a couple of stems going in both directions. And that's just a big arc. I'll bring one here shortly. I want out of here. At the end of these I'm going to I'm not going to have
that one. You've got three. Put a circle, small circle. So it's really easy to draw. The top of each circle. I'm going to make
a flower petal. And I'm going to do
it with two arcs. Think about parentheses
that you closed up. I'm gonna put one opposite that. Going to put one over here, one opposite to that. Again, I'm using my
clock face reference. I'm doing it so that I know that I'm going to get
an even number of petals. In this case. If you just start with one petal and start
going sideways, you'll get to the
other end and you won't have room
for your pedal to be shaped exactly like
you want it to be. I'm gonna do that
on every flower. They don't have to be perfect in their placement because
flowers never are. And if they are, the breathes makes it that they don't
aren't quite there anyways. Finally, all of this is arcs. Everything in this drawing is made from RPS, pairs of arcs. We have flowers, hours needed, a little bit of leaf, I think. What do we make the
leaf side of arcs? If you want to,
you can put a line down the middle of the leaf
to make it more interesting. When you add color to this, it's gonna be just a pretty
little patch of wild flowers. You would go back
then to finish this off and you would
strengthen your line and you would decide
which piece of grass is in front of the other. And you would erase any line that passes through
that would not be seen. Sometimes your end
comes together strongly enough that it
just blocks that anyway. That wouldn't be seen from behind because this
is in front of it. This totally needs cleaning up. When you get all your
lines strengthened, get out whatever
color thing you have. Painter, pencils or crayons or whatever is beautiful bike
adding the color to it. And as your flower patch, now sticking into botanicals, you'll often see a branch motif. There are really useful for
every time you draw a vase, you can bring
branches out of it. They're useful as
a border and we'll just gonna look at it for
just a little minute here. Branch, a leaf branch is going
to start with a long arc. That's going to be the stem. I usually have either
one or two leaves at the very end of the stem. Then you have two choices. Leaves either grow
across from each other. At each juncture. That's a pretty look. All arcs. Or they alternate. In that case, you'd go down one side first,
put your leaves. Then there'd be a
leaf in between, on the other side, between every two
leaves over here. These are wonderful
to use and look how fast and how easy. And again, everything
here is an arc.
9. Using Compound Shapes: We have done so far is we have
learned about the simple, basic shapes that make up
everything truthfully. But they don't
always do it alone. So like whereas a circle can make up a tomato
all by itself. You probably noticed when you
went around on your circle, a hunch in your house that
they were not usually alone. Circles were not alone in defining things
for the most part, unless there were a
bunch of circles. But they might have
been a circle that was connected to a rectangle
or something like that. That is a composite shape. And what it means
is that a couple of the basic shapes get together
to make a new shape. That is what I would call
a secondary basic shape, but something that
we know how to draw so we can use it to
draw a lot of things. The first one that
we're going to look at, composite shape is the teardrop because it is just ubiquitous, it's everywhere and we can
use it for everything. Sort of like the arc. Teardrop is easy if you
start with a circle. So we're going to get
ourselves a nice circle. Be sketchy so it's not too
flat and it's not too fat. Now you know how
to do this because you've done it a few times. On the circle, we're
going to set a triangle. So our baseline, and we're
just going to overlap it, or baseline on our
triangle is gonna be about a third of the
way downers circle. Our height is going
to be about the same as the diameter
of the circle. This is just an honest
have to be this way. But we're doing it for, for learning purposes here. Then we're going to
connect, make our triangle. So now we have our
basic shape triangle sitting over our
basic shapes circle. When we get rid of
those interior lines, we have the basis
for a teardrop. It is a teardrop, but it's a perfect
teardrop and you could do a lot of variety on it. For example, you can turn the sides of the
triangle more into arc. So let's look at what
that might look like. Now that starts to look more like a drop of
water, doesn't it? It also looks like
a flower petal. Else has looked like it could be a purse if we put that
line back in there. But anyway, you
can make the lines inward like that and have
that kind of a drop. You can also have them give
them a slight outward bend. It's just going to
make a fat water drop more like a drop of paint
might be because it's thick. And so it ends up
being a fat or drop. Finally, you can walk
this. How do you do that? Well, start with your
circle, your triangle base. But don't put your doctor, you're trying to go right
in the center a little off. Then join these lines. But this time you probably
really are going to want to play with the curve of those lines because it
doesn't look right this way. But if you, Let's say you
turn that line inward, this line outward a little bit, then you don't have such a water drop anymore
because it's not symmetrical. But you do have a shape
that you can turn into. Other things like flower
petals and the leaves. You see what a great
leaf shape, that is. We love our leaf shape. That's just ergs. But when you do
technical drawings, you just don't want all
the leaves is same. This gives you another
leaf entirely. And if you make Come in here and you pick
that up a little bit. Now you have a
heart shaped leaf. Obviously can be
much fatter and be like the leaves on
a morning glory, maybe much more heart-shaped. The composite shape
made of a circle and a triangle can take you
all kinds of directions. It giving you teardrop leaf shapes that you can use
then to make other things. So it's like using a
circle to make a clock. Only the basic
shape you've got is already a composite
shape of two things, the triangle and the circle. I'm going to turn the page here and we're
going to do kind of an amazing thing using
just that principle. Well, those parallel lines, we're going to draw
something that's just perfect for spring when this class is being made
and that is a tulip. I am not going to go through all of this shaping that we just went through on the
other page because I know that you can
do it if you want to, but you might not need to. Here we have fat teardrop. That sort of comes to a point, but I'm not gonna let it, I'm gonna make it retain
a round thing there. But here, still,
our basic shape. Is there a composite of circle and the
rectangle triangle? Just so that we keep
our eye on that fact. To draw another one
of these right here. I'm overlapping. It can because I can
correct for that. Drawing sketchy. Then I get rid of what
I don't need here. Then I'm going to put
a couple of arcs up here and bring one of
them down so it closes. So what we are looking at here, make them a little more pointy. Those inner petals that
haven't opened yet on this beautiful tulip
that we just drove away, didn't even break
a sweat, did we? Little fat there? You haven't correcting a
fat place on my circle. There. I usually put a little arc at the
bottom of a tulip. Just to make it, it looked like the little
cup that holds the petals. Two of stem is a very
straight line, which is nice. I mean, it's parallel lines. You don't have to
go straight up and down like I am right now. You can curve it. But the stem of a tulip
is very straightforward. It doesn't have anything
sticking out of it. Now, the leaves of a tulip
are pretty dramatic. And so I'm going to make
those out of that same shape, but I'm going to
really stretch it out. Maybe we'll just put a
line there to show that the individual is
turning a little bit. Now here we have the same shape still the steam composite shape. We have. We started with a
circle and then there was a major triangle on that. And then we did a lot of line
bending to make it work. This tulip is in your
playbook as well. These leaves come out
from either side, but what does overlap the other? We're going to do this
same shape once again. This time I'm gonna say that
there's little cup filming. That one. It's a little different
from the one on the right. You don't want real symmetry. Just want interesting stuff. The two leaves are
paired down here, the blossoms coming
out of the middle. And all of that is made from our composite
teardrop shape.
10. The S Curve and the Arch: Just in time we
got our tool done. It's raining. We need the rain here
and I can never say, oh boo, it's raining. But the roof of the
greenhouse is metal. So you may or may not hear
rain in the background. And if you do just
know that it's the first day of
spring right now, that every living
thing out there is so happy to be having
this gentle shower. Anyway, we finished
drawing our tulip. We have just a couple more
compound shapes to talk about. One of them is the S-curve. The S-curve is
just compounded of several arcs going in
different directions. And it's used a lot. It's, it's used for roads and rivers and just for
a lot of things, making designs on things. And so it's good to
know about it isn't anything special to draw because basically it's called an S curve because
it's made of S's. Yeah. So you just start making an
*** but you keep going for as long as the distances that you want your S-Curve
to stretch over. And they can be more Humvee
or they can be more shallow. Like a string. You can pull it out and
make it straighter. Or you can let it bunch
up and make it rounder. Where can we use s-curves? Well, ice cream dish is really a Dairy Queen kind of thing is a really good use
of these S-curves. All you do is you pile them up and get a little
bigger and a little bigger and a little bigger
and put a cup underneath it. And there you have
your ice cream treat. On. Speaking of ice cream treats, if we hearken back
to our teardrop, but we turned it upside down, we can make more ice
cream treats using that and using some circles
and using an S-curve. And I'll show you that
answer straight lines. That is just a combination
of an upside down teardrop, a circle, and a triangle. You get rid of the parts
that you don't want to see. And then if it's a waffle cone, which this is, you put
an S-curve in there. And S-curves don't always
have to be even either, like on a waffle cone. It wouldn't be it'd be maybe smaller and bigger, whatever. Then we can fill in with straight lines to give ourselves
the waffle cone effect. Then we can add some color and some actual drips in
the right direction. To finish our ice cream cones. The S-curve is useful. And it'll be useful in
a number of things. There's just so much
practice in this book. After we, after we did
our first flower patch. Here's a whole lesson on a still-life that
you can make if you just know how to use parenthesis or to draw
parentheses, because that's all. This is a couple of straight
lines and parentheses. Then water is just
a series of arcs. And so there's a whole
exercise here to draw kind of a funny underwater scene in the fish are made of arcs. More that you do these drawings, you'll have fun doing them, but also it's going to
bring home the fact that all things you see are
made up of these shapes. There's our finished
Finish Sketch and here you storm
clouds are made up of arcs that you just
overlap on each other. This one gets to be a
storm and have lightning. Then we did our tier drafts and we can make rainstorm out
of the lightning storm. And here we're
back to our tulip. Our ice cream. And an umbrella is made of
arcs, little rectangle there. And you put clouds on
the umbrella, more arcs, raindrops, parallel lines here. Balloons. Balloons are made out of a version of the teardrop
turned upside down and you've got a circle and then
you go to kind of short fat triangle and
then you turn around, you got another triangle and you just customize it a little
bit and you have balloons. And then with an
S-curve and balloons floating and it's string is
hanging down underneath it. So here's a little tip
in your book about how even on a flat lay drawing
a two-dimensional one, you can give a bit of form to it by adding a
little highlight of white. And you would usually be at about ten o'clock
on a round object. That's easy to see here. But remember when you're here in this drop on this balloon that you actually are
doing the circle. So it's going in the same place. Is just a circle is
part of something else. Just a little side tip to make things look a little
more exciting. Here are some
blooms and a Cloud. Here's a circle with
some straight lines. It becomes a glass dish
with candle in it. Here's a sketch I
did a long time ago and I use the same
shape for balloons and cactus pads and they really
don't make good bedfellows, but if you think positive
balloons will be okay. Okay, So what this
boils down to is that we have a lexicon or a
little alphabet of shapes. And if we can draw these shapes, then we can draw basically anything little more
complicated or not. We have our parallel lines or circle, square, or rectangle, or a triangle, the arc, the curve, and the
teardrop shape. We're going to add
one more thing, not it's a compound shape. We're not gonna get too
carried away with it. But drawing an arch is a really good thing
to be able to do because you'll see it makes up lots of things
and it's going to make up the door that is the center
of our graduation drawing. So drawing an arch is
basically combining circle, a straight line and making, adding three more lines
that are parallel. And making a shape
that looks like, that looks like a circle and
a square joined together. Then if you just erase what's in here that looks like a
like a handbag already. So if any ladies wanted
to draw a handbag, you can erase these and
you'll get an arch. And these can be doors, they can be Windows, they can be other things. In your playbook. We have a little exercise in that where we made
three of them. We made them a little
bit different. Then what we did was
we turn them into a mailbox and some
catalog envelopes that we're going to the mailbox
just with a few changes. Here's some S-curves parallel
line inside the arch. We stuck some of our flowers in our branches in there and you
have a cute illustration, again, made of everything. You know how to draw. It is time for our
graduation drawing, which is this one. And we're going to
do it step-by-step. And it is backed up
in your playbook. But I am going to move to my sketch book and we're
going to go through this together with
pencil and paper.
11. Graduationj Drawing Start: I have my eraser and my three HB pencil
and my sketchbook. And we're going to work through this drawing now if
you would like to look at the drawing at
the same time we do this. Just open your playbook, your PDF, and do a
screenshot of it. And you can be looking at it
on your iPad while you're drawing or your computer
while you're drawing it. And you can look back
and forth for reference. It looks more complicated
than it is for sure. The first thing you do
when you're going to draw anything on a page, you have to establish where
it's going to be on the page. And I just do this with just a scribbly outline to tell me I can't really
go any higher than that. Any lower than that
kind of fit in here. And this does not have to be
perfect or parallel at all. It's just a reference for the
size that things should be. And I know that I have the door, I have a big sunflower
going up besides the door. The door can't be
all the way up here. So I'm gonna start
by drawing a circle. Just a rough, sketchy circle. Right about there. I'm going to cross that with
a line through the middle. Then I'm going to
use that line as the top of a rectangle. And the rectangle is going to be about this distance is going to be about the
same as this distance. It's kind of a nice tall arch. And a tall arch makes
for a good little door. This looks like a big mess
right now, and that's okay. No problem with that. Because this is
our rough sketch. This is gonna be the
shape of our door. Because I need to reference this door and add a
lot of things to it. I am going to strengthen my good line and clean up my
ones that aren't so great. To take a lot of this fuzz
out of here so that I can see the sides of the
story a little better. And you'll see why. Minutes. The why is because I need to put an insert in the door
that will be made of. I'm going to just
show you in case you don't have a picture
in front of you. Drawing is here. Let's take a nice look at it. What we're working on now, we needed to put
a square in here. The lines have to be parallel
to the sides of the door. And that's the reason that I
need to be able to be more sure of where the
sides of the door are. Then when it's real scribbly, this is just going
to be a square. And so I'm going to start. You can turn your book with
the bottom, the square. Get everything are
all nice, squared up. And then the top of the square root sides of the
square have to be equal. Remember, in a judgment call, because I'm eyeballing it, but you can measure it. I figured I would put the
top of it right about there. I have that reference point. Then the top of the door is going to be like a semicircle. I'll show you again. So this is our stained glass
window in our door here. This piece of wood between
the section of boards here has to be just as thick
as the piece at the bottom. Because really this is a
framework if you could see all the joins
and everything. This is done in a
very specific way. If we follow it, we will
have a door that can work. The next thing I'm
gonna do is define this space so that I am then able to finish off the
rest with a circle. That will parallel the edge
of the door like long here. And this will be the same
thickness all the way because of it being made out of the same size would
let's see how that goes. I'm going to establish this guy. This space right here, make it like this
space right here. Once I do that, and I know that this has to be the same
thickness going up. It's easy for me to
watch this space as I draw in this line and make it parallel to this
outside of the door. Because that's got to
stay the same width. Now you can really
hear the rain. It's really soothing
when you think about it. Nature gave him giving a drink. All of us in the long run. There is a basic
architecture of my door. And at this point so that
I can tell what I'm doing, I'm going to clean
up a little bit, get the marks out of the middle, get this line out of here
that we don't need anymore, and just straighten things out. This is really the way I work through a composition
when I'm drawing, I slob it in there, if you will, in the
best way that I can. Then I erase and
I strengthen that all these pencil lines will be gone over with your black
colored pencil or with ink. But in order to keep
drawing in pencil, I need to know where things are. And so for that reason, I am cleaning up. In our bottom section here we have planks and let's
find planks of wood. Let's find the center. The center there. Then let's put a line
on either side of it that we have
board in the center. Make these two lines the equal, equal distance from
the center mark that you had so that you know that that board is centered. Then all we have to do is
add a parallel line over here to divide that
space in half, and add one over here to
divide that space in half. So good-looking door
so far, isn't it? I know yours looks just as good because you're standing up your vertical lines
here and you're making your horizontal lines
nice and horizontal. All going to turn
out great that way. Now, in our
stained-glass window, we're going to start
by putting a circle, the center of it, center of the sunflower. And it should be the center of this smaller arch that
we drew right here. Then it's about S curves. We take them from her and they
do not have to be perfect. We take them from our center and take
them out to the edge. We're not really
doing placement here. And so you may I may
have to adjust some of them if we turn
out that we can't get it looking kind of
even symmetrical. But you never know.
Sometimes it just works. I'm going to throw
another corner one, they're pretty good. Now you might, some of yours are too fat and some are too skinny. You might want to go
back and adjust those, but I think overall
looks pretty good. What else goes in the doors? So we have our slats. Get rid of our center mark here. We're going to put a
triangle right here. That's gonna be our fancy
door knob, door handle. I guess you'd call that,
that's not enough. Now, we're going to
porch at the bottom. If we were speaking
realistically, this would be a triangle
coming from here. That is a good way to establish what these two angles
should be is to know that, know that the base you make
your portrait boat is why did you want it your step
here and know the base. You also know the center. If you go from the base
to the center and make a triangle you've
established with the lines of that
porch are going to be. We won't see this triangle. We won't see these little
lines in the corner. But we will see a couple of parallel lines that are going
to define that step for us. Remember, all of
the steps are in your playbook, so no panicking. You can also make these
videos go back 15 seconds if there's
something that you missed that you
didn't want to miss, going to establish some grass on both sides and you
know how we do that. Usually in a little scene, I let them get smaller
as they go away from the center of interest. These again are
joining each other. At one end. Not at the other. Little low there. The door, the porch
of the grass. So far so good.
12. Graduation Drawing Finish: I'm going to bring
very bendy arc. Then I'm gonna make another
one parallel to it. This is the stem
of my sunflower. I start with the stem
because it's gonna tell you what you're doing. There is our stem. If we look for a
reference here, the stem, reality is going to go to
the center of a song flower, this circle right here. So this actually goes
behind these petals. And it goes to that circle. How high is that circle? That circle is just a little higher than the
circle in our door. And it's moved out far enough
so you can get nuts with your with your paddles on your
sunflower if you want to. But right now we're trying
to establish location. The circle that is
this sunflower. I'm a little high there. I think. It's just a little bit
higher than this one. So there is the center. This part of the stems
not going to show. But I'm going to do exactly what we did in
our simplistic drawings. And I'm going to use that
center as a clock to get my first layer
of petals going. And the pedals are of course, just like they should be
more round, circular. I'm putting my noon and
my six and my three and my nine to start the
orientation of petals. Now we're adding in the
middle of those groups. This time we're getting a lot
more fancy and we're gonna put in-between petals
in-between these two. You're still drawing. So if your pedal goes with pasture door a
little bit, that's okay. Then you come back and you put petals
between your petals. And this is
completely up to you. How many? How nuts, so you want to get
with your sunflower petals. Should be a little bit bigger. Sky would stick up there. You're not seeing that these whole petals
because they are partially behind
the ones in front. So really you're just
drawing the ends of them. We have to have a leaf. Let's establish our first leaf with an arc that
we draw like that. Then this is a
teardrop upside down. Remember we said we could, we could make
heart-shaped leaves. Well, sunflowers have
heart-shaped leaves. That's why we're doing it. Then. Not from the same place, but from a little lower. We're going to make
one, it's going to come right over the door because that just makes
an interesting drawing. Then that side of the heart. This side. Then thicken that stem
just a little bit. There we go. Now this slats of the door
right there, not this one. That one. They do not show because the
leaf is coming into overlap. Right here does not show. And right here it says not show because the sunflower petals
are in front of the door. This side. We did it a
little bit differently. Little further out from
the from the door. We're going to
bring one of these. We just going to have a just a bud on it
and a leaf on it. So we're going to do that. It looks like a little
shepherd's crook, but they're just arcs. Going to make it
thick like a stem. This time, whereas the circle location with that and this flower is sticking out the
side of this stems, so it's right in
our face and it's blocking the black
and this stem. But the circle relationship is kind of cool because it's
even with the door knob. We know right where to put
the center of that sunflower, even with the door knob. So right about here is gonna be the center
of our sunflower. Again. I'm tipping the clock. I'm not always going to start with the petal right at the top, but I'm going to start with that relationship between 612, so that I can pedal
on all four sides. Add the middles.
This is different. Again. Honor, original. Sunflower does not overlap
the door on this one. It does. Just because I feel like it. That's called artistic license. You get to change
whatever you want. Probably don't want
to run this into the window since the
colors there are gonna be very similar and you wouldn't
see one for the other. We put our trainers in there, almost getting done and
it's looking just like the, the original for the
changes we made of course, but the original sunflowers overproduced a
little bit in mind. I'd cut back here
in the interest of time and clarity. Here. Sunflower number two. You're going to have a
lot of fun coloring this. Now up here we said this
is just a new leaf, so it's a smaller
leaf than the others. Coming out of the stem. Then I don't want this
bud to overlap the door. So I'm going to I've got
the height here, it's okay. I'm gonna go a little bit
higher with that stem. Then I have a half circle on arc that is a pretty round one. And then three arcs
coming across there. I'm going to make them
join up to the stem. And that's a little
cap that holds the petals that will
open up and be one of these glorious guys. You can put as many petals
in here as you like. This is not opened up yet. They don't know how they're
going to arrange themselves. Well, they do their inner
being, but we don't know. And there we have our
finished graduation drawing. What has to happen now
is that we'll take our black colored pencil
and we will clean up the lines and erase
the fuzzy lines as we go. As you go and do that. I want you to feel very proud of having
done this drawing. The other thing is adjust whatever feels like
you want to adjust it. Think with every
line that you make. Think about the shape that you're drawing and
how all of this got created because
you knew how to draw the shapes in that lexicon
of drawing shapes.
13. Where to Go from Here: If you are a person
who has worked through this with us and actually
put pencil to paper. You are now a person
who can draw. You can go around
saying that I can draw. You may not be able to draw every single complicated version of anything in the world, but you can draw a lot that looks like what
it's supposed to be. Better than that. You can understand
why you can draw it. So unlike a lot of classes out on YouTube in everywhere
that our new, let's draw a tulip, okay, and that's great. And you do it and
you draw that tulip. And then now you know
how many tulips are you going to draw and you go over to something else in
your yard and you go. That doesn't look like a tulip. And so I can't draw that. What's happened in this class is different because what
you have learned in this class is to understand the puzzle
pieces that make things up. And so in essence, you can draw anything. Now, not the most complicated version of
it because we haven't talked about shading and perspective and proportion and
all of that kind of stuff. But we don't need to because
in 2D flat lay drawing, you are just drawing the
shapes that make up an item. And now you know those shapes. And I want you to practice this, but you're going to walk
around and know that you see the world differently. Now, when you see
something you'll be going, there's a circle
in that and there is a rectangle,
there's a square. I don't see all of it, but part of it's there. This will be a new way of thinking when you
look at things. And that thinking is what
allows you to see the shapes. And then you know how
to draw the shapes. It's just like get some kind of logic about which
one to put where. And you're in business. Now if you're someone
who watched through the class and has not
yet picked up a pencil. I hope that you have gotten the confidence to know that
if you pick that pencil up and you go back and you go over the lessons
again and this time, stop the video or go back
15 minutes or 15 minutes. There's Dean seconds with
that little button they give you and work through with us. Get out your playbook. All of this is in the playbook. Do it so that U2 can get to
this place where you are looking at something very cool and complicated
that you drew. And know that you
can go out and look at other things and
you can draw them too, because a lot of doors are
going to look just like this, but they're going to
have a square top or they're gonna have a line down the middle so
that we would open like this. And there are variety out there, but the basics are the same. This is how a drawing looks when it's cleaned up in the lines. The good lines are done with colored pencil, not
watercolor pencil. You're free now to two color just like you would color
in a coloring book. Watercolor or markers will not smearing or black
colored pencil. So you're just as good
as if you had ink here. You can do it your
color version. And it can look just like
the cover of your playbook. This is the end of our first rung of our ladder
to success in drawing. Subsequent classes will go
wrong too in rung three, so that we can learn what happens when you tip the
thing you're looking at. And then how do
you have to adjust the relationship of the
shapes that you see? But it'll be a piece of cake after you've gotten this far. Enjoy doing this,
enjoy coloring this, enjoy playing with the other practice
drawings in your playbook, and enjoy going out
into your life. You don't even have to go out, just look around your desk or your kitchen or anything else. Pick up things and see if
you can see what they're made of enough to draw a
straight on drawing of them. And the more you do that, the more you'll be able to see, the more you'll be able to draw. And it becomes one of those joyous practices that you're so happy that
you know how to do. Have fun.
 Jessica Wesolek, Artist/Teacher