Transcripts
1. Introduction: Hello everyone. My name is Jessica and I'm an artist and an avid traveler. I'm also a sketcher, so I tried to record my memories of every trip in a lovely travel journal. It's not always easy and most of my travel journals don't get finished on the trip. Finishing a travel journal while traveling is a difficult thing to do, mostly because of time or better said, the lack of it. We take trips to relax and have adventures. And there's often more Adventure Time then relaxed time. When you could play in your travel journal. Some folks are speedy Skechers who can record a scene in their journal and minutes, but most folks are not. So they look for time in the evenings or early mornings and the trip. But after a day of adventuring and eating, you're usually too tired for journaling. So you put it off until morning when the time is short. Also, because of the need to get ready for another day of adventure. This happens day after day and you get discouraged. So what usually happens is that you return home with a page or a few scribbles in the book. I had full of jumbled memories, a handful of brochures, business cards, tickets and such. And if phone full of photos that must be identified and sorted, all of these pieces could help you finish your journal and home. If you could only put the pieces together. Usually you give up. Because I have experienced all of this on almost every trip. I had to come up with a new plan for success and a new definition of what success actually is when it comes to a travel journal. That plan is the subject of this class, is a two-part plan. The first part is called hunting and gathering. How to choose the important stuff during your trip and gather it into an organized collection while you are traveling. There is time for that. This will be your resource album of everything you will need and want to remember for your journal. The second part of the class is about how to create your journal while you are traveling and then finish it after you return from your trip. When you get back home, your journal will be more of a workbook and a blank book. Maybe with some finished pages even that you can complete at your leisure using your photos, notes, and gathered goodies. This class will give you a new perspective. I'm making a travel journal. So you can lump the idea rather than feel frustrated, rushed, or disappointed with your results. Your project for the class will be to create at least one spread and the travel journal from a past journey, present journey, or even one that's coming up. You'll put this plan into action and it will show you how easy it can be to succeed. It's all in how you look at it. So let's go take a look.
2. Your Sketch Kit: Everybody loves to talk about the supplies that we need to make sketchbooks or to make travel journals. And I do too, but this class isn't specifically about that, about what you should use to make the marks on the page. It's more about getting you to make marks on the page. So I'm going to run quickly through the necessities and you take off in any direction you want to, because what you like to use is going to work perfectly for you. And so we start with having sketchbooks. And I will tell you as I go with these supplies, my favorites, and you can take that advice or not take it, it really doesn't matter at all. But my favorite sketch books for anything or the Stillman and burn brand. In the beta or zeta format. The Beta and zeta are the same paper, but one is a relatively smooth cold press and the other one is a very smooth hot press. And it just depends on your mood. To be honest. And in the paper is very heavy, it feels and works like it's heavier than a 140 pound. Technically, that's not true. But really what matters is what it does. And so the stomata and burn books come in a lot of sizes, even in the beta zeta line. And so my favorite size for travel journals and for every day journals, There's always been a 5.5 by 8.5 kind of format. The reason for that is that it's an adequate amount of room for a little bit of information and for more if you need it. So you can work if this is not as spiral bound, which they have available as well. But I don't care for spiral bound. They do turn around backwards and that's great. But my hand always ends up on this firewall, so I don't like that. But anyway, this size is suppose that you drove all day and nothing really happened except you had a really good night's sleep and headed out the next morning in a different direction. Does one-page will handle what you have to say, what you have to sketch about that. But if the day has more to it, you can work across the spread and you can have this much room. Now the last couple of years for some reason, I have wanted even more room than that. And so I have also been using a soft cover version of the eight by 10 size by Stillman and burn. And it's just for more real estate, really. This hardcover is good for people who want to stand up and sketch because you don't need any support under it. I don't do that. So that it's really not operative in my realm. But for some people it's an important thing. The soft cover still has clearly, I mean it's not floppy, but it isn't an actual hard cover like that. So this is an eight by 10 size. I love it. It's got all kinds of room to do what I do in combined photographs with drawings and to get every kind of story onto a page, also onto a spread. And so if you don't mind a larger book, and I don't mind a larger book because you'll see during this course. And in my plan, I do most of the work back at the hotel or back at home or somewhere else. I can a restaurant or something where I can have a support for my book and have room for this big of a book. So it's all in what your comfort zone is, that this large sizes, you know, it's great. It can take a bunch of spot illustrations. It can take a bunch of photos. Or it can be used for larger Hero illustrations. So it's really up to you. But the first supply that we have to have is a very good sketch book. And we'll not a very good one. I mean, you can go out and use a really crummy one if you want to. But if these are keepers, these travel journals are books we want to keep forever and we don't want them falling apart. So that is a good reason for getting a good book. And also the heavyweight paper will take just about any media you want to use. Your water color is not an issue and all the dry media is also great. So there's a lot of, a lot of room here in both figuratively and literally for supply types and for space to put things on. If I could only take one mark-making thing with me. My journals, it would be a pencil and an eraser. I use a hard lead pencil, a three h, because it makes very light lines as long as you don't press on it hard and they race very easily. In my planning that I do so much of. This is the most irreplaceable thing there is because I can just, you know, take a spread and put anything, put any kind of guiding lines and shapes and little notes. This picture goes here and it's all going to be gone when I put the good lines down and erase the sketch lines. So you could take a mechanical pencil also. And harder lads like three H come in mechanical pencil That's as well. So I don't mind taking a little sharpener. And so I'm okay with this is a Tombow three h. I'm okay with that. And then the second thing, my favorite way to work in a sketchbook is where the combo of ink and watercolor. So that being said, the ink needs to be waterproof because you can't draw and then paint over with watercolor and having all the black onto your color. My always has been my favorite for years is the Pitt Artist Pen by Faber Castile. My favorite size is small. This is a fiber tip pen. It dries instantly and you can paint over it instantly, and I love it for that. I recently have also added to my little love affair, the uni-ball Eye, very inexpensive waterproof ink. What is the difference here? The difference is that this is a rollerball. And so whereas a fiber to, even on a smooth cold press paper has a bit of drag. Rollerball just slides right over it. So depends on the kind of sketch I want to do. If I want to do a really light line and just move through it, I will choose this. Otherwise, mostly it's a small tip Artists Pen and we need color. And that can be anything you like. It can be markers or colored pencils or watercolor pencils and so on. I like watercolor. You can get away with as small of a thing as this and even smaller some people do. This is a Winsor Newton 12 color box, but I am not a big color mixer. And so I like to travel with a bunch of color and most of my palettes I have a bunch of color are too big. And so what I did, and you feel free, but this is, this is a little crazy thing that they saw for $16 out there. But the paint that comes with it is really terrible. It's really good grade a little hard cakes. But what I found out is that you can unscrew this like a scrapbook thing and you can get all these guys loose to work with. And if you flex them, those little kid cakes will pop out. What I did then is take my good watercolor paint and I mixed it to a consistency that I could pour it and I refilled these pans and so and I made my own little color things at the end. There's no room to write the name of it or anything else. Let's see how many colors I get to travel with and not much more space. But this is not easy, but this is awesome. So if you want to go spend $16 and about three days on a fiddly project, which was fun. I love to work with color. This. I really recommend doing this because on top of that, a water brush, which is also a favorite thing of mine for travel, will fit right in this little hole. Not a whole, but a slot. And that just is so compact. So that's a look, how much room. So that goes in in a purse or a little toad or anything. But I do have to mention what I have to have. If I had nothing else, I have to have my iPhone or whatever camera phone you use. That's the number one thing because with that, I can come home and use all of this to make my travel journal. So that's it for supplies. And let's move on.
3. Using Your Amazing Phone Camera: This is kind of funny. I am in a bit of a pickle here because the most important thing that I take with me that ensures the success of my travel journaling endeavor is my phone. And my phone is been used being used to do this video right now. So I can't have it in two places at once. And so I'm just showing you a picture of I don't have the iPhone 12. I have the 11 Max Pro, whatever the thing, it looks like this with all these lenses and everything. Because I have an iPhone and I have never had any other kind. I am going to have to share my tips by showing you how the iPhone does it. The other phones I'm sure, do very similar things in the phone editing and so on, the photo editing. And so all you have to do if you have one of those is search those kinds of functions that you see me do with my iPhone. And you find out how your phone does it. And then you'll be all set. I always had an iPhone since there was an iPhone, but, you know, the camera was always fun for snapshots, but I would always pull out the DSLR for any serious photography. And that has changed. Since I got the iPhone 11. I almost always, I'm shooting my travel photos as well with the iPhone. But more than the fact that I can shoot really good photos with my iPhone, things that the iPhone will do for record keeping purposes is just wonderful and it's the basis of how I can keep my sanity while I'm taking a trip and I am not able to record everything in my journal. So I will be showing you these things basically on my iPad here because the phone is doing the filming. And so we're going to start by taking a look at our photos app and how we're going to use it for our travel journal, and how much more it can do then just keep a photo for us.
4. Taking Mindful and Curated Travel Photos: So we're going to start our plan here by going into the Photos app, navigating to albums, and so that we are able to make a new album. So the very first thing that we're going to do is make a new album for this trip. And that's easy when you are in albums. You just have to hit the Plus and new album. And I am just going to call this pretend travel journal. My next trip is going to be to Colorado, but I'm not setup for a yet, so this is for our lesson purposes. So pretend travel journal and you would call yours, of course, the 2021 trip to Kansas City. I don't know where you're going. You get the, you get the idea and we're going to save that album. And we're going to let that album set there. Here it is. It's blank now in my albums. And we're going to let it sit there until we need it for something. The next thing that we're going to do is talk about how we are going to use our phones during our travel day to take mindful and curated photos, how to completely annotate so that we know what they were and where they were and when they were and anything IN why we took them. If we want to do that. When we find ourselves in an unfamiliar place, which this isn't, this is my own neighborhood. When we are on a trip and we find ourselves in an interesting spot, like say, a botanical garden or a park or something with a lot of facets to it. We generally go into some kind of whirling dervish thing and we're just taking pictures of everything, willy nilly and wild. And It's a much better thing for the mish-mash that you need to sort through afterwards for your journal that you stop and you be a little bit mindful about the pictures that you're choosing to take so that you don't have a lot of junk everywhere that you go. Oh, I should never take Amanda. It didn't look like that. It didn't feel like that. And this can be discouraging when you get back home and you go, I haven't got any good pictures to work from. And so instead of that, take a couple of deep breaths and a moment and look at your surroundings. And you might even want to take that camera and zoom in. Again, this is not my camera, It's the iPad, but if there was something in the picture that was more interesting than anything else, take that picture instead of the entire thing. Now, if it's a very interesting areas, so like this is actually, this is a really wonderful, It's a walking trail along the railroad track here, and everything inherits pretty good. The reason I took it is that the sky was very pretty and I loved know the, you know, the road or the path was going up to the horizon and so on. It's going up to a hill, which is why it's not disappearing. Anyway. There are two ways to go at this. If you've looked at the whole scene that you're aiming at in the whole darn thing seems wonderful. And you can't decide what's important and what you might want to sketch from later. Go ahead and take your, your homing shot is what I call I get the whole darn thing in there because you're going to be able to go into this and take pieces out. So that is a good thing. But in order to remember what you thought felt and what you thought was important in that moment that would be more indicative of your feelings of something that you would really like to sketch. Then go ahead When you're taking that photo and do a Zoom. And this isn't necessarily what I would do here, but I'm just showing you, do a zoom to the area that you think has interests for sketching, and then take that picture as well. And this of course applies to everything in that spot where you are. If you're in a national park, if you're, you know, sometimes you're in a place where there's one photo, like some crazy thing at a gas station or something and it's not it's not a big decision of what to take a picture of. You still want to frame it really nicely. But it's not a big choice thing. But just like a painter where the canvas out in the field, they use those little slide, those little mats and things to pick out an area of interests. You can do that with your phone lens by zooming in, zooming out and moving it around and re-framing until you have that object of interest as the main subject in your photo and add a nice size because if, if it's something that you're going to want to sketch, you're going to want to be able to zoom in and see the detail. And so don't take a picture of like a daisy that's way out here in the distance. Go walk up to that Daisy and take a nice big fat picture of that Daisy and you're going to be able to make a better sketch from it and have all the detail that you need when you go to add color and so on. Now as an example of what I'm talking about, along that same trail and this same day was assigned variable trail conditions exist. And that's interesting to me because that's certainly true. And so I went in this far and I got a more detailed picture of the sign. But I wasn't sure if I was going to want to have the sketch with trees and what's the sky in it or not? So this is a good working picture. And from this picture, I actually zoomed in like this. Now you can pretend this is a flower, a sculpture of building detail, whatever. But I just brought a way in and took yet another picture so that I can see exactly what the lettering was like or what the screws looked like, or what the color of the wood was. Because I'm going to have this reference photo. Now I gotta tell you that along the way along this path, you're going to become a lot better photographer. It's just going to happen. Because when you do these things and you bring something in until you frame it and you go, Oh, I like that. You've just done composing and decomposing is the whole basis of good photography and repetition and practice is the whole basis of learning anything. So you're going to find in the process of trying to cure, aid and be mindful of the photos that you're taking for the purpose of your travel journal, you're also going to become a lot better photographer. And the way these phones are now, I mean, there's no limit to how good of a photographer you can be because they do everything that the big cameras dead. So we have this photo. And the next thing that we're going to do, well, not the next thing, but you're at your event and you take all your photos and you kind of do it this way. You don't take pictures are just wide expanses of crud. You try to find interesting scenes. You may or may not do a whole scene shot for reference later. I usually do to be honest, because I will be sketching and I'll be sketching like say, a detail of stone on a house and I'll be right here in the picture will have cut off that. The Zoom picture We'll cut off right here. And I don't have the rest of whatever that shape was right there. That's when you like to go back to that first homing shot as I call it, because that detail will be in there because you shot it from further away. And that's the reason that I do this on top of the fact that maybe I want to make a decision of what's cool about that scene afterwards and not in the heat of the moment. So that is the reason that we first take a homing. Should we first find an interesting scene and choose an interesting scene, and then we take a homing shot and then we gather what we find most interesting out of that shot, out of that experience, I call this whole thing hunting and gathering. My sketching students get a kick out of that. But it is what, you know, you can't you can't get everything. If you go sit somewhere with a sketchpad and do a nice sketch, that is going to be probably one nice sketch from there unless you're very, very quick. So for those of us who are not quick and want to get the gist of everything. Hunting and gathering is totally the way that we do it. And so that's what we're doing here, is we're hunting and gathering images. And meanwhile, listen to the breeze and feel and smell the flowers and feel the moment because that's what everyone says is wrong with photographs, is that later you look and you don't feel the space well, you know what you do if you are taking the photograph mindfully and seriously, you do. I mean, everything. I remember this second just completely because making the photo of it was a part of the experience of it for me and part of the art of it.
5. Adding Information to Your Photos: When you are looking at your photograph, in your photos app, lot of people don't know this, but this is a wonderful thing, is that you can add information to it. Also. There is already information that is wonderful. Before you leave home on your trip, makes sure that your locations are activated, that the phone knows where you are, and if the phone knows where you are, it will label the photograph. So right here, this says Eldorado at Santa Fe. Thus a village where I live. It says March 11th. It doesn't say the year yet because it was this year. It puts the urine later, I think. But anyway, it says March 11th. It says 432 PM. So now I have on every photo that I have taken at that place, at the top of that photo tells me where I took it and what date I took it on, and what time I took it. And this has been so useful for me and putting together the sequence of when I arrived somewhere and did that thing happened before that thing happened or not. And I can know because I see that the time and the date and the place, everything is on there, and we can go further than that, even cooler than that. Make sure that you have on Zoom if you were looking at this blown up and so on, make sure that you have gone back to the actual size. And then hold your finger on the picture and slide it. Sometimes it doesn't work, try it again. But when you do that, you have a gray box right here. It says add a caption. And so if you tap there, you gave keyboard. And I am going to put the rail trail dog walk because that is what I was doing. She's just not showing here. And you can keep going until it stops you. I can't find anywhere where it says. And you can get rid of your keyboard, then I can't find anywhere where it says how many characters you're limited to there. But I know that I have gone to three sentences and so on. You are able to go in and you are able to put any notes about what that was like. This is a sculpture by the artist Rodin, you know, and anything that you want to put. I was here with my sister Sally. All of that can go and that stays with that photo. And it stays with the photo. If the photo is transferred over to your iPad from your phone or the other way around, and so on. Now, the other thing information for the photo is this map. And here, if you tap that, it gets real big. And now you're seeing my neighborhood k. And so if you are visiting a place that it's a more populated than this place. And you can blow this map up like this and you can pinpoint exactly where you took that picture. Is that not wonderful? And so then what you want to do is you want to do a screenshot if you want this map as a graphic for your journal, and you'll do a screenshot. Now on the iPhone, you do a screech as screenshot by pushing the sleep button at the same time as the AP volume button on the iPad here you do the same thing, but it's on the other side. So then you have a little screenshot and then you can tap on it. And you can use the markup tools to add anything to it that you want to. We're coming back to this in just a moment, the markup tools, because that's a really great thing as well. But it say that you wanted to make notes on here. If you tap the pin and then you tap it again, you can choose a linewidth. And I've got the color black, I can choose a different color, but maybe I want to come here and say, Real trail. Walk with sky. Sky is my dog. One of them. So this is boring. This is my own neighborhood. But if you are on a trip and this is a botanical park and you took this picture and you want to remember what the, maybe you're gonna do a map later in your journal of the botanical part. And you're going to be so happy because you're going to know exactly where that sculpture or whenever you took a picture of was. And this is going to be in your photos. So when you're done with the Markup Tool. You hit Done and save to photos. Now, let's go look in our photos. I'm going back here. Okay. And bring the photo back down. But if I pull it up again at anytime There's my caption and there's my math. Okay? And we bring it back down. And I'm going to go back to my photos. And I'm all the way to the end will be where that screenshot is. And here it is. Here's this map. Okay. Now, when you are on a trip, those photos that you took that afternoon at that place are all going to be together here. And so what you do at that point is you're going to go back to your whole library here. And you're going to select, and you're going to select. In this case, I'm just selecting this one because I don't have a whole bunch of photos here that go together. And I am going to move that photo to an album, to album. And the album I'm going to put it in is my pretend travel journal. So when you get back to your mortal or when you're writing in your car after having done a photoshoot like this, you are going to process those photos. You're going to, first of all throw up the crud. Secondly, you're going to go into the photos and put a caption what it was. If you want to, you can then get that map, do a picture of it by doing a screen chat. You can make notes on the map. You can also make them on the photo, which we'll talk about in a minute. And then you're going to put all of those into your album for this trip. And they'll all be in one place and they'll all be available for you to work from. In your travel journal. St. Genevieve, Missouri is a darling town built by the French. It's on the Mississippi River in Missouri. Obviously. I visit there very often because I just find it fascinating architecture, the things they've done with the architecture and so on. It's such a historical place. And I am, I've chosen this picture from there to run through what I just told you about. This was a curated picture. I have taken probably thousands over the years of pictures and St. Genevieve. But this one I ran into the building had not been like this before. And someone has done this and I find it so interesting. So I took the photo and I'm going to use this photo to run through what we just talked about, what you can do with your curated photos as far as accumulating information on your your itinerary and your place and time and your references and everything. So all right. So just start with up here. It says that I'm insane Genovese right here. And then it was October 26, 2019 and it was 242 in the afternoon. Okay. So we have that information because locations were turned on. And that's wonderful. And then we're going to pull our photo op. And I have not captioned it yet. So I'm going to stop there and say, Let's see, wonderful and surreal. Window treatment. Unknown be my caption. I can always come back and I can add more to it if I want to. And I get rid of our keyboard. So here we are in, we have our title in place, and now we have our math that we're looking at beneath here. And so I'm going to tap that to make it bigger. And we have it much bigger now. And I'm going to go in to show you the if you were wanting to make a map to say of the small downtown area of this small town. This is a wonderful way to do it. And there's a little thing down here saying show nearby photos. If I tap that, you'll see that I took a lot of pictures on my walk around downtown. And at each spot, it will give you a number. Of pictures that I took like six at this place. And this was inside of a restaurant. I was trying to line up this eat sign so that it would be it would make a good photo and it wasn't working out. So what are the things you do in new? Consider yourself a photographers. Shoot, like crazy. Lot of the same thing, of the same thing. And then you throw away the ones you don't care about anymore or you don't have to bother with that. You're going to be doing the curated version of photography. But this does show you that all the pictures I took in that one spot are there together. And so making a map using this for reference is just an awesome thing because let's say that you walked around an area and let's just say you are collecting storefront photos. And you went all these stores and took a picture at each one of the front. This would be such a great reference for a map that you make later in your, in your travel journal. Down here in this corner is a little information circle. If you tap that, you get a choice down here at the bottom. And I just hit satellite. And wow, Now look what I have. So if I were making a map of downtown San Gen about what I did there on this trip. I would have taken a picture I would have taken a picture of the map, a screenshot. So I would have this to work from. And I can really, you know, C were the forms and the shapes of the building are. And then I would also go to satellite. And I would take a screenshot of this because now I'm going to get to C. I gotta get that light off of this scurrying all that. Now I'm going to be able to see where trees were in and I can make the map more interesting. Putting green area for a part over here and trees and different colored rooftops. And then I could still have a sketch my little buildings in place before I did any of the two great references. And there's a third one too. And that's the hybrid of the two. And the hybrid shows you the satellite with the streets superimposed. Sometimes there'll be bigger and sometimes they will be about the same size. But now you have your streets in here and the street names are really clear. And you have your satellite vision and you have where your photos were taken. So you can't really do a lot better than this. For reference, it's a really wonderful thing.
6. Using the Mark Up Tool on Photos: When you're on a road trip, I'm one of the big elements of the fun of it all is road, what I call roadside attractions. And oftentimes they're so interesting. I would I would stop and I would go right in there. This one is scared me a little bit. He would not be. It was really, really interesting. Google Maps took me in a very, very strange way from here to there. Unusual way that I hadn't gone before. And I believe I had I was headed. I can't remember where this was. O it is an Oak Grove, Arkansas. And so this was after leaving Eureka Springs and heading up to saying Jen, and we went on all these back roads where we'd never been. And so this was at the side of the of the road. And it's just pretty interesting. But, and I'm a glass artist and I almost went in here. But something about it is just too wild for me. Hillbilly glass shack gifts and gallery. And now we got there was an outhouse right here with hillbillies squad on it. I kind of left it out of the picture. But I'm going to use this picture to demonstrate to you how we can use mark up to add information to this. And markup is an Apple thing and it is a little set of tools that you will see pop up in different apps that you can use them in that app. And one of them is the Notes App that it comes on every Apple device. And you can make notes and make drawings and do everything in there. And then when you do a screenshot, as we mentioned, we had the option to use the markup tools are screenshot as well. And then you can do all kinds of marking up a photo itself. When you intend to use the markup tools on a photo, it's really confusing whether you can undo that are not afterwards. You seem to be able to go back in and erase, but you can't get rid of some of the things you added and so on. And so what I'm going to use markup on photo, I always make a duplicate of my photo. And that is done by hitting the share icon and then duplicate. And so I want to make sure I've got worn. I do. Okay. And be working on this. So to get to the markup tools, you have your photo active here and you go to edit. And you're used to this probably do you're straightening and you're, you're editing here. But there's a little white dot at the top with three dots in it. And when you touch that, you get an option to go to markup. Markup is this little set of tools right here at the bottom. And there's several things you can do. Some are useful in some or a little less useful. But I would like to run through it so that you know, you can do. So. I'm going to choose this marker pen right here. And when I hit it for a second time, I get a choice to choose. Yeah, I get a choice of line thickness and opacity. So this slider right here and take you from an opaque yellow to all kinds of like tense of the yellow. And I chose the second from thickest line width, tap back on the pencil and then I have yellow are chosen. And then you can draw right on your photo. You can also use a pencil on it. And the tool will show that the last color that was used with it. So now we have blue selected, we have the pencil, we have very thin line, we won't even be able to see. So I'm going to go again, I'm going to go to almost the fattest line, tap on it again. And I can make something blue there. I can write on this. And I would write weird because it really was. And I would write lost because we were cores you with the GPS. You can get your way out of there. But they got us there in the first place. So who are you going to trust? So anyway, that is, there's also a highlighter here. And if you tap that, you can get just a midtone and that the fattest. I don't think I want to do the fattest because it's very fat. It's almost like an inch or something. And then you go back in. And you can highlight things good also color things in a little bit. So it's just a lot of strange little details you can do. Whether you want to or not or makes sense or not, is can be actually just note-taking on a photo, you know, things that you noticed or check, look this up or check this out or whatever. Eraser. The eraser really race what you added on top of the photo here. Okay. This weird-looking a pencil with a kind of a striped top on it is a selection tool. So I made this little flower down here. Now I can go and just draw, it's drawing a dotted line around it out. And if you can see that or not, and I can move this anywhere. Now I switch to using my finger. Sometimes the Apple pencil just doesn't do the resizing or the moving or the, the Markov stuff. I have no idea why, but it does the writing and that's what's important to me. And then I can use my finger to move things around. There is a ruler here too, is really odd. You can't, you can't see any of the measurements or hash marks on it. You can rotate it and it tells you right in the middle there what angle you haven't rotated at and what it's for is drawing a straight line. So if, if I put the ruler at this angle and I go to draw yellow line is going to be a straight line. You see I can't move that off the edge of the ruler. So it's good for that. And then you tap it again and it disappears. And when it comes to a time when you think you might use that fantastic like if you're doing an image that you are going to actually use in your, in your trip general, and not just use as reference. You could put guidelines in color to do some writing on it. It'll be straight, that'll be part of the image. So it's all there. Good tools are fun. It just, I'm not altogether sure what they're useful for. So okay. And there are, there are colored dots and then there is a rainbow look and one. And that is because you can get to the color chooser. And you can use the spectrum picker, and you can use a grid. And you can mix your own color if you know the hex numbers for. So that's really useful too, if you're getting artistic with this. And then we have a plus button. And the plus button allows you to add things. One of the things you can add is text. On an iPhone. I'll be honest with you, where you can't use an Apple pencil. Writing stuff is sometimes good in the text tool that you have here because I'm writing with your finger. Or if you have a small phone that can get awkward, but if you want to put a note on to a photo, you can use the text tool more easily on the iPhone in so once I hit the text tool where I have and it's barely visible here. But we're going to have is a little text box that I can read. I can change the length, but only the message will change the the height of the box. Down here in the corner. You have a capital and a small a. And that's where you get your choices of font. And there are only three I like noteworthy because it looks, you know, a hand written. And then you can change the size and see that text is getting really big. And I believe you can change the color, but we're going to find out what happens. Yeah, you can change the color. So now we can actually see this and we can move this around to where we actually want it. Now to change the type that is in there. You tap it with your finger and then you tap Edit. Then you have your keyboard. And the cursor I think is at the end of that. Let's see. Yeah. And deleted what was there that were taxed and allows me to type something else. Okay. So there's Markup Tool. There's a little hanky. I think it's, some parts of it are not intuitive, but the only way that I know to get out of the text tool is to hit Done and then you'll still be an edit. And so like so. And you'll still have the three little dots where we started from. And you can go back into markup and you'll be back to having the other tools available through back to what we can add. You can add a signature that is for, you know, when people use these for PDFs or whatever. The magnifier is. Cool. I think what it does is it puts a circle of whatever size you decide that enlarges what's in the picture behind it. So in this case, what could be interesting is to have the come in part enlarged. And it stays there when you click somewhere else. And I think it would be better if I got the eraser and got these yellow lines out, at least of my my enlargement area. So this is kinda cool. If you wanted to produce a photograph that had a Kahlo like that, they do it in magazines and such sometimes, you know, so even pull any part of your picture into a bigger area to concentrate on. So under the plus as well, you have shaped drawing tools, a square, a circle, and arrow. They're very intuitive. So the arrow is there and you size the arrow and you point it wherever you want it to point and you can change its color. And you can add a talk box here. This allows you, this little symbol allows you to have a solid color one, which I'm going to go for. And then I'm going to pick white. Where they were as a grid there. I pick white. So that's the kind we're used to looking at. And what's kinda cool here. I think you can move it anywhere, but rather than flip it around, you, you move the little arrow that says who's talking. If you tap on it, you get cut, copy, delete, or duplicate. You don't have an edit. So you're either going to have to or you can change the size of the shape though, which is kinda cool. You're either going to have to write on that with the tools or use the add texts right on top of it. And here's a text box. And I'm going to move that up here. And then if I tap on that, I get edit and I can type something else. Okay. And get rid of that. And again, we're, we're at, how do we get out of the text tool? But it's okay because we're going to leave here now. And you can come back, take a trash photo to play with the first time around and play with markup because there are a lot of you, I mean, you've seen stories on Instagram Ray. Well, a lot of this functionality does that like putting little talk things in there and, and drawing cartoons and whatever it is that you'd like to add to a photograph. Here is a way to do it. And then when you're done, you're done and your photograph is like that. This is fun. It's a way to take if you want to use it as a serious tool, it's a way to make notes on a photo. So let's just pretend that we just saw an amazing sculpture by somebody in a sculpture garden and we took a lovely photo of it. We can make a duplicate of our photo and we can get in here and we can make little notes about what we learned about the history of it, the title, the artist you know, made in what year. And if there's any story that goes to it, a lot of times they have those little placards tell you stories. And you can always photograph those two, by the way, as part of your your travel photographs. But you can also make notes on a photo to reference later on. So that's markup. I hope it's useful to you. I rarely use it, but when I want to, I get in there and as I've been showing you this, I think I would maybe use it on this photo to take the yellow in and make the actual lettering on the door brighter. Like it, because that was my experience of this place. It was intriguing and interesting. I thought should I go in? And no, I don't want to go in. And, and so common in is just an important part of my experience with this particular darling of real place.
7. Using Driving Directions Maps: We are on our way over to start talking about our physical sketchbook and how to get that ready and how to interface that with all the electronic help and digital health that we've been getting. Before we go in, before you go on your trip, you might want to sit down and do this if this is a road trip, especially I do these and print them at home before I go anywhere. And I actually paste them into my pages and their maps, there are maps of your route for that day from here to there, and it's a great way to generate them. Now, on the iPhone or a phone is not going to be as big or easy to deal with. You can take optional thing, go to Google Maps, you know, and take a screenshot of that root on, on your phone and then be able to use it as a photo. But this is what I like to do because it gives me a little paper map for every beginning of every day saying I'm going from here to there. So I'm in Safari, I am in at Google. And I'm going to put driving directions in the Google search box. And this is wonderful. This blue box always comes up and what you have is a from an a2. So I typed my starting point, St. Genevieve, Missouri into the top box and where I wanted to end up by the end of that day, Nashville, Indiana, in the two box there. And when I say Okay, what comes up is a wonderful little map and I am going to stretch it bigger with my route between those two places. The other information that it gives is the time, the driving time, great for road trips and what highways were on, and how many miles we're going to be going. And so and also here's an alternative that would take five hours, ten more minutes if I took I 70 and it would be more miles if I went up this way. I don't usually do that. So I usually what I do is go through here through this little country stuff and then up to the freeway. But I'm showing you as an example here that this gives you a map of your itinerary for that day. And renew if you're on an iPad and you make it large like this, you can do a screenshot and you can edit the screenshot. Bye cropping. I'm a guy, I want those directions and I like the little car there. And I'm going to come into this side and into this side. I'm going to save this now. Okay, back to my library. And here's the photo as a basis. This is very useful for me because, you know, any night I can tune in to this photo and see tomorrow I'm going to be driving from those five hours. Okay. I better leave by whatever time to make it okay. So you can use these just in your phone or your iPad, or like I say, if you print them, they make a great graphic to go directly in your real life sketchbook. And that is where we're going to visit next.
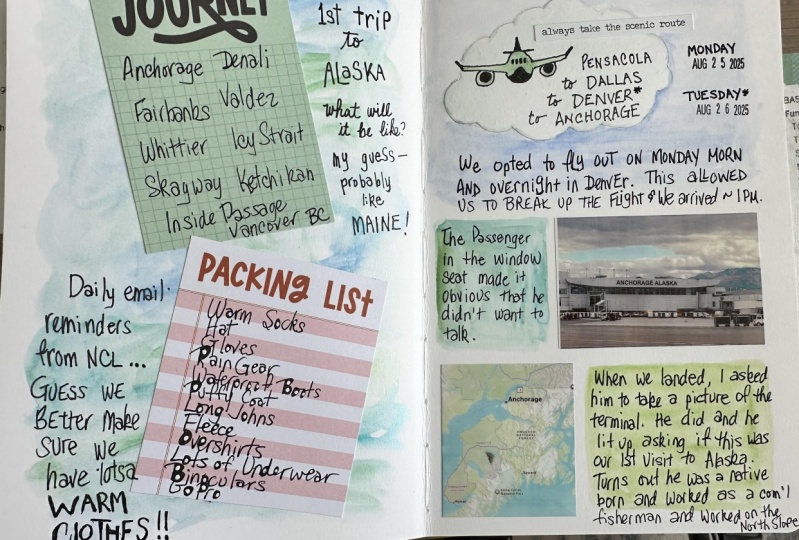
8. Beginning Your Travel Journal: So at long last year we are in our physical with our physical sketchbook. And I'm going to be approaching those by just showing you different examples from different travel journals of mine that will illustrate what it is I'm talking about. And the first thing I'm going to talk about is that the very first page of your travel journal? Is a title page, but it's a title page that I never ever do until the book is done. And then I know what was in the trip, all the details. And I will often then pick the best photograph from the trip and have a nice big picture of it here. That's one of the things I do. Another thing I do is have a graphic from state to state. In this sample. I'm going to be able to show you that. And a few other things to this beginning page was here. I still have the title page before this where I can put my photograph of choice. But I'm showing you this because I will often do this instead. The title page, like overall on the road trip, where am I going from N2? Often times I'm crossing the country to visit my mother in Michigan. And so the Santa Fe to basically Michigan thing is something that happens more than once. And I actually have made these paintings into graphics that I can use on title pages when I need to. Now, for this trip, I not only started with from and two for the road trip and see all this you can do before you leave home. And this is neat because then you don't have any blank pages to deal with in the beginning of your trip. You just have a start. I have the dates of this road trip. I have total miles of this road trip. And then this time I did something that I hadn't done before and I really like it and I think I will do it on my major stops, my overnight night stops on this trip, I made little photos of something indicative of that town. So here's St. Genevieve with its beautiful nighttime architecture. And this is Santa Fe where we started. And this is based city and this is Nashville, Indiana. And this is the route I took. So I put a star for each stop and I did that with a little rubber stamp. And then I printed many photos and I put them in place. Now, I have an entire Skillshare class about using photos in your sketchbooks, and that will give you all the information about how do I size of photo, what do I print it on? How do I get it in the book? So I'm not going to go deeply into how size photos and photos and how to put them in because we've gone very deeply into that already. Okay, here is a, another print and this is a print of what we were just talking about. So this is a map of the first day of this road trip and I was going from Santa Fe to Elk City, Oklahoma. And so I type that into driving directions. I got this map, I printed it out, I taped it into my journal. And then I made little notes right on it about the places that we stopped. And so along 40 along this way, Let's see. Yeah, I'll show you this next bread to just see. Show you what I mean. But we had to stop somewhere interesting, right off the bat. So we stopped in Santa Rosa, New Mexico. Where is this very deep artesian? Well, and it's very blue in it. It was a wonderful adventure. And so I sketched that in. And I also sketched a sunny skies, a beautiful sunny day. And this is not sketched. This is a photo, so I'm mix sketches and photos. This is sky she Lynn on this trip with me. And I mix that up because I think it tells a lot better story in a travel journal. So this page was mostly done first, she's ready to go. I know where I'm going, I illustrated where I'm going and I don't start planning my actual on the trip thing until this page. And I planned it just to review by at the only stuff that we had made here. I took several photographs. And I chose kind of a hybrid of a lot of them to make this drawing. So in the interests of an example of exactly what we've just been through. This was a fall trip in a 2019. And I have an album on my iPad called Fall round a road trip. And it's called jazz because I have another album my traveling companion gave me some photos she took and I didn't wanna make some up. And so these were the ones that I took. This is at the Blue Hole in Santa Rosa, New Mexico. And what I did was I took a series of photographs that were far away like this would be a homing image, as I would call it. This. You can see is a close up of an area here that I thought was very interesting, which it is these balls float for the diverse and a lot of scuba divers practice here. And I also thought this was beautiful, this tree with the turquoise and blue. So I took a close up of that area. This photo here is another homing photo and this is a close-up. Did I shot to get something better of the red balls? This is interesting here because not only did I get how the whole blue hole looks behind it, but I met this guy and his dog, my dog. But he had never been here before and it's the water is very cold in the fall. And here he is thinking about whether he should dive in there or not. And here's his dog being really worried about whether he does. So there's a whole story here in this homing photo which, you know, it's not something that's photographic that I'm going to put a picture in here, but it is part of the story, so I'm glad that I have it in my album. So this is to indicate to you that when I got back to my page here and I wanted to do something about this experience. I went to these photos and I looked at them very carefully and I thought, what am I going to draw in? I chose this. Okay, So here's the photograph. I'll go to the way from the light. And here is the sketch I made from the photograph. So I had all my references that I needed. I may I took some liberties with it, but I totally referenced. Okay. Where were these balls, you know, in relation to the wall and where it was the red one in relation to the blue one. And you get the point. I had every kind of reference I needed. And trust me, I totally feel this whole experience of stopping at the blue pole that day. Every nuance of it, you know, the temperature and the sound and the dog and the whole thing. So when you take photographs mindfully, you're doing just as much for your memory of the event as you do by doing a sketch on the site? We didn't have time to sit and do this sketches. Sketch probably took me. I did it that evening when I started out by my student really well, keeping up daily. But so I did that this same evening, but I think it probably took about oh, it took at least an hour. And so we couldn't have stopped our trip in our whole timing for an hour to make this sketch, but I haven't because I had the reference.
9. Layout for Your Pages: It's true that travel journals take a very long time to get done. I mean, even with this method. But I'm not looking at empty space, I'm not looking at disorganization. And so I wanted to show you this spread because this is basically what I do while I'm traveling with as much time as I have. I take my pencil, sometimes a couple of colored pens. I look at my photos and I choose what I want to put spread. So this is a derived between Albuquerque and Flagstaff. And new Mexico is a gorgeous place along the road side. It's easy for me to say that I looked at my collection of of curated photos and I decided what I was going to put on the page and I put it on the page. It's a little more difficult than that, isn't it? It's not like you're sitting there going Okay. Not so well too. Because there is Page Layout involved. And the page layout stage is the part that you actually can get done and get done every day during your trip. And for that reason, you will go home with pages, at least like this. Maybe you're a little rougher, but you will have instead of a book of blank pages and you don't know what happened and any particular day. And instead of trying to work in a sketchbook, that you do nothing on a page because there was no time that day. And then the next day there is some time, but it's the next day. You don't want to work on yesterday and you don't know how many pages you should leave for yesterday to make your book have some cohesion on this trip. It's one of the big, the big problems and one of the big reasons why people quit travel journaling right off the bat because I don't I don't know how to do that. So with our method, we have our whole hunt and gather stage. We organize its, we have our raw materials right at hand, and we find some time in every day to do a little translation of that imagery to a page about that day. Because then we'll know how much that days probably going to take up in the book where to start for tomorrow and so on. Now this, even at this stage, this looks a little complicated. I'm going to start by telling you that this page was a little complicated for me because the entire day was driving on a freeway between Santa Fe and Flagstaff, Arizona. And so you can't without stopping, you can't really get a lot of curated photos or any kind of photos when you're driving a car. And I've tried some things, have gotten a GoPro camera. And I'm now trying to note is trying to mount my iPhone on the dashboard so that I could use a remote clicker shutter and take photos. But anyway, not an easy thing. And so for this page, this driving page, I didn't really have a selection of photographs to work from. I had them in my head because when I'm driving and I go add remember that. Right. And in this case, the only photo I was actually able to take, I took a picture of a panel of stone tile at a McDonald's in Grants, New Mexico. And I did that because it's a good pattern for maybe a glass design. I work in glass and I could take a picture of the french fries because they were right there and they were holding still at this stop. And so I could do that. So I add these two photos to work from. But the beautiful red rock countryside that I was driving by all day, I couldn't really get a great photo. And this little scene down here is more red rock, but there are some remote buildings on reservation land along and along this route. And just was unusual because they're usually kind of a tan or an off white there. They're not homes where there are buildings that are people are using for things. But this time, this middle one was red and it just really was a really good look. And so I took a picture, this was my eyes and this with my eyes. And it was the first day of a trip. So I did get in early enough that I could spend some time making a page for that day. So I'm going to show you something though. It didn't just start like this. I didn't just take my pencil and, you know, there's the red rock and and, you know, there's the stone over here. I had to plan the page, the layout. I knew the things I wanted to port on it. I knew the story I wanted to tell, but I don't know where anything was going to go. So I'm going to show you now what my original pages look like. That page or originally looked like this. And I feel when I'm traveling that if I get this much done, I succeeded in getting that day into the Travel Channel. And that's why I want to show it to you this rough, because this is done with pencil. It will all erase cleanly later. This is the middle of the CIA had to recreate this for you because the other the other page was done that far. So I thought I'm going to just back up and show you what I first did before I was able to do the other page. And so I knew that the biggest thing that I had was that beautiful red rock it cliff wall. And so it was going to be really the, what I call the hero illustration or hero sketch of the spread. And that means it's the biggest and most important. And I wanted a title for that first day of travel. What day was it and where was I going? And so I knew that this area up here, I penciled that in. And then I drew what is really the outline of an area of red rock from Red Rock State Park near Gallup that I intended to draw and I knew is going to take this much space. And then I wanted to write something about the beauty of the drive. And so I did, this is all in pencil because I will come back and I'll straighten it out and do it in ink. And I like to keep my writing neat in my travel journals. And then so what did I still have? I had french fries and I had in here I wrote about McDonald's because I am, I'm not a McDonald's person. I only ever go there on a road trip. And because it's a lovely stopped, they always have clean restrooms and they have little treats to tide you over. And I only allow myself to have an order french fries or one of their little ice cream cones. So I wanted to write that down also. And I knew I wanted that grid stone pattern. And so I that's that shape. So I put this riding and I put, that's where the stone will go and put what it was. It is a stone panel and I want to reference it for classwork. Okay. Now I had hide this. I had this much of the page pretty much planned out. And so I put my little landscape down here with the houses and the red house. And my note about this was odd, the usual white and tan out buildings with one tall red one. And that writing is going to stay. It's just going to be neat and up. Now what am I going to do with the french fries, right? I can't do anything really realistic with them. And everything else here is a little bit realistic, but little thing or french fries like this. So I thought, No, I'm going to blow the French rise up and have them kinda right in the center, go right across the gutter and kinda tie everything together. So this one wants, this much existed on this spread in my travel journal. I could've quit then if I had no more time because I can come back and with my references and my memories, I can come back and do this better at anytime. As it turned out, I had more time that evening. And so I could take this a little bit further, wall this memory in this this memory here, we're still pretty strong. And I did. So this is, I read my writing in most of it, not this and this, but I redid my writing in ink. I put my headline in. I drew and inked my Red Rock State Park area here. Inked this writing. I didn't get to get very far with the French fries sketch. I define these little houses a little bit more and I looked at the photo and put in my stone pattern from the McDonald's outside panel. And then this page actually sat for a very long time. I'm embarrassed to say how long before it actually got finished. However, it never got lost because I had that moment. I got everything about that page in place and all set for finishing in the future.
10. More Layouts & Your Itinerary: Since we are in this travel journal, I have a couple more spreads it I can use to just talk to you about some structure of travel journal pages. This was day two, the day after the road trip along the highway and I was headed from Flagstaff to Scottsdale actually, but I was going to make a pretty major stop in Sedona and red rock country, which is really beautiful, beautiful place. And I woke up that morning in a great big nest of pillows because comfort ends where I usually stay there started to put like Solved your choice of soft and firm pillows. They put like six pillows on a bed. So it was it was kind of crazy and my hair was very crazy after that much pillow in and I left Flagstaff and I headed down highway, Interstate 17 toward Sedona. And that feeling of that highway is what this was about is just we lined with forest and a lot of up and down, a lot of curvy to it, which is why I don't have it going straight into a vanishing point. But this and this were not from photographs there from memory. And then I off of Interstate 17 and drove into Sedona on Highway 179, which if you ever go that way, that's the way to go into Sedona. A lot of people go down from Flagstaff down oh, Creek Canyon and that's lovely, but it isn't like coming upon this by Highway 179. This I did take a photo. You only ever want to do that. And there's nobody anywhere around you. Actually, you never want to do that. But I held the iPhone on the steering wheel in order to get a shot of this approach. And then it just gets prettier and prettier and every corner or every curve you go around gets beautiful. So because of how beautiful it is, I used my photos instead of trying to do a sketch of this because as it says right here, you just can't do justice to these by drawing and photographs. Don't even do justice. Of course, you have to just be there. But I use three photos on this page. And so we have two imaginary drawings and a page of photos. And I didn't have that much to say in this spread about this experience because the visual is telling most of the story. So this was all that I had set aside for some journaling if you all some writing. So that's a combo layout that works I think and and you type color and to do to get the two pages. And like all the writing here is in blue and that gives harmony to the spread. And there's one more finished page in here I want to show you that is a great travel journal page because a lot of us shop for things. And we want to remember that. I mean, we have the things we can remember them. But something I do really is I do shopping spread. And again, and this one is all drawn. And there are two photos that I worked from here. And one, these were their candlesticks may not have big iron pipe this rusted. And I took a picture of these both in the store where I bought them. And once I got to the motel room, I set the three out that I bought and sketched from them. So this is from life and from photos. And this is some pepper shakers are from life. I unwrapped and set them on the counter and sketch them from that. This is a very long, like an eight-foot long chain of rusted metal heart sculpture. And I hone that and the door in the motel room so that I could see it hanging. And then I sketch that from life. I also took a picture of it so I could zoom in and get angles right. But so I sketched that one from both sources. And these were little cat ceramic dishes and they were so darling. And these were sketched from life. I had a friend. I have a friend who has so many cats and it was perfect birthday present for her and the lady in the store and I, we were texting back and forth getting pictures. Betsy's cats so that we could try to match the different styles in the ceramic dishes. And we finally did it and she loved the gift. But anyway, this, I call it travel shopping page. And they're really fun to do because you're, you're not only sketching and drawing, you are reviewing your purchases of the day. Now that preliminary for this and for this are very similar to the one that I showed you for the first spread in this book. I just had a circle here and I kind of put a rectangle here because that's what that was going to take. And it will put a long rectangle here. And this is on pencil in case I didn't get this done. And a couple of circles here. And I put what I had to say. And then I went back and I refined refined. More than refined. I drew the salt pepper shakers within their space. And I think I actually even I had a lot of time when I was doing this because when I got to my motel room after all of that shopping and everything, I had time and I wasn't very tired. So I did this and and these I did as I could over the next couple of days. But the whole rough out was in there and I had the photos to reference. So the whole point of this being that you are actually keeping a travel journal as you go even, yes, The only time you have is to pencil in where your curated and mindful photos and materials and information are going to go. Now this is at the back of this same travel journal that we've been looking at. And I just wanted to show you another thing that I do that's helpful to me. In most of my sketchbooks, I consider the back page a backdoor to the journal or the army to the sketch book. And I will do my testing of colors. I notes on things on the factor and what I called back porch that goes further than that in a regular sketchbook. And so my color experiments and all that that are used in the book. I would find what I did in the back. And obviously when the movement forward meets the movement backwards of book is done. But there are other useful things for the back door in one of the things I use them for is my itinerary or what I think my itinerary is going to be. And this is a mass because I do this when I first plan the trip. And it says right here what I think will happen, where I think I'm going to be and go and drive and do. And then we're done. As the trip unfolds, I will go in and I will look. I didn't make it to the Desert Museum in Tucson to sell was also a part of this trip. I never made it to one of my favorite towns anywhere, which is to bug Arizona, which is south of Tucson. And it's an adorable little village, looks like Santa Fe, but all walkable and everything. So I had all of these, what I want to do. And then I went back and I did this. It was great. I did that. It wasn't that great. What day I did it on, just blah, blah, blah. And you're looks terrible. But when I am doing my pages, what I back from the trip, I have this as even more reference. What came before or what, you know. Oh, this happened until day and this happened on Thursday. So that is another yet another information keeping trick. And I want to have to bring with me. And then these were just notes of how I felt when I was doing and how I felt about it. And they have heart's fine because I was having a really good time, met a friend for dinner and, you know, a morning journaling in this I was staying at this point in this beautiful because Sita in Tucson. So I had a big cable to work on and I went and bought wildflower seed. So it's like a diary of sorts, but not having to be organized in any kind of way. Not even having to be correct because you can come back and make changes to it on something didn't go well, the way that it was supposed to go. And so I did that all the way through my last day here, last day of summer, I said because it's December and when I go home from here is going to be snow. And so I enjoyed that was 76 degrees and sunny into son and I really enjoyed this day. Now, I knew that I was coming back again in February of 2016 to go to the gym and minerals show, which is something that I do every year. So I started even to make a plan for that in here. So anyway, that is something you might consider. You might wanna do it more neatly than I did, but I don't do this in another place because this goes with this. And it helps me when I'm finishing a creation of the pages of this trip to visit that day again. Oh yeah, that's what happened. So feel free to use your vector, your back porch of your travel journal to keep track of your itinerary.
11. A Trip Through Sample Pages: So where are we? We have really set up a program for a foolproof travel journaling experience that we can take to any trope. Past, present. Passwords are going to be harder because your photos aren't organized, but you can stay, take some of these same principles, go back to those photos and carry them through evolved ones that are no good and zoom in on the ones that are good and get your visuals and get your memory revitalized. So your project for this class is going to be to do a journal spread. And it can be, it can't be from the future yet, while it could be if you wanted to do a pretend one, it can be from any trip in your past or you can start making the front end for one that's coming up, putting your itinerary and the back and all of that stuff and then get ready to to get your photos and pick them, you know, according to our plan, blah, blah, blah. So with that in mind, I am going to give you a tour of some various travel journal pages that will give you ideas for layout, ideas for what to include. Just ideas. These are, this is my approach to things, but there might be something here that will get you going to. Now this, this spread is a beginning of a road trip spread. And an ant is one. And the first thing that my friend and I did was stop locally for lunch. We didn't want to leave town without being too or with being too hungry. And this was a metal sculpture on the wall of the restaurant where a Harris road house where we had lunch in Santa Fe. So while we were sitting there, I sketch this and then we started our drive and we were going down to root dose, so New Mexico and we really screwed up. We overshot the exit and we had to go back and worldwide. So I did this later from imagination can't draw on the car too jiggly. From imagination as hasn't, oops, sign and go back and exit that we missed. This is a really, really simple map in this kind of map is good for overall highway direction of things, you know, like this is Interstate 25 and we had to get through dose. So you do this like weird shaped thing, get off on the highway 380 and then your turn on Highway 37 and then you turn right it on Highway 45. And then finally you get to a dosa and what does that landscape like there? It's mountainous. There's some desert as you go through, but it's mountainous. And so this is a very, very simplistic graphic to tell that entire story of how to get there. And I just used it as a frame for an idea of what the landscape is like. So think about that. You can do that for lots of parts of a road trip or or, you know, if you're staying somewhere and going to certain parts of town or whatever. This road signs are wonderful. You're going to see all kinds of crazy stuff and road signs. And I liked what the wild horses one, I get the sine award. Eating meals is always fun. Either will usually take a picture or do sketch of what it is I'm eating. The sign for the restaurant, maybe the business card for the restaurant. Um, and, but most often, I will take a photograph of the menu. Now this restaurant didn't really have a menuet, have a specials board, and I probably should have taken a picture of it. But I didn't think of it at the time and so I didn't. But this does have this wonderful salad that I had and the name of the restaurant. If I go to this place again, I always look to see if those favorite restaurants are still happening. This is one of my travel journals from trips to Texas. I go to Texas quite a bit too. It's a neighboring state and there's a lot of interesting stuff in the hill country. So, but I'm going to show you several spreads from here because it's an example of the fact that this page may not be complete for years. And I mean literally for years, I still to this day have not. I've thought of a lot of different things that I want to put here, and I still haven't done it. I did get way past my initial layout though. I got a lot of this done. Here's another listing of the places I'm going through like I did that with pictures on that other in the other travel journal. This was mostly driving. I did break my rule about only french fries at McDonald's and I had a sausage make griddle and drew it and painted it. This is a wonderful little ruined building at the side of the road and I was fascinated by it. It must have been either a florist or beauty pair plays, or something with the pink and the purple, so q and it's a wreck. It's been closed for a long time and it's erect, but I brought it back to its glory because it just is so darn cute in Clovis, New Mexico along the highway. And I wondered about it for years. Is this castle replica? And they don't make any big deal out of it at all. In fact, if you look up a castle in Clovis, New Mexico, you'll come up with, say, the Pawnee golf course or whatever it is. It's all. But anyway, I chose stopped. I took pictures from lots of different angles and I was able to use them to get this roadside attraction into my layout. I'm not thrilled. I will tell you with the fact that this faces to the right, that's a layout design thing. And I would, ideally I would have flipped it so that it faced back into here, but then it wouldn't have looked like what it is. And I didn't unfortunately, at the time, I didn't know that maybe I should run over here and take a picture from an angle that would point to the left because I didn't yet know my layout. So life is not perfect even in travel, in trip journals. Okay. And not another unfinished page. I do not let this disturbed me one bit because to me, my travel journals are like a playbook, workbook Library. Anytime that I am not motivated to start a new thing, I will look through all of these trip journals and some page we'll holler at me in my sketchbooks are like this too. There are pages like this all over that you need to still be done and I don't see that as a failure. I see that as a fun opportunity. So I went to the what's called the herb farm in Fredericksburg, Texas and I stayed in one of their Sunday houses, which are their rooms, but they're in Fredericksburg. It used to be all a goat farmers outlining. And they would come into Fredericksburg on Sundays for church. And so a lot of the families were wealthy enough to keep a house for just the weekend when they came to church, so they didn't have to travel right back. And so the herb farm is duped, replicated that and use old-fashioned keys. They're just darling. I highly recommend the places. Got a great restaurant as well, and the grounds are wonderful. So this one got finished, and they got finished pretty soon after the trip. The only photograph on here is the Coca-Cola, the old Coca-Cola cooler. I I knew that it would be too much work to make that look like it looks. So this was a trip that was in December and this place is very lush most of the year, but december things are kinda like Brown and but the grounds are wonderful. They're just weird stuff like sticks stuck on the ground and signs path of least resistance and a door standing by itself in the garden. And little vignette here, there was a whole bunch of stuff around a bird bath, but no water in the bird bath. It was actually a cactus. And so this treatment is, this layout is a little bit different because what I did here is I have a hero drawing. The largest, most important thing to me of this set, and these were all photos that I worked from and I frame them in the first place that there would be great to work from and so on. And I put these little guys, three of them and a little grid frame. And I love to do this because it makes for a great layout. But usually I will make it a little asymmetrical by not putting one of the items in a grid. And so this is sort of the hero of this page escaped. But anyway, it just makes it dynamic, interesting. Kind of page are spread and it's got a lot of whitespace still laughed and your icon knows where to go and see this layout is right. These are all pointing this way. And the writing and the arrow here pointing this way keeping you looking inside of the composition of the spread. Okay, more garden. And I have photos. Several other rock signs, and I haven't ever quite decided which to put in here. But I did know I wanted these wooden birds rely on and a bunch of dead leaves and I wanted this wonderful cat. I keep looking for that sculpture. It was a rock and I don't know where it came from. And if I can ever find out, I'll be a happy camper because I will find one. Okay. I'm going to fast forward here is still Texas, but it's a different trip. Taxes gets filled. The middle of the Texas is just filled with blue bonnets and the spring and it's just an amazing thing to see. And so I took a trip with some sketching friends and we rented and ranch house down in Fredericksburg and spent a week there and it was really wonderful. And so I took pictures to work from one of the first things that we did was when we all got together as we went out to the fields and we got really great photos of blue bonnets because it was the it was the theme of the whole thing. Here actually is that small mini golf course thing. Miniature golf course, Castle in Clovis. So this time I chose something else for a roadside attraction. And here these are two Hero illustrations. Okay, so we don't have a lot of small stuff and sometimes it's a lot of space around something is nice. And I had a lot to say about this here. So I arranged it. So there were still a lot of writing space. Again on page because that's sweet turned out, but this was all in here in pencil. So when I turned the page from Lynn, we all just met up at a one-bar in Fredericksburg when I turned the page from that, when we went the next day to whimper way taxes. I knew that I could start my web page here because I knew how much I was Ramos taking through this. So this page did get done. And there is no rhyme or reason to this except for the amount of time that comes up while I'm relaxing. So we stayed at this ranch house. We were all Skechers. We all sat down and we all did page from the day that we went to orderly. Therefore, I have all of this time to take my original rough layout and to develop it all the way to what it is. The next page from where it really is not finished. This side is, but a lot of the little buildings, and remember really taxes have. These spires are steeples on the top. And I took photos of two of them because I think that was really interesting. And this one I got done at the time and this one over here, I have not yet finished, however, and this was 2019, I think. However it's here. The whole layer is here in the photo is in my album from this trip. So it's not that I won't finish it. I will I don't know Ren I also don't care when.
12. ReMake An Old Travel Journal & Wrap Up: This trip journal is actually a redo of a trip journal that was done in and wasn't ever done. It's one of the tendons from 2007 and it was another trip to Michigan. And I thought I would show it to you for certain things that happen that are interesting approaches. And one of those is in the unfinished trip journal from 2007. I had done some sketches and I didn't want to just let them go because they were actually accurate to the time and I'm doing this at a later time, but I really am lucky because at that time also, I was doing the mindful curated photos. And so, and I also had the old book that had pencil layouts and notes in it. And so I know what I'm doing and where things are going. This is the old journal that I'm working from and it's, it's seriously not done. And it's not, it doesn't even really have its layouts done. What it does have is where and when there's kind of an itinerary kind of a diary of what happened when and then what I have is a big album of photos dated that went with this and so I knew that I could redo it. And why do I want to redo it? It was done in an old mole skin sketchbook and the only thing I could use and nose was watercolor pencils. Not that I mind that. But I wanted to move the the pages where your Wish I don't think they were very archival. I wanted to move this book to one of my big eight by ten beta sketchbooks because I wanted to make more of the picture part or a part of it, the illustration part of it. And not only was I be limited from using watercolor, I don't have room either. So anyway, I thought I would point this out to you. So this is an old travel journal and you might have 12 and it isn't done, but the raw material is there to start from. And so you do. So what I did was I scanned or took a picture of here's all my packing. I didn't do that. Yeah, I didn't put that in here. I don't know where I'm gonna put that. But it's kinda cool history, you know, I brought an iPod. Anyway. So this spread, um, had the moccasins in the blueprints and it, and I really wanted them, so I did scan these and then enlarge them, enhance them a little bit with some editing. And then I printed them as photos and you'll see the moccasins on the next page. I printed them, really nicely, cut them closely so there wouldn't be a lot of edge and glue them into this one. Okay, I haven't original plan situation there. This was a very strange true. I had laid out a route that got changed. It got changed again. This was all because of storms popping up when I looked up the plan on the Weather Channel. And so I ended up with a whole different route. Then I was going in the first place. These are photographs of a couple of very interesting roadside things along I 40 in New Mexico, a town called Mulago, which means miracle. But there really isn't anything there that you can see from the road, but a gas station. And there's another place called where Vo, which is Spanish for Crow. And it's a ghost town. For the most part. There are still a few people living around there, but most of the homes and everything are like abandoned and the furniture is still sitting in there. And what would the blueprints for they were because the best laid plans don't always happen. Okay. So these are now moved into this journal so that they are a relative to the new approach. Here are the moccasins. These are pictures from our restaurant. I stopped that because this guy was with me on this trip also. She was just one. She was very rambunctious. And so the only thing that really happened on that first day was seeing billboards and so on and stopping at the rest area. And we got to K2 in in Amarillo. And I often will go on the computer and get the hotel sign to put into my travel books. And so we each had a mishap in the parking lot because sky wrapped herself up with her leg in her I'm in her leash and we thought that she cut her circulation office. She didn't choose just a puppy, so she was good. I however, tripped over this and felt it was I had an accident where I broke my hip in 2005, so two years later and I hadn't fallen since then until now and I didn't hurt myself. It's a really good thing, but I was paying so much attention to the sidewalk that I didn't see that thing. And so people would not ordinarily friend the time to paint a scene of a parking lot, but I did because that had meaning for me that first fall. This is a longer route that I showed you in the other book that goes through some strange places like this 19 story cross, you can stop and see and and these are photos. This is one of them map route, pronounce it, I told you from driving directions. These are photos. These are drawings of some little beautiful figurines that I bought in the gift shop at this cross, these little angels. Turns out that those were created by a friend of a very good friend of mine. So it's weird how things happened, but I later found that out. Oklahoma has hidden treasure. And this was one of them. It's called Red Rock Canyon and it's also a little town called Hinton. And so I didn't draw very much of this. I drew some of it, and I drew sky, and I drew this little creek pattern, but this is all photographic spread. And so I had taken mindful curated photographs of the rock formations and all I had to do was like size and place them. So it worked in my layout. I sometimes will do something like this. It says Travel note. And that is just like I'm noticing something as I'm going along. And here's something we haven't mentioned before on your phone, there's a voice recording app. It's called voice memo on the iPhone and I don't know what it would be another phones, I just know they exist. And so when I'm driving along and I can't sketch something, I want to remember it. I pick up my phone and I have a little bit to say about it. So that was something that I did here. And then when I was redoing the book that was in with my photos. And so I knew that I had made note that Western Oklahoma is really beautiful if you notice it in a certain times a year. Okay, another hotel sign a restaurant, sign a picture of a meal. Adventures with sky. She found a couple of tongues and eight ohm. And the next day she drank my Starbucks and puppies on trips. So just really a lot of fun. And she's 15 now and she's still going strong and but she's not sure she wants to go on the next trip because your leg and doesn't want to jump in the van, but I'm talking to her about it. I'm going to try and convince her. So your is another route. I'm gone to St. John. I stop in St. James, Missouri. There's a great antique store. This is more stone that is on a pillar. So here's a homing photo and this is like what I was talking about. I was working from this, a closeup from this, and I was missing a piece, so I was able to go back to the homing photo. Fernando, what was there to the right? That's what would those are good for. And I shopped and bought a trellis there. Okay. Roadside attractions. I did stop to take these photographs. I did not do this while driving. And this is cutthroat sewing company. I thought that was very interesting. I wouldn't have gone in there when it was open. And I can figure out why it isn't. I got to do a lot of sketching now that I didn't have time for van. And so I got to do right. By Saint Jan, here are some of the signs that are on the old homes, who house it was and when it was built and narrow day daylilies all over the place. Here's one of the charming little places that is this house, John Hale, 865. Sometimes you just have a moment where you're just so happy with where you are and what you're doing. And that was true here and I couldn't do a good enough sketch of this. I didn't think to really show the moment and I sat outside and tasted the wind from this winery and watch the people walking down the street and I love St. John anyway. And so this was just a wonderful moments. So this is my hero photograph of that moment. And then there was a great little store called IV and twigs. And I bought several things there. So here's a shopping part of the sketchbook. Here's an, these are kind of more urban sketches. I think when you do the shop or you do the houses, the buildings, I don't do a lot of that. That's not really my thing, but I do it and really charming places. And so everything's a vignette around there. And that was that story that I loved. This page is not finished. But it is photographs here. They're very interesting from my walk around town. This comes from a sketch in the original book of this fabulous on in earnings at this place there to absolutely faint from and here's how it was there. And so now it's been transferred to here. And I will be doing, I'm getting the whole story for writing in there. You can see the application of these principles that I've been telling you about. And I hope that you can take them and you can imply them to at least one thing in your environment right away while you're remembering. And then your very next trip, you can start that sketchbook right away. And you can do that beginning stuff with your itinerary and your plan in I will love to see any pages in the project section from your experience of foolproof travel journaling. And I'll be sharing some of mine as well.
 Jessica Wesolek, Artist/Teacher