Transcripts
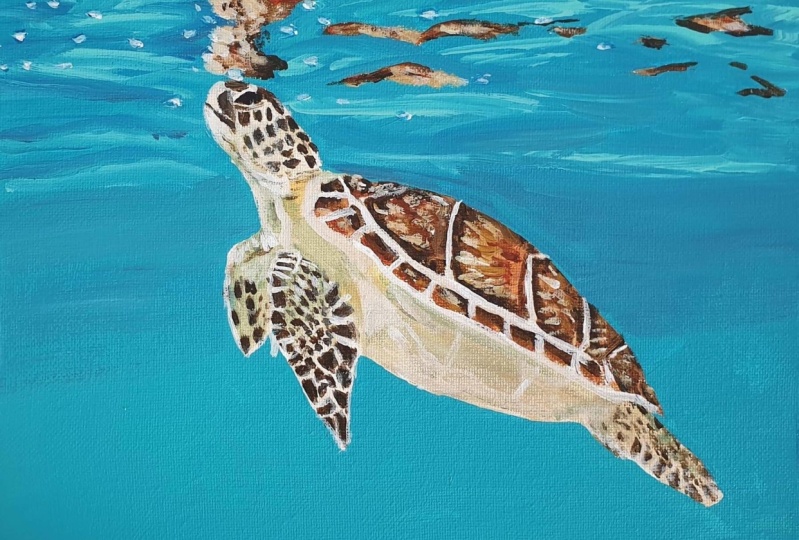
1. Sea Turtle part 1: - Hi . I'm James Corwin. I'm so excited to take you through this beautiful painting of sea Turtle. I photographed the sea turtle off the coast of Kenya just a couple months ago and was so inspired to recreate it on canvas. And now I'm excited to teach it to you. I'm gonna take you step by step through the painting process demonstrated here on the canvas and then giving you some time to complete each step unprompted. Pause a video, complete this step and press play when you're ready to move on. All right, let's dive in. We're gonna start by drawing out our sea turtle. I'll take my small, pointy brush I'm gonna take just a little bit of my brilliant halo blue and a little bit of white to lighten that up, Take bit of my water just to increase the flow of the paint. And now I'm gonna mark out my horizon line. So I just want to be just slightly above the center of the canvas. So this looks about the centre. I'm just going to come up inch or so draw line straight across my canvas. Think that so below this line is the depth of the water and above it will be looking underneath the surface of the water and the reflected sea turtle up here. But below weaken start to draw on our sea turtle. Now, some just going to specially positioned the sea turtle to the space here. I don't want it to be too big or too small toe occupy about this much space on my canvas. Something is going to start with drawing a line here at 12 o'clock in a position at about one o'clock and just draw a line like that? No, From that line, I could begin to draw my show. The reason for this line is this is the angle that my sea turtle will be swimming at. So I want to put make the shell about this big. So just starting on the side of my line, it's gonna bring a shell, okay, around the top half, just bring it down until the line like that. Then they come around on the other side. It's gonna come out just a bit farther, just like this meeting at the other line so you can see the kind of abnormal shape of the shell. So right here it flattens out a little bit and there's a Boeing curve here outside the body coming in. And then the other side, I'd say for measurements to get this accurate about two of these out for this mark here. So first drawing this line as I did and then measure out to more and make a mark and dry your second line. And well, leave that for the first step for drawing in her shell, make sure the lines aren't too thick with the blue. We want this to dry quickly so we can put in some color into our shell. So complete the step now. And when you're ready to move on, press play. Great. Let's go ahead and add in the head of her sea turtle continuing to use our blue. The head's gonna be about the same with here on the on this half of the shell coming out. So I'm just gonna make a mark where the head is going to end. I'm gonna come up here on either side of Mike middle line that's gonna curve up and then flatten out following my line here, you flatten out again that mark men on this side of the line. It's gonna drop straight down and then curved back. It's like that into the shell. Now we're gonna put in our first thin. So here on the side of the show, she's gonna come out, It's gonna curve back. It's like that. Get on this side, fan out then it's gonna curve back and taper into the point The finna crossed on this side gonna be slightly smaller as its bit more behind the shell again comes to a point and then back into the show And then for the flippers in the back, Another side of the line Come in here, Drop out, then round and come back into the ship. The thin That's right. Great. So now we've drawn out or sea turtle. So go ahead and complete this step now and will begin to add some color. Great. I'm gonna let those lines dry now and draw out a reflected see eternal above, continuing to use our blue color drop the sea turtle straight above. So I'm gonna come about equal distance above the water here, So I'm just putting a mark here equal distance above our water line. These are gonna be some interesting shapes as they reflected into the water from just doing a small line here, making the top of the head. It's gonna curve back in and and back out. Then over went down. It's gonna be just a little shape right there. And then it's gonna pull out a little shape there, maybe a little shape inside, and then right up above, do another shape. Uh, no circle inside. So you might want to watch these this step just a couple times if you need to, to see how I've drawn out these funky little shapes. So before we move on to some more interesting shapes, go ahead and draw these. And now, Okay, let's continue to draw in somewhere shapes coming off of this light. It's going to come around here for the shell, just gonna wraparound back and then extend up to the top of our campus to a point. Then back down back to our point there. Cells were gonna be, well, thin that comes off here just like that, offend off from this side, that straight up regional triangle, then back in great. So now, drawing those last little bits of shapes
2. Sea Turtle part 2: Okay. Now that my sea turtle below has dried, I can add some color into it. We're gonna add our first layers of color and build up as the layers dry. So go ahead and pick up your medium size brush. We're gonna mix yellowy orange, taking yellow. Nothing. Just a little bit of red fill in the shell. With this color, it's going to go on quite transparent, so we'll see the lines underneath. But that won't be an issue for right now. But go ahead and bring your color right over those blue lines. Also just a bit of this color right here on the top of the head just to create our first layer of paint. Then rinse off your brush. We're gonna take a mix of our ultra marine blue and some of our thay low blue mix Those together paint in the fins again. This color will go on transparent, but we'll build ups. Um, more color. Within that space. It can also bring some of this color up into my reflected sea turtle filling in just a few of these areas in shapes. You're right there, there, filling in this. Then in this this shape here. Great. So pause a video now and complete this step Great. While the paint dries on her sea turtle we're gonna begin to fill in this white space The water so use your big size brush are brilliant blue We're gonna mix us with some white I'm going for medium blue to start gonna create Grady int of blue As we work down Starting below my line No Put in the darkest of the blue First I said stay in line here I'm gonna add more white to that blue Just make it a bit lighter A little bit darker there I'm gonna take this color Filling around my sea turtle for some of these tighter areas may be easier to use a smaller brush. Now, before these paint stri Myskina blend the transition here between the two colors just taking my brush over them and blending the colors into each other Here. Now I'm gonna take this blue color to write about here about the fourth up through from my canvas, - The water diving in in this area off the coast can you was so beautiful. Was so blue. Just crystal clear. Incredible even from the surface you could look right down through the water and see all the coral below in the fish swimming and plenty of sea turtles. Amazing. - Okay , now I'm gonna add more weight to the blue to create a lighter shade, paint that lighter shade of blue on the rest of the space and then blend two colors. Great. So now I have a beautiful Grady int. I'm just gonna straighten out this rise in line here. Perfect. Great. So now, policy video and complete this step putting in your radiant and then we'll move back into the sea turtle.
3. Sea Turtle part 3: Okay, go ahead and pick up your tiny brush. I'm gonna take some white here. I'm gonna mark out where my sections of the shell are going to be. So just gonna start to draw in some lines Here, come off the shell. Dual triangle coming into my middle. Line them back up from the other side. They come down that middle line now do another section with this line. I'm gonna complete that line on this side. Meaning curving down following the curve of the shell. I'm gonna do another line about it in Sure. So down the shell, another line, same distance, Another one here at the back. I'm gonna take this line and connect it about halfway on that line. Do the same thing here coming down and another section connecting that line. It would be another section here in the shell coming in this line, connecting up and for the last little section just finding it off there. Then when I draw along this blue line just white lines in between the sections, then there's gonna be little lines in between the sections. - It's going around the show. We won't see any on that side and then finally just going to fill in the space on the neck with my white. Okay, so go ahead now and draw out your lines on your shell and then we'll move on to the next step Clean off your pointing brush gonna add a darker layer of blue into our fins. So I'm gonna take my ultra marine blue My fellow blue can actually might add just a hint of black to that to darken it To make a nice dark blue In all the Finns Well, I have this color miss going Teoh dark in these friends up here. Great. So rinse off your brush and complete the step minimal Move on by taking yellow in red to make an orange and take a little bit of black dark in it to brown that wanted to be a red brown. So I'm gonna add some more red to this color Maybe just a hint of yellow Warm it up, Start to put in the beautiful patterning on the shell So working up in each section we'll start down here I was gonna fill in all this shell down here of the space on the show with this color little sections in between. In this section on this section, No leave. Just a little bit of this orange showing right here. Start to fan out. It's little brush strokes, leaving a little bit of space in between each one. Same thing in this section, Steve. In a little bit of orange, they're at the bottom. Continue to fill in some of these sections with the brown Bring all the way up the show. Now in this section to you in your same patterning Just delicate little brush strokes is all you need. Just fill in that section with some brown And then over here just smaller brush jokes filling in that pattern. Great. And while I have this color just gonna bring in a few of these spots on the head someone and create spot there spot going up on the top across the top of the head that just a couple spots in here. We're gonna fill it out more with some highlights. But just getting some of this color into the head is important for now and also this color into these shapes, it's gonna fill in the rest of the shape with this brown color. Wonderful. All right, posit video now and complete the step
4. Sea Turtle part 4: great. No. While these paints dry in our shell we're going Teoh Fill in the rest of our water Their big brush We're gonna makes a light blue By taking white No brilliant blue again Mixing those together to make a nice sky blue Carefully carving out around these shapes A little bit inside before these colors dry Just gonna When the transition between the two again you're welcome to use a smaller brush toe Get these tricky little areas in here There All right, posit video now and complete this step Taking my ultra marine blue I'm gonna add just a little bit of red to that I'm gonna work this color into the shell starting down here at the base Just bringing out some more of those fanned out brushstrokes but leaving a little bit of that brown in between a little bit of this color here into these sections. A no show like that one of brings this color here and the shell for the section of the show . I miss going just we got some very little bits of the lines here and the leaving brown at the end. Same thing on this section. Just adding the purple towards the inside, leaving some brown on the out Slatina a couple in here. I'm gonna take some of this purple. I'm gonna paint it up here. Reflected sea turtle. Just gonna bring this color right over the brown. Now, I'm gonna leave some of this brown, so I'm just gonna bring the purple around it, just lightly fading it in to my brown. I'm gonna bring out just a couple of these little sections here, so I'm just gonna Can I draw out lines like that just to create this little sections in the shell and then work just a few of these fanned out lines from inside them? Just a couple. Just to give the illusion the reflected shell. Mostly gonna pull a couple of these purple lines out into the water that Okay, so complete this step. Now, when you're finished, rinse off your brush
5. Sea Turtle part 5: okay. Using our clean, pointy brush, take my white. Bring out some of very thin lines between these little dots in here just shaping out around them and bring in these lines down the side, filling out more of the neck there. It's a very little pain on my brush, and you can roll your brush palette here as you roll it, Pull away. It's gonna roll it into a very fine point. You can use that fine point, draw, draw in these very delicate lines. I think that no use the same technique to draw in very thin lines here in the fen, starting with some white. If they're the base, move into some thin lines coming off for the fen. It's like this gonna be a little crooked, little wavy and then right before it bends we're going to stop when I come out and go straight down the Fed Now, just going straight down the thin like that. No, we're gonna come back in the opposite way. Getting toe Add some lines over the white lines, creating little little squares and diamond shapes. You know, he finds a way over and across the bottom of offense just like that. I'm gonna do the same thing on this side. I was going to come straight down some lines. Longmire bring lines across the other way, bearing their direction. Just a car about these little shapes in between. And now for this thing in this fed lines coming down, then lines going across some more lines up in here just to create some smaller squares and then bigger squares down towards the bottom. I'm gonna rinse off my brush and then take just a little bit of my for late blue and lightly pull it over the color to create some shadow off the thin in the same thing on this thing. I had a bit of shadow on this thing. It's like that. Okay. Composite video now and and do this step. Take your time. Be patient and no. These are very thin lines, so you only need a little bit of paint on your brush. Great. So now that you've had a little bit of practice in these fins were gonna choose amore. So taking my white do the same little lines in these fins. I don't need to be Teoh perfect. Most of them are refracted and bending and weird ways anyways, but I just want to get the effect in there best we can. - I'm just making up these lines just to create that illusion. Okay, While I have my white and my pointy brush don't bring some white here into the show going the opposite direction over my brown, springing out some highlights here on the show. Not too many. Just a bit of yellow to it. Storm up the ones down in here, - there . I'm also gonna bring more of this white here on the top of the head, adding bit of highlights on the very top. No, I'm gonna bring this color here into this shape during the similar crisscross lines as we did in the fans and then up in the show, going the opposite direction, having the highlights, some of the yellow perfect. Okay, posit video now and complete this step
6. Sea Turtle part 6: All right, clean off your brush. We're almost finished with our sea turtle. You just have a couple marks to make with some blue. So taking my ultra marine blue in a little bit of my brilliant blue Mixing them together we get a fine point on my brush The pain in little wrinkles here in the back of the neck I had just a bit of black to dark in that and at these darker wrinkles on the side, I want to add some of these dark circles here on the side of the face into one big one. A top for the big guy. Just like that, I think those who are all the little edits we need to make for our sea turtle It's a plus video now and complete your sea turtle and then we'll move on. Wonderful. Let's finish our water. Now go ahead and pick up your medium sized brush and we're gonna mix our ultra marine blue with our brilliant blue and had just a bit of white to that color to make a nice dark blue . I want to take this color. Bring out some of these waves here in the water so I'm just very lightly brushing these on , leaving some space in between the lines we get closer together as we get closer to the horizon. These lines have slight bends to them. They start to curve up as we get towards the top of our canvas when I have just a tiny bit of paint on my brush. I like, uh, just lightly brush in some of the reflected bottom on the surface here. So we conceive you just scrum building in a little bit of this. I hate you fanning it out as it picks up the reflection from the bottom which we will paint next. Okay. And while I have this color, it's gonna bring a little bit of it into the bottom, the sandy bottom in the same way. Just fanning out, coming to a point. And about here. So imaginary point bringing out the lines. You can get these transparent brushstrokes by just getting the slightest bit of paint on that brush. Basically using a dry brush right now, you can hear it just being grinded into the canvas just to get any residual paint off. Great. So complete this step now before we move in tow. Our final step. Okay, You ready for your final step? Let's begin. So I'm gonna take my white, gonna mix it with my brilliant blue to make a light blue for the highlights. I'm just going to bring some of these highlights into these sections. I'm gonna pick out you want there. It's come up in here not too many remembering this color and darken it just a little bit. Which of my sand creating some light rays here on the bottom. Some squiggling lines. It's all you need to do to get the effect beautiful. And that completes my sea turtle. So pause the video now and complete this last step. We've come a long way with the sea turtle, but I really enjoyed teaching it to you. And I hope you enjoyed painting it as well. Please share your beautiful artwork with me. I would love to see it. And I hope we can paint together again soon. Thank you so much.
 James Corwin, Professional Artist