Transcripts
1. Introduction: Everything has beauty. If we look at the surroundings,
especially the nature. Nature has always been
an inspiration to many. Whenever I come across
a beautiful landscape, I love to capture that
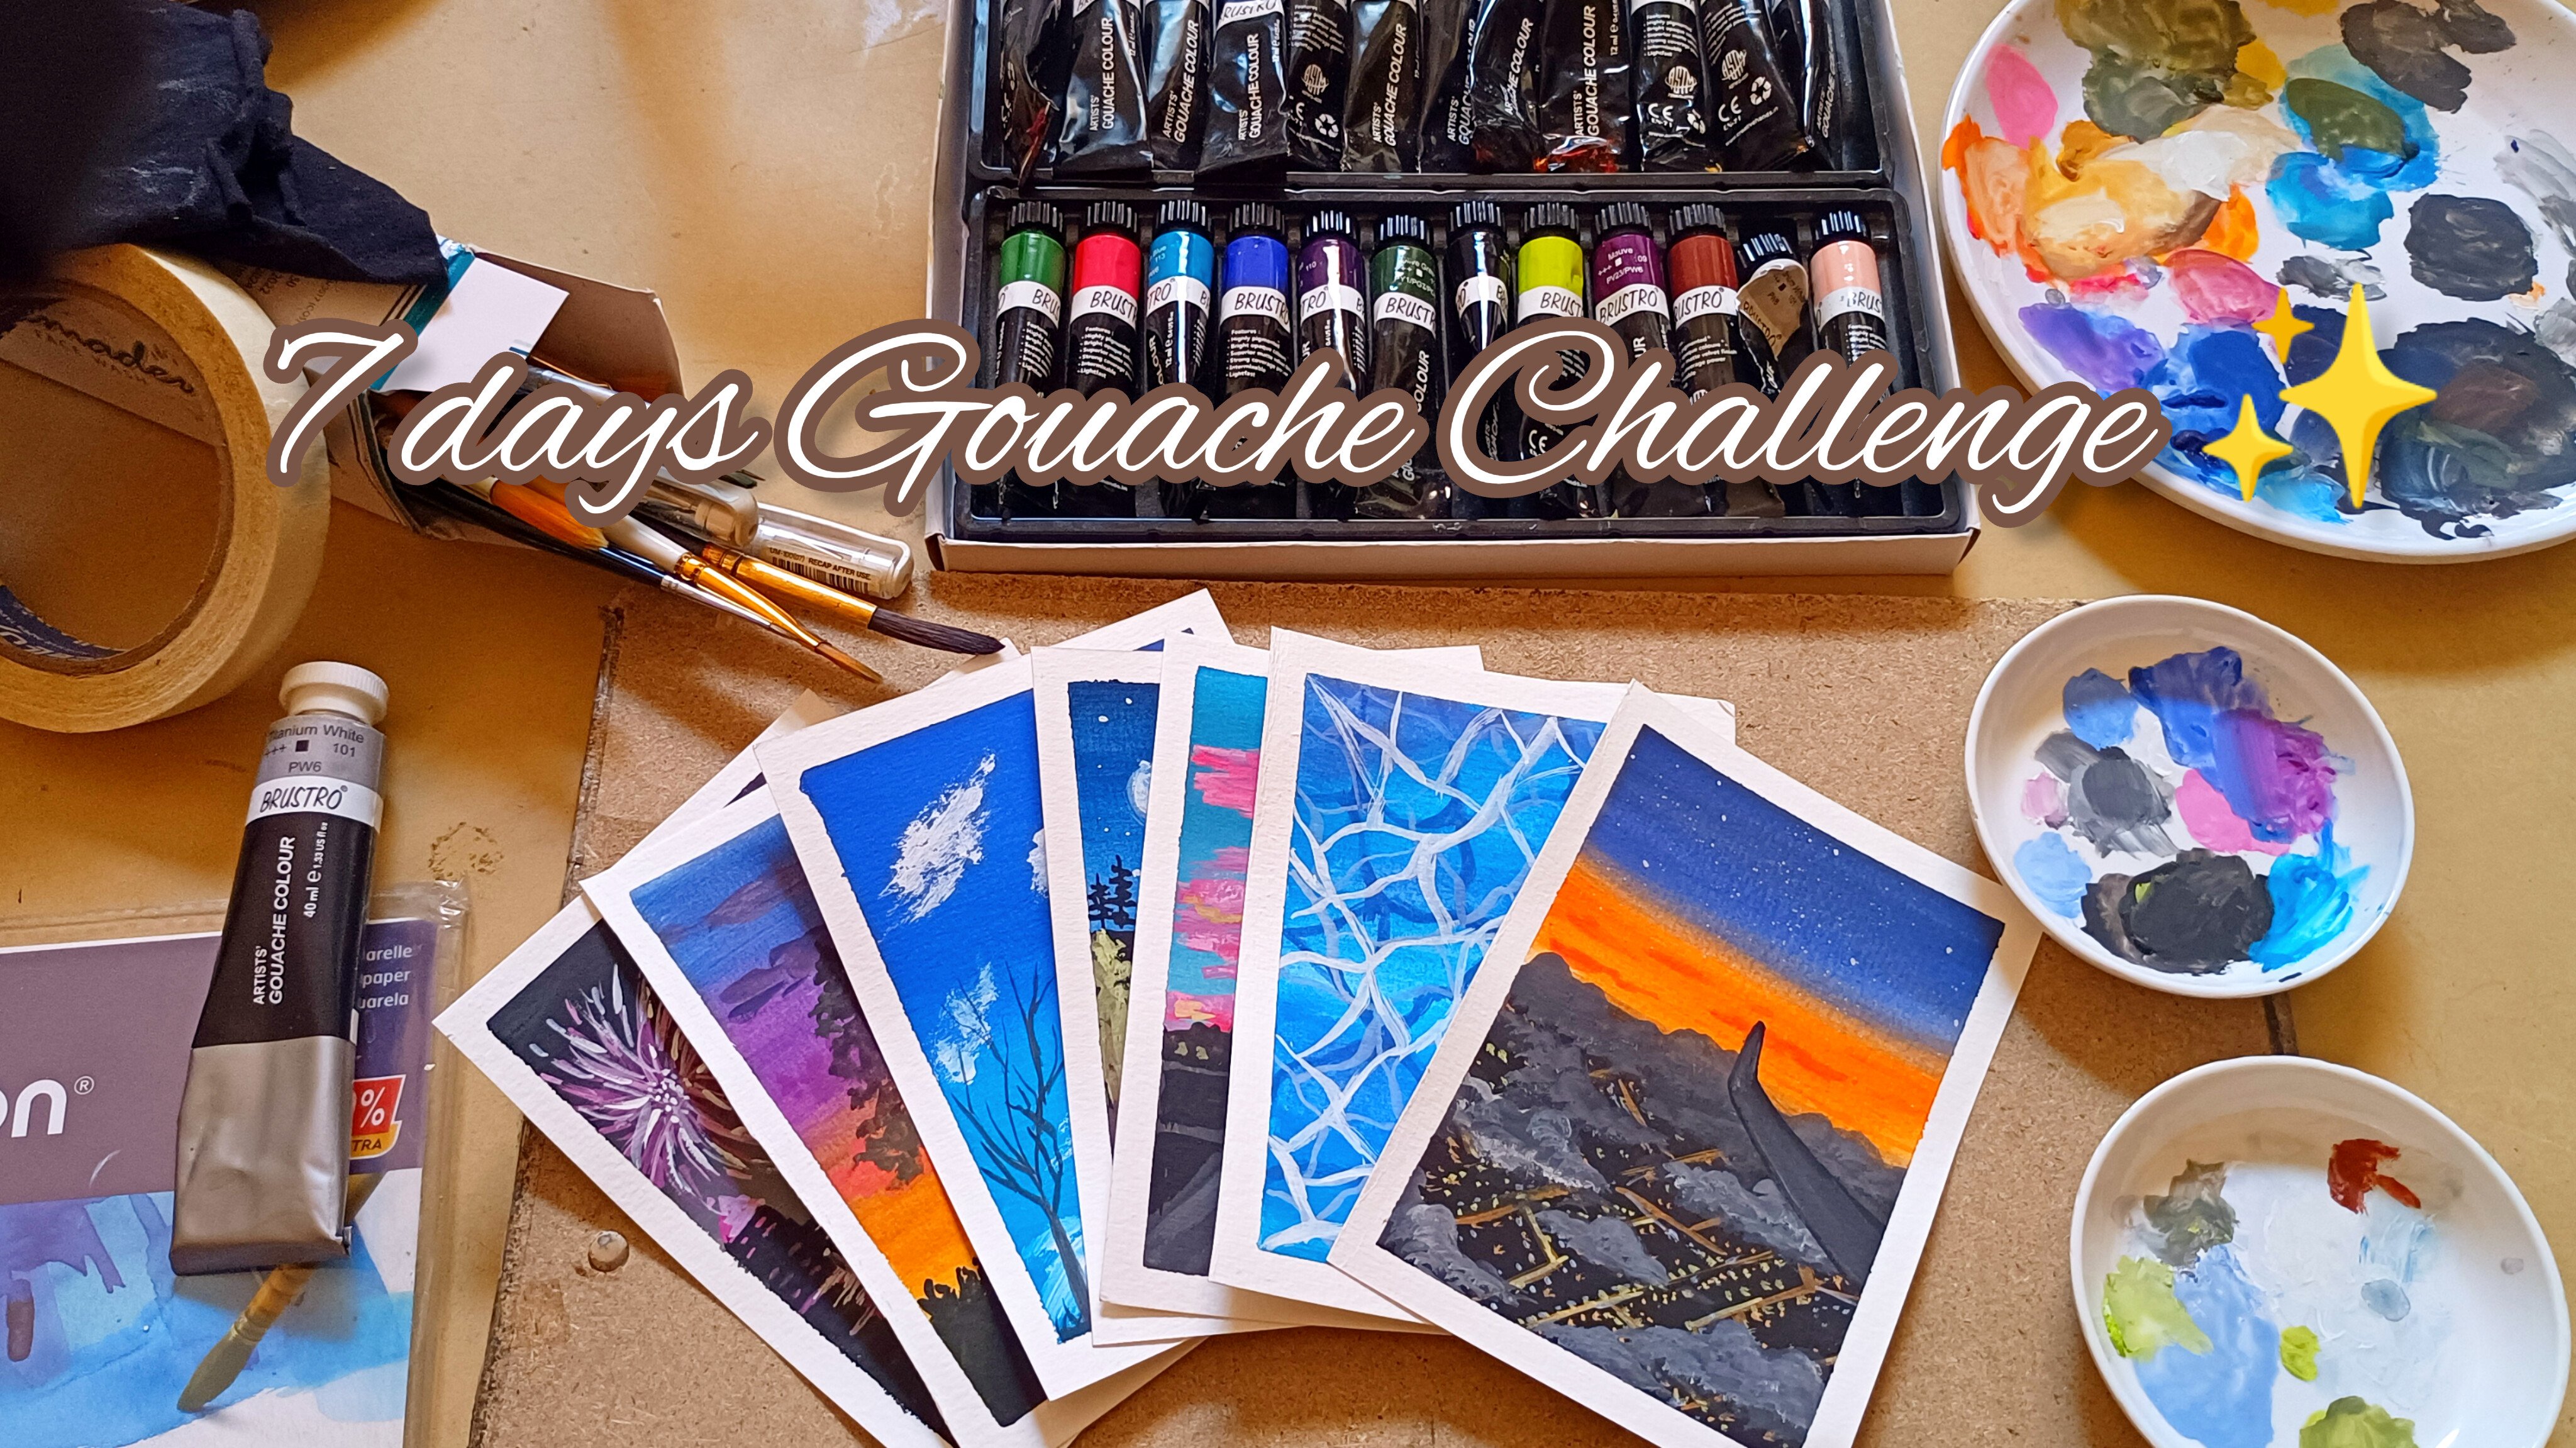
beauty onto the papal. Hello artist. This is Arbia Sultana and
artist and an outage, keto. Judy. I welcome you to a brand new class on
gouache painting. In this course, I will
be showing you how to create four different Aesthetic
paintings using Gouache. Wash is a versatile
and vibrant medium that's perfect for
exploring your creativity. Our first painting will be a
setting moonlight landscape, where we will use a
full color palette to capture the peaceful
atmosphere of the night. Next, we will be Painting, Creating a rainy day, seen through the window, where we will experiment with
different brushstrokes and techniques to capture the
texture and movement of frame. Then we will paint
or cloudy cityscape, where we will experiment with different brushstrokes
and techniques to capture the mood and atmosphere
of the urban environment. Finally, we will create a
whimsical fairylight Painting, where we will use
a combination of warm and cool colors to capture the magical and dreamy
atmosphere of the fairylight. Before we get started
without gosh Painting, I will be taking
you to look around the materials you will need to follow along
with the lessons. Throughout the course,
I'll be sharing tips and techniques on how
to work with Bosch, including layering, blending,
creating different effects. Whether you are a beginner
or an experienced doctors, I'm confident that you
will enjoy exploring the possibilities of
Bosch painting with me. So let's get started and create some beautiful
Art together.
2. Materials Required: Before we get started
with our wash paintings, Let's take a look at
the materials you will need to follow
along with the lessons. Firstly, you will need a paper which is suitable
for wash painting. I recommend you to use
160 GSM to 300 GSM. Anything in-between
these I've been using or sketchbook of Himi
Miya Gouache pad of 160 GSM for this course. Next, you will need artist
grade gouache paint. You can use any
brand of Bosch pain, but I recommend Artist grade
cream for the best results. You will also need a Mixing
Palette for Mixing Carlos. And of course, of flattened
brush around to brush and a Liner brush to create different effects and
textures in your painting. To prepare your
paper for painting, you will need Masking tape. For 67 and a half-inch
masking tape I'll be using. You can use any inch masking tape just to secure the paper
to the working surface. You will also need
a jar of water to clean your brush and
tenure pain as needed. But the shoe or a cotton
cloth to wipe your brushes. That's it. With these materials, you
will be ready to start creating beautiful wash
paintings in no time
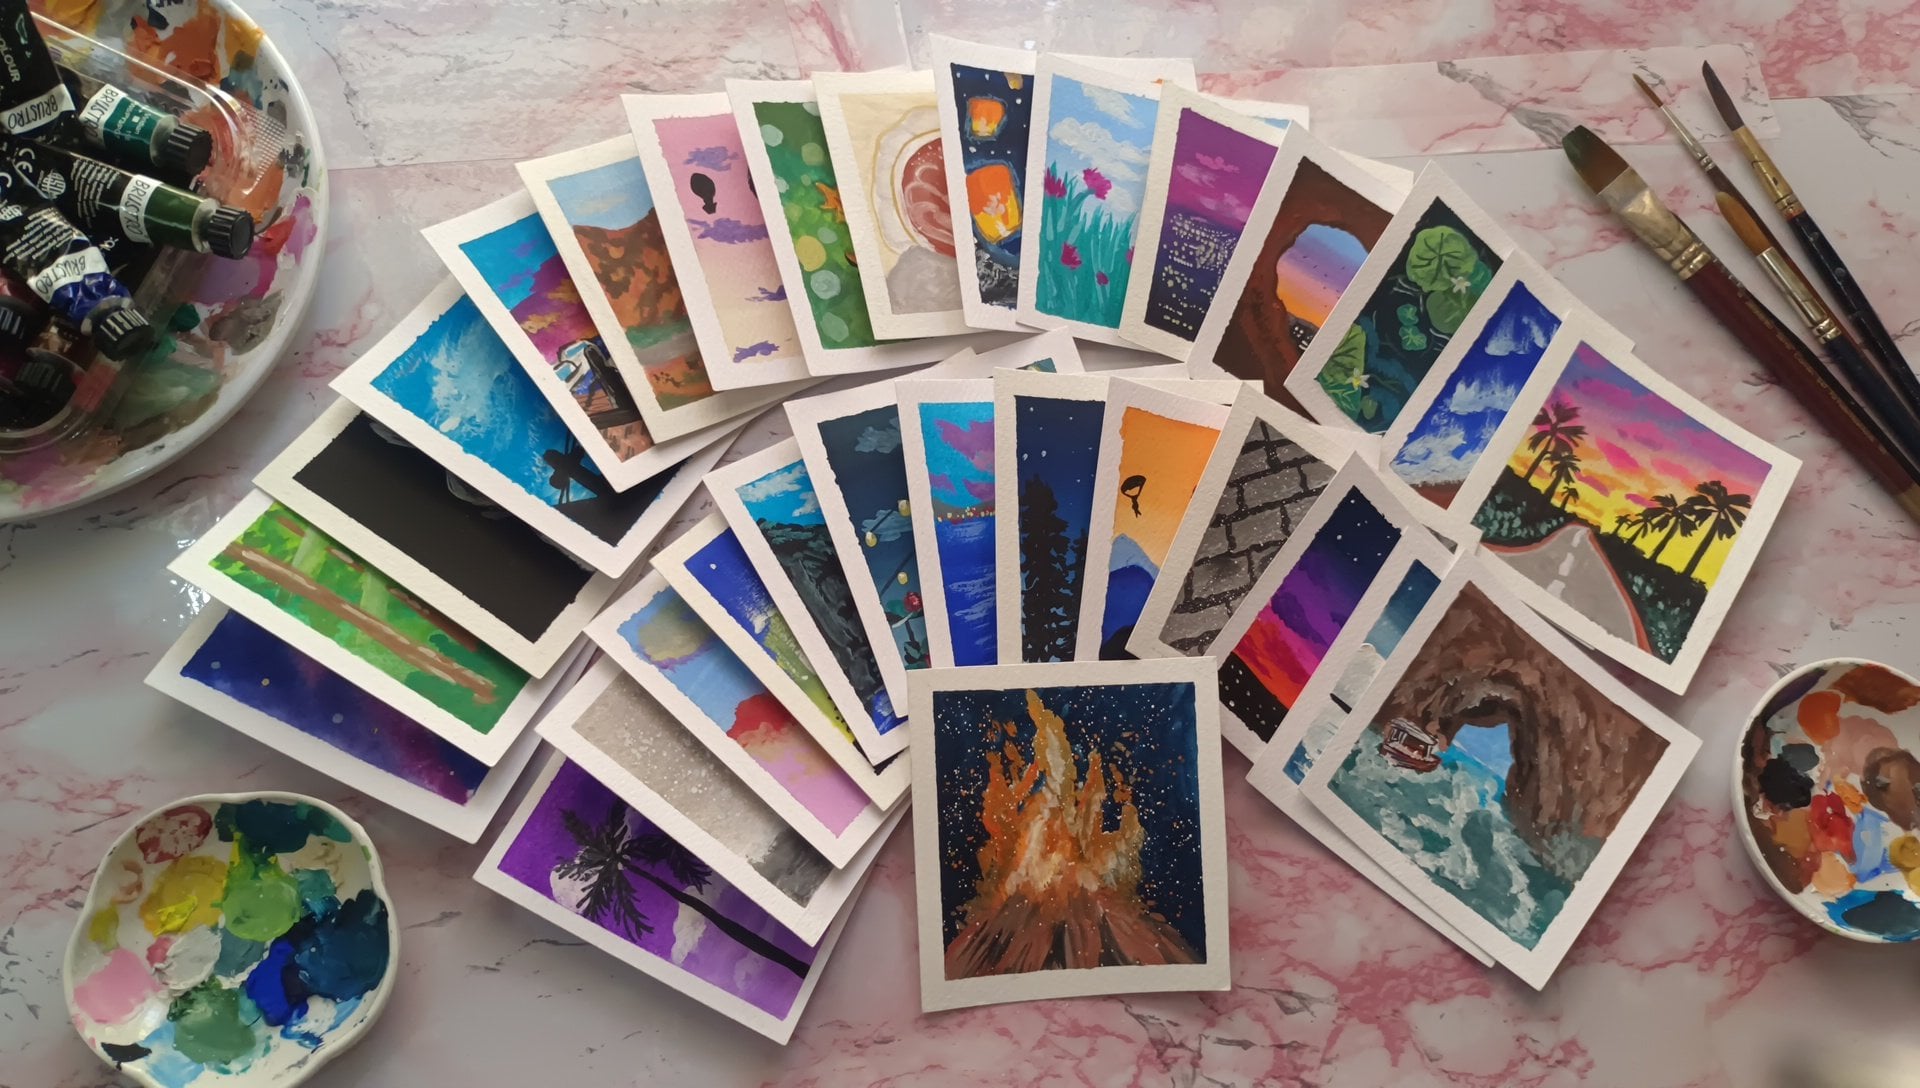
3. Class Overview: As you already know, we are going to paint
this full paintings. The class project for this
course is this full paintings. Let me sick you are the people. You're am using the
Himi Miya Gouache pad. So I have aligned it this way so that we can occupy two
paintings in one pinch. You can also use
various sizes of paper. A5, A4, or even E6 people. I'm using six me Masking tape to divide the paper
into two halves. You can also use a half-inch or whichever Masking
tape you have. I am going to mask to
paintings together. That is why I'm dividing
the page into us. Now once I'm done with
the six adenine division, I'll go ahead and use
a half-inch masking tape to safeguard
the people tightly. And I'll be using
this at the border, especially near the wire. As you can see. This will prevent the paper
from shaking while painting. Since this Gouache
pad is secured with gum and other parts
of the people. That is why I'm not
Masking the other areas. You can go ahead and
mask all the four sides. You are a Masking only two sides
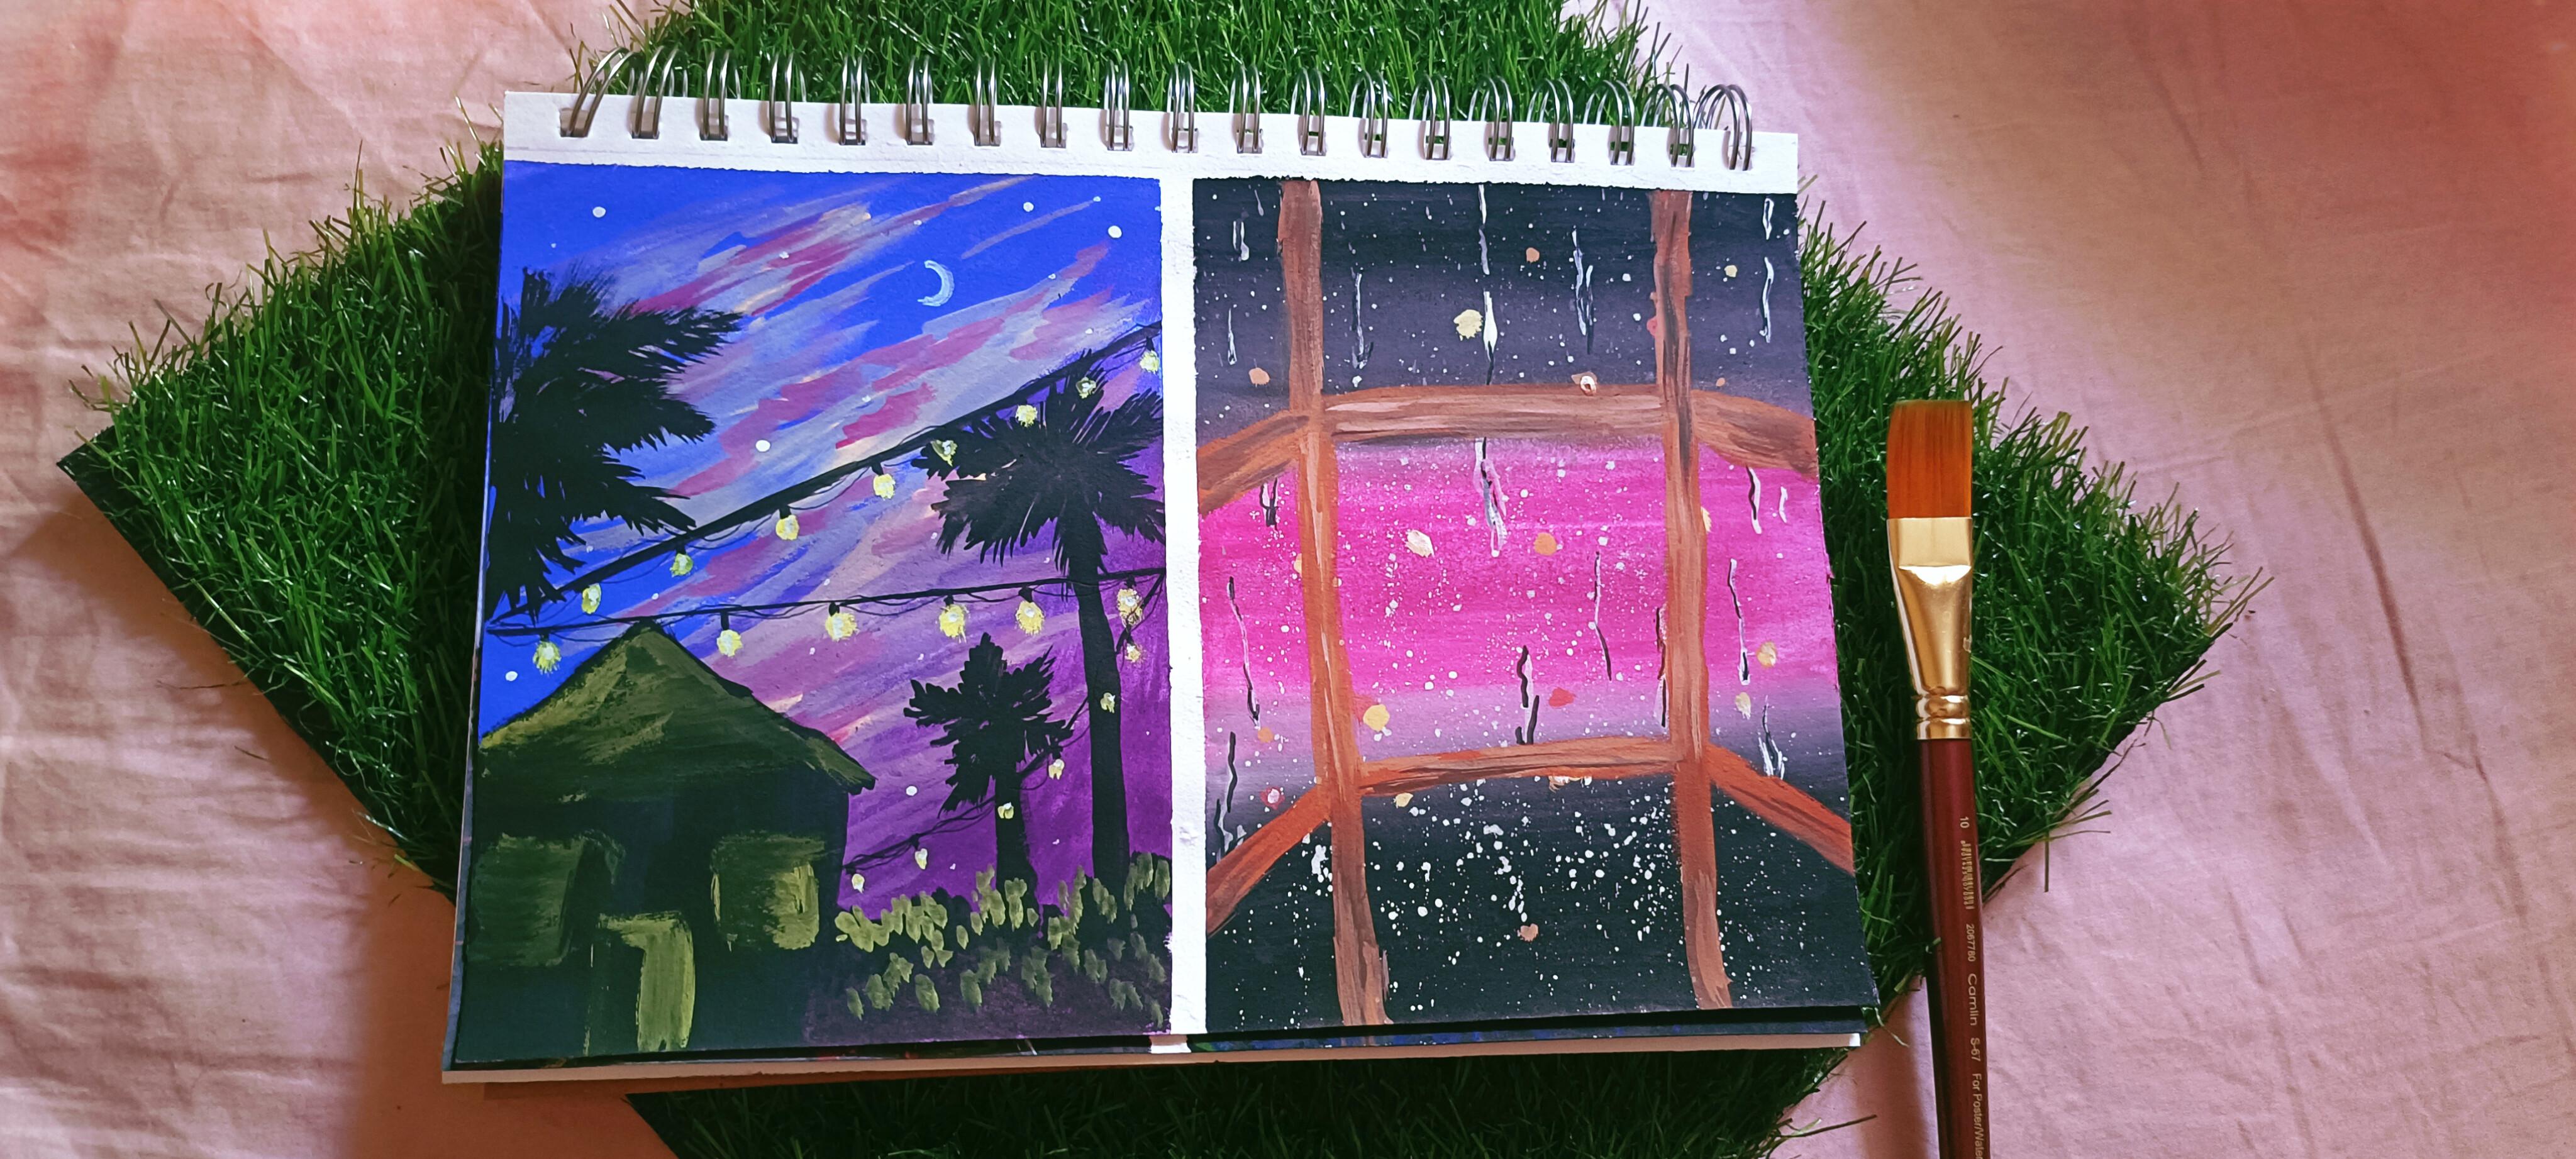
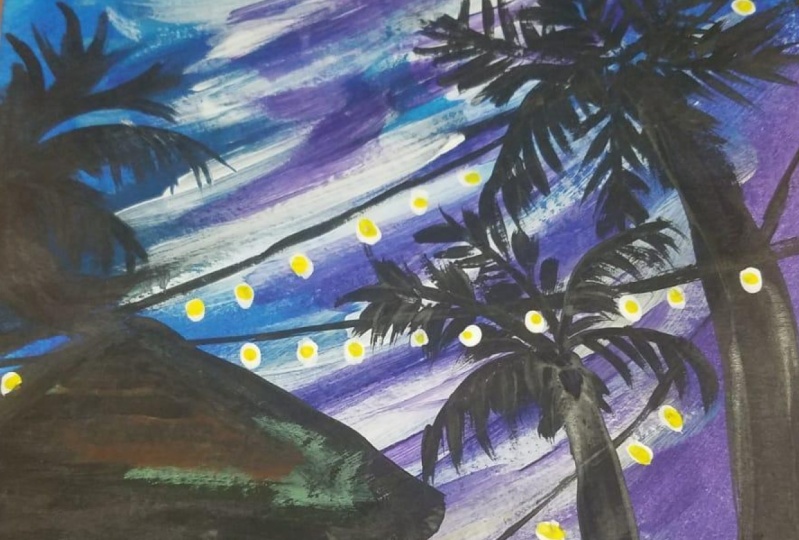
4. Village Festival - Part 1: Thank you all for
joining this class. I hope you have a
good time over you. Judy, we will be painting the lively and
colorful atmosphere of a village festival type, using the following colors
to bring the scene to lie. You for the background, I'm using cobalt blue, violet and some amount of flesh tent and
rows for the clouds. Beginning with the background. Firstly, you use cobalt,
blue, and violet. You can choose whichever
colors you like. But here I'm using cobalt blue, and violet color and using
Flat end brush offsites, then I'll be going ahead and painting it in
a slanted manner. As you can see. I'll be using wet
on dry technique. That is, the paper is dry
and the brush is wet. So if you're new to gosh, I would recommend you
to use a direct to wash and then add two to three drops of water
and then go ahead and paint. As you can see, That's the density opaque
nature of the gauche. As you add water drops
into the mixture, the pain starts becoming
thinner and thinner. So make sure you're adding
it in a typical consistency. So yeah. I hope you can see
the difference of the first one and the second stroke. As you go down, you can lighten. Shade with water. Blending can be done with water as well as
with wide course. But you're am using water
for blending and not wide. Gosh. Go ahead and add more of carlo so that you don't
lose its consistency. Be slow and gentle. I'm just going in
a slant strokes. Once I've covered have the page. Go ahead and do the same
thing with violet Carlo. You can use purple
color as well. But for violet color, I'll go ahead and start
from bottom to top. Before you go ahead
and add on next day, or I would recommend you to
wash your brush thoroughly. In the intro video, I have shown how I have used my Brushes that the end part of the video and not the beginning. That's why those Watercolor
and Palette was the tea. And Artist life is always messy, but yet creative and beautiful. So I hope all artists do
understand about this. Now coming to adding
these layers, look at that how
smoothly blending. Finding difficulty in blending. You can use water, as
I've already told, and white Bosch, but they still cannot blend those rough edges. You can use our dry brush
and go over the edge. A little bit of water as
well you can use all. You can also add colors like if you want to blend
those purple shade, you can go add cobalt
blue and then start from the beginning and then
cross the border a bit. And then from you can use violet and then go ahead and
overlap the colors. Overlapping is also
one type of blending. And now I'll go with the second layer
of black background. That is by using fleshed and I'll go
ahead and make clouds. You can see how I'm doing
it and I'm not leaving any rough edges or dark
patch. As you can see. I'm just trying to blend
with the background. You can go ahead and use
different shade for the Cloud. But here I'm using a flesh tint Here again, I'm making a stroke from left to right,
but in a slant. And the brush I'm using here as a flattened brush
and I'm only using the tip, not the complete brush. Look that only the tip. If you press hardly, it'll give you a
different stroke. So make sure you're
giving a light pressure and using only the
tip of the brush. Let me just go ahead and
add some shadows to clouds. Your am using rules
Carlo and using a Liner brush and doing
all light prejudice two, not everywhere I'm painting
been Carlo, as you can see. I'm just going
ahead and blending simultaneously and
adding shadows. Far apart places. You can use a Liner
brush or you can use a smaller size, Round tip brush. You can see my strokes. It's in C-shaped, inverted
T-shape in can say. Make sure you blend
those colors together. Bosch has huge variety
of properties. Firstly, acts as a watercolor
and acrylic simultaneously. If Watercolor you can use it for textures and in fact relate, you can cover up all
the underlying layers and coming to one more property. That is the time
taken for drying. Gouache dries quickly. Once you're sure that the
paper has completely dried, I'll go ahead and add solutes. But before that, if
you think our rough, especially the ones
which are noticeable, you can go ahead and
use semi wet brush and then blend it with
the background if you blend it with wet brush. Now, I'm using black color
to make the silhouettes. I've chosen palm trees and hard to meet him to
give of village style. You can go ahead and select whatever solutes
you want to use. But if you're making the painting just like
how I have painted, then go ahead and
follow these steps. As you can see, how I'm
using the brushstrokes. Before you go ahead and paint, I would recommend you to watch the class how the
brushstrokes am using. And if needed, go ahead and practice onto the
paper and then go ahead and paint your
chosen sketchbook because sketchbooks are easy to maintain a new have a large
collection of paintings. Let it be a bad
one or a good one. It gives you a whole handy
recall of your paintings, how much you have come across and how much
you have learned, what all techniques
in have applied. And you're 90% of
the times you can see that it's all wet
on dry technique. Here. I have drawn a single
stroke and then go ahead and added more strokes. That means, as you can see, I'm blowing it and a slant. It's a semi dry brush. Again. This is giving me
a texture of fluffiness. You can notice the central part, whereas edges, it's giving
the dry brush strokes. So I would recommend you
to use a semi dry brush. If you don't know what
is the semi dry brush, the brush should give you. When you apply it
onto your hand, it should feel wet
and simultaneously gives paint onto
the skin or people. And it shouldn't be worth three. That's what I mean
by semi dry brush. Once the palm tree is
done on the left side, I'll go ahead and make a
small house or a heart. On the left side itself. You can switch the brush
from a Liner to around them. Brush, which has thick belly of Mistakes. Go ahead and add some shrubs. As you can notice,
I'm just dabbing it and not exactly painting. I'm going left to right, but in a dabbing motion. And he'll am using only
black for the silhouette. Because really be
painting over this. It's been looking empty. So I'll go ahead and add
some more palm trees.
5. Village Festival - Part 2: Gouache takes very
little time to dry. So using a liner brush, again, I'll be drawing some lines which connects from one
boundary to another. Oh, you can just go from one side of the paper
to the next side. You can add as many
solutes as you want, but just don't make the
bad ground Lanisha be. So once I'm satisfied
with the silhouettes, I'm drawing a line. For the fairy lights. This, you're not
confident enough to draw a line using Liner brush. You can go ahead and
use a black marker or a blackboard to draw a line. Once the wires done, I'll go ahead and pin
connection to the bulb. That is a line which is perpendicular to
the previous line. How to add depth into the grass? I'll go ahead and
use a rain Carlo, which is mixed with
a bit of black. You can directly
go ahead and use olive green color. If you have. You can see I'm just living
away some black color to highlight and going ahead
and adding that in order. You can also use yellow,
green color mixture. I'm just going ahead
and adding tiny, tiny dots at the top and find
a bug dots at the bottom. I'll using a low, I'll go ahead and add the bulbs. But as you can see how it does some gouache
consistency. I have my pen then. I have added, but it does
not looking so bright. So I'll try once
more. Effort is none. Then go ahead and add some
white into the mixture. And you can see the difference. Howard weeks, we're doing
two of the danger of light. How bright it is No. I just got it off the
wires connecting though boats. And once I'm done
with this fairylight, I'll go ahead and mix some black to add some
highlights on to the house. As you can see how I'm doing it. Then you feel that a
low and black mixture has offered by dimensional
feel painting. Then go ahead and corrected
with, as you can see, look how beautiful. Let's look in. Now. We can go ahead and add some thoughts
on to the background. This I'll be using
a white marker. You can also use white paint. Once I'm satisfied with the
stars and painting off moon, I'll go ahead and add
some details onto the 3D lights using
Blackboard open. You can skip, but
I love this part, so I'll go ahead and add them. I hope you enjoyed the process and I would love to
see your paintings. So make sure you tag me on Instagram or uploaded
in the project section. And that's it for this painting. See you in the next one.
6. Rain Through The Window - Part 1: Drops are a charm. They give you an enormous
feeling of being meditative. Whenever the sound of rainfalls, it gives you a silent pleasure. Okay. So here I'm painting
a raindrop scenery. For this, I'll be going using with a graded wash.
What is a graded wash? Graded wash is a darker
color at the top. As we go down, it gets lighter and lighter. As you can see, I have added
black and then using white, I'm going lighter and lighter. I'm using a flattened brush
to paint the background. You can go ahead and use whichever size of
flattened brush you have. Okay. Once I'm done with the top part, I'll go ahead and add a graded wash of black again
from the bottom to the top, leaving a space in between
to occupy another color. As you can see, I'm covering
up the edges very slowly. This is because when you
remove the masking tape, there'll be uneven edges, so make sure you cover
up the edges properly. Finally, time to
add a second color. Now we are using a
variegated wash technique. That is using two colors
to make a smooth blend. We'll be using vargated
wash technique for the above part of black, and then again for the
below part of black. That is basically I'm here
using a rose pink color. That will be at the middle. As we blend with the black, I'll be using white color. That is a variegated wash. We have to smoothen
it up the edges. As you can see, after adding
white color and blending, it's giving a totally different
pipe of the background. Since I'm using a sketch book, I'll go ahead and cover
the previous painting and using a line of brush, I'll go ahead and add some water droplets and
make the white color a bit. Should be flowable
but not too flowable. Okay. Now with the
help of another brush, I'll go ahead and see, I'm removing the excess
water from the brush. Now using another brush support, I'll go ahead and dab. This is known as
flattering technique. That is left hand, I'm
just holding a brush, and with the right hand, I'm tapping and I'm
holding a brush that is of right hand brush
at the tip so that the bristol leave some
droplets onto the paper. You can add as many as you want because this is the most
satisfying part of the painting. Now, I'll go ahead and
use some white color and a red color mixture that is scarlet to add some lights
onto the background. It's something like
a bouquet effect. You can add wherever you want, just scatter the lights and you can use any
other color as well. You can use yellow color and
a mixture of red and yellow, which gives orange that
also looks beautiful. You can add some white as well. Using a white paint
and a line of brush, I'm going to draw
a verbally line. It's not a straight line. It's kind of slanted. It's curvy. It's not a
perfect line. So it is. Make sure you hold the bh
lightly and not pressure off everywhere you have
to leave it lo and somewhere you
have to dab and make it k As you can see, I have done so many lines. You can do this with a marker
as well, white marker. Go ahead and do this
process slowly. Now, using black color, I'll go ahead and add black
onto the sides of the white. This is going to be
even more than white. You can do this with a
marker or even a ball pin. Take your pleasant
time and paint them. And once you're satisfied
with it you can stop.
7. Rain Through The Window - Part 2: If you're wondering where is the list of colors which I have used for this painting will
be in the end of this video. And coming to this painting, make sure you follow the
steps properly and paint as many rain drops
as you wish because it's the most satisfying
part of the painting. You can use markers as well. You can paint whichever
shape of Window you like. But I had a window which was already my
mind from the beginning. So I'll be painting that and follow along to make it
real and make it into that. For making the window, I'll be using burnt sienna. You can always sketch out first and then go ahead
and paint ordered. You will undoubtedly painting. That's why I took
time to figure it out or initial few moments for making this as well. I'm using a Liner brush. You can go ahead and use whichever brush you
comfortable us. The base of the painting is
done now follow the shades. That is where it
should be dark and where should we
live accordingly. And white color
and black color to the burnt sienna. More in-depth So if you want realism, make sure you know where to add lighter shade and
where to add darker shade. And also the Donald
part will be dark, It's teamed up and above
part will be lighter. And let's make it into depth. But before that is
looking reload. So let's add the
horizontal line. Once you're satisfied by adding
the depth into the wood, that is to the window. You can go ahead and add more of raindrops
as you wish to. Adding depth to do would that is Window is basically again adding black or white into the burnt sienna and
using the mixture. As I have already told, if you have noticed, I haven't added
black completely, our wide completely white mixture and black
moksha completely. I have used small lines
strokes and they're very thin as compared to the previous one that is
much more thicker, the BS1. And here I'm showing you how
to add raindrops using mako All the details links, whichever you feel
empty or incomplete, and finish up the painting. Dislike I feel the left part of the window as compared
to the right part, which I'll cover it up soon. For this painting. Hope
you enjoyed and make sure you share your
progress with me. And don't forget to tag me
and boost your projects. See You All In the
next painting. By the way, the color
list is coming up now
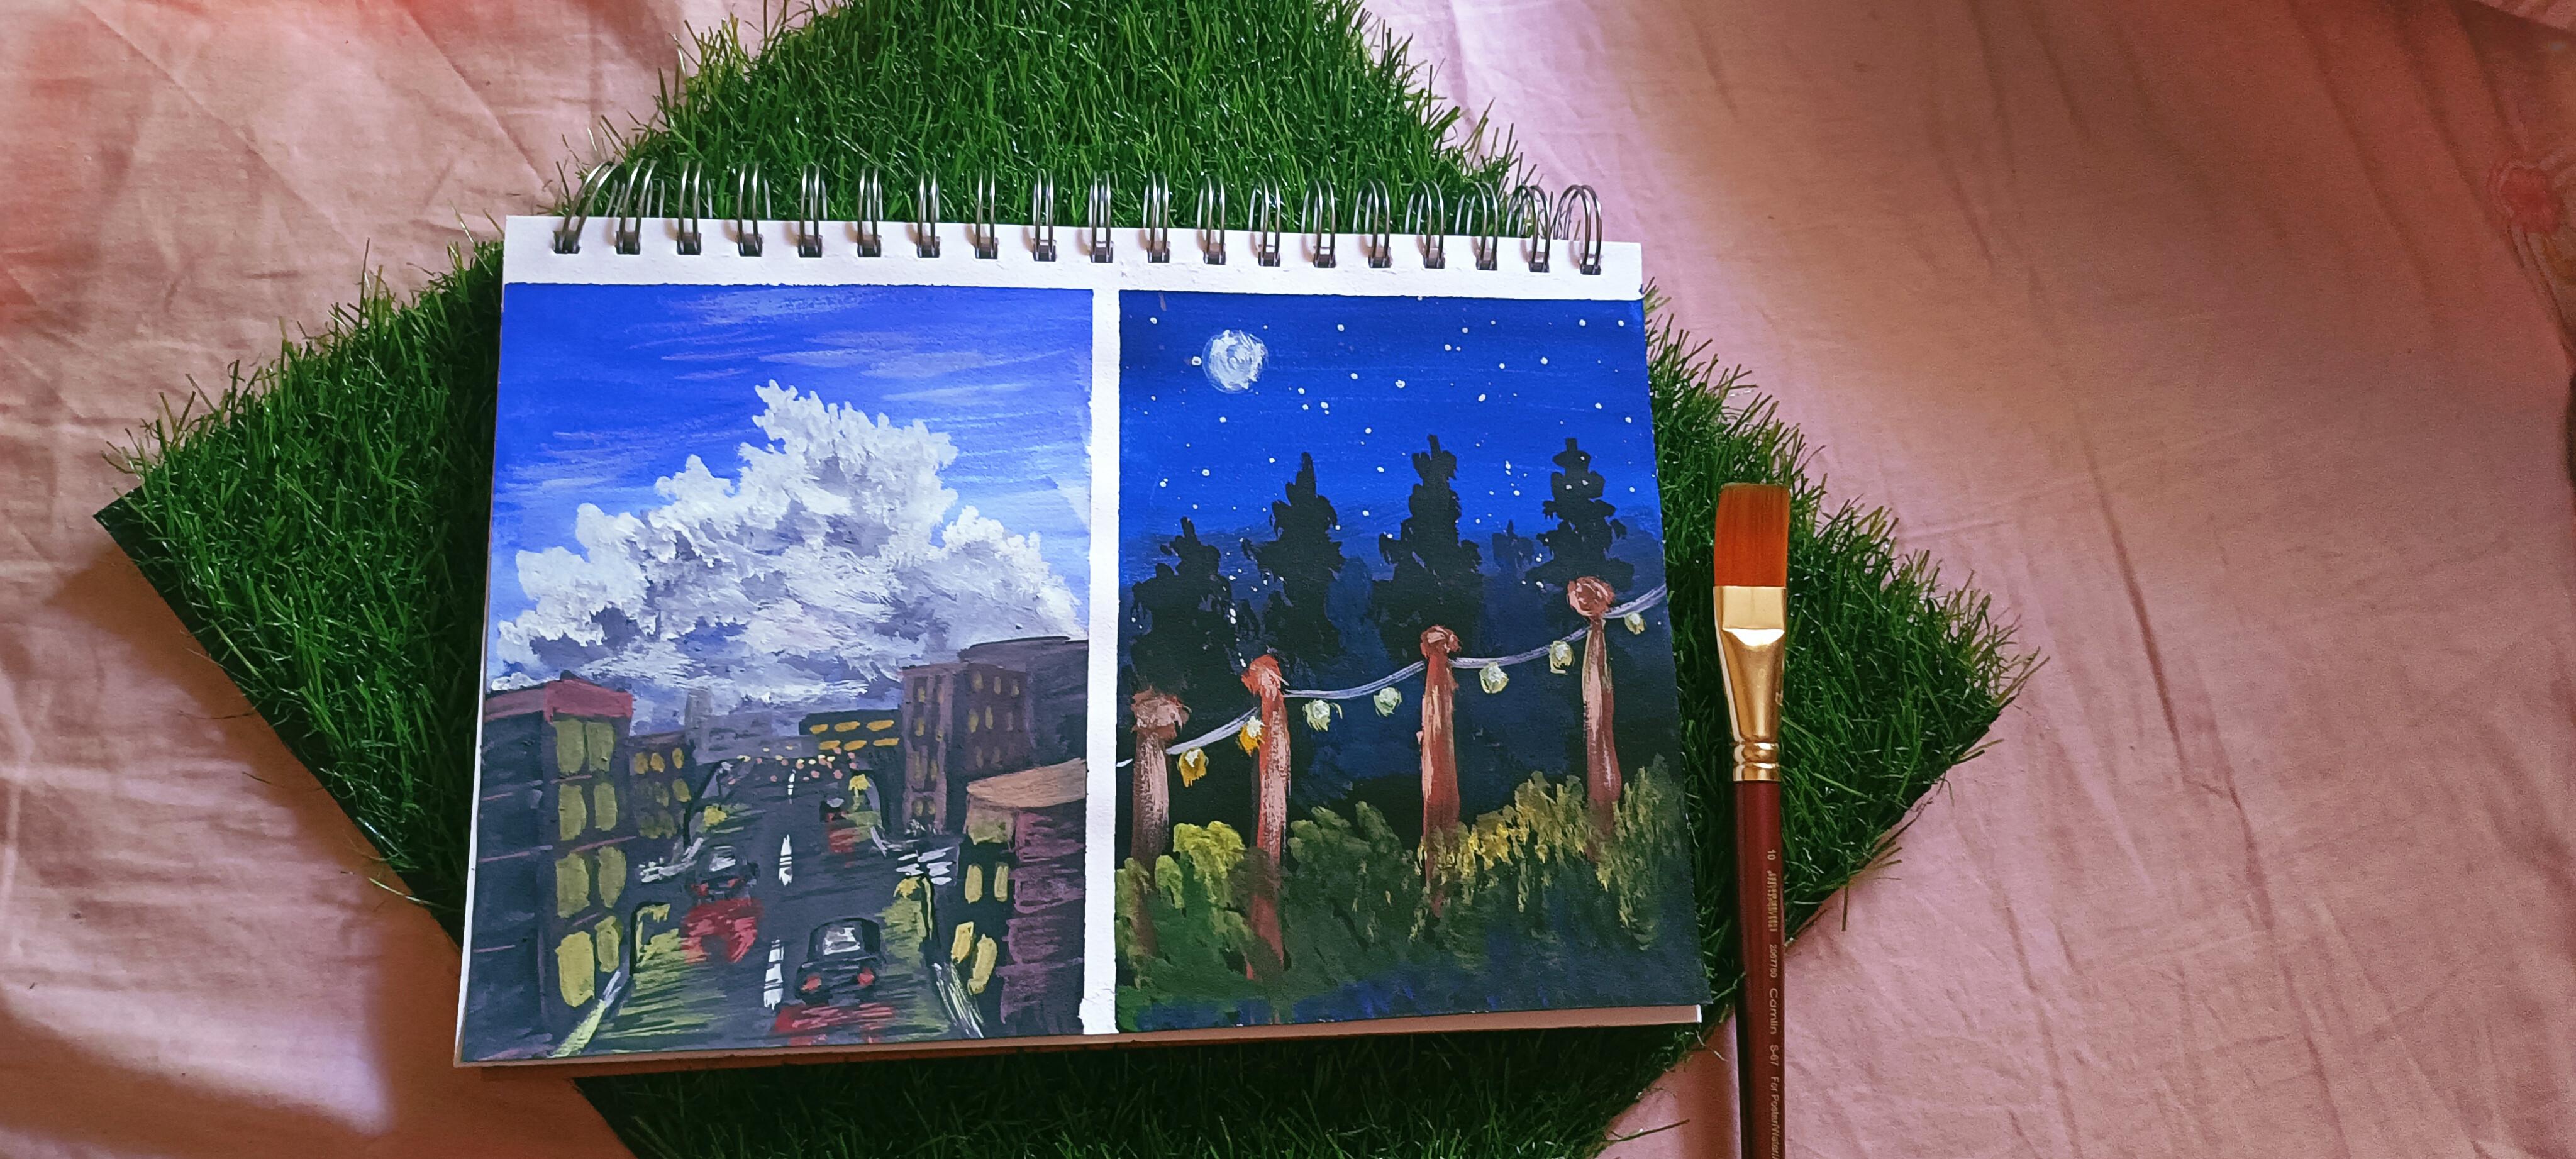
8. Cityscape Painting - Part 1: Hello, Welcome to the most interesting
painting of this series. Today we're going to
paint a cityscape. This painting will try
to capture the mood and atmosphere of the end
urban and rural name. For this, I'm using
football blue in a graded wash. As
you can notice, I have left some space
at the right side. As we go down for this, I'll be using white. I'll be going with strokes, the left to right
and right, left. And are not covering wide
completely to the left end. As you can see, I'm just going
have the V dislike that. I'm going with a graded
wash from top to bottom. Once you feel you're satisfied
with the background, Let's move ahead with
making the club. For this, I'll be using a
bit of a war looming, split. A data sheet that is a mixture
of cobalt blue and black. And this, as you can see, I'm going at such a manner. It's a flattened brush and
you using only the tip, you can go ahead and use
around the brush as well. For making the background. Please go ahead and use only
Flat Brush for the clouds. We can use whichever
whichever brush you require, you can handle it
more beautifully. You can use filbert brush, you can use Round tip brush. You can also use Flat end brush. But here, as you can see, uncomfortable for me to use. So here I'm using a mixture
of cobalt blue mixed with white and black to
make or darker shade, but not to blackish. As you can see how I make the clouds using
Round tip brush. I'm just going from left, right, in no wiggling motion. You can go in the wrong
type motion as well. Firstly, I'll be defining the border and then
going ahead and covering up the whole
sky as you can see. And as you move down, though, she is getting
lighter and lighter using white color, I'll go ahead and add below
the cloud using the tip brush so
that the mixture merges with the people and
there's no rough edge. Now adding depth to the Cloud, I go ahead and add white
mixture to the Cloud, makes sure that is cobalt blue, black, white into
that more white, I'm adding and going ahead and defining the
edge of the flower. As you can see, in the same wiggling motion. I'm leaving some background
to be shown that as I'm leaving some space and
going ahead and adding oh, mixture onto the previous one. I'm not covering up completely. Go ahead and paint
peacefully at one face. And you can use Liner brush, especially end of the corner. The strokes my thumb
out beautifully. For the third layer, I'm going to add more white into the mixture of the Cloud of the previous sheet and going
ahead and painting over it, leaving sound bad Round to
be shown as you can see. And now you can
watch me carefully and then paint four onto
your sketchbook for, onto your painting, people Yoda. And then I'll also be adding bluish gray
mixture on for the flower Painting clouds is so satisfying and you never
know when to finish. So I'll just stop
and more head with the next step because
I feel this is OK. And now using
grayish black mix, show more ahead and paint. The bottom part of the Painting. Now for making the
pathway and buildings, I'll add white accordingly to the black fish mixture
and making it light. And painting over
the background, which we have painted just now. For pathway am using our
slant line as you can see, this gives this gives
somewhat pathway definition. Am using Flat end brush. I'll go ahead and add buildings. So the width remains the same. You can add or you can just minimize the depth
or the Berlin. Now once I know that the
buildings are perfect, I'll go ahead and define
the pathway even more. I'll be using a lighter mixture
and defining the pathway Now coming to the
buildings here, I'm switching to the
Round tip brush. I'm using of pople, make sure. And also the ROS
makes all the pain, the buildings wherever
it's lighter. And this gives the
depth to the Berlin. I am using a rose
color wheel first. As you can see on black only am adding the little scholar. So this is giving me
some lighter shade. The background does
not completely dried. This is merging it with the black and giving
me such a shame. But only use rose
color, violet color. You can go ahead and
use a purple color. You can go ahead and
use a local of it depends upon new
Watercolor wall you want. We'll go ahead and
paint all in detail, painting in the next
part of the video.
9. Cityscape Painting - Part 2: Once we're done with the
base of the building with more head and windows
to the vending. For this, I lose
an arm too brush. You can use a Liner
brush and go ahead and add Windows
using Halo cargo. You can add Windows using a
learn right mixture as well. Window and then the beast. When you use lighter color, you can add darker one later on. But just for the figuring out, read The Window comes. You can go ahead and
mount the windows. You can add windows in
which a shape you want. Let it be squared, rectangle, horizontally, small,
line, anything. But up to you. I'm done with the rough
marking of the window. I'll go ahead and add the
side of the building. Using whitish rose, richer. You can use pure white as well, or you can use purple
with white as well. Anything. But just make sure it makes a difference between
the front and back Part. I'll be dividing into floors. As you can see. I'll be making it into rule says you don't have to louvered. Prominent. Just
some blurred lines. Go ahead and make, go both ways, prominent ones. The building thing is for, well, basically we are going to paint the edge of the pathway. Light. Adding cars using
the same color. I'll go ahead and roughly
draw the outline of the car. You can use a pencil or pen or even in Liner
brush for this step. You can completely
avoid making cars Using black color, I'll go
ahead and paint on the car. And for the lights we can
use red or reddish white, that is cartilage and white
mixture for the lights. And before that we need
to meet some last thing. I'll be using. Light
black and white mixture. Doesn't have to be
very prominent black. And for the shadows of the car, you're am using gray mixture, which is a bit darker than the pathway and
lighter than the car. As you can see it as making a difference but not too much. Am using a Liner brush and going from left to
right strokes and not accompanied volts squared
is just random lines. In this step, blending
is very important, so make sure you do it. In some more details
to the pathway. You All using black color. I have marked the edge of the
pathway and that is road. And also I'll be adding
streetlights using black color. You can add whatever
content you like. And you can just follow
along by seeing me paint. For this street light. I'll be using a local
law and for the cars, I'll be using scarlet Carlo But again, if you notice
that I'm going from left to right strokes and
as you go down, it's getting smaller
and smaller. That is not order. And now, I hope
you get my point. Now to add depth
into this Palette, makes sure I'll go
ahead and mix some more white onto the mixture
and then go ahead and B, this time I'll go
ahead and paint two times the left
parietal stroke, leaving some gaps in the middle. As you can see, the different Leo four streetlights, I'll be using a yellow color. And some part of while loop is added to low street
light black tube. On the land. This is again left to right
own time and being alone. Now finally, using white to add some realism
into the painting. I'll add my love, those sheets. I'm white lines and
also the corners and make the windows more prominent with a low
and wife mixture. You can see where all I'm adding a low light and how
scattered it as you can use dry brush technique
for this Brushes basically all the brush been GI and taking the pain directly from
the tube and applying it? Yeah. You can see the dog part is two and bottom
part is take-up. And I had decided as end of the pathway, am I adding small dots, which is similar to
the bouquet effect? You have used white,
a low-end Scarlett. Scarlett is mixed with white
alone links with Wipe, matte mixture I have added with dot and foldable
screens of the cars. Again, I'm using white Barlow stein domain, the Windows, Dr. though. As you can see, You know, I'm learning those nodes
10. Cityscape Painting - Part 3: Along with the windows, we will also define the
sides of the vending. And you can see I have used the white mixture with why did Carlo to paint the dark all
the building? That is true. And also using some
other mixtures, really go ahead and add the
sides of the building has just okay with the clouds. So I think now it's high time
that reaping clouds again. At the corners, I'm using white and going ahead and painting though clouds and the
corners using white Carlo, am using a dabbing method
and wiggling motion. Or you can go from left
to right with having method or even
rotational method, whichever is
comfortable for you. Go ahead with that, just make sure you give
depth to the Cloud and I just wouldn't
be around it enough. It should have some sheep. Using the same light
makes sure I'll go ahead and add some strokes
to the background. I'm not adding Malcolm
Paints draw, as you can see. I'm just going from left to right and taking up the brush. And again left to right
taking on the brush. And not everywhere at modeling
is just random lines, but you are in their position. Look how beautifully we have
captured the cityscape. I know it's taking a long time, but I hope you're
enjoying painting this I said earlier you can use water mixture of Carlos who
weren't for the buildings. As you can see, how I have utilized
the rose colored Scarlett Carlo or
for the billings. And the detailing part of the most important
thing in this painting. I hope you're
enjoying the process and that's it for this painting. Do the detailing
wherever you want and see you in the
next painting.
11. Fairylight Painting : Welcome to the last
painting of the CDS. You, we are using
a variegated wash. Variegated wash is basically
similar to a graded wash, but here we are using
more than one Carlo. That is your I'll
be using a portion blue and black Carlo
starting with Potion. No, you're am using ******** and blue mixed with black
at the top part. And then potion blue. And as we go down will be using Prussian blue
mixed with white color. Flatten brush. I'll be painting this. You can go ahead
and use whichever you're comfortable even
but Flat end brush, we'll finish off
the world easily and it spreads the
carlos evenly. And if you've caught
up the edges as well. So use a flattened brush I have described like
this so necessary. You can use whichever
you're comfortable with. But just make sure you
cover up the edges. Now, once I'm done
with the top part, will go ahead and add black
color from bottom to top. Now, when new black
Carlo at the bottom, and as we go to the top
will be using black with white mixture. As you can see. The colors properly
use white and blended. You can also use colors such as passionate glue and
blend of black, and then I feel it's blended. So I'll go ahead the next step. So what I'm using a Liner brush and using the black color, I'll go ahead and
add some pine trees. As you can see how my stroke is. Firstly, I'll be
drawing a line and then I'll be adding left-to-right strokes and around
hundred manner. You can slow down
the video and watch. Top part of the pine
tree will be narrower. And as you go down and you'll
get broader and broader. As you can see, the down part is getting blended with the mixture
we just painted. Now, I'll go ahead and splatter some white shade onto the
paper that is to add stars, have explained you how
the pine tree works. So we'll go ahead and do more
pine trees after this step. So you can see I have loaded
the brush with white color. It's in a flowable
consistency, so it's flashing. If you will feel worn
more white color, you can add a bit more
water and make it flow, but not two or three. So yeah, when I'm
satisfied with this task, I will go ahead and add some more pine trees
for making buying Gs. You can always slow down Zero. Notice I haven't drawn the pine tree with same height. And for the sake, hidden layers that is in
between the black pine trees. I have mixed portion blue with black and then made a pint G. If you notice, add burnt sienna and a
vertical strokes but of different height. Now using olive green, I'll go ahead and add
base of the bushes. You can also use black men
stood sap green for this. I am adding the bushes only at the bottom of the painting. As you can see. Once we are done with this, we'll go ahead and add the lighter green
on the top of this. That is a low green mixture which is mixed with
a bit of white. And then we'll go ahead
and add, as you can see, giving us though, brighter
shade of the bushes. And you're am using only dabbing motion and
not rounded motion. Using a Liner brush. I'll go ahead and
Carnac the brown lines with white Carlo in t-shaped. As you can see, slightly
bend it towards boughten. Good news wide marker
for this step. Now using a low-end
white mixture will go ahead and
add fairy lights. For the coordinate ones, you can use extremely low. But as you go at the middle, you can use a brighter
yellow, white. Make sure for the fairy lights Using the same mixture
of a low white, I'll go ahead and add onto
the burnt sienna yellow, white men show onto
the bonds The enough. You can also add some
black lines just to show the bamboo was real. But sure, I feel it's
already know Painting real. So just to give it a shape, I'll go ahead and add
Round Top onto the bamboo. Matches, burnt sienna. I'm just adding some
round shape on to that. Now you see how much of
difference it's making. For this, you can add a
little black white strokes. To give it life. I'll be adding here and there. Some black Carlo. E-tailing is very important
and also blending. So make sure you follow those are correctly even
when I don't tell. So those are the
most important steps when it comes to gouache. And now I'll be adding some white color to
do fairy light bulbs. That is to the LOS. Make sure you're am adding
white at the center. Using the same Liner brush. I'll go ahead and add a moon
onto the ocean blue sky. As you can notice
that first moon, which is larger, see
it's rounded shape. And then I'll blend the edges. This whole series I have told blending can be done with white. You can also do the blending
with water as well. So you're am using water
and then blending, or you can use a mop brush and then note on fashion
for blending it, your am using a fingertip
to make it life. And once this is done, I'll add depth into the moon. That is adding more
white at the center, at one corner of the moon. And all. I'm trying to
blend all this Carlos first and then add
the depth later on. Adding more stars
using white monk. Or you can go ahead and add more stars using splattering technique at the
beginning itself. But here I've used markers and it's all a bigger
size as you can see, this also giving us depth with the status and ones
the moon is dried. I'll go ahead and
add white onto it. And for this, I'll be using, I'll be starting
at one corner and adding bits in dots are
the rest of the moon. You can blend them as well. See I'm using finger. You can go ahead and add
more depth on to the moon. That is adding more
white at one corner. So yeah, that is done. I'll move on with adding burnt sienna and write
mixture onto the wooden, which are whole link though. Fairy lights. Bamboos I could tell, can use dry brush. As you can see, the Brushes dry, but it's carrying paint which is also roughly dried but
not completely dried. So it's giving that consistency for using dry brush technique. Firstly, you need
to drive the brush thoroughly and retinue up. When you run the brush
on back of your hand. It should feel read, but there should not be any
shiny gloss onto the hand. So that's when you know, the brush is actually dry. Now rebelling the
most satisfying part of the painting that is
Masking tape removal. So, yeah, that's it for
the CDs of paintings. I hope to see all
paintings soon. So do tag me on
Instagram and also PUT post your paintings
onto the project section. I would love to see them. And you can give me your
feedbacks in the review session. And along with that, let me know if you enjoyed
this course and would love to teach you more of
whatever you want to learn. And make sure you check out the next video to know
what all techniques we have used in this whole
session. Thankyou
12. Thankyou: Hello, artist, we are finally
at the end of this course. I said earlier, I
would tell you about the techniques used in
this course as a review. Also, as you might know, groceries or water-based
medium and tags both like acrylic as
well as watercolours. Techniques used in acrylics or limiting whereas and
watercolours, its opposite. Similarly, we can use any technique of
watercolor with Bosch. And here are some techniques, and I list them out one by one, which I have used
in this painting. I hope you all
enjoyed this course. Do share your paintings and I, me on Instagram also share your views and follow me
for upcoming courses. For the first painting. I would tell that I have used Flat wash with
to Carlos and then blended them out with a white wash. And then I
have layered the clouds. And then Jews celebrate, that is layering again. Yeah, vitamins,
that technique we have read on dry techniques, mostly for the grass
and the house. We have those red
on wet technique. As you can see why
layering we have not blended out the
previous Carlo. Just that adding more color. But for the grass
and for the house, we used wet on wet technique. Now coming to the next one, I have used a variegated
wash that is to Carlos, and then blending them with wide force and
splattering technique. And then of course
layering and blending. And for the third one, we have used a graded wash. And then for the
clouds layering, blending, and also for
the barrel lengths, we have used wet on dry and
wet on wet to of it together. For the next one, it did wash, blending, layering, adding more colors, and then also
splattering technique. And most importantly,
everywhere I've used blending, blending with colors,
blending with water, blending with wide gosh. These are the three
techniques how to blend with each other. See here I'm adding colors, but simultaneously, I'll
blend with the previous one. You can strokes but
then it will look like, look like a strong appearance. Edge will be sharp. And I have used here and there, I've used dry brush
technique as well, as said in class. So that's it for the
technique session. Thank you for enrolling
into this course.
 Arbia Sultana, Art Educator